
In the previous post, we created a Ktor HTTP API that exposed three endpoints. All of these endpoints were publicly accessible, and in this post, we'll add a security layer requiring a valid access token to query the protected and admin endpoints.
In addition, we'll create an Auth0 API and application for our frontend application, allowing users to be authenticated and providing the access token passed to the backend API.
Before we begin, we need to understand two fundamental technologies that form the core of our API's authentication and authorization layer: JSON Web Tokens (JWTs) and JSON Web Keys (JWKs).
What is a JWT?
The JWT.io website describes JWT as:
an open standard (RFC 7519) that defines a compact and self-contained way for securely transmitting information between parties as a JSON object. This information can be verified and trusted because it is digitally signed.
In the context of authentication and authorization, JWTs provide a standard set of JSON properties that:
- Identify the token issuer via the
issproperty, which in our example will be an Auth0 application. - Identify the audience via
audproperty, which will be our Ktor API. - Define an expiry time via the
expproperty, ensuring tokens can not be used forever.
We'll look at a JWT generated by the frontend application later in the post, but an example of the JSON payload of an Auth0 JWT access token is shown below:
{
  "sub": "auth0|60ab2d9aa43f230069c54f13",
  "aud": [
    "ktordemo",
    "https://yourdomain.auth0.com/userinfo"
  ],
  "iat": 1623731072,
  "exp": 1623817472,
  "azp": "KcFo4BTtPdYvoRdvZ5wKmTUqjT51F84y",
  "scope": "openid profile email"
}
This JWT tells us that the application at https://yourdomain.auth0.com/ granted the bearer of this token the ability to call the ktordemo service.
Because this token is signed, we know that it has not been tampered with, and we can trust the data in the token is valid.
However, what we can not tell from the JWT alone is who created it. The iss field tells us that an Auth0 application issued this token, but anyone can create a valid looking JWT with this iss field. Before we act on the contents of the token, we need to confirm it was created by a service we trust. This is where JWKs come in.
What is a JWK?
Verifying the author of a token is performed with a JWK. A JWK holds one or more public keys that can be used to verify the JWT signature. If a public key from a trusted location matches the JWT signature, we can be sure that a trusted service created the token passed to us.
A JWK is obtained from the /.well-known/jwks.json path exposed by the issuer URL by convention. So in our example, the JWK is available from https://yourdomain.auth0.com/.well-known/jwks.json. Secure HTTPS requests provide us with a high degree of confidence that when we access this JSON file, we are indeed receiving the JWK from the associated Auth0 application.
An example of the JWK file is shown below. In this case, it contains two keys, which gives the issuer the opportunity to rotate keys if needed:
{
  "keys": [
    {
      "alg": "RS256",
      "kty": "RSA",
      "use": "sig",
      "n": "ut8wiM3LtyWZROKo1rUnWrqApCV2idvmAvcOgbXmr_8bygzQtOaoCsjmC6Ra9KUVFZpH4ovFfSyCd8-hSfSspVP7WVhSUUNkPn96WcXChuxPQH7A2W7TiufCIBX-uIZyj8LCy5Sx9bjnRU7XhRpVuP_u610Eaud7ertcTCw6n7bG3zt-BM64VjjLQcjabDFFm3kACRRiP7-m4XOUIDu-ntBMiYt4Ay48LtzIeUI3zAsLwakILqOPrpiyKcpzZx9KTwPIuwr8Ocg3N0Q-XDGyDRBJmoddKRde2ryo2ggt8Yov0LClyVf_BGHqL2X2W5z2QyGFbwgZacTn8XRm2g6joQ",
      "e": "AQAB",
      "kid": "QEf9Ewnh8lGxtIB7GKHF5",
      "x5t": "9XQPmPB7VX7KK73qArUPwRi8Nvk",
      "x5c": [
        "MIIDFTCCAf2gAwIBAgIJPedZR/pd9QahMA0GCSqGSIb3DQEBCwUAMCgxJjAkBgNVBAMTHW1hdHRoZXdjYXNwZXJzb24uYXUuYXV0aDAuY29tMB4XDTIxMDUyNDA0MzQ1NVoXDTM1MDEzMTA0MzQ1NVowKDEmMCQGA1UEAxMdbWF0dGhld2Nhc3BlcnNvbi5hdS5hdXRoMC5jb20wggEiMA0GCSqGSIb3DQEBAQUAA4IBDwAwggEKAoIBAQC63zCIzcu3JZlE4qjWtSdauoCkJXaJ2+YC9w6Bteav/xvKDNC05qgKyOYLpFr0pRUVmkfii8V9LIJ3z6FJ9KylU/tZWFJRQ2Q+f3pZxcKG7E9AfsDZbtOK58IgFf64hnKPwsLLlLH1uOdFTteFGlW4/+7rXQRq53t6u1xMLDqftsbfO34EzrhWOMtByNpsMUWbeQAJFGI/v6bhc5QgO76e0EyJi3gDLjwu3Mh5QjfMCwvBqQguo4+umLIpynNnH0pPA8i7Cvw5yDc3RD5cMbINEEmah10pF17avKjaCC3xii/QsKXJV/8EYeovZfZbnPZDIYVvCBlpxOfxdGbaDqOhAgMBAAGjQjBAMA8GA1UdEwEB/wQFMAMBAf8wHQYDVR0OBBYEFMp/i3n4GHWiXGdG3w6C77ulo+6nMA4GA1UdDwEB/wQEAwIChDANBgkqhkiG9w0BAQsFAAOCAQEAZj+TggYxBCiri4/rWTBq+lQo0bpn89uGZ1vfWdmxhurHEsanG1XgxUyh75jeuul+U3NGZU/d2wzPi9ttORsiSoYdsoJttZ5cVI8UYJZhfeUi/JWW8p2SlptOrSOCk/2/n5qy6PYb5npXxnrC2BDWqS/G6zfqfHCJXCyR1Wo2XpFC3PIhlFtMNvgDv5jHWVxuxrS0iwfsB3nKARcEZ34G6X26fijYMxB0ivjrzhtTcQCEvdCKs9dAcyd0+gnnxZvtbxK/ev+pXvnWoTAr9x0CpTTFBxIoozp8ClxY+D4fr1IIAz+akO1NMj1u3XycjqjKgG01xeCma+NS5+skfm1dow=="
      ]
    },
    {
      "alg": "RS256",
      "kty": "RSA",
      "use": "sig",
      "n": "wjdxVLuQw2aBc7swDtkL20V4nZw2NKlvBZZvl7sSmgsyAL4UoL_tE_GLNy5ASN3dafUfLsvYg_C5EPvd0-_A5LI7yxe0zbE8CMMHD6l-W3EnsOBLvmI-RgvXSpJXrmVh87_GOSVcHQw5n2GloEFqZfeSGDcbpTCJEMiNB5zU_MzYzATpTCgFW3Tvx7WX8oNQmHZhXAFEO9in4LZbg_3GDqZZg1LPy3dGnEvr_vw635sP6h8bmfOXAG3RNVGxfZuV0prV-m-VjyYm-qaVShA2XkDll1rCnHFBz1dI6KVEcbH-dyTWFLHrlBCpDEMG5ve3XanIJ_eExWIDc3YN_DsGJw",
      "e": "AQAB",
      "kid": "puUYU8zrbxliFfz0jn8St",
      "x5t": "dXu90JUEVYhGTwQx7gZp5q4lmMM",
      "x5c": [
        "MIIDFTCCAf2gAwIBAgIJHphcpYJ9MY8TMA0GCSqGSIb3DQEBCwUAMCgxJjAkBgNVBAMTHW1hdHRoZXdjYXNwZXJzb24uYXUuYXV0aDAuY29tMB4XDTIxMDUyNDA0MzQ1NVoXDTM1MDEzMTA0MzQ1NVowKDEmMCQGA1UEAxMdbWF0dGhld2Nhc3BlcnNvbi5hdS5hdXRoMC5jb20wggEiMA0GCSqGSIb3DQEBAQUAA4IBDwAwggEKAoIBAQDCN3FUu5DDZoFzuzAO2QvbRXidnDY0qW8Flm+XuxKaCzIAvhSgv+0T8Ys3LkBI3d1p9R8uy9iD8LkQ+93T78DksjvLF7TNsTwIwwcPqX5bcSew4Eu+Yj5GC9dKkleuZWHzv8Y5JVwdDDmfYaWgQWpl95IYNxulMIkQyI0HnNT8zNjMBOlMKAVbdO/HtZfyg1CYdmFcAUQ72KfgtluD/cYOplmDUs/Ld0acS+v+/Drfmw/qHxuZ85cAbdE1UbF9m5XSmtX6b5WPJib6ppVKEDZeQOWXWsKccUHPV0jopURxsf53JNYUseuUEKkMQwbm97ddqcgn94TFYgNzdg38OwYnAgMBAAGjQjBAMA8GA1UdEwEB/wQFMAMBAf8wHQYDVR0OBBYEFKpDxHQVMbLDzGBjlGeT66aWQqU+MA4GA1UdDwEB/wQEAwIChDANBgkqhkiG9w0BAQsFAAOCAQEAf89pRtcVC9TrMgBCC6xoZoV4HwA6Sr4MFQsJC1WO5g1rnFJlYgXLn2LGK6ZhxByEbZlQ+lf1ZcpZ1cJMGEqnIJPfexfiedB19TNrQ4Yu8vr9JlwHrrD2c8P1TJPlOUGBiodSBGxQP8WfzHCO61mX2XFpdXELDl8u/bA/QZ5Z1jyNui21y6LQDtJlb/vsbcXn8pd73Sd4H9+PHhIutRhuaJ5wFeD3iLB1bNpOoXXwVYl2Gvzmxg6lJCEBBG+AgIvbD0hiSujL2fQC9KfSYqXwwoXHm8qMKYii41V3lHwE/etfeoDjwPs32FrLrpSuZQ7xDA5RT7p2BkhE/rN64bZr9A=="
      ]
    }
  ]
}
The combination of a JWT and JWK provides us with the details we need to grant the token bearer their necessary access and verify that the tokens were generated by a trusted source.
Configuring the Auth0 API, Application, Roles, and User
Our API will be protected by an Auth0 API and application.
Creating the API
We'll start by creating a new API. In the Auth0 management console, select the Applications -> APIs option in the left-hand menu and click the Create API button. Create a new API with the name and identifier of ktordemo:
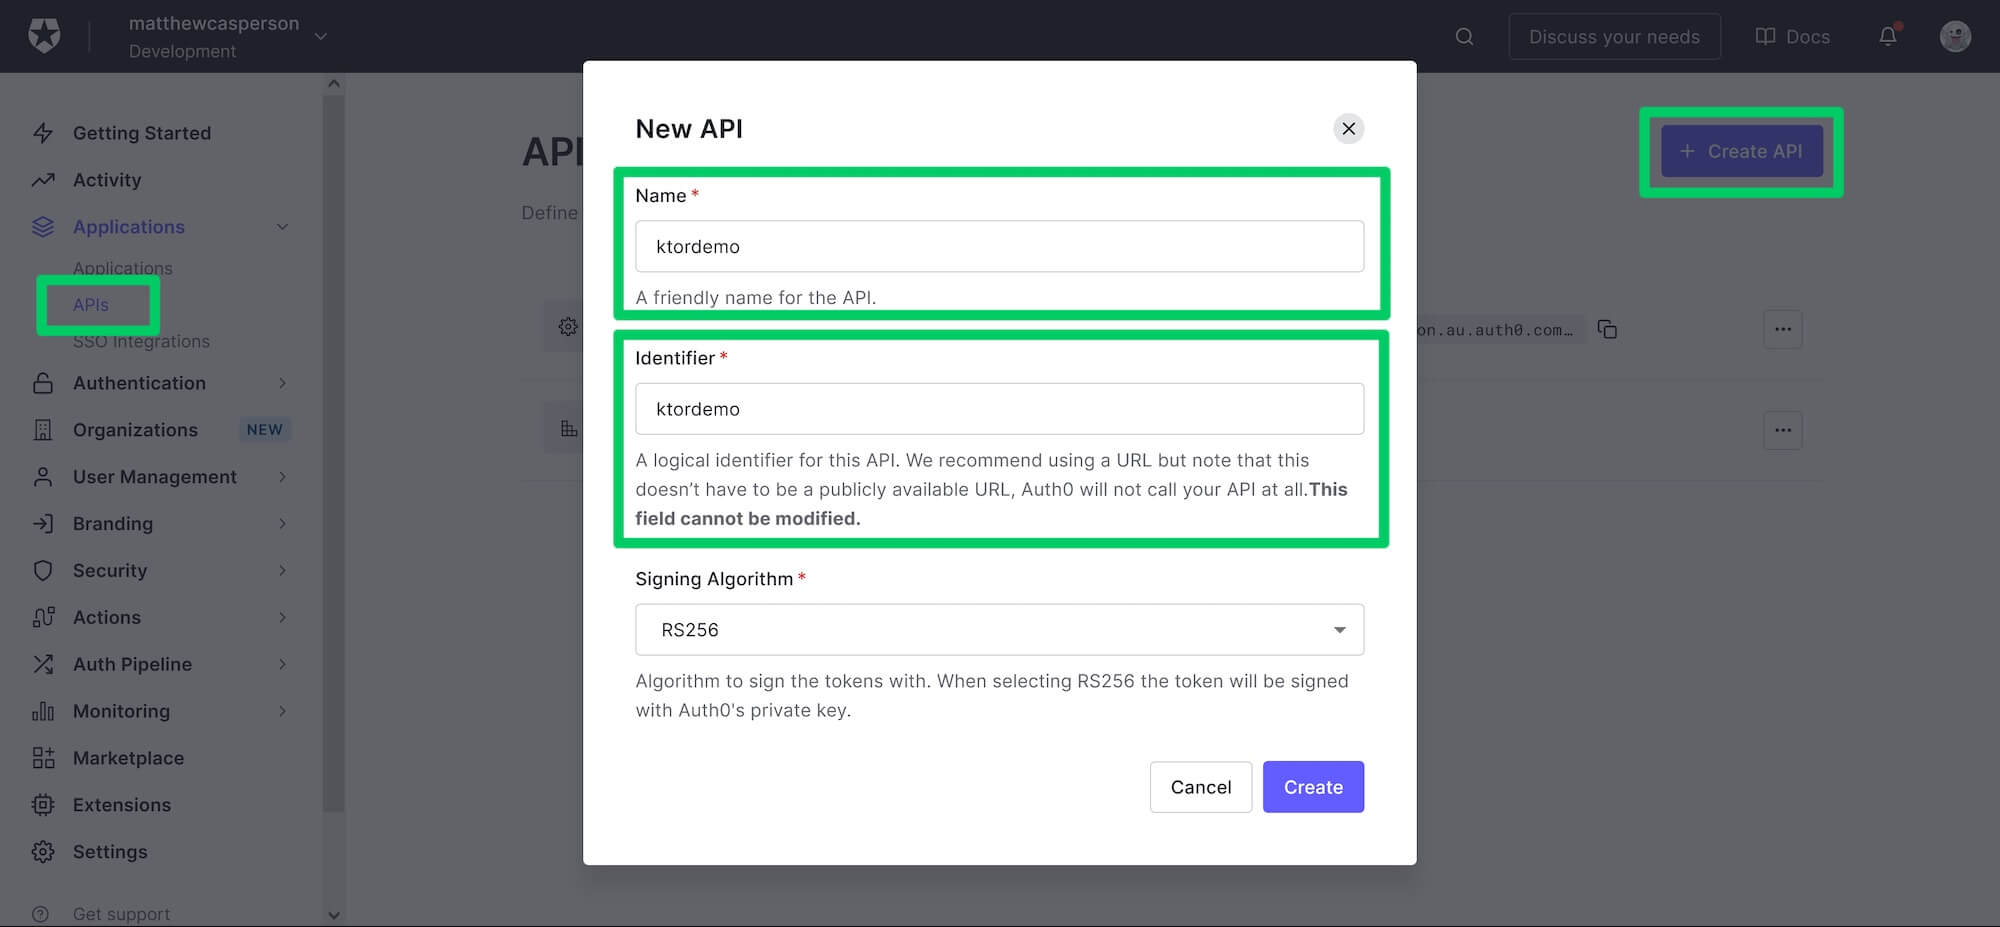 Creating a new Auth0 API.
Creating the application
Next, we create the application. Select the Applications -> Applications option in the left-hand menu and click the Create Application button.
In the Create application dialog, select the Single Page Web Applications option, give the application a name (this name is not important, so use one that makes sense to you), and click the Create button:
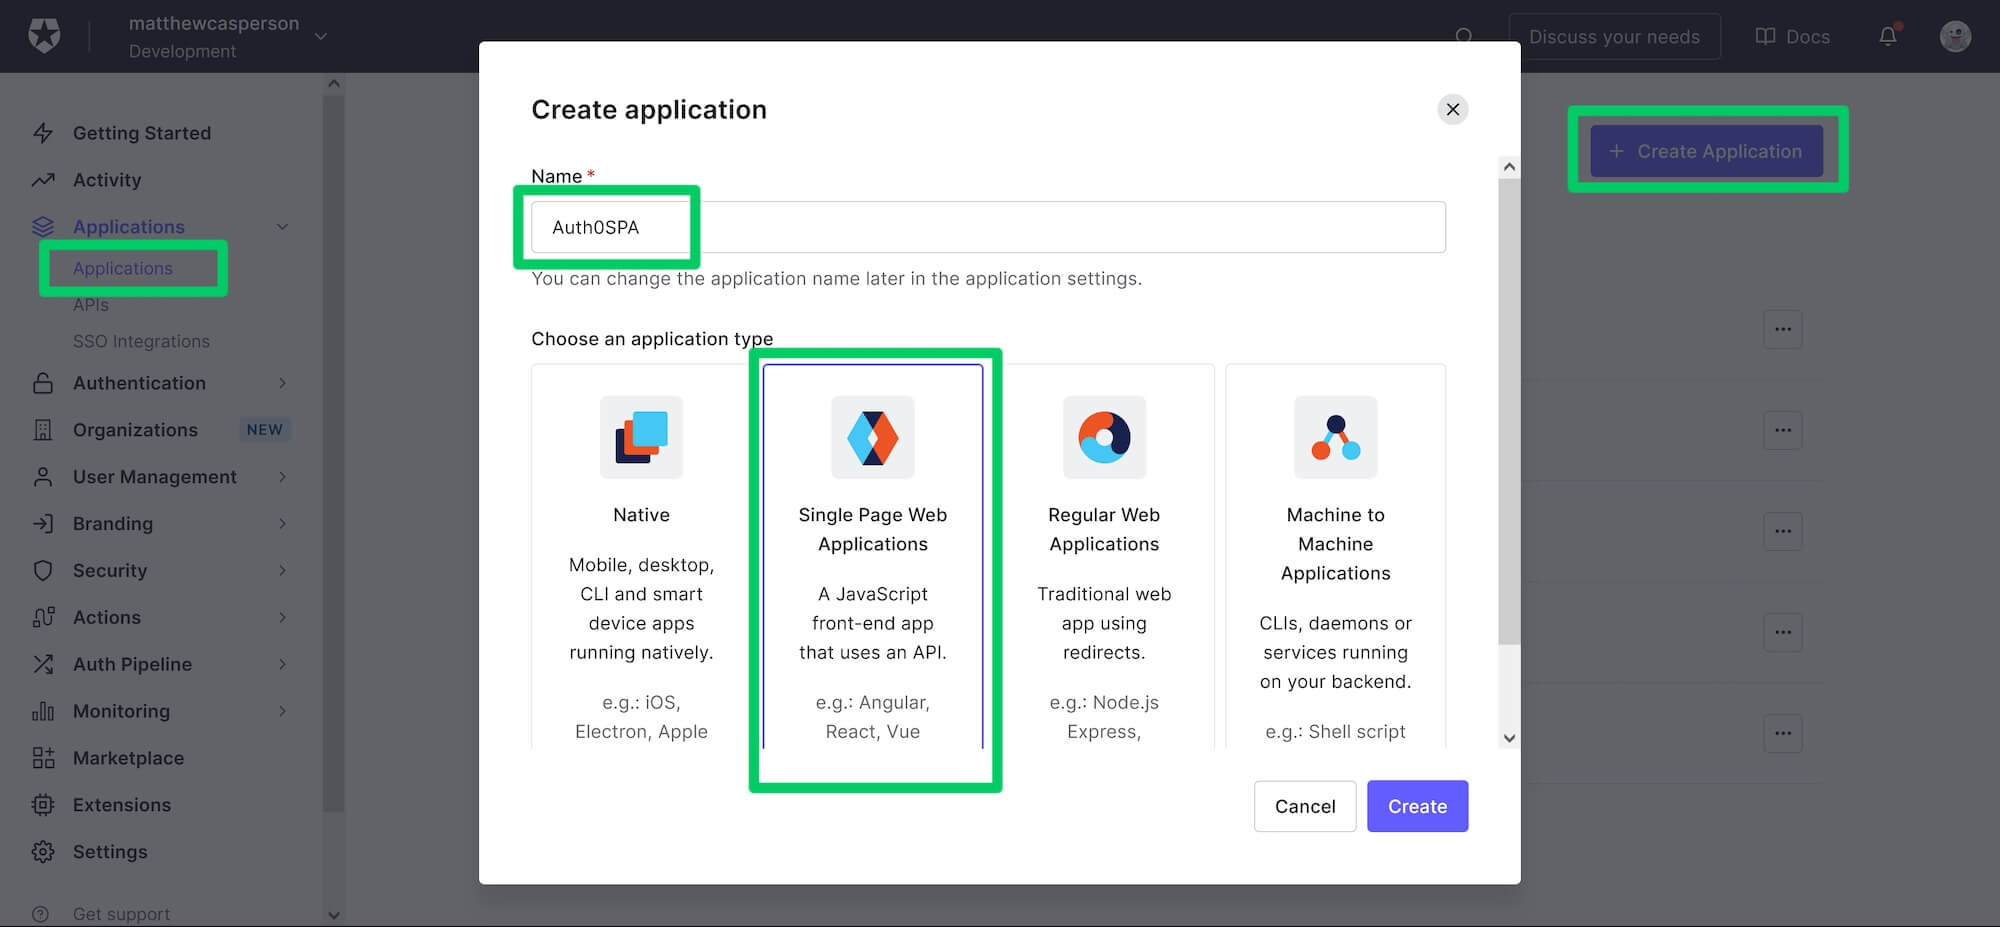 Creating a new application.
Make a note of the Domain and Client ID of the application, as we'll need these later when configuring the frontend web application.
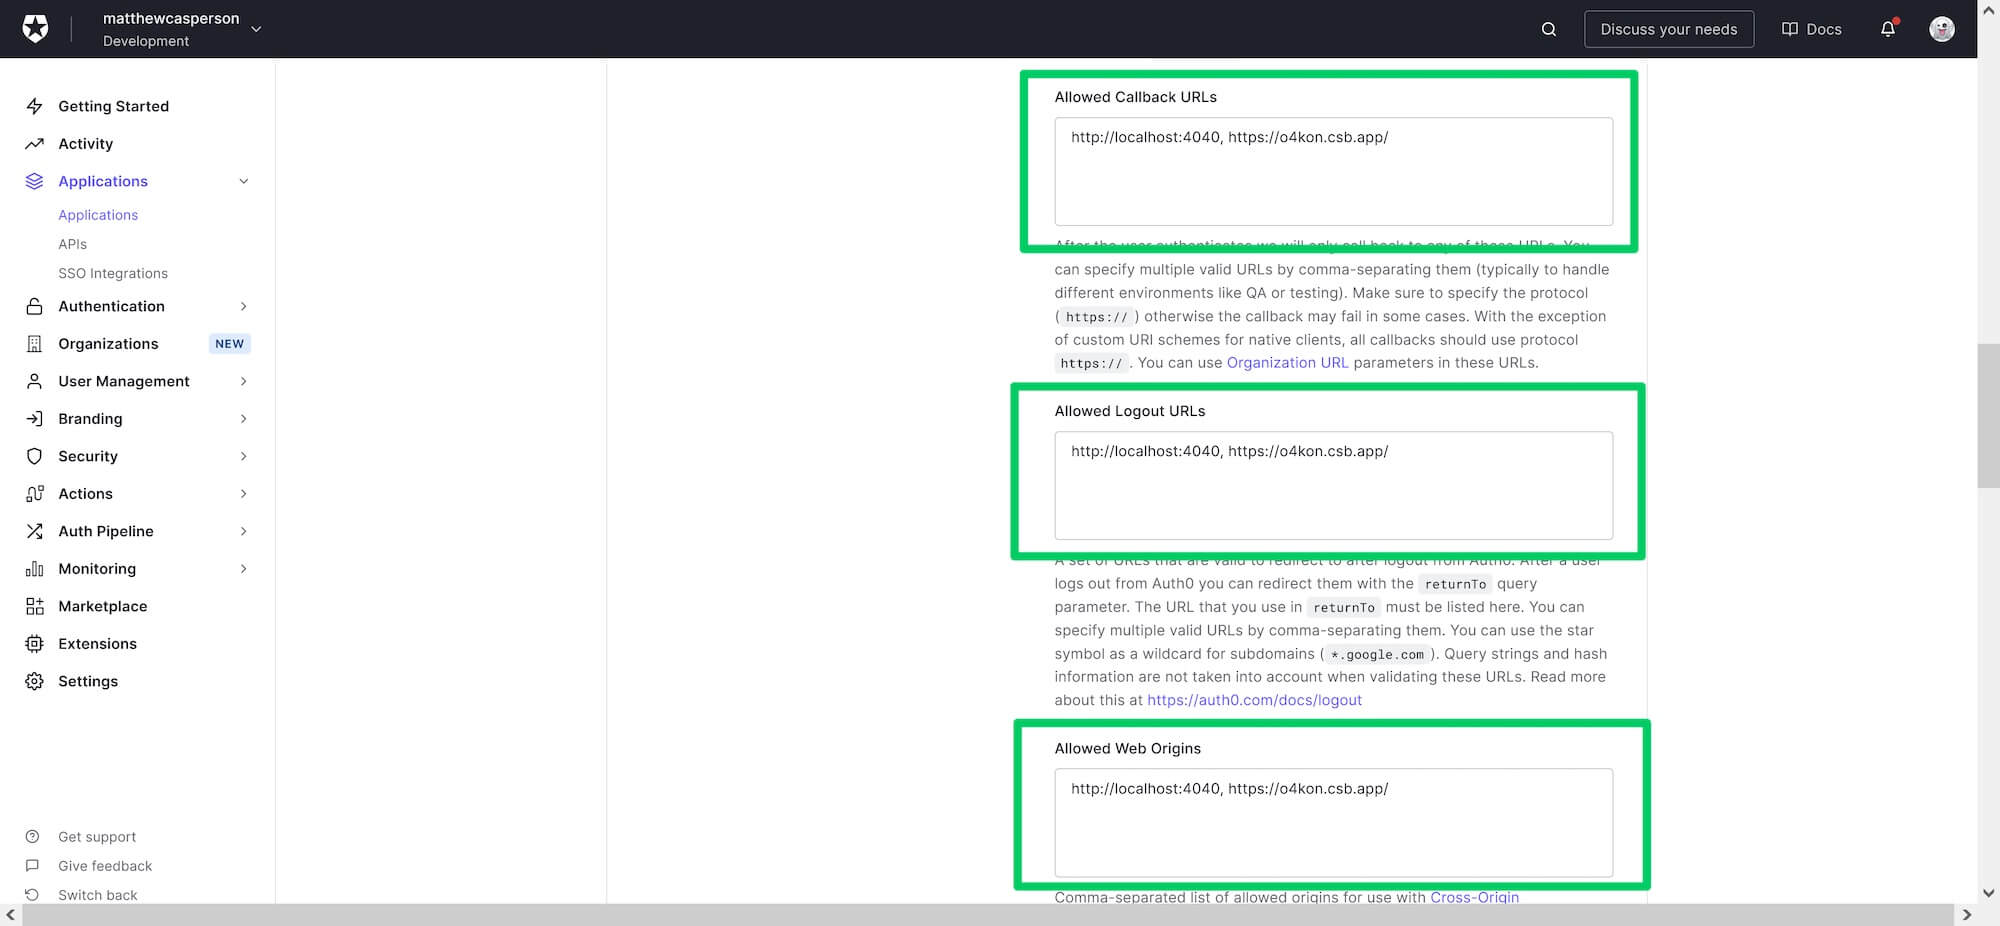
We need to add the URL http://localhost:4040 to the Allowed Callback URLs, Allowed Logout URLs and Allowed Web Origins fields. These will allow our sample frontend application to connect to the Auth0 application later in the post:
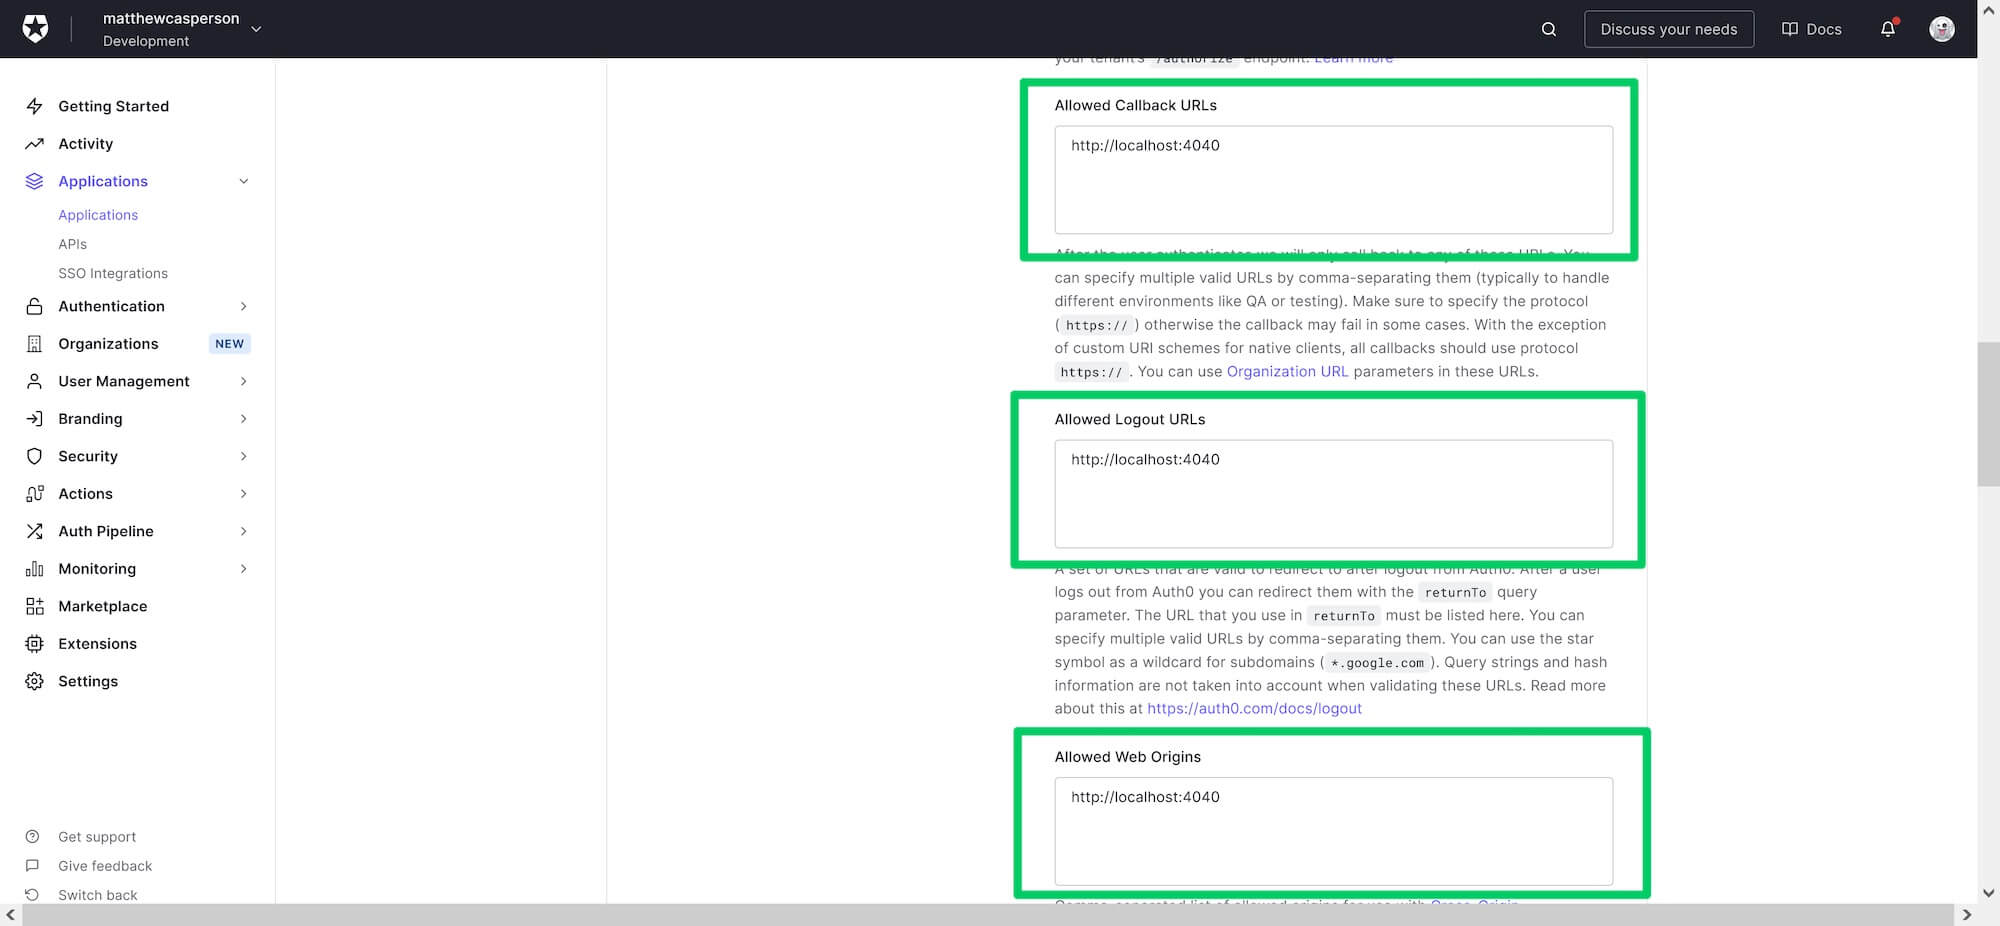 Configuring the callback, logout, and origin URLs.
The Sample Application Code
To build the backend application, you'll need to have JDK 11 or above, which is available from many sources, including OpenJDK, AdoptOpenJDK, Azul, or Oracle.
The frontend application requires Node.js.
The final code for the Ktor application can be found here. The code discussed in each post is matched by a branch:
- starter — the base API with no authentication or authorization.
- add-authorization — the API requiring a valid access token for the
protectedandadminendpoints. This branch is discussed in this post. - add-rbac — the API requiring special permissions to access the
adminendpoint.
The frontend application code can be found here.
Updating the API
The backend API must now be updated to ensure the protected and admin endpoints require a valid JWT access token. The complete code for the src/Application.kt file is shown below:
package com.matthewcasperson

import com.auth0.jwk.JwkProviderBuilder
import io.ktor.application.*
import io.ktor.auth.*
import io.ktor.auth.jwt.*
import io.ktor.features.*
import io.ktor.http.*
import io.ktor.response.*
import io.ktor.routing.*
import java.util.concurrent.TimeUnit

fun main(args: Array<String>): Unit = io.ktor.server.netty.EngineMain.main(args)

fun validateCreds(credential: JWTCredential): JWTPrincipal? {
    val containsAudience = credential.payload.audience.contains(System.getenv("AUDIENCE"))

    if (containsAudience) {
        return JWTPrincipal(credential.payload)
    }

    return null
}

fun Application.module() {

    val jwkProvider = JwkProviderBuilder(System.getenv("ISSUER"))
        .cached(10, 24, TimeUnit.HOURS)
        .rateLimited(10, 1, TimeUnit.MINUTES)
        .build()

    install(Authentication) {
        jwt("auth0") {
            verifier(jwkProvider, System.getenv("ISSUER"))
            validate { credential -> validateCreds(credential) }
        }
    }
    install(CORS) {
        anyHost()
        method(HttpMethod.Options)
        method(HttpMethod.Get)
        header("authorization")
        allowCredentials = true
        allowNonSimpleContentTypes = true

    }


    routing {
        get("/api/messages/public") {
            call.respondText(
                """{"message": "The API doesn't require an access token to share this message."}""",
                contentType = ContentType.Application.Json
            )
        }
    }

    routing {
        authenticate("auth0") {
            get("/api/messages/protected") {
                call.respondText(
                    """{"message": "The API successfully validated your access token."}""",
                    contentType = ContentType.Application.Json
                )
            }
        }
    }

    routing {
        authenticate("auth0") {
            get("/api/messages/admin") {
                call.respondText(
                    """{"message": "The API successfully recognized you as an admin."}""",
                    contentType = ContentType.Application.Json
                )
            }
        }
    }
}
Let's highlight the changes required from the code presented in the previous blog post.
The validateCreds function contains the logic to determines if a request is authorized to access a given endpoint. It ensures the supplied JWT has a predefined audience, defined in the AUDIENCE environment variable. This verifies that the token we received is intended for use with our API:
fun validateCreds(credential: JWTCredential): JWTPrincipal? {
    val containsAudience = credential.payload.audience.contains(System.getenv("AUDIENCE"))

    if (containsAudience) {
        return JWTPrincipal(credential.payload)
    }

    return null
}
We make use of the JwkProviderBuilder to build an object that verifies our JWT token. This object understands the standard location of a JWK file (i.e. ${issuer}/.well-known/jwks.json), and will access it to verify the signature of any JWTs passed to the application:
    val jwkProvider = JwkProviderBuilder(System.getenv("ISSUER"))
        .cached(10, 24, TimeUnit.HOURS)
        .rateLimited(10, 1, TimeUnit.MINUTES)
        .build()
We now install and configure the Authentication feature, with a single jwt authentication mechanism called auth0, which verifies the signatures in the JWT token, and validates the audience:
    install(Authentication) {
        jwt("auth0") {
            verifier(jwkProvider, System.getenv("ISSUER"))
            validate { credential -> validateCreds(credential) }
        }
    }
The final step is to update the routing features to ensure calls to the protected and admin endpoints satisfy the auth0 authentication mechanism:
    routing {
        authenticate("auth0") {
            get("/api/messages/protected") {
                call.respondText(
                    """{"message": "The API successfully validated your access token."}""",
                    contentType = ContentType.Application.Json
                )
            }
        }
    }

    routing {
        authenticate("auth0") {
            get("/api/messages/admin") {
                call.respondText(
                    """{"message": "The API successfully recognized you as an admin."}""",
                    contentType = ContentType.Application.Json
                )
            }
        }
    }
Our backend application is now ready to accept authenticated requests. Now that we have the Auth0 API and application created, we can make these requests from the sample frontend application.
The Frontend Application
The frontend is provided by a JavaScript React application available on GitHub. This application understands how to call an API exposing the endpoints /api/messages/public, /api/messages/protected, and /api/messages/admin, allowing it to be integrated into our Ktor backend.
Check out the code and install the dependencies with:
npm install
Then set the environment variables required to connect to the Auth0 application that will authenticate our users:
export REACT_APP_AUTH0_DOMAIN=yourdomain.auth0.com
export REACT_APP_AUTH0_CLIENT_ID=abcdefghigklmnop
Next, define the environment variables relating to the backend API:
export REACT_APP_AUTH0_AUDIENCE=ktordemo
export REACT_APP_API_SERVER_URL=http://localhost:6060
Finally, run the frontend application with:
npm start
Open the application at http://localhost:4040, complete the log in, click the External API tab, and click the PUBLIC, PROTECTED, and ADMIN links to query the associated HTTP API endpoints exposed by our Ktor application:
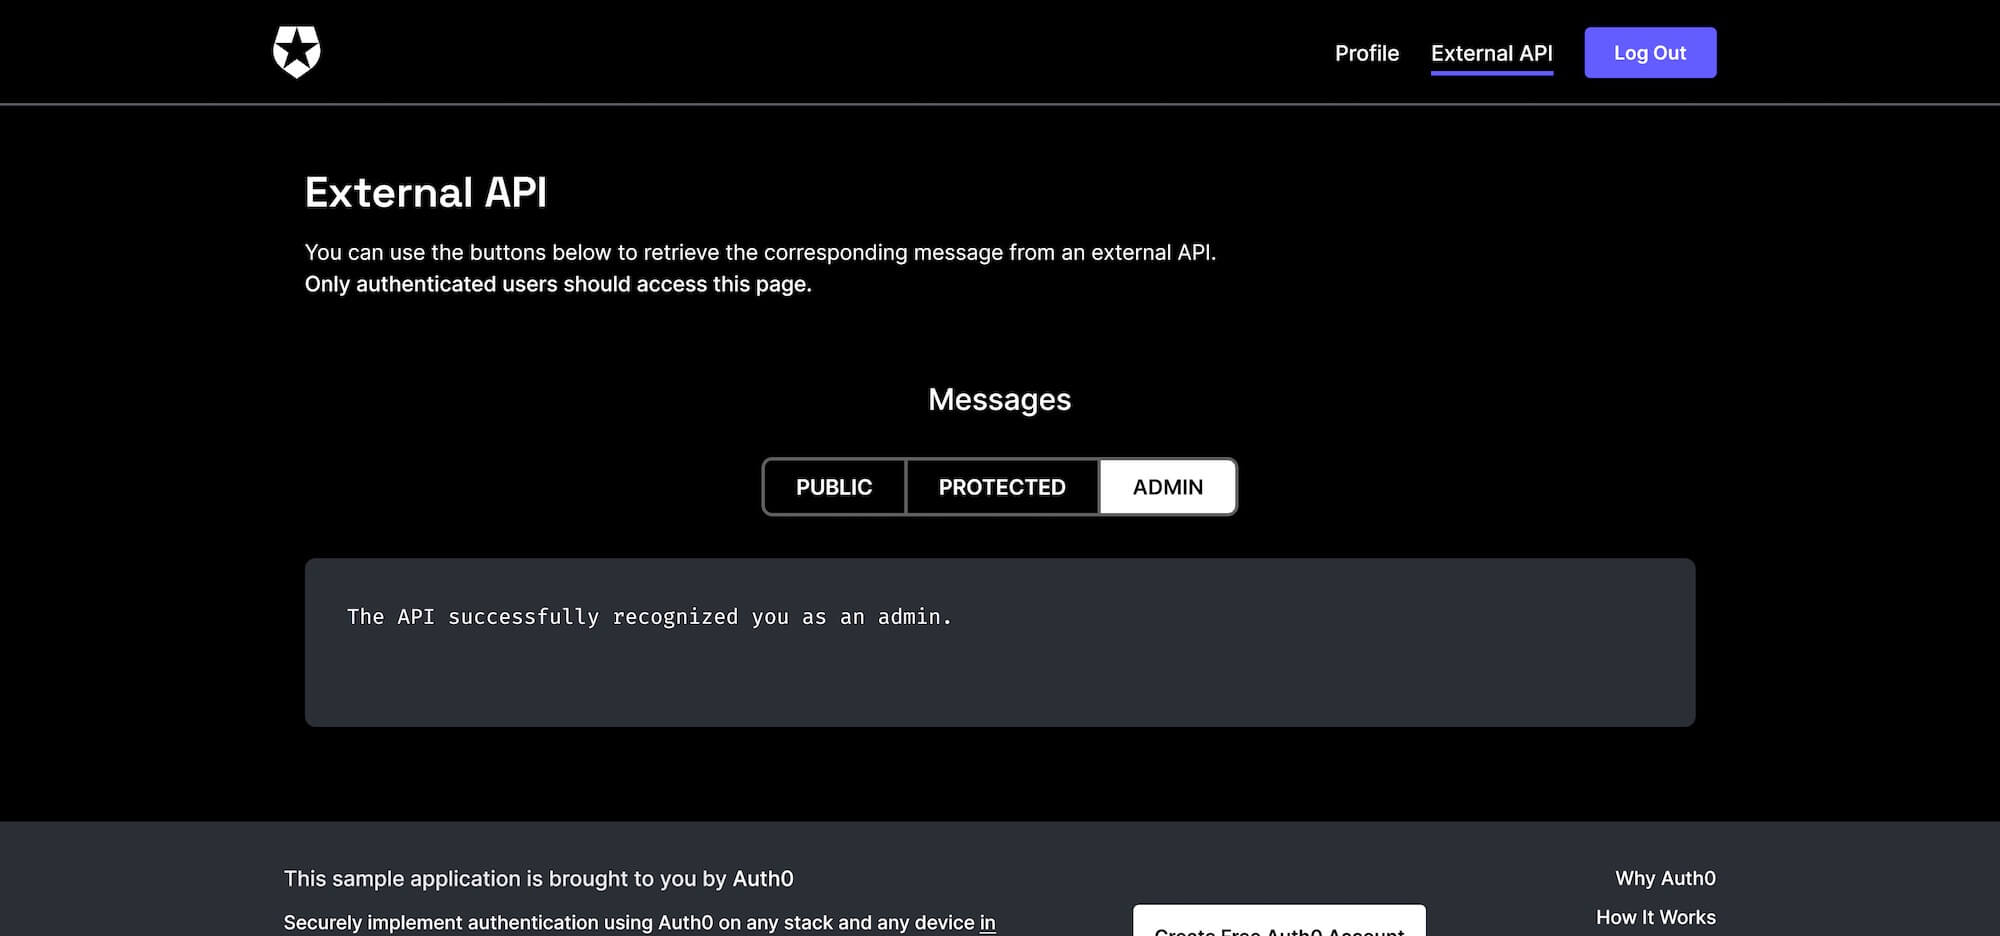 The sample frontend application.
Running the Frontend in CodeSandBox
You can also run the frontend application in CodeSandBox.
Open the URL https://githubbox.com/auth0-sample-gallery/spareactjavascript_hello-world. This will import the frontend code into a sandbox.
Then create a file called .env in the root directory with the following contents, making sure to replace the REACT_APP_AUTH0_DOMAIN and REACT_APP_AUTH0_CLIENT_ID values with those for your Auth0 application:
REACT_APP_AUTH0_DOMAIN=yourdomain.auth0.com
REACT_APP_AUTH0_CLIENT_ID=abcdefghigklmnop
REACT_APP_AUTH0_AUDIENCE=ktordemo
REACT_APP_API_SERVER_URL=http://localhost:6060
The built-in browser will display the frontend application with a URL like https://[code].csb.app/. This URL must be added to your Auth0 application callback, logout, and origin URLs:
 CodeSandBox URLs added to the Auth0 application.
You can now browse the frontend application from the CodeSandBox URL.
If you run into errors logging into Auth0, make sure the .env file is saved with LF line endings. This is done with the Change End of Line Sequence in the command palette:
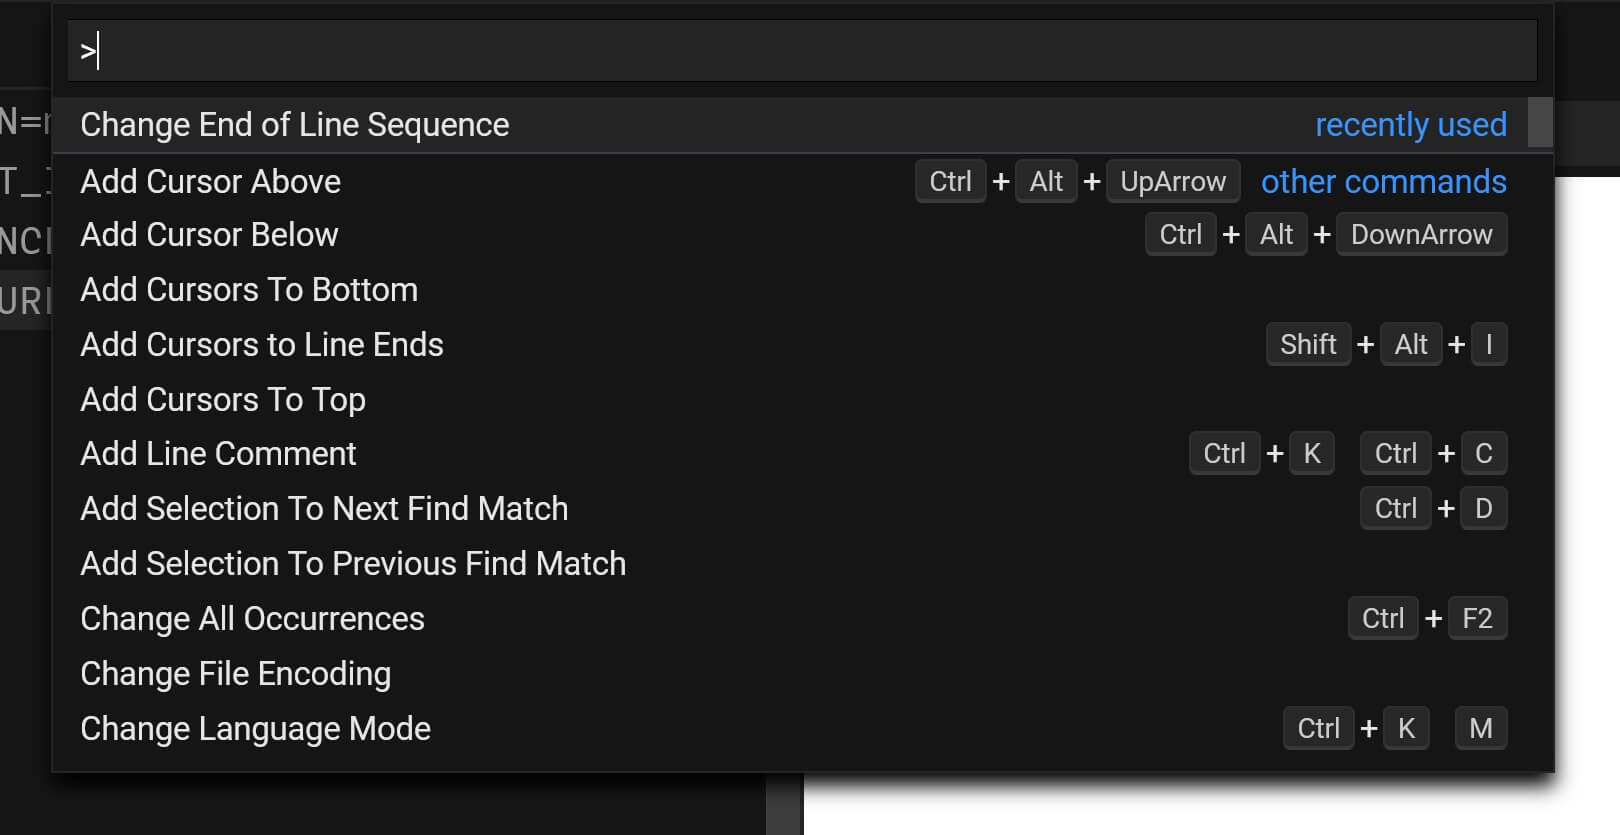 The CodeSandBox command palette
Inspecting the Access Token
Capturing the traffic sent by the frontend shows the requests being made to the backend API. The screenshot below shows the request to the api/messages/admin endpoint. Notice the Authorization header includes the value Bearer <token>. The <token> part of this value is the JWT:
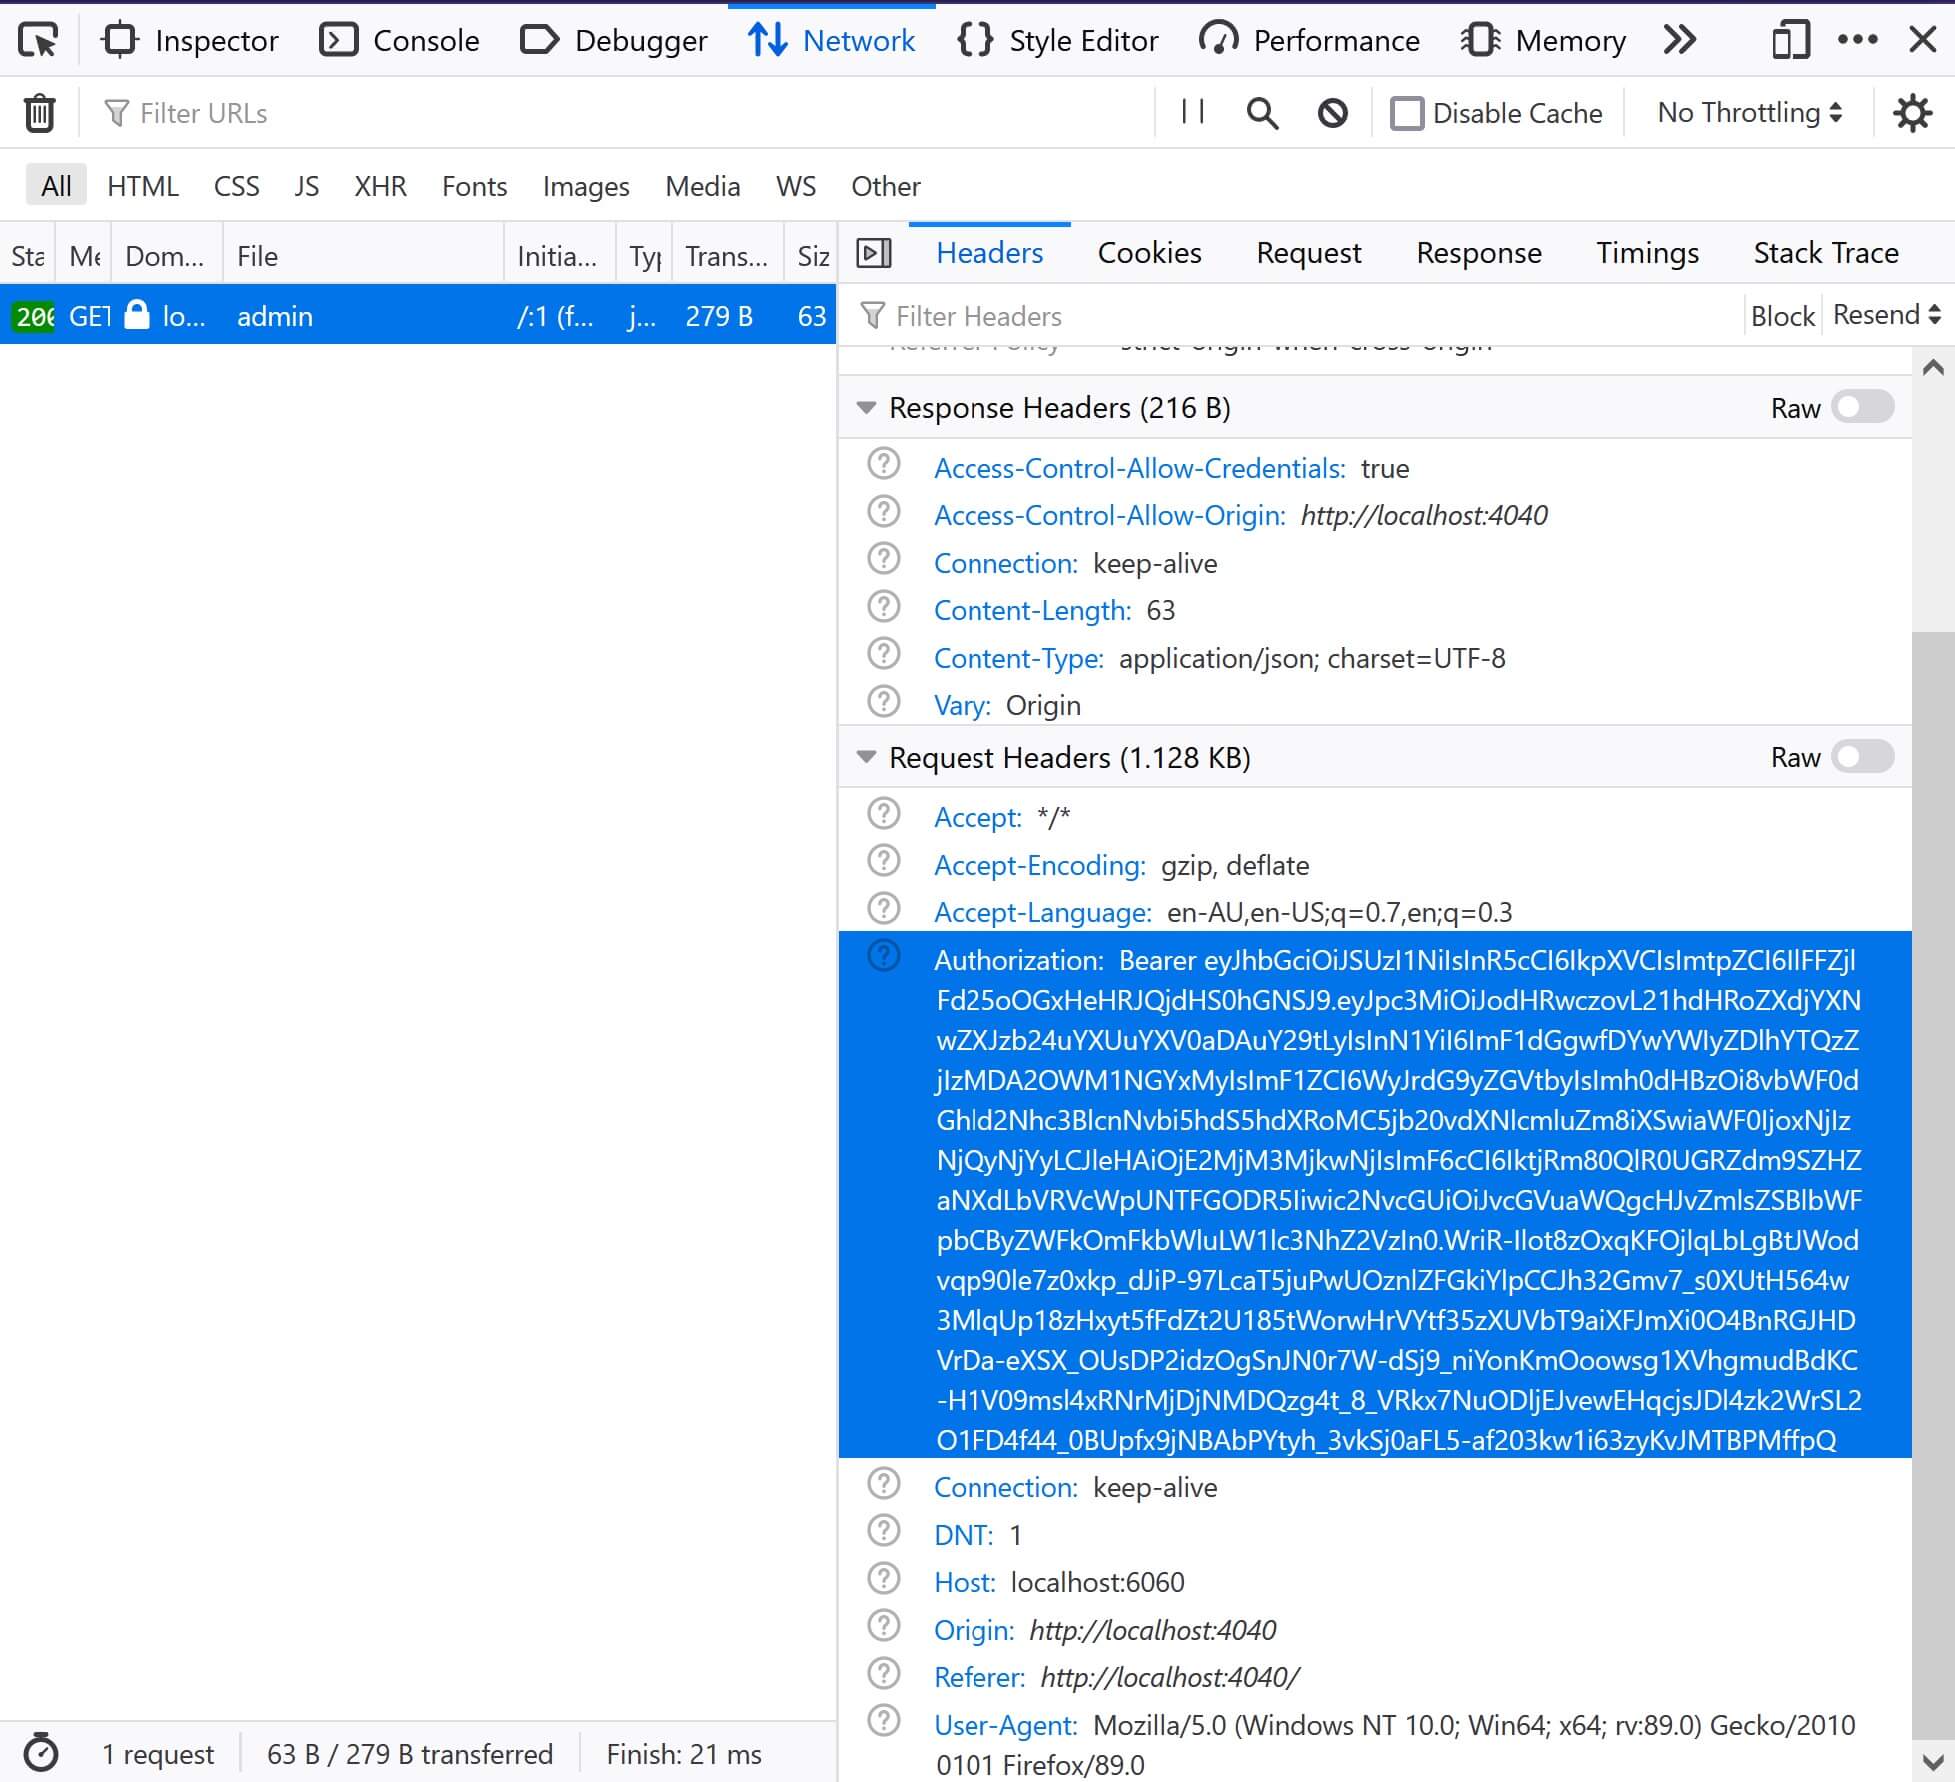 Browser network traffic capture.
You can copy this token to jwt.io to inspect the JWT contents. Note the PAYLOAD section, which includes the fields we talked about earlier in the blog post:
 A parsed JWT token.
Conclusion
In this post, we extended the HTTP API created in the previous post to secure the protected and admin endpoints with native JWT validation support provided by Ktor.
We then created an Auth0 API and application and accessed our backend API by a sample frontend application integrated with Auth0.
In the next and final post in this series, we'll lock down the admin endpoint with Role-Based Access Control (RBAC) and special permission called read:admin-messages.
About the author

Matthew Casperson
Product Manager at Octopus Deploy