
In the previous post, we created an Auth0 API to represent the Ktor HTTP API and an Auth0 application to allow the frontend application to authenticate users. This allowed us to query the backend API from the frontend application with a valid access token. We also updated the backend API to require a valid access token for the protected and admin endpoints.
In this post, we'll complete the journey by enabling Role-Based Access Controls (RBAC) within Auth0 and restrict access to the admin endpoint in our backend API to those users with the correct permissions.
RBAC and permissions
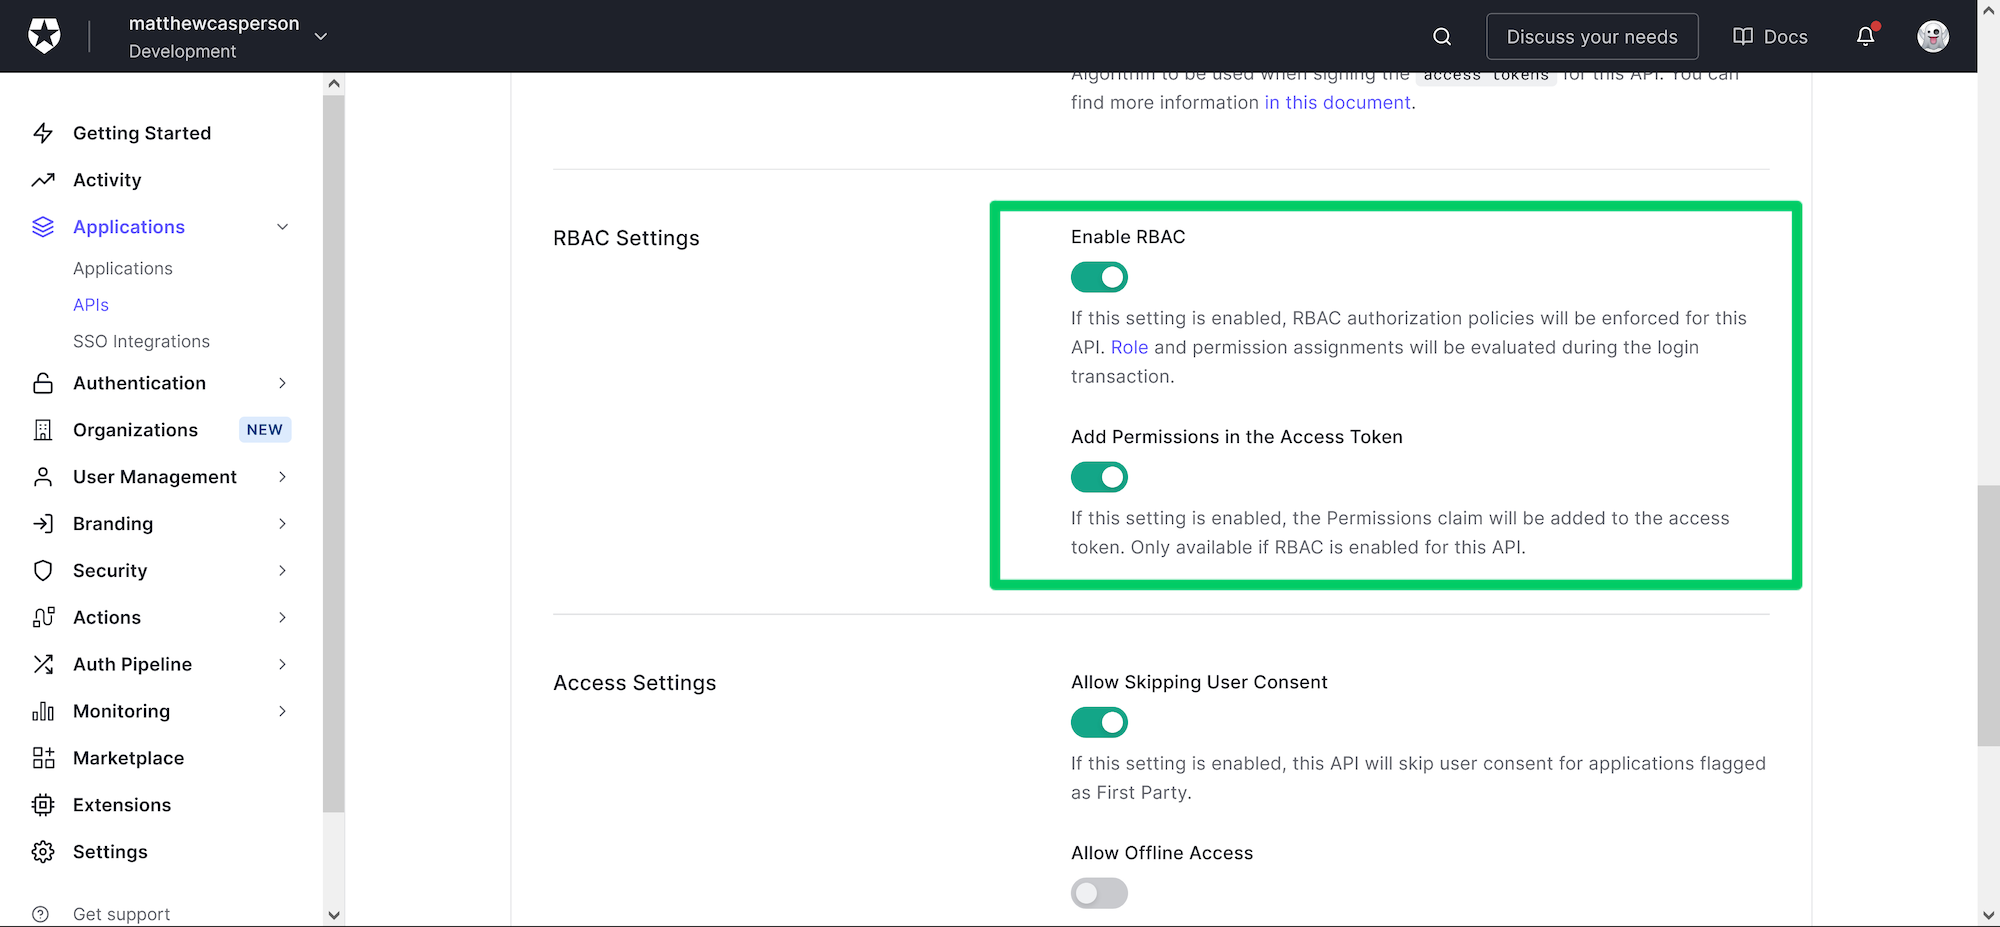
We start by enabling RBAC within our Auth0 API.
Under the Settings tab in the API, switch the Enable RBAC and Add permissions in the Access Token sliders to the on the setting. Doing so will ensure a permissions claim is added to the access token with any scopes that have been assigned to the logged-in user.
A detailed discussion on why scopes should not be used to grant permissions is presented in the post On The Nature of OAuth2's Scopes. The summary is that a scope constrains the actions that an OAuth client may attempt to perform on behalf of a user, but does not imply that the user has the permission to access any particular resource.
This has some subtle but significant implications on the claims returned in an Auth0 access token.
Without enabling the RBAC settings, any scope requested by the OAuth client and consented to by the user will be returned in the scope claim. It doesn't matter if that scope has been assigned to the user or not - it is returned regardless. It is then the responsibility of the OAuth resource server to allow or deny access to a given resource based on the user's identity and the action being performed.
When RBAC is enabled, only scopes that have been requested by the client, and consented to by the user, and assigned to a user will be returned in the scope claim. In this scenario, the resource server can assume the absence of a scope means the client did not request it, the user did not consent to it, or it has not been assigned to the user, and so can quickly deny access.
By adding the permissions claim, each scope assigned to the user is calculated and included in the access token. The permissions claim is populated without asking for consent from the user, which supports more traditional RBAC style applications, where clients have delegated all the permissions of their users, and the users don't pick and choose scopes with each login.
Our sample application will make use of the scopes in the permissions claim to determine access to the API.
 Enabling RBAC and permissions in the access token.
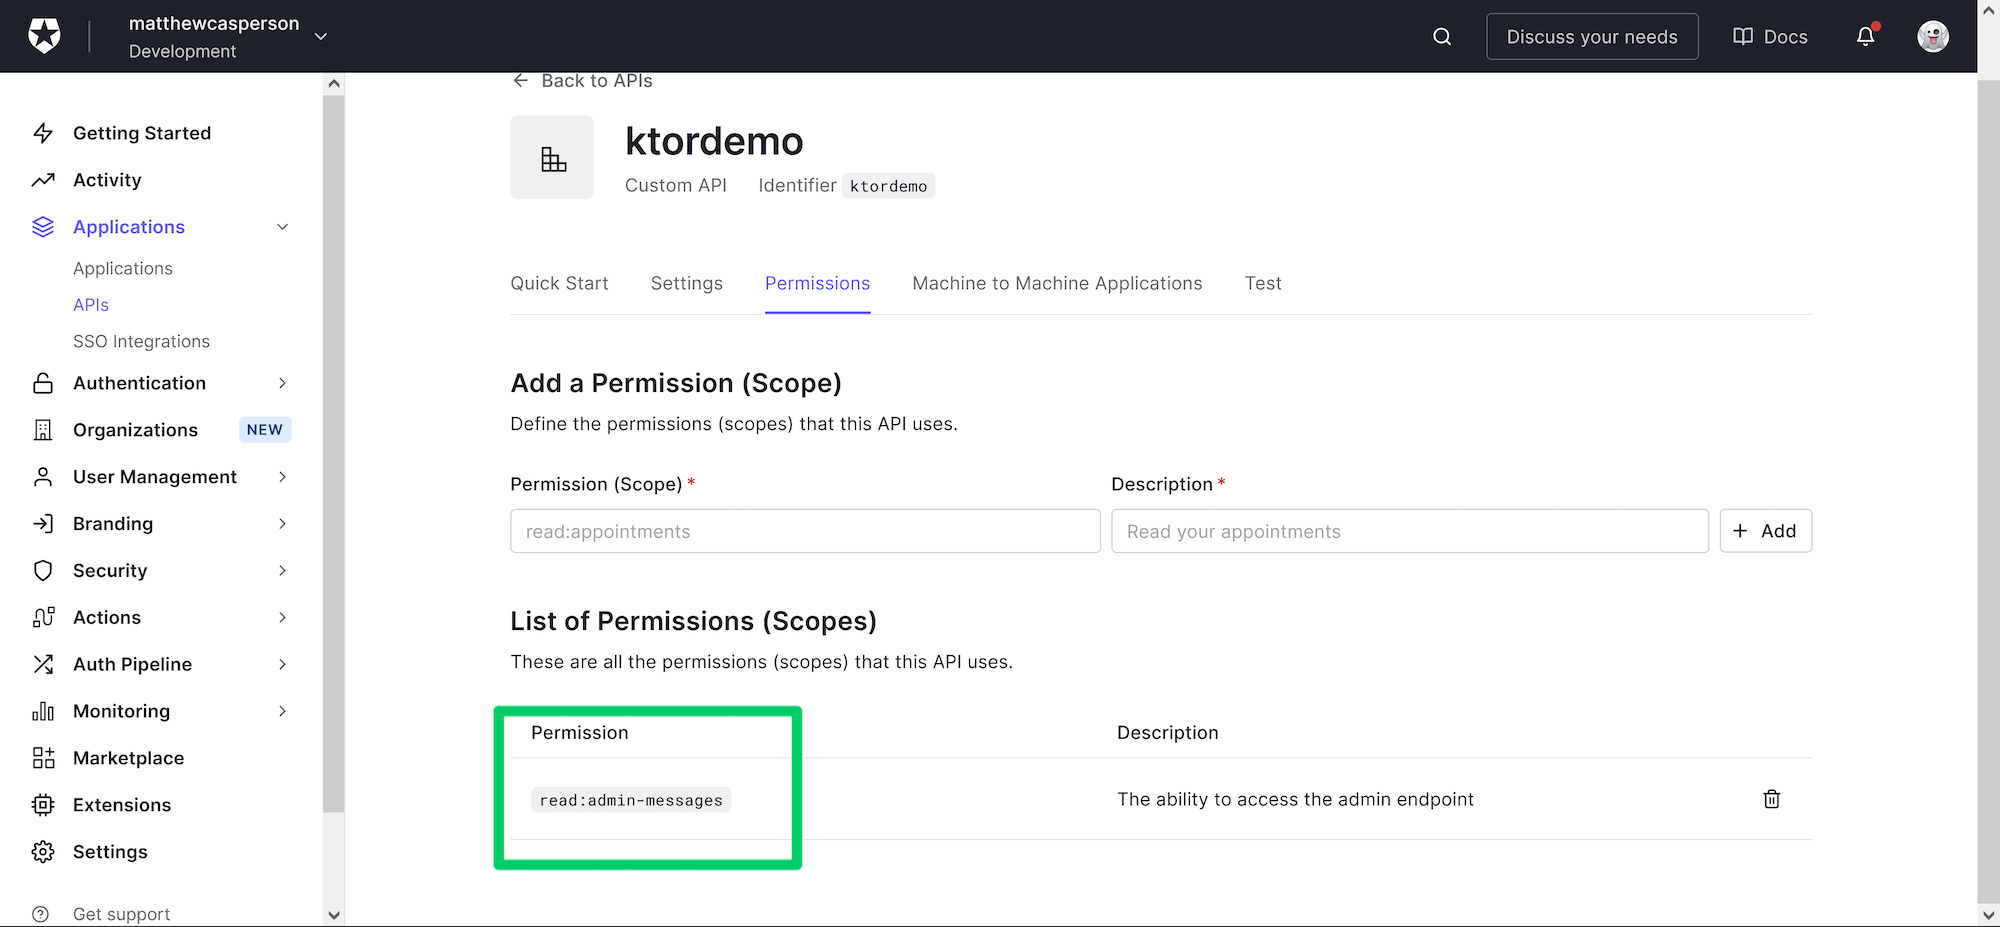
Under the Permissions tab, define a new Permission (Scope) of read:admin-messages and a Description of The ability to access the admin endpoint. Click the Add button to save the new permission:
 Creating an API permission.
Creating the role
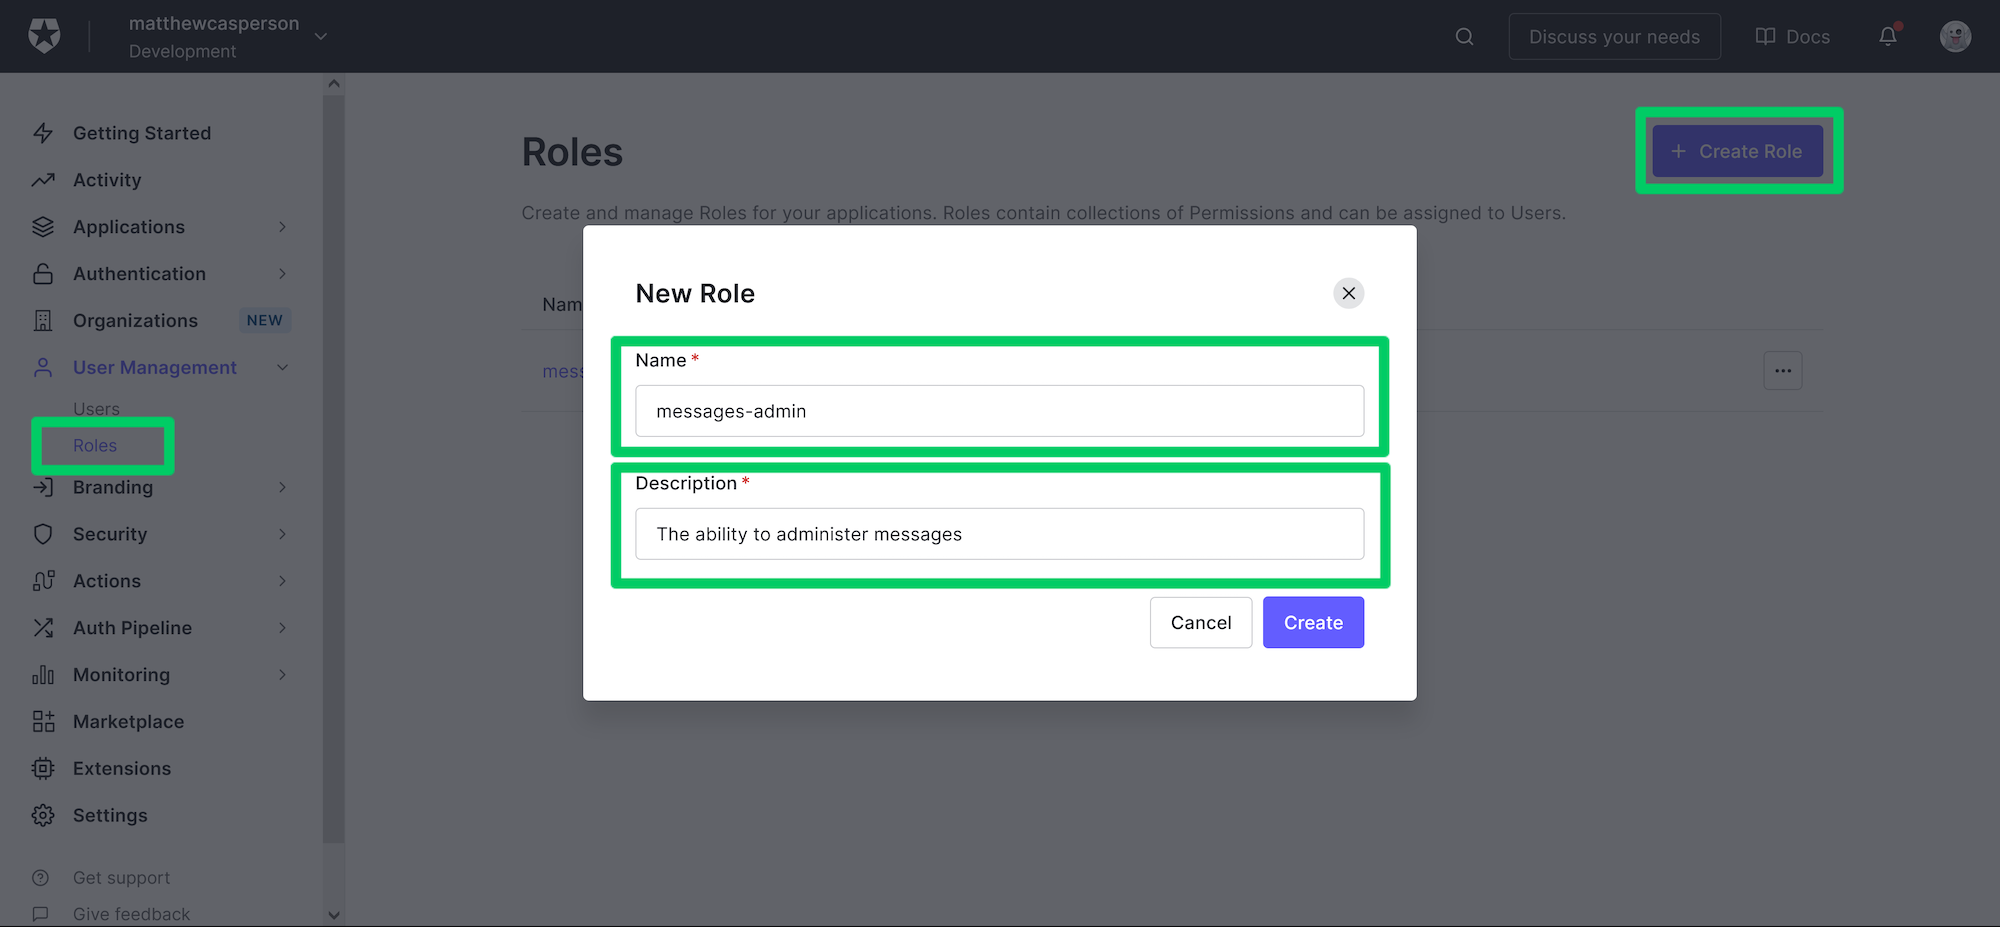
We now create a role to hold the permissions required by our API. Click the User Management -> Roles option and click the Create Role button.
In the New Role dialog, enter a name of messages-admin, enter a description, and click the Create button:
 Creating a new role.
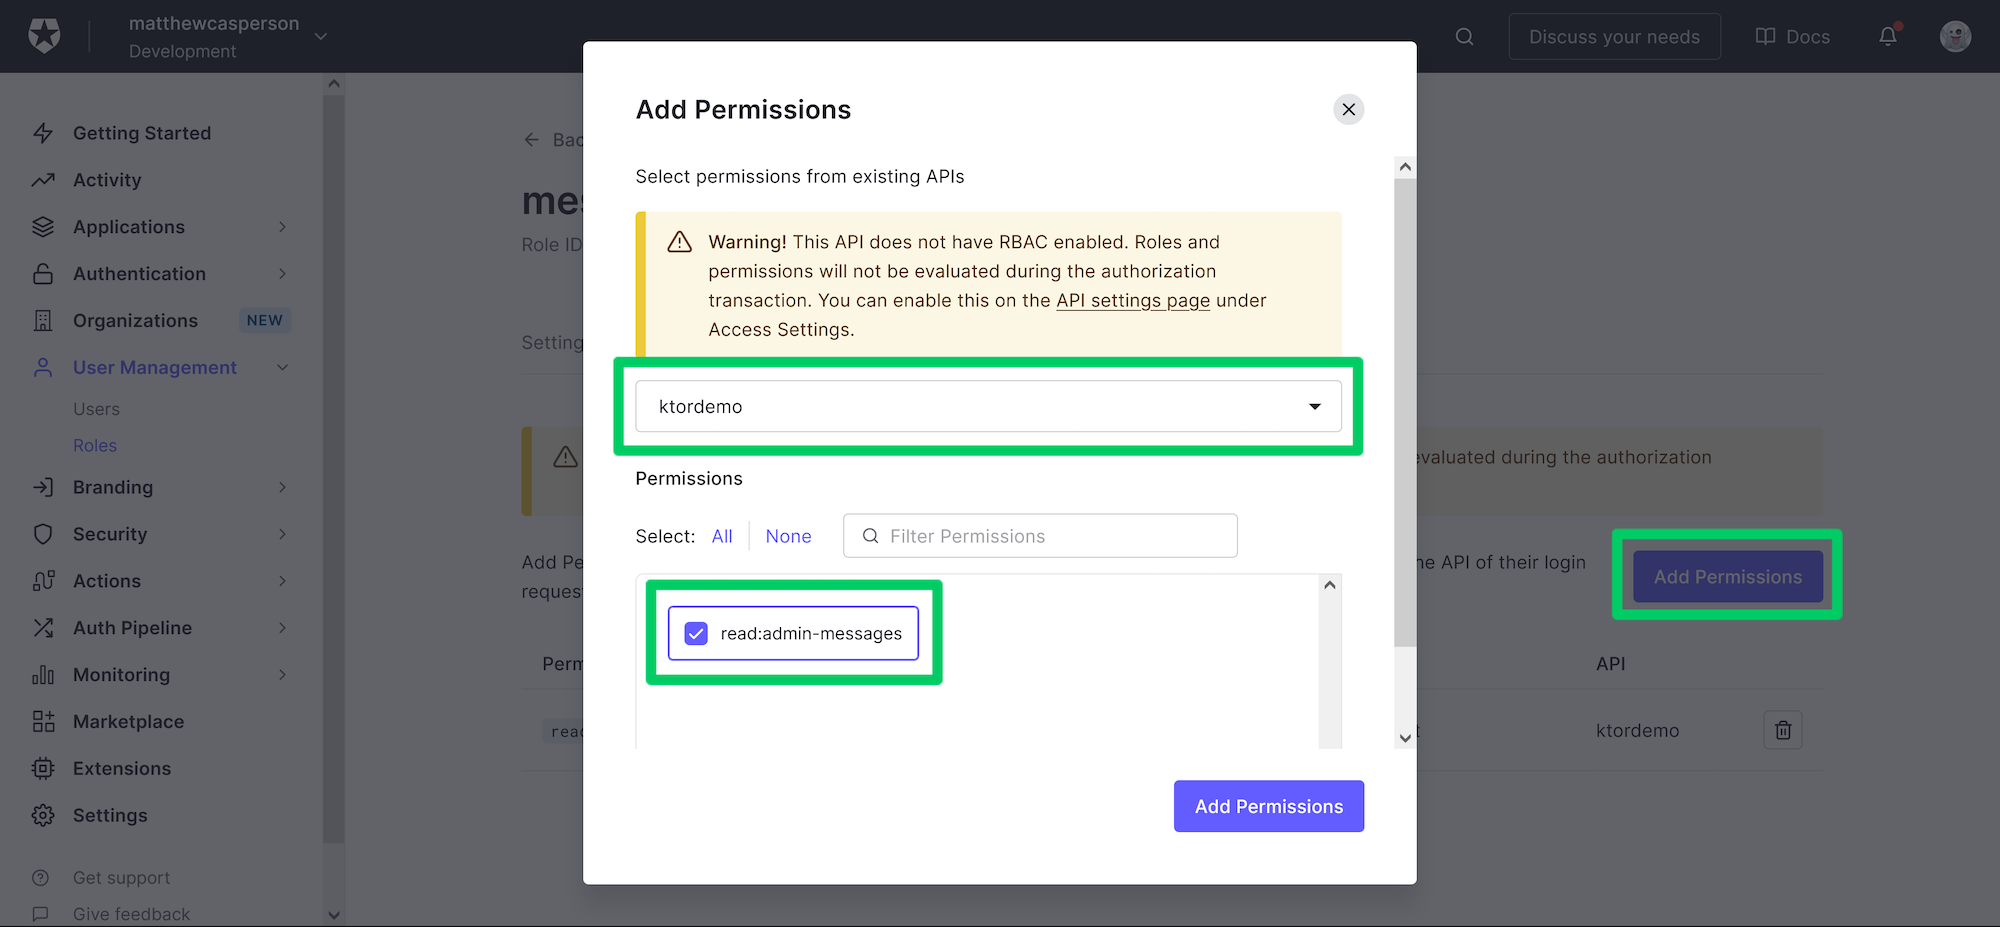
Under the Permissions tab click the Add Permissions button. In the Add Permissions dialog select the API we created earlier, select the read:admin-messages permission, and click the Add Permission button:
 Adding permissions to a role.
Assigning the role to a user
For the purposes of this demo, I'll assume you have already created an Auth0 user. I'll also assume this user is linked to the application that was created earlier.
Select the user, click the Roles tab, and click the Assign Roles button.
In the Add Roles dialog, select the messages-admin role and click the Assign button:
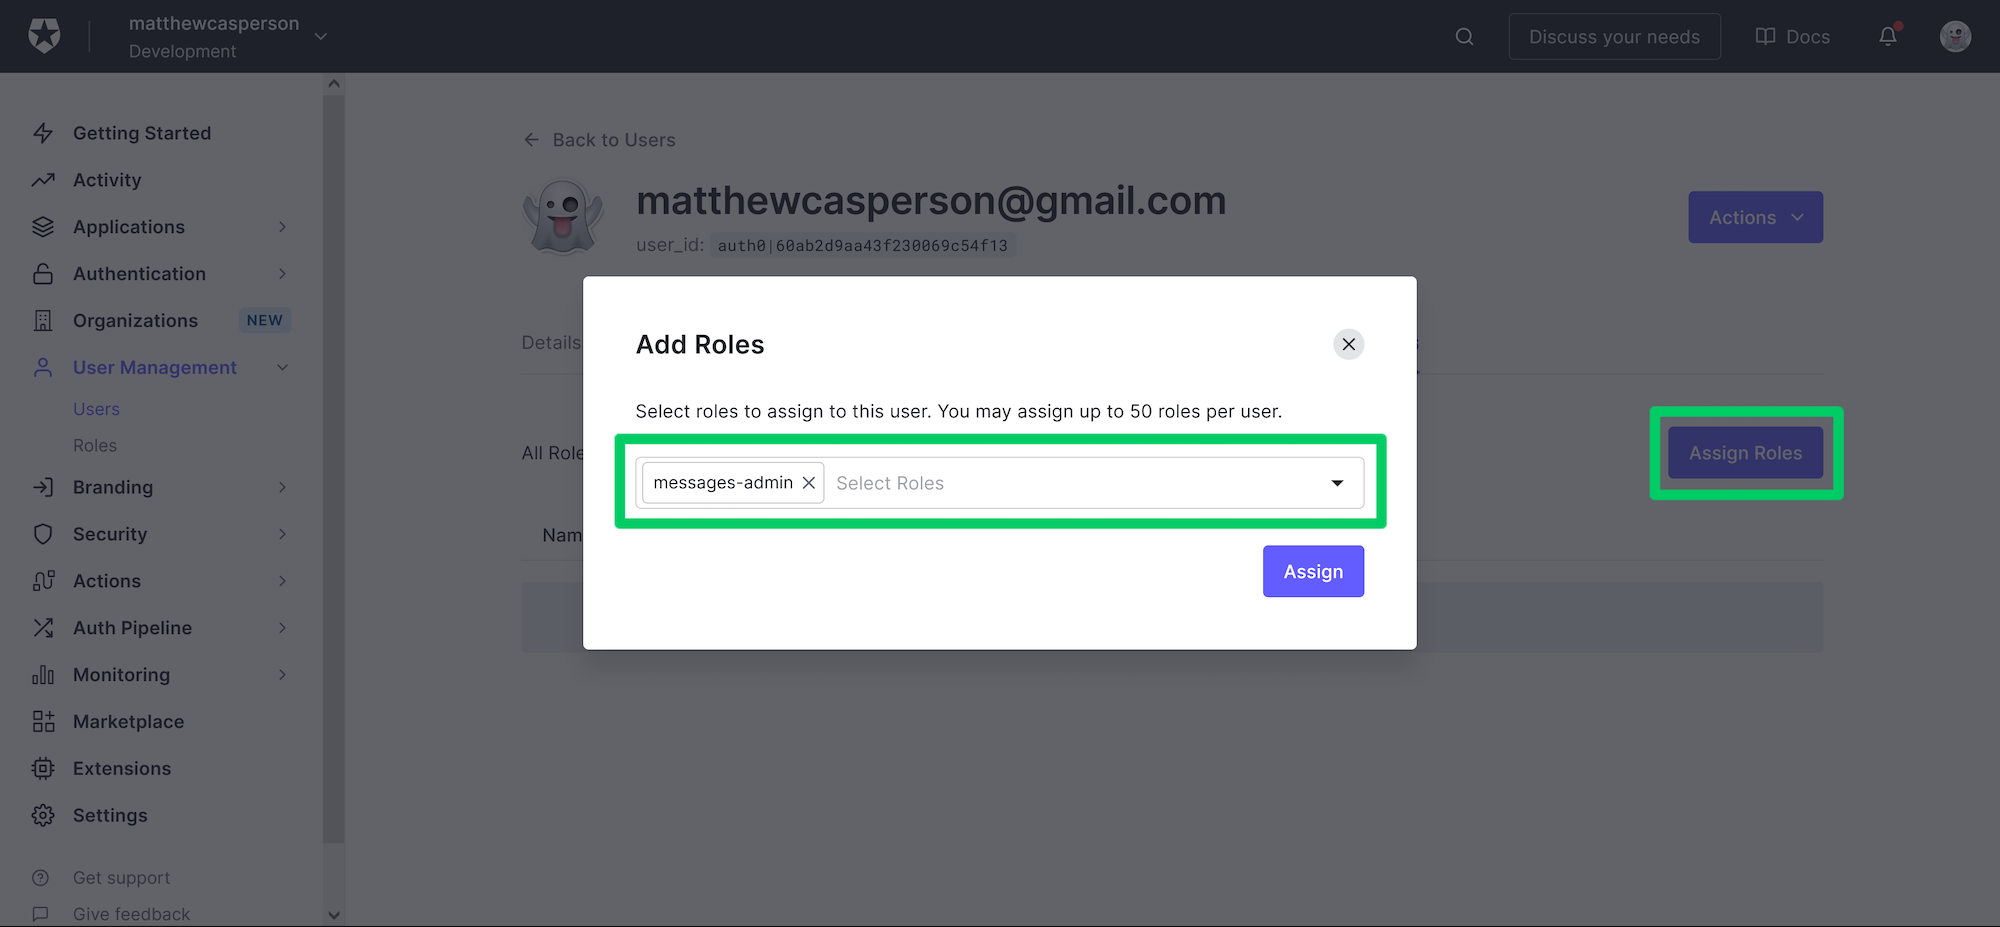 Assigning a role to a user.
Auth0 is now configured and ready to authenticate our frontend application. We can move on to updating our Ktor HTTP API to check for the presence of these permissions when accessing the admin endpoint.
 Want to take your Authorization to the next level? → fga.dev
The sample application code
To build the backend application, you'll need to have JDK 11 or above, which is available from many sources, including OpenJDK, AdoptOpenJDK, Azul, or Oracle.
The final code for the Ktor application can be found here. The code discussed in each post is matched by a branch:
- starter
- the base API with no authentication or authorization.
- add-authorization
- the API requiring a valid access token for the
protectedandadminendpoints.
- the API requiring a valid access token for the
- add-rbac
- the API requiring special permissions to access the
adminendpoint. This branch is discussed in this post.
- the API requiring special permissions to access the
The frontend application code can be found here.
Updating the API
The backend API must now be updated to ensure the admin endpoint requires the access token, including the read:admin-messages permission. The complete code for the src/Application.kt file is shown below:
package com.matthewcasperson

import com.auth0.jwk.JwkProviderBuilder
import io.ktor.application.*
import io.ktor.auth.*
import io.ktor.auth.jwt.*
import io.ktor.features.*
import io.ktor.http.*
import io.ktor.response.*
import io.ktor.routing.*
import java.util.concurrent.TimeUnit

fun main(args: Array<String>): Unit = io.ktor.server.netty.EngineMain.main(args)

fun validateCreds(credential: JWTCredential, permission: String? = null): JWTPrincipal? {
    val containsAudience = credential.payload.audience.contains(System.getenv("AUDIENCE"))
    val containsScope = permission.isNullOrBlank() ||
            credential.payload.claims["permissions"]?.asArray(String::class.java)?.contains(permission) == true

    if (containsAudience && containsScope) {
        return JWTPrincipal(credential.payload)
    }

    return null
}

fun Application.module() {

    val jwkProvider = JwkProviderBuilder(System.getenv("ISSUER"))
        .cached(10, 24, TimeUnit.HOURS)
        .rateLimited(10, 1, TimeUnit.MINUTES)
        .build()

    install(Authentication) {
        jwt("auth0") {
            verifier(jwkProvider, System.getenv("ISSUER"))
            validate { credential -> validateCreds(credential) }
        }
        jwt("auth0-admin") {
            verifier(jwkProvider, System.getenv("ISSUER"))
            validate { credential -> validateCreds(credential, "read:admin-messages") }
        }
    }
    install(CORS) {
        anyHost()
        method(HttpMethod.Options)
        method(HttpMethod.Get)
        header("authorization")
        allowCredentials = true
        allowNonSimpleContentTypes = true

    }


    routing {
        get("/api/messages/public") {
            call.respondText(
                """{"message": "The API doesn't require an access token to share this message."}""",
                contentType = ContentType.Application.Json
            )
        }
    }

    routing {
        authenticate("auth0") {
            get("/api/messages/protected") {
                call.respondText(
                    """{"message": "The API successfully validated your access token."}""",
                    contentType = ContentType.Application.Json
                )
            }
        }
    }

    routing {
        authenticate("auth0-admin") {
            get("/api/messages/admin") {
                call.respondText(
                    """{"message": "The API successfully recognized you as an admin."}""",
                    contentType = ContentType.Application.Json
                )
            }
        }
    }
}
Let's highlight the changes required from the code presented in the previous blog post.
We've updated the validateCreds function to include an optional permission parameter. If a permission has been supplied, we ensure it is present in the permissions claim on the access token:
fun validateCreds(credential: JWTCredential, permission: String? = null): JWTPrincipal? {
    val containsAudience = credential.payload.audience.contains(System.getenv("AUDIENCE"))
    val containsScope = permission.isNullOrBlank() ||
            credential.payload.claims["permissions"]?.asArray(String::class.java)?.contains(permission) == true

    if (containsAudience && containsScope) {
        return JWTPrincipal(credential.payload)
    }

    return null
}
We then define a second authentication mechanism called auth0-admin requiring the permission read:admin-messages in order to pass validation:
    install(Authentication) {
        // ...
        jwt("auth0-admin") {
            verifier(jwkProvider, System.getenv("ISSUER"))
            validate { credential -> validateCreds(credential, "read:admin-messages") }
        }
    }
Finally, the route exposing the admin endpoint is updated to use the new auth0-admin authentication mechanism:
    routing {
        authenticate("auth0-admin") {
            get("/api/messages/admin") {
                call.respondText(
                    """{"message": "The API successfully recognized you as an admin."}""",
                    contentType = ContentType.Application.Json
                )
            }
        }
    }
Inspecting the access token
By capturing the network traffic sent by the frontend (as we did in the previous post), we can copy the access token to jwt.io to inspect the JWT contents.
Note that the token includes the permissions claim, which defines the read:admin-messages permission:
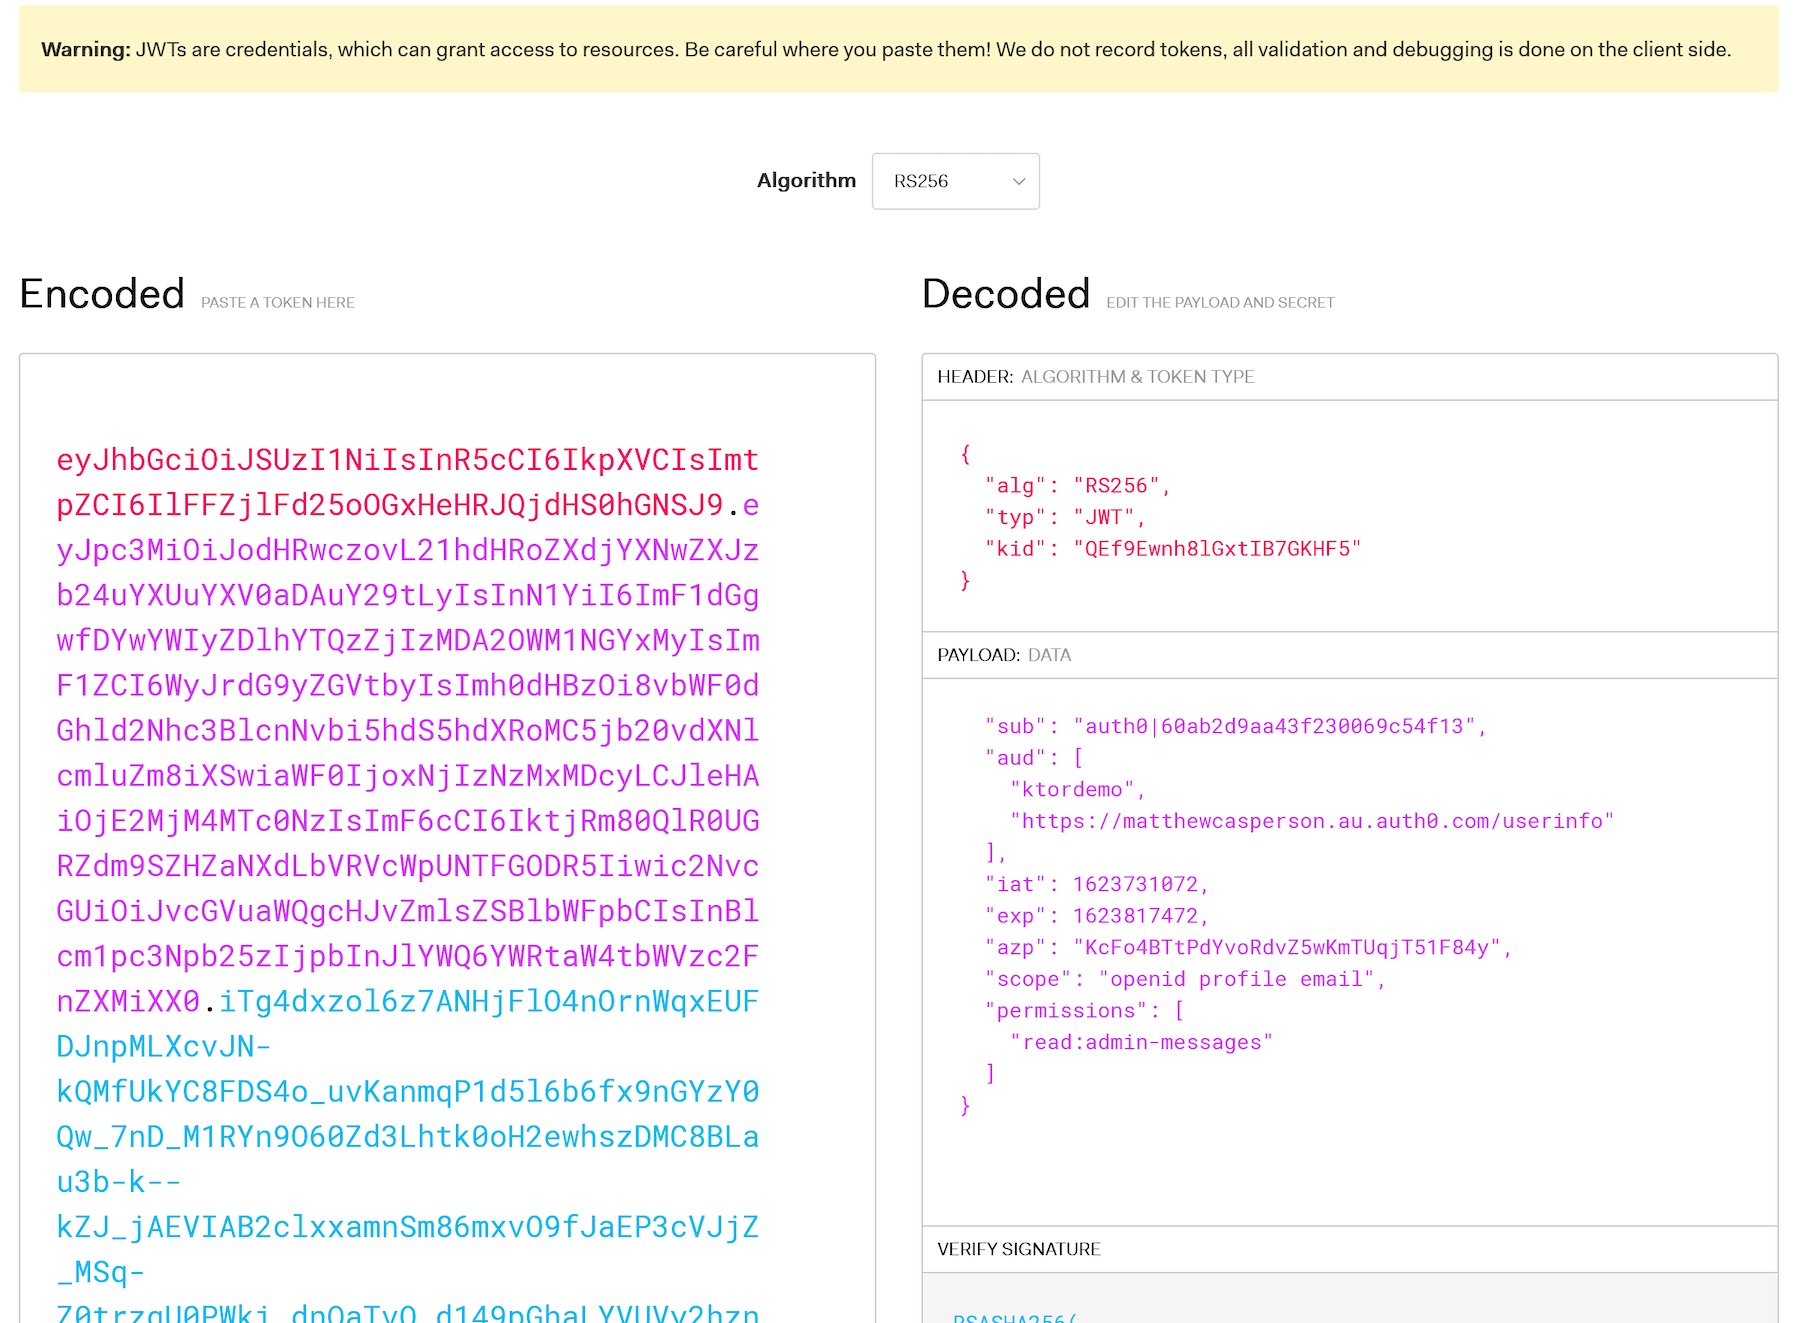 A parsed JWT token.
Conclusion
In this post, we completed our three-part journey creating an HTTP API with Ktor, requiring authentication via Auth0, and finally enabling RBAC. By embedding the permissions assigned to a user in the permissions scope and verifying the presence of a known permission for any queries to the admin endpoint, we can be sure that only authorized users can access the restricted endpoints in our HTTP API.
About the author

Matthew Casperson
Product Manager at Octopus Deploy