
Shiny Server is a great solution for BI/analytics reporting. It leverages all the power of the R language, which is the most popular open-source language for statistics, and it has a lot of useful functions for Data Mining, Machine Learning, Reporting, etc.
“Shiny Server is a great solution for BI/analytics reporting.”
Tweet This
The open-source version of Shiny Server features no Authentication, and if it's open on Internet, it leaves your data exposed. In that case, you likely won't want everyone on the Internet to be able to see your internal analytics, so you'll need to install and configure the authentication yourself.
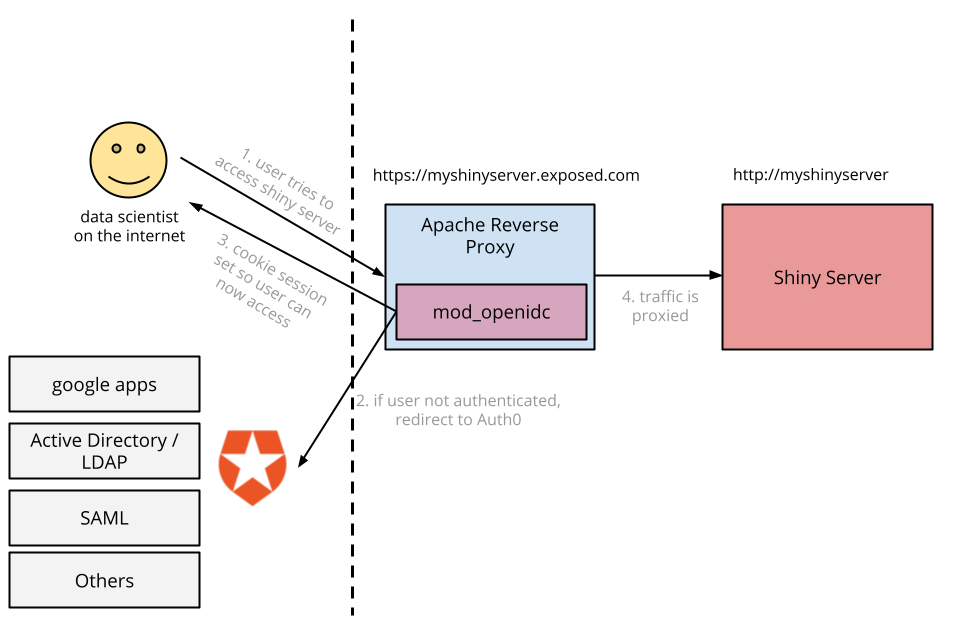
One of the easiest ways to add authentication to Shiny and, by extension, any unsecured web application, is to use Apache with Auth0 through the auth_openidc module.
This is also useful if you have a legacy web app with a username and password everyone shares or if you are hosting a server with static files you want to share.
So, let's get started with the steps.
Installing and Configuring Shiny
First, follow the instructions to install and configure Shiny Server.
When you have installed and configured Shiny and you're sure it works, modify your config file so it only serves to 127.0.0.1 (the local machine). This ensures that we don't accidentally expose the open server to the entire Internet.
[...]
server {
  listen 3838 127.0.0.1;
[...]
Installing Apache and the OpenID Connect Module
We will use Apache as a gateway to our app using Auth0's tutorial. This will enable Apache to serve as a gatekeeper—a reverse proxy that only serves after authentication.
If you don't already have apache2 installed, install it according to your platform and ensure that you have two modules: modproxy and modauth_openidc.
mod_proxy is pretty standard. It comes with most apache2 installs, but it is often disabled. To enable it, execute the following with root:
a2enmod proxy_http
modauthopenidc is provided in Debian as libapache2-mod-auth-openidc. Binary packages are available at the releases page, or you can always build it from source. When it is installed, enable it with this command:
a2enmod auth_openidc
Configure an Auth0 Account
If you don't already have an Auth0 Account, create one here and set up the type of connections you want to allow. The default settings allow anyone to sign up, but you can set up a better scheme. For example, if you use Google Apps, you can just connect that and allow only those from your domain to access the server. Alternatively, you can use rules to decide which users are allowed access.
You can browse the docs or ask for help setting up the best scheme for your scenario.
Configure Apache to Serve Shiny with Auth0
Make sure Shiny is running in the background while Apache tries to serve it. You can ensure that it's always on by running it as a Daemon.
You will need to follow the steps in the Apache tutorial. Note: when you are logged in to Auth0, the tutorial includes your own variables in the configuration to make it easier for you.
Create a configuration file for your website using the configuration from the tutorial as a starting point. Replace everything from OIDCProviderIssuer to Location with the code in the tutorial.
You will need to personalize your OIDCRedirectURI. I recommend using https://<yourapacheserver>/auth. Of course, replace <yourapacheserver> with the public address that will be used for your server.
You also need to generate or write some random string on
You should at least have a self-signed SSL certificate to test and a real one to deploy.
It should look something like this:
<VirtualHost *:443>
  ProxyPass / http://localhost:3838/
  ProxyPassReverse / http://localhost:3838/
  ProxyPreserveHost On

  OIDCProviderIssuer https://<your-tenant>.auth0.com
  OIDCProviderAuthorizationEndpoint https://<your-tenant>.auth0.com/authorize
  OIDCProviderTokenEndpoint https://<your-tenant>.auth0.com/oauth/token
  OIDCProviderTokenEndpointAuth client_secret_post
  OIDCProviderUserInfoEndpoint https://<your-tenant>.auth0.com/userinfo

  OIDCClientID <YourClientID>
  OIDCClientSecret <YourClientSecret>

  OIDCScope "openid profile"
  OIDCRedirectURI https://<your-website>/auth
  OIDCCryptoPassphrase <passwordToEncryptTheSessionInformationOnTheCookie>
  OIDCCookiePath /

  SSLEngine on
  SSLCertificateFile /path/to/server.crt
  SSLCertificateKeyFile /path/to/server.key

  <Location />
     AuthType openid-connect
     Require valid-user
     LogLevel debug
  </Location>

</VirtualHost>
You can save it somewhere like `/etc/apache/sites-available/001-shiny and then link it to make it active:
ln -s /etc/apache/sites-available/001-shiny /etc/apache/sites-enabled/001-shiny
As the tutorial states, Auth0's clientSecret is by default Base64 encoded, which isn't compatible with this Apache plugin out of the box. We're going to change that in the near future, but in the meantime, you need to call an API to make sure the clientSecret isn't Base64 encoded for your account.
Get an access token by clicking "Try Me!" on the docs page and execute the code shown in step 3 of the tutorial to change ACCESS_TOKEN to the access token you just received.
Boom.
Now you have a Shiny Server that is secured with Auth0, which you can use to serve reports only to employees of your organization using username and password authentication or one of the many identity providers supported.
This same configuration works well for other cases. For example, suppose you have an old legacy web application for which everyone uses the same password. That scenario is not very safe, is it? You can give it an additional security layer with the above approach without modifying your site.
Gotchas
Shiny uses websockets for a lot of things. While we haven't explored tunneling, it is theoretically possible with proxy_wstunnel. For most users, this will work fine because if the library fails with websockets, it will automatically fall back to XHR.
About the author

Pablo Seibelt
Head of Data (Auth0 Alumni)