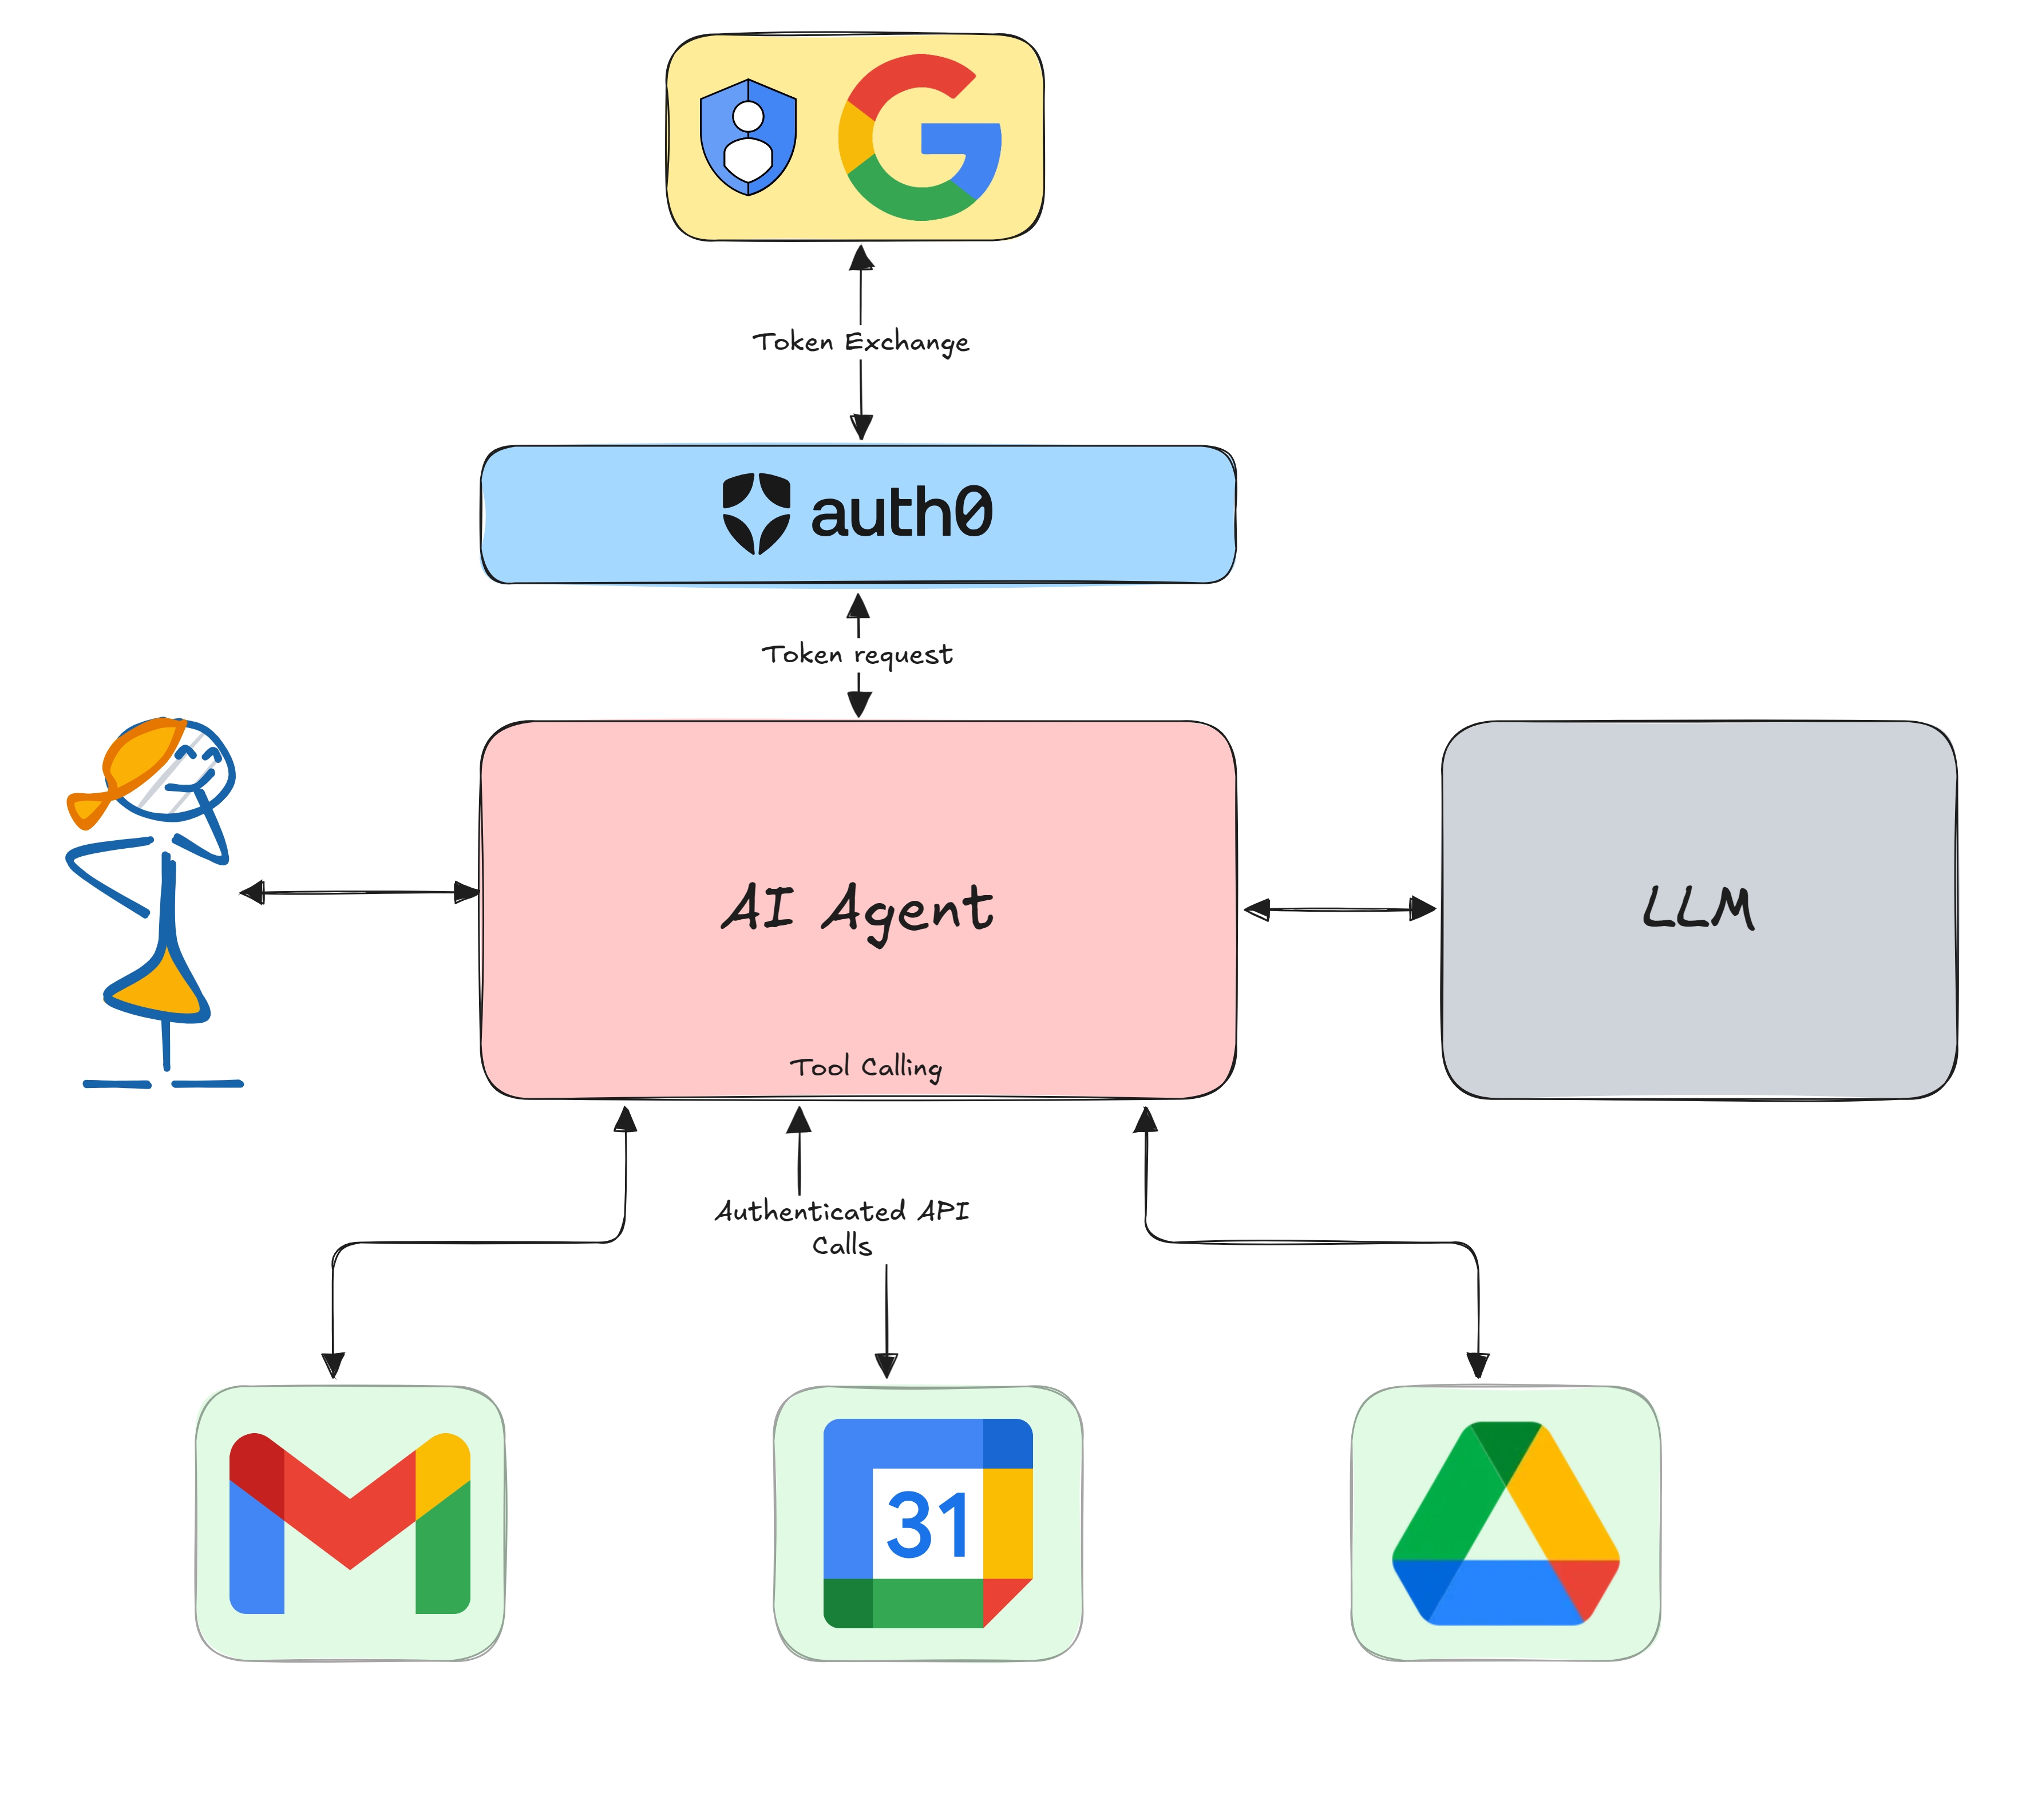
AI agents need to access multiple services securely. In the previous posts, we built an AI personal assistant that integrates with Gmail and Google Calendar using Auth0's Token Vault. In this post, we'll enhance the assistant by adding integrations with Slack and GitHub using Connected Accounts for Token Vault.
Recap
The previous posts in this series are:
- Tool Calling in AI Agents: Empowering Intelligent Automation Securely
- Build an AI Assistant with LangGraph, Vercel, and Next.js: Use Gmail as a Tool Securely
- Build an AI Assistant with LangGraph and Next.js: Use Your APIs and Google Calendar as Tools
In those posts, we learned how to:
- Build a tool-calling AI agent using LangGraph
- Implement step-up authorization with Auth0 Token Vault
- Integrate with Gmail and Google Calendar
What We Will Learn in This Post
Today, we will learn the following:
- Connected Accounts for Token Vault: Understand and use Auth0's Connected Accounts feature
- Slack Integration: Add tools to list channels and interact with Slack workspaces
- GitHub Integration: Add tools to list repositories and view GitHub activity
Prerequisites
You will need the following tools and services to build this application:
- Completion of the Build an AI Assistant with LangGraph and Next.js: Use Your APIs and Google Calendar as Tools post
- Bun v1.2+ or NodeJS v20
- An Auth0 for AI Agents account. Create one.
- A GitHub account for testing GitHub integration
- A Slack workspace where you have admin permissions
Getting Started
We will continue from where we left off in the previous post. Make sure you are on the correct branch:
git clone https://github.com/auth0-samples/auth0-assistant0.git
cd auth0-assistant0

git switch step-4
If you have not completed the previous posts, you can catch up by checking out the step-4 branch and following the prerequisites in our LangGraph quickstart guide.
Understanding Connected Accounts for Token Vault
Connected Accounts for Token Vault lets you access multiple third-party services through Token Vault using a single Auth0 profile. While standard user authentication handles user login through a social or enterprise identity provider, Connected Accounts links a user profile to external services like Google, GitHub, Slack, and more, facilitating federated access to external APIs on the user’s behalf.
What problem does Connected Accounts solve?
In the previous posts, our AI agent could access Google services (Gmail, Calendar) through a single Google OAuth connection. However, as we add more services like GitHub and Slack, we need a way to:
- Link multiple providers to the same user profile
- Manage separate access tokens for each service
- Allow users to connect/disconnect services independently
- Handle different OAuth scopes per service
This is where Connected Accounts come in.
Connected Accounts vs. Token Vault
Let's clarify the relationship:
- Token Vault: Securely stores and manages OAuth tokens for third-party services
- Connected Accounts: The user-facing feature that allows linking multiple OAuth providers to a single Auth0 profile for use with Token Vault
Together, this means:
- Users can link their GitHub, Slack, and Google accounts to one Auth0 profile.
- The AI agent can access all connected services through Token Vault.
- Tokens are refreshed automatically and stored securely.
- Users can manage connections through a dedicated profile page using the Connected Accounts API.
Set Up Connected Accounts in Auth0
Before we start coding, we need to configure Connected Accounts in your Auth0 tenant. If you have already followed the prerequisites from previous posts, you can skip to the next section. But make sure you have all the Connected Accounts scopes mentioned below enabled.
Enable Connected Accounts API in Auth0
- Navigate to your Auth0 Dashboard
- Go to Applications > APIs and locate the My Account API banner, and select Activate to activate the Auth0 My Account API.
- Once activated, select Auth0 My Account API and then select the Applications tab.
- Toggle your client application to authorize it to access the My Account API.
- In the dropdown menu next to the toggle, select the Connected Accounts scopes for the application. For this tutorial, select all available scopes.
- Click Update.
- Next, navigate to the Settings tab. Under Access Settings, select Allow Skipping User Consent.
- Next, navigate to Applications > Applications, select your application, and go to the Settings tab.
- Locate the Multi-Resource Refresh Token section, click Edit Configuration, then enable the MRRT toggle for the Auth0 My Account API.
Important: The scopes
read:me:connected_accountsanddelete:me:connected_accountsare required to fetch and manage connected accounts through the My Account API.
Create Profile Management UI
Let's fetch data for a profile page where users can view and manage their connected accounts.
Create the profile server action
Create src/lib/actions/profile.ts to interact with the Connected Accounts API:
// src/lib/actions/profile.ts
'use server';

import { auth0 } from '@/lib/auth0';

export interface ConnectedAccount {
 id: string;
 connection: string;
 access_type: string;
 scopes: string[];
 created_at: Date;
 expires_at: Date;
}

const CONNECTED_ACCOUNTS_AUDIENCE = `https://${process.env.AUTH0_DOMAIN}/me/`;
const CONNECTED_ACCOUNTS_BASE_URL = `https://${process.env.AUTH0_DOMAIN}/me/v1/connected-accounts/accounts`;

/**
* Get an access token for the connected accounts API
*/
async function getConnectedAccountsToken(scope: string): Promise<string | null> {
 try {
   const { token } = await auth0.getAccessToken({
     audience: CONNECTED_ACCOUNTS_AUDIENCE,
     scope,
   });

   return token;
 } catch (error) {
   console.error('Error retrieving access token:', error);
   return null;
 }
}

/**
* Create headers for API requests
*/
function createApiHeaders(token: string): HeadersInit {
 return {
   'Content-Type': 'application/json',
   Authorization: `Bearer ${token}`,
 };
}

export async function fetchConnectedAccounts(): Promise<ConnectedAccount[]> {
 try {
   const token = await getConnectedAccountsToken('read:me:connected_accounts');
   if (!token) {
     return [];
   }

   const response = await fetch(CONNECTED_ACCOUNTS_BASE_URL, {
     headers: createApiHeaders(token),
   });

   if (response.ok) {
     const data = await response.json();
     return data.accounts || [];
   } else {
     console.error('Failed to fetch connected accounts');
     return [];
   }
 } catch (error) {
   console.error('Error fetching connected accounts:', error);
   return [];
 }
}

export async function deleteConnectedAccount(
 connectedAccountId: string,
): Promise<{ success: boolean; error?: string }> {
 try {
   const token = await getConnectedAccountsToken('delete:me:connected_accounts');
   if (!token) {
     return { success: false, error: 'No token retrieved' };
   }

   const response = await fetch(`${CONNECTED_ACCOUNTS_BASE_URL}/${connectedAccountId}`, {
     method: 'DELETE',
     headers: createApiHeaders(token),
   });

   if (response.ok) {
     console.log('Connected account deleted successfully');
     return { success: true };
   } else {
     const errorText = await response.text();
     console.error('Failed to delete connected account:', errorText);
     return { success: false, error: errorText || 'Failed to delete connected account' };
   }
 } catch (error) {
   console.error('Error deleting connected account:', error);
   return { success: false, error: error instanceof Error ? error.message : 'Unknown error' };
 }
}
Create the profile content component
Create src/components/auth0/profile/profile-content.tsx. This component fetches connected accounts and renders the UI using the ConnectedAccountsCard and UserInfoCard components defined in the project.
// src/components/auth0/profile/profile-content.tsx
'use client';

import { useState, useEffect } from 'react';

import UserInfoCard from './user-info-card';
import ConnectedAccountsCard from './connected-accounts-card';
import { ConnectedAccount, fetchConnectedAccounts, deleteConnectedAccount } from '@/lib/actions/profile';

interface KeyValueMap {
 [key: string]: any;
}

export default function ProfileContent({ user }: { user: KeyValueMap }) {
 const [connectedAccounts, setConnectedAccounts] = useState<ConnectedAccount[]>([]);
 const [loading, setLoading] = useState(true);

 useEffect(() => {
   loadConnectedAccounts();
 }, []);

 const loadConnectedAccounts = async () => {
   try {
     const accounts = await fetchConnectedAccounts();
     setConnectedAccounts(accounts);
   } catch (error) {
     console.error('Error fetching linked accounts:', error);
   } finally {
     setLoading(false);
   }
 };

 const handleDeleteAccount = async (accountId: string): Promise<{ success: boolean; error?: string }> => {
   const result = await deleteConnectedAccount(accountId);
   if (result.success) {
     // Refresh the accounts list after successful deletion
     await loadConnectedAccounts();
   }
   return result;
 };

 return (
   <div className="grid grid-cols-2 lg:grid-cols-2 gap-6">
     <div className="lg:col-span-1">
       <UserInfoCard user={user} />
     </div>

     <div className="lg:col-span-1">
       <ConnectedAccountsCard
         connectedAccounts={connectedAccounts}
         loading={loading}
         onDeleteAccount={handleDeleteAccount}
       />
     </div>
   </div>
 );
}
Create a profile page with connected accounts
Create a new file src/app/profile/page.tsx to tie everything together:
// src/app/profile/page.tsx
import { Suspense } from 'react';
import { redirect } from 'next/navigation';
import { Loader2 } from 'lucide-react';

import { auth0 } from '@/lib/auth0';
import ProfileContent from '@/components/auth0/profile/profile-content';

export default async function ProfilePage() {
 const session = await auth0.getSession();

 if (!session || !session.user) {
   redirect('/auth/login');
 }

 return (
   <div className="min-h-full bg-white/5">
     <div className="max-w-4xl mx-auto p-6">
       <div className="mb-8">
         <h1 className="text-3xl font-bold text-white mb-2">Profile</h1>
         <p className="text-white/70">Manage your connected accounts</p>
       </div>

       <Suspense
         fallback={
           <div className="flex items-center justify-center min-h-[400px]">
             <Loader2 className="h-8 w-8 animate-spin text-white/60" />
           </div>
         }
       >
         <ProfileContent user={session.user} />
       </Suspense>
     </div>
   </div>
 );
}
Now start your development server and navigate to http://localhost:3000/profile to see the profile page!
bun all:dev # or npm run all:dev
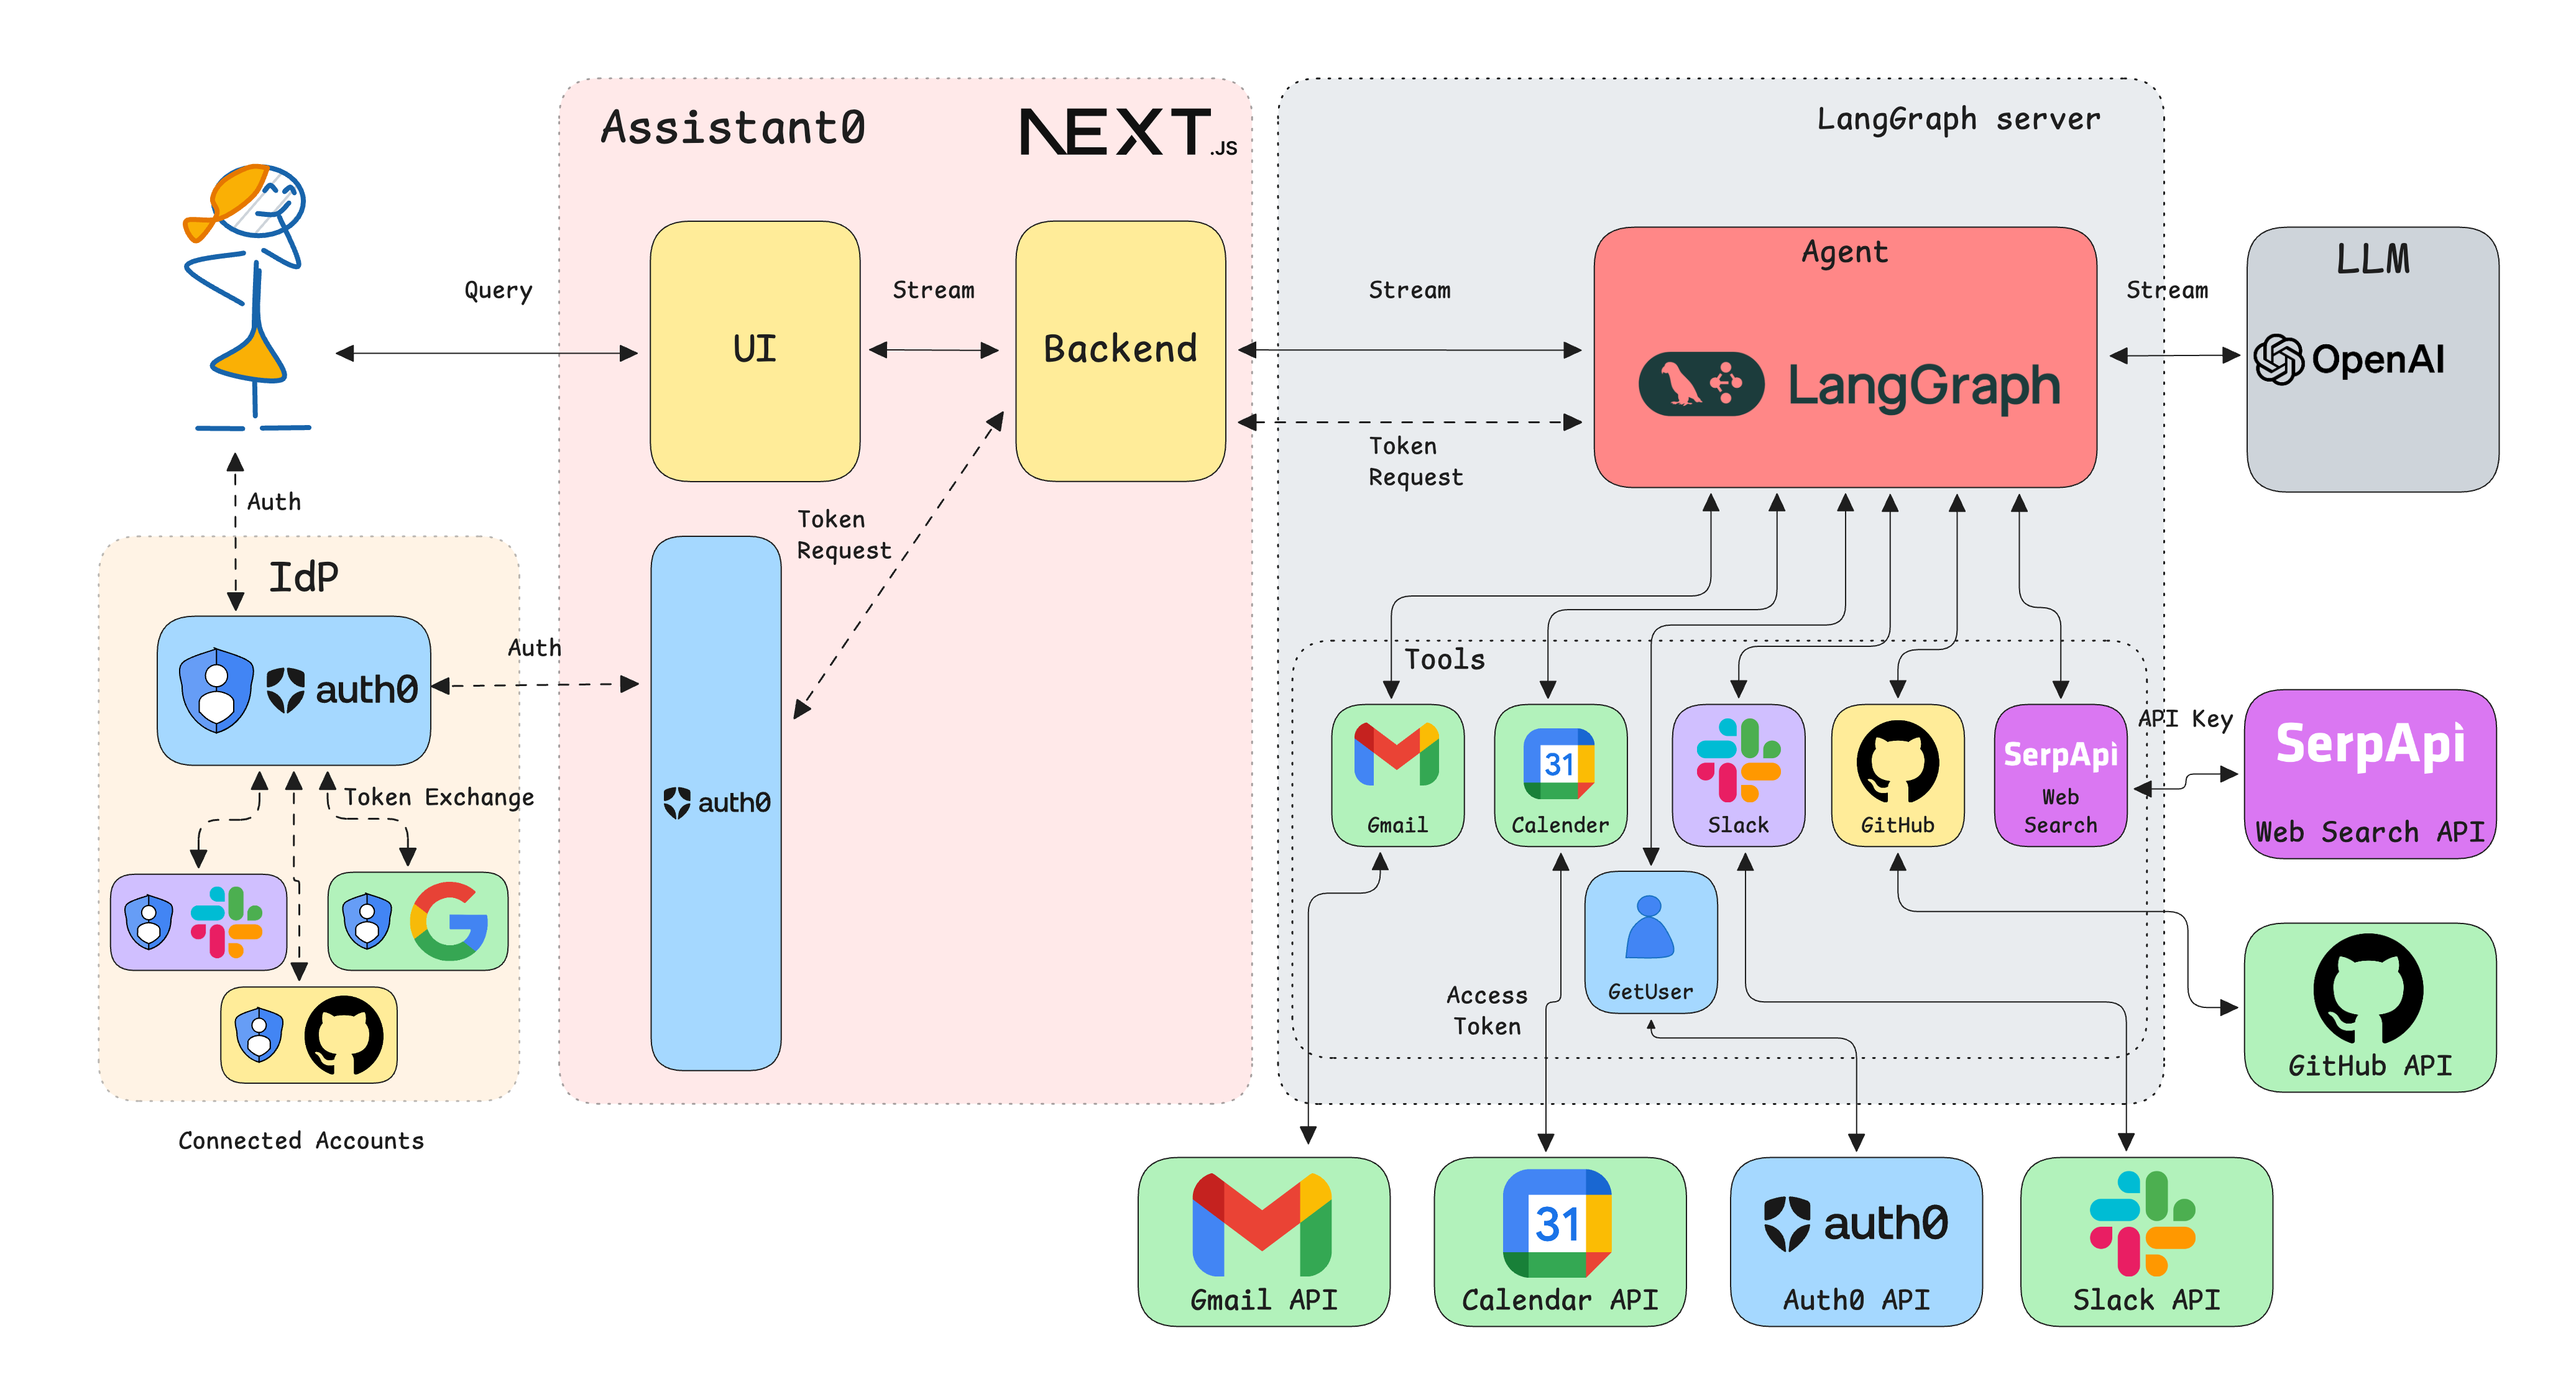
Here is the updated architecture of the application.
Checkpoint
At this point, you should be able to:
- Access the profile page at
/profile - See your user information
- View the connected accounts list (more accounts will show up as we add integrations)
Full git changelog for this step
Configure GitHub Integration in Auth0
Now let's add GitHub as a connected account so our AI agent can access repositories and activity.
First, follow the GitHub integration guide to configure GitHub as a connection in Auth0.
Note: GitHub doesn't use OAuth scopes in the same way as Google. The scopes you select when creating the GitHub OAuth App determine what the agent can access.
Create GitHub tools
Now let's add tools for interacting with GitHub.
Install the GitHub SDK:
bun add octokit # or npm install octokit
Create a GitHub repository tool in src/lib/tools/list-gh-repos.ts:
// src/lib/tools/list-gh-repos.ts
import { TokenVaultError } from '@auth0/ai/interrupts';
import { getAccessToken } from '../auth0-ai';
import { tool } from '@langchain/core/tools';
import { z } from 'zod';

export const listRepositoriesTool = tool(
 async () => {
   // Get the access token from Auth0 AI
   const accessToken = await getAccessToken();

   // GitHub SDK - dynamically import to avoid module resolution issues
   const { Octokit, RequestError } = await import('octokit');
   try {
     const octokit = new Octokit({
       auth: accessToken,
     });

     const { data } = await octokit.rest.repos.listForAuthenticatedUser({ visibility: 'all' });

     // Return simplified repository data to avoid overwhelming the LLM
     const simplifiedRepos = data.map((repo) => ({
       name: repo.name,
       full_name: repo.full_name,
       description: repo.description,
       private: repo.private,
       html_url: repo.html_url,
       language: repo.language,
       stargazers_count: repo.stargazers_count,
       forks_count: repo.forks_count,
       open_issues_count: repo.open_issues_count,
       updated_at: repo.updated_at,
       created_at: repo.created_at,
     }));

     return {
       total_repositories: simplifiedRepos.length,
       repositories: simplifiedRepos,
     };
   } catch (error) {
     console.log('Error', error);

     if (error instanceof RequestError) {
       if (error.status === 401) {
         throw new TokenVaultError(
           `Authorization required to access your GitHub repositories. Please connect your GitHub account.`,
         );
       }
     }

     throw error;
   }
 },
 {
   name: 'list_repositories',
   description: 'List data of all repositories for the current user on GitHub',
   schema: z.object({}),
 },
);
You can also find a tool to fetch GitHub events in src/lib/tools/list-gh-events.ts:
Register GitHub connection
Update src/lib/auth0-ai.ts to add the GitHub connection wrapper:
// src/lib/auth0-ai.ts
//... existing code

export const withGitHubConnection = withConnection(
 'github',
 // scopes are not supported for GitHub yet. Set required scopes when creating the accompanying GitHub app
 [],
);
Add GitHub tools to the agent
Update src/lib/agent.ts to include the GitHub tools:
// src/lib/agent.ts
import {
 // ... existing imports
 withGitHubConnection,
} from './auth0-ai';
import { listRepositoriesTool } from './tools/list-gh-repos';
import { listGitHubEventsTool } from './tools/list-gh-events';

// ... existing code

const tools = [
 // ... existing tools
 withGitHubConnection(listRepositoriesTool),
 withGitHubConnection(listGitHubEventsTool),
];
Checkpoint
At this point, you should be able to:
- Ask the agent about your GitHub repositories
- See step-up authorization prompt for GitHub
- Grant GitHub permissions through the pop-up
- View your repositories and recent GitHub activity
- See your GitHub connection in the profile page
Try asking: "List my GitHub repositories" or "What have I been working on recently on GitHub?"
Configure Slack Integration in Auth0
Now let's add Slack integration to allow the AI agent to list channels in your workspace.
First, follow the Slack integration guide to configure Slack as a connection in Auth0.
Install Slack SDK:
bun add @slack/web-api # or npm install @slack/web-api
Create Slack channels tool
Create src/lib/tools/list-slack-channels.ts:
// src/lib/tools/list-slack-channels.ts
import { ErrorCode, WebClient } from '@slack/web-api';
import { TokenVaultError } from '@auth0/ai/interrupts';
import { tool } from '@langchain/core/tools';
import { z } from 'zod';
import { getAccessToken } from '../auth0-ai';

export const listSlackChannelsTool = tool(
 async () => {
   // Get the access token from Auth0 AI
   const accessToken = await getAccessToken();

   // Slack SDK
   try {
     const web = new WebClient(accessToken);

     const result = await web.conversations.list({
       exclude_archived: true,
       types: 'public_channel,private_channel',
       limit: 10,
     });

     const channelNames = result.channels?.map((channel) => channel.name) || [];

     return {
       total_channels: channelNames.length,
       channels: channelNames,
     };
   } catch (error) {
     if (error && typeof error === 'object' && 'code' in error) {
       if (error.code === ErrorCode.HTTPError) {
         throw new TokenVaultError(`Authorization required to access the Federated Connection`);
       }
     }

     throw error;
   }
 },
 {
   name: 'list_slack_channels',
   description: 'List channels for the current user on Slack',
   schema: z.object({}),
 },
);
Register Slack connection
Update src/lib/auth0-ai.ts:
// src/lib/auth0-ai.ts
// ... existing code

export const withSlack = withConnection('sign-in-with-slack', ['channels:read', 'groups:read']);
Add Slack tool to agent
Update src/lib/agent.ts to include the Slack tool.
// src/lib/agent.ts
import {
 // ... existing imports
 withSlack,
} from './auth0-ai';
import { listSlackChannelsTool } from './tools/list-slack-channels';

// ... existing code

const tools = [
 // ... existing tools
 withSlack(listSlackChannelsTool),
];
Checkpoint
At this point, you should be able to:
- Ask the agent about your Slack channels
- See step-up authorization prompt for Slack
- Grant Slack permissions
- View your workspace channels
- See your Slack connection in the profile page
Try asking: "What are my Slack channels?" or "List my Slack workspace channels"
Full git changelog for this step
What You Have Accomplished
Outstanding work! You have successfully built a comprehensive AI assistant with multi-service integration:
- Implemented Connected Accounts management UI
- Integrated GitHub for repository and activity access
- Integrated Slack for workspace channel listing
- Built a profile page for managing connections
- Implemented secure token management with Token Vault
- Handled step-up authorization across multiple providers
- Created a scalable pattern for adding more services
Extending further
You can now easily add more integrations from the supported integrations. For example:
- Google Drive: Document management and search
- Discord: Community engagement and messaging
- Stripe: Payment and subscription management
The pattern is always the same:
- Configure the OAuth provider in Auth0
- Create a tool that uses Token Vault for access tokens
- Define a connection using
withConnection()for the service - Wrap the tool with the connection
- Add to the agent's tool list
Learn More
This tutorial is the fourth in a series on building AI agents with Auth0 for AI Agents.
Auth0 AI Resources:
We're working on more content and sample apps for Auth0 for AI Agents, so stay tuned! If you have any questions or feedback, feel free to reach out in the comments.
Sign up for the Auth0 for AI Agents.
About the author

Deepu K Sasidharan
Principal Developer Advocate