
In this tutorial series, we'll learn how to build a small app with some big concepts. We'll cover reactive programming with Reactive Extensions (Rx*), JS framework component interaction in Angular, and speech recognition with the Web Speech API. The completed Madlibs app code can be found at this GitHub repo.
In this part, we will cover the following:
- Introduction to reactive programming with Rx* and observables
- Setting up our Angular app
Let's get started!
What We'll Learn About
The concepts and tools we'll use and learn about include:
- Component communication in Angular JavaScript framework
- Managing streams with RxJS ReactiveX for JavaScript (packaged with Angular)
- Annyang library for Web API Speech Recognition
- Accessing a prebuilt Node API to generate random words
Let's begin with some core concepts to facilitate the use of these tools.
Reactive Programming with RxJS and Observables
Angular brought the ReactiveX RxJS library to the forefront for JavaScript Single Page Application (SPA) developers. RxJS is packaged with Angular, and while it was unfamiliar to many at first, the concept of reactive programming with observables in JS has gained traction and popularity with increased Angular adoption.
Observables Are Streams
Observables are a vital part of RxJS and now Angular. When learning about observables, the first concept to reconcile is that observables are streams. What does this mean?
Consider an array. An array is a collection of values. With a normal array, you theoretically have the collection of all values available to you from the beginning. Of course, we know this isn't always the case: in fact, it's common practice to push additional values to an array in response to events, or to create new arrays from other arrays with methods like map, filter, and reduce. Traditionally, if we do this with a normal array, we need to use callbacks in order to tell our scripting code that the array has a new value.
On the other hand, an observable "stream" represents a collection over time. A stream may (or may not) have an initial value, and over time, more values are added to it. We can subscribe to the observable stream to be notified whenever a new value has been added. This is an ideal way to react to collections over time.
“An observable is a stream that represents a collection over time.”
Tweet This
For example, say we have a shopping cart. Every time a user successfully adds an item to their cart, we then want to run some code. (This code might display a toast with the name of the item, update a count of all items in the cart, update the cart subtotal, etc.) We could do this with a state container such as Redux or @ngrx/store, or we could simply use an observable and subscribe to it to react each time a new value is added.
We'll implement several observables in the app that we'll build in this tutorial. To see additional examples right now, look over the Observables section of the Glossary of Modern JavaScript Concepts. You should also check out Rob Wormald's "Everything is a Stream" slides and presentation.
Reactive Programming and RxJS
ReactiveX, or Rx*, is an API for asynchronous programming with observable streams. The JavaScript implementation is RxJS, which is available on GitHub. As mentioned, Angular comes packaged with RxJS, so it's to our great advantage to make use of it wherever it might help.
Reactive programming, in a nutshell, is based on propagating and responding to incoming events over time in a declarative manner. Observables, which are streams of collections over time, are ideal for this.
“Reactive programming is based on propagating and responding to incoming events over time, declaratively.”
Tweet This
You can read more about reactive programming here.
Web Speech API
The Web Speech API is an in-draft feature that enables the incorporation of voice data into web apps. It's still an experimental technology at the time of writing, however, so cross-browser support is limited.
For our app, we're specifically interested in the speech recognition interface of the Web Speech API. This technology allows the browser to start listening via the user's microphone, assess speech using language and grammar dictionaries, and then execute functionality (as defined by the developer) in response.
At the time of writing, this is only supported in Chrome, so we will build our app with progressive enhancement in mind.
We will use the lightweight Annyang JS library to work with speech recognition more easily in our application.
What We'll Build
We're going to build an ad libitum web app inspired by Mad Libs games! Our own Madlibs app will have the following features:
- The app requires 5 nouns, 5 verbs, and 5 adjectives to generate a short, silly story.
- Words can be generated automatically through a provided Node madlibs-api.
- Words can be typed in manually by the user.
- If the user's browser supports it, words can be entered through speech recognition using the computer's microphone.
- The app will then automatically fetch supplemental pronouns and use the user's words to generate and then display the story.
In Chrome, our app will look like this when it's finished:
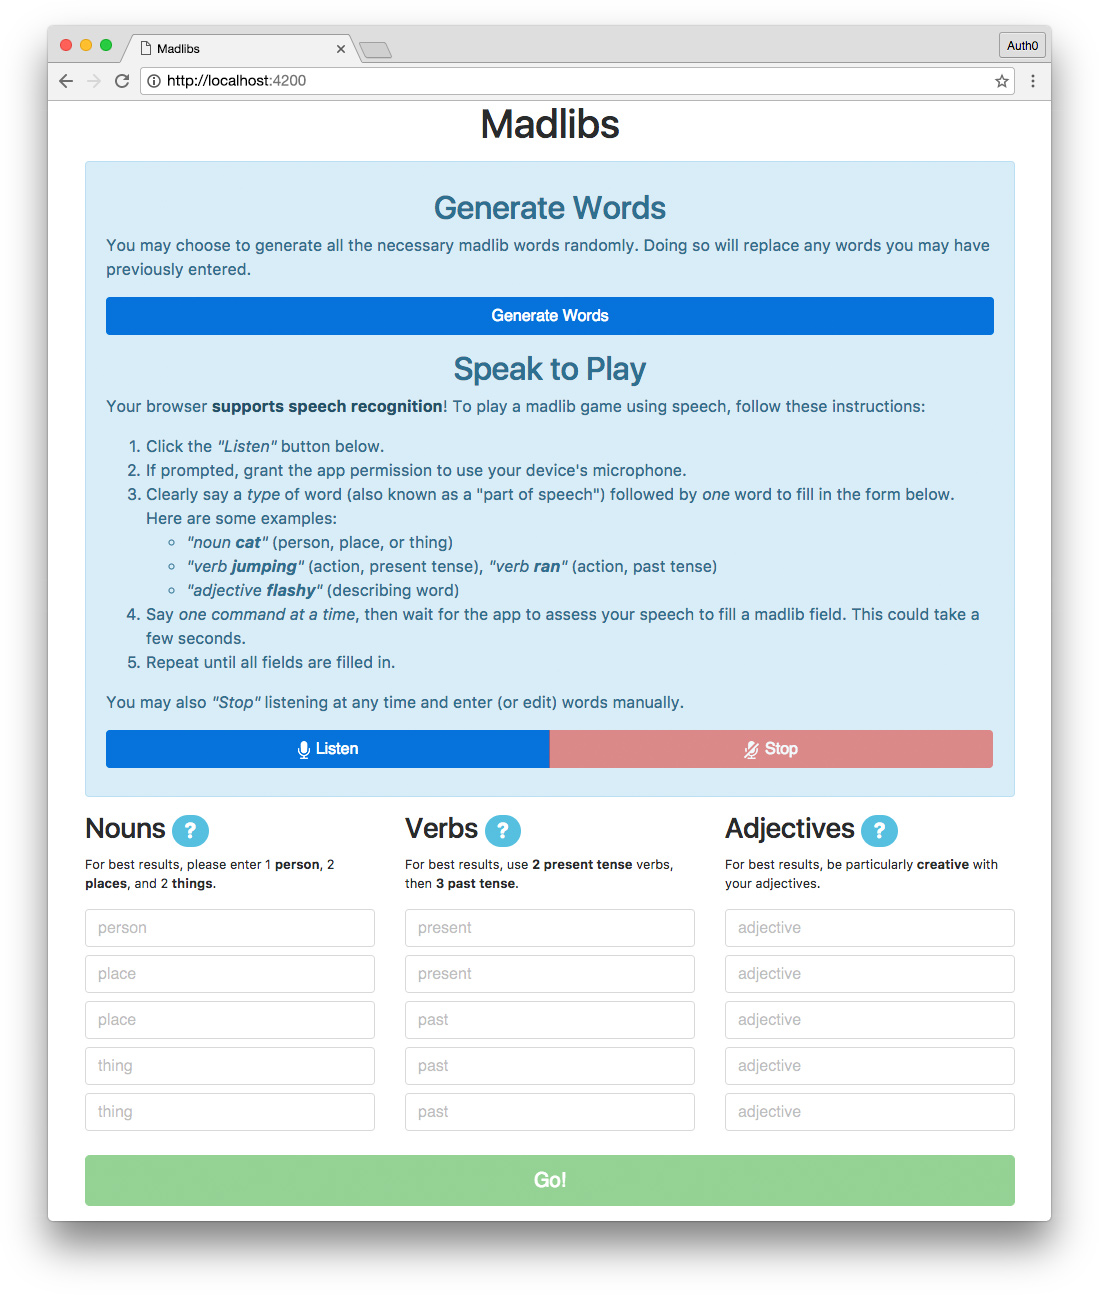
Note: In other browsers that don't support speech recognition, the "Speak to Play" feature will not be displayed. Users will still be able to generate words using the API or type them manually.
Though our Madlibs app is relatively small, it has a lot of features and robust functionality, so we'll build it over a short series of two tutorial articles.
Note: This tutorial moves quickly over the core Angular concepts. It's recommended that you have some experience with Angular before tackling the Madlibs app. You can check out the Angular Tour of Heroes tutorial or my Real-World Angular Series to learn about Angular in-depth before beginning this tutorial.
Let's get started!
Dependencies and Setup
The first thing we need to do is install dependencies. You'll need:
- Node.js with npm
- Angular CLI
- follow the README instructions to install the CLI globally
You should also clone the madlibs-api to your local machine. Once installed, you can start the API server by running the following command from the project's root folder:
$ node server
The API will then be accessible in the browser at http://localhost:8084/api with the endpoints specified in the madlibs-api README.
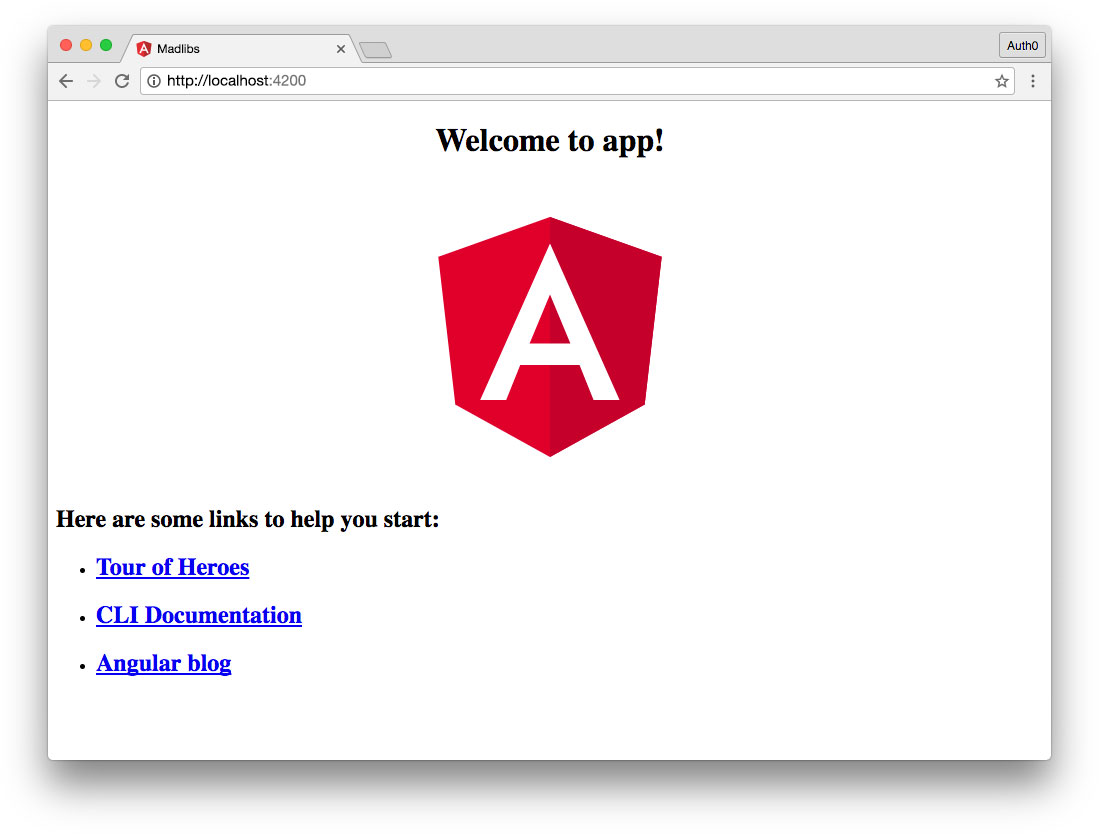
Create a New Angular Project
We'll use the Angular CLI to generate a new Angular project. In a folder of your choosing, run the following command:
$ ng new madlibs --style=scss
A new Angular project called madlibs will be generated with SCSS support. To start the app's server, navigate into the new project folder and run the serve command like so:
$ cd madlibs
$ ng serve
The app will run at http://localhost:4200 and should look something like this in the browser:
Add Bootstrap and Annyang From CDN
We'll add Bootstrap for CSS styling and Annyang for speech recognition using CDNs.
Note: This tutorial uses an alpha version of Bootstrap v4, latest available at the time of writing. If a newer v4 release is available at the time of reading, please feel free to upgrade and make changes as necessary to the CSS in your app.
Open your app's index.html file and add the following CDN links to the document <head>:
<!-- src/index.html -->
<!doctype html>
<html lang="en">
<head>
  ...
  <!-- Bootstrap v4 -->
  <link rel="stylesheet" href="https://maxcdn.bootstrapcdn.com/bootstrap/4.0.0-alpha.6/css/bootstrap.min.css" integrity="sha384-rwoIResjU2yc3z8GV/NPeZWAv56rSmLldC3R/AZzGRnGxQQKnKkoFVhFQhNUwEyJ" crossorigin="anonymous">
  <!-- annyang speech recognition -->
  <script src="//cdnjs.cloudflare.com/ajax/libs/annyang/2.6.0/annyang.min.js"></script>
  ...
We now have access to Bootstrap's styles and Annyang's Web Speech API helpers in our application. We're ready to start development!
About the author

Kim Maida
Group Manager, Developer Content