
In this tutorial series, we'll learn how to build a small app with some big concepts. We'll cover reactive programming with Reactive Extensions (Rx*), JS framework component interaction in Angular, and speech recognition with the Web Speech API. The completed Madlibs app code can be found at this GitHub repo.
In thais part, we will cover the following:
- Integrating the Annyang library for speech recognition support
- Implementing a form component allowing users to speak or type words to use in the madlib story
Let's get started!
Web Speech Service
The first thing we'll do is create a service in our Angular app that we can use to interact with the Web Speech API via the Annyang library. Once we have a service that interfaces with speech recognition, we can build a component that listens to the user's voice and stores the words they speak for use in the app.
Generate a Service
Create a new service using the Angular CLI from the root of the madlibs project:
$ ng g service speech
We can use ng g as a shortcut for ng generate.
Note: For brevity, this tutorial will not cover testing. The CLI automatically generates
.spec.tsfiles for testing. You can add your own tests, or choose not to generate these files by adding the--no-specflag tong gcommands. To learn more about testing in Angular, check out the following articles on testing components and testing services.
Provide Speech Service in App Module
The service will be generated but you'll see a warning in the command line stating that it must be provided to be used. Let's do that now.
Open the app.module.ts file:
// src/app/app.module.ts
...
import { SpeechService } from './speech.service';

@NgModule({
  ...
  providers: [
    SpeechService
  ],
  ...
We'll import our SpeechService and then add it to the providers array in the @NgModule declaration. This provides the Speech service to any component in our app.
Speech Service Functionality
Before we start coding, let's plan what we want our Speech service to do. The speech recognition feature in our app should work like this:
- After granting microphone access in the browser, the user can click a button that will allow the app to start listening to what they will say.
- The user says what part of speech they want to enter followed by a word, such as:
"verb running","noun cat","adjective red", etc. - The words are filled into editable form fields so the user can modify them if desired.
- If speech recognition did not understand what the user said, the user should be shown a message asking them to try again.
- The user can click a button to tell the browser to stop listening.
On the technical side, our Speech service needs to do the following:
- Interface Angular with the Annyang library.
- Check whether Web Speech is supported in the user's browser.
- Initialize Annyang and set up the different speech commands we'll be listening for (e.g.,
verb [word], etc.). - Create and update a stream of the words as Web Speech recognizes the user's spoken commands.
- Handle errors with another stream, including if the user does not grant microphone permissions or if the Web Speech API does not recognize what the user said.
- Functions to start and stop listening with the user's microphone.
Speech Service Class
Now let's write the code. Open the speech.service.ts file. We'll go through this code in more detail below:
// src/app/speech.service.ts
import { Injectable, NgZone } from '@angular/core';
import { Subject } from 'rxjs/Subject';

// TypeScript declaration for annyang
declare var annyang: any;

@Injectable()
export class SpeechService {
  words$ = new Subject<{[key: string]: string}>();
  errors$ = new Subject<{[key: string]: any}>();
  listening = false;

  constructor(private zone: NgZone) {}

  get speechSupported(): boolean {
    return !!annyang;
  }

  init() {
    const commands = {
      'noun :noun': (noun) => {
        this.zone.run(() => {
          this.words$.next({type: 'noun', 'word': noun});
        });
      },
      'verb :verb': (verb) => {
        this.zone.run(() => {
          this.words$.next({type: 'verb', 'word': verb});
        });
      },
      'adjective :adj': (adj) => {
        this.zone.run(() => {
          this.words$.next({type: 'adj', 'word': adj});
        });
      }
    };
    annyang.addCommands(commands);

    // Log anything the user says and what speech recognition thinks it might be
    // annyang.addCallback('result', (userSaid) => {
    //   console.log('User may have said:', userSaid);
    // });
    annyang.addCallback('errorNetwork', (err) => {
      this._handleError('network', 'A network error occurred.', err);
    });
    annyang.addCallback('errorPermissionBlocked', (err) => {
      this._handleError('blocked', 'Browser blocked microphone permissions.', err);
    });
    annyang.addCallback('errorPermissionDenied', (err) => {
      this._handleError('denied', 'User denied microphone permissions.', err);
    });
    annyang.addCallback('resultNoMatch', (userSaid) => {
      this._handleError(
        'no match',
        'Spoken command not recognized. Say "noun [word]", "verb [word]", OR "adjective [word]".',
        { results: userSaid });
    });
  }

  private _handleError(error, msg, errObj) {
    this.zone.run(() => {
      this.errors$.next({
        error: error,
        message: msg,
        obj: errObj
      });
    });
  }

  startListening() {
    annyang.start();
    this.listening = true;
  }

  abort() {
    annyang.abort();
    this.listening = false;
  }

}
We'll start by importing a couple of additional modules: NgZone and Subject from RxJS. We'll talk about both of these in more detail shortly.
We'll declare the annyang variable with a type of any. This will prevent TypeScript errors.
In our SpeechService class, the first thing we'll need to do is create streams for our words$ collection and our errors$ collection.
Note: Using a
$at the end of a variable is popular notation to indicate an observable.
  words$ = new Subject<{[key: string]: string}>();
  errors$ = new Subject<{[key: string]: any}>();
To do this, we'll use subjects. Rx Subjects act as both observer and observable. This means that subjects can be subscribed to (observable). Subjects also have next(), error(), and complete() methods (observer), allowing them to emit values that all subscribers will receive. We'll create words$ and errors$ subjects that can push values in our Speech service and be subscribed to elsewhere in our app.
Each new Subject<T>() needs a type annotation, so we'll declare words$ as a stream of objects with string keys and string values. The errors$ stream will contain objects with string keys and values of any type.
We'll create a listening property to track whether or not the microphone is actively listening for the user's speech input and set it to false by default. The constructor() function accepts a private zone argument typed NgZone. We'll use and explain this in more detail soon.
We can then create a speechSupported accessor function (getter) that will tell us whether the Web Speech API is supported in the user's browser. Annyang enables us to do this simply by checking for its existence.
Next we'll create an init() method to add commands and callbacks with Annyang. The first part of this method looks like this:
  init() {
    const commands = {
      'noun :noun': (noun) => {
        this.zone.run(() => {
          this.words$.next({type: 'noun', 'word': noun});
        });
      },
      'verb :verb': (verb) => {
        this.zone.run(() => {
          this.words$.next({type: 'verb', 'word': verb});
        });
      },
      'adjective :adj': (adj) => {
        this.zone.run(() => {
          this.words$.next({type: 'adj', 'word': adj});
        });
      }
    };
    annyang.addCommands(commands);
    ...
These are the voice commands that we'll listen for. When we want to set up speech recognition in a component, we can call the Speech service's init() method, which in turn calls Annyang's addCommands() method to establish what we're listening for. You can read more about Annyang's API documentation here.
To create commands, we'll build a commands object of string keys with functions that are executed when the command is recognized. Let's break down the first of these (noun :noun) in more detail.
We'll listen for the user to say the word "noun", followed by a named variable (e.g., :noun), which represents a one word argument. A good example of a match might be "noun cat".
Note: We aren't specifically verifying that the spoken
:nounis truly a noun. That is beyond the scope of our app and would require dictionary lookups. However, I encourage you to investigate expanding the Madlibs app's functionality on your own with dictionary APIs such as Oxford, Merriam-Webster, Words API, and more.
Angular Zones
When this command is recognized, we'll use an Angular zone method called run() to execute a function that emits an object value from the words$ observable. What does this mean and why do we need to do this?
Angular uses zones to tell the framework when something happens that is outside its zone. We can also use zones to deliberately run code outside the Angular framework. This can be done to improve performance when asynchronous tasks should be run and don't require UI updates or error handling in Angular. You can read more about how NgZone works in its documentation.
In our case, the Annyang library and Web Speech API naturally execute functions outside the Angular zone. However, we need to make sure Angular knows about the outcomes of these functions. To do so, we can reenter the Angular zone and synchronously execute these functions and return their values by using NgZone's run() method.
Inside the function that will run in the Angular zone, we'll use the RxJS observer next() method to feed a new object to the words$ subject that contains the part of speech (type) and the word that was spoken. This value will be multicasted to observers listening to our subject.
Finally, we'll use Annyang's addCommands() method to pass our commands argument to speech recognition.
Annyang Callbacks
The last thing we'll do in our init() method is register some callback functions.
Note: You can check out the different callbacks that Annyang supports in the documentation.
  init() {
    ...
    // Log anything the user says and what speech recognition thinks it might be
    // annyang.addCallback('result', (userSaid) => {
    //   console.log('User may have said:', userSaid);
    // });
    annyang.addCallback('errorNetwork', (err) => {
      this._handleError('network', 'A network error occurred.', err);
    });
    annyang.addCallback('errorPermissionBlocked', (err) => {
      this._handleError('blocked', 'Browser blocked microphone permissions.', err);
    });
    annyang.addCallback('errorPermissionDenied', (err) => {
      this._handleError('denied', 'User denied microphone permissions.', err);
    });
    annyang.addCallback('resultNoMatch', (userSaid) => {
      this._handleError(
        'no match',
        'Spoken command not recognized. Say "noun [word]", "verb [word]", OR "adjective [word]".',
        { results: userSaid });
    });
  }

  private _handleError(error, msg, errObj) {
    this.zone.run(() => {
      this.errors$.next({
        error: error,
        message: msg,
        obj: errObj
      });
    });
  }
The first block is commented out. If uncommented, this code adds a callback that logs all the possibilities for what speech recognition thinks the user may have said. While not practical for our app's final presentation, it's a fun way to experiment with the Web Speech API during development. Uncomment this block to see what the browser interprets, and comment it back out (or delete it) later.
Each callback passes data to a _handleError() method that pushes an object to the errors$ subject we created earlier. Like the words$ subject above, this is done inside an NgZone run() method to ensure it executes in the Angular zone. The _handleError() method accepts the name of the error, a message string to display to the user, and the error object for logging.
  startListening() {
    annyang.start();
    this.listening = true;
  }

  abort() {
    annyang.abort();
    this.listening = false;
  }
Finally, we'll add startListening() and abort() methods to start and stop listening with the microphone. These will be executed by buttons that the user clicks in the UI.
That's it for our Speech service!
Listen Component
Now we need to build a component that uses the Speech service to listen to the user's spoken input.
First let's add a couple of image assets. Create a new folder called images inside your src/assets folder. Then right-click and download these two images:
Save them to your src/assets/images directory.
Now use the following Angular CLI command to generate a new component:
$ ng g component listen
This creates and declares the component for us. The first iteration of our Listen Component will simply use the Speech service to listen to user input and subscribe to the subjects we created to log some information. This component will get more complex as we build out our app (interfacing with form inputs, supporting API word generation, etc.), but this is a good place to start.
Add Listen Component to App Component
The first thing we'll need to do now is display our component somewhere so we can view it in the browser.
Open your app.component.ts file and add:
// src/app/app.component.ts
...
import { SpeechService } from './speech.service';
...
export class AppComponent {
  constructor(public speech: SpeechService) {}
}
Before we add the Listen component, we'll import the SpeechService and make it publicly available via the App component's constructor() function. This way, we can use methods and properties from the Speech service in our App component. We'll use the speechSupported accessor to conditionally show the Listen component only if the user's browser supports Web Speech.
Open up your app.component.html template and replace the sample markup with the following:
<!-- src/app/app.component.html -->
<div class="container">
  <h1 class="text-center">Madlibs</h1>
  <app-listen *ngIf="speech.speechSupported"></app-listen>
</div>
We'll do most of our development in Google Chrome since it supports Web Speech well at the time of writing. Make sure your app's server is running with ng serve and open it in the browser at http://localhost:4200. You should see the Listen component (with the text "listen works!").
Listen Component Class
Open the listen.component.ts file and let's add the first phase of our code:
// src/app/listen/listen.component.ts
import { Component, OnInit, OnDestroy } from '@angular/core';
import { SpeechService } from './../speech.service';
import { Subscription } from 'rxjs/Subscription';
import 'rxjs/add/operator/filter';
import 'rxjs/add/operator/map';

@Component({
  selector: 'app-listen',
  templateUrl: './listen.component.html',
  styleUrls: ['./listen.component.scss']
})
export class ListenComponent implements OnInit, OnDestroy {
  nouns: string[];
  verbs: string[];
  adjs: string[];
  nounSub: Subscription;
  verbSub: Subscription;
  adjSub: Subscription;
  errorsSub: Subscription;
  errorMsg: string;

  constructor(public speech: SpeechService) { }

  ngOnInit() {
    this.speech.init();
    this._listenNouns();
    this._listenVerbs();
    this._listenAdj();
    this._listenErrors();
  }

  get btnLabel(): string {
    return this.speech.listening ? 'Listening...' : 'Listen';
  }

  private _listenNouns() {
    this.nounSub = this.speech.words$
      .filter(obj => obj.type === 'noun')
      .map(nounObj => nounObj.word)
      .subscribe(
        noun => {
          this._setError();
          console.log('noun:', noun);
        }
      );
  }

  private _listenVerbs() {
    this.verbSub = this.speech.words$
      .filter(obj => obj.type === 'verb')
      .map(verbObj => verbObj.word)
      .subscribe(
        verb => {
          this._setError();
          console.log('verb:', verb);
        }
      );
  }

  private _listenAdj() {
    this.adjSub = this.speech.words$
      .filter(obj => obj.type === 'adj')
      .map(adjObj => adjObj.word)
      .subscribe(
        adj => {
          this._setError();
          console.log('adjective:', adj);
        }
      );
  }

  private _listenErrors() {
    this.errorsSub = this.speech.errors$
      .subscribe(err => this._setError(err));
  }

  private _setError(err?: any) {
    if (err) {
      console.log('Speech Recognition:', err);
      this.errorMsg = err.message;
    } else {
      this.errorMsg = null;
    }
  }

  ngOnDestroy() {
    this.nounSub.unsubscribe();
    this.verbSub.unsubscribe();
    this.adjSub.unsubscribe();
    this.errorsSub.unsubscribe();
  }

}
Let's step through this code. First we have our imports. In addition to OnInit, we'll import the OnDestroy lifecycle hook so we can unsubscribe from any observables when the component is destroyed and prevent memory leaks. We also need our SpeechService, Subscription from RxJS, and the RxJS operators filter and map.
Our component implements OnInit, OnDestroy and then we'll declare type annotations for the properties we'll use. In order to organize our code and maintain separation of concerns, we'll create properties for each of the different parts of speech we're collecting: nouns, verbs, and adjectives (adjs). All types of words recognized from speech will come through the words$ observable, but we'll set up different subscriptions to build out arrays of each type. The type annotation for each of these properties is string[], meaning an array containing strings.
We also need to subscribe to the errors$ subject, so we'll add an errorsSub property. Finally, we want to be able to display error messages to the user should they occur, so we'll make a string property called errorMsg that we can display in the UI if necessary.
In the constructor() method, we'll pass the SpeechService and declare it public so it can be accessed by the HTML template as well as the component class.
The ngOnInit() lifecycle function will execute when the component is ready and should run any initialization code necessary. First we'll call the SpeechService's init() method to set up the speech recognition commands and callbacks. Then we'll run functions we'll create shortly to subscribe to the words$ and errors$ observables.
We'll have buttons in the UI to start and stop listening. We'll change the text on the "Listen" button to indicate to the user whether the app is actively listening or not. To determine this, we'll use an accessor method called btnLabel() that checks the Speech service's listening property and returns a string that either says "Listening..." or "Listen" for the button.
Next we have the three methods that set up speech recognition subscriptions: _listenNouns(), _listenVerbs(), and _listenAdjs(). Let's look at _listenNouns() for example:
  private _listenNouns() {
    this.nounSub = this.speech.words$
      .filter(obj => obj.type === 'noun')
      .map(nounObj => nounObj.word)
      .subscribe(
        noun => {
          this._setError();
          console.log('noun:', noun);
        }
      );
  }
This function filters and maps the words$ observable before subscribing. The filter operator is used to return only objects with a type of 'noun'. The map operator is then used to return only the value of the word property in each object. This gives us a stream that only contains the nouns spoken by the user. We can then subscribe() to this stream. For each value emitted, we'll run a _setError() function (which we'll create shortly) and then simply console.log the part of speech and the word itself.
We'll create two similar functions for verbs and adjectives. You may notice that our subscriptions, right now, don't perform any real functionality. That's fine because at the moment, we just want to make sure our speech recognition works. Integrating with a form and limiting the number of words of each type is something we'll do a little later.
Next we'll create our errors subscription and the _setError() method we referenced earlier:
  private _listenErrors() {
    this.errorsSub = this.speech.errors$
      .subscribe(err => this._setError(err));
  }

  private _setError(err?: any) {
    if (err) {
      console.log('Speech Recognition:', err);
      this.errorMsg = err.message;
    } else {
      this.errorMsg = null;
    }
  }
The errorsSub subscribes to the errors$ observable and runs the _setError() function, passing in the error object. If the err parameter is present, the error is logged to the console and the errorMsg property is set with the message to display in the UI. If no err parameter is present (such as in the cases with our _listenNouns(), _listenVerbs(), and _listenAdjs() functions above), the errorMsg is set to null to clear any existing errors from the UI.
The last thing we'll do is use the ngOnDestroy() lifecycle method to cancel all the subscriptions we set up when the component is destroyed:
  ngOnDestroy() {
    this.nounSub.unsubscribe();
    this.verbSub.unsubscribe();
    this.adjSub.unsubscribe();
    this.errorsSub.unsubscribe();
  }
That's it for the first phase of our Listen component class!
Listen Component Template
Next we'll create the template for our Listen component. Open the listen.component.html file and add:
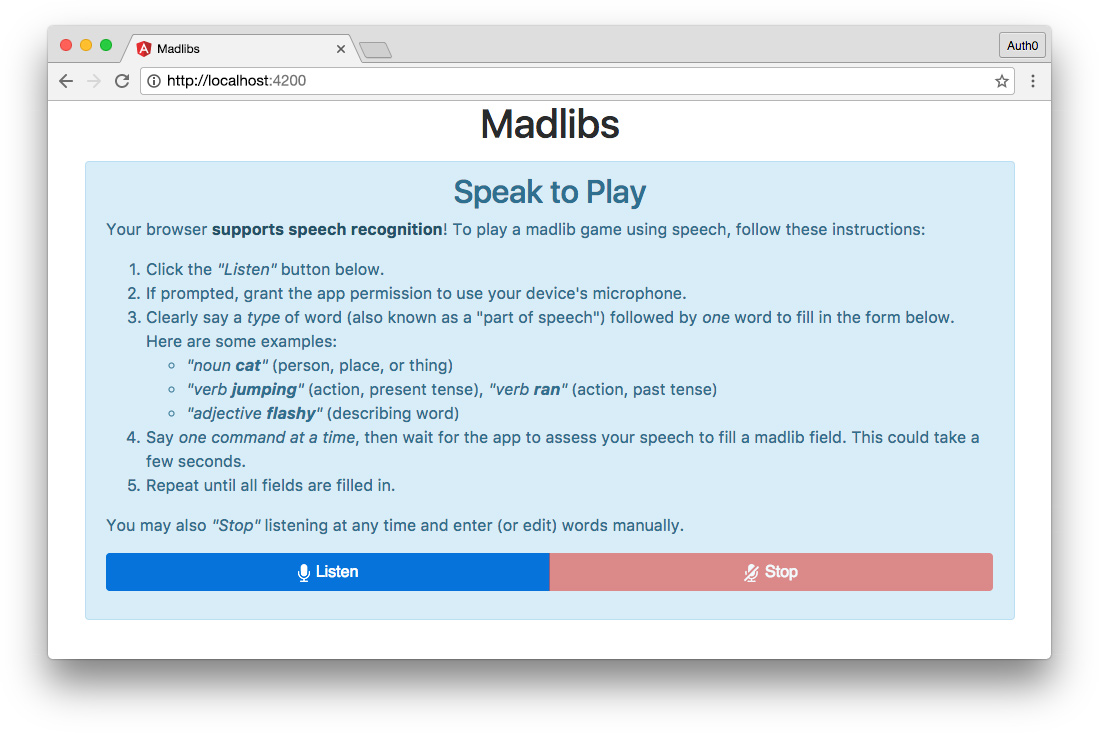
<!-- src/app/listen/listen.component.html -->
<div class="alert alert-info mt-3">
  <h2 class="text-center">Speak to Play</h2>
  <p>Your browser <a class="alert-link" href="https://developer.mozilla.org/en-US/docs/Web/API/SpeechRecognition#Browser_compatibility">supports speech recognition</a>! To play a madlib game using speech, follow these instructions:</p>
  <ol>
    <li>Click the <em>"Listen"</em> button below.</li>
    <li>If prompted, grant the app permission to use your device's microphone.</li>
    <li>
      Clearly say a <em>type</em> of word (also known as a "part of speech") followed by <em>one</em> word to fill in the form below. Here are some examples:
      <ul>
        <li><em>"noun <strong>cat</strong>"</em> (person, place, or thing)</li>
        <li><em>"verb <strong>jumping</strong>"</em> (action, present tense), <em>"verb <strong>ran</strong>"</em> (action, past tense)</li>
        <li><em>"adjective <strong>flashy</strong>"</em> (describing word)</li>
      </ul>
    </li>
    <li>Say <em>one command at a time</em>, then wait for the app to assess your speech to fill a madlib field. This could take a few seconds.</li>
    <li>Repeat until all fields are filled in.</li>
  </ol>
  <p>You may also <em>"Stop"</em> listening at any time and enter (or edit) words manually.</p>
  <div class="row mb-3">
    <div class="col btn-group">
      <button
        class="btn btn-primary col-6"
        (click)="speech.startListening()"
        [disabled]="speech.listening">
          <img class="icon" src="/assets/images/mic-on.png"/>{{btnLabel}}
      </button>
      <button
        class="btn btn-danger col-6"
        (click)="speech.abort()"
        [disabled]="!speech.listening">
          <img class="icon" src="/assets/images/mic-off.png"/>Stop
      </button>
    </div>
  </div>
  <div class="row" *ngIf="errorMsg">
    <div class="col">
      <p class="alert alert-warning">
        {{errorMsg}}
      </p>
    </div>
  </div>
</div>
This component only shows if the user's browser supports speech recognition, so we'll introduce how it works and display some instructions. Then we'll show two buttons to start and stop listening. On a (click) event, we'll execute the corresponding startListening() or abort() methods from the SpeechService.
Note: If you need a refresher, see the Angular documentation on binding syntax to read about interpolation and data binding in templates.
The start listening button will have the btnLabel accessor text on it and each button will be [disabled] according to the state of the speech.listening property. We'll also add the microphone icon images we saved to the src/assets/images directory earlier.
Finally, we'll create a conditional alert to display errors. This element should only show if errorMsg is truthy.
Listen Component Styles
Most of our styling is done with Bootstrap, but let's add one SCSS ruleset in our listen.component.scss:
/* src/app/listen/listen.component.scss */
.icon {
  display: inline-block;
  margin-right: 6px;
  vertical-align: middle;
}
Now our microphone icons are aligned.
Playing With Speech Recognition
It's time to test out our speech recognition feature! The app should now look like this in the browser:
Note: Make sure you're using a browser that supports Web Speech API, such as Google Chrome.
Open the developer tools panel in the browser. This is where speech recognition will be logged. Then click the "Listen" button and grant your browser permission to use the microphone, if a popup appears. You can then speak the commands we set up and the results will be logged to the console. When you're finished experimenting with the Web Speech API, click the "Stop" button to stop listening. If everything works as expected, we can move on to the next step: adding a form where the user can edit words from speech recognition or manually enter their own.
Madlibs Service
Next let's create a service that provides various reuseable methods for our Madlibs app. Generate a service with the Angular CLI like so:
$ ng g service madlibs
Then open the new madlibs.service.ts file and add the following code:
// src/app/madlibs.service.ts
import { Injectable } from '@angular/core';
import { Subject } from 'rxjs/Subject';

@Injectable()
export class MadlibsService {
  submit$ = new Subject<any>();
  words: any;

  constructor() { }

  submit(eventObj) {
    // form submitted with form results
    this.submit$.next(eventObj);
    this.words = eventObj;
  }

}
Let's import Subject from RxJS and create a submit$ subject that we can subscribe to in our app. When the submit() method is called, we can pass the submit event object to the submit$ subject and emit it. For our use case, this object will be the words the user has entered for their madlib, so we can set a local property words to the passed argument. We'll see this in action soon.
Provide Madlibs Service in App Module
In order to use this service, we need to provide it. Open the app.module.ts file:
// src/app/app.module.ts
...
import { MadlibsService } from './madlibs.service';
...
@NgModule({
  ...,
  providers: [
    ...,
    MadlibsService
  ],
  ...
Import the new MadlibsService and add it to the providers array. It's now available for use throughout the app.
Words Class
Let's make a class that can create new instances of the arrays we'll need for storing words:
$ ng g class words
Open the new words.ts file and add the following:
// src/app/words.ts
export class Words {
  constructor(
    public array: string[] = []
  ) {
    for (let i = 0; i < 5; i++) {
      array.push('');
    }
  }
}
Our class, Words, allows us to create instances of arrays of five strings. We would do this like so:
nouns: string[] = new Words().array;
This creates a new instance of an array that looks like this:
[
  '',
  '',
  '',
  '' ,
  ''
]
Using a constructor and the new keyword ensures that the array is a unique instance. Because we'll have three arrays of Word objects (nouns, verbs, and adjectives), we need to be certain operating on one of these data sets does not accidentally impact any of the others. This class serves that purpose nicely.
We can now utilize these classes in other components, so it's time to make some updates.
Update Listen Component
Recall that we're just logging words (as strings) to the console right now in our Listen component. It's time to update the component to store arrays of words.
Before we update the code itself, let's briefly review our goals. We want to:
- Store nouns, verbs, and adjectives in arrays of type
string[]. There should be five words in each array. - Show an error when a user tries to continue speaking words when there are already five for that part of speech.
- If the user manually deletes any words using the form, spoken commands should then fill in the missing words appropriately where there are openings.
Now let's develop the functionality to facilitate these goals.
Update Listen Component Class
Open the listen.component.ts file:
// src/app/listen/listen.component.ts
...
import { Words } from './../word';
...
  nouns: string[] = new Words().array;
  verbs: string[] = new Words().array;
  adjs: string[] = new Words().array;
  ...
  arrayFull: string;
  ...

  private _listenNouns() {
    ...
      .subscribe(
        ...
          this.nouns = this._updateWords('nouns', this.nouns, noun);
        }
      );
  }
  ...
  private _listenVerbs() {
    ...
      .subscribe(
        ...
          this.verbs = this._updateWords('verbs', this.verbs, verb);
        }
      );
  }
  ...
  private _listenAdj() {
    ...
      .subscribe(
        ...
          this.adjs = this._updateWords('adjectives', this.adjs, adj);
        }
      );
  }

  ...

  private _updateWords(type: string, arr: string[], newWord: string) {
    const _checkArrayFull = arr.every(item => !!item === true);

    if (_checkArrayFull) {
      this.arrayFull = type;
      return arr;
    } else {
      let _added = false;
      this.arrayFull = null;
      return arr.map(item => {
        if (!item && !_added) {
          _added = true;
          return newWord;
        } else {
          return item;
        }
      });
    }
  }
  ...
Let's go over this step by step.
The first change we'll make is to import our Words class from words.ts so we can use it in our component. Then we'll declare the initial values of our word properties as new instances of Words().array:
  nouns: string[] = new Words().array;
  verbs: string[] = new Words().array;
  adjs: string[] = new Words().array;
This allows us to be certain that these arrays are entirely unique from one another, although they all share the same data shape.
Next we'll add a new property: arrayFull: string. We'll use this to monitor if the user is trying to add speech recognized words to word types that have already reached the maximum of five words.
Next we'll update each of our words$ subscriptions. In each subscribe() function, delete the console.log and replace it with the appropriate property:
this.nouns = this._updateWords('nouns', this.nouns, noun);
this.verbs = this._updateWords('verbs', this.verbs, verb);
this.adjs = this._updateWords('adjectives', this.adjs, adj);
We'll create this new _updateWords() function next:
  private _updateWords(type: string, arr: string[], newWord: string) {
    const _checkArrayFull = arr.every(item => !!item === true);

    if (_checkArrayFull) {
      this.arrayFull = type;
      return arr;
    } else {
      let _added = false;
      this.arrayFull = null;
      return arr.map(item => {
        if (!item && !_added) {
          _added = true;
          return newWord;
        } else {
          return item;
        }
      });
    }
  }
This function takes the following arguments:
type: a user-friendly string representing the part of speech, e.g.,"adjectives", used for error messaging when the array is fullarr: the component property that is the array ofWords for the specific part of speech, e.g.,this.nounsnewWord: the spoken word recognized by the Web Speech API
The first thing _updateWords() does is check to see if the component property array that was passed in already has five words in it. We can do this using the every() array method to see if each item has a truthy value (recall that when we created the array, the value was '' for each item). If the array is full, we'll set the this.arrayFull property to the user-friendly type string that was passed in so we can display it to the user.
If there are openings in the array for new words, we'll reset this.arrayFull to remove any errors from full arrays. We can use the map() array method to return a new array with the latest word in the first available spot and any words after it still in place. This ensures that there are never more than five items in the array. It also ensures that if the user manually deleted a word from the beginning of the array using the form, any new spoken words fill in the open spot(s) rather than being pushed to the end or discarded.
Update Listen Component Template
Now that we have an arrayFull property, we need to utilize it in our template. Open the listen.component.html file:
<!-- src/app/listen/listen.component.html -->
...
  <div class="row" *ngIf="errorMsg || arrayFull">
    <div class="col">
      <p class="alert alert-warning">
        <ng-template [ngIf]="errorMsg">{{errorMsg}}</ng-template>
        <ng-template [ngIf]="arrayFull">You've already filled in all the available fields for <strong>{{arrayFull}}</strong>.</ng-template>
      </p>
    </div>
  </div>
...
In the element containing our error messaging, we'll update the *ngIf to check if errorMsg || arrayFull. Using ng-template syntax, we'll show the errorMsg if it is present. If arrayFull, we'll show a message informing the user which array is full and that their last Web Speech attempt failed.
Note: The Angular NgIf directive can be used with an
<ng-template [ngIf]>element if you don't want to render an extra container in the markup. In many cases, we already have a container wrapping whatever we want to show or hide, so we use<div *ngIf>.
Words Form Component
Whether or not the user's browser supports speech recognition, we'll need a component with a form that displays and allows manual entry and editing of words the user wants to use in their madlib.
Add Forms Module to App Module
We're going to create a form, so first we need to add the FormsModule to our Angular application. Open the app.module.ts file and add the following:
// src/app/app.module.ts
...
import { FormsModule } from '@angular/forms';
...
@NgModule({
  ...,
  imports: [
    ...,
    FormsModule
  ],
  ...
We'll import FormsModule from Angular and add it to the NgModule's imports array. We can now take advantage of template-driven forms in our Angular app.
Create and Display Words Form Component
Let's create a Words Form component now:
$ ng g component words-form
We'll add this component to our Listen component. Open the listen.component.html template and add the following to the bottom of the file:
<!-- src/app/listen/listen.component.html -->
...
<app-words-form
  [nouns]="nouns"
  [verbs]="verbs"
  [adjs]="adjs"></app-words-form>
Until we add our TypeScript, we'll receive an error when compiling because we've declared that the <app-words-form> component takes inputs ([nouns], [verbs], and [adjs]), but we haven't yet set these inputs up in the component class. Let's do so now.
Words Form Component Class
Once again, before we write our code, let's think about what we want to achieve.
- Show 5 input fields for each part of speech, making 15 fields total (nouns, verbs, adjectives).
- Each field needs placeholder text telling the user what kind of subject or tense should be used (such as
person,place,present,past, etc.). - Create a
trackByfunction that distinguishes each item in an array as unique.
Open the words-form.component.ts file and add the following code:
// src/app/words-form/words-form.component.ts
import { Component, Input } from '@angular/core';
import { MadlibsService } from './../madlibs.service';

@Component({
  selector: 'app-words-form',
  templateUrl: './words-form.component.html',
  styleUrls: ['./words-form.component.scss']
})
export class WordsFormComponent {
  @Input() nouns: string[];
  @Input() verbs: string[];
  @Input() adjs: string[];
  generating = false;
  placeholders = {
    noun: ['person', 'place', 'place', 'thing', 'thing'],
    verb: ['present', 'present', 'past', 'past', 'past']
  };

  constructor(private ml: MadlibsService) { }

  trackWords(index) {
    return index;
  }

  getPlaceholder(type: string, index: number) {
    return this.placeholders[type][index];
  }

  done() {
    this.ml.submit({
      nouns: this.nouns,
      verbs: this.verbs,
      adjs: this.adjs
    });
    this.generating = true;
  }

}
First we'll import Input and our MadlibsService.
The @Input() decorator allows us to pass data from a parent component to a child component. We implemented this above in the template when we added the <app-words-form> element in the Listen component. We can now use the decorator to define, in the WordsFormComponent class, what these inputs are called and that their type annotations should be arrays of strings:
  @Input() nouns: string[];
  @Input() verbs: string[];
  @Input() adjs: string[];
Next we'll create two properties. The first is simply a boolean called generating to use in the template once the user has submitted their words to generate a madlib. The second is a placeholders object containing arrays of what the input placeholders should be for each word field.
Note: Adjectives are excluded from this object because all adjective placeholders should be the same.
The constructor makes the MadlibsService available to the component.
The next method, trackWords(), is a trackBy function. Angular uses this option to track changes to the contents of the ngFor iterator using the return value of this function. This enables us to make changes to the array contents (via the repeated input fields) while making sure these changes are propagated appropriately in the DOM. The trackWords() function in our case simply takes the index of the iterated item as an argument and returns it. Each index in a loop is unique, so this serves to track changes to the items while preserving their order in the array.
The getPlaceholder() method takes the part of speech as type and the iteration index, then returns the corresponding item from the placeholders property. We can use this function to display the appropriate placeholder text in each input field even when the input fields are inside a loop.
Finally, the done() method will be executed when the user submits the words form. It calls the submit() method from MadlibsService and passes the nouns, verbs, and adjectives to it. It also sets the generating property to true.
Words Form Component Template
Open the words-form.component.html template and add this code:
<!-- src/app/words-form/words-form.component.html -->
<form (submit)="done()" #wordsForm="ngForm">
  <div class="row">
    <div class="col-md-4">
      <h3>Nouns <a class="badge badge-pill badge-info" href="http://www.grammar-monster.com/lessons/nouns.htm" title="Nouns are naming words, usually people, places, or things." target="_blank">?</a></h3>
      <p class="small">For best results, please enter 1 <strong>person</strong>, 2 <strong>places</strong>, and 2 <strong>things</strong>.</p>
      <div *ngFor="let noun of nouns; index as i; trackBy: trackWords" class="mb-2">
        <input
          type="text"
          name="noun-{{i}}"
          class="form-control"
          [(ngModel)]="nouns[i]"
          [disabled]="generating"
          [placeholder]="getPlaceholder('noun', i)"
          required>
      </div>
    </div>
    <div class="col-md-4">
      <h3>Verbs <a class="badge badge-pill badge-info" href="http://www.grammar-monster.com/lessons/verbs.htm" title="Verbs are doing words: physical action, mental action, or state of being." target="_blank">?</a></h3>
      <p class="small">For best results, use <strong>2 present tense</strong> verbs, then <strong>3 past tense</strong>.</p>
      <div *ngFor="let verb of verbs; index as i; trackBy: trackWords" class="mb-2">
        <input
          type="text"
          name="verb-{{i}}"
          class="form-control"
          [(ngModel)]="verbs[i]"
          [disabled]="generating"
          [placeholder]="getPlaceholder('verb', i)"
          required>
      </div>
    </div>
    <div class="col-md-4">
      <h3>Adjectives <a class="badge badge-pill badge-info" href="http://www.grammar-monster.com/lessons/adjectives.htm" title="Adjectives are describing words." target="_blank">?</a></h3>
      <p class="small">For best results, be particularly <strong>creative</strong> with your adjectives.</p>
      <div *ngFor="let adj of adjs; index as i; trackBy: trackWords" class="mb-2">
        <input
          type="text"
          name="adj-{{i}}"
          class="form-control"
          [(ngModel)]="adjs[i]"
          [disabled]="generating"
          placeholder="adjective"
          required>
      </div>
    </div>
  </div>
  <div class="row">
    <div class="col mt-3 mb-3">
      <button
        class="btn btn-block btn-lg btn-success"
        [disabled]="!wordsForm.form.valid">Go!</button>
    </div>
  </div>
</form>
Here we have the template-driven form. When words are spoken via the Web Speech API, they automatically fill in the appropriate fields. The user can also enter or edit the words manually. Let's go over this code more thoroughly.
The <form> element has a (submit) event that executes the done() method. This is attached to the form itself, so when we add a <button> to the form, this is the method that will run when that button is clicked.
We'll also add #wordsForm="ngForm". This is a template variable. It creates a reference to the NgForm directive (which Angular applies under the hood). This wordsForm template variable allows us to reference properties and methods of the NgForm directive in the template. This is useful for logic that does things like check whether the form is valid. (We'll take advantage of this later in the form code.)
We'll create three columns in our Words Form template UI using Bootstrap CSS. Each column contains a heading, a help link, short text instructions, and the input fields for a specific part of speech.
NgFor with Word Inputs
Let's discuss the NgFor loops that contain the input fields for words in each of the three arrays (nouns, verbs, and adjectives). The noun loop looks like this:
<div *ngFor="let noun of nouns; index as i; trackBy: trackWords" class="mb-2">
  <input
    type="text"
    name="noun-{{i}}"
    class="form-control"
    [(ngModel)]="nouns[i]"
    [disabled]="generating"
    [placeholder]="getPlaceholder('noun', i)"
    required>
</div>
The NgFor loop iterates over each item in the nouns array, tracks index as i, and implements the trackBy option with the trackWords method we created in our component class.
The <input> elements in each iterator need unique names in the form, so we'll append i to them to create names like noun-0, noun-1, and so on. We'll two-way bind the form input to the array item with the NgModel directive. We don't want the user to be able to edit the form after submitting it, so we'll disable the input if generating is truthy. We also need to display placeholder text informing the user of any specific instructions for that particular input field, so we'll use one-way attribute binding with [placeholder] to execute our getPlaceholder() method and retrieve the appropriate placeholder string. Finally, we'll add the required attribute since the user shouldn't submit the form with any fields left blank.
Submit Button
Last but not least, we'll add a <button> to submit the form:
<div class="row">
  <div class="col mt-3 mb-3">
    <button
      class="btn btn-block btn-lg btn-success"
      [disabled]="!wordsForm.form.valid">Go!</button>
  </div>
</div>
As mentioned earlier, this button doesn't need an event attached to it. It will execute the <form (submit)="done()"> method that has already been declared. The button should be [disabled] if the form is not valid. Here is where the template variable wordsForm referencing the NgForm directive comes in handy. We can access the form itself and check if it's valid or not using wordsForm.form.valid.
Words Form Component Styles
If we check out our form in the browser, you may notice that the placeholder text is very dark: it almost looks like normal text has already been inputted. We don't want to give that impression, so let's add a few styles in the words-form.component.scss file:
/* src/app/words-form/words-form.component.scss */
input::-webkit-input-placeholder { /* Chrome/Opera/Safari */
  color: rgba(0,0,0,.25);
  opacity: 1;
}
input::-moz-placeholder { /* Firefox 19+ */
  color: rgba(0,0,0,.25);
  opacity: 1;
}
input:-moz-placeholder { /* Firefox 18- */
  color: rgba(0,0,0,.25);
  opacity: 1;
}
input:-ms-input-placeholder { /* IE 10+ */
  color: rgba(0,0,0,.25);
  opacity: 1;
}
These component styles override the Bootstrap defaults specifying the dark placeholder text color.
Try It Out
Our app should now look like this:
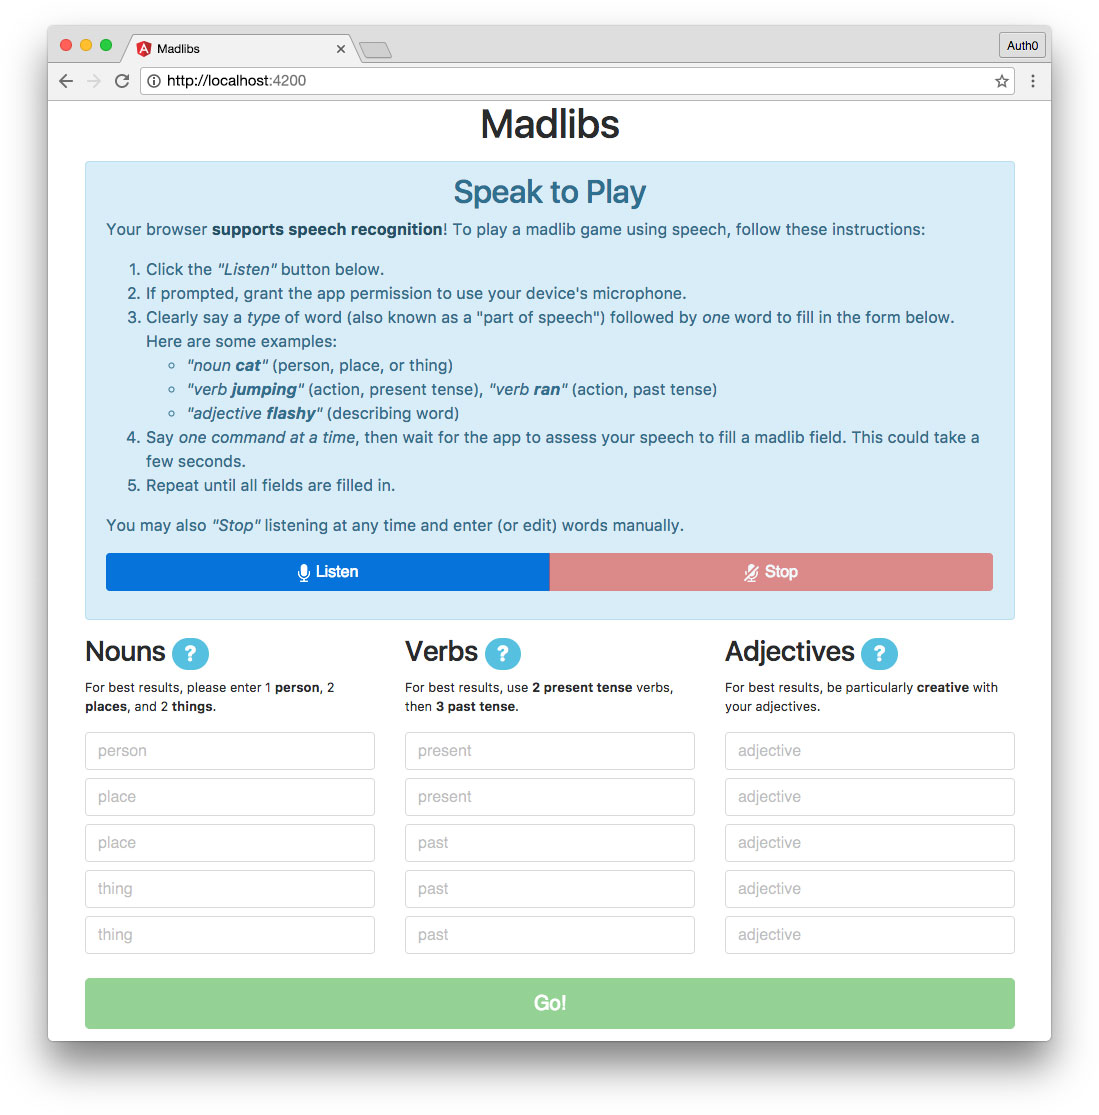
Now is a great time to test out the functionality of our Listen component and Words Form component. Try clicking the "Listen" button and issuing spoken commands. It takes a second or two for the Web Speech API to assess speech, but once it does, your spoken words should appear in the appropriate form fields.
Try a variety of things:
- Try saying things that are not the commands we set up.
- Try speaking additional words for a word type after all words have been filled in already.
- Try deleting a word or two manually and then using speech to fill them back in.
- Try typing in some words and then using speech to fill in the rest.
If we've done everything correctly, all of the above scenarios should be accounted for and the app should respond appropriately. Once all word fields have been populated, the "Go!" button to submit the form should enable (though it won't do anything visible yet).
If everything works as expected, congratulations! You've implemented speech recognition with Angular.
Aside: Securing Applications with Auth0
Are you building a B2C, B2B, or B2E tool? Auth0 can help you focus on what matters the most to you, the special features of your product. Auth0 can improve your product's security with state-of-the-art features like passwordless, breached password surveillance, and multifactor authentication.
We offer a generous free tier so you can get started with modern authentication.
Conclusion
In Part 1 of our 2-part tutorial, we covered basic concepts of reactive programming and observables and an introduction to speech recognition. We set up our Madlibs app and implemented speech recognition and an editable form where users can enter and modify words to eventually generate a madlibs story.
In the next part of our tutorial, we'll implement fallback functionality for browsers that don't support speech recognition. We'll also fetch words from an API if the user doesn't want to enter their own, and we'll learn about RxJS operators that make it easy to manage and combine observables. Of course, we'll also generate our madlib story with the user's words. As a final bonus, we'll learn how to authenticate an Angular app and Node API with Auth0.
When you're finished with both parts, you should be ready to tackle more advanced reactive programming projects with Angular!
About the author

Kim Maida
Group Manager, Developer Content