TL;DR: Vuepress is a static site generator that was initially developed privately for the documentation needs of the Vue.js framework. It was later made public for anyone to use and optimized for writing technical documentation. Vuepress is built on Vue.js and uses markdown for writing pages, so you have the simplicity of content writing with markdown combined with the powerful capabilities of the Vue.js framework. Vuepress also comes bundled with a Vue-powered theming system and a Plugin API for extending its capabilities. In this tutorial, you will learn and demonstrate how to authenticate Vuepress sites using Auth0.
Prerequisites
To get started, you will need to have a few things set up:
With these in place, you are good to go.
Creating the Auth0 Application
First, you will set up your Auth0 application to handle authentication in your Svelte application. If you don't already have an Auth0 account, you can sign up for a free account here.
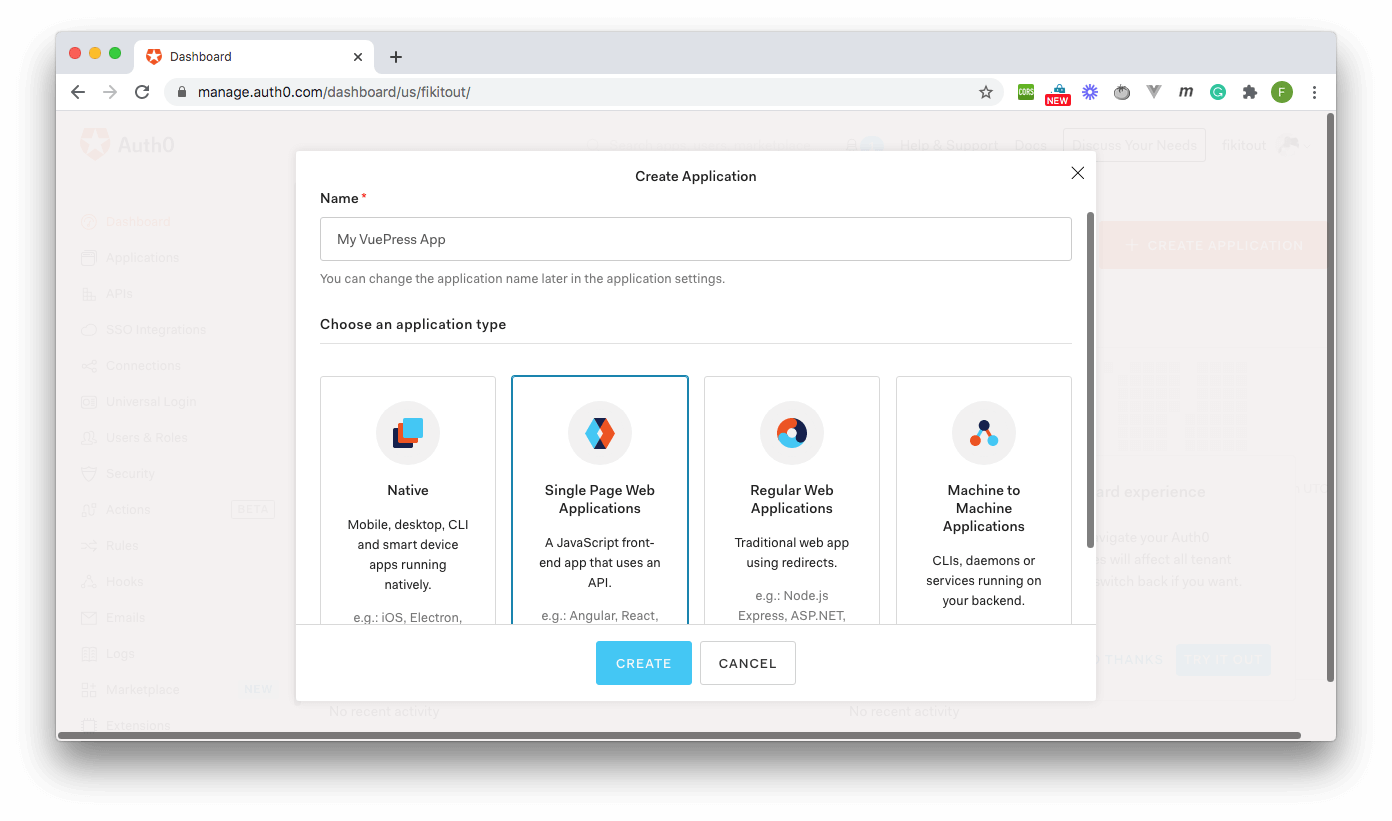
Once logged in, click on Applications on the left-hand side menu. On the Applications page, click on the big orange CREATE APPLICATION button.
On the Create Application dialog that pops up, enter an appropriate name for your application and select Single Page Web Applications from the options below the application name field.

Click the Create button to complete the process.
After the successful creation of the application, go to the Settings section of your newly created app. In the Allowed Callback URLs, Allowed Web Origins, Allowed Logout URLs, and Allowed Origins (CORS) fields, enter http://localhost:8080. This address is the default address of the Vuepress site you will be creating later on. Make sure you update these settings once your application moves to production.
Once you're done entering these values, scroll down and hit the SAVE CHANGES button.
Scaffolding the Vuepress Project
Your next task is to scaffold a new Vuepress project by running the following command:
yarn create vuepress-site my-vuepress-site
This will prompt you to answer a few questions to set up your site. You can use the answers below for this exercise for quickly scaffolding a demo project:
- What's the name of your project?: my-vuepress-site
- What's the description of your project?: A sample App for Authentication with Auth0
- What's your email?: demo@test.com
- What's your name?: Vuepress User
- What's the repo of your project?: my-vuepress-site
This should then scaffold a new Vuepress project inside the my-vuepress-site folder. By default, the scaffolding process packs all the project's code into a docs folder. Move all the contents of the docs folder into the root project folder and delete the docs folder.
Next, install the project dependencies by running yarn at the root of the project. Once the dependencies are completely downloaded, run the Vuepress app by running the following command:
yarn dev
This will compile the code and boot up a development server at http://localhost:8080. Visit this URL in your browser, and you will see a default home page similar to the one below:

Setting Up Authentication with Auth0
Creating the Authentication Service
The first step to adding authentication to the application using Auth0 is to bring in the Auth0 javascript SPA library. Go to src/.vuepress/config.js and add a new entry to the end of the head array as shown below:
// src/.vuepress/config.js

...
head : [
  ....,
  ["script", {src : "https://cdn.auth0.com/js/auth0-spa-js/1.13/auth0-spa-js.production.js"}]
]
With this in place, the next task is to create an authentication service. Inside the src/.vuepress folder, create a new folder auth and in this folder, create the file auth_config.js and enter the following code:
// src/auth/auth_config.js
const config = {
  domain: "YOUR_AUTH0_DOMAIN",
  clientId: "YOUR_CLIENT_ID"
};

export default config;
Ensure you replace YOUR_AUTH0_DOMAIN with your Auth0 domain and YOUR_CLIENT_ID with the Client ID of your application. To find these values, go back into the Applications page of your Auth0 dashboard. Find the application you created at the beginning of the tutorial, and click on "Settings." You'll find Domain and Client ID listed there.
Make sure you also add this file to your .gitignore file so that you don't mistakenly push your details to a public repository.
With this file in place, you can now create the authentication service. Create the file index.js inside the auth folder and place the following code in it:
// src/auth/index.js
import config from "./auth_config";

async function createClient() {
  let auth0Client = await createAuth0Client({
    domain: config.domain,
    client_id: config.clientId
  });

  return auth0Client;
}

async function loginWithPopup(client, options) {
  try {
    await client.loginWithPopup(options);
  } catch (e) {
    // eslint-disable-next-line
    console.error(e);
  }
}

function logout(client) {
  return client.logout();
}

const auth = {
  createClient,
  loginWithPopup,
  logout
};

export default auth;
The above service exports 3 methods that do the following:
createClient: Uses Auth0'screateAuth0Clientfunction and the authentication configuration to create a new authentication client and returns it.loginWithPopup: Takes in an authenticationclientinstance with defined options and uses these to call the loginWithPopup on the client to sign-in and user. It then sets isAuthenticated to true and user to the user details returned by the logged-in client.logout: This is simply a proxy to the Auth0client'slogoutmethod that ends a logged-in user's session.
Creating the Login button component
Next, you need to create a LoginButton component that would hold, you guessed it, the sign-in logic for the application. Being a reusable component, it can be used in different parts of the application. Inside src/.vuepress/components folder, create the file LoginButton.vue and enter the following code:
<template>
    <button @click="login()">Login</button>
</template>

<script>
import auth from "../auth";
export default {
    props : ['client'],
    methods : {
        async login () {
            await auth.loginWithPopup(this.client);

            this.$emit('login-complete');
        }
    }
}
</script>
The component above takes in the Auth0 client instance as a prop and uses it to call the loginWithPopup method from the authentication service. Once the login process is complete, it emits a login-complete event to the calling code to take action. The template contains a Login button that calls the login method defined in the methods object of the component.
Creating the Logout button component
Just as you have created a reusable login component, you will also be creating a component for signing out of the application also.
In the same location as the LoginButton component, create a new file LogoutButton.vue and enter the following code:
<template>
    <button @click="logout()">Log Out</button>
</template>

<script>
import auth from "../auth";
export default {
    props : ['client'],
    methods : {
        async logout () {

            await auth.logout(this.client);
        }
    }
}
</script>
Similar to LoginButton, the LogoutButton component also takes in the client as a prop and uses it to call the logout on the authentication service.
Adding Authentication to the Application
It's now time to bring everything together to add authentication to the application. Locate the file src/index.md and replace the content with the following code:
---
home: true
footer: Made by Auth0 User with ❤️
---

<template>
  <div class="main-content">
    <div v-if="user">
      <p align="center">
        Hi {{user.given_name}} {{user.family_name}}, Welcome to the Vuepress Blog
      </p>
      <p align="center">
        <LogoutButton :client="auth0client" />
      </p>
    </div>
    <div v-else>
      <p align="center">
        You are currently not logged-in to the Application. Please use the login button below to sign in
      </p>
      <p align="center">
        <LoginButton :client="auth0client" @login-complete="getUser()" />
      </p>
    </div>
  </div>

</template>

<script>
import auth from "./.vuepress/auth";
import LoginButton from "./.vuepress/components/LoginButton";
import LogoutButton from "./.vuepress/components/LogoutButton";

export default {
  data() {
    return {
      auth0client : null,
      user : null
    }
  },
  async mounted(){
    this.auth0client = await auth.createClient();

    this.user = await this.auth0client.getUser();
  },
  methods : {
    async login () {
      await auth.loginWithPopup(this.auth0client);
    },
    async getUser(){
      this.user = await this.auth0client.getUser();
    }
  }
}
</script>
The code above contains two sections, one for authenticated users and the other for non-authenticated users using the v-if directive with a user variable defined in the data object.
The authenticated section contains the login button, while the non-authenticated section contains the logout button. In the script section, the authentication service, LoginButton, and LogoutButton components are imported.
The LoginButton component handles the login-complete event by calling the getUser function that fetches user data once the login process is complete.
In the mounted lifecycle method, the Auth0 client is initialized and set in the auth0Client data variable; the user details are also fetched from the Auth0 service by calling getUser on the Auth0 client instance. If there is a user session active, the user data variable will contain the data and validate the authenticated state.
In the methods object, the login and getUser methods are defined to call the login method of the authentication service and fetch the user, respectively.
Running the Application
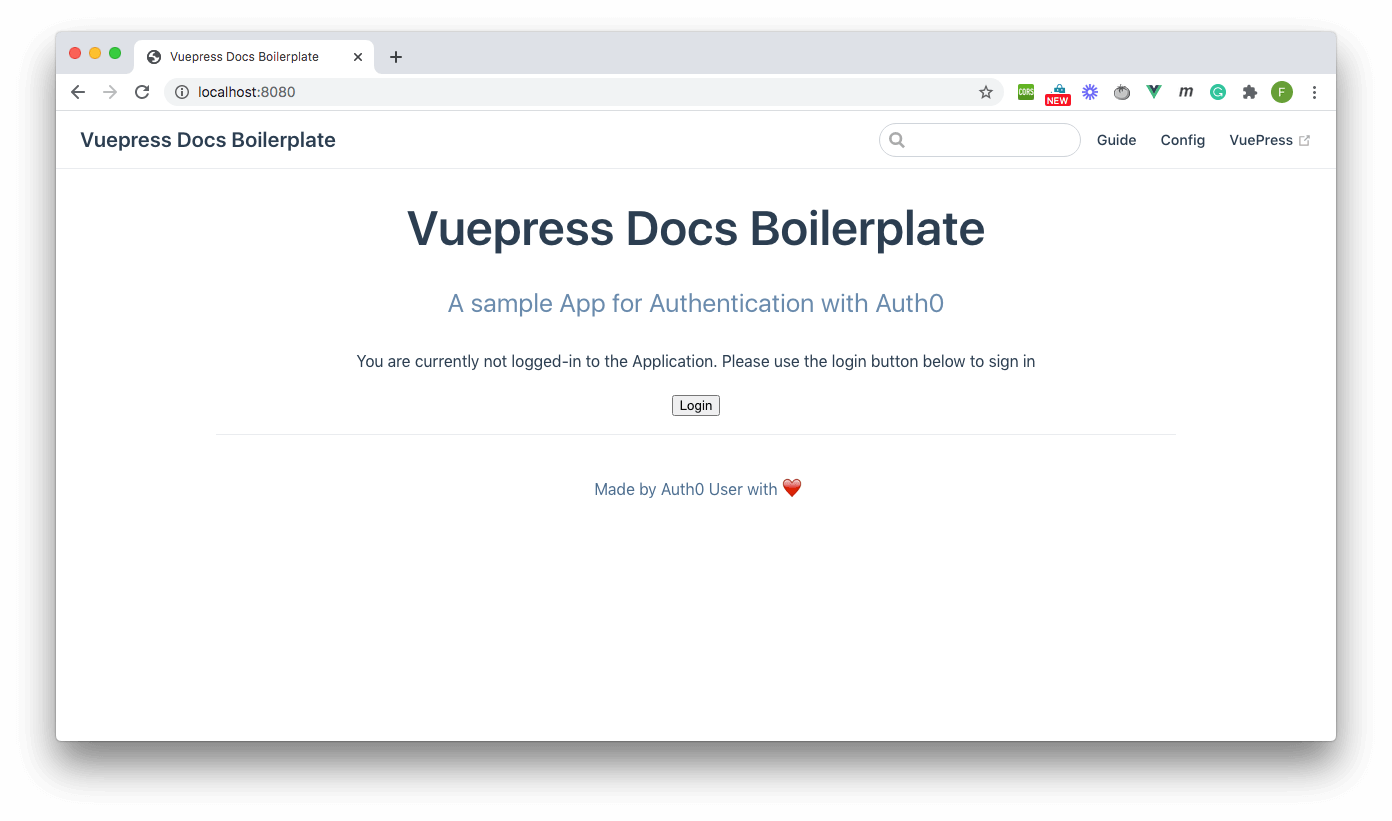
It's now time to put the application to test. Save all changes and relaunch the application using yarn dev; you will see a screen like the one below:

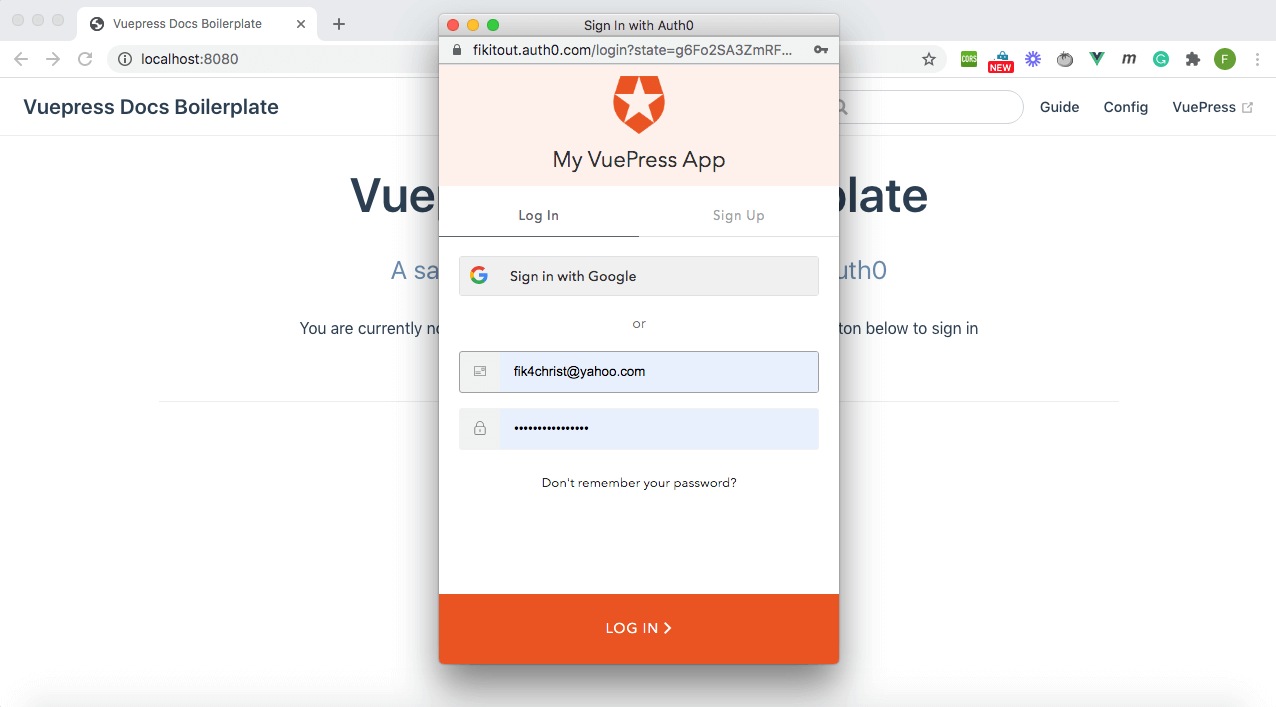
Now, click the Login button to prompt the Auth0 authentication dialog box as shown below:

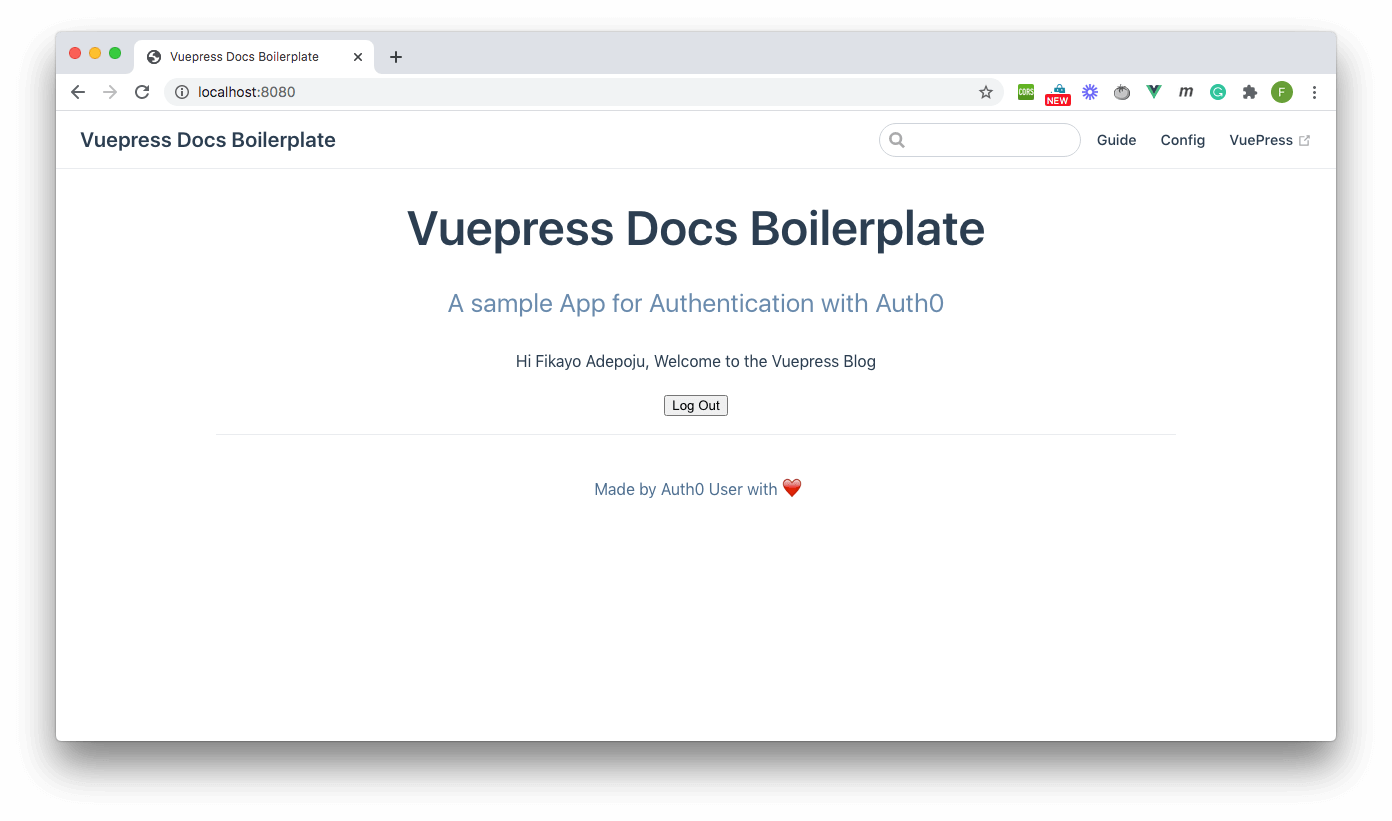
The dialog might ask that you give the application permissions; go ahead and approve this request to complete the sign-in process. Once signed in, your homepage should now display the authenticated message as shown below:

If you reload the page, the user data will be requested in the mounted lifecycle hook to fetch the user and persist the session. Click the logout button to end the user session; once logged out, the login button is once again displayed.
Conclusion
Vuepress is an amazing tool for generating static sites with Vue.js, and in this tutorial, you have learned and demonstrated how to authenticate users on Vuepress sites. Rolling your own authentication from scratch for every application built can be a very laborious and routine task, but with Auth0, it's a breeze.
Happy Coding :)
About the author

Fikayo Adepoju
Full-Stack Developer
