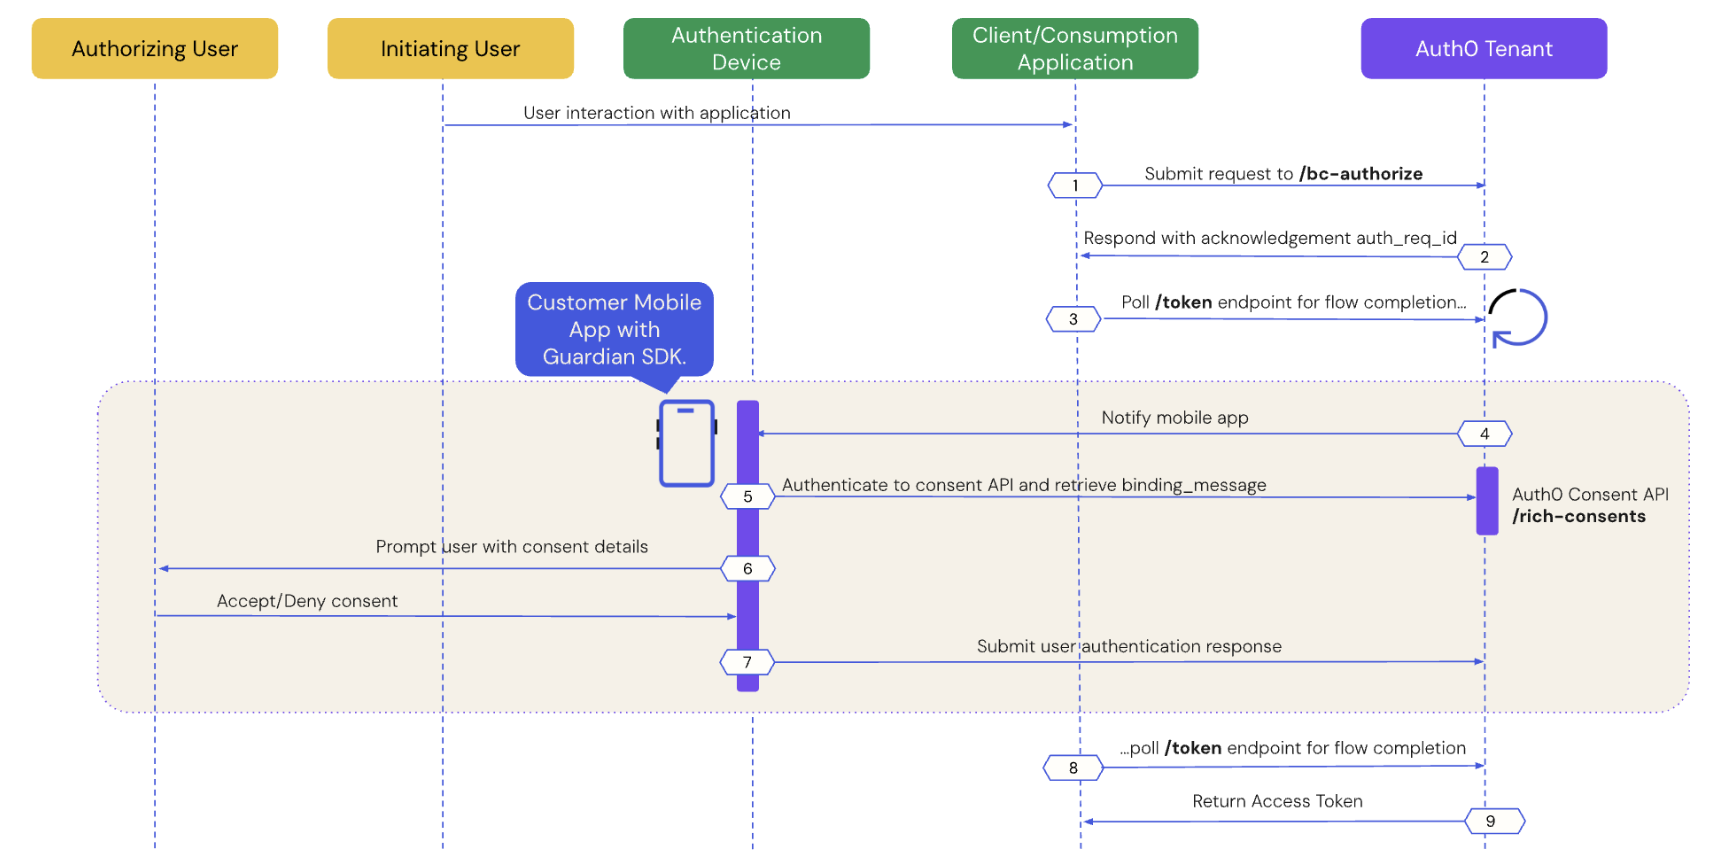
In this article, you will learn how to apply asynchronous authentication flow using Client-Initiated Backchannel Authentication (CIBA) with LangGraph and Auth0. This authentication flow is designed to obtain specific and restrictive permissions using a secondary authentication device, such as a multifactor authentication app, at the moment the permission is needed. For example, a user may need a specific permission to make financial transactions on their account.

CIBA is not only designed for the user itself, but can be used to obtain permission from another user. For example, a supervisor may need to approve the cancellation of an order created by an employee.
To learn more about CIBA read this blog post:

AI agents are making decisions without you? Explore the challenges of AI autonomy and discover why human oversight is crucial for responsible AI. Learn how asynchronous authorization and CIBA can help you keep humans in the loop for critical AI actions.
Recap
Previous posts in this series:
- Secure LangChain Tool Calling with Python, FastAPI, and Auth0 Authentication
- Secure Third-Party Tool Calling: A Guide to LangGraph Tool Calling and Secure AI Integration in Python
In the previous post you learned how to securely make third-party calls on behalf of users. In both articles, the LLM does not have direct access to any token; instead, tokens are provided or generated within our Python code.
Our Zoo AI Tool: Things Get Serious
Once again we will expand our Zoo AI with new features:
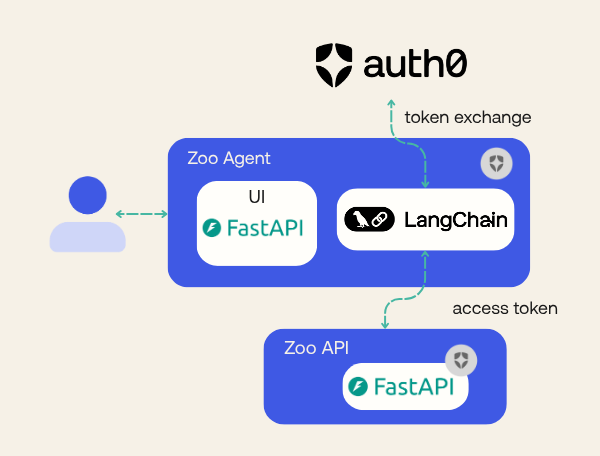
- In the first article, we created the Zoo AI. It had two services: one REST API (we named API) and a LangChain integrated with OpenAI as the LLM (we named Agent). The Agent needed to call the API on the user's behalf so it could update and check animal statuses and notify other employees, all of that in a nice interface with an interactive prompt.
- In the second article, we expanded the Zoo AI to enable it to contact third-party services on behalf of the user. Our Agent gained the ability to send e-mails to suppliers asking for more resources.
There is one missing feature we talked about in previous articles, but it was not properly implemented: emergency protocol. What if there is an emergency and we need to start a protocol to close the Zoo?
While I'm not a zoo specialist, I believe (and hope!) every zoo has one. Our zoo, at least, will have one. However, such a protocol should not be initiated by anyone without double validation. In our case, the emergency protocol will require special permission, only available to a specific employee (we will call them the "emergency coordinator"). These will be the steps:
- Any employee can report an emergency.
- The LLM will evaluate and ask the coordinator to start the protocol.
- The coordinator will receive a push notification on their mobile device detailing the emergency and asking for approval.
- If approved, our tool will start the protocol.
- If not approved, the LLM will reply to the initiator user that the emergency was not approved.
Prerequisites
- Python 3.11 or later
- Poetry for dependency management. Check how to install.
- An Auth0 for GenAI account. Create one.
- An OpenAI account and API key. Create one or use any other LLM provider supported by LangChain.
- Our repository cloned
Setting Up the Environment
You can skip this section and continue to the next one if you are following our tutorial series. After cloning the tutorial repository, make sure you are in the branch step3-thirdparty-toolcalling, which has all the source code generated in previous articles.
git clone https://github.com/auth0-samples/auth0-zoo-ai
cd auth0-zoo-ai
git switch step3-thirdparty-toolcalling
poetry install
Now, we need to create an Auth0 for GenAI account. The link provides a special configuration for GenAI solutions that enables preview features such as Token Federation, which we are going to use.
We have two projects inside the repository: api and agent. The api will not be changed, but we need to configure it.
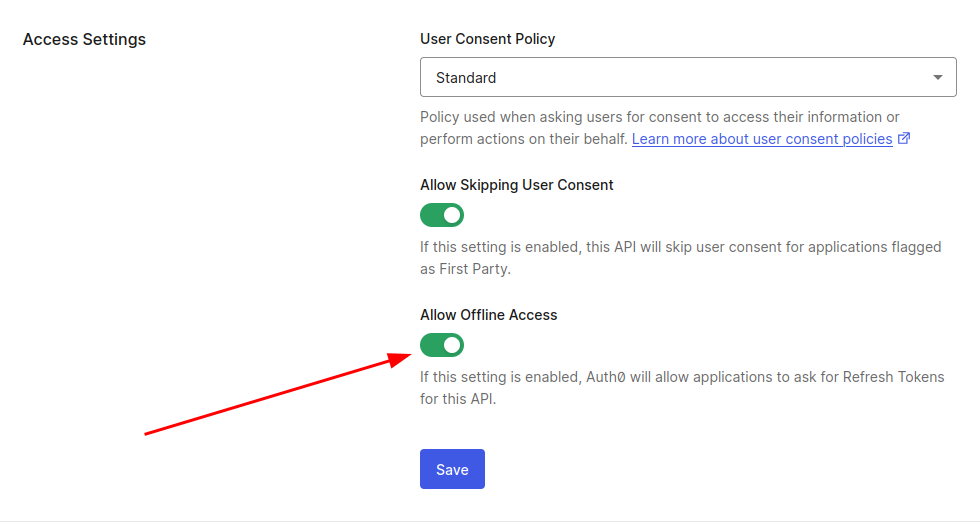
First, we must define an API and Roles in your Auth0 account. You can follow the instructions provided in our previous article, section “Setting up authentication in the Zoo API”. Do not forget to “Allow offline access”.
Also, remember to create the roles we need.
We must add the roles in our access token to be able to retrieve them in our application. Make sure to follow the instructions in the previous article in the section "Setting up authentication in the Zoo API".
Lastly, create the .env file for the project API. If you have any doubts, review the earlier article.
AUTH0_DOMAIN=YOUR_AUTH0_DOMAIN
API_AUDIENCE=https://zoo-management-api
The project Agent will have some changes, and, as such, we will deal with its .env file later.
A Note on Google Accounts: In the previous article (third-party tool calling), we used Google’s authentication mechanism together with Auth0 to demonstrate federated token authentication. You can ignore Google's authentication if you don't mind the feature for buying supplies being non-functional. If you have already developed using the other article, keep your Google account integration.
Creating an OAuth 2.0 Application with CIBA Grant
Before coding, we need to create or modify an OAuth 2.0 application that allows a CIBA grant. In your Auth0 Dashboard, go to Applications -> Applications and click on “Create Application”. In Application Type, select “Regular Web Application” and give the name “Zoo Ai Agent Article 3”.

After the creation, go to the application settings and fill in the following values:
- Allowed callback URL - http://localhost:3000/auth/callback

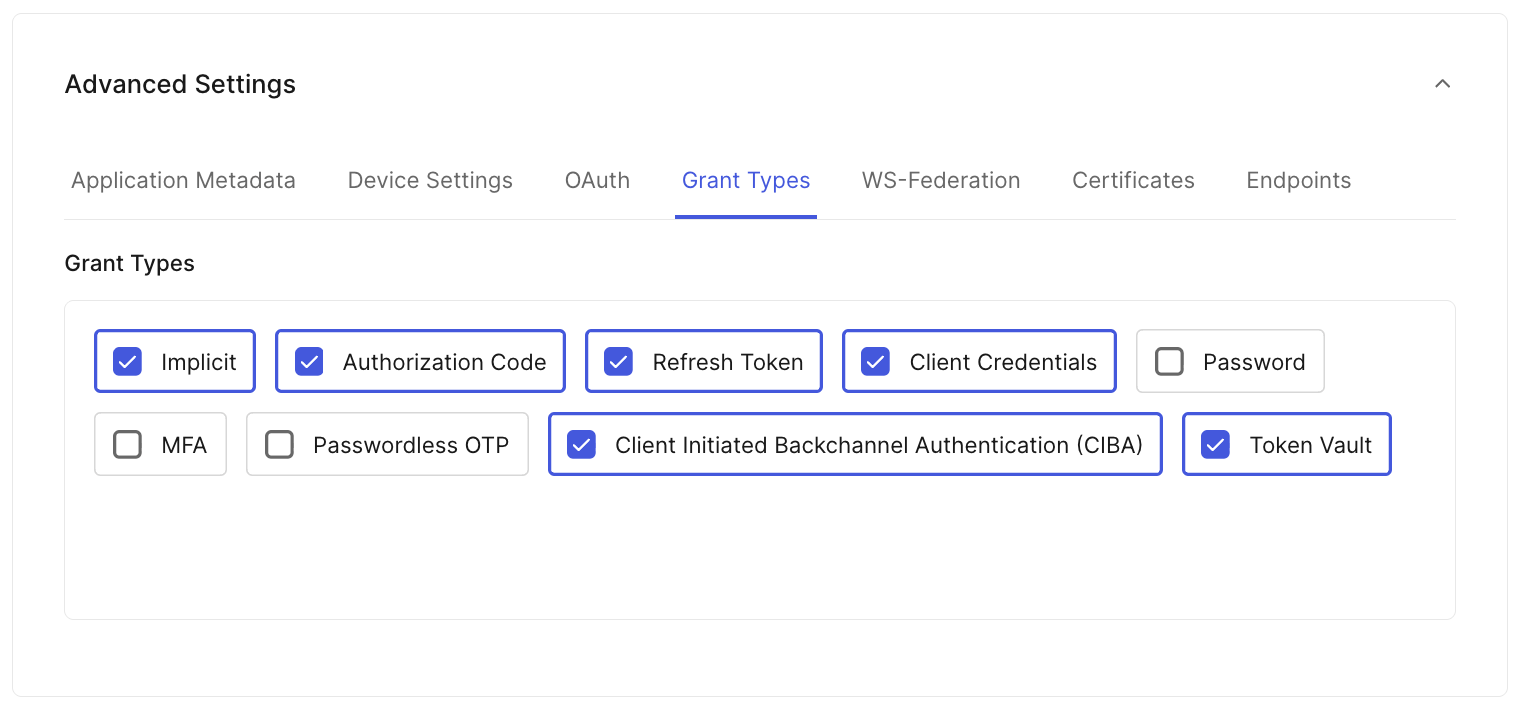
- Advanced settings, grant types: Implicit, Authorization Code, Refresh Token, Client Credentials, Token Vault, and Client Initiated Backchannel Authentication (CIBA). The Token Vault grant was used on the previous article, and we will keep it to maintain compatibility with older features.

In the tab API, authorize “Zoo Management API”

In the Settings tab, save the domain, client_id, and client_secret property values for further use.

Allowing a Coordinator to Receive Push Notifications
We must select one user who will have the power to allow emergency protocols to be initiated. This user will have to configure the Auth0 Guardian app on iOS or Android and will receive a push notification when an emergency protocol is trying to be activated.
First, in the Auth0 Dashboard, go to User Management -> Users. If no user exists yet, you can create a new one in the “Create User” button at the top right. For the user who will authorize the emergency protocol, click the three-dots button and select "View Details".

In the user details page, go to the “Multi-Factor Authentication” section and click on the “Send an enrolment invitation” link. This will send an email to the user to start the MFA enrolment process. Also, store the user_id for further use in the next section.

The user also must be a COORDINATOR, so go to the “Roles” section and ensure the user already has the COORDINATOR role.

After following the enrolment instructions, it is expected that the user has MFA installed and configured on their device. You can check the enrolment status by going back to the user details page and checking the “Multi-Factor Authentication” section again.

Changing Our API to Require the Emergency Protocol Scope
Our current API already has a new endpoint [PUT] /emergency, which requires a special permission emergency:start. Only our special coordinator will have this permission enabled.
The permission is defined in the API and assigned to the user we chose to be the emergency coordinator.
First, we need to create the permission on the Auth0 Dashboard. Go to Applications -> APIs and choose “Zoo Management API,” go to the tab “Permissions” and add the permission emergency:start with the description “Allows an emergency to start.”

Now, we need to assign this permission to the user we chose and added MFA in the previous section. Go to User Management -> users and click on the correct user. Go to the permissions tab and click on “Assign permissions”.

Then, find “Zoo Management API” select emergency:start permission. Do not forget to click on the “Add permissions” button.

Ok, now we are ready to implement asynchronous authorization using LangGraph!
Implementing LangGraph Async Authorization Tools
Now, we are going to add a new LangGraph tool to our application. This tool will enable you to start an emergency protocol.
First, create a file tools_async_auth.py using the command line at the project root folder:
touch agent/tools_async_auth.py
Now, put the following content inside the file:
import os

import requests
from auth0_ai.authorizers.ciba.ciba_authorizer_base import get_ciba_credentials
from auth0_ai_langchain.auth0_ai import Auth0AI
from dotenv import load_dotenv
from langchain_core.tools import StructuredTool

load_dotenv()
auth0_ai = Auth0AI()

with_emergency_protocol = auth0_ai.with_async_user_confirmation(
    scopes=["emergency:start"],
    binding_message="Emergency protocol triggered",
    user_id=os.getenv("EMERGENCY_COORDINATOR_ID"),
    audience=os.getenv("API_AUDIENCE"),
    on_authorization_request="block"
)


def emergency_protocol(event: str) -> str:
    credentials = get_ciba_credentials()

    response = requests.put(
        f"{os.getenv('API_BASE_URL')}/emergency",
        headers={
            "authorization": f"{credentials['token_type']} {credentials['access_token']}"
        },
    )
    response.raise_for_status()
    return f"Emergency protocol triggered"


emergency_protocol_tool = with_emergency_protocol(
    StructuredTool.from_function(
        func=emergency_protocol,
        name="emergency_protocol",
        description="Emergency protocols can be triggered by a coordinator.",
    )
)
We need to add emergency_protocol_tool as a LangGraph tool. Edit the file agent/agent.py and add the following lines
# add this import
from tools_async_auth import emergency_protocol_tool
# Modify the tools array and add emergency_protocol_tool
tools = [
    list_animals,
    update_animal_status,
    notify_staff,
    ask_for_veterinarian_supplies_tool,
    ask_for_cleaning_supplies_tool,
    emergency_protocol_tool,
]
That is it! In the agent_async_auth.py file, we created a function that is wrapped with with_async_user_confirmation. This library function receives the needed scopes and the user ID, for which we must ask for authorization. This library function will handle all CIBA authorization flow and call your function once the flow is successfully completed. You can get the access token on behalf of the user by calling get_ciba_credentials(). With that credential, you can easily call our API project with the required scope.
Now, we need to fill in the environment variables. Create a file .env and fill these contents. Use the values we asked you to copy in the previous sections.
AUTH0_DOMAIN="YOUR_AUTH0_DOMAIN"
AUTH0_CLIENT_ID="YOUR_AUTH0_CLIENT_ID"
AUTH0_CLIENT_SECRET="YOUR_AUTH0_CLIENT_SECRET"
APP_BASE_URL="http://localhost:3000"
APP_SECRET_KEY="use [openssl rand -hex 32] to generate a 32 bytes value"
# OpenAI
OPENAI_API_KEY="YOUR_OPEN_AI_KEY"
API_AUDIENCE="https://zoo-management-api"
API_BASE_URL="http://localhost:8000"

VETERINARIAN_SUPPLIES_EMAIL="EMAIL_SENT_FOR_VETERINARY_SUPPLIES"
CLEANING_SUPPLIES_EMAIL="EMAIL_SENT_FOR_CLEANING_SUPPLIES"
EMERGENCY_COORDINATOR_ID="AUTH0_USER_ID_THAT_WILL_RECEIVE_PUSH_NOTIFICATIONS"
Now, we need to start both services and test them. For the API project, do the following:
cd api
poetry run uvicorn main:app
And for the Agent, run these commands:
cd agent
poetry run uvicorn main:app --port 3000
Now, you can access the browser using the address http://localhost:3000, fill out the signup form, or log in with an existing user. Prompt the LLM to start an emergency by typing “Start the emergency protocol, Alex escaped its cage!”. The user assigned as emergency coordinator will receive a push notification like this one:

If the user allows, the LLM will reply, and the emergency protocol will be triggered:

Note: All the code until now is on branch step4-blocking-ciba of our repository. You can double-check your code or continue from this point.
Production-Level LangGraph with Auth0
Although we properly implemented CIBA, we are not applying the best approach for either LangGraph and CIBA yet.
To simplify our understanding until now, we decided to put together our FastAPI code in the same runtime as LangGraph although LangGraph recommends using LangGraph CLI to run and deploy your graph application. With the CLI, LangGraph becomes an API that we can access and allow other services to consume it, it also enables debugging features that will ease the development.
Also, Auth0 library is not using the best approach for CIBA as we are using a blocking method for waiting user approval/denial: the correct approach would be using a LangGraph feature called interruptions for this kind of event. In this section we are going to explain how to solve both issues.
Separating agent from LangGraph
Until now, our platform has two services: (1) API and (2) Agent. The Agent service actually serves two purposes: it handles our web application with front and backend code, and it handles all LangGraph functions. In this section, we are going to separate this service into two.
First, we need to add some dependencies (stick with the following versions to avoid potential dependency conflicts and ensure compatibility with the tutorial’s code):
poetry add langgraph-cli@0.3.6 langgraph-api@0.2.94 langgraph-runtime-inmem@0.5.0
Now, we are going to modify the agent/agent.py file to be the entrypoint of LangGraph platform. Modify the function create_langgraph and remove the checkpointer attribute as it will be automatically handled by LangGraph platform, also modify the __GRAPH to graph so the CLI can capture this variable.
def create_langgraph():
    graph_builder = StateGraph(State)
    graph_builder.add_node("chatbot", chatbot)
    graph_builder.add_node("tools", ToolNode(tools))
    graph_builder.add_edge(START, "chatbot")
    graph_builder.add_edge("chatbot", END)
    graph_builder.add_edge("tools", "chatbot")
    graph_builder.add_conditional_edges("chatbot", tools_condition)
    return graph_builder.compile()

graph = create_langgraph()
You can remove both run_agent and get_messages functions, we are not going to use them.
The CLI needs a JSON file that specifies how the platform should behave. Create a file langgraph.json at agent folder:
touch agent/langgraph.json
And fill the following content:
{
  "python_version": "3.11",
  "graphs": {
    "agent": "./agent.py:graph"
  },
  "env": ".env",
  "dependencies": ["."]
}
The file above declares that the platform will use the variable graph from agent.py file, and will load environment variables from the same file we use on our application.
Now we need to change our FastAPI main.py file to remotely connect to LangGraph instead of our direct calls. Luckily, LangGraph already provided a class to make all hurdle transparent. Just instantiate a langgraph_client and create few functions as we need how threads are handled by the application:
from langgraph_sdk import get_client

langgraph_client = get_client(url=os.getenv("LANGGRAPH_URL", "http://localhost:2024"))


async def get_thread(request: Request) -> dict:
    try:
        thread_id = await get_thread_id(request)
        thread = await langgraph_client.threads.get(thread_id)
    except:
        thread_id = await get_thread_id(request, create_new=True)
        thread = await langgraph_client.threads.get(thread_id)
    return thread


async def get_thread_id(request: Request, create_new=False) -> str:
    if "thread_id" not in request.session or create_new:
        logging.info("Creating new thread")
        thread = await langgraph_client.threads.create()
        request.session["thread_id"] = thread["thread_id"]

    return request.session["thread_id"]
We use get_client to connect to a remote service. The client will have all functions we need to communicate with our LangGraph instance. In the previous version, we created the memory using the Auth0 user id, but in this version we introduce the concept of threads to handle different chat threads even for the same user. Now, modify the following functions to this new version:
@app.get("/prompt")
async def get_prompt(
    request: Request,
    auth_session=Depends(auth_client.require_session),
) -> Iterable[Prompt]:

    thread = await get_thread(request)
    messages = []
    if "values" in thread and "messages" in thread["values"]:
        messages = list(
            filter(None, map(_convert_to_prompt, thread["values"]["messages"]))
        )
    return messages


@app.get("/prompt/new")
async def get_new_prompt(request: Request, response: Response):
    await get_thread_id(request, create_new=True)
    return RedirectResponse(url="/")


def _convert_to_prompt(message: HumanMessage | AIMessage) -> Prompt | None:

    if message["type"] not in ["human", "ai"]:
        return None

    content = message["content"]

    if not content:
        return None

    marker = "User input:"

    if marker in content:
        content = content.split(marker, 1)[1].strip()

    return Prompt(prompt=content, type=message["type"])


@app.post("/prompt")
async def query_genai(
    data: Prompt,
    request: Request,
    response: Response,
    auth_session=Depends(auth_client.require_session),
):
    user_role = auth_session["user"]["https://zooai/roles"][0]
    access_token = await get_access_token(request, response)
    refresh_token = auth_session.get("refresh_token")

    result = await langgraph_client.runs.wait(
        thread_id=await get_thread_id(request),
        assistant_id="agent",
        input={
            "messages": [
                HumanMessage(
                    content=f"User role: {user_role}. Timestamp: {datetime.now().isoformat()}, User input: {data.prompt}"
                )
            ]
        },
        config={
            "configurable": {
                "_credentials": {"refresh_token": refresh_token},
                "api_access_token": access_token,
            }
        },
    )

    return {"response": result["messages"][-1]["content"]}
All changes are related to how we should connect to a remote service and also how to deal with threads. We also created a new endpoint [GET] /prompt/new just to create a new thread if needed.
Now, in addition to the services we are already running, we must spin the LangGraph platform using the following command:
cd agent
langgraph dev --allow-blocking
Note: All the code until now is on the branch step5-langgraph-platform of our repository.
Handling interruptions and CIBA without thread blocking
Our CIBA implementation uses a blocking call to wait for the user to approve or deny the permission request. This causes the graph to be improperly frozen and locks a system thread indefinitely. To handle human-in-the-loop interactions, LangGraph provides a feature called interrupts that allows a graph to be in a pause state waiting to be resumed when some action is done.

Using this solution will make us have better feedback for our users and will properly be more aligned with LangGraph's proposal.
First, let’s change our FastAPI main file and JavaScript file to properly handle interruptions and provide user feedback.
At agent/main.py file change the following fragments
class Prompt(BaseModel):
    prompt: str
    type: Literal["human", "ai", "interrupted"] = "human"
This will allow us to send a message to the frontend indicating there is an interruption going on. Now, change get_prompt function to include interruption events:
@app.get("/prompt")
async def get_prompt(
    request: Request,
    auth_session=Depends(auth_client.require_session),
) -> Iterable[Prompt]:

    thread = await get_thread(request)
    messages = []
    if "values" in thread and "messages" in thread["values"]:
        messages = list(
            filter(None, map(_convert_to_prompt, thread["values"]["messages"]))
        )

    interrupts = thread.get("interrupts", {})
    for interrupt in interrupts.values():
        messages.append(
            Prompt(prompt=interrupt[0]["value"]["message"], type="interrupted")
        )

    return messages
Now, we need to modify the agent/static/app.js file so it can work with the new prompt type. For that, we are going to modify the frontend to do message pooling instead of request/response message retrieval. A more advanced solution is to use Websockets or Server Side Events.
First, remove the print message function call from sendMessage function so server messages will not be printers as messages are sent (they will only be printed with our pooling solution):
async function sendMessage() {
    const input = document.getElementById('message-input');
    const message = input.value.trim();

    if (message) {
        print_message(message, "human")
        input.value = '';

        const response = await fetch(`/prompt`, {
            method: 'POST',
            headers: {
                'Content-Type': 'application/json',
            },
            body: JSON.stringify({ prompt: message })
        });

        const data = await response.json();
        print_message(data.response, "ai")
    }
}
Now, change the print_message function to handle interrupt message type:
function print_message(message, type) {
    const classes = {
        human: "alert alert-primary ms-auto",
        ai: "alert alert-secondary",
        interrupted: "alert alert-warning w-75 mx-auto text-center"
    }
    const divclass = classes[type]
    const messagesContainer = document.getElementById('chat-messages');
    messagesContainer.innerHTML += `<div class="${divclass}" style="max-width:80%">${message}</div>`;
    const chat = document.getElementById("chat-messages")
    chat.scrollTop = chat.scrollHeight
}
Last, let us modify fetching messages to be executed every 5 seconds:
document.addEventListener('DOMContentLoaded', async () => {
    const messageInput = document.getElementById('message-input');
    const sendButton = document.getElementById('send-button');

    messageInput.addEventListener('keypress', (e) => {
        if (e.key === 'Enter') sendMessage();
    });
    sendButton.addEventListener('click', sendMessage);

    await fetchMessagesAndPrint();
    setInterval(fetchMessagesAndPrint, 5000);
    await fetchNotifications();
    setInterval(fetchNotifications, 5000);
});
Now, we need to remove the blocking mechanism from our tool calling in the agent/tools_async_auth.py file. Put the with_emergency_protocol as in the example below, removing on_authorization_request attribute:
with_emergency_protocol = auth0_ai.with_async_user_confirmation(
    scopes=["emergency:start"],
    binding_message="Emergency protocol triggered",
    user_id=os.getenv("EMERGENCY_COORDINATOR_ID"),
    audience=os.getenv("API_AUDIENCE"),
)
Test your application again, try to force an emergency to see what happens. You should receive the following message and the prompt at your mobile device:

You probably noticed that even after approval the protocol is not initiated. That happens because the graph is paused and needs to be resumed. LangGraph does not proactively resume graphs as it is unable to know what’s the correct course of action, we need to manually resume or use tools that already do this. auth0-ai library provides a utility class called GraphResumer that handles these actions for us.
We need to create a new service that will be solely responsible to monitor CIBA interruptions and resume them. Create the file agent/main_scheduler.py:
touch agent/main_scheduler.py
And write the following code:
import asyncio
import os

from auth0_ai_langchain.ciba import GraphResumer
from langgraph_sdk import get_client


async def main():
    resumer = GraphResumer(
        lang_graph=get_client(
            url=os.getenv("LANGGRAPH_URL", "http://localhost:2024")
        ),
        filters={"graph_id": "agent"},
    )

    resumer.on_resume(
        lambda thread: print(
            f"Attempting to resume thread {thread['thread_id']} from interruption {thread['interruption_id']}"
        )
    ).on_error(lambda err: print(f"Error in GraphResumer: {str(err)}"))

    resumer.start()
    print("Started CIBA Graph Resumer.")
    print(
        "The purpose of this service is to monitor interrupted threads by Auth0AI CIBA Authorizer and resume them."
    )

    try:
        await asyncio.Event().wait()
    except KeyboardInterrupt:
        print("Stopping CIBA Graph Resumer...")
        resumer.stop()


asyncio.run(main())
Now, run this application, it should connect to our LangGraph platform and resume interrupted graphs. In a few seconds, you should see something similar to the image bellow:

Congratulations! Now you have a production level LangGraph solution!
Note: All the code can be checked at branch step6-async-auth of our repository.
Learnings
This article demonstrated how to implement asynchronous authentication with CIBA, creating an emergency protocol that utilizes a designated user's mobile device for approval. This method ensures secure, real-time decision-making for critical workflows, significantly enhancing the protection and control of your application's emergency processes.
We also explored preparing a production-level LangGraph solution using the LangGraph CLI and managing human-in-the-loop graphs.
Ready to secure your GenAI applications with advanced authentication? Learn more about how Auth0 for AI Agents can simplify and strengthen your AI and LangGraph solutions.
Sign up for the Auth0 for AI Agents Developer Preview.
About the author


