Not long ago we released the Auth0 MCP Server, a specialized Model Context Protocol server that brings Auth0's identity management capabilities directly to your AI assistant conversations in your favorite app or IDE. This server enables you to analyze authentication patterns, identify authentication related issues, and manage identity operations through natural language interactions.
This post will guide you through setting up the Auth0 MCP Server in your VS Code development environment and using it to perform some basic analysis.
What Is the Auth0 MCP Server?
The Auth0 MCP server provides a bridge between your AI assistant and Auth0's identity platform. Instead of manually navigating the Auth0 Dashboard or writing custom API calls, you can ask natural language questions like:
- "Create an application for me"
- "Show me recent failed login attempts"
- "What applications are configured in my tenant?"
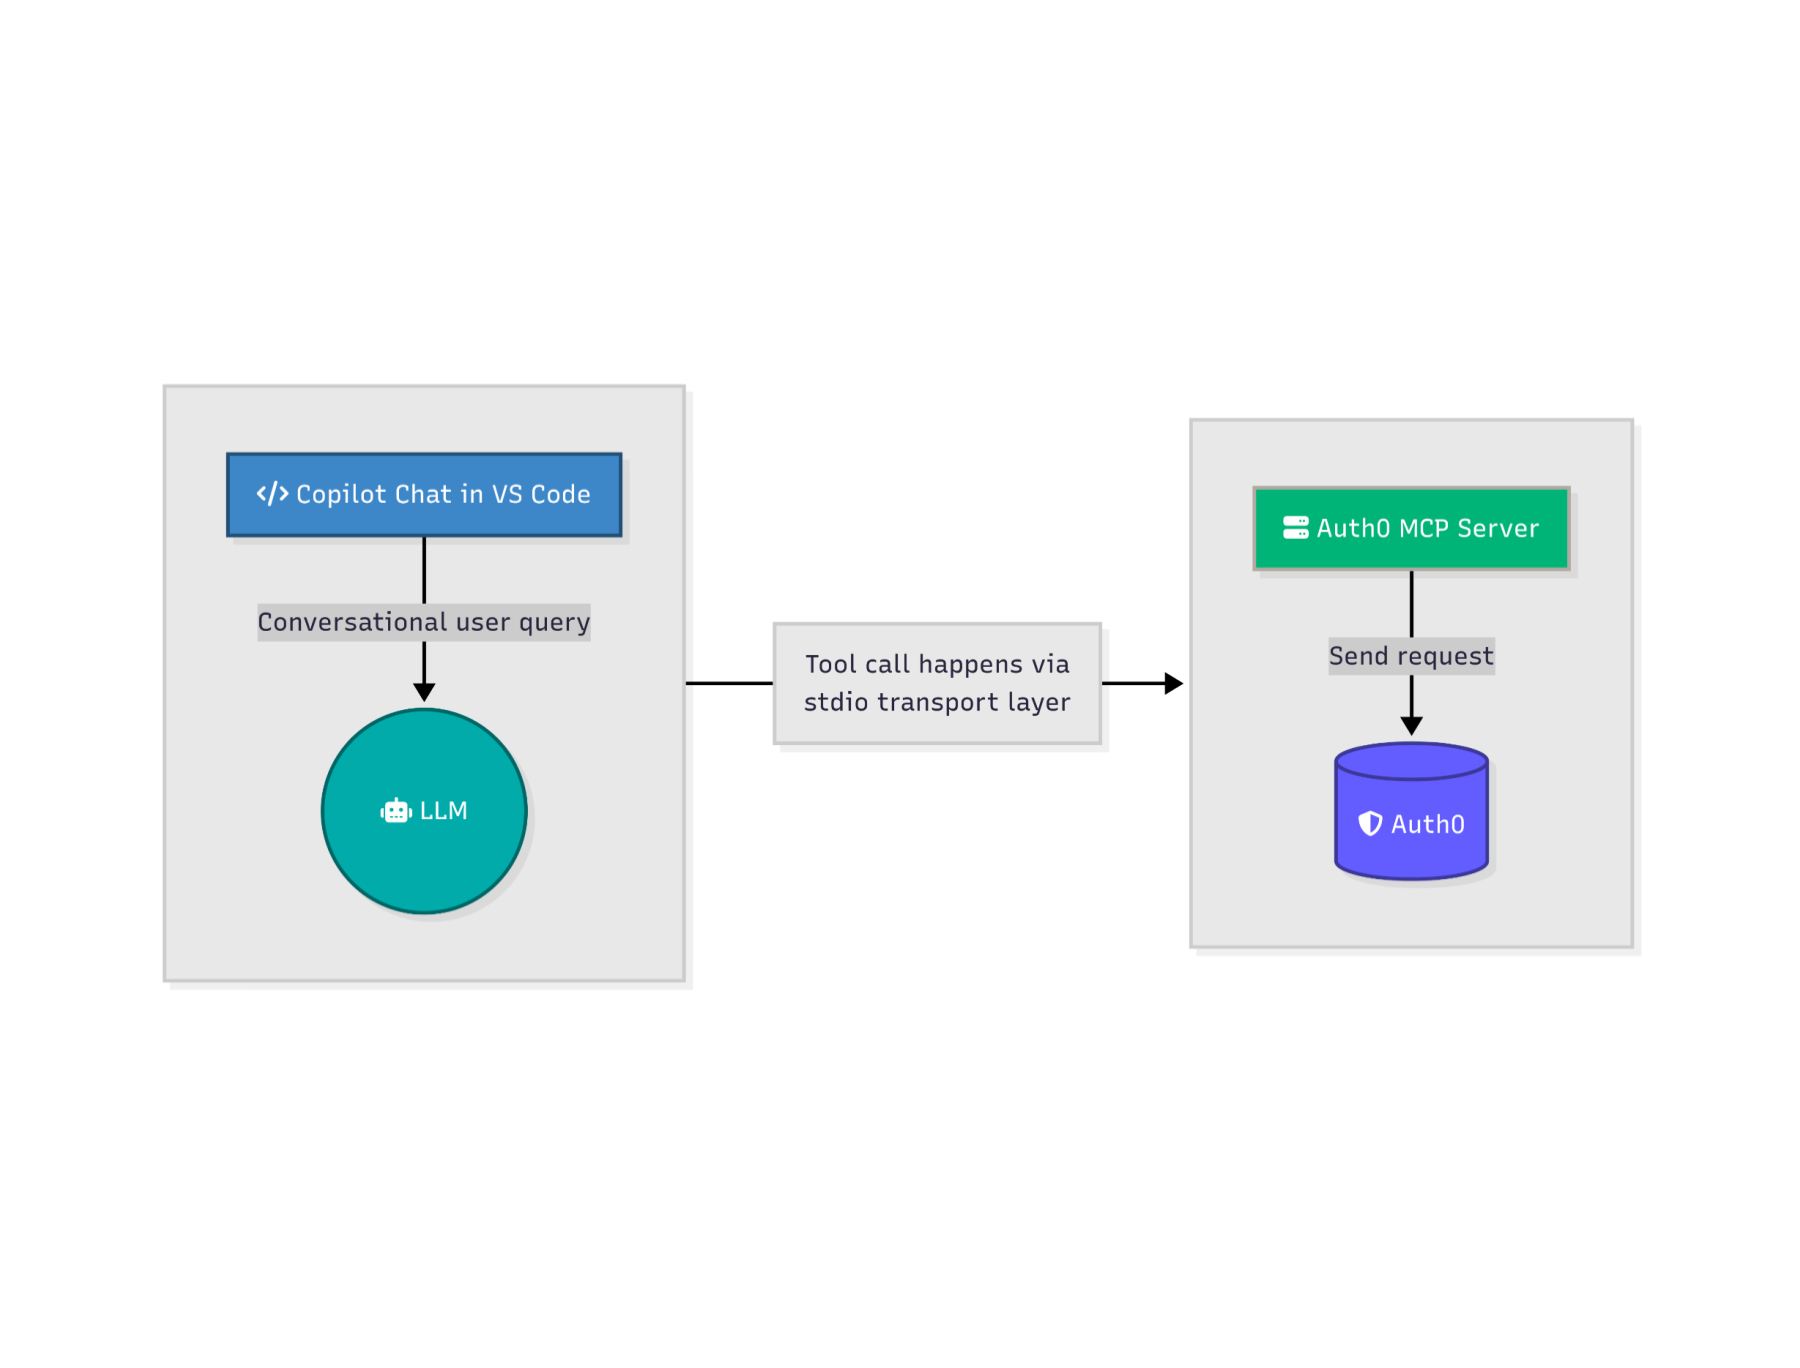
The server translates these requests into Auth0 Management API calls and returns the results in a format that your AI assistant can understand and present clearly.
Key capabilities
The Auth0 MCP server includes several tools for interacting with your Auth0 tenant:
- User Management: Search, retrieve, and analyze user data across your tenant
- Log Analysis: Query authentication logs to understand user behavior and troubleshoot issues
- Application Management: Review and analyze your configured applications and their settings
- Statistics and Analytics: Get insights into user activity, sign-ups, and authentication patterns
Prerequisites
Before configuring the Auth0 MCP server, ensure you have:
- An Auth0 account with a configured tenant;
- VS Code;
npx, get npx here.
That's everything you need to get started!
Initializing the Auth0 MCP Server Configuration
The Auth0 MCP Server needs access to your Auth0 account. To configure it, you need to:
- Select the scopes: which actions the server can perform for you
- Choose the tenant: also define which tenant to perform actions in
And add the configuration to your project by creating the mcp.json file with the settings in the appropriate location. So run the following command on the terminal:
npx @auth0/auth0-mcp-server@0.1.0-beta.7 init --client vscode
The Auth0 MCP Server is currently in beta and is provided as is, for that reason we recommend pinning the version whenever possible.
This will start the configuration wizard prompting you to select the scopes for the server.
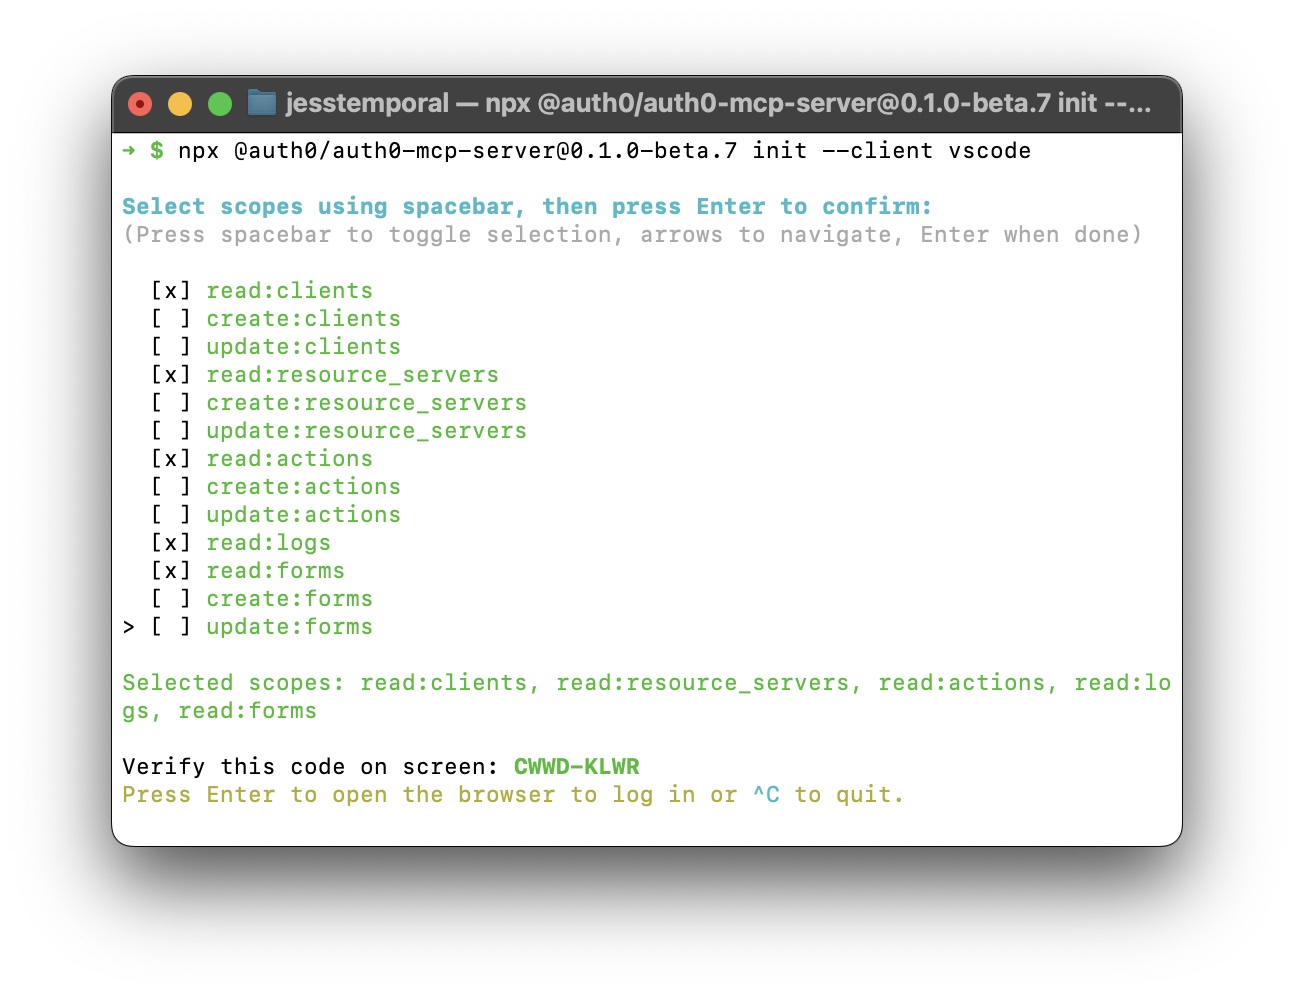
Once you select the scopes, you'll receive a code in the terminal. You will use this code to verify your device when logging in to Auth0.
Authorize the Auth0 MCP Server for Your Auth0 Tenant
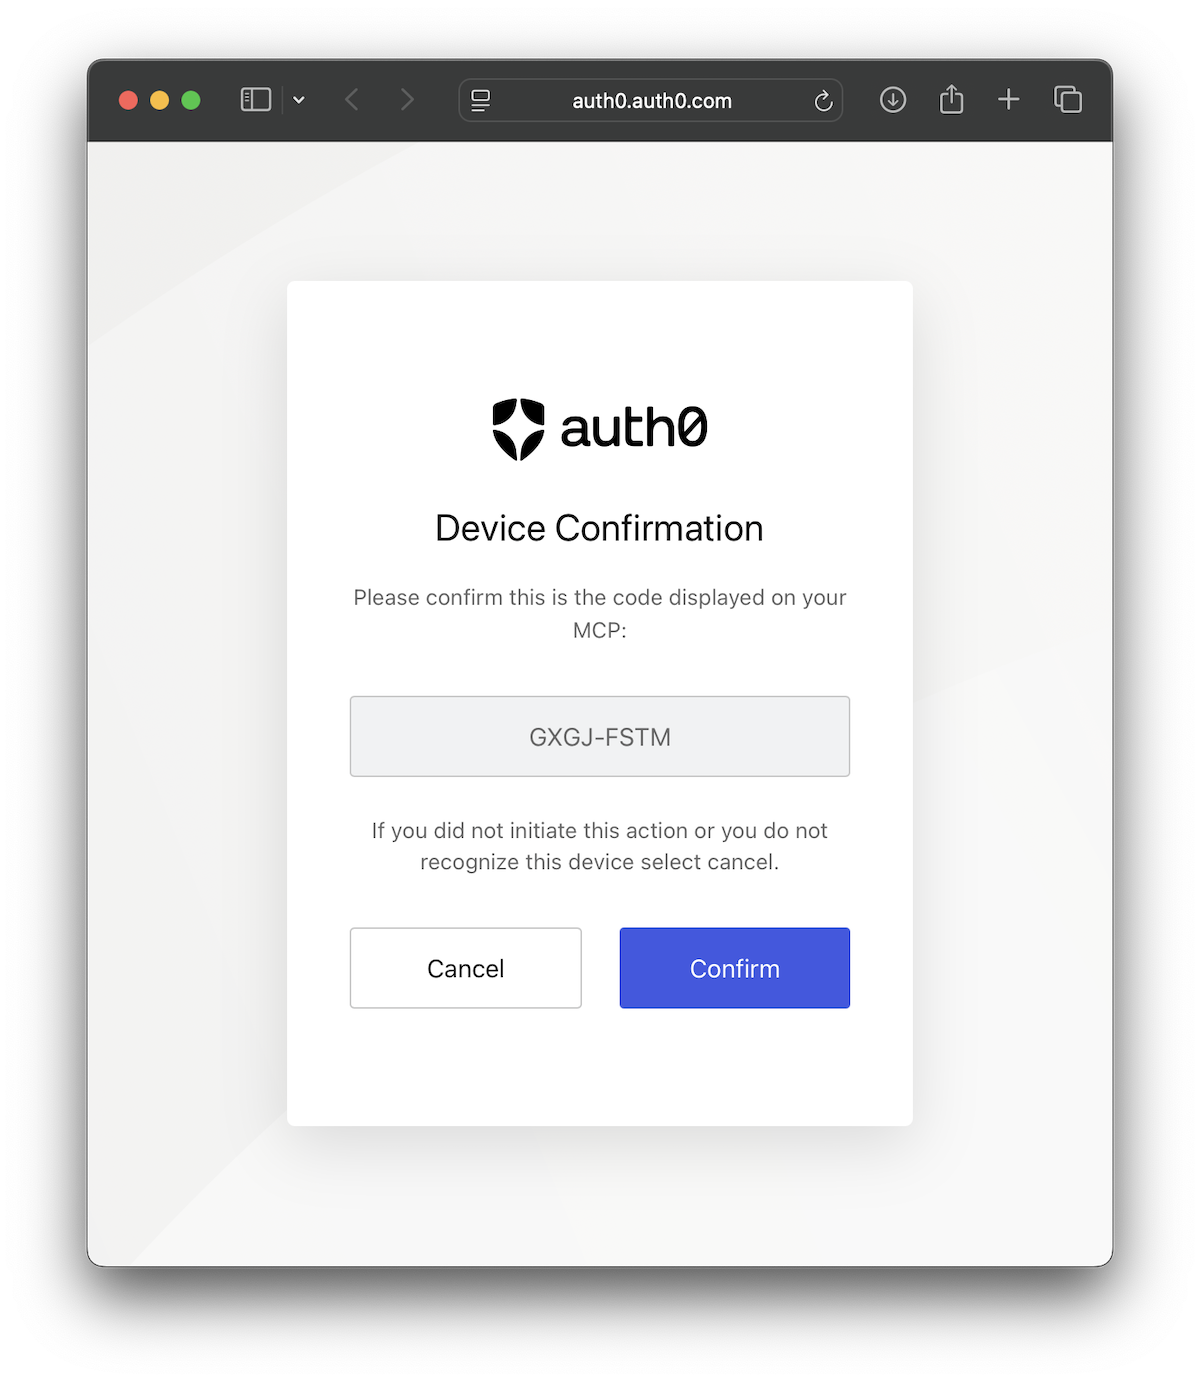
After selecting the scopes and pressing Enter, a browser window will open. This will take you to the Auth0 login page (if you are not logged in yet) and will ask you to confirm the device code you received in the terminal:
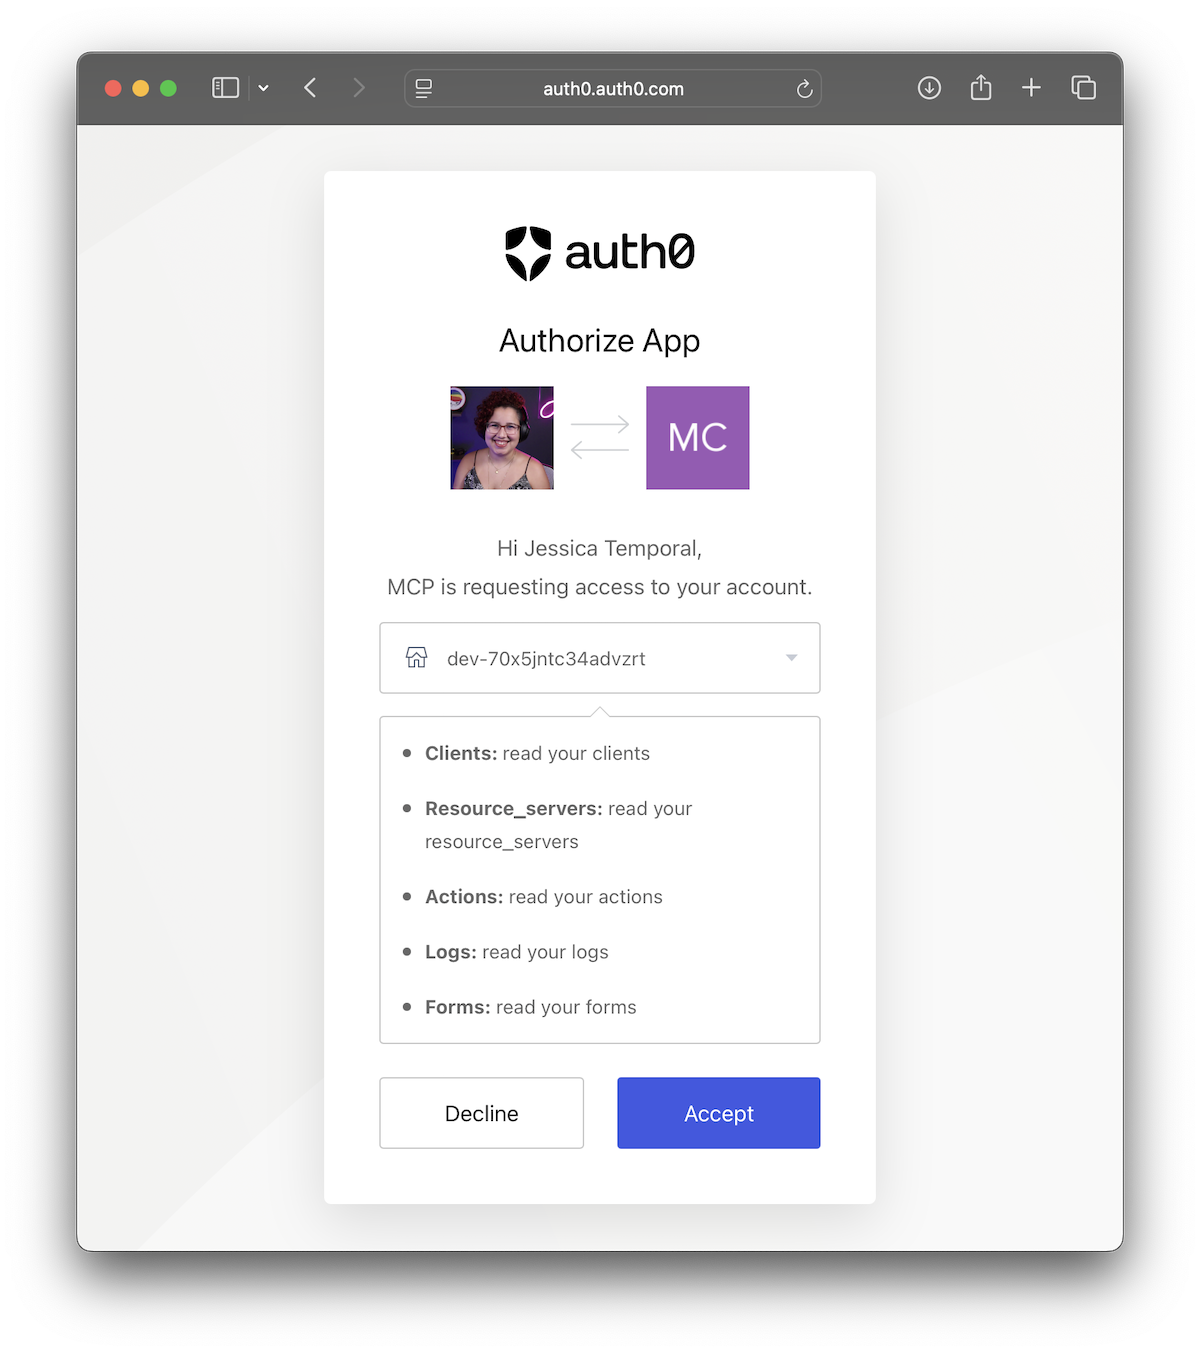
Once confirmed you'll be able to both select the tenant you want to use and double check the scopes:
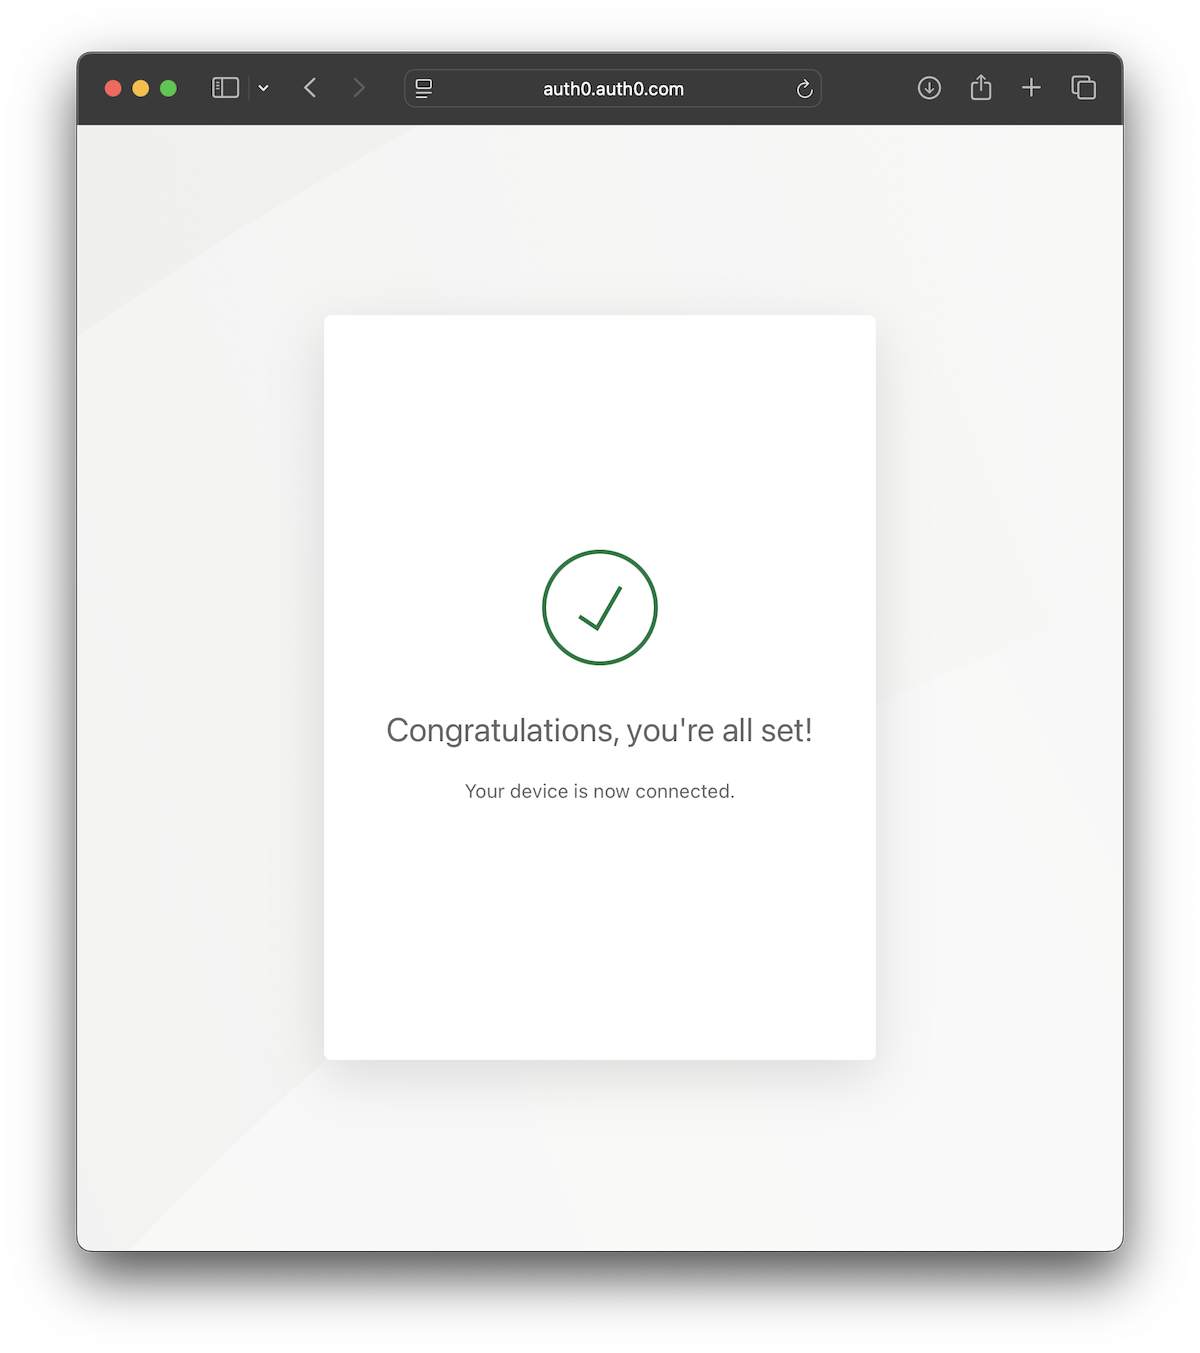
Once the authorization process finishes you'll see a message like the one below.
If you haven't looked into the Auth0 MCP Server source code on GitHub you may be wondering, "How does this work?"
The Auth0 MCP Server uses device authorization flow to enable your access to the Auth0 Management API while running tools.
Under the hood, when you finish logging in and authorizing the application, the Auth0 MCP Server will store in the system keychain (or similar depending on your operating system) the Auth0 access tokens and a few extra bits of information.
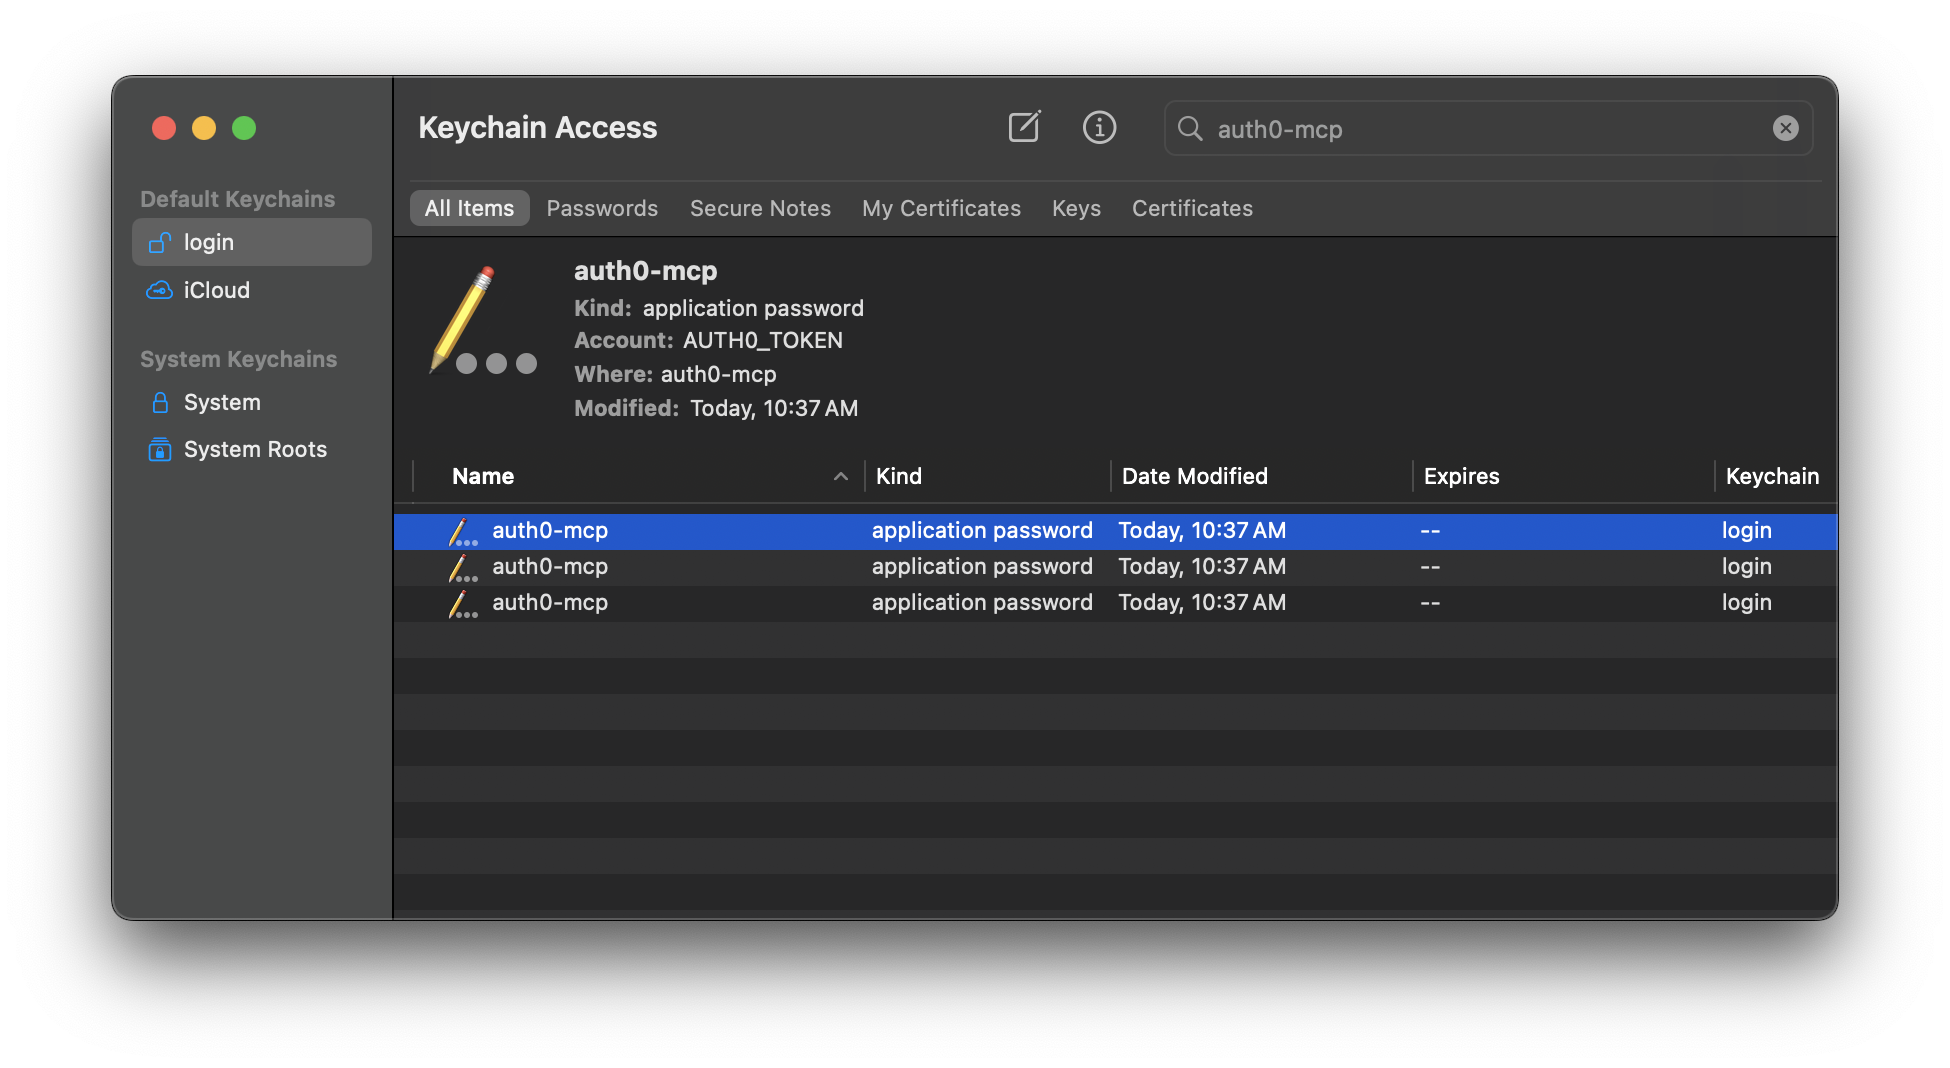
This step guarantees that the LLM in your AI assistant cannot access your Auth0 access token. The token is stored securely and is only retrieved by the MCP server when needed to perform an action.
Stepping back into our configuration: feel free to close the browser with the confirmation screen and return to the terminal to finish the setup.
Choose Where to Configure the MCP Server for VS Code
For VS Code, differently than Cursor and Claude, you can set two levels of access:
- Workspace: Configure for a specific project/repository;
- Global: Configure for all VS Code instances
Following the principle of least privilege, you should ideally configure your MCP Server at the Workspace level. However, if you use the same server across multiple projects, a Global configuration may be more practical.
In this blog post we are going to use the Workspace approach to make sure only our project has access to the Auth0 MCP Server.
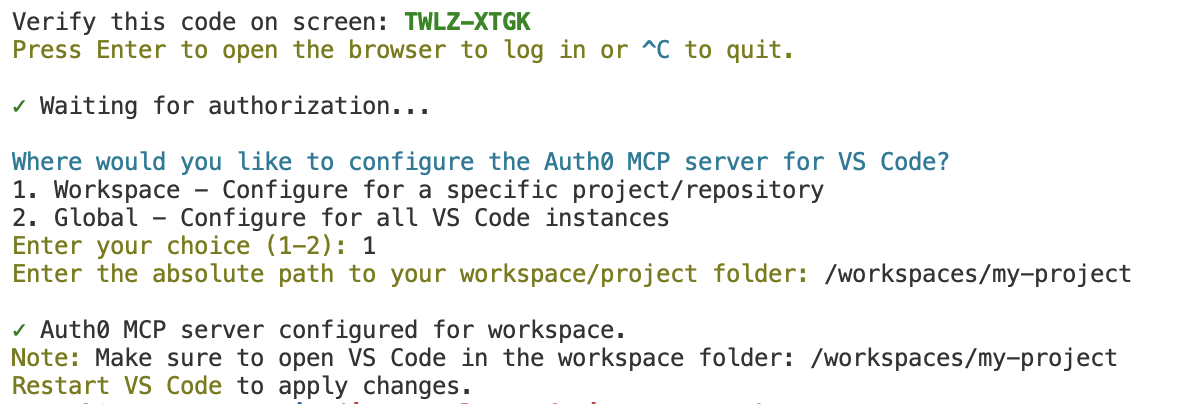
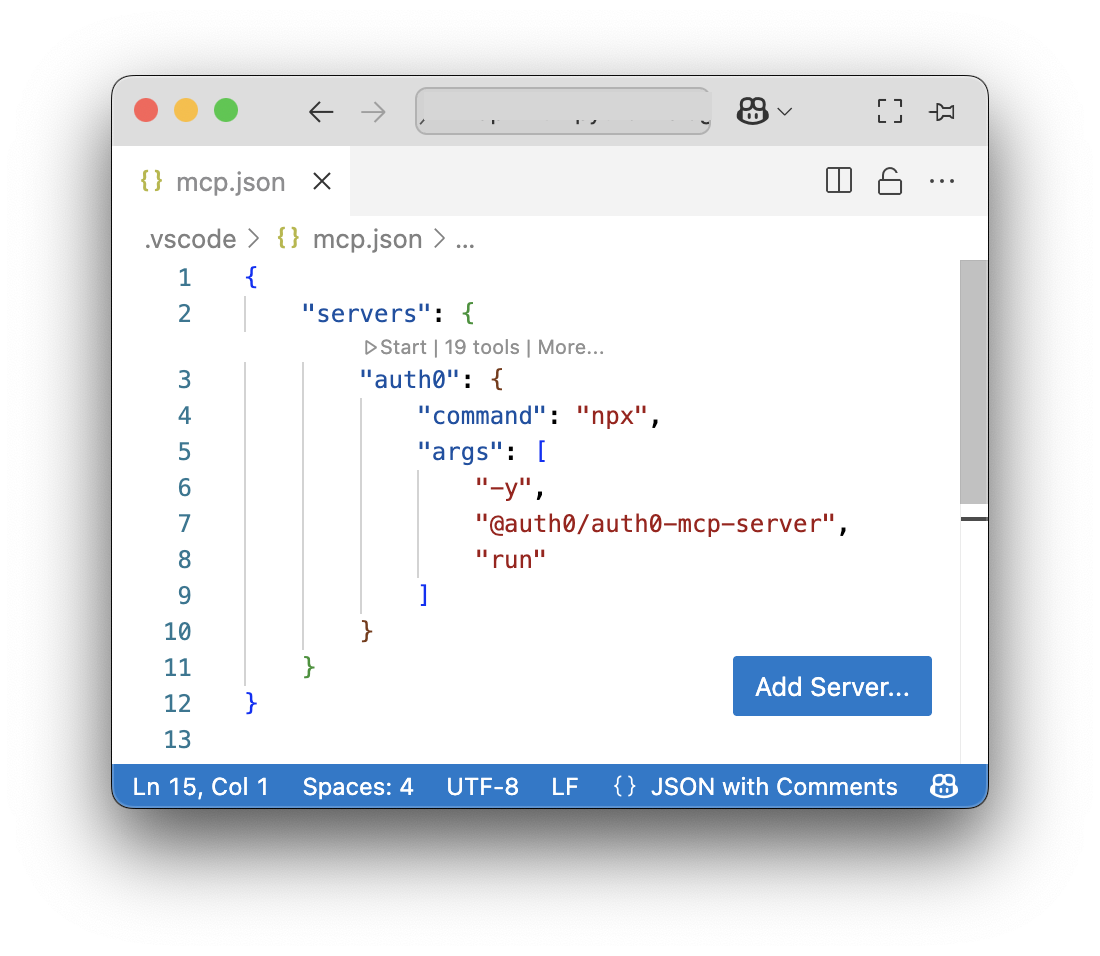
When you choose "Workspace" for your MCP server a .vscode/mcp.json file will be created in your project. If you are performing these steps within VS Code, the file will automatically open, and you'll see inline commands like this:
If you open VS Code in the directory you selected during the configuration step, the server should already be up and running.
Testing the Auth0 MCP Server Configuration
Once configured and the login is made, you can verify that the server is working properly through the VS Code interface.
Checking server status
- Navigate to the Extensions tab and look for your Auth0 MCP server in the servers list
- Click on the server entry to see its status and available tools
- Check the output logs to ensure the server started successfully and connected to Auth0
Changing the tenant
If you want to change the tenant, run the init command once again. You’ll go through the authorization flow again and see the page where you can choose a different tenant.
Using the Auth0 MCP Server with GitHub Copilot for Analysis
With the server configured, you can now interact with your Auth0 tenant through GitHub Copilot Chat in VS Code. Set the Copilot mode to "Agent" and start asking questions like the ones below.
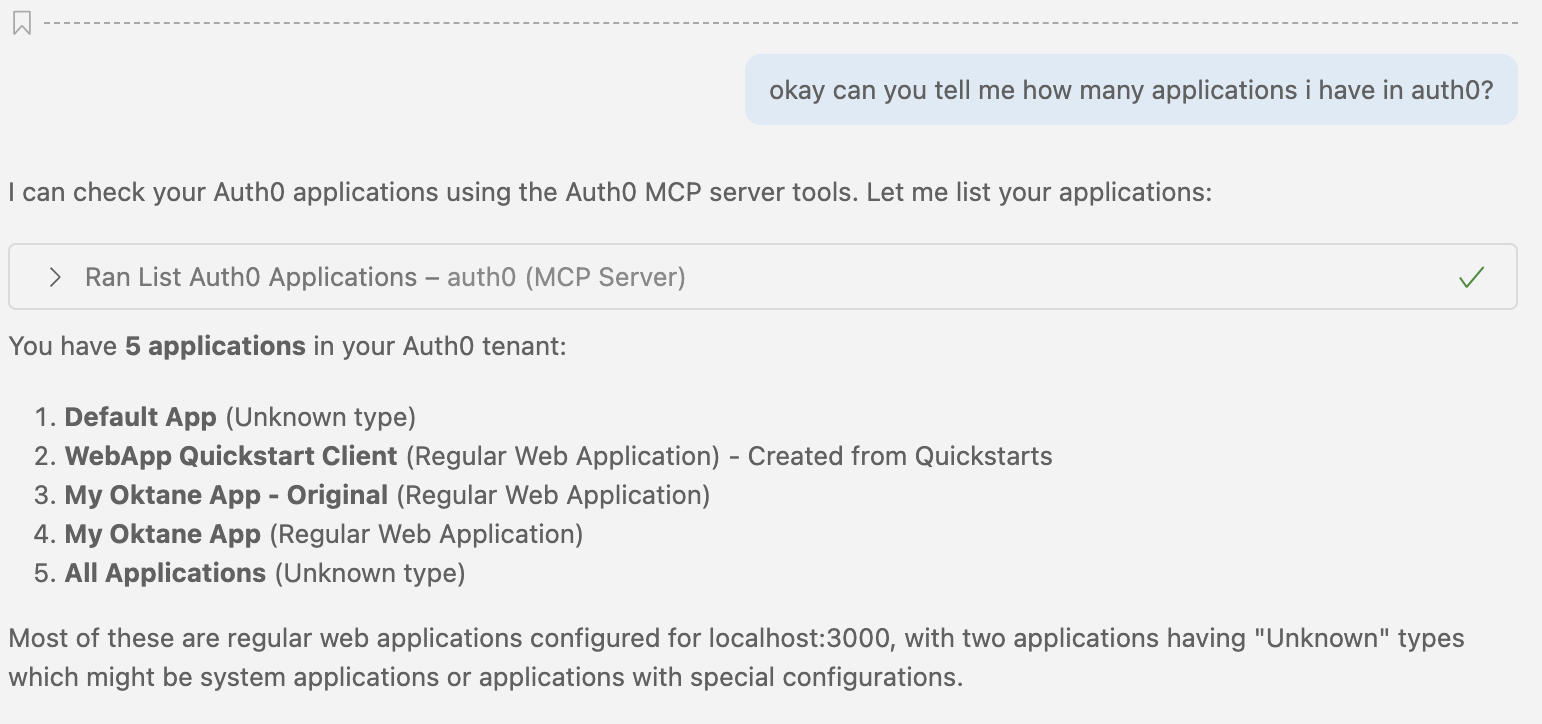
“How many applications do I have in Auth0?”
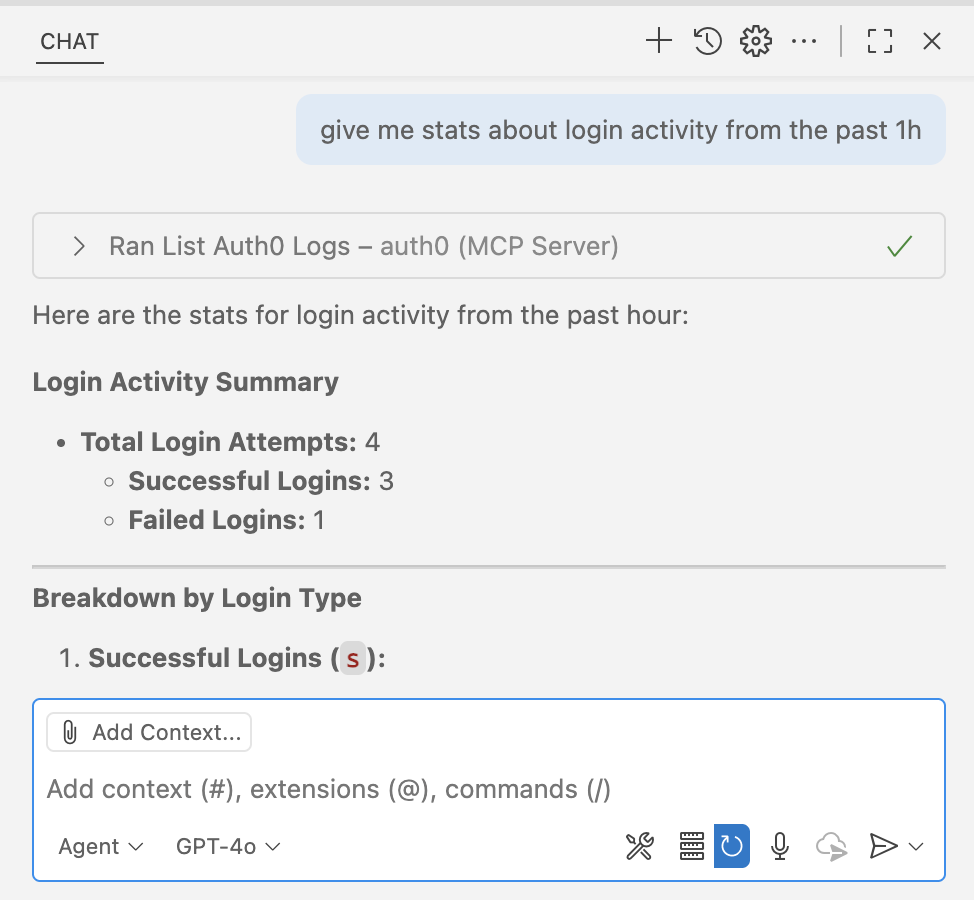
“Give me stats about login activity from the past 1h”
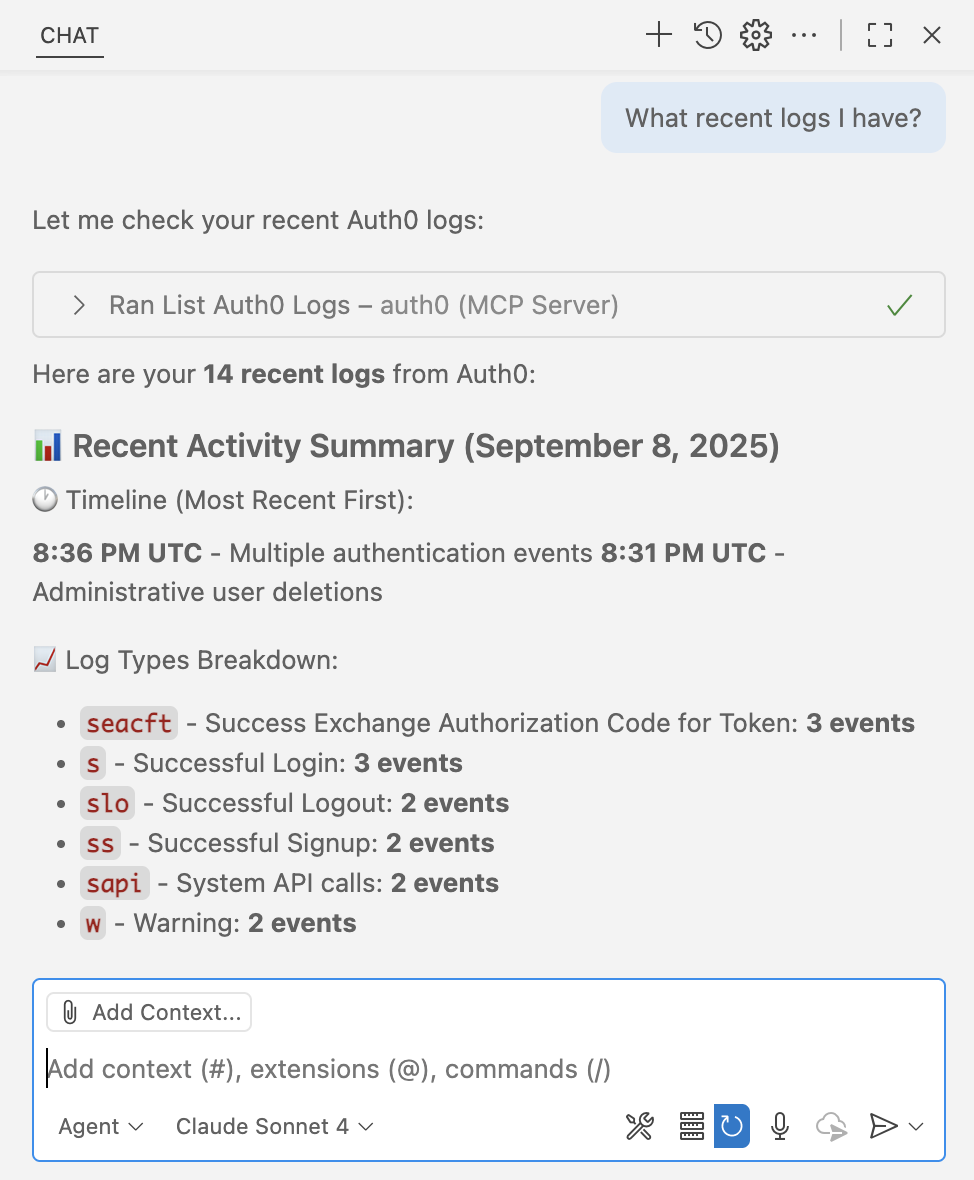
“What recent logs do I have?”
Keep in mind that if you have other MCP servers that manage logs you might need to be more specific in your question by adding an “Auth0” in it so it knows which server to use.
Next Steps
Setting up the Auth0 MCP server in VS Code creates a seamless bridge between your development environment and your identity infrastructure. Key takeaways include:
- Security First: Always prioritize secure credential management and follow the principle of least privilege
- Environment Separation: Use different configurations for development, staging, and production tenants
- Workflow Integration: The real value comes from integrating identity queries into your daily development workflow
- Monitoring and Compliance: Maintain awareness of data access patterns and compliance requirements
- Team Collaboration: Share common queries and best practices with your development team
The Auth0 MCP server transforms identity management from a context-switching activity into a natural part of your development conversation. Whether you're troubleshooting user issues, analyzing authentication patterns, or reviewing security configurations, you can now handle these tasks without leaving your IDE.
This integration represents the future of developer tooling: AI-assisted workflows that bring complex systems closer to the point of development. As MCP adoption grows, we can expect similar integrations across the entire development stack.
Start using the Auth0 MCP Server and let us know what you think below
About the author

Jessica Temporal
Sr. Developer Advocate