

TL;DR: Learn how “self-sovereign” digital wallet Trusted Key can be leveraged with Auth0 to easily manage authenticated identity.
Introducing Authenticated Identities
Trying to authorize user access based on real-life identity has always presented a significant technical challenge for website and application providers. Age verification is commonly attempted for mature content, and just as commonly circumvented by 14-yr old boys claiming to be born in 1972. Real-name policies have a colorful internet history and are a sure-fire topic to start a dinner argument. Regardless of your outlook, it is reasonable to assume that as technology makes authenticated identity solutions more practical to implement, there will be more service providers looking to implement enhanced age verification and real-name policies to meet the needs of regulators and to differentiate their online experience.
A few key technologies are making real-life identity verification closer to reality. First, advances in Optical Character Recognition (OCR), identity documents embedded with barcodes/NFC, and facial recognition allows smart devices such as mobile phones to reliably extract Identity information from government-issued documents and confirm ownership with the person pictured on the ID. Second, public key cryptography allows that identity information to be securely stored using technologies such as Apple’s Secure Enclave, and safely transported. Finally, blockchain technologies are enabling “self-sovereign” identity solutions that allow users to create a digital wallet to store their identity and be in full control of what information leaves that wallet in the form of signed identity tokens, which will, in turn, increase users’ willingness to participate in such identity transfers.
“Technologies like OCR, public key, and blockchain are making real-life identity verification closer to reality.”
Tweet This
To help illustrate these principles we will demonstrate importing real-life identities using Auth0 and Trusted Keys Digital Identity Wallet.
Setting up the Trusted Key App
The Trusted Key App is a secure self-sovereign Digital Identity Wallet based on Ethereum with a wide range of identity applications including KYC, registration, passwordless login, transaction authorization, document signing, and even managing SSH Keys. This entire Trusted Key App setup process only takes a few minutes.
“The Trusted Key App is a secure self-sovereign Digital Identity Wallet based on Ethereum”
Tweet This
Step 1: Download the free Trusted Key iOS App or the Android app.
Step 2: Go through the onboarding process and create a PIN and register an email address.

Step 3: On the “My Identity” screen select “Add an ID” and “Driver’s License”. The App will take you through a process where you will take a picture of the front and back of your license and then automatically extract the information from the ID for review. The Trusted Key App supports driver licenses from around the world, and if you don’t have a driver’s license you can try another identity card such as a National ID. The App will then take a selfie that confirms you are a kicking breathing human, and that your face matches the picture on the ID.
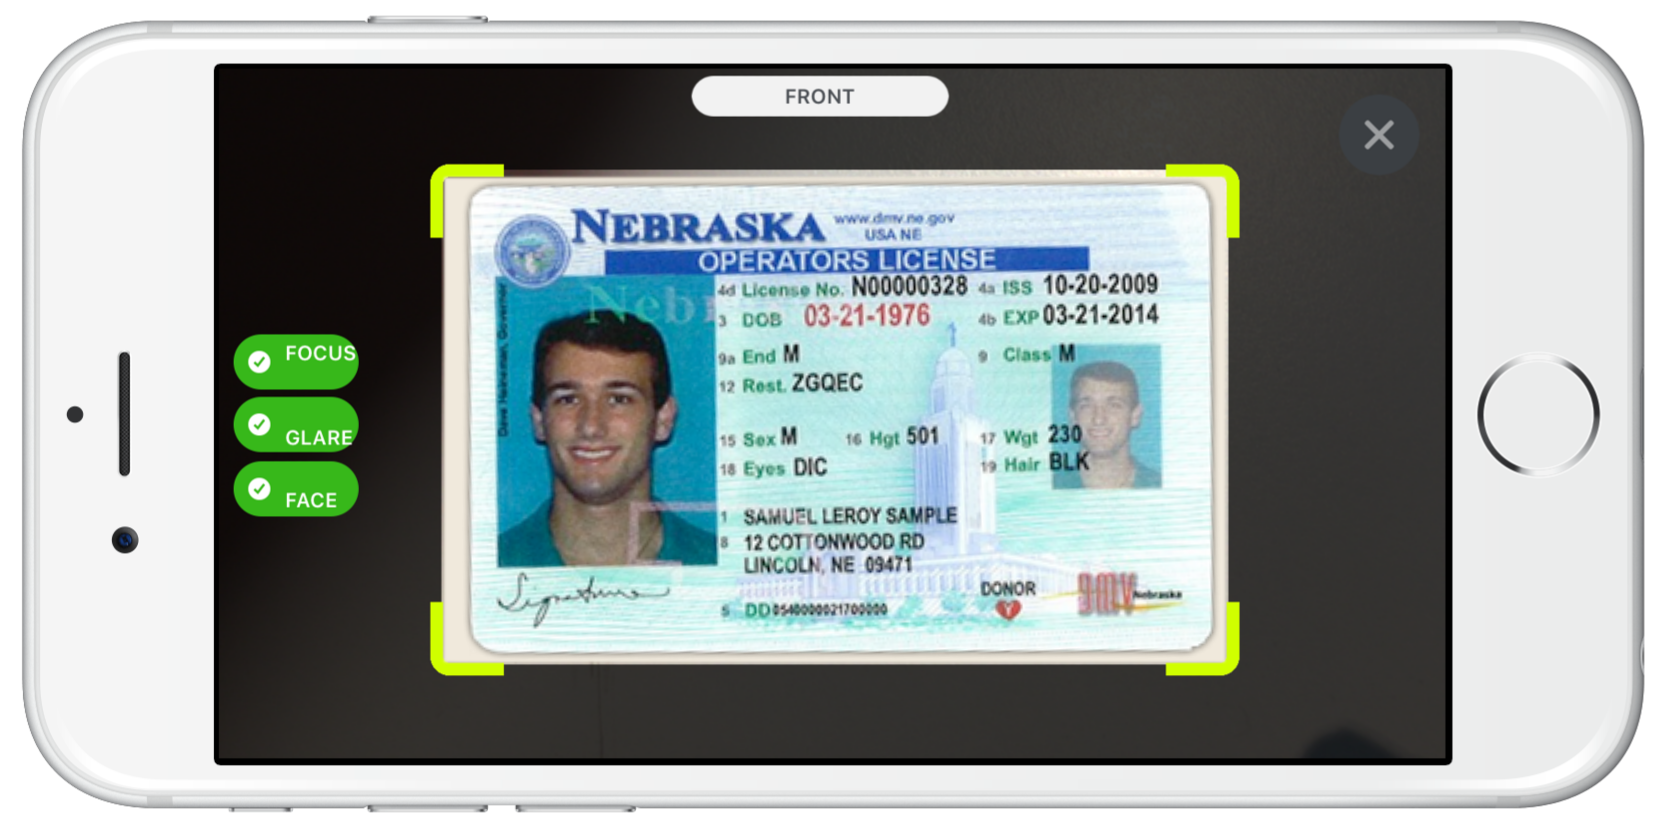
A key aspect of this process is that users are not able to edit or modify the Identity information extracted from the ID. This means that any identity information provided by the Trusted Key App is derived from a government-issued ID document, and the user’s ownership confirmed through the selfie process, resulting in an authenticated identity.
For more information please see the Trusted Key App user guide here.
Getting a Client ID / Secret
Step 1: Go to the Trusted Key Developer Portal here.
Step 2: Click on “Sign up with Trusted Key App” in the upper navigation bar. You will be asked to enter the email address you registered on the Trusted Key App. You will get a notification on the Trusted Key mobile app asking for authorization to access the Developer Portal. Confirm the login.
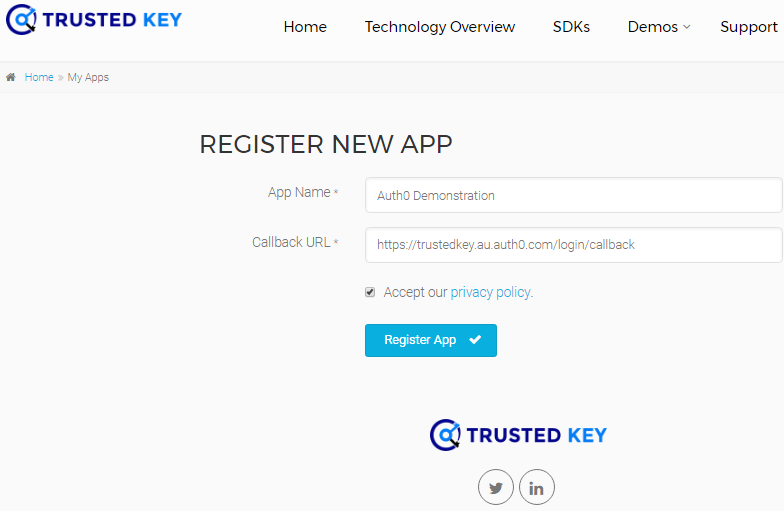
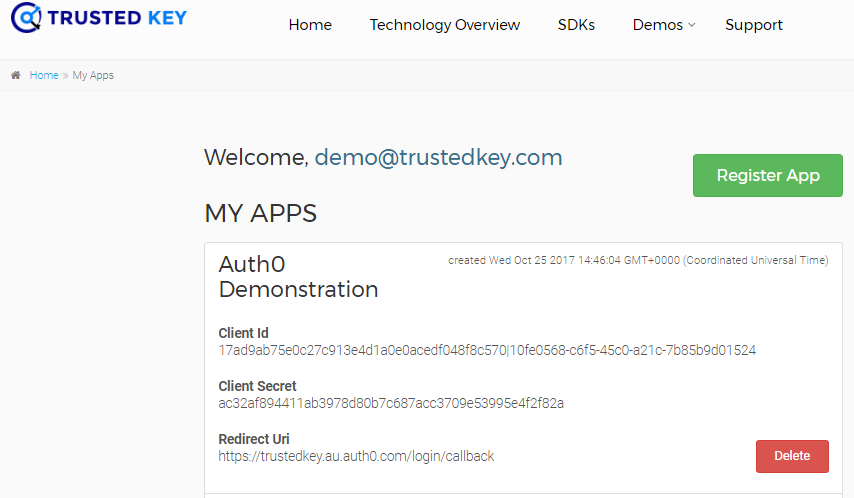
Step 3: Once you have logged into the Trusted Key Developer Portal click on “Register New App” where you will be asked to enter your app name and callback URI. Your callback URI is https://YOUR_TENANT_DOMAIN/login/callback. The portal will then provision a Client ID and Client Secret to use in your API calls to the Trusted Key Platform. Copy both values for the Auth0 setup.
Setting Up Auth0
Auth0 is an ideal platform for easy configuration of connections to third-party Identity Providers such as Trusted Key, combined with a powerful backend for vetting, adding, and managing users. The setup process starts with signing up for a free Auth0 account.
Next, go to Connections > Social in the Auth0 Dashboard, scroll to the bottom, and click Create Custom.
Standard Trusted Key Social Connection Setup
- Connection Name: The name you choose for your connection
- Authorization URL:
https://wallet.trustedkey.com/oauth/authorize - Token URL:
https://wallet.trustedkey.com/oauth/token - Scope:
openid email(Depends on your requirements. Please note that any email address received will have been already verified by the Trusted Key app.) - Client ID and Client Secret: Paste your Client ID and Client Secret obtained in the process described above.
- Fetch User Profile Script:
// Call oauth2 API with the access token and create the profile
function(access_token, context, callback) {
    request.get('https://wallet.trustedkey.com/oauth/user', {
        'headers': {
              'Authorization': 'Bearer ' + access_token,
              'User-Agent': 'Auth0'
        }
    }, (error, response, body) => {
        if (error) {
            return callback(error);
        }
        if (response.statusCode !== 200) {
              return callback(new Error('StatusCode:' + response.statusCode));
        }

        return callback(null, JSON.parse(body));
    });
}
Authenticated Identity Trusted Key Social Connection Setup
To support authenticated identity we will need to make a few changes to the above settings.
In the “Scope” field you would enter the desired authenticated identity information. A convenient shortcut is to use the scope profile:
Scope: openid email profile
By using profile, the Trusted Key App will automatically provide the user’s full name, first name, last name, gender, and birth date.
You also have the option to force users to provide authenticated identity details to complete the registration process. There are many ways to do this both client side and within the Auth0 dashboard such as setting up a rule. A very simple way is to add some script into the User Profile Agent that mandates authenticated identity information or else returns an error. Typically, if the Trusted Key App is not providing this information it means the user has not scanned their ID, their ID does not contain the needed information, or there was an error in the scanning where identity fields are missing.
// Call oauth2 API with the accesstoken and create the profile
function(access_token, context, callback) {
    request.get('https://wallet.trustedkey.com/oauth/user', {
        'headers': {
              'Authorization': 'Bearer ' + access_token,
              'User-Agent': 'Auth0'
        }
    }, (error, response, body) => {
        if (error) {
            return callback(error);
        }

        if (response.statusCode !== 200) {
              return callback(new Error('StatusCode:' + response.statusCode));
        }

        const ui = JSON.parse(body);

        if(!ui.given_name) {
              return callback(new Error("First Name missing. Please rescan your ID in the Trusted Key App"));
        }

        if(!ui.family_name) {
              return callback(new Error("Family Name missing. Please rescan your ID in the Trusted Key App"));
        }

        if(!ui.birthdate) {
              return callback(new Error("Birthdate missing. Please rescan your ID in the Trusted Key App"));
        }

        if(!ui.gender) {
              return callback(new Error("Gender is missing. Please rescan your ID in the Trusted Key App"));
        }

        return callback(null, ui);
    });
}
When you finish filling out the fields, you can Create your new social connection, and then click “Try Connection at the top of the page. You will be taken to the Trusted Key login. Enter your email address and then confirm the login using your Trusted Key App. If everything works correctly, you’ll get a confirmation message and an output where you can review the raw identity data provided by the Trusted Key App.
Upon exiting the window make sure your Trusted Key custom social connection is turned on.
Testing it Out
To provide a “real life” example we set up a demo WordPress website. We then downloaded and installed the “Login by Auth0” WordPress plugin. After activating the login you will be asked to log into your Auth0 Account, and a client will automatically be set up in your Auth0 dashboard. In the WordPress Admin settings under Settings > General > Membership make sure the “Anyone can Register” box is checked.
On your WordPress website if you go to login with the Auth0 module there should be a button reflecting the name you choose for your Trusted Key Social Connection—in this case, we called it “Trusted-Key”.
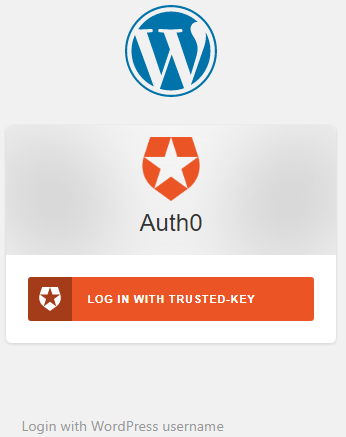
Click on the login button and the Trusted Key window should appear. Enter the email address associated with your Trusted Key Wallet, and then confirm the login using the Trusted Key App. You should now be registered and logged into the WordPress website.
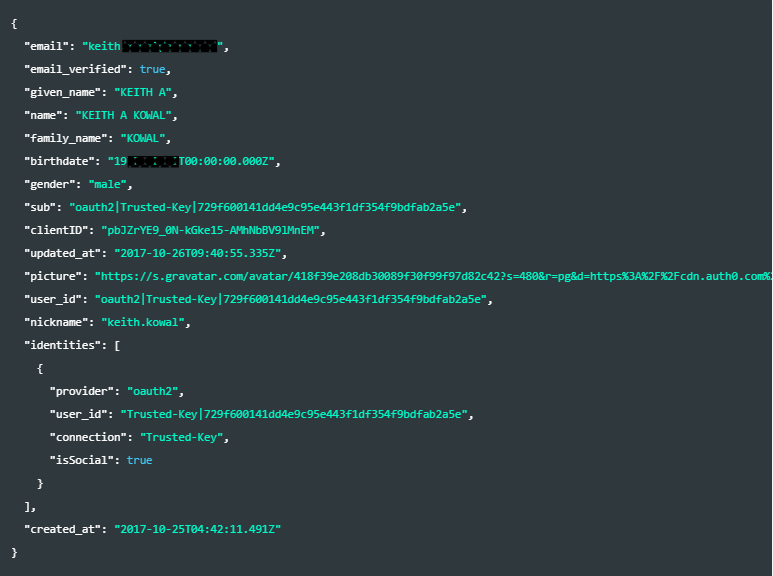
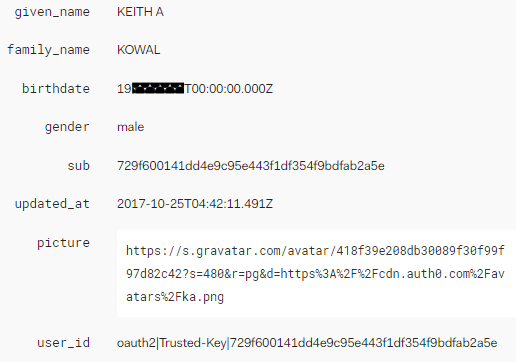
Back in the Auth0 dashboard if we look at “Users” in the left-hand toolbar we will see the login showing the name and email address associated with your Trusted Key App. If you click on the User a window will open showing the entire user profile. This includes the user’s full name, given name, last name, birthdate, gender, and verified email address. This information can also be stored in the WordPress user profile, although some fields such as birthdate and gender will require customization of the profile input fields.
Now that you have the user’s authentic identity information you have a wide range of choices on how to use that data to create customized registration and user experiences. Auth0 provides a powerful set of capabilities in their rules engine or database setup. You also have the option to set up policies or custom flows in the website front end.
Conclusion
The ability to create authenticated identity user profiles provides website and application creators exciting opportunities to redefine and segment their user experience. A new generation of “self-sovereign” digital wallets like Trusted Key makes the ingestion of government identities documents easy and secure. When combined with Auth0’s powerful user management and flexible backend, managing and leveraging authenticated identity is made easy for everyone.