

TL;DR: In this article, we'll delve into Azure's search-as-a-Service solution, understand its core features and benefits, and finally, integrate it with Auth0 and Azure DocumentDB on a custom database implementation. A full working application sample is available as a GitHub repository.
The quest for search
Whether you are a start-up with a great app or a company with established products on the market, you will face the complexity of providing a search experience for your users. There are plenty of options available that require expensive infrastructure, continuous maintenance, a lengthy ramp up process to achieve a working and efficient solution, and a dedicated team to keep it working afterward.
But what if you could achieve the same or even better results in a matter of minutes, with zero maintenance and much lower costs? What if I told you there is a solution that will let you to stop wasting time on maintaining infrastructure and focus on what really matters: creating and enhancing the best possible products for your clients.
Enter Azure Search
Azure Search is a managed cloud search-as-a-service engine that fits your business' budget and can scale easily as your data grows, with just a few clicks. It's a service that provides a full-text search experience in more than 70 languages, with features such as faceting and filtering, stemming, real-time geolocation, and auto-suggestion support with a latency in the order of milliseconds---even when dealing with millions and millions of records. If you add complete reporting support on Microsoft PowerBI, customizable business logic, and phonetic analysis, all without ever needing to worry about infrastructure maintenance or platform updates, it's a no-brainer.
Azure Search's engine is not only fast---it will enable you to get things done faster and save you countless of implementation hours in the process. You can have a working production-proof scenario in a matter of minutes.
Data in, results out
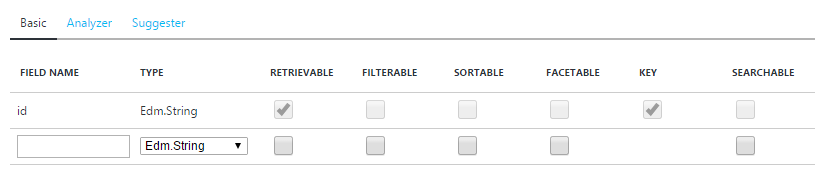
Azure Search stores data in indexes and performs searches on them. Much like your beloved SQL indexes, they are meant to store key information for your search logic. Each index contains fields and each field has a type (according to the Entity Data Model) and a set of attributes.
Supported types are Edm.String, Edm.Boolean, Edm.Int32, Edm.Int64, Edm.Double, Edm.DateTimeOffSet, Edm.GeographyPoint, and Collection(Edm.String).
Available attributes applicable to fields are:
- Retrievable: Can be retrieved among the search results.
- Searchable: The field is indexed and analyzed and can be used for full-text search.
- Filterable: The field can be used to apply filters or be used on Scoring Functions (next section)
- Sortable: The field can be used to sort results. Sorting results overrides the scoring order that Azure Search provides.
- Facetable: The field values can be used to calculate Facets and possibly used for Filtering afterward.
- Key: The primary unique key of the document.
A simple and visual representation of these Types and Attributes are visible during the Azure Portal index creation experience:
Alternatively, you can use the REST API to achieve the same result.
Now that our index is ready, we need to load in data; we have several options:
- Push data: Sending your data programmatically to Azure Search's indexes can be achieved using the REST API or through the .NET SDK. This option provides very low synchronization latency between the contents of your database and the index and lets you upload information regardless of where the data is.
- Pull data: In this model, Azure Search is capable of pulling data from a wide variety of data sources including: Azure SQL Database, Azure DocumentDB, Azure Blob storage, SQL Server on Azure VMs, and Azure Table Storage. The service will poll the data source through Indexers on a configurable interval and use time stamp and soft-delete detection to update or remove documents from the index. Indexers can be created using the API or using the Portal. They can be run once or assigned a schedule, and they can track changes based on SQL Integrated Change Tracking or a High Watermark Policy (an internal mark that tracks last-updated time stamps).
Once your data is in, you can start by doing some searches. You can do it using the .NET SDK or REST API we mentioned before, but you can also do it directly from inside the Azure Portal without a single line of code through the Search Explorer:
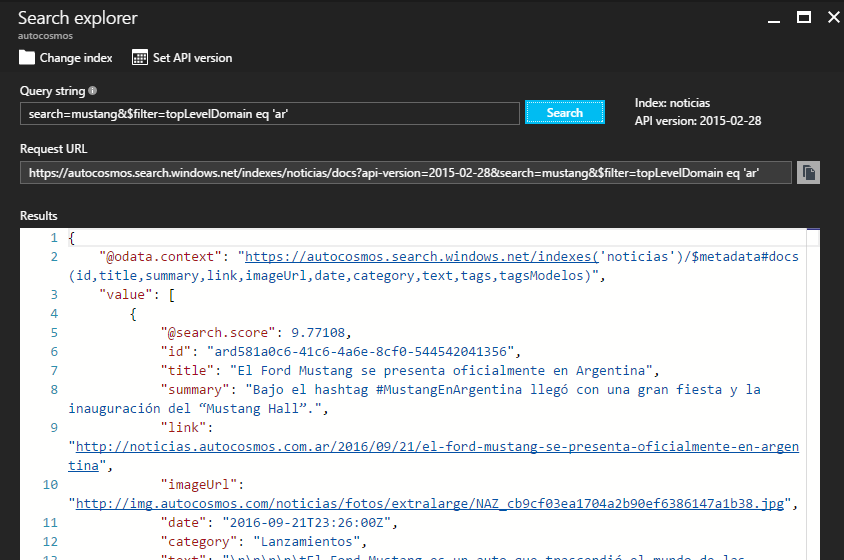
You can even use any of the query parameters specified on the documentation when you use the Explorer.
By default, Azure Search applies the TF-IDF algorithm on all attributes marked as Searchable and calculates order by the resulting score. We can customize this behavior with Custom Scoring Profiles in the next section.
The search experience
Azure Search has a very powerful set of features that will empower you to create the ultimate search experience, among the most used ones:
- Facets and filters let you create drill-down navigation experiences like thos proficed by the most popular e-commerce sites by providing real-time statistics on result filters and enabling your users to apply them to further narrow their searches.
- Search Suggestions that cover auto-complete scenarios from within the search box.
- Advanced querying for complex scenarios by supporting Lucene query syntax, including Fuzzy Search, Proximity Search, Term boosting, and Regular expressions.
As we mentioned earlier, results are treated with the TF-IDF algorithm to calculate the result score. But what if we don't want the default behavior? What if our documents have attributes that are more relevant than others, or if we want to provide our users with geo-spatial support?
Fortunately, we can do this with Custom Scoring Profiles. A scoring profile is defined by:
- A name (following Naming Rules).
- A group of one or more searchable fields and a weight for each of them. The weight is just a relative value of relevance among the selected fields. For example, in a document that represents a news article with a title, summary, and body, I could assign a weight of 1 to the body, a weight of 2 to the summary (because it's twice as important), and a weight of 3.5 to the title (weights can have decimals).
- Optionally, scoring functions will alter the result of the document score for certain scenarios. Available scoring functions are:
- "freshness": For boosting documents that are older or newer (on an Edm.DataTimeOffset field). For example, raising the score of the current month's news above the rest.
- "magnitude": For boosting documents based on numeric field (Edm.Int32, Edm.Int64, and Edm.Double) values. Mostly used to boost items given their price (cheaper items are ranked higher) or number of downloads, but can be applied to any custom logic you can think of.
- "distance": For boosting documents based on their location (Edm.GeographyPoint fields). The most common scenario is the "Show the results closer to me" feature on search apps.
- "tag": Used for Tag Boosting scenarios. If we know our users, we can "tag" them with (for example) the product categories they like more, and when they search, we can boost the results that match those categories, providing a personalized result list for each user.
Custom Scoring Profiles can be created through the API or on the Portal.
The big picture
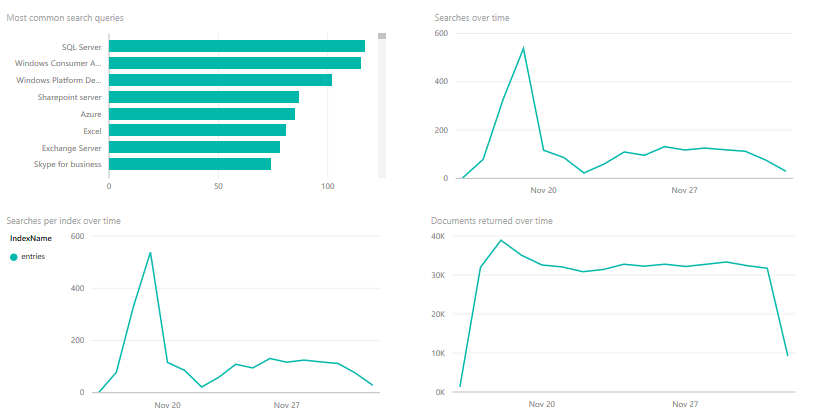
After creating our service and consuming it for some time, we may be wondering: Can I see how frequently the service is being used? What are the most common queries? Are users searching for something I can't provide answers for?
Fortunately, we can! We only need to have an Azure Storage account on the same region and subscription as our Azure Search service and use the Azure Portal to configure it. Afterward, we can either download the data or consume it with another service, such as Microsoft PowerBI, with a content pack.
Mixing it all together
Tools of the trade
If you followed our previous post (if you didn't, I recommend you do), you already integrated Auth0 with Azure DocumentDB as a custom database provider to store your users.
Since we will be working on ASP.NET Core (you can obtain the Runtime and Client tools here for any platform), everything I mention in this article will be open-source and cross-platform, and at the end, all the code will be available in the Github repository.
We'll start with a base template by running dotnet new -t web on our command line. This will create a basic ASP.NET Core web app on our current folder. Another alternative is to use the widely known Yeoman's ASP.NET generator.
To install Yeoman, you need an environment that has npm (Node.js Package Manager), which comes with the Node.js runtime. Once that npm is available, installing Yeoman is as simple as:
npm install -g yo
And installing ASP.NET generator with:
npm install --global generator-aspnet
Once the generator is installed, we can create our basic app by running:
yo aspnet
And picking Web Application Basic:

This creates a simple ASP.NET Core MVC Web application that you can try by running
dotnet restoreanddotnet runon the created folder (you can also follow the next steps with a preexisting ASP.NET Core application).
Continuing after this groundwork, we will create a personalized Auth0 sign-up page, store our users’ information on DocumentDB, leverage Azure Search’s indexers to index all this data, and, finally create a search experience on ASP.NET Core for maximum performance.
Our custom lock
You will initially need your Auth0 ClientId, Secret, and Domain, which you can obtain from your Dashboard:
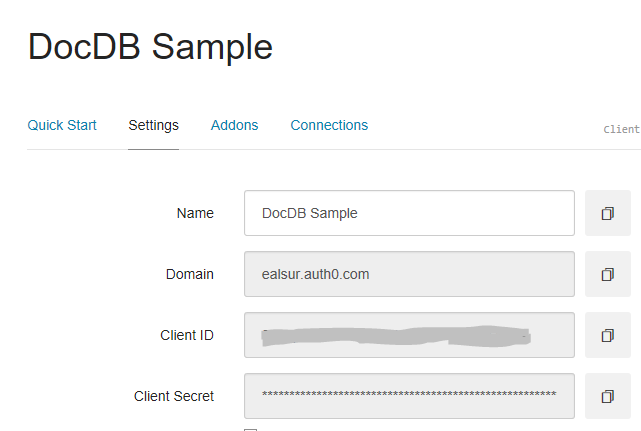
Auth0 offers a generous free tier so we can get started with modern authentication.
Authentication will be handled by OpenID Connect, so we will need to configure it first. We need ASP.NET Core’s OpenID Connect package, so we’ll add that to our dependencies:
"dependencies": {
   ...
   "Microsoft.AspNetCore.Authentication.OpenIdConnect": "1.1.0",
   ...
  },
After that, we need to configure and include the service on our ASP.NET Core’s pipeline on our Startup.cs file using the Domain, ClientId, and Secret that we obtained from the Dashboard:
public void ConfigureServices(IServiceCollection services)
{
    services.AddAuthentication(
        options => options.SignInScheme = CookieAuthenticationDefaults.AuthenticationScheme);
    services.Configure<Auth0Settings>(Configuration.GetSection("Auth0"));

    // Configure OIDC
    services.Configure<OpenIdConnectOptions>(options =>
    {
        // Specify Authentication Scheme
        options.AuthenticationScheme = "Auth0";

        // Set the authority to your Auth0 domain
        options.Authority = $"https://{Configuration["auth0:domain"]}";

        // Configure the Auth0 Client ID and Client Secret
        options.ClientId = Configuration["auth0:clientId"];
        options.ClientSecret = Configuration["auth0:clientSecret"];

        // Do not automatically authenticate and challenge
        options.AutomaticAuthenticate = false;
        options.AutomaticChallenge = false;

        // Set response type to code
        options.ResponseType = "code";

        // Set the callback path, so Auth0 will call back to http://localhost:5000/signin-auth0
        // Also ensure that you have added the URL as an Allowed Callback URL in your Auth0 dashboard
        options.CallbackPath = new PathString("/signin-auth0");

        // Configure the Claims Issuer to be Auth0
        options.ClaimsIssuer = "Auth0";
    });

   //Other things like Mvc...
}
public void Configure(IApplicationBuilder app, IHostingEnvironment env, IOptions<OpenIdConnectOptions> oidcOptions)
{


    app.UseCookieAuthentication(new CookieAuthenticationOptions
    {
        AutomaticAuthenticate = true,
        AutomaticChallenge = true
    });
    // Add the OIDC middleware
    app.UseOpenIdConnectAuthentication(oidcOptions.Value);
    //Other things like Mvc...
}
We can store these settings on an appsettings.json file for programmatic access.
Let’s start customizing our users’ profiles by creating a custom sign-up experience using Auth0’s Lock. We can achieve this by creating an MVC AccountController and a Login view, which will hold the Lock’s code, and use an extension to create the OpenID Connect context information.
The syntax is pretty clear; once we add the Lock javascript library we can proceed to initialize it using the additionalSignUpFields attribute, which is an Array of objects that describe new data fields for our users to fill during sign-up:
additionalSignUpFields: [{
      name: "address",
      placeholder: "enter your address",
      icon: "/images/location.png",
      prefill: "street 123",
      validator: function(value) {
        // only accept addresses with more than 10 chars
        return value.length > 10;
      }
    },
    {
      type: "select",
      name: "country",
      placeholder: "choose your location",
       options: [
        {value: "us", label: "United States"},
        {value: "fr", label: "France"},
        {value: "ar", label: "Argentina"}
      ],
      prefill: "us",
      icon: "/images/country.png"
}]
This example will prompt for two extra fields: one a text value, the other a restricted option on a selector.
Our Lock (with some other extra fields) will end up looking like this:
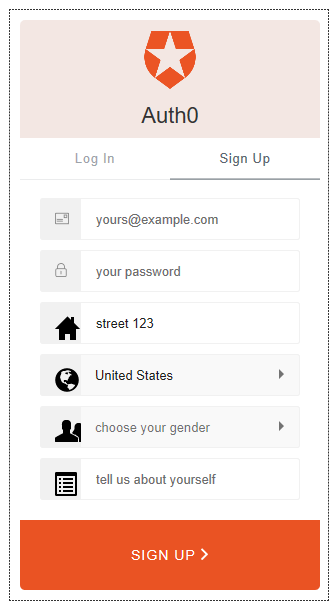
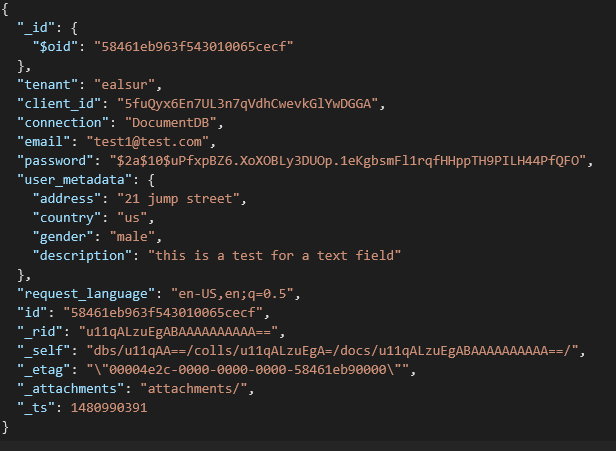
All these extra fields get stored on our Azure DocumentDB database inside the user_metadata attribute as part of the JSON user document.
Indexing users
If you recall one of the features we mentioned earlier, Azure Search is capable of pulling data with indexers from Azure DocumentDB databases automatically.
We can start by creating an Azure Search account. The service includes a free tier that has all the features of the paid ones with some capacity restrictions (10,000 documents), which are enough for tests and proofs of concept.
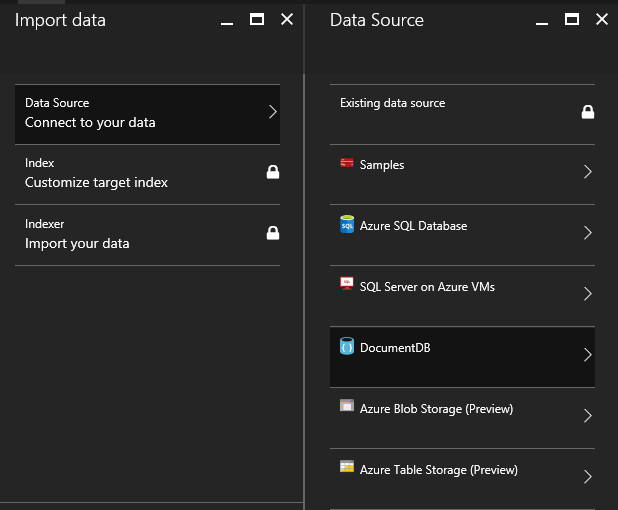
Once our account is created, we will need to set up the import pipeline by selecting Import data:

Next, we’ll search for our Azure DocumentDB database among the available sources:
After selecting our database, we can customize the query that obtains our documents, so we will flatten the data generated by Auth0 by configuring this query:
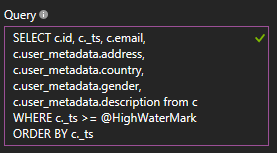
Keep in mind that the user_metadata attribute will hold your own custom fields (in our case the address, gender, country, and description), so edit this query accordingly.
Once the source is set, Azure Search probes the database for one document and provides us with a suggested index structure:
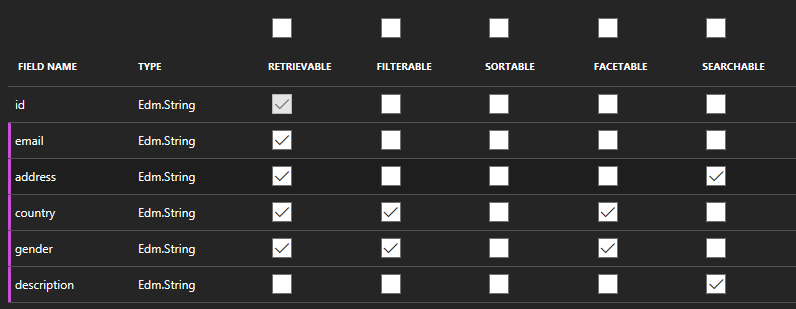
We will mark each field’s attributes depending on the search experience we want to provide. Data that comes from closed value lists are good Filterable/Facetable candidates while open text data is probably best suited for Searchable.
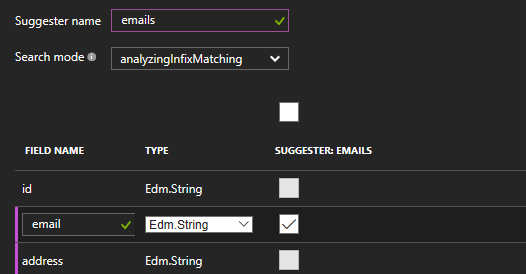
Additionally, we will create a Suggester that will use our users’ email to provide an auto-complete experience later on:
After configuring the index structure, we are left with just the pulling schedule that will define how often our Indexer will look for new information in our database. This includes automatic change tracking and, optionally, deletions tracking by a configurable soft-delete attribute.
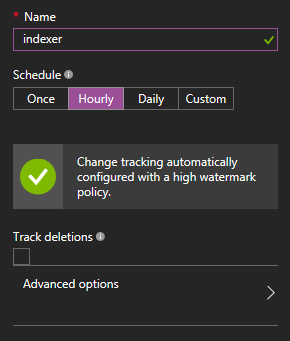
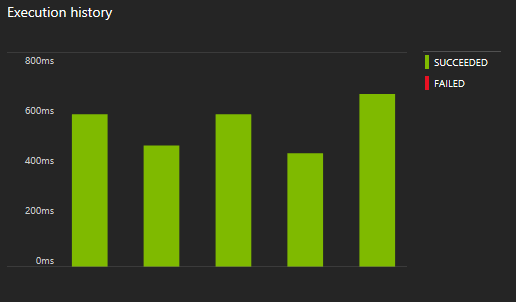
The Indexer will run and detect new documents. We can always keep track of every run through the Portal:
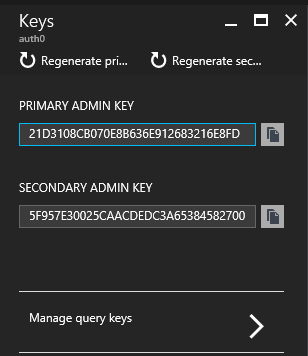
Finally, you will need to write down your access keys so you can use them on the next section:
Creating our UX
With our index ready and our Lock configured, we need to add Azure Search’s Nuget package to our project by adding the dependency:
"dependencies": {
    ...
    "Microsoft.Azure.Search": "3.0.1",
    ...
  },
After that, we will use ASP.NET Core’s Dependency Injection to create a singleton service which will act as wrapper over Azure Search. The service’s full code can be viewed on GitHub; it is created, so you can reuse it on your own projects outside of this article and as a stepping stone.
The key part of that service is the in-memory cache of ISearchIndexClients. Each client lets you connect to one index and, internally, it works mostly like an HttpClient. Based on the most common error with HttpClient, it’s in our best interest to reuse each ISearchIndexClient to avoid Socket Exhaustion with a ConcurrentDictionary(since our service is injected as a Singleton).
private SearchServiceClient client;
//Maintaining a Dictionary of Index Clients is better-performant
private ConcurrentDictionary<string, ISearchIndexClient> indexClients;
public SearchService(string accountName,string queryKey)
{
    client = new SearchServiceClient(accountName, new SearchCredentials(queryKey));
    indexClients = new ConcurrentDictionary<string, ISearchIndexClient>();
}

/// <summary>
/// Obtains a new IndexClient and avoids Socket Exhaustion by reusing previous clients.
/// </summary>
/// <param name="indexName"></param>
/// <returns></returns>
private ISearchIndexClient GetClient(string indexName)
{
    return indexClients.GetOrAdd(indexName, client.Indexes.GetClient(indexName));
}
Finally, we’ll register our service on our Startup.cs as a singleton by providing our account name and key we obtained from the Portal:
public void ConfigureServices(IServiceCollection services)
{
    //OIDC configuration...

    //Injecting Azure Search service
    services.AddSingleton<ISearchService>(new SearchService(Configuration["search:accountName"],Configuration["search:queryKey"] ));

    //Other things like Mvc
}
This will enable you to inject the service on any controller:
private ISearchService _searchService;
public SearchController(ISearchService searchService)
{
    _searchService = searchService;
}
Using this viewmodel to support client-to-server communications:
public class SearchPayload
{
    public int Page { get; set; }=1;
    public int PageSize { get; set; } = 10;
    public bool IncludeFacets { get; set; } = false;
    public string Text { get; set; }
    public Dictionary<string,string> Filters { get; set; } = new Dictionary<string,string>();
    public List<string> Facets { get; set; } = new List<string>();
    public string OrderBy { get; set; } = "";
    public string QueryType { get; set; } = "simple";
    public SearchMode SearchMode { get; set; } = SearchMode.Any;
    public string ScoringProfile { get; set; }
}
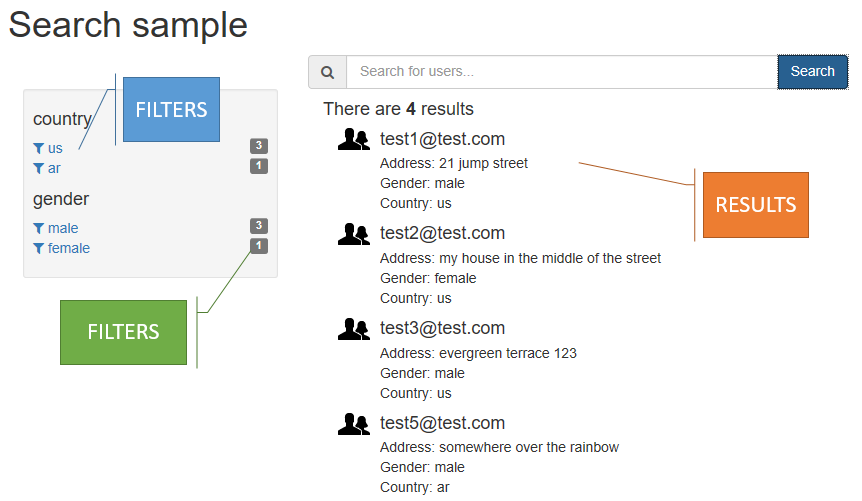
Once the wiring is done, it’s just a matter of creating interfaces. You can use any client framework of your choice to do so. Using AngularJS for example, we can create a UI that provides for a Faceted/Filterable search experience:

And even an auto-complete experience using the Suggester we created previously:
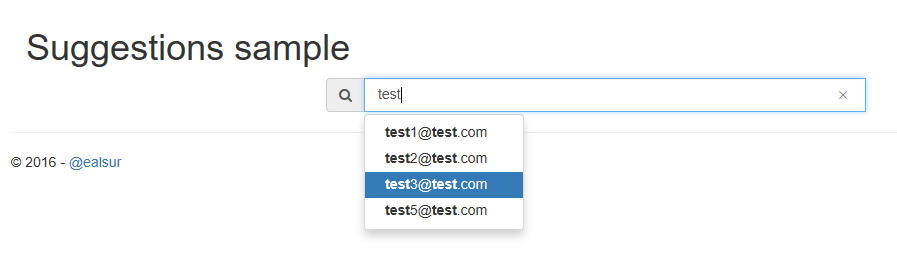
Code samples for each experience are available at the repository.
Conclusion
Azure Search is a scalable and powerful search engine that takes the infrastructure problem out of our hands and provides us with an easy-to-use API and visual tooling in the Azure Portal. Once again, we can see how great services and technologies can be integrated to achieve a better user experience. Azure Search adds an almost-limitless search feature on top of Auth0 and Azure DocumentDB that, paired with ASP.NET Core, yields a cross-platform and efficient solution.