
Starting from this chapter?
Clone the application starter repo:
git clone git@github.com:auth0-blog/vue-express-auth.git
Follow the directions in the project README.
In the Auth0 dashboard, click on "APIs" in the left menu and then select "Auth0 Management API". From there, select "Machine to Machine Applications" and find the "Vue Express API" you just created. Click the switch next to it so that it says "Authorized".
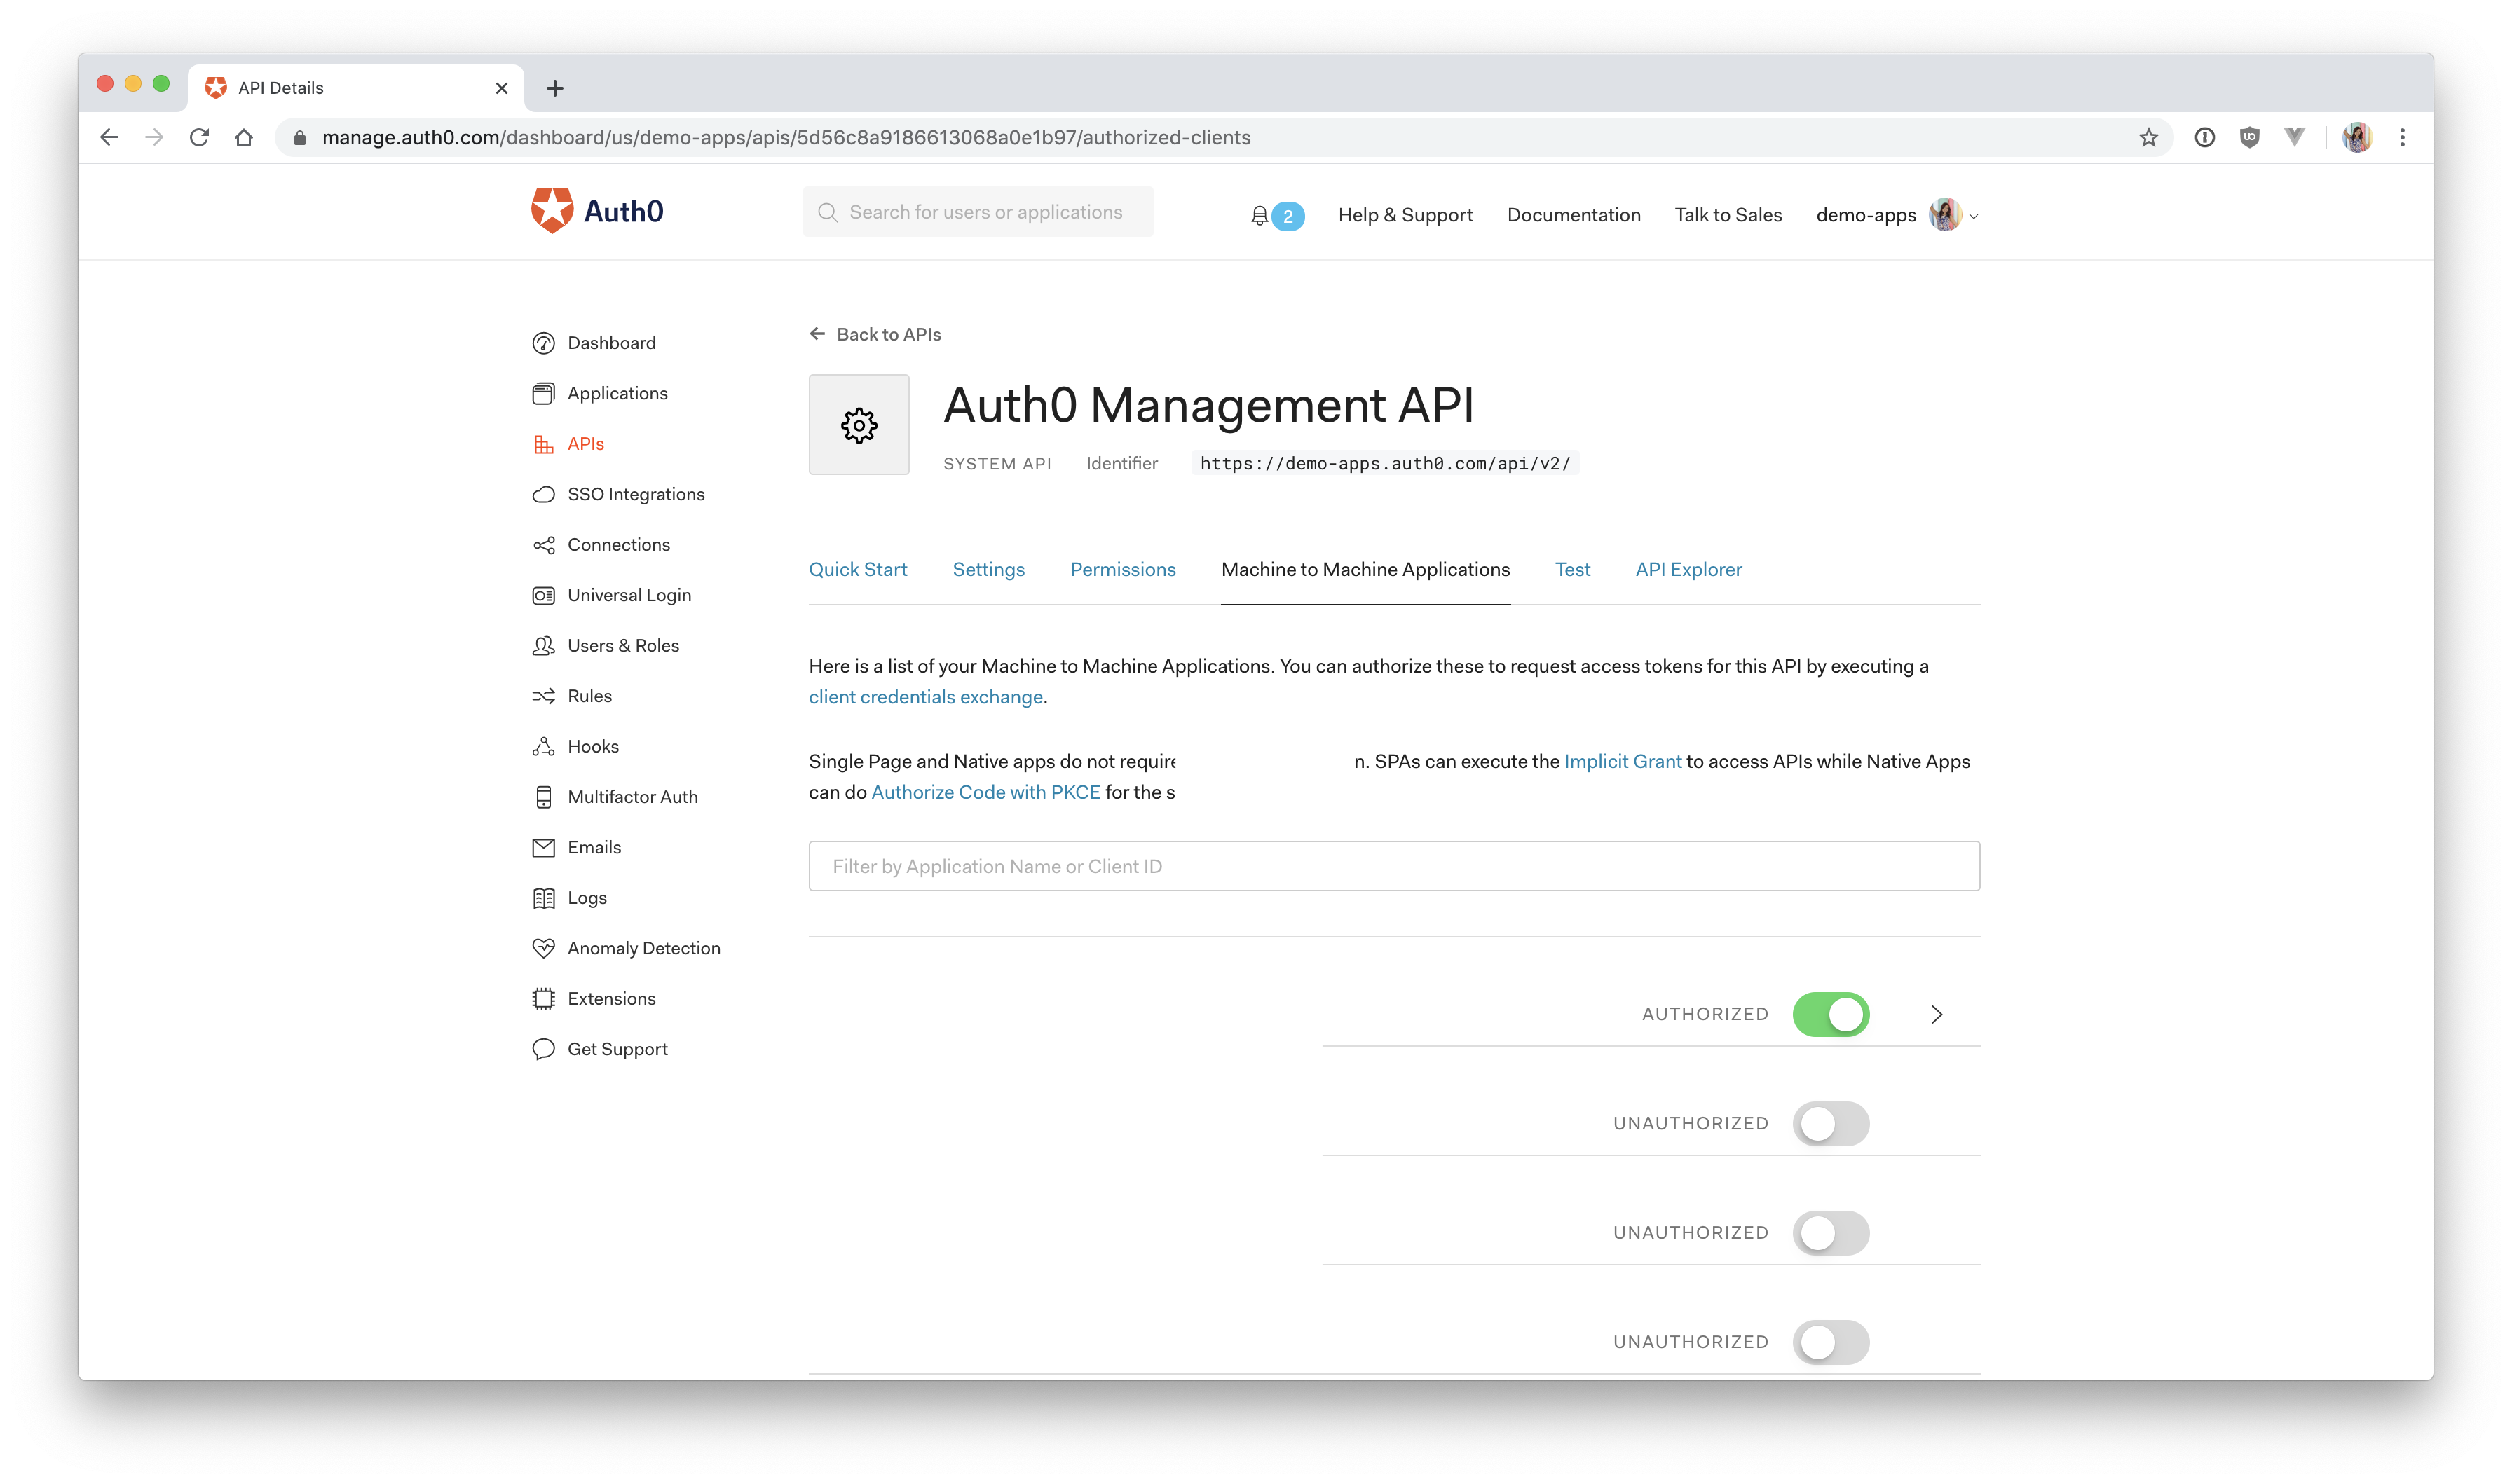
Next, add permissions to the application. Click on the down arrow V next to the authorized switch. Select read:users, delete:users, and read:user_idp_tokens and then click "Update".
Calling the Management API with Express
The Express API is now registered in the dashboard, and the Auth0 Management API is set up and ready to issue an access token to the Express API. So what's next? Now, you have to do the client credentials dance to get an access token.
Client Credentials Flow
The OAuth 2.0 RFC 6794 defines how trusted clients (your Express API) can use the client credentials to request an access token from a resource owner (the Auth0 Management API):
❗ The client can request an access token using only its client credentials (or other supported means of authentication) when the client is requesting access to the protected resources under its control, or those of another resource owner that have been previously arranged with the authorization server (the method of which is beyond the scope of this specification).
Because the Management API access token is requested on behalf of the Express application, not a user, it doesn't make sense to ask for a username and password to verify who the requester is. Instead, you can use the Express application's client credentials (client_id and client_secret) to authenticate the application.
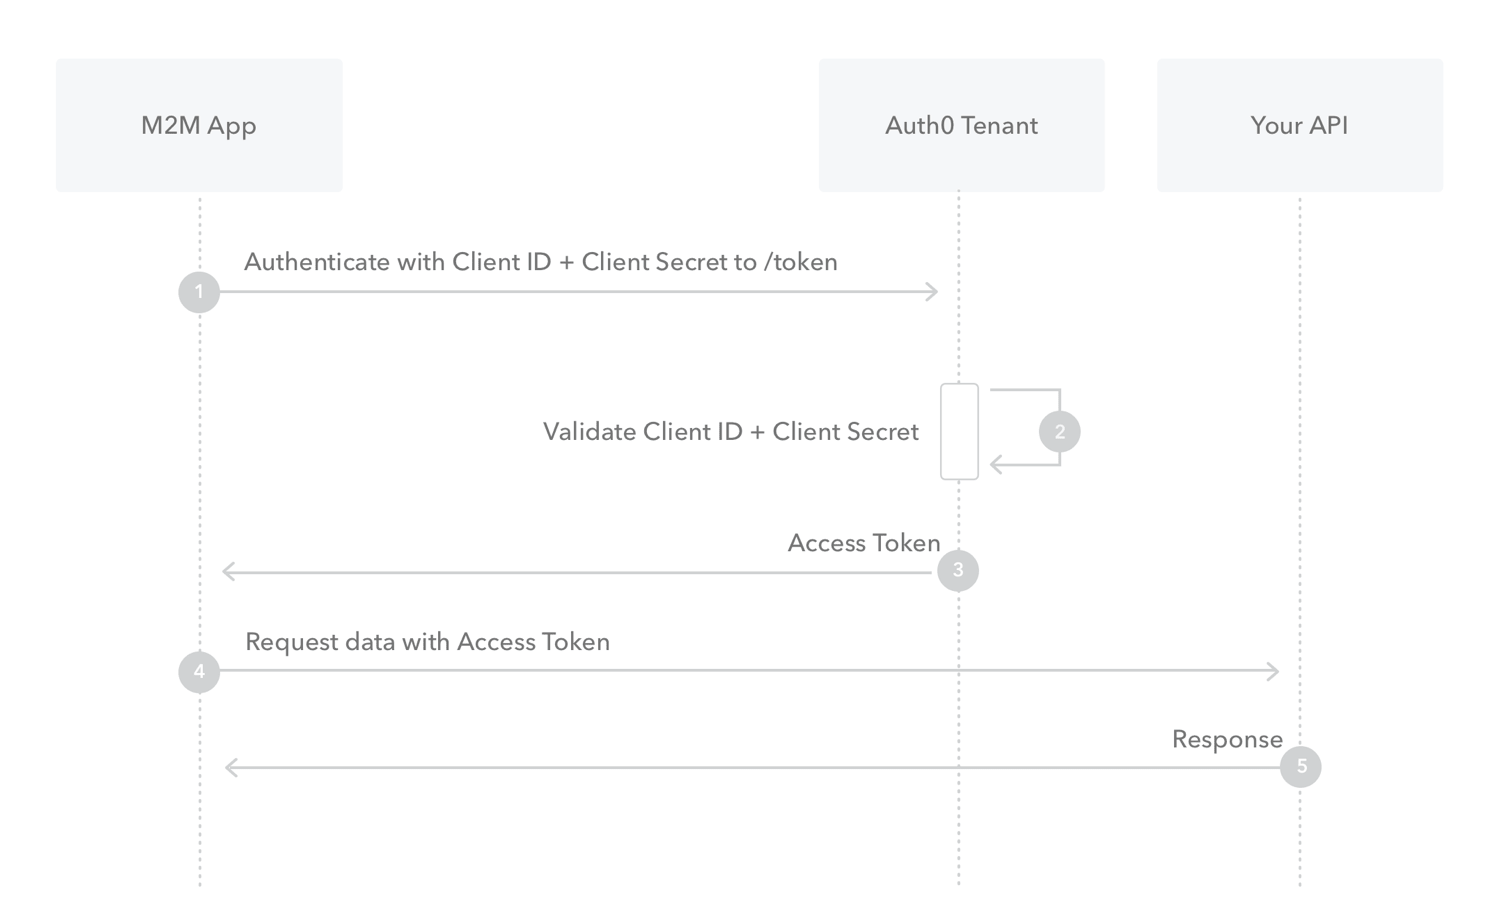
This diagram depicts the client credentials grant flow described below
- The Express application authenticates with the Auth0 Authorization Server using its
client_idandclient_secret - The Auth0 Authorization Server validates the
client_idandclient_secret - The Auth0 Authorization Server issues an access token and passes it back to your application
- The Express application passes this token when it makes a request to the Management API
- The Management API responds with the requested data
Requesting an Access Token
The Express application needs to request an access token for the Management API from the Auth0 server. There are three ways to do this.
1) Make a POST request to the token endpoint using your Express API client ID and client secret, as shown below:
let request = require("request");

let options = {
    method: 'POST',
    url: 'https://YOUR-DOMAIN.auth0.com/oauth/token',
    headers: { 'content-type': 'application/json' },
    body: '{
        "client_id": "yourclientid",
        "client_secret": "yourclientsecret",
        "audience": "https://YOUR-DOMAIN.auth0.com/api/v2",
        "grant_type": "client_credentials"
    }'
};

request(options, function (error, response, body) {
  if (error) throw new Error(error);
});
This will return the access token (with a 24-hour expiration) and token type:
{
  "access_token": "somelongstring",
  "token_type": "Bearer"
}
2) Use the Auth0 Node Authentication API Client
let AuthenticationClient = require('auth0').AuthenticationClient;

let auth0 = new AuthenticationClient({
  domain: '{YOUR_ACCOUNT}.auth0.com',
  clientId: '{CLIENT_ID}',
  clientSecret: '{CLIENT_SECRET}'
});

auth0.clientCredentialsGrant(
  {
    audience: 'https://{YOUR_ACCOUNT}.auth0.com/api/v2/',
    scope: '{MANAGEMENT_API_SCOPES}'
  },
  function(err, response) {
    if (err) {
      // Handle error.
    }
    console.log(response.access_token);
  }
);
This performs a Client Credentials Grant using the clientId and clientSecret of the client that was registered in the Auth0 dashboard, in this case, the Express API. This will return the access token, scopes, expiration, and token type. You'll then send this access token along with every request you make to the Management API.
3) Use the Auth0 Node Management API Client
let ManagementClient = require('auth0').ManagementClient;

let auth0 = new ManagementClient({
  domain: '{YOUR_ACCOUNT}.auth0.com',
  clientId: '{YOUR_CLIENT_ID}',
  clientSecret: '{YOUR_CLIENT_SECRET}',
  scope: 'read:users delete:users'
});
Finally, there also exists an option to automatically receive an access token in the background using the Auth0 Node Management API Client. This is similar to option 2. The Client Credentials Grant still takes place behind the scenes and will retrieve a Management API access token along with its expiration. It then automatically caches this access token for the time specified in the expiration.
For this tutorial, you'll be using the third option. This option allows you to use the Management Client to easily make requests to the Management API.
Getting your Access Token in Express
Now that you know how the client credentials flow works and how you're going to implement it in your application, it's finally time to write some code!
Head back to your code editor and open server/server.js from the Vue Express application you cloned earlier.
📝 Here's an overview of what you're going to do:
- Install and import the Auth0
ManagementClient - Create a
.envfile for your confidential values - Add
clientIdandclientSecretto yourauthConfigobject - Create a new instance of the
ManagementClientwith yourdomain,clientId, andclientSecret
Make sure you're in the server directory in your terminal and install the node-auth0 package by running:
npm install auth0
Find the require functions at the top of your server/server.js file and add the following line to import ManagementClient.
// ...
// import statements
const ManagementClient = require('auth0').ManagementClient;
// app.use
Next, toward the top of the file, you should see an authConfig object directly underneath the require and use methods. This needs to be modified to include your client secret and client ID from the Express API.
Because these are sensitive values, you should not save them directly in the code. If you ever share this code or upload it to GitHub, you risk leaking your client secret. Instead, it's best to create a .env file and add this file to your .gitignore. To do this, navigate to the server directory and run the following command in your terminal:
npm install dotenv
At the top of your server/server.js file add this line:
require('dotenv').config();
Now create a file in the root of the server directory called .env and add the following to it:
AUTH0_DOMAIN = your-domain.auth0.com
AUTH0_AUDIENCE = https://your-api-audience.com
CLIENT_ID = yourclientid
CLIENT_SECRET = yourclientsecret
The values for CLIENT_ID and CLIENT_SECRET can be found back in the Auth0 dashboard on the Auth0 Management API page that you set up earlier.
If you already closed this tab, just click on "APIs" > "Auth0 Management API" > "Test" and then select the Express API from the dropdown. Next, click on "Node.JS", and you can copy the client_id and client_secret from the resulting code below.
If you followed the setup instructions from the README, you should already have an object in server.js called authConfig that contains the audience and domain values. Grab those and paste them into their corresponding spots in .env.
If you don't have the domain and audience values, they can be found by clicking on "APIs" in the left-hand menu and then selecting the Vue Express API. Next, click on "Quick Start" and then select "Node.js". You'll see a value for audience, which you can paste directly into AUTH0_AUDIENCE and then another value for issuer. Copy this and paste it into AUTH0_DOMAIN.
⚠️ Important: For
AUTH0_DOMAIN, omit thehttps://and the trailing/. It should be formatted exactly as shown above.
Next, modify the authConfig object in server/server.js to use those environment variables as follows:
// Set up Auth0 configuration
const authConfig = {
  domain: process.env.AUTH0_DOMAIN,
  audience: process.env.AUTH0_AUDIENCE,
  clientId: process.env.CLIENT_ID,
  clientSecret: process.env.CLIENT_SECRET
};
And finally, you'll create a new instance of the ManagementClient, which takes an object that contains your Auth0 domain, client ID, and client secret.
Paste this just below the authConfig object in server/server.js:
const managementAPI = new ManagementClient({
  domain: authConfig.domain,
  clientId: authConfig.clientId,
  clientSecret: authConfig.clientSecret
});
Now, when you use managementAPI, it will automatically perform the Client Credentials Grant in the background using the domain, client ID, and the client secret, which will result in an access token that can be used to make requests to the Management API.
Now it's time to test it out.
Calling the Management API
Back in server/server.js, scroll down to where the events array is defined. Paste in the following code right below it:
app.get('/users', (req, res) => {
  managementAPI
    .getUsers()
    .then(function(users) {
      res.send(users);
    })
    .catch(function(err) {
      console.log(err);
    });
});
This will create an API route in your Express application that calls the Management API Node Client to get all users whenever that route is accessed.
To verify that it's working, switch to your terminal and start your Express application if you haven't already by running:
npm start
Navigate to http://localhost:8000/users in your browser, and you should see all of the users that have signed up for your application! 💃
If you're getting an error, reach out in the comments below, and I'll try to help troubleshoot.
You're also going to need a route to delete a user, so since you're here, just set that up now. Below the previous route, paste in:
app.get('/users/:id/delete', (req, res) => {
  managementAPI
  .deleteUser({ id: req.params.id })
  .then(response => {
    res.send('User deleted!');
  })
  .catch(function(err) {
    res.send(err);
  });
});
This will grab the id of the user, which will be passed to the server from the Vue client. Then it will call the Management API to do the deletion.
Now that you're able to pull all of your users into the application and delete a user, it's time to switch to the frontend.
Next Step: I've set up the Express backendI ran into an issueAbout the author

Holly Guevara
Former Developer Content Manager (Auth0 Alumni)