Let's say you have a blog that you want to be able to consult from your AI assistant like Claude, how would you do it? In today's world of AI-powered tools, the easiest way would be to create an MCP (Model Context Protocol) server that can access the blog in some way and find what you are looking for.
I often use my own blog as a source of information. I think of it as my public field notebook, the only issue with that is that my blog is not "searchable", it doesn't have a built-in search feature, so I often use the site:jtemporal.com <topic> Google search trick to find what I'm looking for.
I have also been using AI assistants like Claude for writing and editing my content, and with the rise of MCP I'd love to search my own content through the chat instead of interrupting my flow to search for information on a separate application.
In order to make this information available we will build an MCP server in Python and learn how to configure it in Claude Desktop. Let's get started, shall we?
How our MCP server works
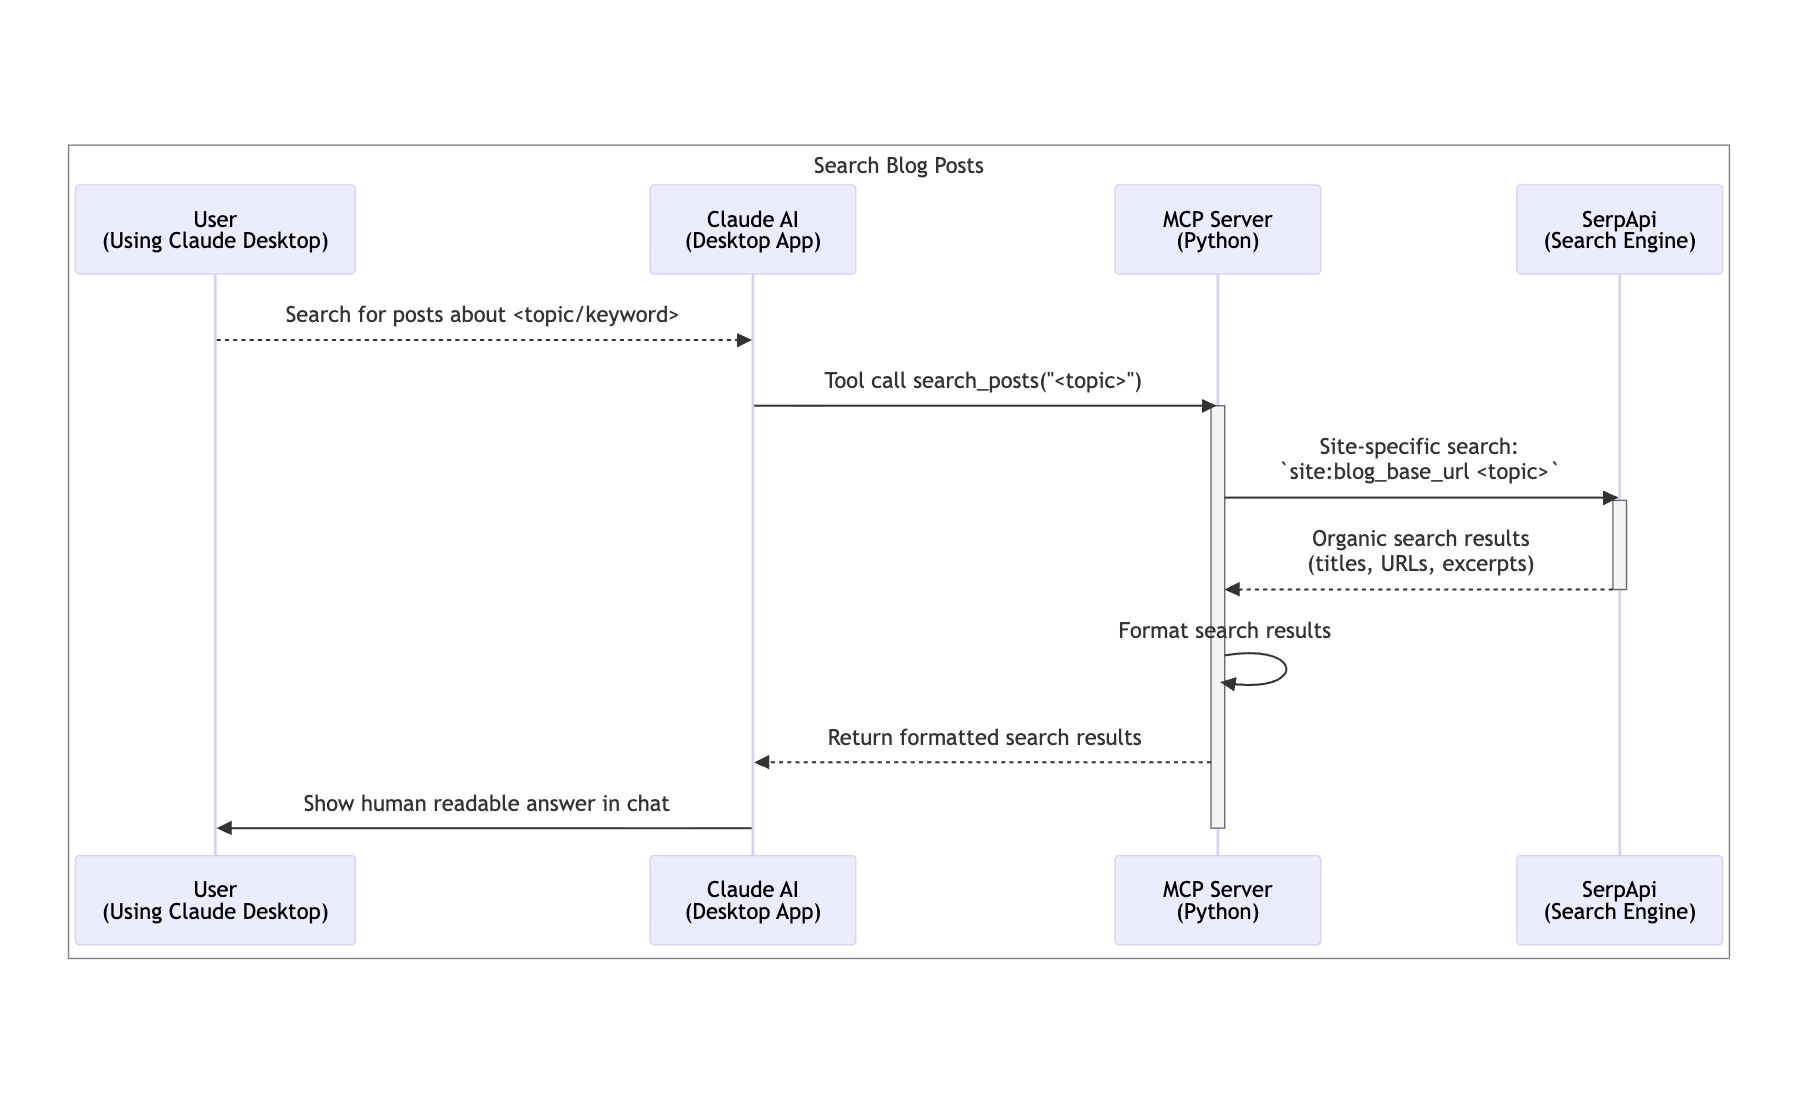
Our MCP server will run locally and act as a bridge between Claude and the blog content:
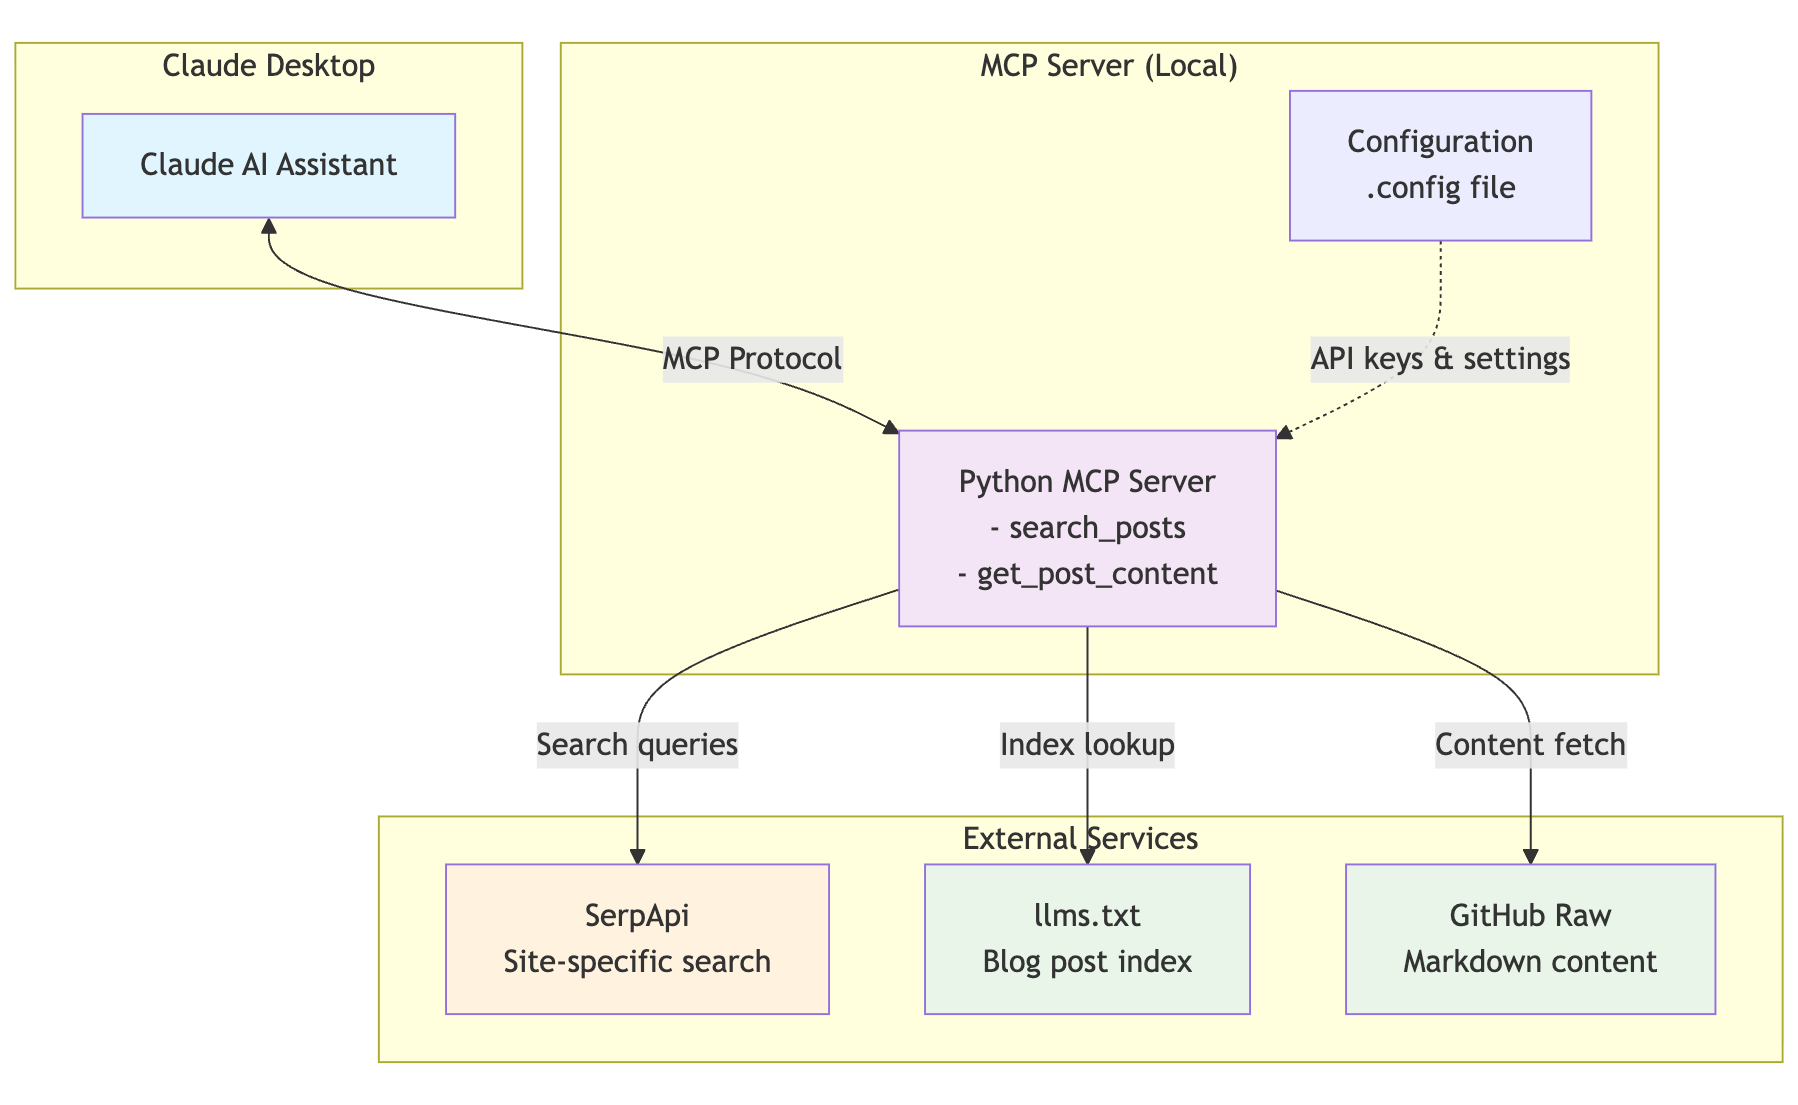
This flow shows how Claude can access your blog content using SerpAPI and how it can obtain the content of a given blog post without you ever leaving your conversation by leveraging the MCP server. That means you don't have to switch between interfaces and break your flow.
⚡️ Prefer a video walkthrough? Watch the video below to see a complete, step-by-step guide on how to build, test, and integrate your Python MCP server with an AI assistant like Claude Desktop.
What Is Model Context Protocol (MCP)
The Model Context Protocol (MCP) is an open standard that enables AI applications to securely connect to external data sources and tools. Think of it as a bridge between your AI assistant and various resources. For the GenAI-powered apps using an MCP, it doesn't really matter what the resources are, they could be files, databases, APIs, or in our case, blog posts stored in a GitHub repository.
MCP allows AI models to:
- Access external data through standardized interfaces
- Use tools to perform actions on your behalf
- Maintain security boundaries between the AI and your data
In our case, we'll use MCP to give our AI assistant the ability to search through blog posts, making your personal knowledge base accessible without having to switch contexts.
Discover the Model Context Protocol (MCP) and its authorization mechanisms. Learn how to use API keys, OAuth 2.1 implementation, and best practices for secure LLM API connections.
Model Context Protocol (MCP) SDKs and other libraries
MCP already has a few SDKs you can start using. For this blog post we will use the MCP Python SDK.
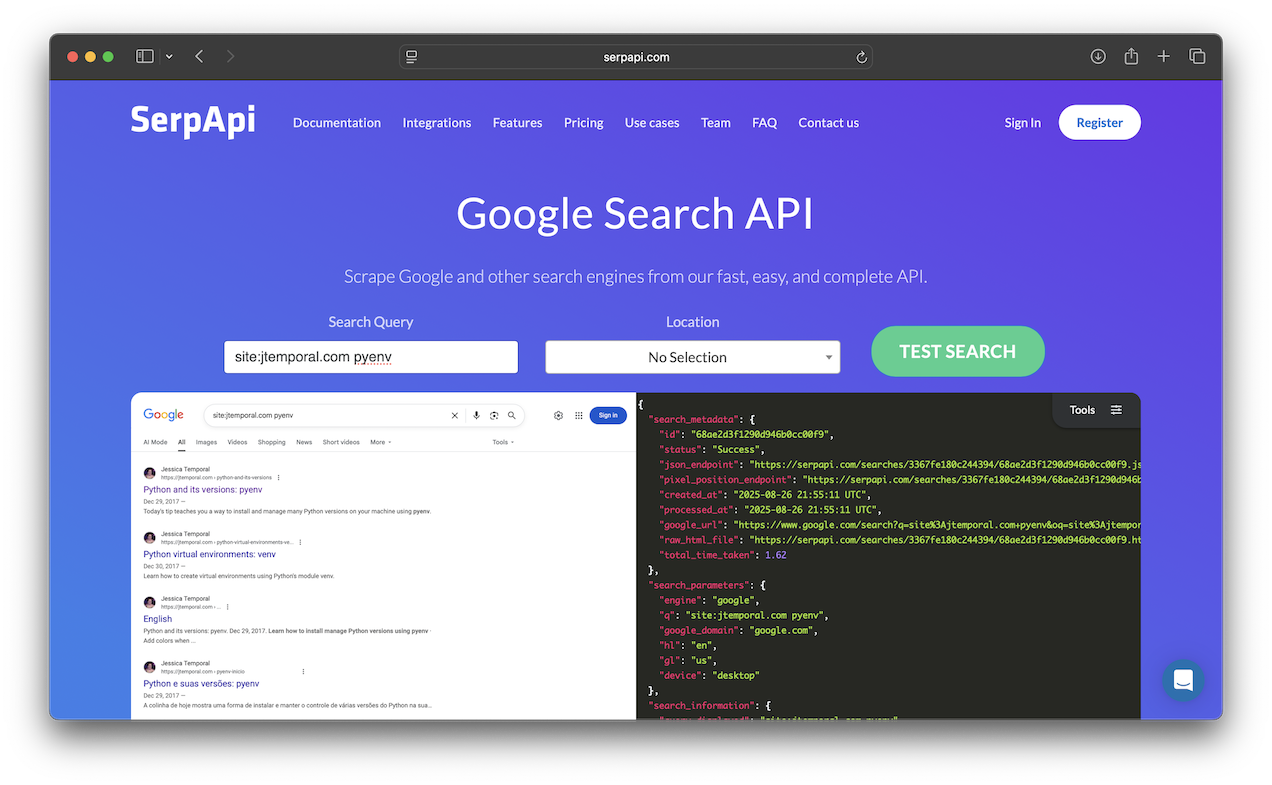
We'll also use the SerpApi library to search for blog posts without needing to manage search infrastructure ourselves. SerpApi provides a simple API for performing site-specific Google searches, which is perfect for finding content on your blog.
For package management, we'll use uv, a modern Python package manager that's significantly faster than pip and handles virtual environments automatically. Using uv will also make it easier to setup the server within Claude.
Setting Up the Application
Let's get our MCP server up and running using uv:
Install
uv: you can learn how to do that on your system on theuvdocs.Clone the repository: For this tutorial, you can follow along by cloning the repository which contains the setup for the code we'll build:
git clone https://github.com/jtemporal/blog-search-mcp-in-python.git
cd blog-search-mcp-in-python
git switch base-app
Initialize the project with
uv: This creates a virtual environment and installs dependenciesuv syncConfigure your blog repository settings copy the template:
cp .config.example .configThen populate the file with your blog details:
[MCP_SERVER]
blog_base_url = https://yourblog.com
serpapi_key = your-serpapi-key-here
server_name = Blog Search Server
log_level = INFO
To get the SerpApi key sign up for free here. If you don't have a blog with llms.txt feel free to use mine:
jtemporal.comTest the setup
uv run pytest tests/test_config.py -vIf you set everything up correctly, all 10 tests should pass. This validates that your configuration is loaded properly and the MCP server can access your settings.
That's it! The code is ready, let's update the MCP server and make sure we can use it in Claude. The uv approach automatically handles virtual environments and dependency management, making the setup much cleaner and more reliable.
Code structure
Our MCP server project has a clean, organized structure like this:
mcp-with-python-blog/
├── src/
│   ├── server.py          # Main MCP server implementation
│   └── config.py          # Configuration loader
├── tests/                 # All tests
├── .config                # Your blog configuration
├── .config.example        # Configuration template
├── pyproject.toml         # Python project configuration and dependencies
├── uv.lock                # Dependency lock file
└── README.md              # Development documentation
Note a few important aspects of our codebase structure:
Test Organization: The test suite in
tests/holds both unit tests with mock data and integration tests. We should run integration tests sparingly as they make real API calls to SerpApi, which count towards your monthly quota and take longer to run.Configuration Security: The
.configfile contains sensitive data like your SerpApi key. Keep this file secure and never commit it to version control.Clean Architecture: The
src/server.pyfile contains the MCP server implementation where we'll define our tools for blog search and content retrieval.
Tool vs. Resources in MCP Servers
If I were to serve this MCP server as part of my website and in the same machine the blog is hosted today, the MCP server would have access to the files used to generate the blog pages. If this were the case we could use a resource like this to retrieve documents:
@mcp.resource("file://documents/{name}")
def read_document(name: str) -> str:
    """Read a document by name."""
    # This would normally read from disk
    return f"Content of {name}"
From the MCP documentation:
Resources are how you expose data to LLMs. They're similar to GET endpoints in a REST API - they provide data but shouldn't perform significant computation or have side effects.
But that's not the case. The blog is a simple static generated website using Jekyll, it is built and served through GitHub Pages. With that in mind it makes more sense to use tools and leverage tool calling.
Tools are more powerful than resources since you can use them to perform actions like the one below that sums two numbers:
@mcp.tool()
def sum(a: int, b: int) -> int:
    """Add two numbers together."""
    return a + b
But more than that you can also have tools to search for information in any knowledge base, and in this case a collection of blog posts.
In more concrete terms tool calling, in the context of GenAI and MCP, allows an AI model to execute specific functions. This is perfect for our use case where we need to search through blog posts based on user questions.
Read more on secure tool calling with Auth0 for AI Agents here.
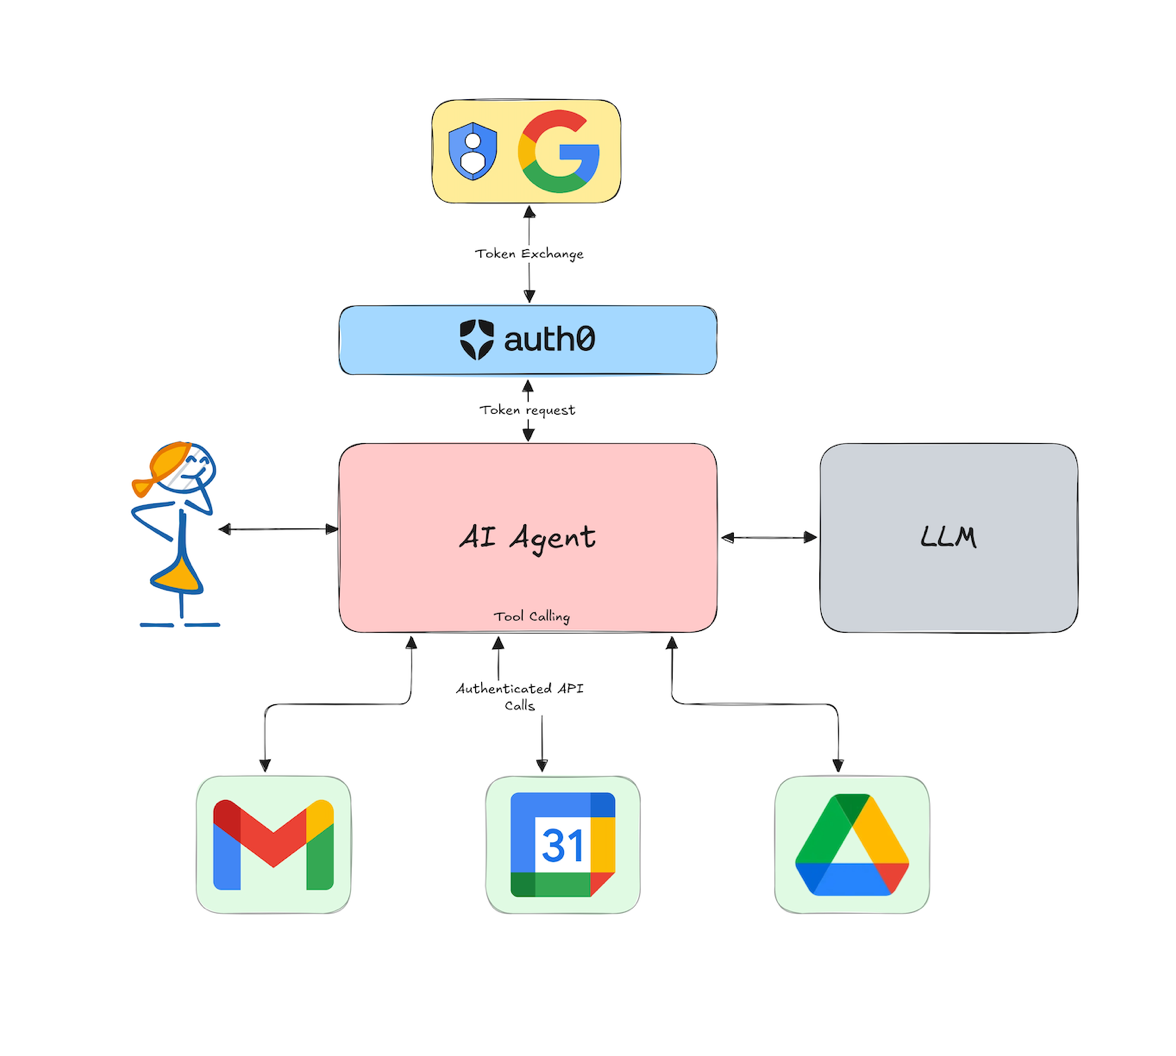
Discover how AI agents are taking center stage by seamlessly integrating with multiple digital tools like Gmail, Calendar, Slack, and Google Drive to be more efficient. Learn why it is important to secure them and how to do it.
Creating the MCP Server
Navigate to src/server.py. You'll see some imports already in place: these are the libraries we'll use to build our MCP server. Now create the MCP server instance by adding this line at the end of the file:
mcp = FastMCP(name=SERVER_NAME)
The mcp object is our application instance. We'll use this object to define our tools that Claude can call. Next, we'll implement two tools:
search_posts: Search blog posts for specific topics or keywordsget_post_content: Retrieve the full content of a specific blog post
Search posts tool
The first tool we'll implement, searches for blog posts using SerpApi. This tool will leverage Google's search capabilities to find relevant posts on your blog by performing a site-specific search.
Add the following code to the end of src/server.py:
@mcp.tool()
def search_posts(query: str) -> str:
    search = GoogleSearch({
        "q": f"site:{BLOG_BASE_URL.strip('https://')} {query}",
        "api_key": SERPAPI_KEY
    })
    search_result = search.get_dict()

    if search_result.get("search_metadata").get("status") == "Success":
        posts = search_result.get("organic_results", [])
        if posts:
            result = f"Found {len(posts)} post(s) matching '{query}':\n\n"
            for post in posts:
                title = post.get("title")
                url = post.get("link")
                snippet = post.get("snippet")
                result += f"**{title}**\n{url}\n{snippet}\n\n"
            return result

    return f"No posts found matching '{query}'."
Let's break down what is happening:
@mcp.tool(): This decorator registers the function as an MCP tool that your client can call. The decorator automatically makes the function available to the client with proper type information and documentation.queryparameter: This is the search term that users provide when they want to find blog posts. Claude will automatically extract this from the user's request.SerpApi integration: We create a
GoogleSearchobject that performs a site-specific search using thesite:operator. This limits results to only your blog domain.Result processing: We extract the organic search results and format them into a readable response with titles, URLs, and snippets that give users a preview of each post.
Error handling: If no results are found or the API call fails, we return an appropriate message rather than crashing.
From an user perspective this is what happens when this tool is called:
Making the MCP Server Runnable
Finally, to make our MCP server runnable we need to add the following at the end of the file:
if __name__ == "__main__":
    mcp.run(transport="stdio")
This is the server entrypoint. The transport="stdio" parameter tells the MCP server to communicate through standard input/output streams. This is the recommended transport method for local MCP servers that integrate with desktop applications like Claude Desktop.
When Claude Desktop launches your MCP server, it communicates with it through stdin/stdout, making this transport layer perfect for our use case. In future deployments to cloud environments, you might use different transport methods like HTTP.
Testing the MCP Server with the MCP Inspector
Now you have a tool to work with. Let's use the MCP Inspector to figure out if everything is running as expected. In your terminal run the following command:
npx @modelcontextprotocol/inspector uv run src/server.py
This will use npx to run the MCP inspector, a tool for testing and debugging MCP servers.
On the left, click Connect so the inspector can connect to your server and then switch to the Tools tab on the right. Then click on List Tools, and you should see something like the image below:
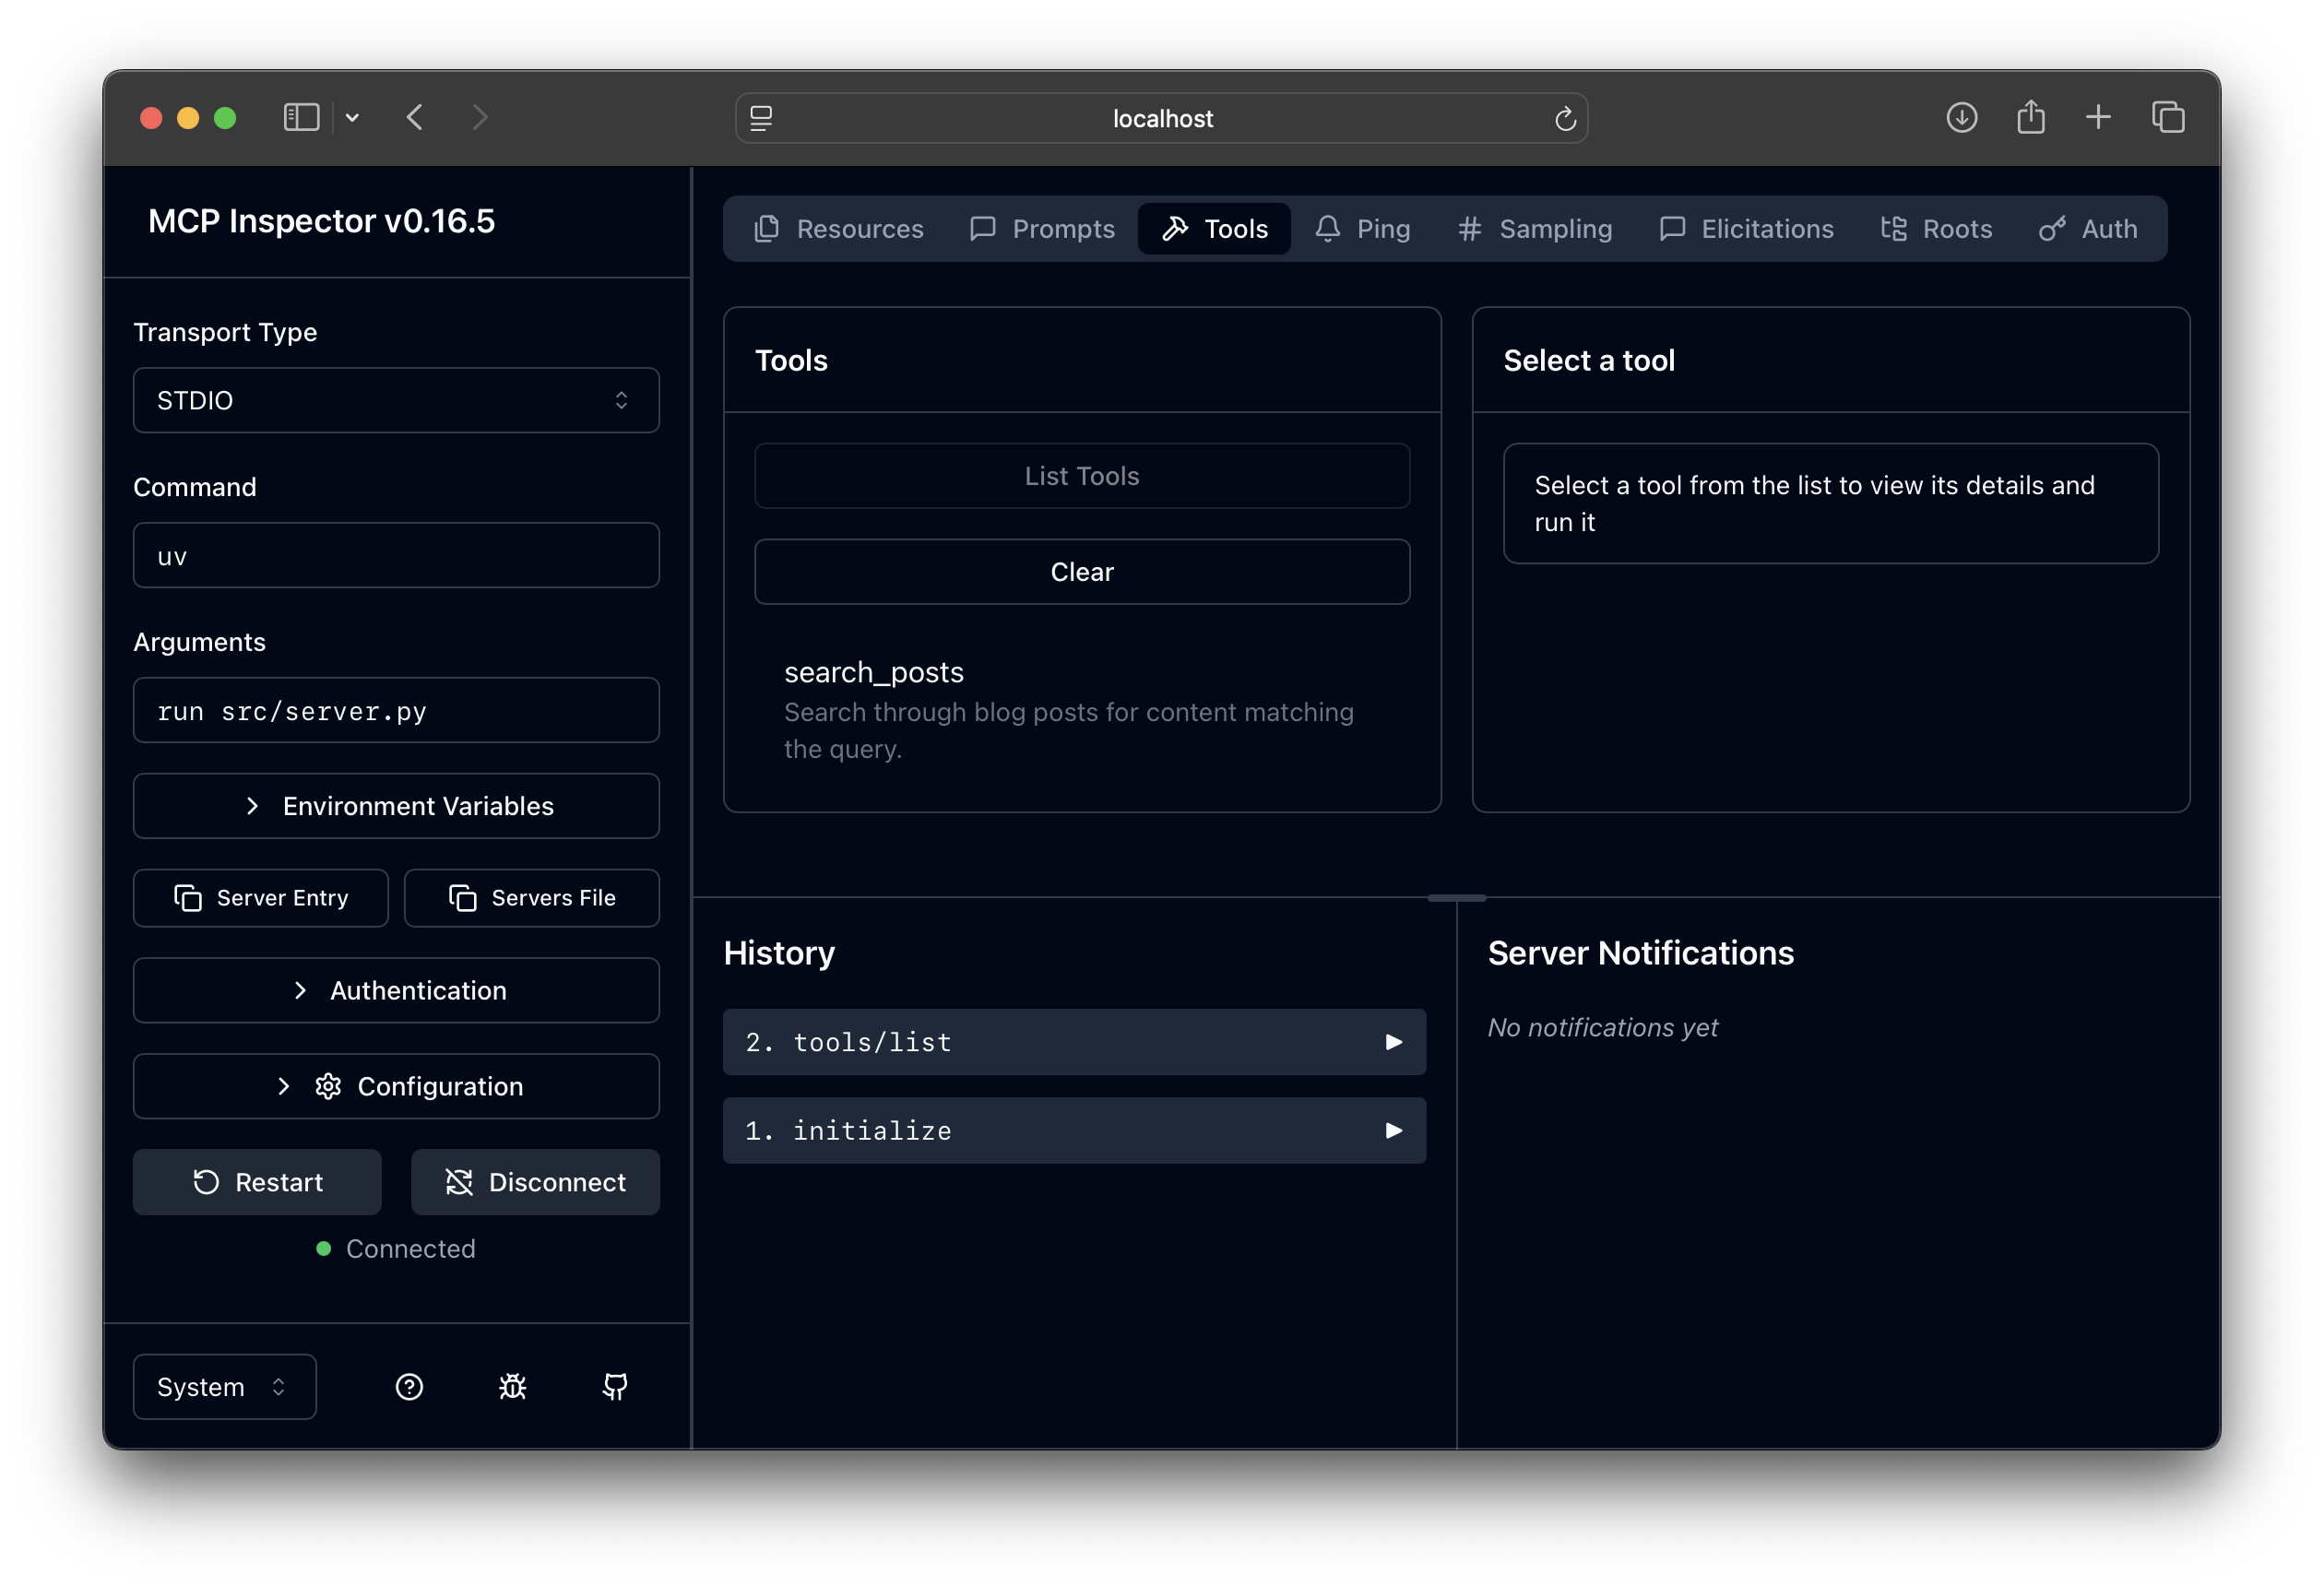
You can even run a tool from this interface, go on, try it.
Get Post Content Tool
Your current tool can get your blog posts, but after finding a blog post you usually want to investigate the content you find interesting, so it is time to implement a second tool that can obtain a post content. This tool will leverage the llms.txt from the blog.
What is llms.txt?
The llms.txt file is a simple text file that serves as an index of your blog posts in a format optimized for AI consumption. It contains:
- A header describing the content
- Other sections about the blog
- Links to raw Markdown files hosted on GitHub
It is structured in a way that's easy for both humans and AI to parse. Here's what a typical llms.txt looks like:
# LLM Feed for jtemporal.com

## Projects

- [GitFichas](https://gitfichas.com)
...

## All posts

Links to blog posts in Markdown format for easy LLM consumption.

- [How to Handle JWTs in Python](https://raw.githubusercontent.com/jtemporal/jtemporal.github.io/refs/heads/main/_posts/2023-04-06-how-to-handle-jwts-in-python.md)
- [Creating a Travel Diary With Django](https://raw.githubusercontent.com/jtemporal/jtemporal.github.io/refs/heads/main/_posts/2023-03-30-creating-a-travel-diaries-blog-with-django.md)
...
LLMs prefer Markdown as it is less noisy than an HTML would be, also less expensive to process since you'll have fewer embeddings generated by Markdown than you would by HTML.

Generative AI is everywhere, and since not every user has access to all data, learn how to use retrieval-augmented generation with fine-grained authorization to ensure that private information stays private.
Add the following code after the first tool and before the if __name__ == "__main__": clause in src/server.py:
def get_post_content(title: str) -> str:
    try:
        # Fetch the llms.txt content from the blog
        llm_url = f"{BLOG_BASE_URL}/llms.txt"
        response = requests.get(llm_url, timeout=10)
        response.raise_for_status()

        # Parse the llm.txt content to find the post by title
        content = response.text
        lines = content.split('\n')

        # Find the "## All posts" section and extract posts from there
        raw_url = None
        in_all_posts_section = False

        for line in lines:
            # Check if we've reached the "## All posts" section
            if line.strip() == "## All posts":
                in_all_posts_section = True
                continue

            # Only search for posts within the "All posts" section
            if in_all_posts_section and title in line:
                # Extract URL from markdown link format: [title](url)
                if '](https://' in line:
                    raw_url = line.split('](')[1].strip(')')
                    break

        if not raw_url:
            return f"Post with title '{title}' not found in llm.txt"

        # Fetch the raw markdown content from GitHub
        content_response = requests.get(raw_url, timeout=10)
        content_response.raise_for_status()

        return content_response.text

    except requests.RequestException as e:
        return f"Error fetching content: {str(e)}"
    except Exception as e:
        return f"Error processing content: {str(e)}"
Let's break down what is happening:
@mcp.tool(): Once again, this decorator registers the function as an MCP tool that Claude can invoke when users want to read full blog post content.titleparameter: This is the blog post title that users want to retrieve. Claude will extract this from the user's request or from search results.llms.txt integration: We fetch the
llms.txtfile from your blog, which serves as an index of all your posts with links to their raw Markdown content on GitHub.Title matching: We search through the llms.txt index to find a post that contains the requested title in the "All posts" section. This allows for partial matches, making it easier for users to find posts.
Content retrieval: Once we find the matching post, we extract the GitHub raw URL and fetch the full Markdown content directly from GitHub.
Error handling: We handle various error cases like network issues, missing posts, or malformed index files gracefully.
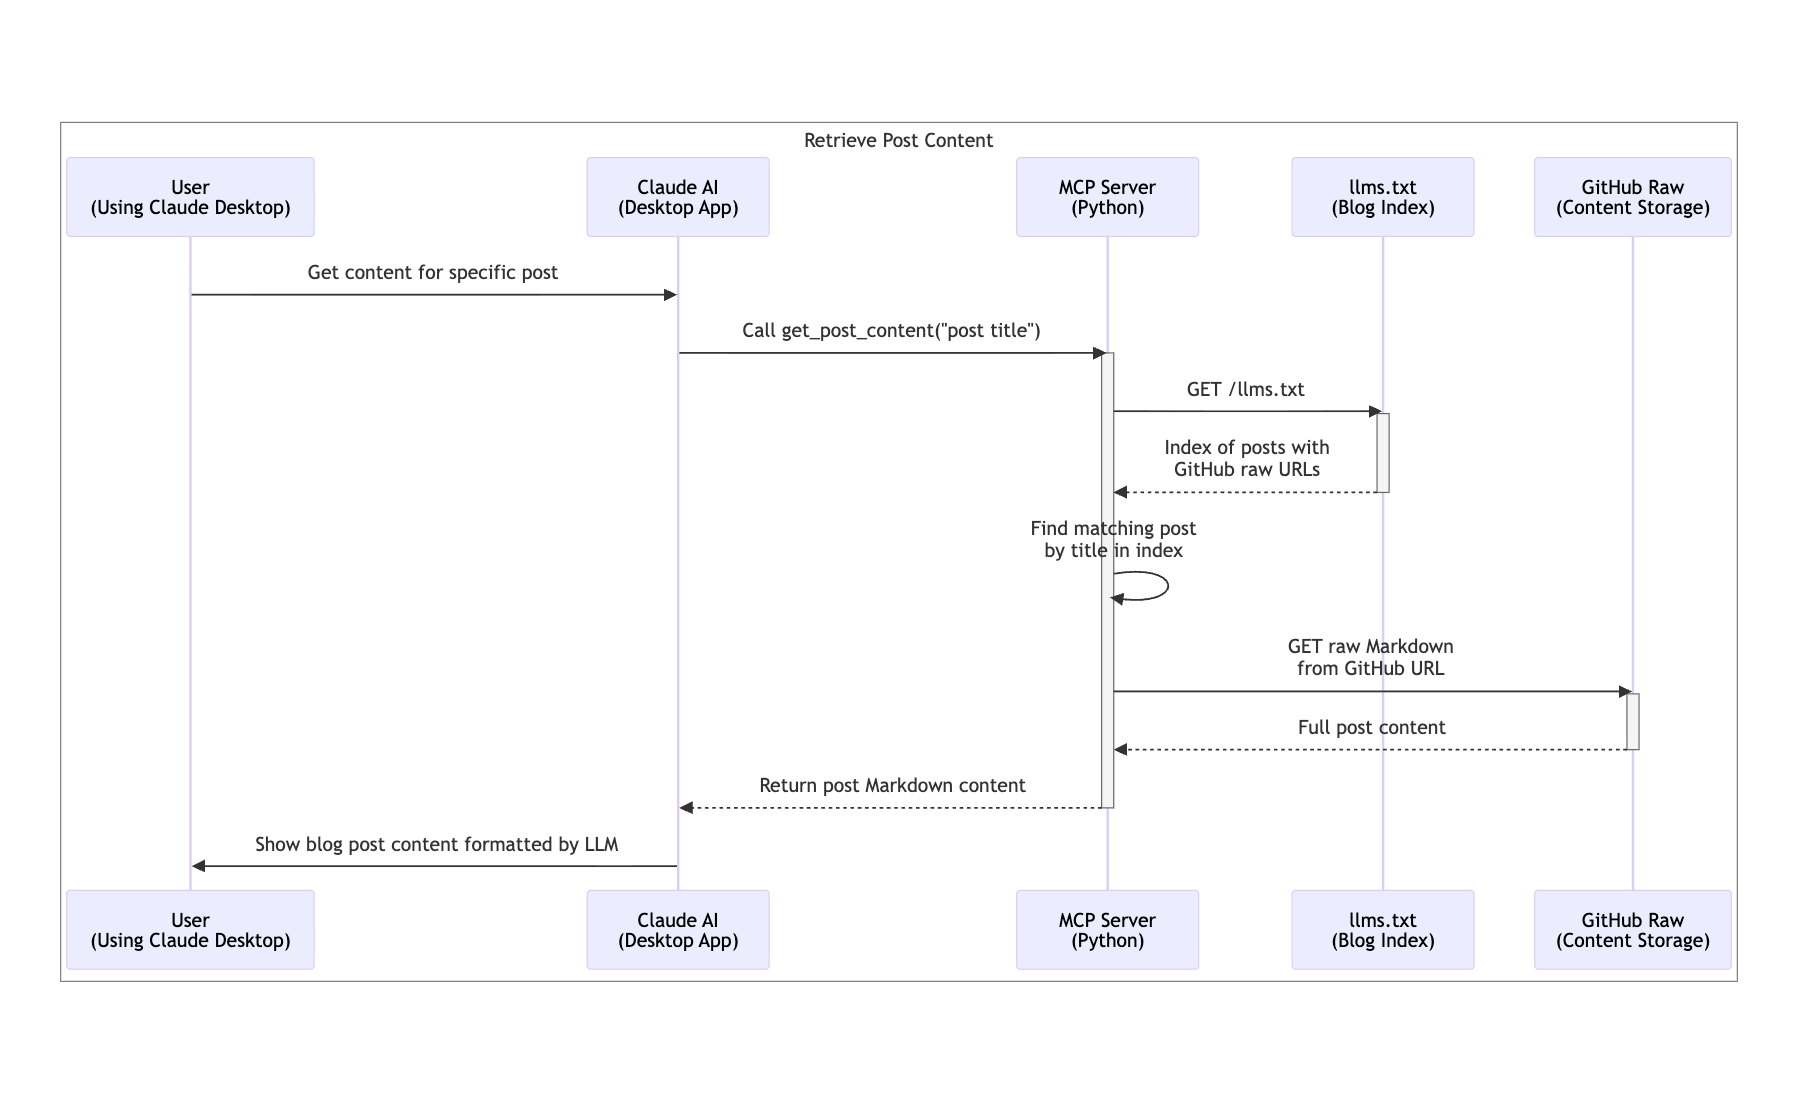
When this tool is called this is what happens:
Setting Up the MCP Server in Claude Desktop
Now that we have a working MCP server with two tools, let's configure it in Claude Desktop so you can use it for searching your blog posts during your conversations.
Before setting up the server in Claude Desktop, make sure you have:
- Completed the server setup from the previous sections (including
uvinstallation) - A working SerpApi key in your
.configfile - Claude Desktop app installed on your computer
Configuring Claude Desktop
Claude Desktop uses a claude_desktop_config.json file for MCP server configuration. Since we used the MCP SDK there's a easy way to configure our server in Claude, use the following command:
uv run mcp install "src/server.py" --with google-search-results
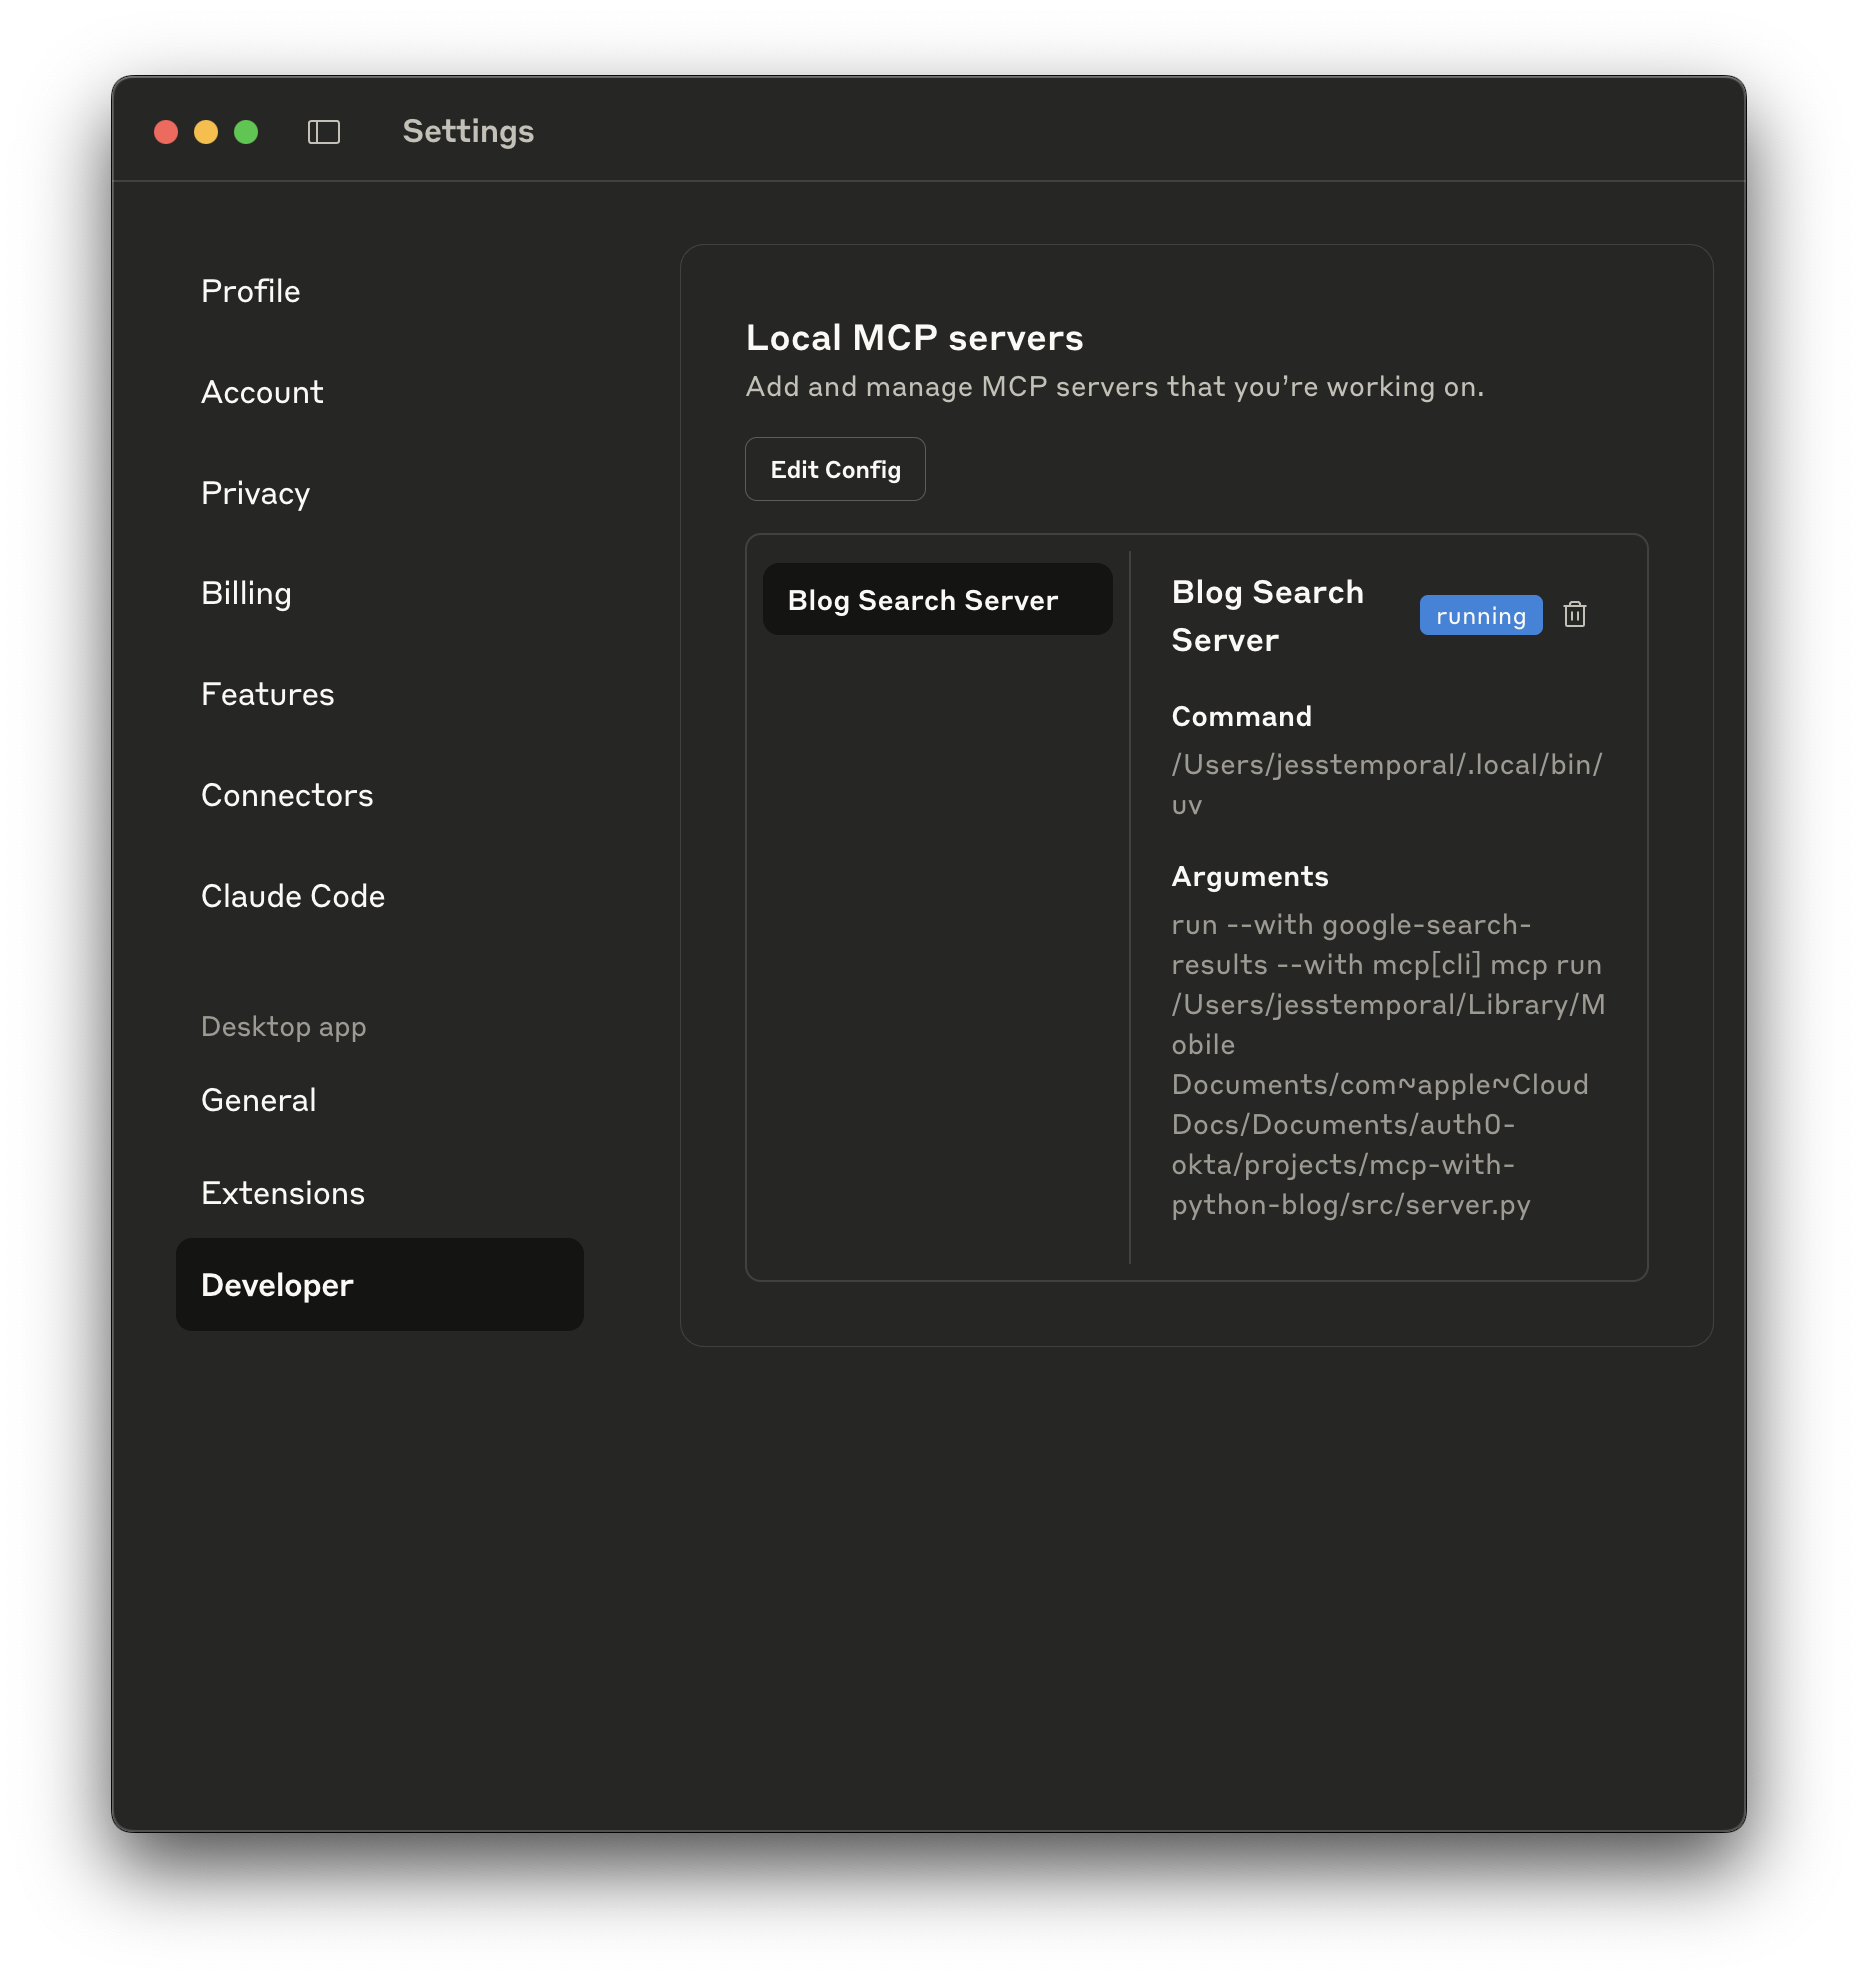
This will create the configuration file for you. Now restart Claude and check in the preferences if the server is running: Open the Settings, then access the Developer section. If your server is running as expected you should see something like the image below:
Testing the search blog tool in Claude
Now open a new conversation and ask something like: "Can search my blog for posts on pyenv?" Claude should identify your intent, recognize pyenv as the query for the search_posts tool, and offer to use it like so:

After a second you should see a result like this:
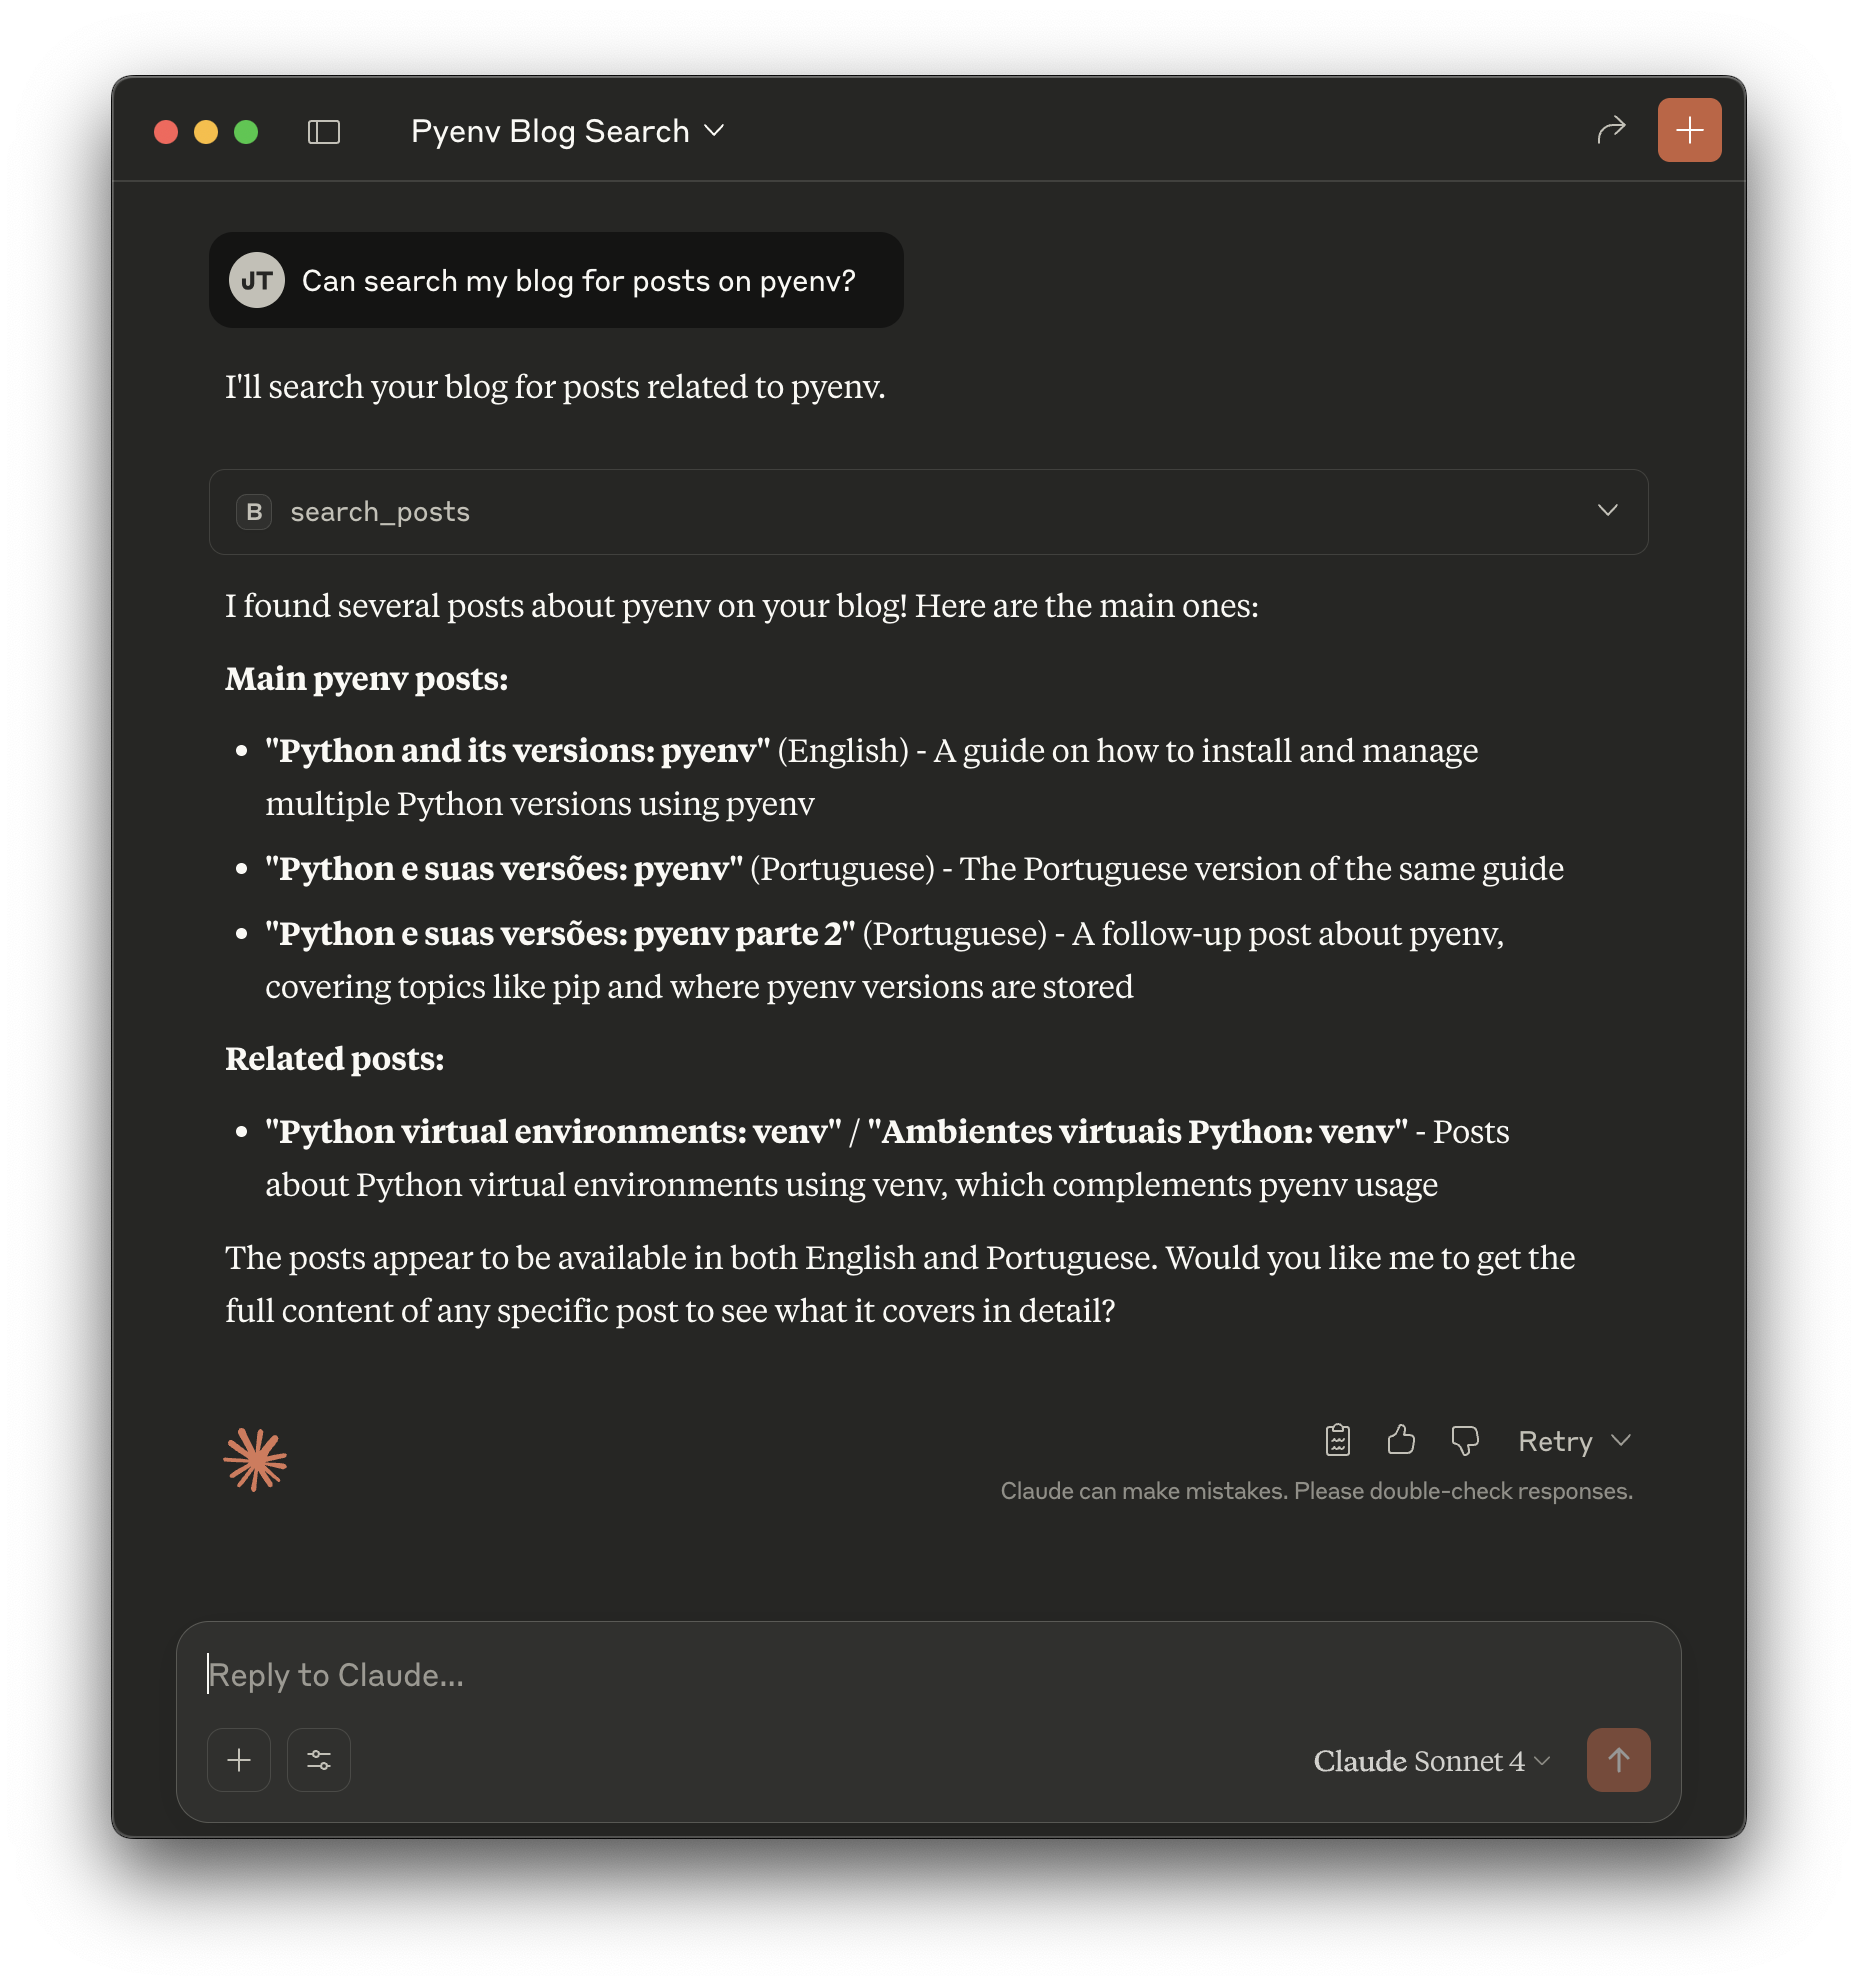
This means that Claude parsed the result of the search into a readable result for the chat for you.
Testing the post content tool in Claude
In the same conversation ask something like: "Can you get the content for the first post?" This time Claude should identify the get_post_content tool as well as post title and ofer to use the tool passing along the query like so:
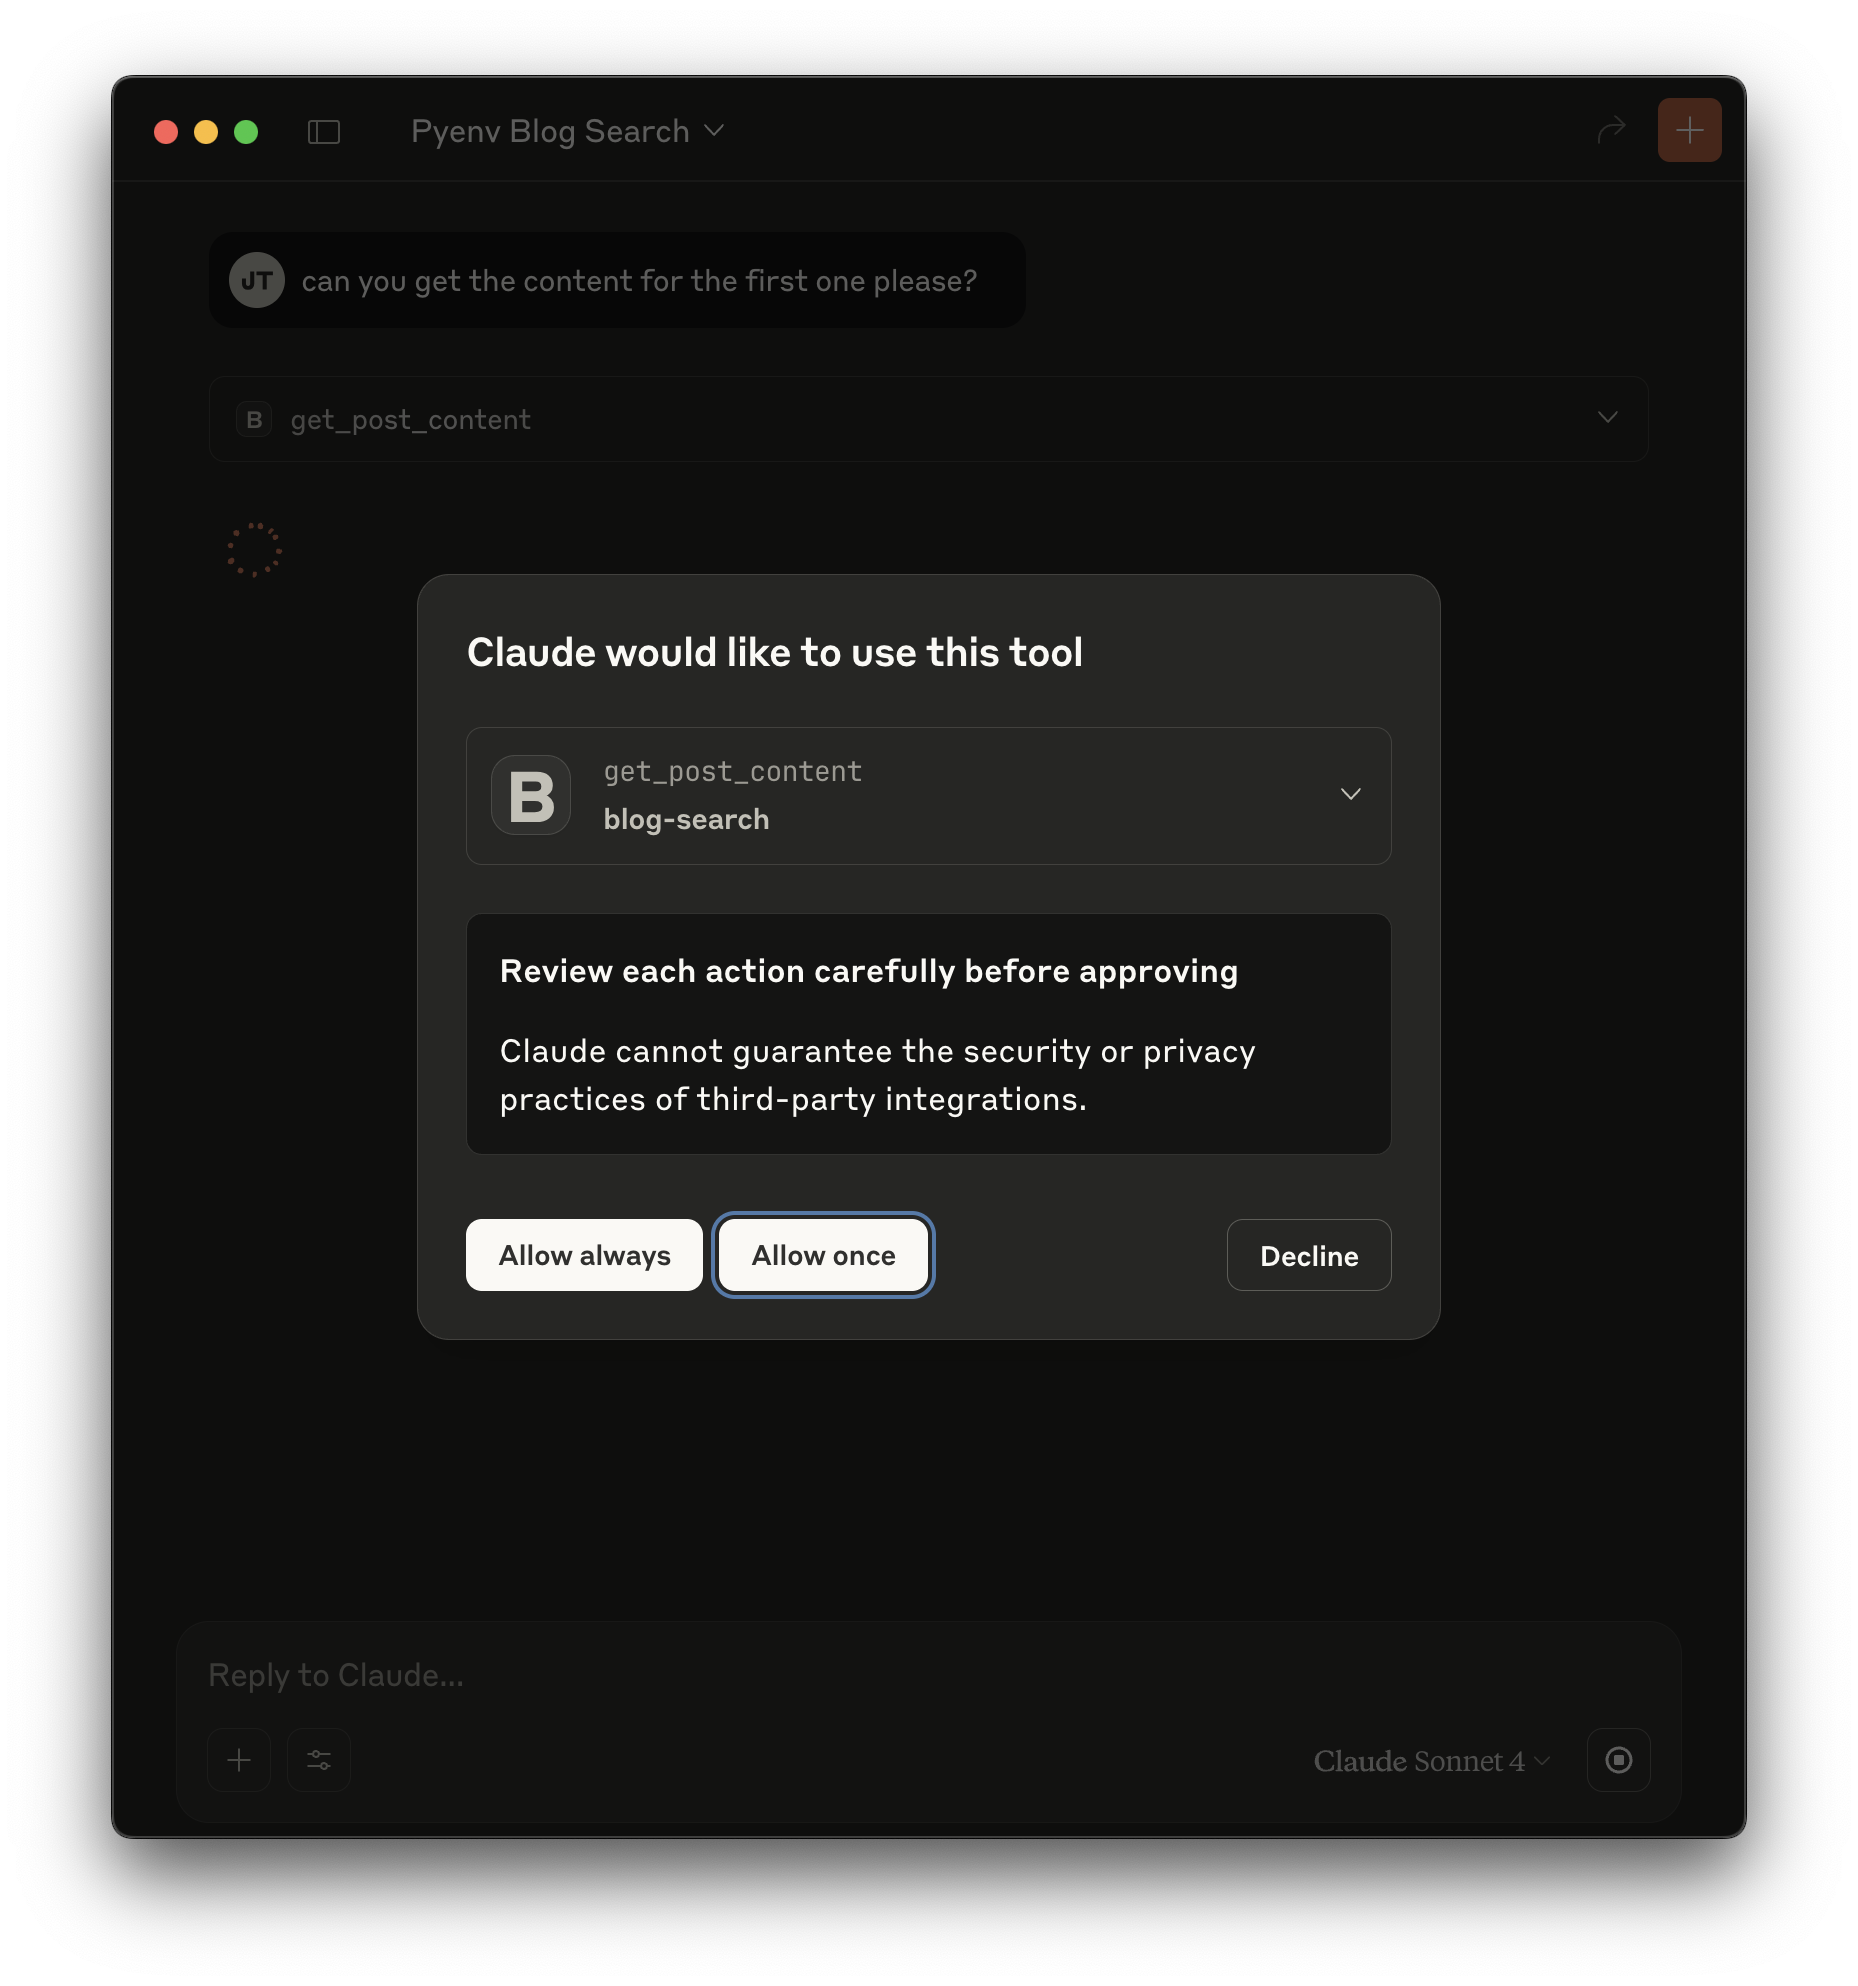
After a second you should see a result like this:
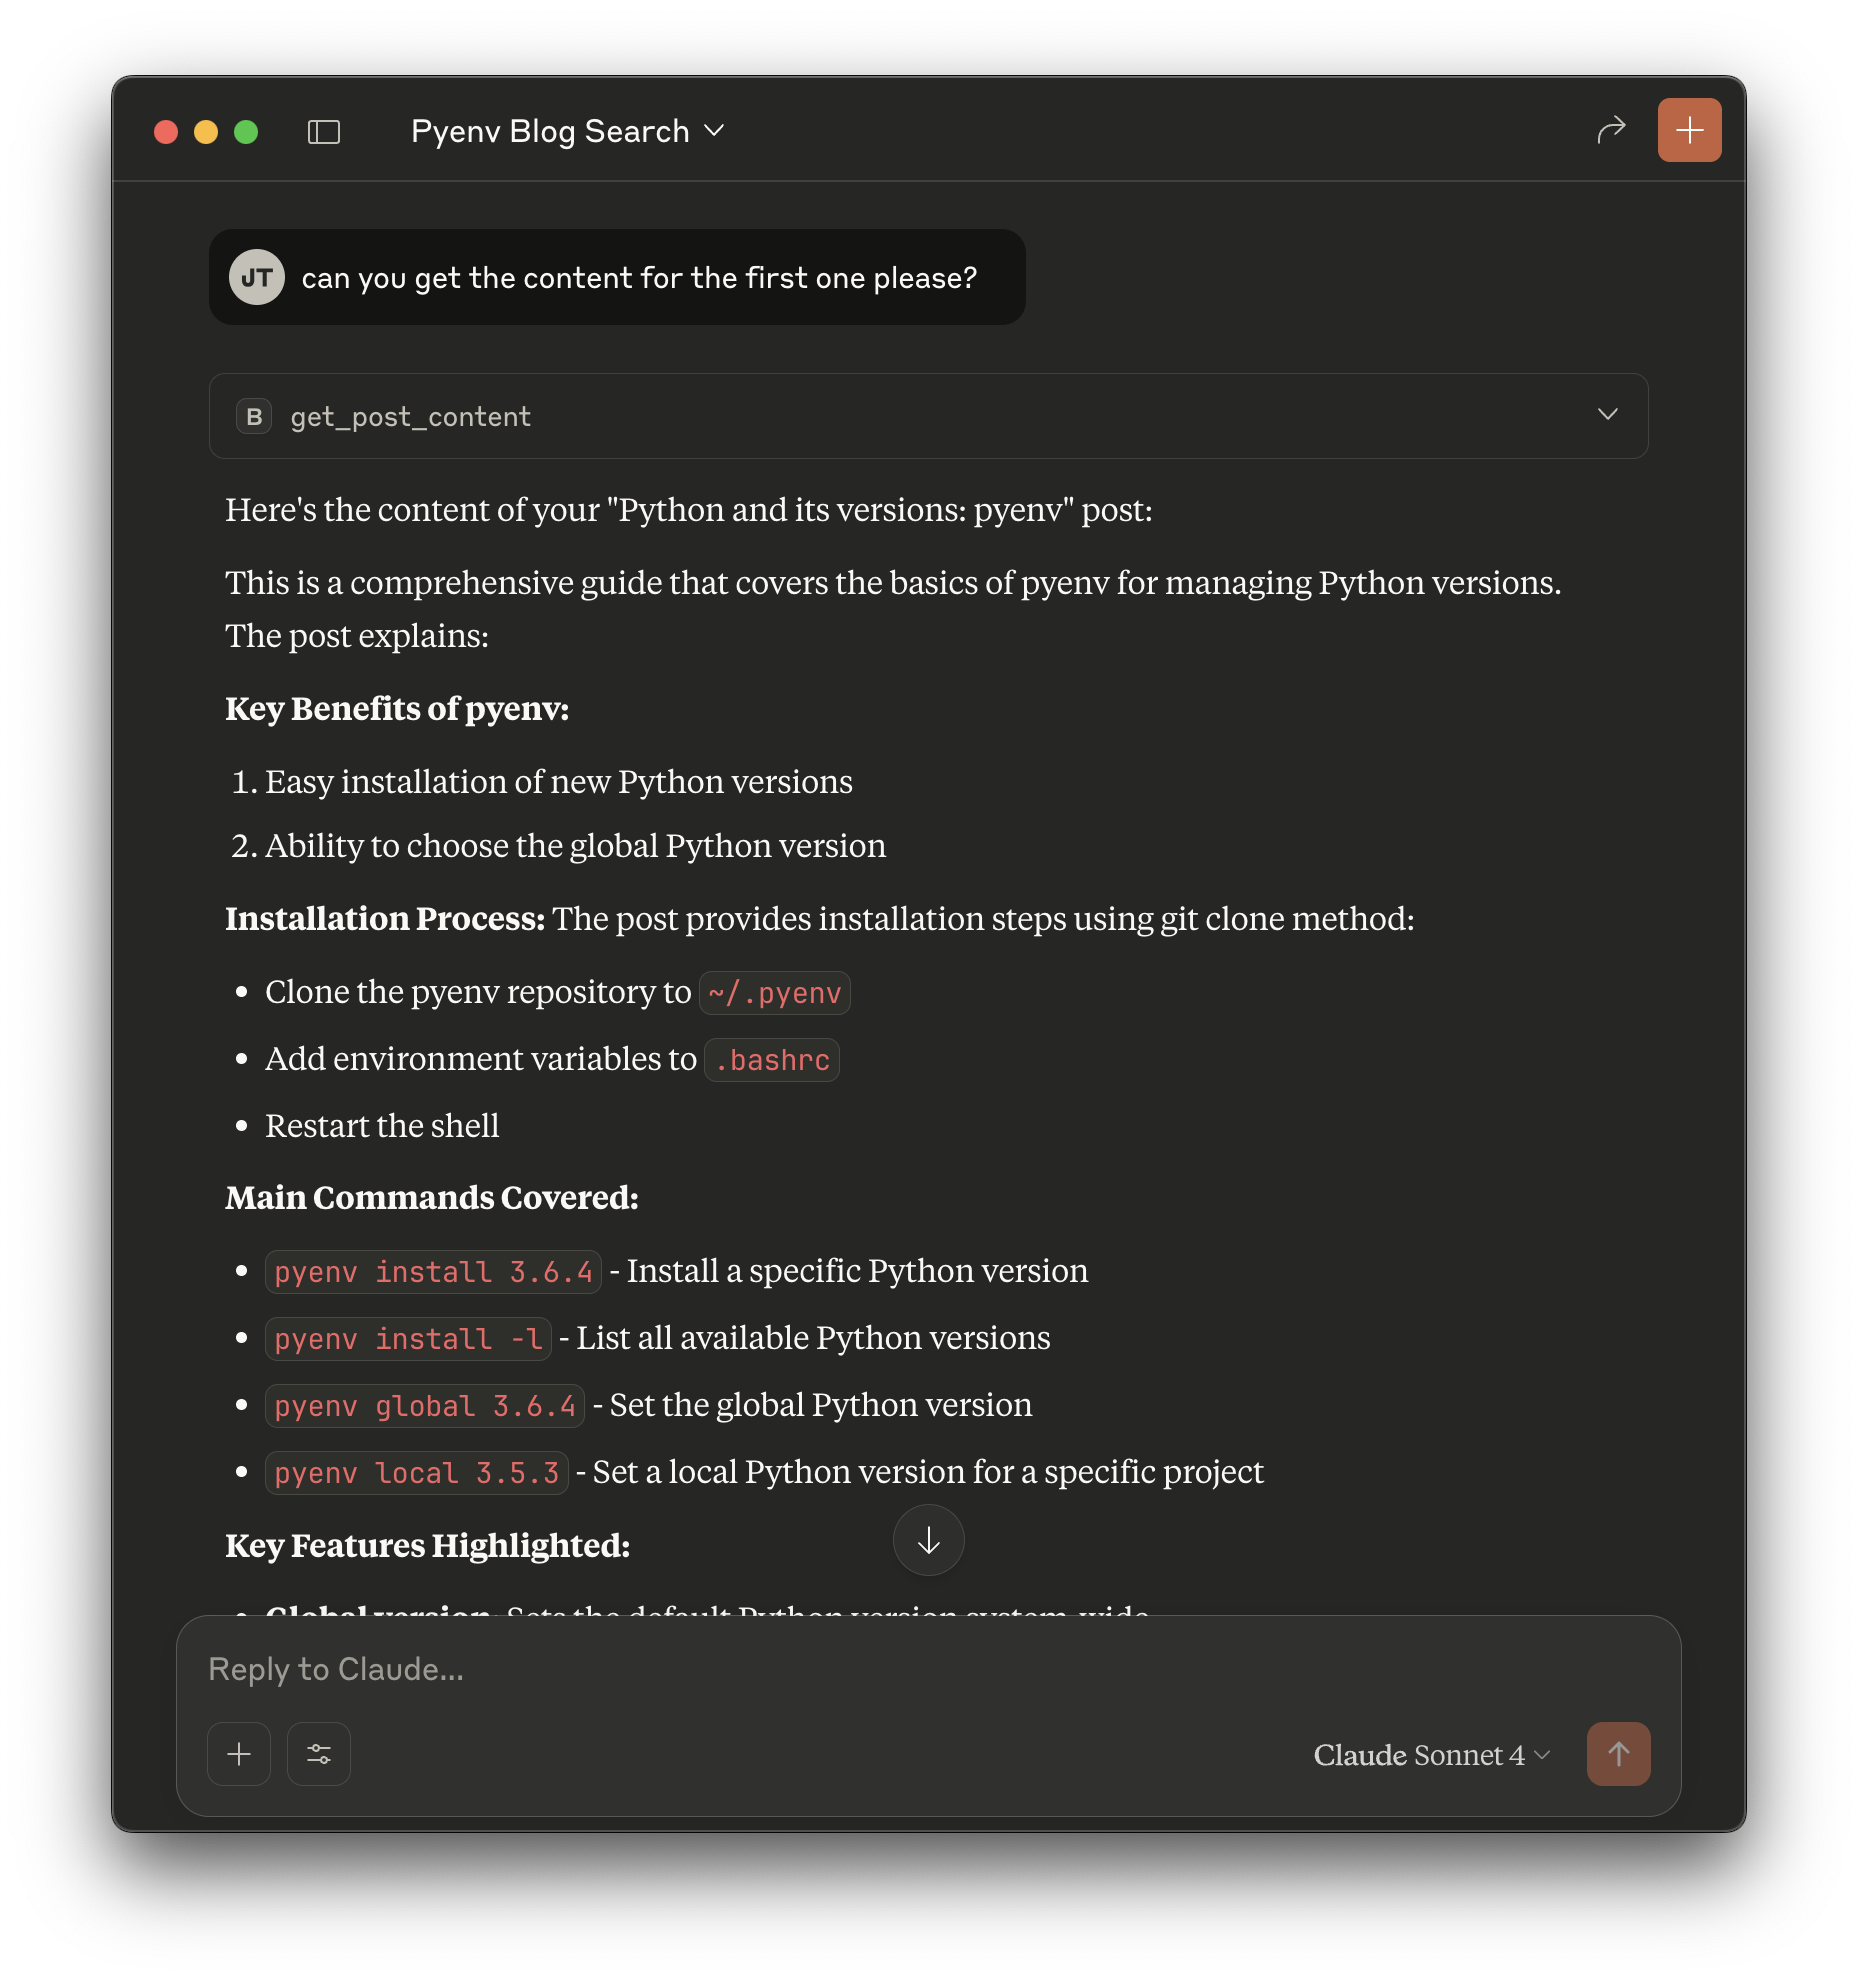
This means that Claude parsed the result of the blog post to show it to you. Keep in mind that this is not a copy of the content on the page but what Claude understood from the blog post.
Tip: If you want you can also configure the server in Cursor, we left instructions in the repository's README.md on how to do it.
Recap and Future Steps
You've successfully built a complete MCP server that can search through your blog posts using Python! Here's what we accomplished:
Created a functional MCP server with two tools:
search_posts: Site-specific search using SerpApiget_post_content: Full content retrieval via llms.txt indexing
Integrated with modern APIs using SerpApi for reliable search functionality
Implemented content indexing using the llms.txt standard for AI-optimized content access
Added comprehensive error handling and logging for robust operation
Configured Claude Desktop integration for seamless AI-powered blog search
Key benefits
- Simple local server: SerpApi and llms.txt require minimal setup and you can run it locally
- Reliable search: Leverages Google's search quality for finding relevant content
- Fast content access: Direct GitHub raw content fetching bypasses the GitHub API rate limits
- AI-optimized: llms.txt format is specifically designed for LLM consumption
What's next?
The MCP ecosystem is rapidly growing, and your blog search server is just the beginning. In a future blog post we will cover how to protect your MCP server to avoid abuse and how to deploy it to Claude so you can access it anywhere without having to have the code locally.
The complete code for this blog post is in this repository.
If you are building GenAI applications make sure you are protecting your user's data and giving the right level of access to your LLMs with Auth0 for AI Agents. Sign up for the Auth0 for AI Agents Developer Preview.
We've been writing a lot on GenAI applications and tool calling, check out the related blog posts section below to continue learning and keep an eye out here or on our Community Forum to learn when the next part of this series go live.
About the author

Jessica Temporal
Sr. Developer Advocate