
TL;DR: In this series, you will learn how to make React and Redux control a bunch of SVG elements to create a game. The knowledge acquired throughout this series will also allow you to create other types of animations that are orchestrated by React and Redux, not only games. You can find the final code developed in this article in the following GitHub repository: Aliens Go Home - Part 3
Developing a Real-Time Leaderboard with Socket.IO
Cool, you are already using Auth0 as the identity management service and you also created the components needed to show the leaderboard. So, what do you need next? That's right, you need a backend capable of emitting real-time events to update the leaderboard.
This may make you think: isn't it hard to develop a real-time backend server? No, it is not. With Socket.IO, you can develop this feature in no time. However, before diving into it, you will probably want to secure this backend service, right? To do this, you will need to create an Auth0 API to represent your service.
Doing so is quite easy. Just head to the APIs page on your Auth0 dashboard and click on the Create API button. After that, Auth0 will present to you a small form where it will ask for three things:
- The Name of the API: Here, you need to inform just a friendly name so you don't forget what this API represents. So, just type Aliens, Go Home! for this field.
- The Identifier of the API: The recommended value here is the final URL of your game, but the truth is that it can be anything. Nevertheless, insert
https://aliens-go-home.digituz.com.brin this field. - The Signing Algorithm: There are two options here, RS256 and HS256. You will be better off leaving this field untouched (i.e. stick with RS256). If you want to learn the difference between them, check this answer.
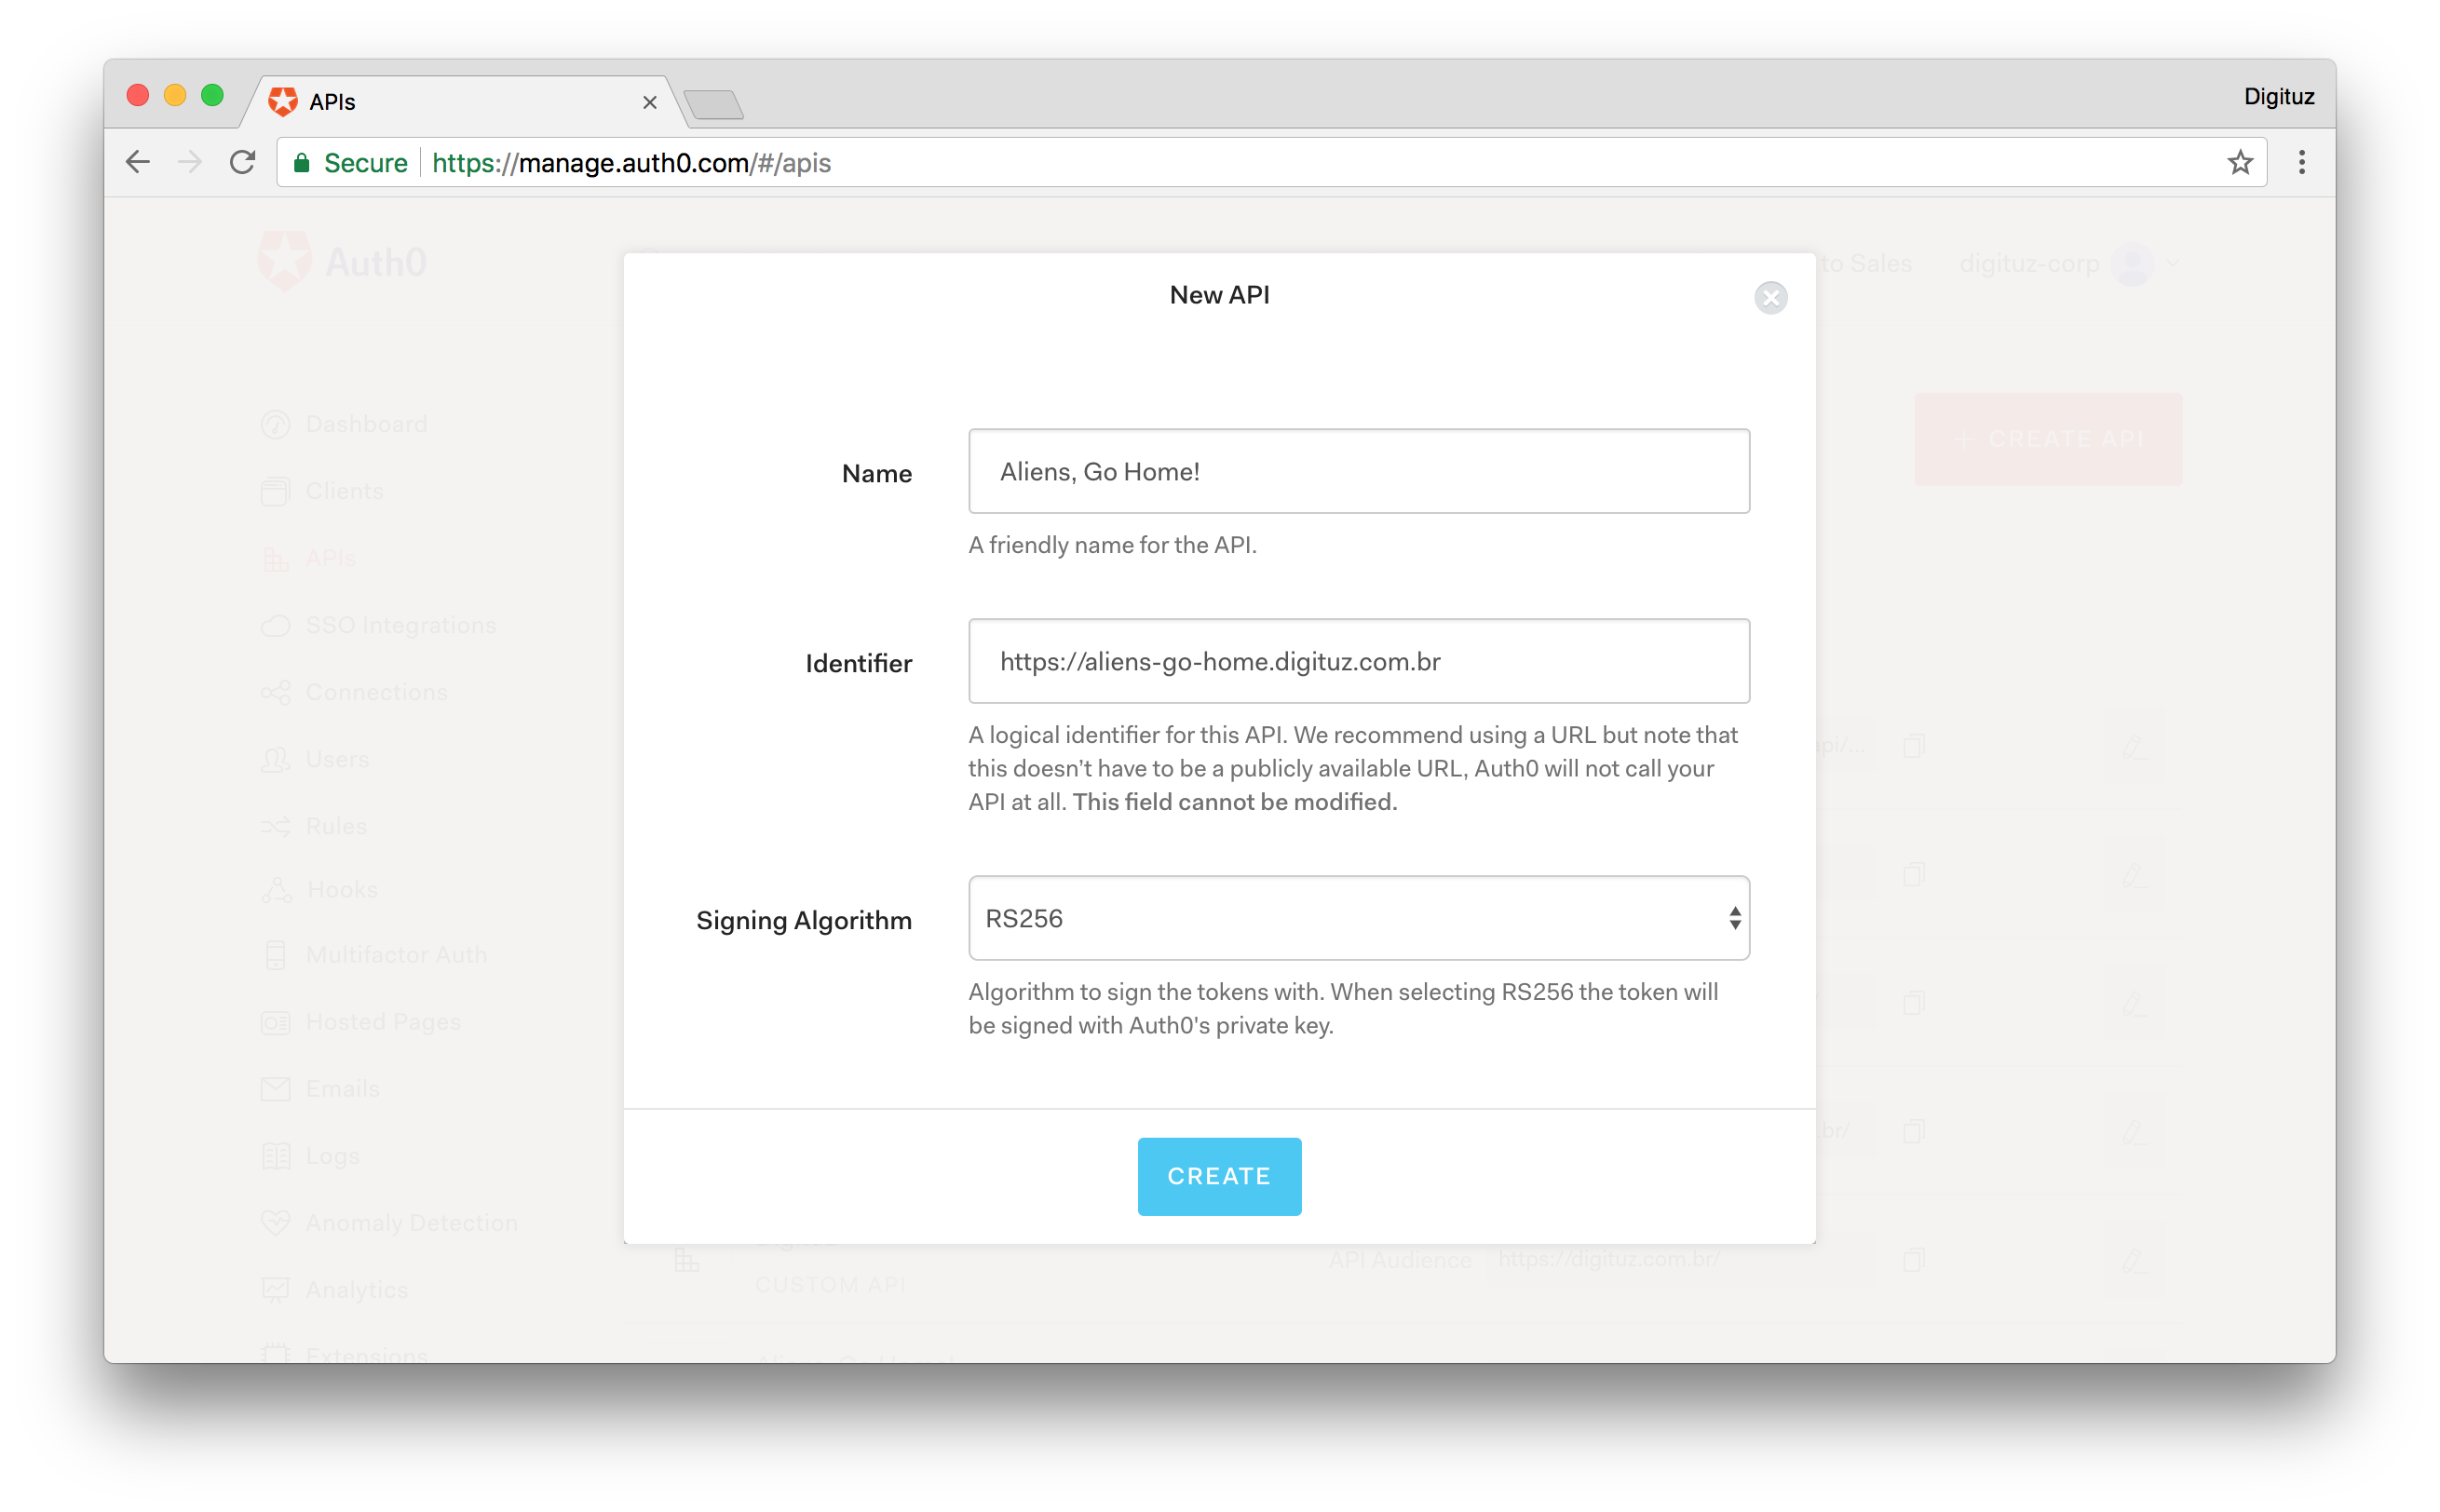
After filling this form, click on the Create button. This will redirect you to a tab called Quick Start inside your new API. From there, click on the Scopes tab and add a new scope called manage:points with the following description: "Read and write Max Score". It's a good practice to define scopes on Auth0 APIs.
After adding this scope, you can go back coding. To implement your real-time leaderboard service, do the following:
# create a server directory in the project root
mkdir server

# move into it
cd server

# start it as a NPM project
npm init -y

# install some dependencies
npm i express jsonwebtoken jwks-rsa socket.io socketio-jwt

# create a file to hold your server source code
touch index.js
Then, in this new file, add the following code:
const app = require('express')();
const http = require('http').Server(app);
const io = require('socket.io')(http);
const jwt = require('jsonwebtoken');
const jwksClient = require('jwks-rsa');

const client = jwksClient({
  jwksUri: 'https://YOUR_AUTH0_DOMAIN/.well-known/jwks.json'
});

const players = [
  { id: 'a1', maxScore: 235, name: 'Bruno Krebs', picture: 'https://twitter.com/brunoskrebs/profile_image', },
  { id: 'c3', maxScore: 99, name: 'Diego Poza', picture: 'https://twitter.com/diegopoza/profile_image', },
  { id: 'b2', maxScore: 129, name: 'Jeana Tahnk', picture: 'https://twitter.com/jeanatahnk/profile_image', },
  { id: 'f6', maxScore: 153, name: 'Kim Maida', picture: 'https://twitter.com/KimMaida/profile_image', },
  { id: 'e5', maxScore: 55, name: 'Luke Oliff', picture: 'https://twitter.com/mroliff/profile_image', },
  { id: 'd4', maxScore: 146, name: 'Sebastian Peyrott', picture: 'https://twitter.com/speyrott/profile_image', },
];

const verifyPlayer = (token, cb) => {
  const uncheckedToken = jwt.decode(token, {complete: true});
  const kid = uncheckedToken.header.kid;

  client.getSigningKey(kid, (err, key) => {
    const signingKey = key.publicKey || key.rsaPublicKey;

    jwt.verify(token, signingKey, cb);
  });
};

const newMaxScoreHandler = (payload) => {
  let foundPlayer = false;
  players.forEach((player) => {
    if (player.id === payload.id) {
      foundPlayer = true;
      player.maxScore = Math.max(player.maxScore, payload.maxScore);
    }
  });

  if (!foundPlayer) {
    players.push(payload);
  }

  io.emit('players', players);
};

io.on('connection', (socket) => {
  const { token } = socket.handshake.query;

  verifyPlayer(token, (err) => {
    if (err) socket.disconnect();
    io.emit('players', players);
  });

  socket.on('new-max-score', newMaxScoreHandler);
});

http.listen(3001, () => {
  console.log('listening on port 3001');
});
Before learning about what this code does, replace YOUR_AUTH0_DOMAIN with your Auth0 domain (the same one that you added to the App.js file). You will find this placeholder in the value of the jwksUri property.
Now, to understand how this thing works, check out this list:
expressandsocket.io: This is simply an Express server enhanced with Socket.IO to make it real-time. If you haven't used Socket.IO before, checkout their Get Started tutorial. It's really simple.jwtandjwksClient: When authenticating with Auth0, your players will get (among other things) anaccess_tokenin the form of a JWT (JSON Web Token). Since you are using the RS256 signing algorithm, you need to use thejwksClientpackage to fetch the correct public key to validate JWTs. The JWTs that you receive contain akidproperty (Key ID) that you can use to get the correct public key (if curious, you can learn more about JWKS here).jwt.verify: After finding the correct key, you use this function to decode and validate JWTs. If they are fine, you just send theplayerslist to whoever is requesting. If they are not valid, you justdisconnectthesocket(client).on('new-max-score', ...): Lastly, you are attaching thenewMaxScoreHandlerfunction to thenew-max-scoreevent. As such, whenever you need to update the max score of a user, you will need to emit this event from your React app.
The rest of the code is pretty intuitive. Therefore, you can focus on integrating this service into your game.
Socket.IO and React
After creating your real-time backend service, it's time to integrate your React game with it. The best way to use React and Socket.IO is by installing the socket.io-client package. To do this, issue the following code in the root directory of your React app:
npm i socket.io-client
Then, after that, you will make your game connect to your service whenever your players authenticate (you won't show the leaderboard for unauthenticated players). As you are using Redux to hold the state of your game, you will need two actions to keep your Redux store up to date. As such, open the ./src/actions/index.js file and update it as follows:
export const LEADERBOARD_LOADED = 'LEADERBOARD_LOADED';
export const LOGGED_IN = 'LOGGED_IN';
// ... MOVE_OBJECTS and START_GAME ...

export const leaderboardLoaded = players => ({
  type: LEADERBOARD_LOADED,
  players,
});

export const loggedIn = player => ({
  type: LOGGED_IN,
  player,
});

// ... moveObjects and startGame ...
This new version defines actions to be triggered in two moments:
LOGGED_IN: When a player logs in, you will use this action to connect your React game to the real-time service.LEADERBOARD_LOADED: When the real-time service sends the list of players, you will use this action to update the Redux store with these players.
To make you Redux store respond to these actions, open the ./src/reducers/index.js file and update it as follows:
import {
  LEADERBOARD_LOADED, LOGGED_IN,
  MOVE_OBJECTS, START_GAME
} from '../actions';
// ... other import statements

const initialGameState = {
  // ... other game state properties
  currentPlayer: null,
  players: null,
};

// ... initialState definition

function reducer(state = initialState, action) {
  switch (action.type) {
    case LEADERBOARD_LOADED:
      return {
        ...state,
        players: action.players,
      };
    case LOGGED_IN:
      return {
        ...state,
        currentPlayer: action.player,
      };
    // ... MOVE_OBJECTS, START_GAME, and default cases
  }
}

export default reducer;
Now, whenever your game triggers the LEADERBOARD_LOADED action, you will update the Redux store with the new array of players. Besides that, whenever a player logs in (LOGGED_IN), you will update the currentPlayer in the store.
Then, to make your game use these new actions, open the ./src/containers/Game.js file and update it as follows:
// ... other import statements
import {
  leaderboardLoaded, loggedIn,
  moveObjects, startGame
} from '../actions/index';

const mapStateToProps = state => ({
  // ... angle and gameState
  currentPlayer: state.currentPlayer,
  players: state.players,
});

const mapDispatchToProps = dispatch => ({
  leaderboardLoaded: (players) => {
    dispatch(leaderboardLoaded(players));
  },
  loggedIn: (player) => {
    dispatch(loggedIn(player));
  },
  // ... moveObjects and startGame
});

// ... connect and export statement
With that, you are ready to make your game connect to the real-time service to load and update the leaderboard. Therefore, open the ./src/App.js file and update it with the following code:
// ... other import statements
import io from 'socket.io-client';

Auth0.configure({
  // ... other properties
  audience: 'https://aliens-go-home.digituz.com.br',
});

class App extends Component {
  // ... constructor

  componentDidMount() {
    const self = this;

    Auth0.handleAuthCallback();

    Auth0.subscribe((auth) => {
      if (!auth) return;

      const playerProfile = Auth0.getProfile();
      const currentPlayer = {
        id: playerProfile.sub,
        maxScore: 0,
        name: playerProfile.name,
        picture: playerProfile.picture,
      };

      this.props.loggedIn(currentPlayer);

      const socket = io('http://localhost:3001', {
        query: `token=${Auth0.getAccessToken()}`,
      });

      let emitted = false;
      socket.on('players', (players) => {
        this.props.leaderboardLoaded(players);

        if (emitted) return;
        socket.emit('new-max-score', {
          id: playerProfile.sub,
          maxScore: 120,
          name: playerProfile.name,
          picture: playerProfile.picture,
        });
        emitted = true;
        setTimeout(() => {
          socket.emit('new-max-score', {
            id: playerProfile.sub,
            maxScore: 222,
            name: playerProfile.name,
            picture: playerProfile.picture,
          });
        }, 5000);
      });
    });

    // ... setInterval and onresize
  }

  // ... trackMouse

  render() {
    return (
      <Canvas
        angle={this.props.angle}
        currentPlayer={this.props.currentPlayer}
        gameState={this.props.gameState}
        players={this.props.players}
        startGame={this.props.startGame}
        trackMouse={event => (this.trackMouse(event))}
      />
    );
  }
}

App.propTypes = {
  // ... other propTypes definitions
  currentPlayer: PropTypes.shape({
    id: PropTypes.string.isRequired,
    maxScore: PropTypes.number.isRequired,
    name: PropTypes.string.isRequired,
    picture: PropTypes.string.isRequired,
  }),
  leaderboardLoaded: PropTypes.func.isRequired,
  loggedIn: PropTypes.func.isRequired,
  players: PropTypes.arrayOf(PropTypes.shape({
    id: PropTypes.string.isRequired,
    maxScore: PropTypes.number.isRequired,
    name: PropTypes.string.isRequired,
    picture: PropTypes.string.isRequired,
  })),
};

App.defaultProps = {
  currentPlayer: null,
  players: null,
};

export default App;
As you can see in the code above, what you had to:
- configure the
audienceproperty on theAuth0module; - fetch the profile of the current player (
Auth0.getProfile()) to create thecurrentPlayerconstant and update the Redux store (this.props.loggedIn(...)); - connect to your real-time service (
io('http://localhost:3001', ...)) with the player'saccess_token(Auth0.getAccessToken()); - and listen to the
playersevent emitted by your real-time service to update the Redux store (this.props.leaderboardLoaded(...));
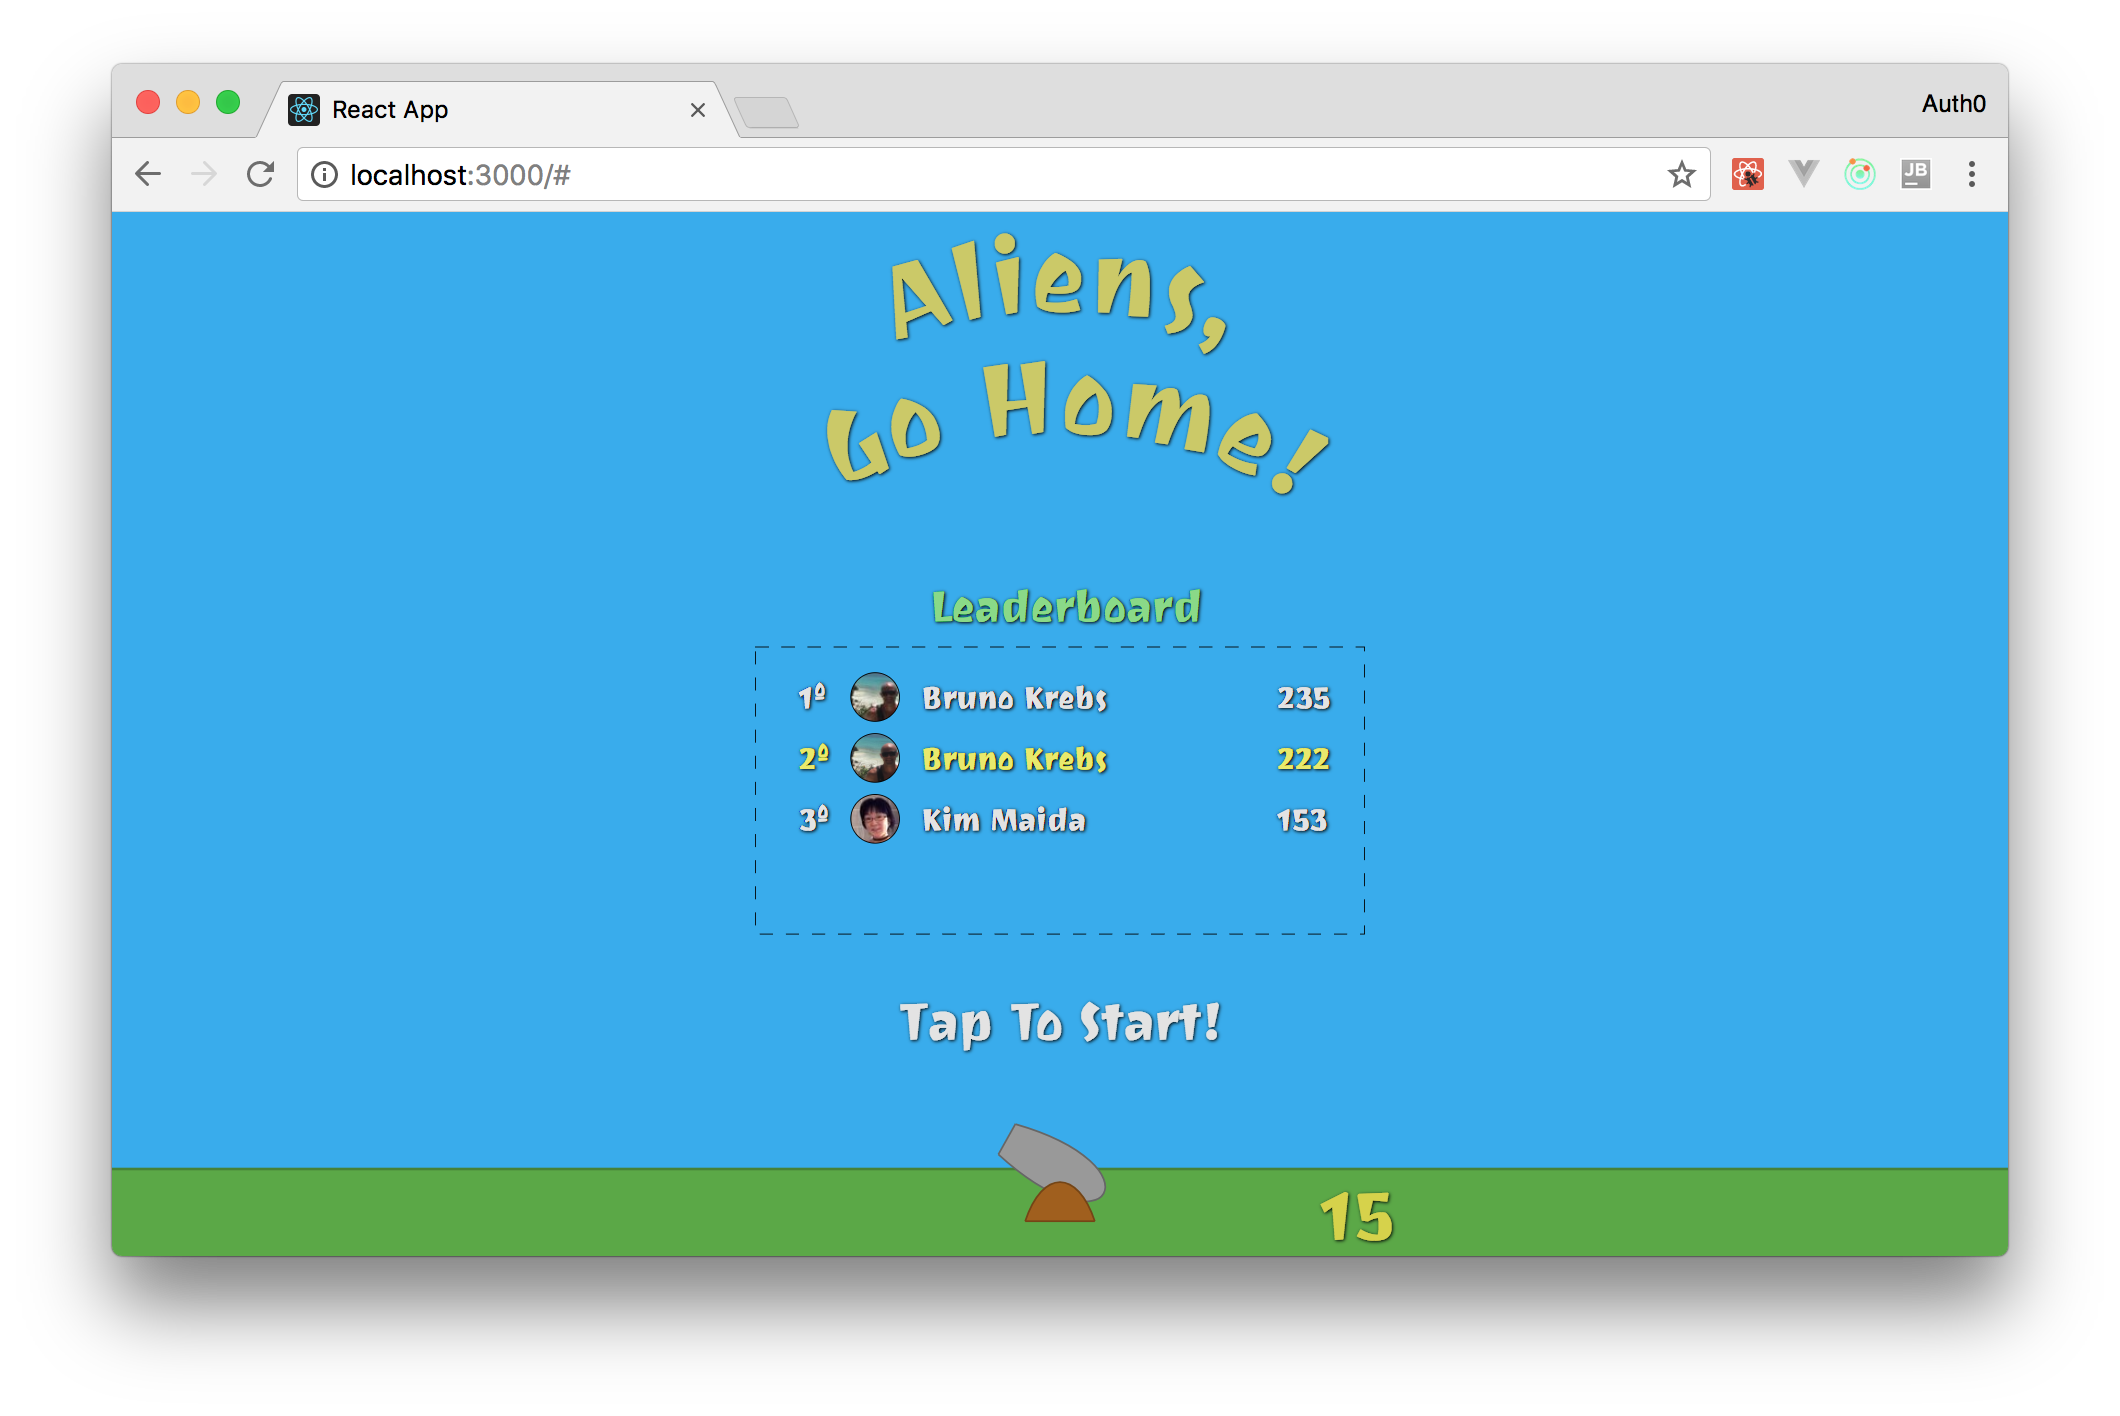
Then, as your game is not complete and your players cannot kill aliens yet, you added some temporary code to simulate new-max-score events. First, you emitted a new maxScore of 120, which puts the logged-in player in the fifth position. Then, after five seconds (setTimeout(..., 5000)), you emitted a new action with a new maxScore of 222, putting the logged-in player in the second position.
Besides these changes, you passed two new properties to your Canvas: currentPlayer and players. Therefore, you need to open the ./src/components/Canvas.jsx file and update it:
// ... import statements

const Canvas = (props) => {
  // ... gameHeight and viewBox constants

  // REMOVE the leaderboard constant !!!!

  return (
    <svg ...>
      // ... other elements

      { ! props.gameState.started &&
      <g>
        // ... StartGame and Title
        <Leaderboard currentPlayer={props.currentPlayer} authenticate={signIn} leaderboard={props.players} />
      </g>
      }

      // ... flyingObjects.map
    </svg>
  );
};

Canvas.propTypes = {
  // ... other propTypes definitions
  currentPlayer: PropTypes.shape({
    id: PropTypes.string.isRequired,
    maxScore: PropTypes.number.isRequired,
    name: PropTypes.string.isRequired,
    picture: PropTypes.string.isRequired,
  }),
  players: PropTypes.arrayOf(PropTypes.shape({
    id: PropTypes.string.isRequired,
    maxScore: PropTypes.number.isRequired,
    name: PropTypes.string.isRequired,
    picture: PropTypes.string.isRequired,
  })),
};

Canvas.defaultProps = {
  currentPlayer: null,
  players: null,
};

export default Canvas;
In this file, you had to make the following changes:
- Remove the
leaderboardconstant. Now, you are loading this constant from your real-time service. - Update the
<Leaderboard />element. You have some more realistic data now:props.currentPlayerandprops.players. - Enhance the
propTypesdefinition to declare that theCanvascomponent can use thecurrentPlayerandplayersvalue.
Done! You have integrated your React game leaderboard with the Socket.IO real-time service. To test everything, issue the following commands:
# move to the real-time service directory
cd server

# run it on the background
node index.js &

# move back to your game
cd ..

# start the React development server
npm start
Then, open your game in your browser (http://localhost:3000). There, you will see that, after logging in, you will appear in the fifth position and that, after 5 seconds, you will jump to the second position.
Implementing the Missing Parts
Now, you have almost everything you need to finish your game. You have created all the React elements that your game needs, you have added most of the animations it will have, and you have implemented the leaderboard feature. The pieces that are missing in this puzzle are:
- Shooting Cannon Balls: To kill aliens, you must allow your players to shoot cannon balls.
- Detecting Collisions: As your game will have cannon balls and flying objects moving around, you must implement an algorithm to detect collisions between these object.
- Updating Lives and the Current Score: After allowing your players to kill flying objects, your game must increment their current score so they can achieve new max scores. Also, you need to decrement lives when flying objects invade the Earth.
- Updating the Leaderboard: With all the features above implemented, the last thing you will have to do is to update the leaderboard with new max scores.
So, in the next sections, you will focus on implementing these pieces to wrap up your game.
Shooting Cannon Balls
To allow your players to shoot cannon balls, you will add an onClick event listener to your Canvas. Then, when clicked, your canvas will trigger a Redux action to add a cannon ball to the Redux store (that is, to the state of your game). The movement of this ball will be handled by the moveObjects reducer.
To start the implementation of this feature, you can begin by creating the Redux action. To do this, open the ./src/actions/index.js file and add the following code to it:
// ... other string constants

export const SHOOT = 'SHOOT';

// ... other function constants

export const shoot = (mousePosition) => ({
  type: SHOOT,
  mousePosition,
});
Then, you can prepare the reducer (./src/reducers/index.js) to handle this action:
import {
  LEADERBOARD_LOADED, LOGGED_IN,
  MOVE_OBJECTS, SHOOT, START_GAME
} from '../actions';
// ... other import statements
import shoot from './shoot';

const initialGameState = {
  // ... other properties
  cannonBalls: [],
};

// ... initialState definition

function reducer(state = initialState, action) {
  switch (action.type) {
    // other case statements
    case SHOOT:
      return shoot(state, action);
    // ... default statement
  }
}
As you can see, the new version of your reducer uses a function called shoot when it receives the SHOOT action. You still have to define this function. So, create a file called shoot.js in the same directory of the reducer and add the following code to it:
import { calculateAngle } from '../utils/formulas';

function shoot(state, action) {
  if (!state.gameState.started) return state;

  const { cannonBalls } = state.gameState;

  if (cannonBalls.length === 2) return state;

  const { x, y } = action.mousePosition;

  const angle = calculateAngle(0, 0, x, y);

  const id = (new Date()).getTime();
  const cannonBall = {
    position: { x: 0, y: 0 },
    angle,
    id,
  };

  return {
    ...state,
    gameState: {
      ...state.gameState,
      cannonBalls: [...cannonBalls, cannonBall],
    }
  };
}

export default shoot;
This function starts by checking if the game is started or not. If it is not, it simply returns the current state. Otherwise, it checks if the game already contains two cannon balls. You are limiting the number of cannon balls to make the game a little bit harder. If the player has shot less than two cannon balls, this function uses calculateAngle to define the trajectory of the new cannon ball. Then, in the end, this function creates a new object representing the cannon ball and returns a new state to the Redux store.
After defining this action and the reducer to handle it, you will have to update the Game container to provide the action to the App component. So, open the ./src/containers/Game.js file and update it as follows:
// ... other import statements
import {
  leaderboardLoaded, loggedIn,
  moveObjects, startGame, shoot
} from '../actions/index';

// ... mapStateToProps

const mapDispatchToProps = dispatch => ({
  // ... other functions
  shoot: (mousePosition) => {
    dispatch(shoot(mousePosition))
  },
});

// ... connect and export
Now, you need to update the ./src/App.js file to make use of the dispatch wrapper:
// ... import statements and Auth0.configure

class App extends Component {
  constructor(props) {
    super(props);
    this.shoot = this.shoot.bind(this);
  }

  // ... componentDidMount and trackMouse definition

  shoot() {
    this.props.shoot(this.canvasMousePosition);
  }

  render() {
    return (
      <Canvas
        // other props
        shoot={this.shoot}
      />
    );
  }
}

App.propTypes = {
  // ... other propTypes
  shoot: PropTypes.func.isRequired,
};

// ... defaultProps and export statements
As you can see here, you are defining a new method in the App class to call the shoot dispatcher with the canvasMousePosition. Then, you are passing this new method to the Canvas component. So, you still need to enhance this component to attach this method to the onClick event listener of the svg element and to make it render the cannon balls:
// ... other import statements
import CannonBall from './CannonBall';

const Canvas = (props) => {
  // ... gameHeight and viewBox constant

  return (
    <svg
      // ... other properties
      onClick={props.shoot}
    >
      // ... defs, Sky and Ground elements

      {props.gameState.cannonBalls.map(cannonBall => (
        <CannonBall
          key={cannonBall.id}
          position={cannonBall.position}
        />
      ))}

      // ... CannonPipe, CannonBase, CurrentScore, etc
    </svg>
  );
};

Canvas.propTypes = {
  // ... other props
  shoot: PropTypes.func.isRequired,
};

// ... defaultProps and export statement
Note: It is important to add
cannonBalls.mapbeforeCannonPipebecause, otherwise, cannon balls would overlap the cannon itself.
These changes are enough to make your game add cannon balls to their initial position (x: 0, y: 0) and with their trajectory (angle) properly defined. The problem now is that these objects are inanimate (that is, they don't move).
To make them move, you will need to add two functions to the ./src/utils/formulas.js file:
// ... other functions

const degreesToRadian = degrees => ((degrees * Math.PI) / 180);

export const calculateNextPosition = (x, y, angle, divisor = 300) => {
  const realAngle = (angle * -1) + 90;
  const stepsX = radiansToDegrees(Math.cos(degreesToRadian(realAngle))) / divisor;
  const stepsY = radiansToDegrees(Math.sin(degreesToRadian(realAngle))) / divisor;
  return {
    x: x +stepsX,
    y: y - stepsY,
  }
};
Note: To learn how the formula above works, take a look here.
You will use the calculateNextPosition function in a new file called moveCannonBalls.js. So, create this file inside the ./src/reducers/ directory with the following code:
import { calculateNextPosition } from '../utils/formulas';

const moveBalls = cannonBalls => (
  cannonBalls
    .filter(cannonBall => (
      cannonBall.position.y > -800 && cannonBall.position.x > -500 && cannonBall.position.x < 500
    ))
    .map((cannonBall) => {
      const { x, y } = cannonBall.position;
      const { angle } = cannonBall;
      return {
        ...cannonBall,
        position: calculateNextPosition(x, y, angle, 5),
      };
    })
);

export default moveBalls;
In the function exposed by this file, you are doing two important things. First, you are using the filter function to remove cannonBalls that are not within a specific area. That is, you are removing cannon balls that are above -800 on the Y-axis, or that moved too much to the left (lower than -500) or to the right (greater than 500).
Lastly, to use this function, you will need to refactor the ./src/reducers/moveObjects.js file as follows:
// ... other import statements
import moveBalls from './moveCannonBalls';

function moveObjects(state, action) {
  if (!state.gameState.started) return state;

  let cannonBalls = moveBalls(state.gameState.cannonBalls);

  // ... mousePosition, createFlyingObjects, filter, etc

  return {
    ...newState,
    gameState: {
      ...newState.gameState,
      flyingObjects,
      cannonBalls,
    },
    angle,
  };
}

export default moveObjects;
In the new version of this file, you are simply enhancing the previously moveObjects reducer to make use of the new moveBalls function. Then, you are using the result of this function to define a new array to the cannonBalls property of the gameState.
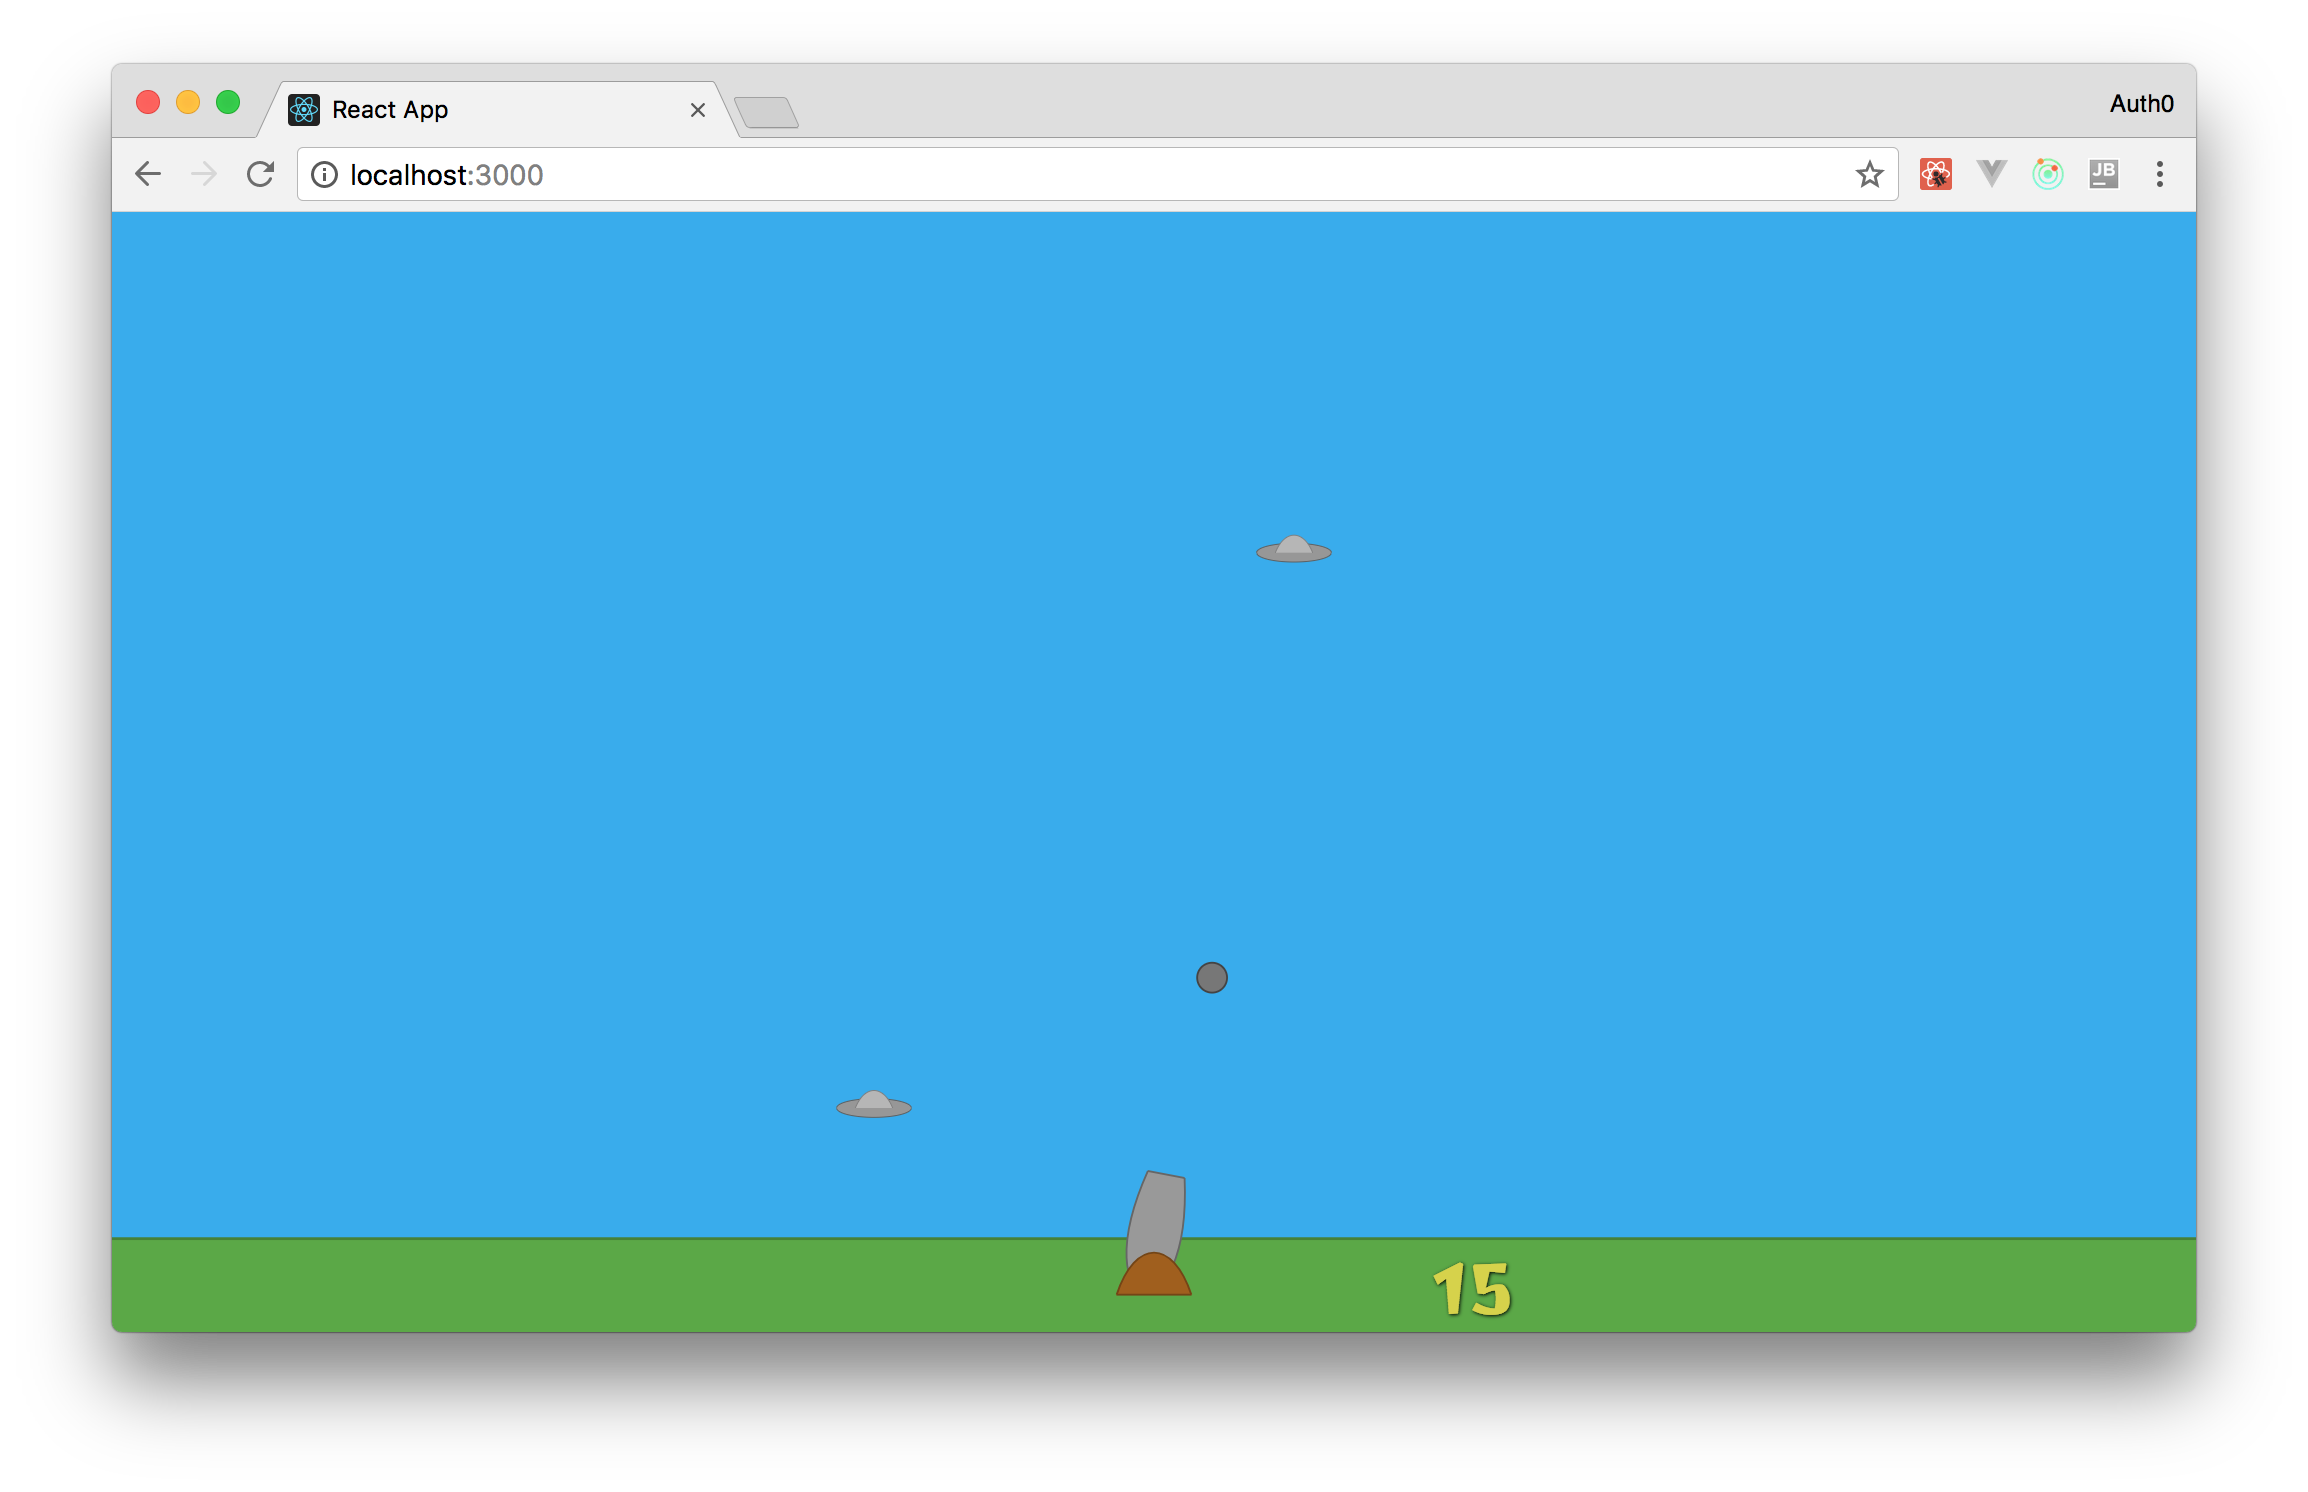
Now, with all these changes in place, your players will be able to shoot cannon balls. You can check that by testing your game in a web browser.
Detecting Collisions
Now that your game supports players shooting cannon balls and that there are flying objects trying to invade the Earth, it is a good time to add an algorithm to detect collisions. With this algorithm, you will be able to remove cannon balls and flying objects that collide. This will also enable you to work on the next feature: Incrementing the Current Score.
A good strategy to follow when trying to implement the algorithm that checks collisions is to imagine the cannon balls and flying objects are rectangles. Although this strategy is less precise than implementing an algorithm that considers the real format of these objects, handling them as rectangles will make everything much easier. Besides that, for this game, you won't need too much precision because, fortunately, you won't need this algorithm to kill real aliens.
Having that in mind, add the following function to the ./src/utils/formulas.js file:
// ... other functions

export const checkCollision = (rectA, rectB) => (
  rectA.x1 < rectB.x2 && rectA.x2 > rectB.x1 &&
  rectA.y1 < rectB.y2 && rectA.y2 > rectB.y1
);
As you can see, treating objects as rectangles allows you to check for overlaps with these simple conditions. Now, to use this function, create a new file called checkCollisions.js inside the ./src/reducers directory with the following code:
import { checkCollision } from '../utils/formulas';
import { gameHeight } from '../utils/constants';

const checkCollisions = (cannonBalls, flyingDiscs) => {
  const objectsDestroyed = [];
  flyingDiscs.forEach((flyingDisc) => {
    const currentLifeTime = (new Date()).getTime() - flyingDisc.createdAt;
    const calculatedPosition = {
      x: flyingDisc.position.x,
      y: flyingDisc.position.y + ((currentLifeTime / 4000) * gameHeight),
    };
    const rectA = {
      x1: calculatedPosition.x - 40,
      y1: calculatedPosition.y - 10,
      x2: calculatedPosition.x + 40,
      y2: calculatedPosition.y + 10,
    };
    cannonBalls.forEach((cannonBall) => {
      const rectB = {
        x1: cannonBall.position.x - 8,
        y1: cannonBall.position.y - 8,
        x2: cannonBall.position.x + 8,
        y2: cannonBall.position.y + 8,
      };
      if (checkCollision(rectA, rectB)) {
        objectsDestroyed.push({
          cannonBallId: cannonBall.id,
          flyingDiscId: flyingDisc.id,
        });
      }
    });
  });
  return objectsDestroyed;
};

export default checkCollisions;
The code in this file basically does the following:
- It defines an array called
objectsDestroyedto hold everything that is destroyed. - It iterates over the
flyingDiscsarray (with theforEachfunction) to create a rectangular representation of the flying discs. Note that, as you are using CSS animations to move these objects, you need to calculate their positions over the Y-axis based on theircurrentLifeTime. - It iterates over the
cannonBallsarray (with theforEachfunction) to create a rectangular representation of the cannon balls. - It calls the
checkCollisionfunction with both rectangular representations to decide if these objects must be destroyed. Then, if they must be destroyed, they are added to theobjectsDestroyedarray that this function returns.
Lastly, you will need to update the moveObjects.js file to use this function as follows:
// ... import statements

import checkCollisions from './checkCollisions';

function moveObjects(state, action) {
  // ... other statements and definitions

  // the only change in the following three lines is that it cannot
  // be a const anymore, it must be defined with let
  let flyingObjects = newState.gameState.flyingObjects.filter(object => (
    (now - object.createdAt) < 4000
  ));

  // ... { x, y } constants and angle constant

  const objectsDestroyed = checkCollisions(cannonBalls, flyingObjects);
  const cannonBallsDestroyed = objectsDestroyed.map(object => (object.cannonBallId));
  const flyingDiscsDestroyed = objectsDestroyed.map(object => (object.flyingDiscId));

  cannonBalls = cannonBalls.filter(cannonBall => (cannonBallsDestroyed.indexOf(cannonBall.id)));
  flyingObjects = flyingObjects.filter(flyingDisc => (flyingDiscsDestroyed.indexOf(flyingDisc.id)));

  return {
    ...newState,
    gameState: {
      ...newState.gameState,
      flyingObjects,
      cannonBalls,
    },
    angle,
  };
}

export default moveObjects;
Here, you are using the result of the checkCollisions function to remove objects from the cannonBalls and flyingObjects arrays.
Now, when cannon balls and flying objects overlap, the new version of the moveObjects reducer will remove them from the gameState. You can see this in action in your web browser.
Updating Lives and the Current Score
Whenever a flying object invades the Earth, you must decrement the number of lives players have. Also, you must end the game when they have no more lives. To implement these features, you will need to update only two files. The first one is the ./src/reducers/moveObject.js file. You will need to update it as follows:
import { calculateAngle } from '../utils/formulas';
import createFlyingObjects from './createFlyingObjects';
import moveBalls from './moveCannonBalls';
import checkCollisions from './checkCollisions';

function moveObjects(state, action) {
  // ... code until newState.gameState.flyingObjects.filter

  const lostLife = state.gameState.flyingObjects.length > flyingObjects.length;
  let lives = state.gameState.lives;
  if (lostLife) {
    lives--;
  }

  const started = lives > 0;
  if (!started) {
    flyingObjects = [];
    cannonBalls = [];
    lives = 3;
  }

  // ... x, y, angle, objectsDestroyed, etc ...

  return {
    ...newState,
    gameState: {
      ...newState.gameState,
      flyingObjects,
      cannonBalls: [...cannonBalls],
      lives,
      started,
    },
    angle,
  };
}

export default moveObjects;
These new lines of code simply compare the current length of the flyingObjects array with the one from the original state to decide if players must loose a life or not. This strategy works because you are adding this code right after popping flying objects that remained for 4 seconds in the game ((now - object.createdAt) < 4000) and before removing objects that collide. So, if the length of these arrays differs, it means one flying object invaded the Earth.
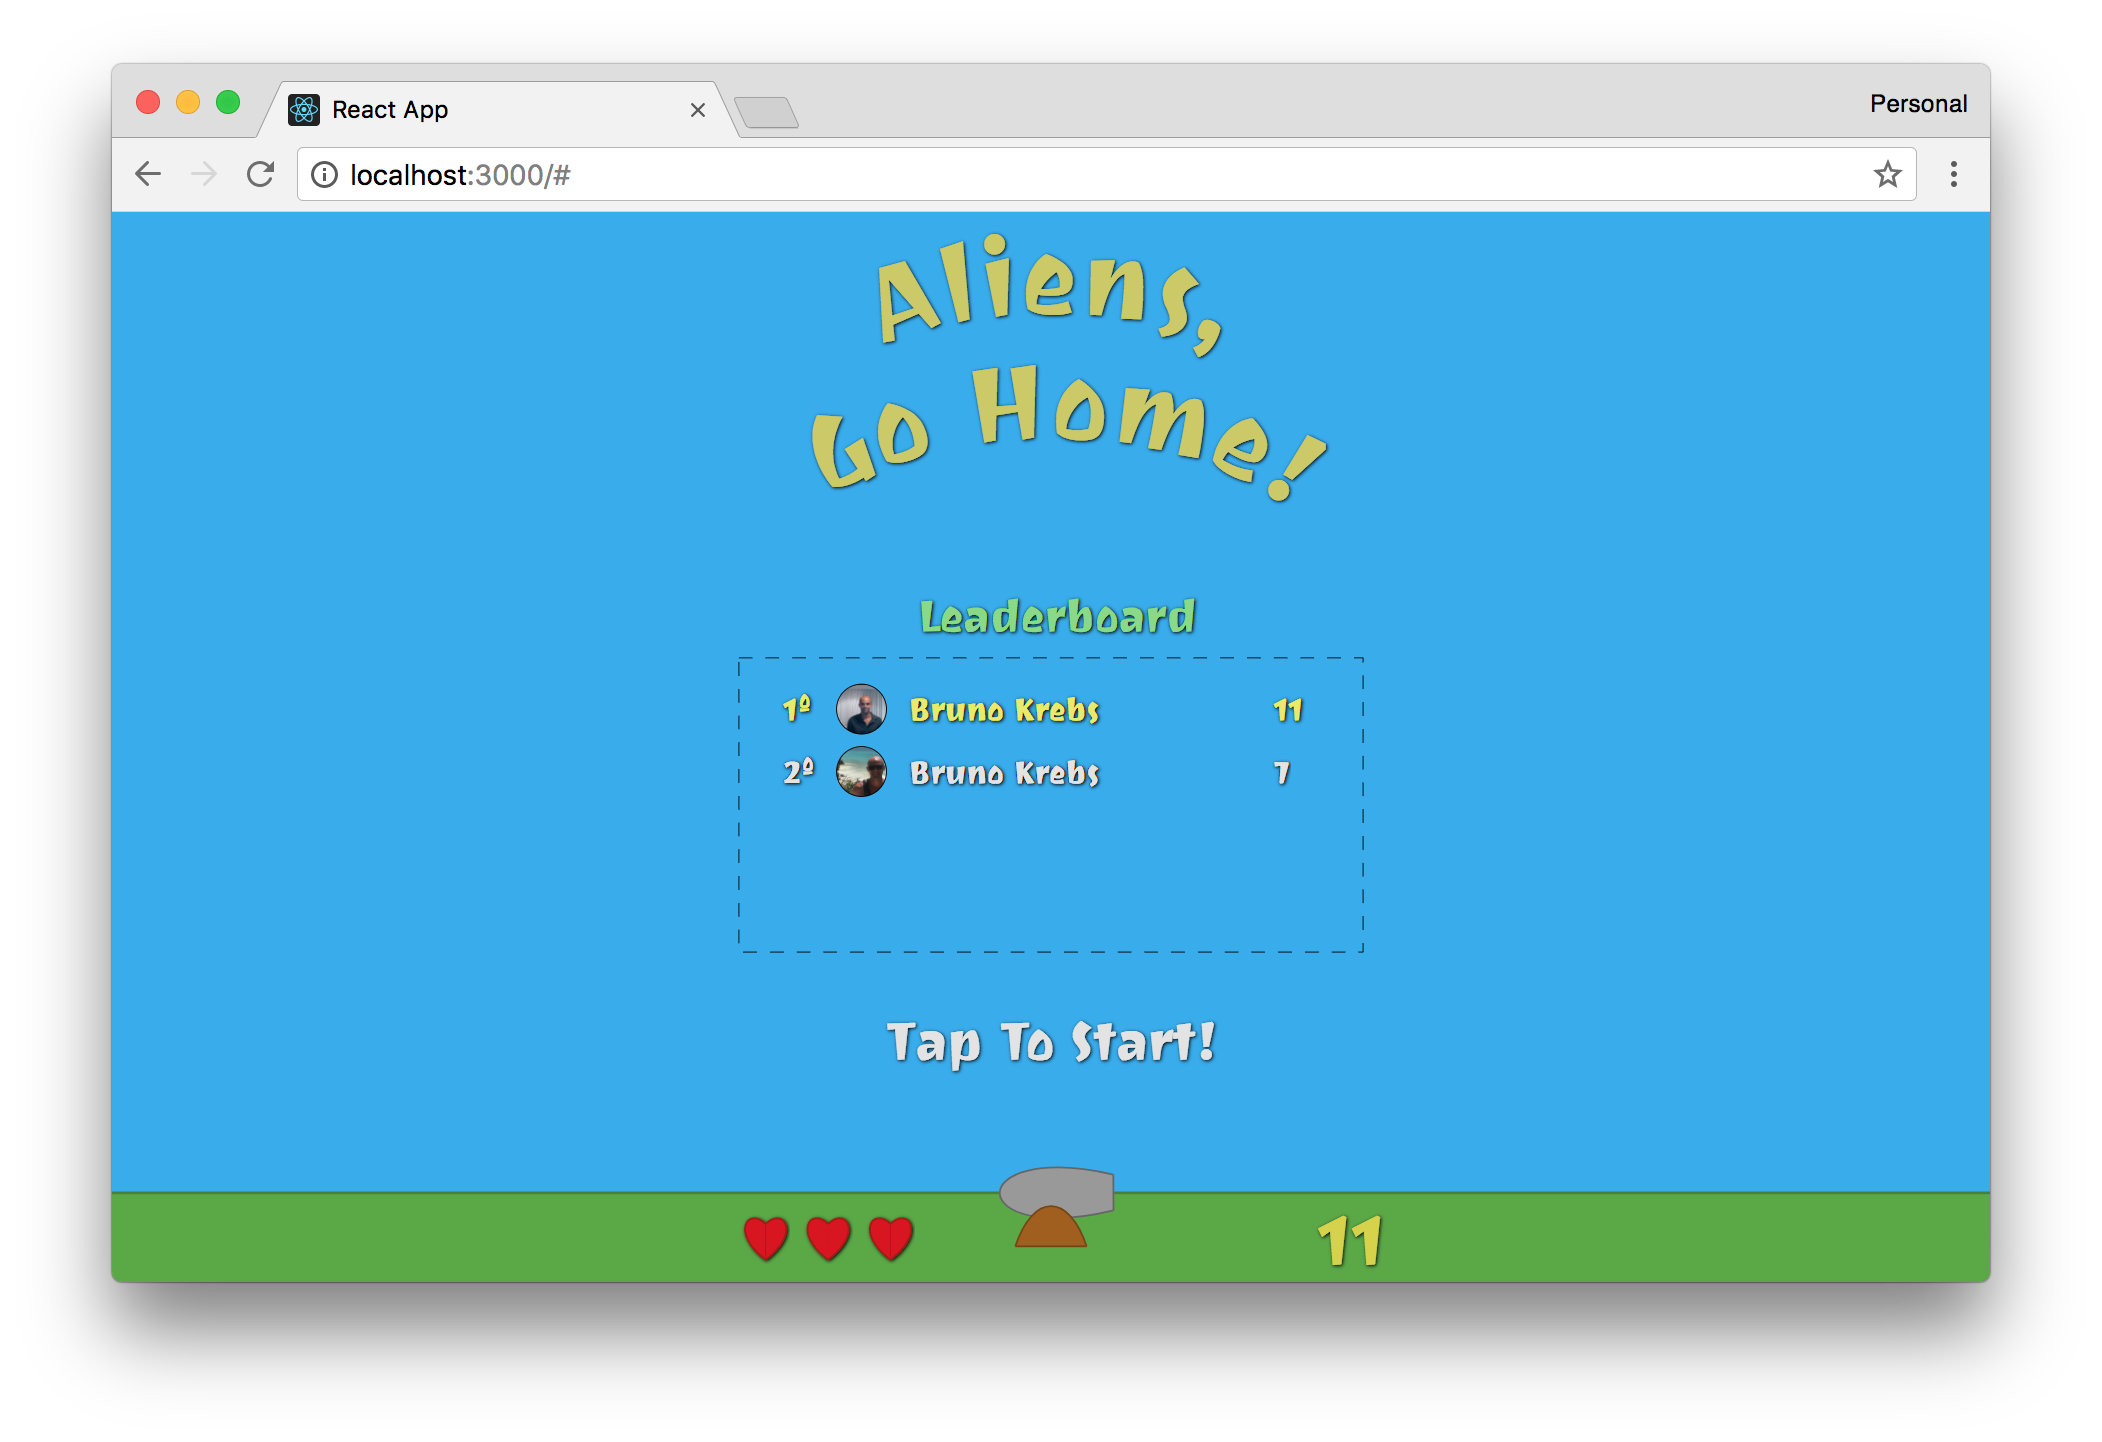
Now, to show players their lives, you will need to update the Canvas component. So, open the ./src/components/Canvas.jsx file and update it as follows:
// ... other import statements
import Heart from './Heart';

const Canvas = (props) => {
  // ... gameHeight and viewBox constants

  const lives = [];
  for (let i = 0; i < props.gameState.lives; i++) {
    const heartPosition = {
      x: -180 - (i * 70),
      y: 35
    };
    lives.push(<Heart key={i} position={heartPosition}/>);
  }

  return (
    <svg ...>
      // ... all other elements

      {lives}
    </svg>
  );
};

// ... propTypes, defaultProps, and export statements
With these changes in place, your game is almost complete. Players are already able to shoot and kill flying objects and, if too many of them invade the Earth, the game is ended. Now, to complete this section, you need to update the current score of your players, so they can compete to see who kills more aliens.
Making this enhancement in your game is quite simple. You just have to update the ./src/reducers/moveObjects.js file as follows:
// ... import statements

function moveObjects(state, action) {
  // ... everything else

  const kills = state.gameState.kills + flyingDiscsDestroyed.length;

  return {
    // ...newState,
    gameState: {
      // ... other props
      kills,
    },
    // ... angle,
  };
}

export default moveObjects;
Then, on the ./src/components.Canvas.jsx file, you will need to replace the CurrentScore component (which is hard-coded with the value of 15) with this:
<CurrentScore score={props.gameState.kills} />
“I'm creating a game with React, Redux, SVG, and CSS animations.”
Tweet This
Updating the Leaderboard
Good news! Updating the leaderboard is the last thing you will have to do to be able to say that you wrote a complete game with React, Redux, SVG, and CSS animations. Also, as you will see, the work here will be quick and painless.
First, you will need to update the ./server/index.js file to reset the players array. You won't want your game with fake players and fake results when you release it. So, open this file and remove all fake players/results. In the end, you will have this constant defined as follows:
const players = [];
Then, you will need to refactor the App component. So, open the ./src/App.js file and make the following changes:
// ... import statetments

// ... Auth0.configure

class App extends Component {
  constructor(props) {
    // ... super and this.shoot.bind(this)
    this.socket = null;
    this.currentPlayer = null;
  }

  // replace the whole content of the componentDidMount method
  componentDidMount() {
    const self = this;

    Auth0.handleAuthCallback();

    Auth0.subscribe((auth) => {
      if (!auth) return;

      self.playerProfile = Auth0.getProfile();
      self.currentPlayer = {
        id: self.playerProfile.sub,
        maxScore: 0,
        name: self.playerProfile.name,
        picture: self.playerProfile.picture,
      };

      this.props.loggedIn(self.currentPlayer);

      self.socket = io('http://localhost:3001', {
        query: `token=${Auth0.getAccessToken()}`,
      });

      self.socket.on('players', (players) => {
        this.props.leaderboardLoaded(players);
        players.forEach((player) => {
          if (player.id === self.currentPlayer.id) {
            self.currentPlayer.maxScore = player.maxScore;
          }
        });
      });
    });

    setInterval(() => {
      self.props.moveObjects(self.canvasMousePosition);
    }, 10);

    window.onresize = () => {
      const cnv = document.getElementById('aliens-go-home-canvas');
      cnv.style.width = `${window.innerWidth}px`;
      cnv.style.height = `${window.innerHeight}px`;
    };
    window.onresize();
  }

  componentWillReceiveProps(nextProps) {
    if (!nextProps.gameState.started && this.props.gameState.started) {
      if (this.currentPlayer.maxScore < this.props.gameState.kills) {
        this.socket.emit('new-max-score', {
          ...this.currentPlayer,
          maxScore: this.props.gameState.kills,
        });
      }
    }
  }

  // ... trackMouse, shoot, and render method
}

// ... propTypes, defaultProps, and export statement
To summarize, these are the changes that you applied in this component:
- You defined two new properties on its class (
socketandcurrentPlayer) so you can use them on different methods. - You removed the fake max scores that you were emitting to simulate
new-max-scoreevents. - You made your code iterate over the
playersarray (the one received from the Socket.IO backend) to set the correctmaxScoreof your players. That is, if they come back another time, they will still have theirmaxScorerecord. - You defined the
componentWillReceivePropslifecycle method to check if players have reached a newmaxScore. If so, your game emits anew-max-scoreevent to update the leaderboard.
That's it! Your game is ready for prime time. To see everything in action, run both the Socket.IO backend and your React application with the following code:
# run the backend server in the background
node ./server/index &

# run the React app
npm start
Then, open two browsers, authenticate with different email addresses, and kill some aliens. You will see that, when the game is over, the leaderboard will be updated in both browsers.
Conclusion
In this series, you used a lot of amazing technologies to create a nice game. You used React to define and control the game elements, you used SVG (instead of HTML) to render these elements, you used Redux to control the state of the game, and you used CSS animations to make aliens move through the screen. Oh, besides that, you even used a little bit of Socket.IO to make your leaderboard real-time and Auth0 to work as the identity management system of your game.
Phew! You came a long way and you learned a lot in this tutorial. Perhaps it is time to take a break and play your game.
About the author

Bruno Krebs
R&D Content Architect (Auth0 Alumni)