TL;DR: In this series, you will learn how to make React and Redux control a bunch of SVG elements to create a game. The knowledge acquired throughout this series will also allow you to create other types of animations that are orchestrated by React and Redux, not only games. You can find the final code developed in this article in the following GitHub repository: Aliens Go Home - Part 3
The React Game: Aliens, Go Home!
The game that you will develop in this series is called Aliens, Go Home! The idea of this game is simple, you will have a cannon and will have to kill flying objects that are trying to invade the Earth. To kill these flying objects you will have to point and click on an SVG canvas to make your cannon shoot.
If you are curious, you can find the final game up and running here. But don't play too much, you have work to do!
"I'm creating a game with React, Redux, and SVG elements."
Previously, on Part 1 and Part 2
In the first part of this series, you have used create-react-app
to bootstrap your React application and you have installed and configured Redux to manage the game state. After that, you have learned how to use SVG with React components while creating game elements like Sky
, Ground
, the CannonBase
, and the CannonPipe
. Finally, you added the aiming capability to your cannon by using an event listener and a JavaScript interval to trigger a Redux action that updates the CannonPipe
angle.
These actions paved the way to understand how you can create your game (and other animations) with React, Redux, and SVG.
In the second part, you have created the other elements needed in your game (e.g. Heart
, FlyingObject
, and CannonBall
), enabled your players to start the game, and used CSS animations to make flying objects fly (that's what they do right?).
Although these are awesome features to have, they don't make a complete game yet. You still have to make your cannon shoot cannon balls and implement an algorithm to detect collision between these balls and flying objects. Besides that, you have to increment the CurrentScore
component when your players kill some aliens.
Killing aliens and seeing the current score increase is cool, but you probably can make this game more attractive. That's why you are going to add a leaderboard feature to your game. This will make your players spend more time trying to reach the top of the leaderboard.
With these features, you can say that you have a complete game. So, without wasting more time, it's time to focus on them.
Note: If (for whatever reason) you don't have the code created in the first two parts of the series, you can simply clone it from this GitHub repository. After cloning it, you will be able to follow the instructions in the sections that follow.
Implementing the Leaderboard Feature in Your React Game
The first thing you will do to make your game look like a real game is to implement the leaderboard feature. This feature will enable players to sign in, so your game can track their max score and show their rank.
Integrating React and Auth0
To make Auth0 manage the identity of your players, you have to have an Auth0 account. If you don't have one yet, you can sign up for a free Auth0 account here.
After creating your account, you just have to create an Auth0 Application to represent your game. To do this, head to the Applications page on the Auth0 dashboard and click on the Create Application button. The dashboard will show you a form where you will have to inform the name of your application and its type. You can type Aliens, Go Home! as the name and choose the Single Page Web Application type (your game is an SPA based on React after all). Then, you can click on Create.
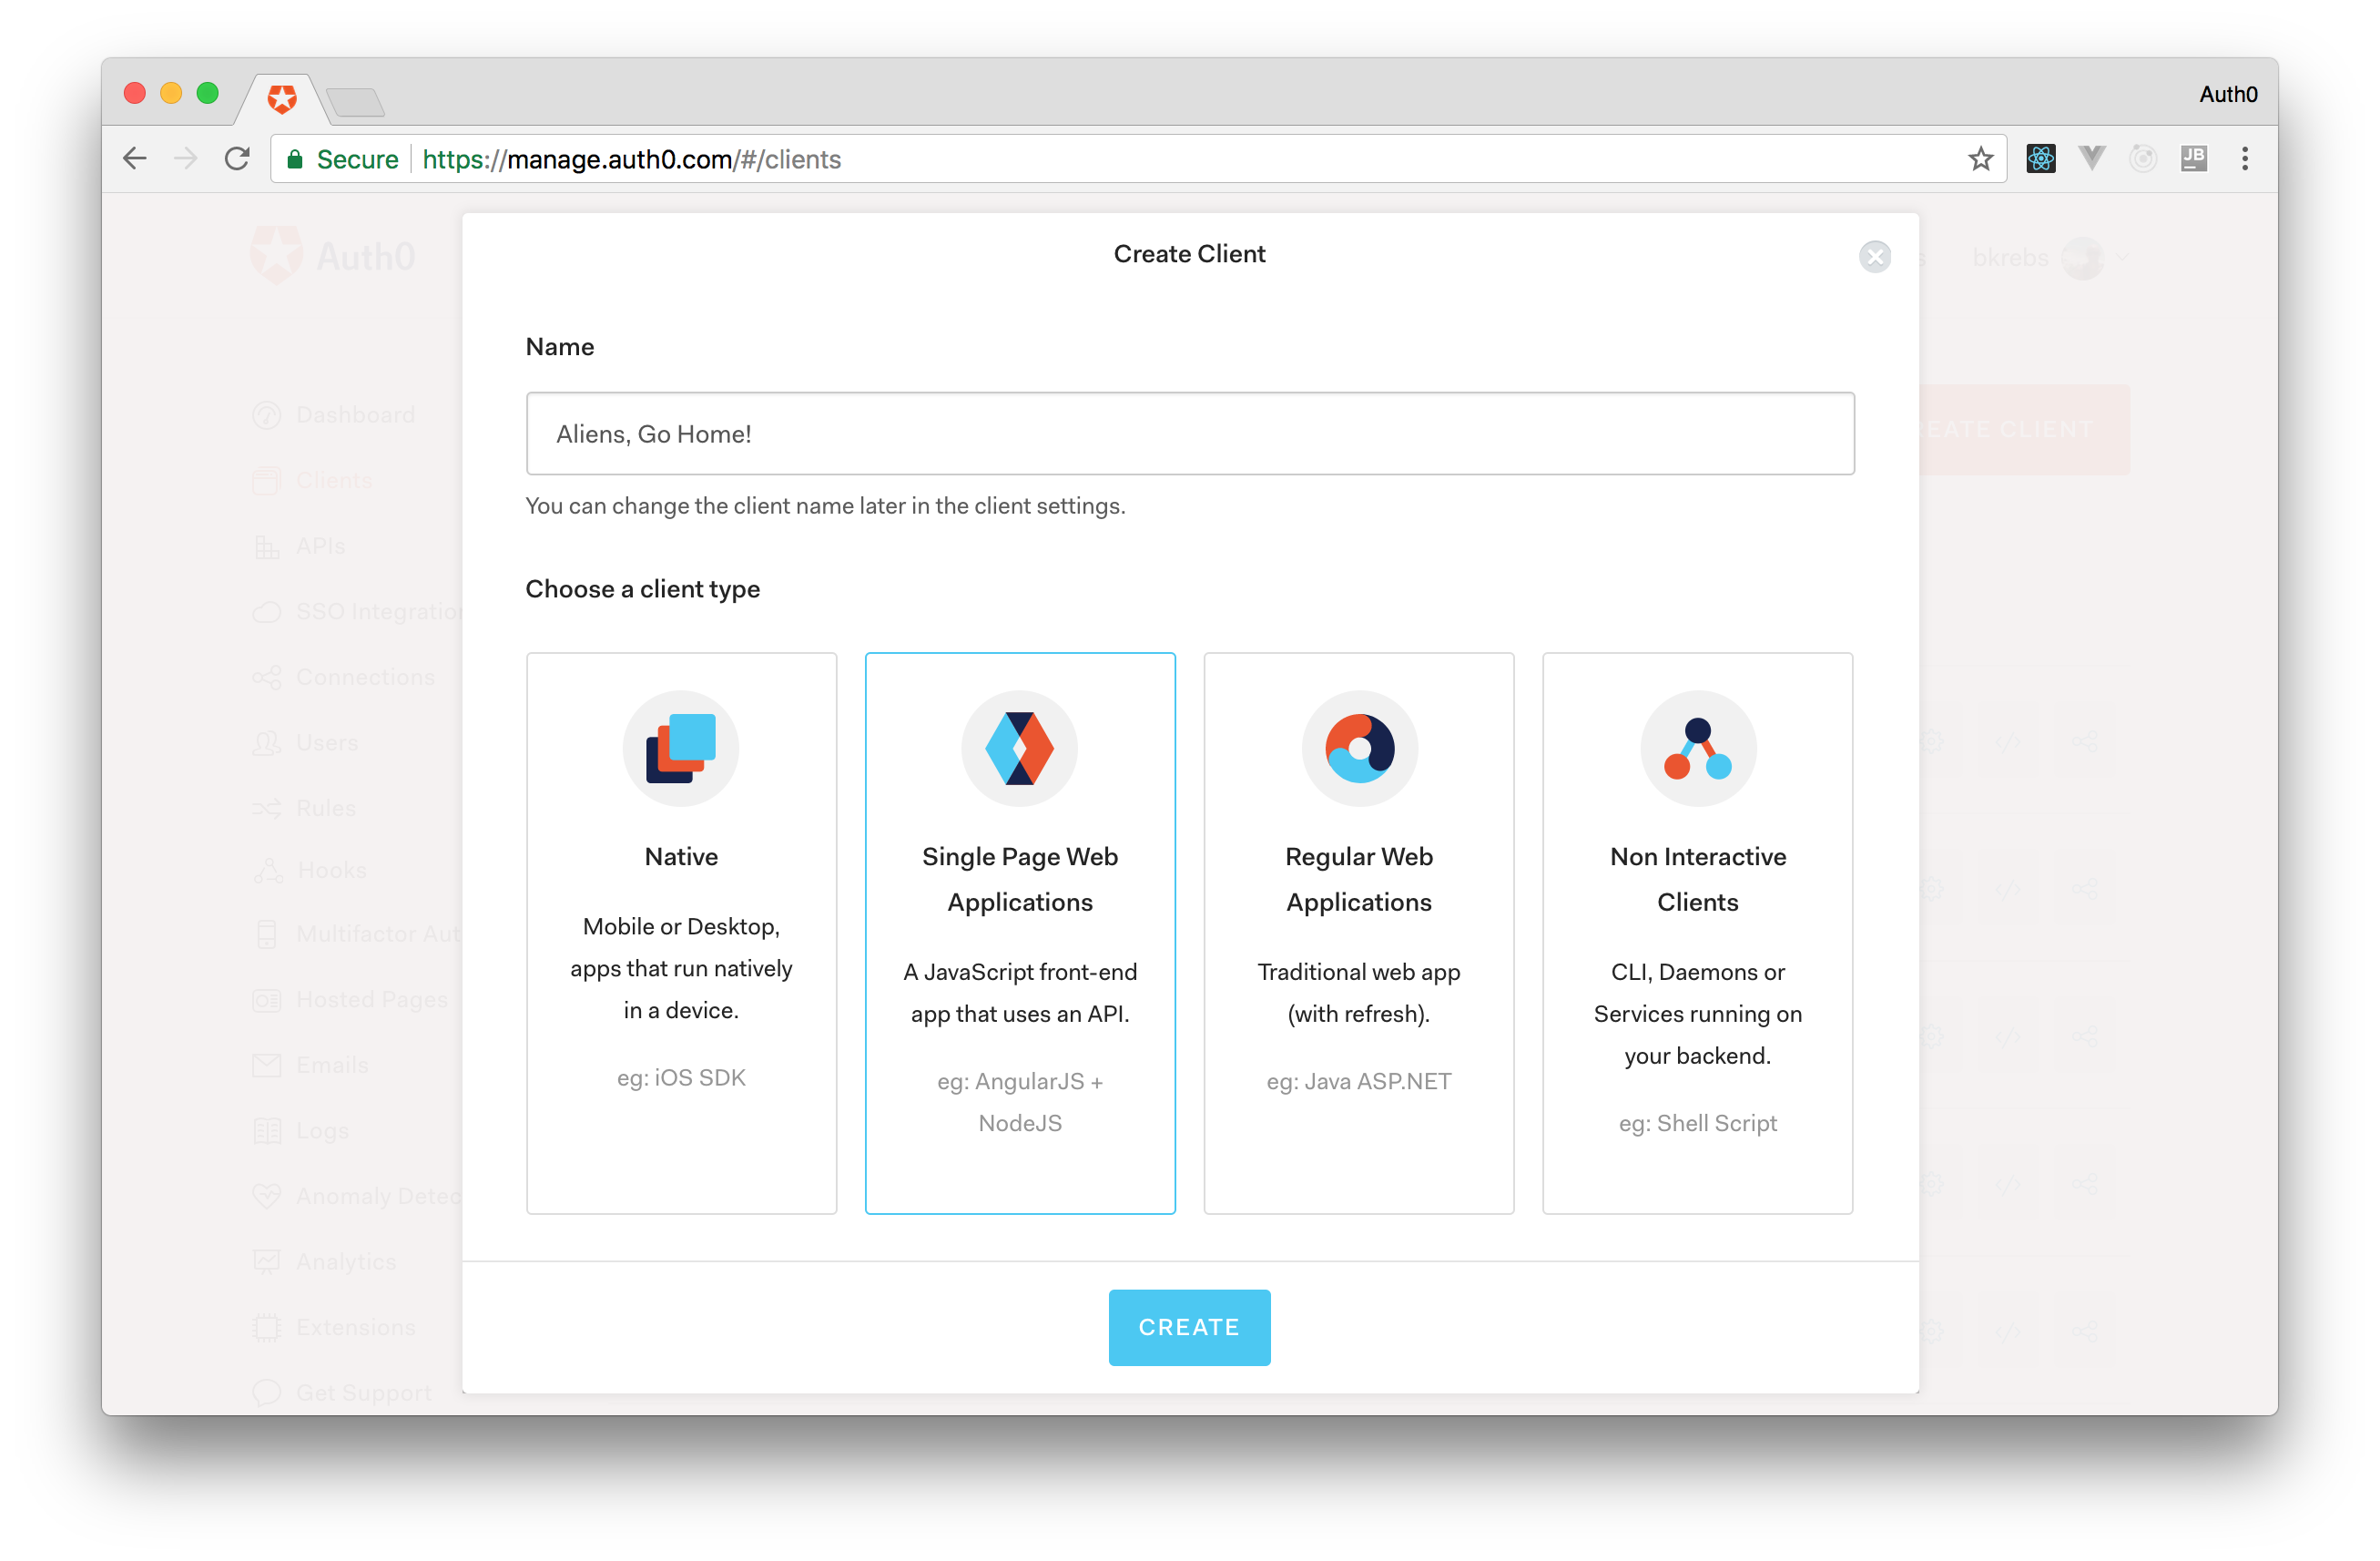
When you click this button, the dashboard will redirect you to the Quick Start tab of your new application. As you will learn how to integrate React and Auth0 in this article, you won't need to use this tab. Instead, you will need to use the Settings tab, so head to it.
There are three things that you will need to do in this tab. The first one is to add the http://localhost:3000
value to the field called Allowed Callback URLs. As the dashboard explains, after the player authenticates, Auth0 will only call back one of the URLs in this field. So, if you are going to publish your game on the web, be sure to add its public URL there as well (e.g. http://aliens-go-home.digituz.com.br
).
After inputting all your URLs on this field, hit the Save button or press ctrl
+ s
(if you are using a MacBook, you will need to press command
+ s
instead).
The last two things you will need to do is to copy the values from the Domain and Client ID fields. However, before using these values, you will need to code a little.
For starters, you will need to issue the following command in the root directory of your game to install the auth0-web
package:
npm i auth0-web@1.7.0
As you will see, this package facilitates the integration between Auth0 and SPAs.
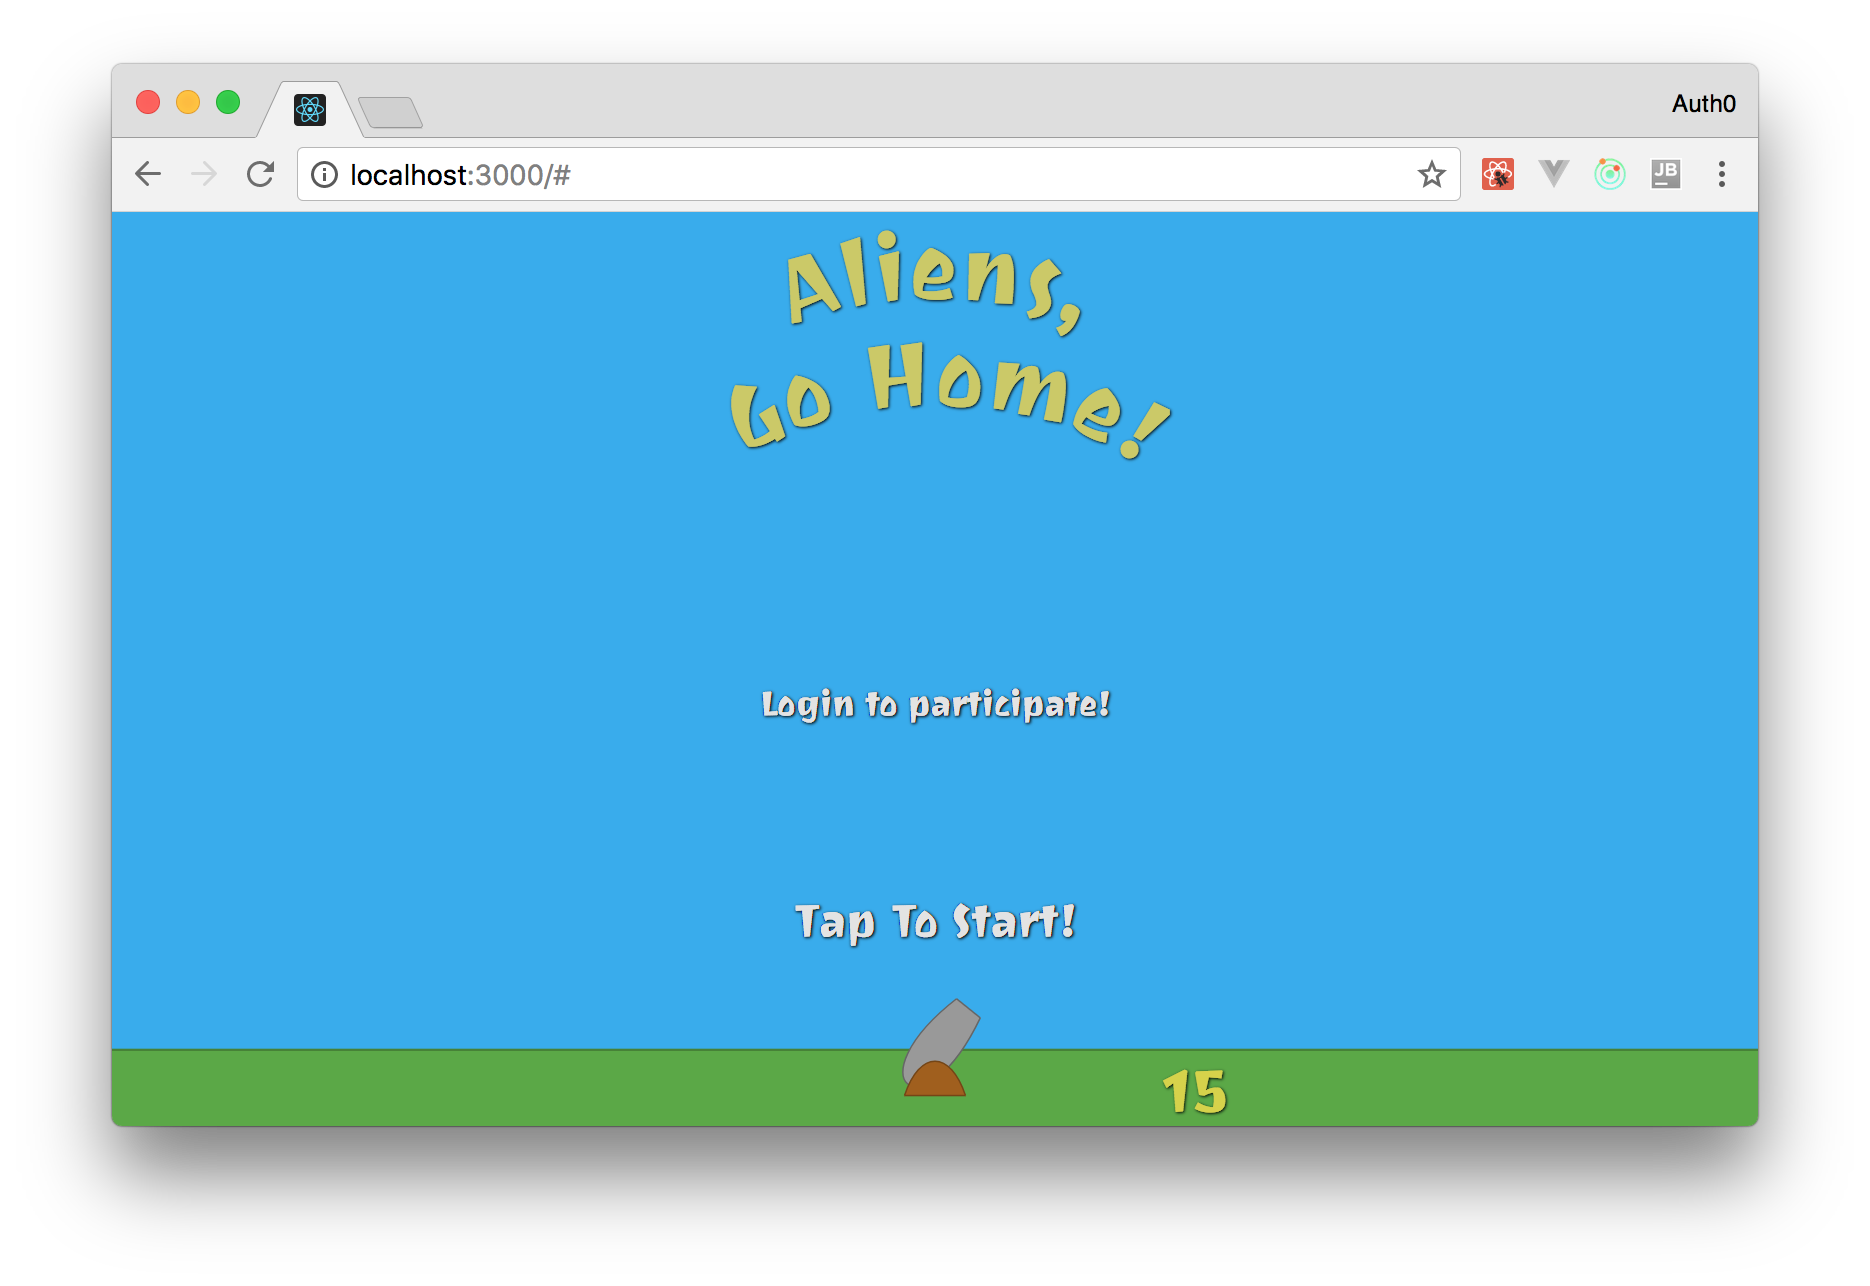
The next step is to add a login button in your game, so your players can authenticate via Auth0. To do this, create a new file called Login.jsx
inside the ./src/components
directory with the following code:
import React from 'react';
import PropTypes from 'prop-types';
const Login = (props) => {
const button = {
x: -300, // half width
y: -600, // minus means up (above 0)
width: 600,
height: 300,
style: {
fill: 'transparent',
cursor: 'pointer',
},
onClick: props.authenticate,
};
const text = {
textAnchor: 'middle', // center
x: 0, // center relative to X axis
y: -440, // 440 up
style: {
fontFamily: '"Joti One", cursive',
fontSize: 45,
fill: '#e3e3e3',
cursor: 'pointer',
},
onClick: props.authenticate,
};
return (
<g filter="url(#shadow)">
<rect {...button} />
<text {...text}>
Login to participate!
</text>
</g>
);
};
Login.propTypes = {
authenticate: PropTypes.func.isRequired,
};
export default Login;
The component that you have just created is agnostic in terms of what it will do when clicked. You will define this action when adding it to the Canvas
component. So, open the Canvas.jsx
file and update it as follows:
// ... other import statements
import Login from './Login';
import { signIn } from 'auth0-web';
const Canvas = (props) => {
// ... const definitions
return (
<svg ...>
// ... other elements
{ ! props.gameState.started &&
<g>
// ... StartGame and Title components
<Login authenticate={signIn} />
</g>
}
// ... flyingObjects.map
</svg>
);
};
// ... propTypes definition and export statement
As you can see, in this new version, you have imported the Login
component and the signIn
function of the auth0-web
package. Then, you have added your new component to the block of code that is shown only if players have not started the game. Also, you have indicated that, when clicked, the login button must trigger the signIn
function.
With these changes in place, the last thing you will have to do is to configure the auth0-web
with your Auth0 Application properties. To do this, open the App.js
file and update it as follows:
// ... other import statements
import * as Auth0 from 'auth0-web';
Auth0.configure({
domain: 'YOUR_AUTH0_DOMAIN',
clientID: 'YOUR_AUTH0_CLIENT_ID',
redirectUri: 'http://localhost:3000/',
responseType: 'token id_token',
scope: 'openid profile manage:points',
});
class App extends Component {
// ... constructor definition
componentDidMount() {
const self = this;
Auth0.handleAuthCallback();
Auth0.subscribe((auth) => {
console.log(auth);
});
// ... setInterval and onresize
}
// ... trackMouse and render functions
}
// ... propTypes definition and export statement
Note: You have to replace
YOUR_AUTH0_DOMAIN
andYOUR_AUTH0_CLIENT_ID
with the values copied from the Domain and Client ID fields of your Auth0 application. Besides that, when publishing your game to the web, you will have to replace theredirectUri
value as well.
The enhancements in this file are quite simple. This list summarizes them:
configure
: You used this function to configure theauth0-web
package with your Auth0 application properties.handleAuthCallback
: You triggered this function in thecomponentDidMount
lifecycle hook to evaluate if the player is returning from Auth0 after authenticating. This function simply tries to fetch tokens from the URL and, if it succeeds, fetches the player profile and persists everything in thelocalstorage
.subscribe
: You used this function to log if the player is authenticated or not (true
for authenticated andfalse
otherwise).
That's it, your game is already using Auth0 as its identity management service. If you run your app now (npm start
) and head to it in your browser (http://localhost:3000
), you will see the login button. Clicking on it will redirect you to the Auth0 login page where you will be able to sign in.
After you finish the sign in process, Auth0 will redirect you to your game again where the handleAuthCallback
function will fetch your tokens. Then, as you have told your app to console.log
any changes on the authentication state, you will be able to see it logging true
in your browser console.
"Securing games with Auth0 is simple and painless."
Creating the Leaderboard React Component
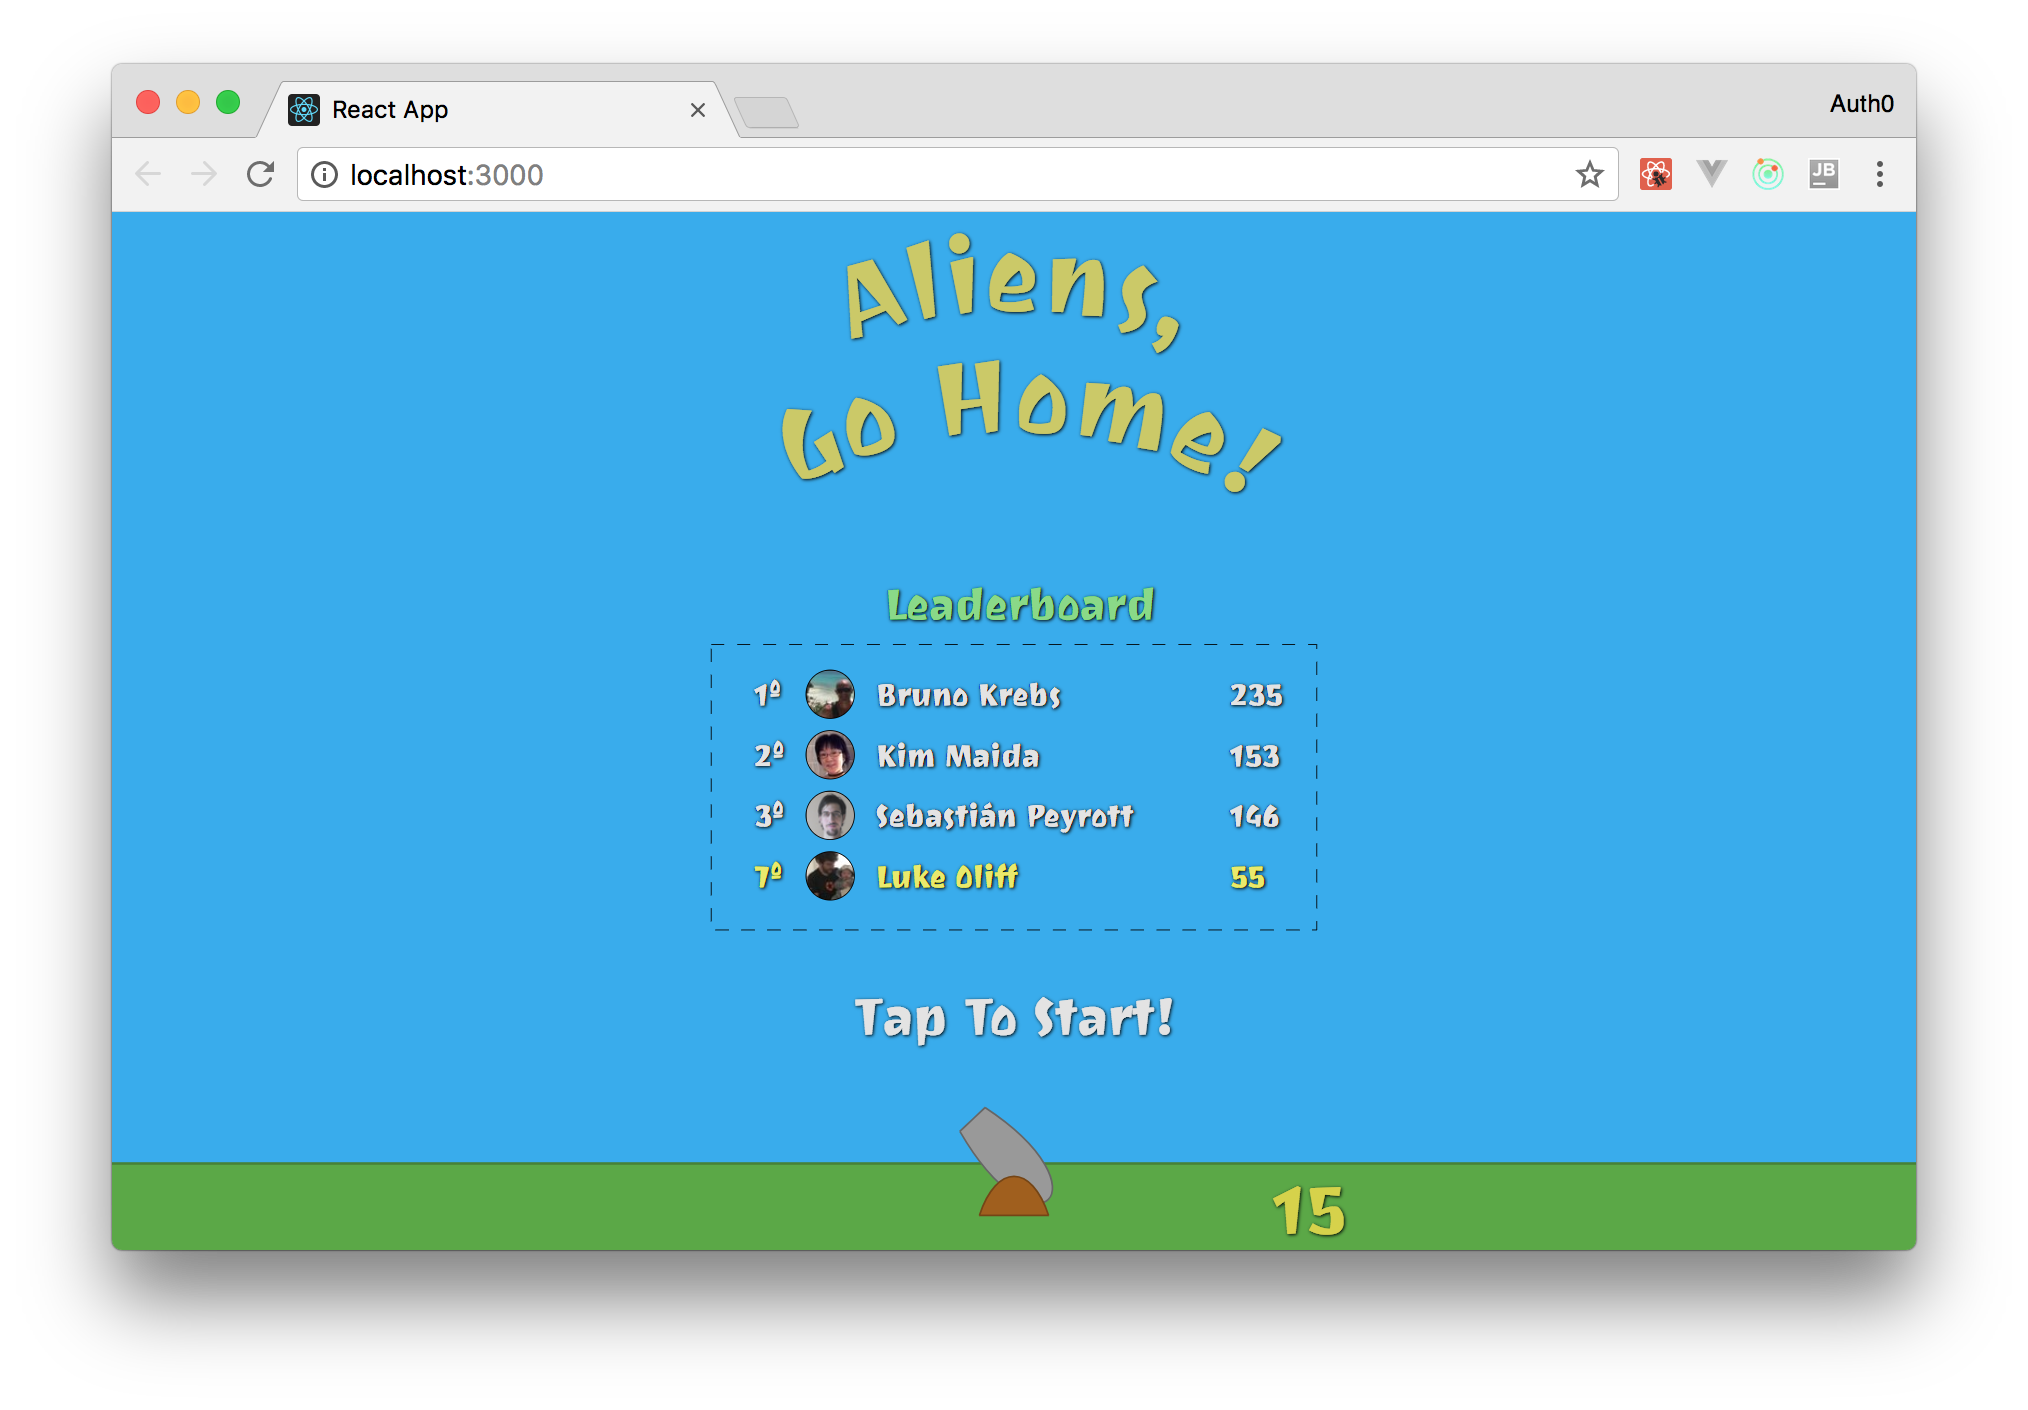
Now that you have configured Auth0 as your identity management system, you will need to create the components that will show the leaderboard and the max score for the current player. For that, you will create two components: Leaderboard
and Rank
. You will need to split this feature into two components because, as you will see, it's not that simple to show player's data (like max score, name, position, and picture) in a nice way. It's not hard either, but you will have to type some good amount of code. So, adding everything into one component would make it look clumsy.
As your game does not have any players yet, the first thing you will need to do is to define some mock data to populate the leaderboard. The best place to do this is in the Canvas
component. Also, since you are going to update your canvas, you can go ahead and replace the Login
component with the Leaderboard
(you will add Login
inside the Leaderboard
in a moment):
// ... other import statements
// replace Login with the following line
import Leaderboard from './Leaderboard';
const Canvas = (props) => {
// ... const definitions
const leaderboard = [
{ id: 'd4', maxScore: 82, name: 'Ado Kukic', picture: 'https://twitter.com/KukicAdo/profile_image', },
{ id: 'a1', maxScore: 235, name: 'Bruno Krebs', picture: 'https://twitter.com/brunoskrebs/profile_image', },
{ id: 'c3', maxScore: 99, name: 'Diego Poza', picture: 'https://twitter.com/diegopoza/profile_image', },
{ id: 'b2', maxScore: 129, name: 'Jeana Tahnk', picture: 'https://twitter.com/jeanatahnk/profile_image', },
{ id: 'e5', maxScore: 34, name: 'Jenny Obrien', picture: 'https://twitter.com/jenny_obrien/profile_image', },
{ id: 'f6', maxScore: 153, name: 'Kim Maida', picture: 'https://twitter.com/KimMaida/profile_image', },
{ id: 'g7', maxScore: 55, name: 'Luke Oliff', picture: 'https://twitter.com/mroliff/profile_image', },
{ id: 'h8', maxScore: 146, name: 'Sebastian Peyrott', picture: 'https://twitter.com/speyrott/profile_image', },
];
return (
<svg ...>
// ... other elements
{ ! props.gameState.started &&
<g>
// ... StartGame and Title
<Leaderboard currentPlayer={leaderboard[6]} authenticate={signIn} leaderboard={leaderboard} />
</g>
}
// ... flyingObjects.map
</svg>
);
};
// ... propTypes definition and export statement
In the new version of this file, you defined a constant called leaderboard
that holds an array of fake players. These players have the following properties: id
, maxScore
, name
, and picture
. Then, inside the svg
element, you added the Leaderboard
component with the following parameters:
currentPlayer
: This defines who the current player is. For now, you are using one of the fake players defined before so you can see how everything works. The purpose of passing this parameter is to make your leaderboard highlight the current player.authenticate
: This is the same parameter that you were adding to theLogin
component in the previous version.leaderboard
: This is the array of fake players. Your leaderboard will use it to show the current ranking.
Now, you have to define the Leaderboard
component. To do this, create a new file called Leaderboard.jsx
in the ./src/components
directory and add the following code to it:
import React from 'react';
import PropTypes from 'prop-types';
import Login from './Login';
import Rank from "./Rank";
const Leaderboard = (props) => {
const style = {
fill: 'transparent',
stroke: 'black',
strokeDasharray: '15',
};
const leaderboardTitle = {
fontFamily: '"Joti One", cursive',
fontSize: 50,
fill: '#88da85',
cursor: 'default',
};
let leaderboard = props.leaderboard || [];
leaderboard = leaderboard.sort((prev, next) => {
if (prev.maxScore === next.maxScore) {
return prev.name <= next.name ? 1 : -1;
}
return prev.maxScore < next.maxScore ? 1 : -1;
}).map((member, index) => ({
...member,
rank: index + 1,
currentPlayer: member.id === props.currentPlayer.id,
})).filter((member, index) => {
if (index < 3 || member.id === props.currentPlayer.id) return member;
return null;
});
return (
<g>
<text filter="url(#shadow)" style={leaderboardTitle} x="-150" y="-630">Leaderboard</text>
<rect style={style} x="-350" y="-600" width="700" height="330" />
{
props.currentPlayer && leaderboard.map((player, idx) => {
const position = {
x: -100,
y: -530 + (70 * idx)
};
return <Rank key={player.id} player={player} position={position}/>
})
}
{
! props.currentPlayer && <Login authenticate={props.authenticate} />
}
</g>
);
};
Leaderboard.propTypes = {
currentPlayer: PropTypes.shape({
id: PropTypes.string.isRequired,
maxScore: PropTypes.number.isRequired,
name: PropTypes.string.isRequired,
picture: PropTypes.string.isRequired,
}),
authenticate: PropTypes.func.isRequired,
leaderboard: PropTypes.arrayOf(PropTypes.shape({
id: PropTypes.string.isRequired,
maxScore: PropTypes.number.isRequired,
name: PropTypes.string.isRequired,
picture: PropTypes.string.isRequired,
ranking: PropTypes.number,
})),
};
Leaderboard.defaultProps = {
currentPlayer: null,
leaderboard: null,
};
export default Leaderboard;
Don't be scared! The code of this component is quite simple:
- You are defining the
leaderboardTitle
constant to set how the leaderboard title will look like. - You are defining the
dashedRectangle
constant to style arect
element that will work as the container of the leaderboard. - You are calling the
sort
function of theprops.leaderboard
variable to order the ranking. After that, your leaderboard will have the highest max score on the top and the lowest max score on the bottom. Also, if there is a tie between two players, you are ordering them based on their names. - You are calling the
map
function on the result of the previous step (thesort
function) to complement players with theirrank
and with a flag calledcurrentPlayer
. You will use this flag to highlight the row where the current player appears. - You are using the
filter
function on the result of the previous step (themap
function) to remove everyone who is not among the top three players. Actually, you are letting the current player stay on the final array if they don't belong to this select group. - Lastly, you are simply iterating over the filtered array to show
Rank
elements if there is a player logged in (props.currentPlayer && leaderboard.map
) or showing theLogin
button otherwise.
Then, the last thing you will need to do is to create the Rank
React component. To do this, create a new file called Rank.jsx
beside the Leaderboard.jsx
file with the following code:
import React from 'react';
import PropTypes from 'prop-types';
const Rank = (props) => {
const { x, y } = props.position;
const rectId = 'rect' + props.player.rank;
const clipId = 'clip' + props.player.rank;
const pictureStyle = {
height: 60,
width: 60,
};
const textStyle = {
fontFamily: '"Joti One", cursive',
fontSize: 35,
fill: '#e3e3e3',
cursor: 'default',
};
if (props.player.currentPlayer) textStyle.fill = '#e9ea64';
const pictureProperties = {
style: pictureStyle,
x: x - 140,
y: y - 40,
href: props.player.picture,
clipPath: `url(#${clipId})`,
};
const frameProperties = {
width: 55,
height: 55,
rx: 30,
x: pictureProperties.x,
y: pictureProperties.y,
};
return (
<g>
<defs>
<rect id={rectId} {...frameProperties} />
<clipPath id={clipId}>
<use xlinkHref={'#' + rectId} />
</clipPath>
</defs>
<use xlinkHref={'#' + rectId} strokeWidth="2" stroke="black" />
<text filter="url(#shadow)" style={textStyle} x={x - 200} y={y}>{props.player.rank}º</text>
<image {...pictureProperties} />
<text filter="url(#shadow)" style={textStyle} x={x - 60} y={y}>{props.player.name}</text>
<text filter="url(#shadow)" style={textStyle} x={x + 350} y={y}>{props.player.maxScore}</text>
</g>
);
};
Rank.propTypes = {
player: PropTypes.shape({
id: PropTypes.string.isRequired,
maxScore: PropTypes.number.isRequired,
name: PropTypes.string.isRequired,
picture: PropTypes.string.isRequired,
rank: PropTypes.number.isRequired,
currentPlayer: PropTypes.bool.isRequired,
}).isRequired,
position: PropTypes.shape({
x: PropTypes.number.isRequired,
y: PropTypes.number.isRequired
}).isRequired,
};
export default Rank;
Nothing to be scared of about this code either. The only unordinary thing that you are adding to this component is the clipPath
element and a rect
inside the defs
element to create a rounded portrait.
With these new files in place, you can head to your app (http://localhost:3000/
) to see your new leaderboard feature.
Developing a Real-Time Leaderboard with Socket.IO
Cool, you are already using Auth0 as the identity management service and you also created the components needed to show the leaderboard. So, what do you need next? That's right, you need a backend capable of emitting real-time events to update the leaderboard.
This may make you think: isn't it hard to develop a real-time backend server? No, it is not. With Socket.IO, you can develop this feature in no time. However, before diving into it, you will probably want to secure this backend service, right? To do this, you will need to create an Auth0 API to represent your service.
Doing so is quite easy. Just head to the APIs page on your Auth0 dashboard and click on the Create API button. After that, Auth0 will present to you a small form where it will ask for three things:
- The Name of the API: Here, you need to inform just a friendly name so you don't forget what this API represents. So, just type Aliens, Go Home! for this field.
- The Identifier of the API: The recommended value here is the final URL of your game, but the truth is that it can be anything. Nevertheless, insert
https://aliens-go-home.digituz.com.br
in this field. - The Signing Algorithm: There are two options here, RS256 and HS256. You will be better off leaving this field untouched (i.e. stick with RS256). If you want to learn the difference between them, check this answer.
After filling this form, click on the Create button. This will redirect you to a tab called Quick Start inside your new API. From there, click on the Scopes tab and add a new scope called manage:points
with the following description: "Read and write Max Score". It's a good practice to define scopes on Auth0 APIs.
After adding this scope, you can go back coding. To implement your real-time leaderboard service, do the following:
# create a server directory in the project root
mkdir server
# move into it
cd server
# start it as a NPM project
npm init -y
# install some dependencies
npm i express jsonwebtoken jwks-rsa socket.io socketio-jwt
# create a file to hold your server source code
touch index.js
Then, in this new file, add the following code:
const app = require('express')();
const http = require('http').Server(app);
const io = require('socket.io')(http);
const jwt = require('jsonwebtoken');
const jwksClient = require('jwks-rsa');
const client = jwksClient({
jwksUri: 'https://YOUR_AUTH0_DOMAIN/.well-known/jwks.json'
});
const players = [
{ id: 'a1', maxScore: 235, name: 'Bruno Krebs', picture: 'https://twitter.com/brunoskrebs/profile_image', },
{ id: 'c3', maxScore: 99, name: 'Diego Poza', picture: 'https://twitter.com/diegopoza/profile_image', },
{ id: 'b2', maxScore: 129, name: 'Jeana Tahnk', picture: 'https://twitter.com/jeanatahnk/profile_image', },
{ id: 'f6', maxScore: 153, name: 'Kim Maida', picture: 'https://twitter.com/KimMaida/profile_image', },
{ id: 'e5', maxScore: 55, name: 'Luke Oliff', picture: 'https://twitter.com/mroliff/profile_image', },
{ id: 'd4', maxScore: 146, name: 'Sebastian Peyrott', picture: 'https://twitter.com/speyrott/profile_image', },
];
const verifyPlayer = (token, cb) => {
const uncheckedToken = jwt.decode(token, {complete: true});
const kid = uncheckedToken.header.kid;
client.getSigningKey(kid, (err, key) => {
const signingKey = key.publicKey || key.rsaPublicKey;
jwt.verify(token, signingKey, cb);
});
};
const newMaxScoreHandler = (payload) => {
let foundPlayer = false;
players.forEach((player) => {
if (player.id === payload.id) {
foundPlayer = true;
player.maxScore = Math.max(player.maxScore, payload.maxScore);
}
});
if (!foundPlayer) {
players.push(payload);
}
io.emit('players', players);
};
io.on('connection', (socket) => {
const { token } = socket.handshake.query;
verifyPlayer(token, (err) => {
if (err) socket.disconnect();
io.emit('players', players);
});
socket.on('new-max-score', newMaxScoreHandler);
});
http.listen(3001, () => {
console.log('listening on port 3001');
});
Before learning about what this code does, replace YOUR_AUTH0_DOMAIN
with your Auth0 domain (the same one that you added to the App.js
file). You will find this placeholder in the value of the jwksUri
property.
Now, to understand how this thing works, check out this list:
express
andsocket.io
: This is simply an Express server enhanced with Socket.IO to make it real-time. If you haven't used Socket.IO before, checkout their Get Started tutorial. It's really simple.jwt
andjwksClient
: When authenticating with Auth0, your players will get (among other things) anaccess_token
in the form of a JWT (JSON Web Token). Since you are using the RS256 signing algorithm, you need to use thejwksClient
package to fetch the correct public key to validate JWTs. The JWTs that you receive contain akid
property (Key ID) that you can use to get the correct public key (if curious, you can learn more about JWKS here).jwt.verify
: After finding the correct key, you use this function to decode and validate JWTs. If they are fine, you just send theplayers
list to whoever is requesting. If they are not valid, you justdisconnect
thesocket
(client).on('new-max-score', ...)
: Lastly, you are attaching thenewMaxScoreHandler
function to thenew-max-score
event. As such, whenever you need to update the max score of a user, you will need to emit this event from your React app.
The rest of the code is pretty intuitive. Therefore, you can focus on integrating this service into your game.
Socket.IO and React
After creating your real-time backend service, it's time to integrate your React game with it. The best way to use React and Socket.IO is by installing the socket.io-client
package. To do this, issue the following code in the root directory of your React app:
npm i socket.io-client
Then, after that, you will make your game connect to your service whenever your players authenticate (you won't show the leaderboard for unauthenticated players). As you are using Redux to hold the state of your game, you will need two actions to keep your Redux store up to date. As such, open the ./src/actions/index.js
file and update it as follows:
export const LEADERBOARD_LOADED = 'LEADERBOARD_LOADED';
export const LOGGED_IN = 'LOGGED_IN';
// ... MOVE_OBJECTS and START_GAME ...
export const leaderboardLoaded = players => ({
type: LEADERBOARD_LOADED,
players,
});
export const loggedIn = player => ({
type: LOGGED_IN,
player,
});
// ... moveObjects and startGame ...
This new version defines actions to be triggered in two moments:
LOGGED_IN
: When a player logs in, you will use this action to connect your React game to the real-time service.LEADERBOARD_LOADED
: When the real-time service sends the list of players, you will use this action to update the Redux store with these players.
To make you Redux store respond to these actions, open the ./src/reducers/index.js
file and update it as follows:
import {
LEADERBOARD_LOADED, LOGGED_IN,
MOVE_OBJECTS, START_GAME
} from '../actions';
// ... other import statements
const initialGameState = {
// ... other game state properties
currentPlayer: null,
players: null,
};
// ... initialState definition
function reducer(state = initialState, action) {
switch (action.type) {
case LEADERBOARD_LOADED:
return {
...state,
players: action.players,
};
case LOGGED_IN:
return {
...state,
currentPlayer: action.player,
};
// ... MOVE_OBJECTS, START_GAME, and default cases
}
}
export default reducer;
Now, whenever your game triggers the LEADERBOARD_LOADED
action, you will update the Redux store with the new array of players. Besides that, whenever a player logs in (LOGGED_IN
), you will update the currentPlayer
in the store.
Then, to make your game use these new actions, open the ./src/containers/Game.js
file and update it as follows:
// ... other import statements
import {
leaderboardLoaded, loggedIn,
moveObjects, startGame
} from '../actions/index';
const mapStateToProps = state => ({
// ... angle and gameState
currentPlayer: state.currentPlayer,
players: state.players,
});
const mapDispatchToProps = dispatch => ({
leaderboardLoaded: (players) => {
dispatch(leaderboardLoaded(players));
},
loggedIn: (player) => {
dispatch(loggedIn(player));
},
// ... moveObjects and startGame
});
// ... connect and export statement
With that, you are ready to make your game connect to the real-time service to load and update the leaderboard. Therefore, open the ./src/App.js
file and update it with the following code:
// ... other import statements
import io from 'socket.io-client';
Auth0.configure({
// ... other properties
audience: 'https://aliens-go-home.digituz.com.br',
});
class App extends Component {
// ... constructor
componentDidMount() {
const self = this;
Auth0.handleAuthCallback();
Auth0.subscribe((auth) => {
if (!auth) return;
const playerProfile = Auth0.getProfile();
const currentPlayer = {
id: playerProfile.sub,
maxScore: 0,
name: playerProfile.name,
picture: playerProfile.picture,
};
this.props.loggedIn(currentPlayer);
const socket = io('http://localhost:3001', {
query: `token=${Auth0.getAccessToken()}`,
});
let emitted = false;
socket.on('players', (players) => {
this.props.leaderboardLoaded(players);
if (emitted) return;
socket.emit('new-max-score', {
id: playerProfile.sub,
maxScore: 120,
name: playerProfile.name,
picture: playerProfile.picture,
});
emitted = true;
setTimeout(() => {
socket.emit('new-max-score', {
id: playerProfile.sub,
maxScore: 222,
name: playerProfile.name,
picture: playerProfile.picture,
});
}, 5000);
});
});
// ... setInterval and onresize
}
// ... trackMouse
render() {
return (
<Canvas
angle={this.props.angle}
currentPlayer={this.props.currentPlayer}
gameState={this.props.gameState}
players={this.props.players}
startGame={this.props.startGame}
trackMouse={event => (this.trackMouse(event))}
/>
);
}
}
App.propTypes = {
// ... other propTypes definitions
currentPlayer: PropTypes.shape({
id: PropTypes.string.isRequired,
maxScore: PropTypes.number.isRequired,
name: PropTypes.string.isRequired,
picture: PropTypes.string.isRequired,
}),
leaderboardLoaded: PropTypes.func.isRequired,
loggedIn: PropTypes.func.isRequired,
players: PropTypes.arrayOf(PropTypes.shape({
id: PropTypes.string.isRequired,
maxScore: PropTypes.number.isRequired,
name: PropTypes.string.isRequired,
picture: PropTypes.string.isRequired,
})),
};
App.defaultProps = {
currentPlayer: null,
players: null,
};
export default App;
As you can see in the code above, what you had to:
- configure the
audience
property on theAuth0
module; - fetch the profile of the current player (
Auth0.getProfile()
) to create thecurrentPlayer
constant and update the Redux store (this.props.loggedIn(...)
); - connect to your real-time service (
io('http://localhost:3001', ...)
) with the player'saccess_token
(Auth0.getAccessToken()
); - and listen to the
players
event emitted by your real-time service to update the Redux store (this.props.leaderboardLoaded(...)
);
Then, as your game is not complete and your players cannot kill aliens yet, you added some temporary code to simulate new-max-score
events. First, you emitted a new maxScore
of 120
, which puts the logged-in player in the fifth position. Then, after five seconds (setTimeout(..., 5000)
), you emitted a new action with a new maxScore
of 222
, putting the logged-in player in the second position.
Besides these changes, you passed two new properties to your Canvas
: currentPlayer
and players
. Therefore, you need to open the ./src/components/Canvas.jsx
file and update it:
// ... import statements
const Canvas = (props) => {
// ... gameHeight and viewBox constants
// REMOVE the leaderboard constant !!!!
return (
<svg ...>
// ... other elements
{ ! props.gameState.started &&
<g>
// ... StartGame and Title
<Leaderboard currentPlayer={props.currentPlayer} authenticate={signIn} leaderboard={props.players} />
</g>
}
// ... flyingObjects.map
</svg>
);
};
Canvas.propTypes = {
// ... other propTypes definitions
currentPlayer: PropTypes.shape({
id: PropTypes.string.isRequired,
maxScore: PropTypes.number.isRequired,
name: PropTypes.string.isRequired,
picture: PropTypes.string.isRequired,
}),
players: PropTypes.arrayOf(PropTypes.shape({
id: PropTypes.string.isRequired,
maxScore: PropTypes.number.isRequired,
name: PropTypes.string.isRequired,
picture: PropTypes.string.isRequired,
})),
};
Canvas.defaultProps = {
currentPlayer: null,
players: null,
};
export default Canvas;
In this file, you had to make the following changes:
- Remove the
leaderboard
constant. Now, you are loading this constant from your real-time service. - Update the
<Leaderboard />
element. You have some more realistic data now:props.currentPlayer
andprops.players
. - Enhance the
propTypes
definition to declare that theCanvas
component can use thecurrentPlayer
andplayers
value.
Done! You have integrated your React game leaderboard with the Socket.IO real-time service. To test everything, issue the following commands:
# move to the real-time service directory
cd server
# run it on the background
node index.js &
# move back to your game
cd ..
# start the React development server
npm start
Then, open your game in your browser (http://localhost:3000
). There, you will see that, after logging in, you will appear in the fifth position and that, after 5 seconds, you will jump to the second position.
Implementing the Missing Parts
Now, you have almost everything you need to finish your game. You have created all the React elements that your game needs, you have added most of the animations it will have, and you have implemented the leaderboard feature. The pieces that are missing in this puzzle are:
- Shooting Cannon Balls: To kill aliens, you must allow your players to shoot cannon balls.
- Detecting Collisions: As your game will have cannon balls and flying objects moving around, you must implement an algorithm to detect collisions between these object.
- Updating Lives and the Current Score: After allowing your players to kill flying objects, your game must increment their current score so they can achieve new max scores. Also, you need to decrement lives when flying objects invade the Earth.
- Updating the Leaderboard: With all the features above implemented, the last thing you will have to do is to update the leaderboard with new max scores.
So, in the next sections, you will focus on implementing these pieces to wrap up your game.
Shooting Cannon Balls
To allow your players to shoot cannon balls, you will add an onClick
event listener to your Canvas
. Then, when clicked, your canvas will trigger a Redux action to add a cannon ball to the Redux store (that is, to the state of your game). The movement of this ball will be handled by the moveObjects
reducer.
To start the implementation of this feature, you can begin by creating the Redux action. To do this, open the ./src/actions/index.js
file and add the following code to it:
// ... other string constants
export const SHOOT = 'SHOOT';
// ... other function constants
export const shoot = (mousePosition) => ({
type: SHOOT,
mousePosition,
});
Then, you can prepare the reducer (./src/reducers/index.js
) to handle this action:
import {
LEADERBOARD_LOADED, LOGGED_IN,
MOVE_OBJECTS, SHOOT, START_GAME
} from '../actions';
// ... other import statements
import shoot from './shoot';
const initialGameState = {
// ... other properties
cannonBalls: [],
};
// ... initialState definition
function reducer(state = initialState, action) {
switch (action.type) {
// other case statements
case SHOOT:
return shoot(state, action);
// ... default statement
}
}
As you can see, the new version of your reducer uses a function called shoot
when it receives the SHOOT
action. You still have to define this function. So, create a file called shoot.js
in the same directory of the reducer and add the following code to it:
import { calculateAngle } from '../utils/formulas';
function shoot(state, action) {
if (!state.gameState.started) return state;
const { cannonBalls } = state.gameState;
if (cannonBalls.length === 2) return state;
const { x, y } = action.mousePosition;
const angle = calculateAngle(0, 0, x, y);
const id = (new Date()).getTime();
const cannonBall = {
position: { x: 0, y: 0 },
angle,
id,
};
return {
...state,
gameState: {
...state.gameState,
cannonBalls: [...cannonBalls, cannonBall],
}
};
}
export default shoot;
This function starts by checking if the game is started or not. If it is not, it simply returns the current state. Otherwise, it checks if the game already contains two cannon balls. You are limiting the number of cannon balls to make the game a little bit harder. If the player has shot less than two cannon balls, this function uses calculateAngle
to define the trajectory of the new cannon ball. Then, in the end, this function creates a new object representing the cannon ball and returns a new state to the Redux store.
After defining this action and the reducer to handle it, you will have to update the Game
container to provide the action to the App
component. So, open the ./src/containers/Game.js
file and update it as follows:
// ... other import statements
import {
leaderboardLoaded, loggedIn,
moveObjects, startGame, shoot
} from '../actions/index';
// ... mapStateToProps
const mapDispatchToProps = dispatch => ({
// ... other functions
shoot: (mousePosition) => {
dispatch(shoot(mousePosition))
},
});
// ... connect and export
Now, you need to update the ./src/App.js
file to make use of the dispatch wrapper:
// ... import statements and Auth0.configure
class App extends Component {
constructor(props) {
super(props);
this.shoot = this.shoot.bind(this);
}
// ... componentDidMount and trackMouse definition
shoot() {
this.props.shoot(this.canvasMousePosition);
}
render() {
return (
<Canvas
// other props
shoot={this.shoot}
/>
);
}
}
App.propTypes = {
// ... other propTypes
shoot: PropTypes.func.isRequired,
};
// ... defaultProps and export statements
As you can see here, you are defining a new method in the App
class to call the shoot
dispatcher with the canvasMousePosition
. Then, you are passing this new method to the Canvas
component. So, you still need to enhance this component to attach this method to the onClick
event listener of the svg
element and to make it render the cannon balls:
// ... other import statements
import CannonBall from './CannonBall';
const Canvas = (props) => {
// ... gameHeight and viewBox constant
return (
<svg
// ... other properties
onClick={props.shoot}
>
// ... defs, Sky and Ground elements
{props.gameState.cannonBalls.map(cannonBall => (
<CannonBall
key={cannonBall.id}
position={cannonBall.position}
/>
))}
// ... CannonPipe, CannonBase, CurrentScore, etc
</svg>
);
};
Canvas.propTypes = {
// ... other props
shoot: PropTypes.func.isRequired,
};
// ... defaultProps and export statement
Note: It is important to add
cannonBalls.map
beforeCannonPipe
because, otherwise, cannon balls would overlap the cannon itself.
These changes are enough to make your game add cannon balls to their initial position (x: 0
, y: 0
) and with their trajectory (angle
) properly defined. The problem now is that these objects are inanimate (that is, they don't move).
To make them move, you will need to add two functions to the ./src/utils/formulas.js
file:
// ... other functions
const degreesToRadian = degrees => ((degrees * Math.PI) / 180);
export const calculateNextPosition = (x, y, angle, divisor = 300) => {
const realAngle = (angle * -1) + 90;
const stepsX = radiansToDegrees(Math.cos(degreesToRadian(realAngle))) / divisor;
const stepsY = radiansToDegrees(Math.sin(degreesToRadian(realAngle))) / divisor;
return {
x: x +stepsX,
y: y - stepsY,
}
};
Note: To learn how the formula above works, take a look here.
You will use the calculateNextPosition
function in a new file called moveCannonBalls.js
. So, create this file inside the ./src/reducers/
directory with the following code:
import { calculateNextPosition } from '../utils/formulas';
const moveBalls = cannonBalls => (
cannonBalls
.filter(cannonBall => (
cannonBall.position.y > -800 && cannonBall.position.x > -500 && cannonBall.position.x < 500
))
.map((cannonBall) => {
const { x, y } = cannonBall.position;
const { angle } = cannonBall;
return {
...cannonBall,
position: calculateNextPosition(x, y, angle, 5),
};
})
);
export default moveBalls;
In the function exposed by this file, you are doing two important things. First, you are using the filter
function to remove cannonBalls
that are not within a specific area. That is, you are removing cannon balls that are above -800
on the Y-axis, or that moved too much to the left (lower than -500
) or to the right (greater than 500
).
Lastly, to use this function, you will need to refactor the ./src/reducers/moveObjects.js
file as follows:
// ... other import statements
import moveBalls from './moveCannonBalls';
function moveObjects(state, action) {
if (!state.gameState.started) return state;
let cannonBalls = moveBalls(state.gameState.cannonBalls);
// ... mousePosition, createFlyingObjects, filter, etc
return {
...newState,
gameState: {
...newState.gameState,
flyingObjects,
cannonBalls,
},
angle,
};
}
export default moveObjects;
In the new version of this file, you are simply enhancing the previously moveObjects
reducer to make use of the new moveBalls
function. Then, you are using the result of this function to define a new array to the cannonBalls
property of the gameState
.
Now, with all these changes in place, your players will be able to shoot cannon balls. You can check that by testing your game in a web browser.
Detecting Collisions
Now that your game supports players shooting cannon balls and that there are flying objects trying to invade the Earth, it is a good time to add an algorithm to detect collisions. With this algorithm, you will be able to remove cannon balls and flying objects that collide. This will also enable you to work on the next feature: Incrementing the Current Score.
A good strategy to follow when trying to implement the algorithm that checks collisions is to imagine the cannon balls and flying objects are rectangles. Although this strategy is less precise than implementing an algorithm that considers the real format of these objects, handling them as rectangles will make everything much easier. Besides that, for this game, you won't need too much precision because, fortunately, you won't need this algorithm to kill real aliens.
Having that in mind, add the following function to the ./src/utils/formulas.js
file:
// ... other functions
export const checkCollision = (rectA, rectB) => (
rectA.x1 < rectB.x2 && rectA.x2 > rectB.x1 &&
rectA.y1 < rectB.y2 && rectA.y2 > rectB.y1
);
As you can see, treating objects as rectangles allows you to check for overlaps with these simple conditions. Now, to use this function, create a new file called checkCollisions.js
inside the ./src/reducers
directory with the following code:
import { checkCollision } from '../utils/formulas';
import { gameHeight } from '../utils/constants';
const checkCollisions = (cannonBalls, flyingDiscs) => {
const objectsDestroyed = [];
flyingDiscs.forEach((flyingDisc) => {
const currentLifeTime = (new Date()).getTime() - flyingDisc.createdAt;
const calculatedPosition = {
x: flyingDisc.position.x,
y: flyingDisc.position.y + ((currentLifeTime / 4000) * gameHeight),
};
const rectA = {
x1: calculatedPosition.x - 40,
y1: calculatedPosition.y - 10,
x2: calculatedPosition.x + 40,
y2: calculatedPosition.y + 10,
};
cannonBalls.forEach((cannonBall) => {
const rectB = {
x1: cannonBall.position.x - 8,
y1: cannonBall.position.y - 8,
x2: cannonBall.position.x + 8,
y2: cannonBall.position.y + 8,
};
if (checkCollision(rectA, rectB)) {
objectsDestroyed.push({
cannonBallId: cannonBall.id,
flyingDiscId: flyingDisc.id,
});
}
});
});
return objectsDestroyed;
};
export default checkCollisions;
The code in this file basically does the following:
- It defines an array called
objectsDestroyed
to hold everything that is destroyed. - It iterates over the
flyingDiscs
array (with theforEach
function) to create a rectangular representation of the flying discs. Note that, as you are using CSS animations to move these objects, you need to calculate their positions over the Y-axis based on theircurrentLifeTime
. - It iterates over the
cannonBalls
array (with theforEach
function) to create a rectangular representation of the cannon balls. - It calls the
checkCollision
function with both rectangular representations to decide if these objects must be destroyed. Then, if they must be destroyed, they are added to theobjectsDestroyed
array that this function returns.
Lastly, you will need to update the moveObjects.js
file to use this function as follows:
// ... import statements
import checkCollisions from './checkCollisions';
function moveObjects(state, action) {
// ... other statements and definitions
// the only change in the following three lines is that it cannot
// be a const anymore, it must be defined with let
let flyingObjects = newState.gameState.flyingObjects.filter(object => (
(now - object.createdAt) < 4000
));
// ... { x, y } constants and angle constant
const objectsDestroyed = checkCollisions(cannonBalls, flyingObjects);
const cannonBallsDestroyed = objectsDestroyed.map(object => (object.cannonBallId));
const flyingDiscsDestroyed = objectsDestroyed.map(object => (object.flyingDiscId));
cannonBalls = cannonBalls.filter(cannonBall => (cannonBallsDestroyed.indexOf(cannonBall.id)));
flyingObjects = flyingObjects.filter(flyingDisc => (flyingDiscsDestroyed.indexOf(flyingDisc.id)));
return {
...newState,
gameState: {
...newState.gameState,
flyingObjects,
cannonBalls,
},
angle,
};
}
export default moveObjects;
Here, you are using the result of the checkCollisions
function to remove objects from the cannonBalls
and flyingObjects
arrays.
Now, when cannon balls and flying objects overlap, the new version of the moveObjects
reducer will remove them from the gameState
. You can see this in action in your web browser.
Updating Lives and the Current Score
Whenever a flying object invades the Earth, you must decrement the number of lives players have. Also, you must end the game when they have no more lives. To implement these features, you will need to update only two files. The first one is the ./src/reducers/moveObject.js
file. You will need to update it as follows:
import { calculateAngle } from '../utils/formulas';
import createFlyingObjects from './createFlyingObjects';
import moveBalls from './moveCannonBalls';
import checkCollisions from './checkCollisions';
function moveObjects(state, action) {
// ... code until newState.gameState.flyingObjects.filter
const lostLife = state.gameState.flyingObjects.length > flyingObjects.length;
let lives = state.gameState.lives;
if (lostLife) {
lives--;
}
const started = lives > 0;
if (!started) {
flyingObjects = [];
cannonBalls = [];
lives = 3;
}
// ... x, y, angle, objectsDestroyed, etc ...
return {
...newState,
gameState: {
...newState.gameState,
flyingObjects,
cannonBalls: [...cannonBalls],
lives,
started,
},
angle,
};
}
export default moveObjects;
These new lines of code simply compare the current length of the flyingObjects
array with the one from the original state
to decide if players must loose a life or not. This strategy works because you are adding this code right after popping flying objects that remained for 4 seconds in the game ((now - object.createdAt) < 4000
) and before removing objects that collide. So, if the length of these arrays differs, it means one flying object invaded the Earth.
Now, to show players their lives, you will need to update the Canvas
component. So, open the ./src/components/Canvas.jsx
file and update it as follows:
// ... other import statements
import Heart from './Heart';
const Canvas = (props) => {
// ... gameHeight and viewBox constants
const lives = [];
for (let i = 0; i < props.gameState.lives; i++) {
const heartPosition = {
x: -180 - (i * 70),
y: 35
};
lives.push(<Heart key={i} position={heartPosition}/>);
}
return (
<svg ...>
// ... all other elements
{lives}
</svg>
);
};
// ... propTypes, defaultProps, and export statements
With these changes in place, your game is almost complete. Players are already able to shoot and kill flying objects and, if too many of them invade the Earth, the game is ended. Now, to complete this section, you need to update the current score of your players, so they can compete to see who kills more aliens.
Making this enhancement in your game is quite simple. You just have to update the ./src/reducers/moveObjects.js
file as follows:
// ... import statements
function moveObjects(state, action) {
// ... everything else
const kills = state.gameState.kills + flyingDiscsDestroyed.length;
return {
// ...newState,
gameState: {
// ... other props
kills,
},
// ... angle,
};
}
export default moveObjects;
Then, on the ./src/components.Canvas.jsx
file, you will need to replace the CurrentScore
component (which is hard-coded with the value of 15
) with this:
<CurrentScore score={props.gameState.kills} />
"I'm creating a game with React, Redux, SVG, and CSS animations."
Updating the Leaderboard
Good news! Updating the leaderboard is the last thing you will have to do to be able to say that you wrote a complete game with React, Redux, SVG, and CSS animations. Also, as you will see, the work here will be quick and painless.
First, you will need to update the ./server/index.js
file to reset the players
array. You won't want your game with fake players and fake results when you release it. So, open this file and remove all fake players/results. In the end, you will have this constant defined as follows:
const players = [];
Then, you will need to refactor the App
component. So, open the ./src/App.js
file and make the following changes:
// ... import statetments
// ... Auth0.configure
class App extends Component {
constructor(props) {
// ... super and this.shoot.bind(this)
this.socket = null;
this.currentPlayer = null;
}
// replace the whole content of the componentDidMount method
componentDidMount() {
const self = this;
Auth0.handleAuthCallback();
Auth0.subscribe((auth) => {
if (!auth) return;
self.playerProfile = Auth0.getProfile();
self.currentPlayer = {
id: self.playerProfile.sub,
maxScore: 0,
name: self.playerProfile.name,
picture: self.playerProfile.picture,
};
this.props.loggedIn(self.currentPlayer);
self.socket = io('http://localhost:3001', {
query: `token=${Auth0.getAccessToken()}`,
});
self.socket.on('players', (players) => {
this.props.leaderboardLoaded(players);
players.forEach((player) => {
if (player.id === self.currentPlayer.id) {
self.currentPlayer.maxScore = player.maxScore;
}
});
});
});
setInterval(() => {
self.props.moveObjects(self.canvasMousePosition);
}, 10);
window.onresize = () => {
const cnv = document.getElementById('aliens-go-home-canvas');
cnv.style.width = `${window.innerWidth}px`;
cnv.style.height = `${window.innerHeight}px`;
};
window.onresize();
}
componentWillReceiveProps(nextProps) {
if (!nextProps.gameState.started && this.props.gameState.started) {
if (this.currentPlayer.maxScore < this.props.gameState.kills) {
this.socket.emit('new-max-score', {
...this.currentPlayer,
maxScore: this.props.gameState.kills,
});
}
}
}
// ... trackMouse, shoot, and render method
}
// ... propTypes, defaultProps, and export statement
To summarize, these are the changes that you applied in this component:
- You defined two new properties on its class (
socket
andcurrentPlayer
) so you can use them on different methods. - You removed the fake max scores that you were emitting to simulate
new-max-score
events. - You made your code iterate over the
players
array (the one received from the Socket.IO backend) to set the correctmaxScore
of your players. That is, if they come back another time, they will still have theirmaxScore
record. - You defined the
componentWillReceiveProps
lifecycle method to check if players have reached a newmaxScore
. If so, your game emits anew-max-score
event to update the leaderboard.
That's it! Your game is ready for prime time. To see everything in action, run both the Socket.IO backend and your React application with the following code:
# run the backend server in the background
node ./server/index &
# run the React app
npm start
Then, open two browsers, authenticate with different email addresses, and kill some aliens. You will see that, when the game is over, the leaderboard will be updated in both browsers.
Conclusion
In this series, you used a lot of amazing technologies to create a nice game. You used React to define and control the game elements, you used SVG (instead of HTML) to render these elements, you used Redux to control the state of the game, and you used CSS animations to make aliens move through the screen. Oh, besides that, you even used a little bit of Socket.IO to make your leaderboard real-time and Auth0 to work as the identity management system of your game.
Phew! You came a long way and you learned a lot in this three articles. Perhaps it is time to take a break and play your game.