
TL;DR: In this post, you will learn how to develop web applications using React and Symfony. Moreso, you will also learn how secure both the frontend and backend of the application by adding authentication and authorization using Auth0. React will be used to power the frontend logic of this application while Symfony will be used to build the backend API. The complete source code for this post can be found here on GitHub.
Prerequisites
To get the best out of this post, a reasonable knowledge of React, Object Oriented Programming in PHP, JavaScript and a basic knowledge of building applications with Symfony is advised. Another important factor is for you to ensure that you have Node.js and Yarn package manager installed in your development machine. If you are yet to get them installed, kindly check this link to learn how to properly install Node.js and here for Yarn package manager. Lastly, you also need to install Composer.
What is Symfony
Symfony is a set of reusable PHP components, the leading PHP framework to create websites and web applications. It has an elegant structure and it is known for being a suitable framework to bootstrap any web application project regardless of the size, from small to a large scale complex applications.
For additional information and a deep dive into more concepts and philosophy of Symfony, visit its official documentation.
What is React
ReactJS is an open-source JavaScript library popularly used for building dynamic and decent user interface for single page applications. The simplicity and incredible performance of applications created with React make it a top choice by most web developers and reputable companies. Developed and maintained by Facebook and with commendable numbers of stars on GitHub, React has really enjoyed a wide adoption from the web tech community.
While developing applications with React, it is absolutely necessary to put into consideration the basic concepts considered as best practises and extremely crucial to successfully craft a top-notched React app. If you are new to React and will like to easily get yourself familiarised with some of these core concepts of creating modern reusable user interface with React, check out this comprehensive article on building and securing your first React app.
Combining React and Symfony
Contemporarily, modern web applications built with PHP framework like Symfony now require implementation of a huge amount of logic on the frontend in order to create a rich web experience for users. This is mostly handled by jQuery back in the days, but at the moment, there are numerous awesome frontend libraries available in the market. They include, but are not limited to Angular, Ember, Vue and React. With these several options, one can easily get lost and spend quite a bit of time deciding on which of the library is more compatible with Symfony.
To make things easier, Symfony unlike its major contender in the PHP world (Laravel), does not favor a particular library or frontend framework over another. It remains absolutely neutral to your choice of the library that runs on the client side of your application. This leaves you with an opportunity to explore the world of JavaScript and work with any of the modern frontend library for building single page applications that you are quite comfortable with.
However, as at the time of writing, React is the most prominent library for building reusable user interface components. As you proceed with this post, you will realise how easy it is to combine React and Symfony together in a single project successfully. Thanks to the introduction of a pure-JavaScript library called Symfony Webpack Encore, it is now simple to manage JavaScript files in a Symfony-based application, as it offers a simplified process for working with both CSS and JavaScript.
What You Will Build with React and Symfony
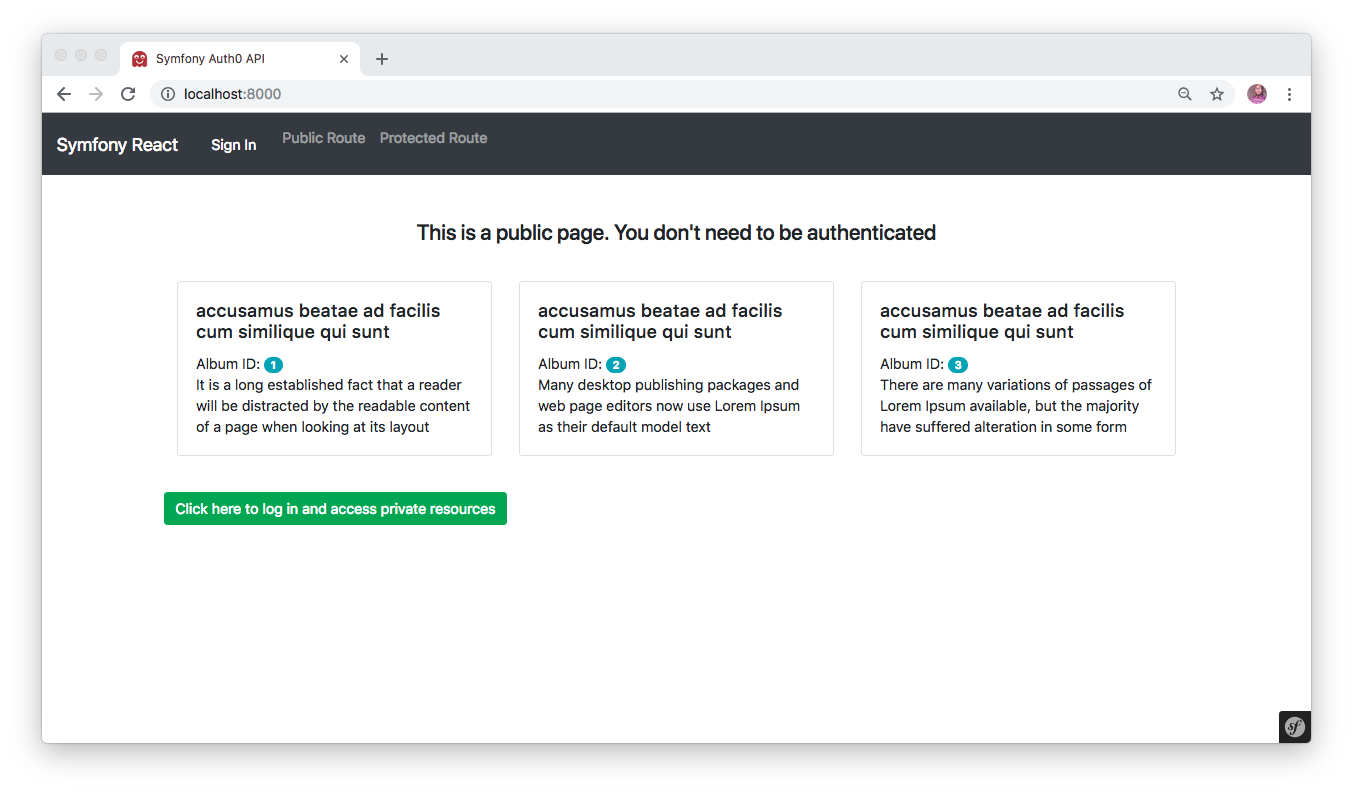
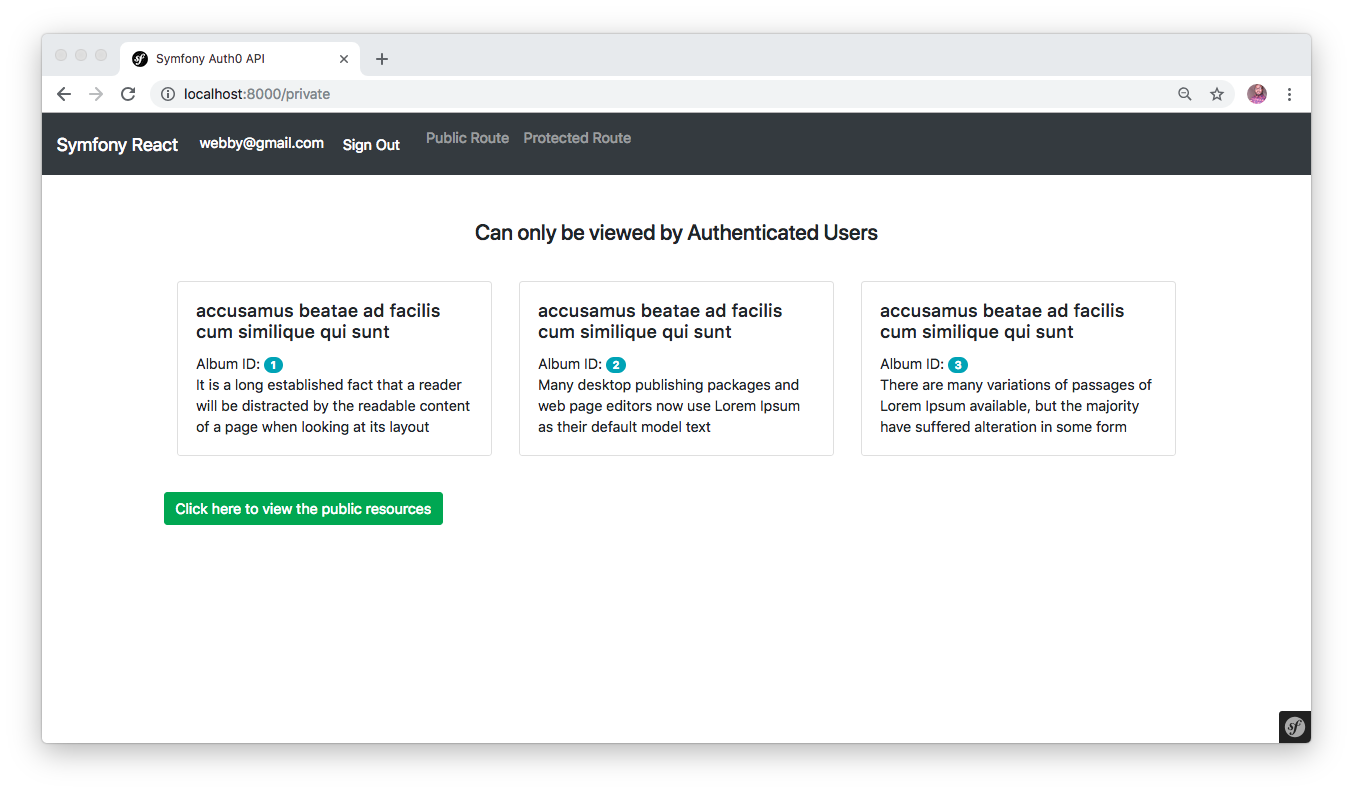
As pointed out at the beginning of this post, you will learn how to build a secured application with React at the frontend and a Symfony powered backend API. This application will allow users to fetch protected information from the API only if they are authenticated and give full access to a public route for all users ( authenticated and non-authenticated) as depicted by the images below:
Traditionally, Symfony usually handles everything from the state management, page rendering and routing when developing web applications with it. Here, you will deviate a little from totally building Symfony applications that way, as you will learn a different approach to page rendering, routing and state management.
Structure of the application
The frontend of the application will be broken into different reusable and independent UI components. Here, you will use React to render contents without necessarily requesting a new page from the server or refreshing the page before navigating to a new route. This is one of the beauties of single-page applications.
Once a user tries to fetch information from a protected route, that will be defined later in this post, they will be redirected to Auth0 to get authorized and afterwards, they will be redirected back to the app.
For the backend, you will simply use Symfony to accept and process HTTP requests sent in by React and return the appropriate information based on the authentication status of the user.
With the structure and basic information about the application that will be built in this post properly covered, you can now proceed to start building the application.
Scaffolding the Symfony Application
Here, to start building the backend API, you will install and set up a Symfony application via Composer. To do this, you need to access the terminal in your operating system, navigate to your development directory and run the following command to install a project named symfony-auth0-api on your machine:
composer create-project symfony/website-skeleton symfony-auth0-api
Once the installation process of Symfony and the respective required bundle by Composer is completed, change directory into the newly created folder with:
cd symfony-auth0-api
Creating the Symfony Backend API
Leverage the Symfony maker bundle to create a controller for the API with:
php bin/console make:controller SecuredController
The preceding command will create a new file named SecuredController.php which can be found in src/Controller folder and a template file in templates/secured/index.html.twig. You can ignore the template file for now, but open the newly created SecuredController.php and add the following content:
// .src/Controller/SecuredController
<?php

namespace App\Controller;

use Symfony\Bundle\FrameworkBundle\Controller\AbstractController;
use Symfony\Component\HttpFoundation\JsonResponse;
use Symfony\Component\Routing\Annotation\Route;

class SecuredController extends AbstractController
{
    /**
     * @Route("/api/public", name="public")
     * @return JsonResponse
     */
    public function publicAction()
    {

        $data = [
            [
                'albumId' => "1",
                "id" => 1,
                "title" => "accusamus beatae ad facilis cum similique qui sunt",
                "description" => "It is a long established fact that a reader will be distracted by the readable content of a page when looking at its layout"
            ],
            [
                'albumId' => "2",
                "id" => 2,
                "title" => "accusamus beatae ad facilis cum similique qui sunt",
                "description" => "Many desktop publishing packages and web page editors now use Lorem Ipsum as their default model text"
            ],
            [
                'albumId' => "3",
                "id" => 3,
                "title" => "accusamus beatae ad facilis cum similique qui sunt",
                "description" => "There are many variations of passages of Lorem Ipsum available, but the majority have suffered alteration in some form"
            ],
        ];

        return new JsonResponse($data);
    }

        /**
         * @Route("/api/private", name="private")
         */
    public function privateAction()
    {
        $data = [
            [
                'albumId' => "1",
                "id" => 1,
                "title" => "accusamus beatae ad facilis cum similique qui sunt",
                "description" => "It is a long established fact that a reader will be distracted by the readable content of a page when looking at its layout"
            ],
            [
                'albumId' => "2",
                "id" => 2,
                "title" => "accusamus beatae ad facilis cum similique qui sunt",
                "description" => "Many desktop publishing packages and web page editors now use Lorem Ipsum as their default model text"
            ],
            [
                'albumId' => "3",
                "id" => 3,
                "title" => "accusamus beatae ad facilis cum similique qui sunt",
                "description" => "There are many variations of passages of Lorem Ipsum available, but the majority have suffered alteration in some form"
            ],
        ];

        return new JsonResponse($data);
    }
}
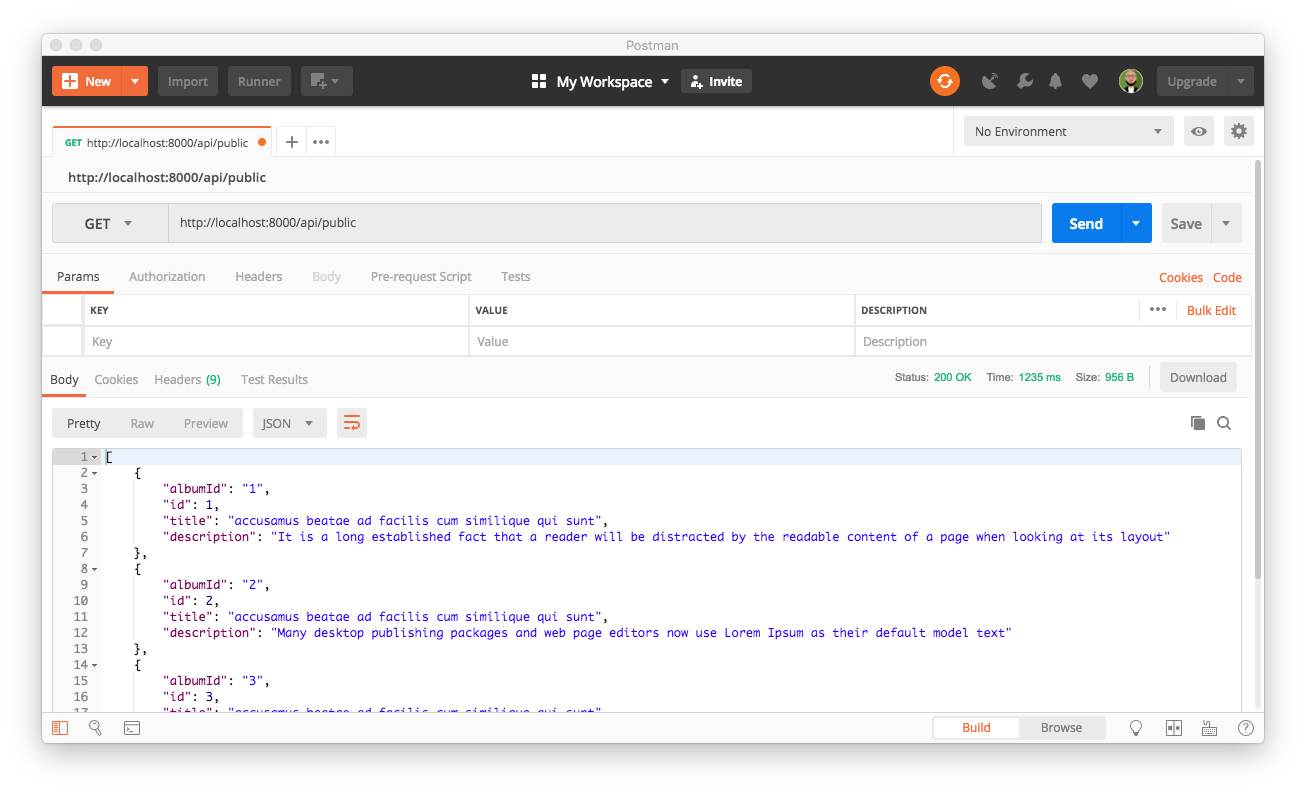
Here, you defined two different methods, a publicAction() and a privateAction(). They both returned different responses in JSON format. You can try this out using a tool called Postman. But before that, you need to start the application by running php bin/console server:run to start the development server on http://localhost:8000.
Next, try accessing the public route on http://localhost:8000/api/public. You will see the list of JSON data returned as a response for the public route as depicted by the image below:
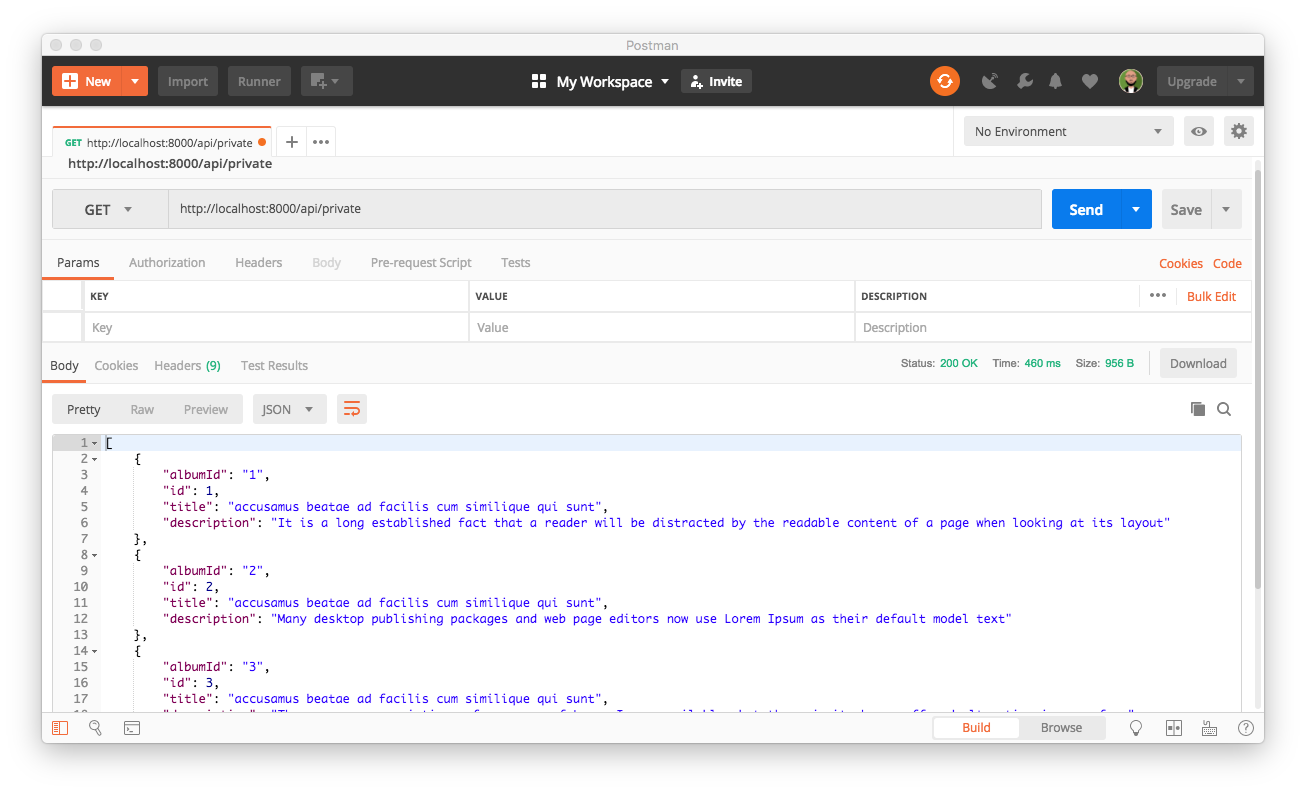
Now, do the same for the protected route on http://localhost:8000/api/private. You will see the list of JSON data returned as response for the private route as depicted by the image below:
At the moment, the endpoint for both routes can easily be accessed by anyone. This is not ideal. You need to protect the private API by making its endpoint secured. Proceed to the next section to learn how to make your /api/private endpoint secured by adding authentication and authorization. You will need an Auth0 account for this purpose, create a new account if you don’t have one already.
Securing the Symfony API with Auth0
In the previous section, you created a controller for the API and added some mock data that will be displayed for both the protected and public route. To secure these APIs, you will need to head back to your Auth0 dashboard and configure an API. What this means is that you will have to create a new API on Auth0 and integrate it with your Symfony application. This, among other things, will leverage on Auth0 to issue JSON Web Token for your application and make it more secured.
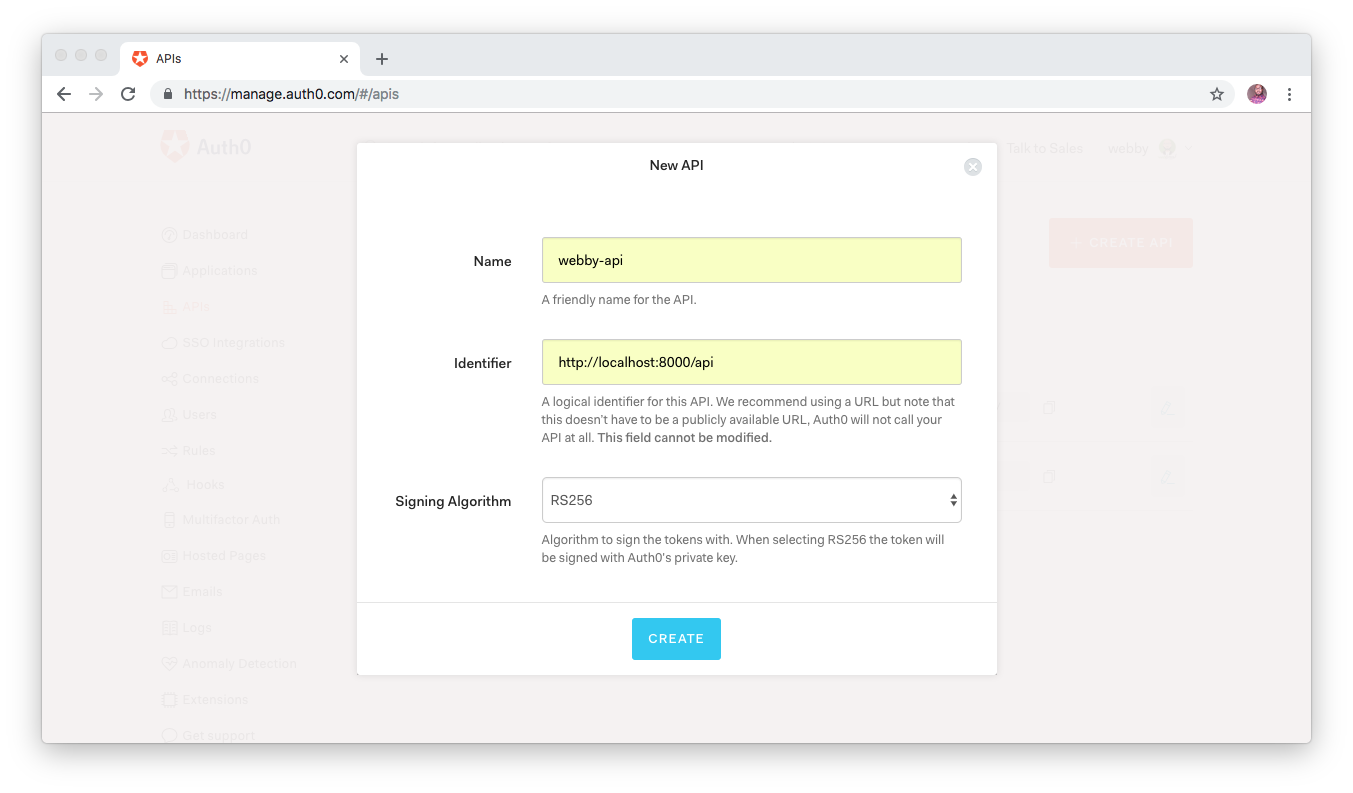
To begin, head to the API section of your Auth0 management dashboard and select APIs. If you have created APIs before now, this will show you the list of all APIs for your account, but for the purpose of this tutorial, go ahead and click on the CREATE API button and set up a new one. Next, provide a friendly name as you deem fit for your API. I have intuitively named the API for this demo as webby-api. In addition, also ensure that you set an identifier as this will be used as audience later when you are configuring the Access token, I currently used http://localhost:8000/api for mine. You must leave the signing algorithm as RS256 and then proceed to click on the CREATE button.
Validating Access Tokens
How this will work is, whenever a user tries to access a protected endpoint of your custom API, an authorization header with a bearer access token will be sent alongside the HTTP request. Once this access token has been validated appropriately, the resources protected by such endpoint will now be made available to such user.
Protecting a Symfony API with Auth0 requires that you install auth0/jwt-auth-bundle package. But before that, stop the process that is currently running by pressing CTRL + C. Next, run the following command to install the jwt-auth-bundle for your project:
composer require auth0/jwt-auth-bundle:"^3.0"
Once the installation process is complete, you will need to add configuration value for the newly created bundle. For this, navigate to /config/packages folder and create a new file named jwt_auth.yaml. This file will hold three different required values for your API. Open the newly created file and paste the following content in it:
jwt_auth:
    domain: YOUR_AUTH0_DOMAIN
    authorized_issuer: https://YOUR_AUTH0_DOMAIN/
    api_identifier: http://localhost:8000/api
Note that, you will need to replace the YOUR_AUTH0_DOMAIN with the appropriate value from your application dashboard. Earlier, when you created an API, Auth0 also automatically created a test application for you to use. This will be the Auth0 application that will hold your users. In order to view your applications, click on Applications from the menu items and you will see the list of all applications on your Auth0 management dashboard. You can also select and use any other applications for your account. But for the purpose of this tutorial, click on the test application and you will see a page as shown here:
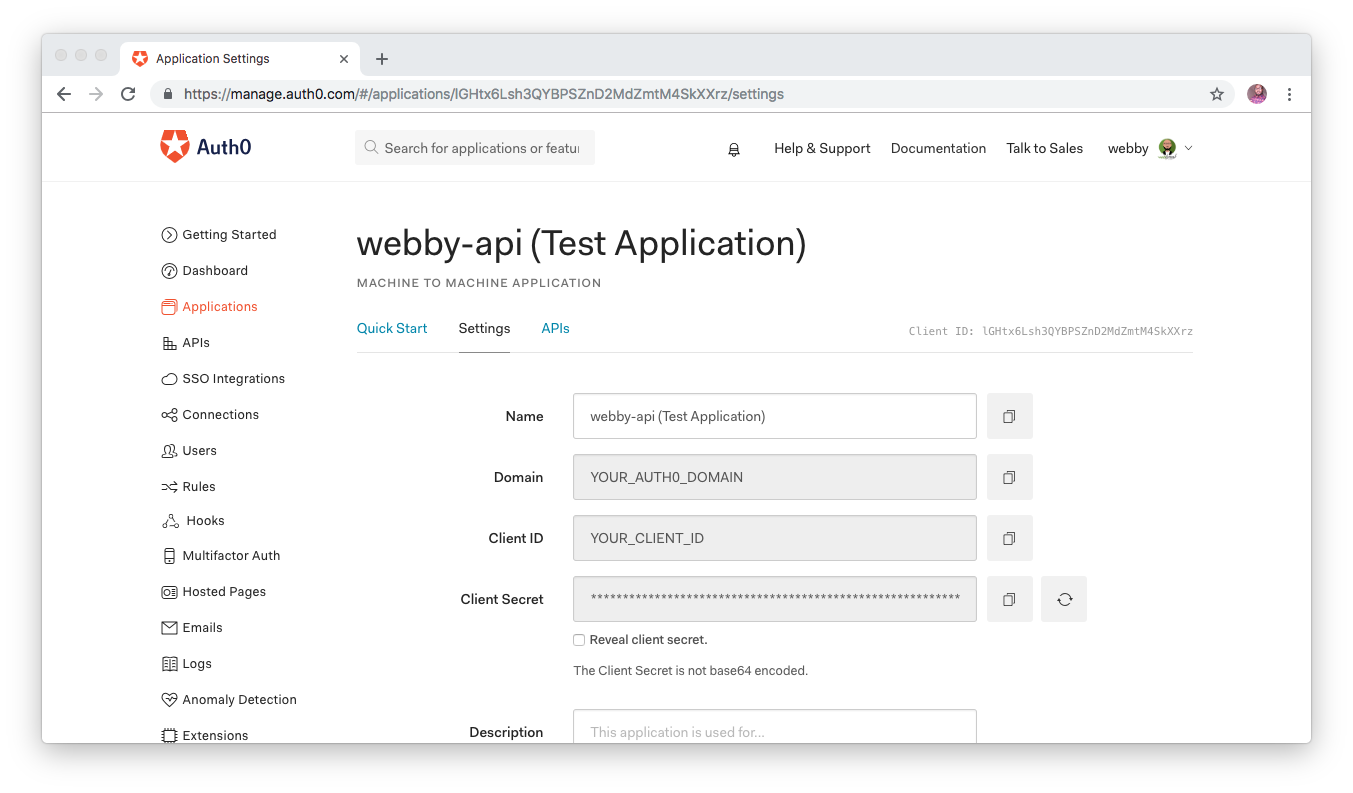
You can copy the domain from the test application and use it to replace YOUR_AUTH0_DOMAIN placeholder (e.g. blog-samples.auth0.com).
Now, that you are done creating an API, installing the jwt bundle to validate users and adding the appropriate credentials to configure the bundle for your application properly, you can now proceed to the next section and create a User class alongside a User provider.
Set Up User and User provider, and configure security provider
For a typical Symfony application a User class is always required and for each User class in your application, there is a need to set up and configure a user provider. A user provider, among other things, helps to reload a user from the session and load users for other login specific features like using username or email for authentication.
Here, you will need to create a custom user provider class since you will be loading users from a custom location (via Auth0) and not from your application’s database. To begin with, navigate to the src folder and create a new folder named Security and within the newly created folder, create another one and call it User. Next, create the user class within the User folder and name it WebServiceUser.php. Open the newly created file and paste the following code in it:
// /src/Security/User/WebServiceUser.php

<?php

namespace App\Security\User;

use Symfony\Component\Security\Core\User\EquatableInterface;
use Symfony\Component\Security\Core\User\UserInterface;

class WebServiceUser implements UserInterface, EquatableInterface
{
    private $roles;
    private $jwt;

    public function __construct($jwt, array $roles)
    {
        $this->roles = $roles;
        $this->jwt = $jwt;
    }

    public function getRoles()
    {
        return $this->roles;
    }

    public function getPassword()
    {
        return null;
    }

    public function getSalt()
    {
        return null;
    }

    public function getUsername()
    {
        return isset($this->jwt["email"]) ? $this->jwt["email"] : $this->jwt["sub"];
    }

    public function eraseCredentials()
    {

    }

    public function isEqualTo(UserInterface $user)
    {
        if (!$user instanceof WebServiceUser) {
            return false;
        }

        if ($this->getUsername() !== $user->getUsername()) {
            return false;
        }

        return true;
    }
}
Here, the WebServiceUser class implements two different interfaces namely:
- UserInterface: which represents the interface that all User classes must implement and
- EquatableInterface: which is used to test if two objects are equal in security and re-authentication context
With that completed, create another file within the User folder and name it WebServiceUserProvider.php. Use the content below for it:
// /src/Security/User/WebServiceUserProvider.php
<?php
namespace App\Security\User;

use Auth0\JWTAuthBundle\Security\Core\JWTUserProviderInterface;
use Symfony\Component\Intl\Exception\NotImplementedException;
use Symfony\Component\Security\Core\Exception\UnsupportedUserException;
use Symfony\Component\Security\Core\User\UserInterface;

class WebServiceUserProvider implements JWTUserProviderInterface
{
    public function loadUserByJWT($jwt)
    {
        $data = ['sub' => $jwt->sub];
        $roles = array();
        $roles[] = 'ROLE_OAUTH_AUTHENTICATED';

        return new WebServiceUser($data, $roles);
    }

    public function getAnonymousUser()
    {
        return new WebServiceAnonymousUser();
    }

    public function loadUserByUsername($username)
    {
        throw new NotImplementedException('method not implemented');
    }

    public function refreshUser(UserInterface $user)
    {
        if (!$user instanceof WebServiceUser) {
            throw new UnsupportedUserException(
                sprintf('Instances of "%s" are not supported.', get_class($user))
            );
        }

        return $this->loadUserByUsername($user->getUsername());
    }

    public function supportsClass($class)
    {
        return $class === 'App\Security\User\WebServiceUser';
    }

}
This class implements the JWTUserProviderInterface from the Auth0 bundle installed earlier which specifies the important methods that the WebServiceUserProvider class must implement. These methods are:
loadUserByJWT: it receives the decoded JWT Access Token and returns a User.getAnonymousUser: returns an anonymous user that represents an unauthenticated one (usually represented by the roleIS_AUTHENTICATED_ANONYMOUSLY)
To wrap things up for the user, create a file that will return the anonymous user within the User folder and name it WebServiceAnonymousUser.php. Use the following content for it:
// /src/Security/User/WebServiceAnonymousUser.php

<?php

namespace App\Security\User;

class WebServiceAnonymousUser extends WebServiceUser
{
    public function __construct()
    {
        parent::__construct(null, array('IS_AUTHENTICATED_ANONYMOUSLY'));
    }

    public function getUsername()
    {
        return null;
    }
}
Configure the Security Provider
You are almost done with the API security configuration, the last thing you need to do is tell Symfony about the user class and provider and also configure the access control. These configurations will be done by modifying the security.yaml file located in config/packages folder, but before that, you need to set up a service for WebServiceUserProvider.
Services are a great way to make your applications easier to maintain and adapt to new requirements. You can create one by adding this code to the bottom of config/services.yaml file:
# config/services.yaml

parameters:
    locale: 'en'

services:
    ...
    # add this code
    web_service_user_provider:
        class: App\Security\User\WebServiceUserProvider
        arguments: ["@jwt_auth.auth0_service"]
Lastly, modify the security.yaml file located in config/packages/security.yaml file such that it contains the following:
- The
web_service_user_providerservice - The secured area that you want to authenticate using an Access Token
- The
access_controlsection with the roles needed for each route
# config/packages/security.yaml
security:
    providers:
        web_service_user_provider:
          id:
            web_service_user_provider


    firewalls:
        secured_area:
            pattern: ^/api
            stateless: true
            simple_preauth:
                authenticator: jwt_auth.jwt_authenticator
            provider: web_service_user_provider

    # Easy way to control access for large sections of your site
    access_control:
        - { path: ^/api/private, roles: ROLE_OAUTH_AUTHENTICATED }
        - { path: ^/api/public, roles: IS_AUTHENTICATED_ANONYMOUSLY }
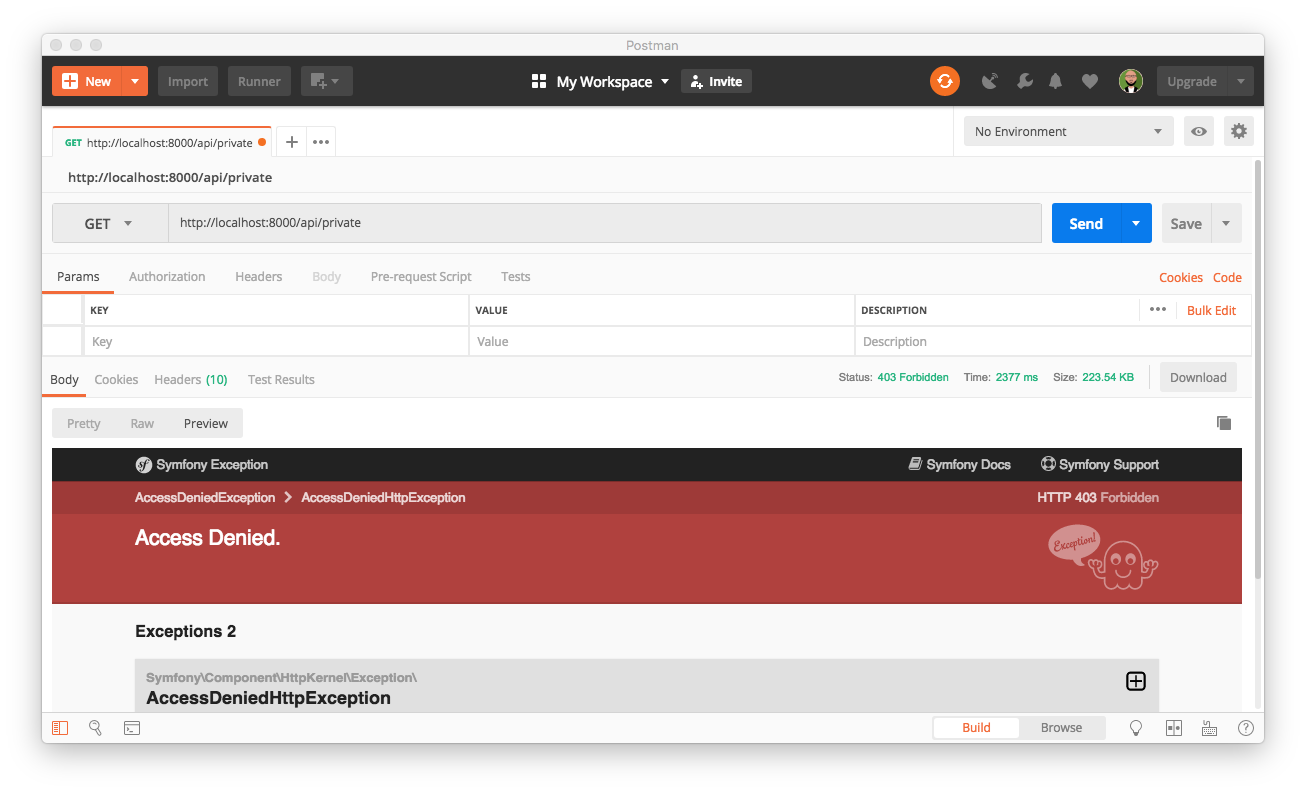
Now you are done securing the API. You can test this again with Postman by accessing the protected route. Start the application by running php bin/console server:run and access http://localhost:8000/api/private. You will receive a message indicating that you do not have access to such endpoint as shown below:
You can now proceed to the next section where you will set up the frontend of the application with React.
Building the Frontend App with React
Here in this section, you will download and install React. To begin, stop the process that is currently running by pressing CTRL + C, then run the following command from the terminal and within your project directory to install React, Webpack Encore and other dependencies using Composer:
composer require encore
The preceding command will carry out the following tasks automatically:
- Create a
webpack.config.jsfile - Add the
assetsdirectory - And finally, add
node_modulesfolder to the.gitignorefile
Once the installation process is complete, use Yarn to install React, React-router and other dependencies
yarn add --dev @babel/preset-react
yarn add react react-dom prop-types react-router-dom reactstrap axios
yarn add @babel/plugin-proposal-class-properties @babel/plugin-transform-runtime
Configuring Webpack Encore
Configure Webpack Encore by enabling React and adding the entry point within the webpack.config.js file at the root of your project as shown here:
// ./webpack.config.js

var Encore = require('@symfony/webpack-encore');

Encore
    .setOutputPath('public/build/')
    .setPublicPath('/build')
    .addEntry('app', './assets/js/app.js')
    .enableSingleRuntimeChunk()
    .cleanupOutputBeforeBuild()
    .enableBuildNotifications()
    .enableSourceMaps(!Encore.isProduction())
    .enableVersioning(Encore.isProduction())
    .enableReactPreset()

    .configureBabel(function (babelConfig) {
        babelConfig.plugins = [
            "@babel/plugin-proposal-object-rest-spread","@babel/plugin-proposal-class-properties",
            "@babel/plugin-transform-runtime"
        ]
    })
;

module.exports = Encore.getWebpackConfig();
With webpack.config.js file properly configured, as shown above, you now have an entry point (i.e., addEntry()) method that tells Encore to load the assets/js/app.js file, which was automatically created to manage all javaScript related files.
You can now proceed to the next section where you will start creating reusable components for the application.
Building React components
Now that you have installed React successfully, you will need to create a couple of React reusable components to help with a better structure for the application. To begin, create a new folder inside assets/js folder and name it components. This newly created folder will house all the reusable components for this application.
Next, within the components folder, create the following JavaScript files:
Home.js: This component will be the homepage for the application and be used to display the contents from the public route to users.NavBar.js: This component will handle navigation for the frontend of the applicationprivateResources.js: This will be used to fetch the private resources from the protected route of the API and display it to the users.publicResources.js: This will fetch the resources from the public route for all users.SecuredRoute.js: This file will be used to check if a user is authenticated and routed to the protected component.Callback.js: This component will process the redirect from Auth0 after a user has been authenticated. It will be activated at thehttp://localhost:8000/callbackendpoint.
The Home component
You can now start with the HomeComponent by opening the assets/js/components/Home.js file created earlier and add the following code:
// assets/js/components/Home.js

import React, { Component } from 'react';
import NavBar from '../components/NavBar';
import { Route, Switch, Link, withRouter } from 'react-router-dom';
import Callback from "./Callback";
import SecuredRoute from "./SecuredRoute";
import PrivateResources from "./privateResources";
import PublicResources from "./publicResources";
import auth0Client from '../utils/Auth';

class Home extends Component {

    async componentDidMount() {
        if (this.props.location.pathname === '/callback') return;
        try {
            await auth0Client.silentAuth();
            this.forceUpdate();
        } catch (err) {
            if (err.error === 'login_required') return;
            console.log(err.error);
        }
    }

    render() {
        return (
            <div>
                <NavBar />
                <Switch>
                    <Route exact path={"/callback"} component={Callback} />
                    <SecuredRoute path={'/private'} component={PrivateResources}/>
                    <Route path={"/"} component={PublicResources} />
                </Switch>
            </div>
        )
    }
}

export default withRouter(Home);
Here, what you have done is to import the required modules (some of the files will be created later in this section), used one of React’s lifecycle methods to check whether the requested route is /callback. If it is, the Callback.js component created earlier will be used to handle the authentication process.
Later in this component, within the render() method, you have included the NavBarComponent and used React-Router to render the appropriate components. Did you notice the SecuredRoute component? it was used to ensure that only authenticated users can access the /private endpoint. You will create it later in this post
Lastly, you enclosed the HomeComponent class inside the withRouter method in order the check the router being called.
The Navigation bar
In the last section, you imported and included the NavBarComponent with the HomeComponent. Here, you will open the NavBar.js file created earlier and paste the following content in it:
// assets/js/components/NavBar.js

import React from 'react';
import {Link, withRouter} from 'react-router-dom';
import auth0Client from '../utils/Auth';


function NavBar(props) {

    const logOut = () => {
        auth0Client.logOut();
        props.history.replace('/');
    };

    return(
        <nav className="navbar navbar-expand-lg navbar-dark bg-dark">
            <a href="#" className="navbar-brand"> Symfony React </a>
            <div className="collapse navbar-collapse" id="navbarText">
                <ul className="navbar-nav mr-auto">
                    <li className="nav-item">
                        <Link className={"nav-link"} to={"/"}>
                            {
                                !auth0Client.isAuthenticated() &&
                                <button className="btn btn-dark" onClick={auth0Client.logIn}>Sign In</button>
                            }
                            {
                                auth0Client.isAuthenticated() &&
                                <div>
                                    <label className="mr-2 text-white">{auth0Client.getProfile().name}</label>
                                    <button className="btn btn-dark" onClick={() => {logOut()}}>Sign Out</button>
                                </div>
                            }
                        </Link>

                    </li>
                    <li className="nav-item">
                        <Link className={"nav-link"} to={"/"}> Public Route </Link>
                    </li>

                    <li className="nav-item">
                        <Link className={"nav-link"} to={"/private"}> Protected Route </Link>
                    </li>
                </ul>
            </div>
        </nav>
    )
}
export default withRouter(NavBar);
You imported the auth0Client from a utils folder. This is a helper class that will be used to handle authentication for the frontend of this application. There will be more details about it in the next section.
The Auth Component
This component is an helper file that will help with the authentication flow. This will give the application a meaningful structure for authentication. Before you create this file, you will have to install a library provided by Auth0 to secure single page applications. It is called auth0-js and you can install it now using Yarn package manager:
yarn add auth0-js
Next, create a utils folder inside assets/js and create a new file named Auth.js inside of it. Once you are done, paste the code below in the newly created file:
// assets/js/utils/Auth.js

import auth0 from 'auth0-js';

class Auth {
    constructor() {
        this.auth0 = new auth0.WebAuth({
            domain: 'YOUR_AUTH0_DOMAIN',
            audience: 'http://localhost:8000/api',
            clientID: 'YOUR_CLIENT_ID',
            redirectUri: 'http://localhost:8000/callback',
            responseType: 'token id_token',
            scope: 'openid profile'
        });

        this.getProfile = this.getProfile.bind(this);
        this.handleAuthentication = this.handleAuthentication.bind(this);
        this.isAuthenticated = this.isAuthenticated.bind(this);
        this.logIn = this.logIn.bind(this);
        this.logOut = this.logOut.bind(this);
    }

    getProfile() {
        return this.profile;
    }

    getAccessToken() {
        return this.accessToken;
    }

    handleAuthentication() {
        return new Promise((resolve, reject) => {
            this.auth0.parseHash((err, authResult) => {
                if (err) return reject(err);
                if (!authResult || !authResult.idToken) {
                    return reject(err);
                }
                this.setSession(authResult);
                resolve();
            });
        })
    }

    setSession(authResult, step) {
        this.profile = authResult.idTokenPayload;
        this.accessToken = authResult.accessToken;
        this.expiresAt = authResult.expiresIn * 1000 + new Date().getTime();
    }

    isAuthenticated() {
        return new Date().getTime() < this.expiresAt;
    }

    logIn() {
        this.auth0.authorize();
    }

    logOut() {

        this.auth0.logout({
            returnTo: 'http://localhost:8000/logout',
            clientID: 'YOUR_CLIENT_ID',
        });
    }

    silentAuth() {
        return new Promise((resolve, reject) => {
            this.auth0.checkSession({}, (err, authResult) => {
                if (err) return reject(err);
                this.setSession(authResult);
                resolve();
            });
        });
    }
}

const auth0Client = new Auth();

export default auth0Client;
Here, you instantiated the auth0.WebAuth and included the required configuration from your Auth0 management dashboard. So far, you have a YOUR_CLIENT_ID and YOUR_AUTH0_DOMAIN, however, there are other configurations that you still need to include for your application to work properly.
To complete this, head back to your applications dashboard and click on the test application created by Auth0 as you did earlier in this post. This will by default opened the settings tab. Next, search for Allowed Callback URLs field and insert http://localhost:8000/callback in it. This is quite important as users of your application will only be redirected back to the endpoint specified for this field after authentication.
There are two important configuration properties to change before saving the changes. Look for these fields and insert the respective values:
Allowed Web Origins: add the followinghttp://localhost:8000and*Allowed Logout URLs*: This will be a log out endpoint that will be used to end user’s session on Auth0, so update the field withhttp://localhost:8000/logout
Note: Don’t forget to replace the
YOUR_CLIENT_IDandYOUR_AUTH0_DOMAINplaceholder with the appropriate credentials
Handling Public Resources
Next, open the publicResources.js file and use the content below for it:
// assets/js/components/publicResources.js

import React, {Component} from 'react';
import {withRouter} from 'react-router-dom';
import { Card, CardText, CardBody,CardTitle, Container,Row, Col, Badge  } from 'reactstrap';
import axios from 'axios';

class FetchResourcePublic extends Component {

    constructor(props) {
        super(props);
        this.state = {
            publicResources: null,
        };
        this.fetchPublicResources = this.fetchPublicResources.bind(this);
    }

    componentWillMount() {
        this.fetchPublicResources();
    }

    fetchPublicResources() {
        if (!this.state.publicResources) {
            axios.get('http://localhost:8000/api/public').then(res => {
                    this.setState({publicResources: res.data});
                })
        }
    }


    viewPrivateResources = () => {
        this.props.history.push('/private');
    }

    render() {
        return (
            <Container style={{marginTop:50}}>
                <h4 className={'text-center'}> This is a public page. You don't need to be authenticated  </h4>
                {this.state.publicResources &&
                    <Row style={{marginTop:40}}>
                        {this.state.publicResources.map(data =>
                            <Col xs="4" id={data.id} key={data.id}>
                                <Card>
                                    <CardBody>
                                        <CardTitle>{data.title}</CardTitle>
                                        <span> Album ID:  <Badge color="info" pill>{data.albumId}</Badge></span>
                                        <CardText>{data.description}</CardText>
                                    </CardBody>
                                </Card>
                            </Col>
                        )}
                    </Row>
                }
                <div className={'row text-center'} style={{marginTop:40}}>
                    <button
                        className={"btn btn-success text-center"}
                        onClick={() => {this.viewPrivateResources()}}
                    >
                       Click here to log in and access private resources
                    </button>
                </div>
            </Container>
        )
    }
}
export default withRouter(FetchResourcePublic);
The component file above is responsible for fetching resources from the http://localhost:8000/api/public endpoint once the page is fully loaded and displayed it to the users. There is no need to check if the user accessing this endpoint is an authenticated user as it is a public route.
In the next section, you will set up the privateResources components.
Handling Private Resources
To set up this component, open the privateResources.js file created earlier and paste the following content in it:
// assets/js/components/privateResources.js

import React, {Component} from 'react';
import {withRouter} from 'react-router-dom';
import { Card, CardText, CardBody,CardTitle, Container,Row, Col, Badge  } from 'reactstrap';
import axios from 'axios';
import auth0Client from '../utils/Auth';

class FetchResourcePrivate extends Component {

    constructor(props) {
        super(props);
        this.state = {
          privateResources: null,
          isLoading: null
        };
        this.fetchPrivateResources = this.fetchPrivateResources.bind(this);
    }

    componentWillMount() {
        this.fetchPrivateResources();
    }


    fetchPrivateResources () {
        if (!this.state.privateResources) {
            this.setState({ isLoading: true});
            axios.get('http://localhost:8000/api/private', {
                    headers: {'authorization': `Bearer ${auth0Client.getAccessToken()}`}
                }
            ).then(res => { this.setState({privateResources: res.data, isLoading: false}); })
        }
    }

    viewPublicResources() {
        this.props.history.push('/');
    }

    render() {
        return (

            <Container style={{marginTop:50}}>

                <h4 className={'text-center'}> Can only be viewed by Authenticated Users  </h4>

                {this.state.isLoading &&
                <span> Loading... </span>
                }

                {this.state.privateResources &&
                <Row style={{marginTop:40}}>
                    {this.state.privateResources.map(data =>
                        <Col xs="4" id={data.id} key={data.id}>
                            <Card>
                                <CardBody>
                                    <CardTitle>{data.title}</CardTitle>
                                    <span> Album ID:  <Badge color="info" pill>{data.albumId}</Badge></span>
                                    <CardText>{data.description}</CardText>
                                </CardBody>
                            </Card>
                        </Col>
                    )}
                </Row>
                }
                <div className={'row text-center'} style={{marginTop:40}}>
                    <button
                        className={"btn btn-success text-center"}
                        onClick={() => {this.viewPublicResources()}}
                    >
                        Click here to view the public resources
                    </button>
                </div>
            </Container>
        )
    }
}

export default withRouter(FetchResourcePrivate);
This file is responsible for fetching resources from the http://localhost:8000/api/private endpoint and unlike the public endpoint, it requires that a user with the right authorization can only be allowed to view its contents.
Here within the fetchPrivateResources() method, an authorization header containing the Bearer token was passed alongside the HTTP request. Without the bearer token, the request will be denied as it is being expected by your Symfony API.
Add a Callback Component
This component will be activated once the /callback endpoint is called. The /callback endpoint would normally be called only when a user has been authenticated on Auth0 and redirected back to your application. You will still need to import and make use of the Auth helper class created earlier for authentication within this component. Open callback.js file within assets/js/components folder and paste the following code:
// assets/js/components/Callback.js

import React, { Component } from 'react';
import { withRouter } from 'react-router-dom';
import auth0Client from '../utils/Auth';


class Callback extends Component {
    async componentDidMount() {
        await auth0Client.handleAuthentication();
        this.props.history.replace('/');
    }

    render() {
        return (
            <p>Loading profile...</p>
        );
    }
}

export default withRouter(Callback);
Auth0 will redirect back to your application once a user is authenticated and call the /callback route. This will come with an id_token as well as the access_token for the particular request.
Secure the protected route
To secure the protected route and ensured that only authenticated users could access it, you wrapped it The file for this component has been created earlier. It can be found in assets/js/components/SecuredRoute.js. Open it and insert the following content:
// assets/js/components/SecuredRoute.js

import React from 'react';
import {Route} from 'react-router-dom';
import auth0Client from '../utils/Auth';

function SecuredRoute(props) {
    const {component: Component, path} = props;
    return (
        <Route path={path} render={() => {
            if (!auth0Client.isAuthenticated()) {
                auth0Client.logIn();
                return <div></div>;
            }
            return <Component />
        }} />
    );
}

export default SecuredRoute;
Modify the App component
You need to make little modification to the AppComponent for the application. To do that, open assets/js/app.js and update as shown here:
// assets/js/app.js

import React, { Component } from 'react';
import ReactDom from 'react-dom';
import { BrowserRouter } from 'react-router-dom';
import Home from "./components/Home";

class App extends Component {
    render() {
        return (
            <BrowserRouter>
                <div>
                    <Home/>
                </div>
            </BrowserRouter>
        )
    }
}

ReactDom.render(<App />, document.getElementById('root'));
Creating the Default Controller
Finally, before you test the application head back to your Symfony application and use the maker:bundle to create a default controller for the application. This new controller will be responsible for rendering the pages. Run the following command for that purpose:
php bin/console make:controller DefaultController
This will create a new file named DefaultController.php within /src/Controller and a template file within /templates/default/index.html.twig.
First, open the DefaultController.php file and edit as shown below:
// src/Controller/DefaultController.php

<?php
namespace App\Controller;

use Symfony\Bundle\FrameworkBundle\Controller\AbstractController;
use Symfony\Component\Routing\Annotation\Route;

class DefaultController extends AbstractController
{
    /**
     * @Route("/{reactRouting}", name="home", defaults={"reactRouting": null})
     */
    public function index()
    {
        return $this->render('default/index.html.twig');
    }
}
What you have done differently from a typical Symfony controller is the addition of a parameter (reactRouting) to the URL within the controller. This included parameter will allow React router to control routing within the application and stop Symfony from intercepting the route.
Rendering the React application
Locate the template for the default controller within templates/default/index.html.twig and paste the following:
{% extends 'base.html.twig' %}
{% block title %} Symfony Auth0 API {% endblock %}
{% block body %}
<div>
    <div id="root"></div>
</div>
{% endblock %}
This is the template file that will render the React application within Symfony.
Updating the Base template
Navigate to templates/base.html.twig and update it with the following code:
// templates/base.html.twig

<!DOCTYPE html>
<html>
<head>
    <meta charset="UTF-8">
    <title>{% block title %}Welcome!{% endblock %}</title>
    {% block stylesheets %}{% endblock %}
    <link rel="stylesheet" href="https://maxcdn.bootstrapcdn.com/bootstrap/4.0.0/css/bootstrap.min.css" integrity="sha384-Gn5384xqQ1aoWXA+058RXPxPg6fy4IWvTNh0E263XmFcJlSAwiGgFAW/dAiS6JXm"
              crossorigin="anonymous">
    <link href="https://maxcdn.bootstrapcdn.com/font-awesome/4.7.0/css/font-awesome.min.css" rel="stylesheet">
 </head>
<body>
{% block body %}{% endblock %}
{% block javascripts %}
    {{ encore_entry_script_tags('app') }}
{% endblock %}
</body>
</html>
What you have done here is to include a CDN file for Bootstrap, Font Awesome and the file for React as compiled by Webpack Encore.
Running your React and Symfony App
You can now run the application to test the functionality. First, start Symfony application by opening the terminal from within your project directory in case you have closed it already:
php bin/console server:run
Next, open another terminal and run the following command to compile the React application and watch the JavaScript files for any changes:
yarn encore dev --watch
Navigate to http://localhost:8000 to see the application.
Conclusion
This tutorial gives you an understanding of how to successfully craft an application that combines both Symfony and React together as a single project. This eliminates the worries about CORS (Cross-Origin Resource Sharing) as you can easily run the application from a single domain.
As shown here in this post, you have learned how to create APIs within Symfony application and integrate it with an API created on Auth0. You went further to learn how to properly secure your application by leveraging on Auth0’s API and application configuration services.
A modern single page application like what you have built in this post always requires the right tools in order to work properly by combining several components. Thanks to Auth0, you now have a more secured Symfony backend API with a secured React frontend. I hope you found this tutorial helpful.
Please Feel free to share your thoughts and questions in the comment section below.
About the author

Olususi Oluyemi
Software Engineer / Technical Content Creator