
TL;DR: In today's post, we are going to learn how to develop RESTful APIs with Kotlin, the thriving programming language that is eating Java's world. We will start by creating a small Spring Boot RESTful API that handles CRUD operations. After that we are going to secure this API with Auth0, which brings to the table many security features such as Multifactor Authentication, integration with Social Providers, and so on. In the end, we will also see how to manage the JWTs by ourselves, replacing Auth0 with an in-house solution where we issue our own tokens.
What is Kotlin
Kotlin is a programming language, developed by JetBrains, that runs on Java Virtual Machines (JVMs) and that can also be compiled to JavaScript. This programming language is statically typed, which means that variables, functions, and expressions use predefined sets of types that can be checked on compile time.
One of its main goals is to solve the problems that comes along with Java. For example, compared to Java, a software written in Kotlin is expected to have roughly 40% less lines of code, while still being able to interoperate with the rich set of libraries available for Java.
How Kotlin Differs from Java
First of all, the syntax. Kotlin's syntax is somewhat similar to Java's, but there are many differences. JetBrains states that Java developers will have an smooth learning curve when migrating to Kotlin. Although this might be true, becoming a Kotlin developer and writing idiomatic code in this new language is not that straightforward.
If you start studying Kotlin's specifics, you will note that Kotlin is an advanced programming language with a glossary of its own. For example, Kotlin has features like data classes, sealed classes, inline functions, and more. Most of these features can be mirrored in Java, but not without writing some pretty verbose code. Therefore, writing true idiomatic Kotlin source code is not as easy as JetBrains wants you to believe.
But fear not, JetBrains developed some tools to help developers translate Java source code to Kotlin. The Try Kotlin's website has a button labeled Convert from Java that one can paste some Java code and get Kotlin's version back. Besides that, IntelliJ IDEA also has some features that enables developers to perform these conversions.
Learning Kotlin
If you have never used Kotlin before, you can still follow along with this blog post. But it will do you no harm to study the language a little before. The following list contains some resources where you can learn Kotlin:
- Kotlin Reference: where the details of Kotlin's syntax are explained
- Try Kotlin: where you can do some hands-on exercises to learn Kotlin
- Kotlin in Action: if you want to dive deep into this new language
If you already have some experience with Kotlin or are just wondering if developing a simple RESTful API will be easy, read on.
Starting a Spring Boot Kotlin Application
Spring Initializr is a great way to start a Spring Boot application, and they already added Kotlin as one of the options for the chosen programming language (there are three available at the time of writing: Java, Kotlin, and Groovy). This website easily allows us to select what other libraries we want in our application. However, for the sake of simplicity, we will start by cloning this GitHub repository that I have prepared for this article, and then we are going to evolve from it.
git clone https://github.com/auth0-blog/kotlin-spring-boot/
cd kotlin-spring-boot
This startup project already comes with Spring Data JPA and HSQLDB. Together, these features will hold a set of customers that our API is going to allow users to manage. Our job will be just to create the Customer entity model that represents the customers, a CustomerRepository interface to handle the persistence layer, and a CustomerController class that will define the RESTful endpoints.
Creating a Kotlin Data Class
As already mentioned, one of Kotlin's best features is that it's a very concise programming language. Most of the boilerplate code that Java developers are used to—like getters, setters, equals, and hashCode—were dropped in favor of a succinct syntax. Well, actually dropped is not the correct term here. Methods like equals and hashCode are automatically derived by the compiler, but one can still explicitly define them if needed.
As the idea of our RESTful API is to enable users to manage a set of customers, our Kotlin Data Class is going to be called Customer. Let's start by creating a new directory called model in the src/main/kotlin/com/auth0/samples/kotlinspringboot/ directory, and then let's add a file called Customer.kt in it with the following source code:
package com.auth0.samples.kotlinspringboot.model

import javax.persistence.Entity
import javax.persistence.Id
import javax.persistence.GenerationType
import javax.persistence.GeneratedValue

@Entity
class Customer(
  @Id @GeneratedValue(strategy = GenerationType.AUTO)
  var id: Long = 0,
  var firstName: String = "",
  var lastName: String = ""
)
Note that, differently from Java, we defined the basic properties of the Customer class embraced in parentheses after the class declaration. In Kotlin, this is called a primary constructor. We could define these properties in the class's body, and we could also define other constructors as well, but for our case this is enough. Also note that we have added two annotations, @Id and @GeneratedValue, to the id property. This syntax is identical to Java's syntax.
Creating a Repository for Customer
The CustomerRepository interface that we are going to create will be very similar to what we would do on a regular Java Spring Boot application. To keep things organized, let's first create a directory called persistence in the src/main/kotlin/com/auth0/samples/kotlinspringboot/ directory. In this new directory, we are going to create a file called CustomerRepository.kt and add the following code:
package com.auth0.samples.kotlinspringboot.persistence

import com.auth0.samples.kotlinspringboot.model.Customer
import org.springframework.data.repository.CrudRepository

interface CustomerRepository : CrudRepository<Customer, Long>
This interface has everything that we need to interact with the HSQLDB in-memory database that our project has. With it, we can save, delete, findAll, and do a lot more. Take a look at this resource if you need more info about the CrudRepository interface that we just extended.
Defining Customer RESTful Endpoints
The RESTful endpoints that will handle user requests is also going to be similar to its Java counterpart, a little bit more succinct, but still pretty familiar for Java developers. You may also note that the import statements haven't changed. Although they are quite verbose, in my opinion this is a good thing. Like that, one can easily identify where a dependency comes from.
To create our class, let's start by creating a controller directory in the src/main/kotlin/com/auth0/samples/kotlinspringboot/ directory. After that, let's create a file called CustomerController.kt in this new directory and add the following code:
package com.auth0.samples.kotlinspringboot.controller

import com.auth0.samples.kotlinspringboot.model.Customer
import com.auth0.samples.kotlinspringboot.persistence.CustomerRepository
import org.springframework.web.bind.annotation.DeleteMapping
import org.springframework.web.bind.annotation.GetMapping
import org.springframework.web.bind.annotation.PathVariable
import org.springframework.web.bind.annotation.PostMapping
import org.springframework.web.bind.annotation.PutMapping
import org.springframework.web.bind.annotation.RequestBody
import org.springframework.web.bind.annotation.RequestMapping
import org.springframework.web.bind.annotation.RestController

@RestController
@RequestMapping("/customers")
class CustomerController(val repository: CustomerRepository) {

    @GetMapping
    fun findAll() = repository.findAll()

    @PostMapping
    fun addCustomer(@RequestBody customer: Customer)
            = repository.save(customer)

    @PutMapping("/{id}")
    fun updateCustomer(@PathVariable id: Long, @RequestBody customer: Customer) {
        assert(customer.id == id)
        repository.save(customer)
    }

    @DeleteMapping("/{id}")
    fun removeCustomer(@PathVariable id: Long)
            = repository.delete(id)

    @GetMapping("/{id}")
    fun getById(@PathVariable id: Long)
            = repository.findOne(id)
}
The source code of this class is pretty self-explanatory, but for the sake of completeness here is an explanation of it:
@RequestMapping("/customers")annotation declares that all endpoints in this class will have the/customersprefix.@GetMappingannotation definesfindAllas the method responsible for handling HTTP GET requests to/customer.@PostMappingannotation definesaddCustomeras the method responsible for handling HTTP POST requests to/customers. Also, this method accepts a JSON version of customer and deserialize it to ourCustomerclass automatically.@PutMapping("/{id}")annotation definesupdateCustomeras the method responsible for handling HTTP PUT requests to/customers. This method also accepts aCustomeras the body of the request. The difference between the put and post methods is that put expects the request path to have an{id}of the Customer to be updated.@DeleteMapping("/{id}")annotation definesremoveCustomeras the method responsible for handling HTTP DELETE requests to/customers.{id}, in this case, defines the id of the customer to be deleted.@GetMapping("/{id}")annotation definesgetByIdas the method responsible for handling HTTP GET requests to/customer/{id}, where{id}defines which customer will be serialized as a response.
And that's it. We have now our first Kotlin RESTful API, backed by Spring Boot. If you want to play with it, type mvn spring-boot:run in the root directory of the application and Spring Boot will startup. After that, you can use the following commands to interact with the API:
# adds a new customer
curl -H "Content-Type: application/json" -X POST -d '{
    "firstName": "Bruno",
    "lastName": "Krebs"
}'  http://localhost:8080/customers

# retrieves all customers
curl http://localhost:8080/customers

# updates customer with id 1
curl -H "Content-Type: application/json" -X PUT -d '{
    "id": 1,
    "firstName": "Bruno",
    "lastName": "Simões Krebs"
}'  http://localhost:8080/customers/1

# deletes customer with id 1
curl -X DELETE http://localhost:8080/customers/1
If anything went wrong, you can compare your source code with the customers branch in the GitHub repository.
Securing Kotlin RESTful APIs with Auth0
As you will see, securing our API with Auth0 is very easy and brings a lot of great features to the table. With Auth0, we have to write just a few lines of code to get a solid identity management solution, including single sign-on, user management, support for social identity providers (like Facebook, GitHub, Twitter, etc.), enterprise (Active Directory, LDAP, SAML, etc.), and your own database of users.
For starters, if you haven't done so yet, this is a good time to sign up for a free Auth0 account. Having an Auth0 account, the first thing that we must do is to create a new API on the dashboard. An API is an entity that represents an external resource, capable of accepting and responding to protected resource requests made by clients. And this is exactly what the Kotlin app that we just built is, an API.
Auth0 offers a generous free tier to get started with modern authentication.
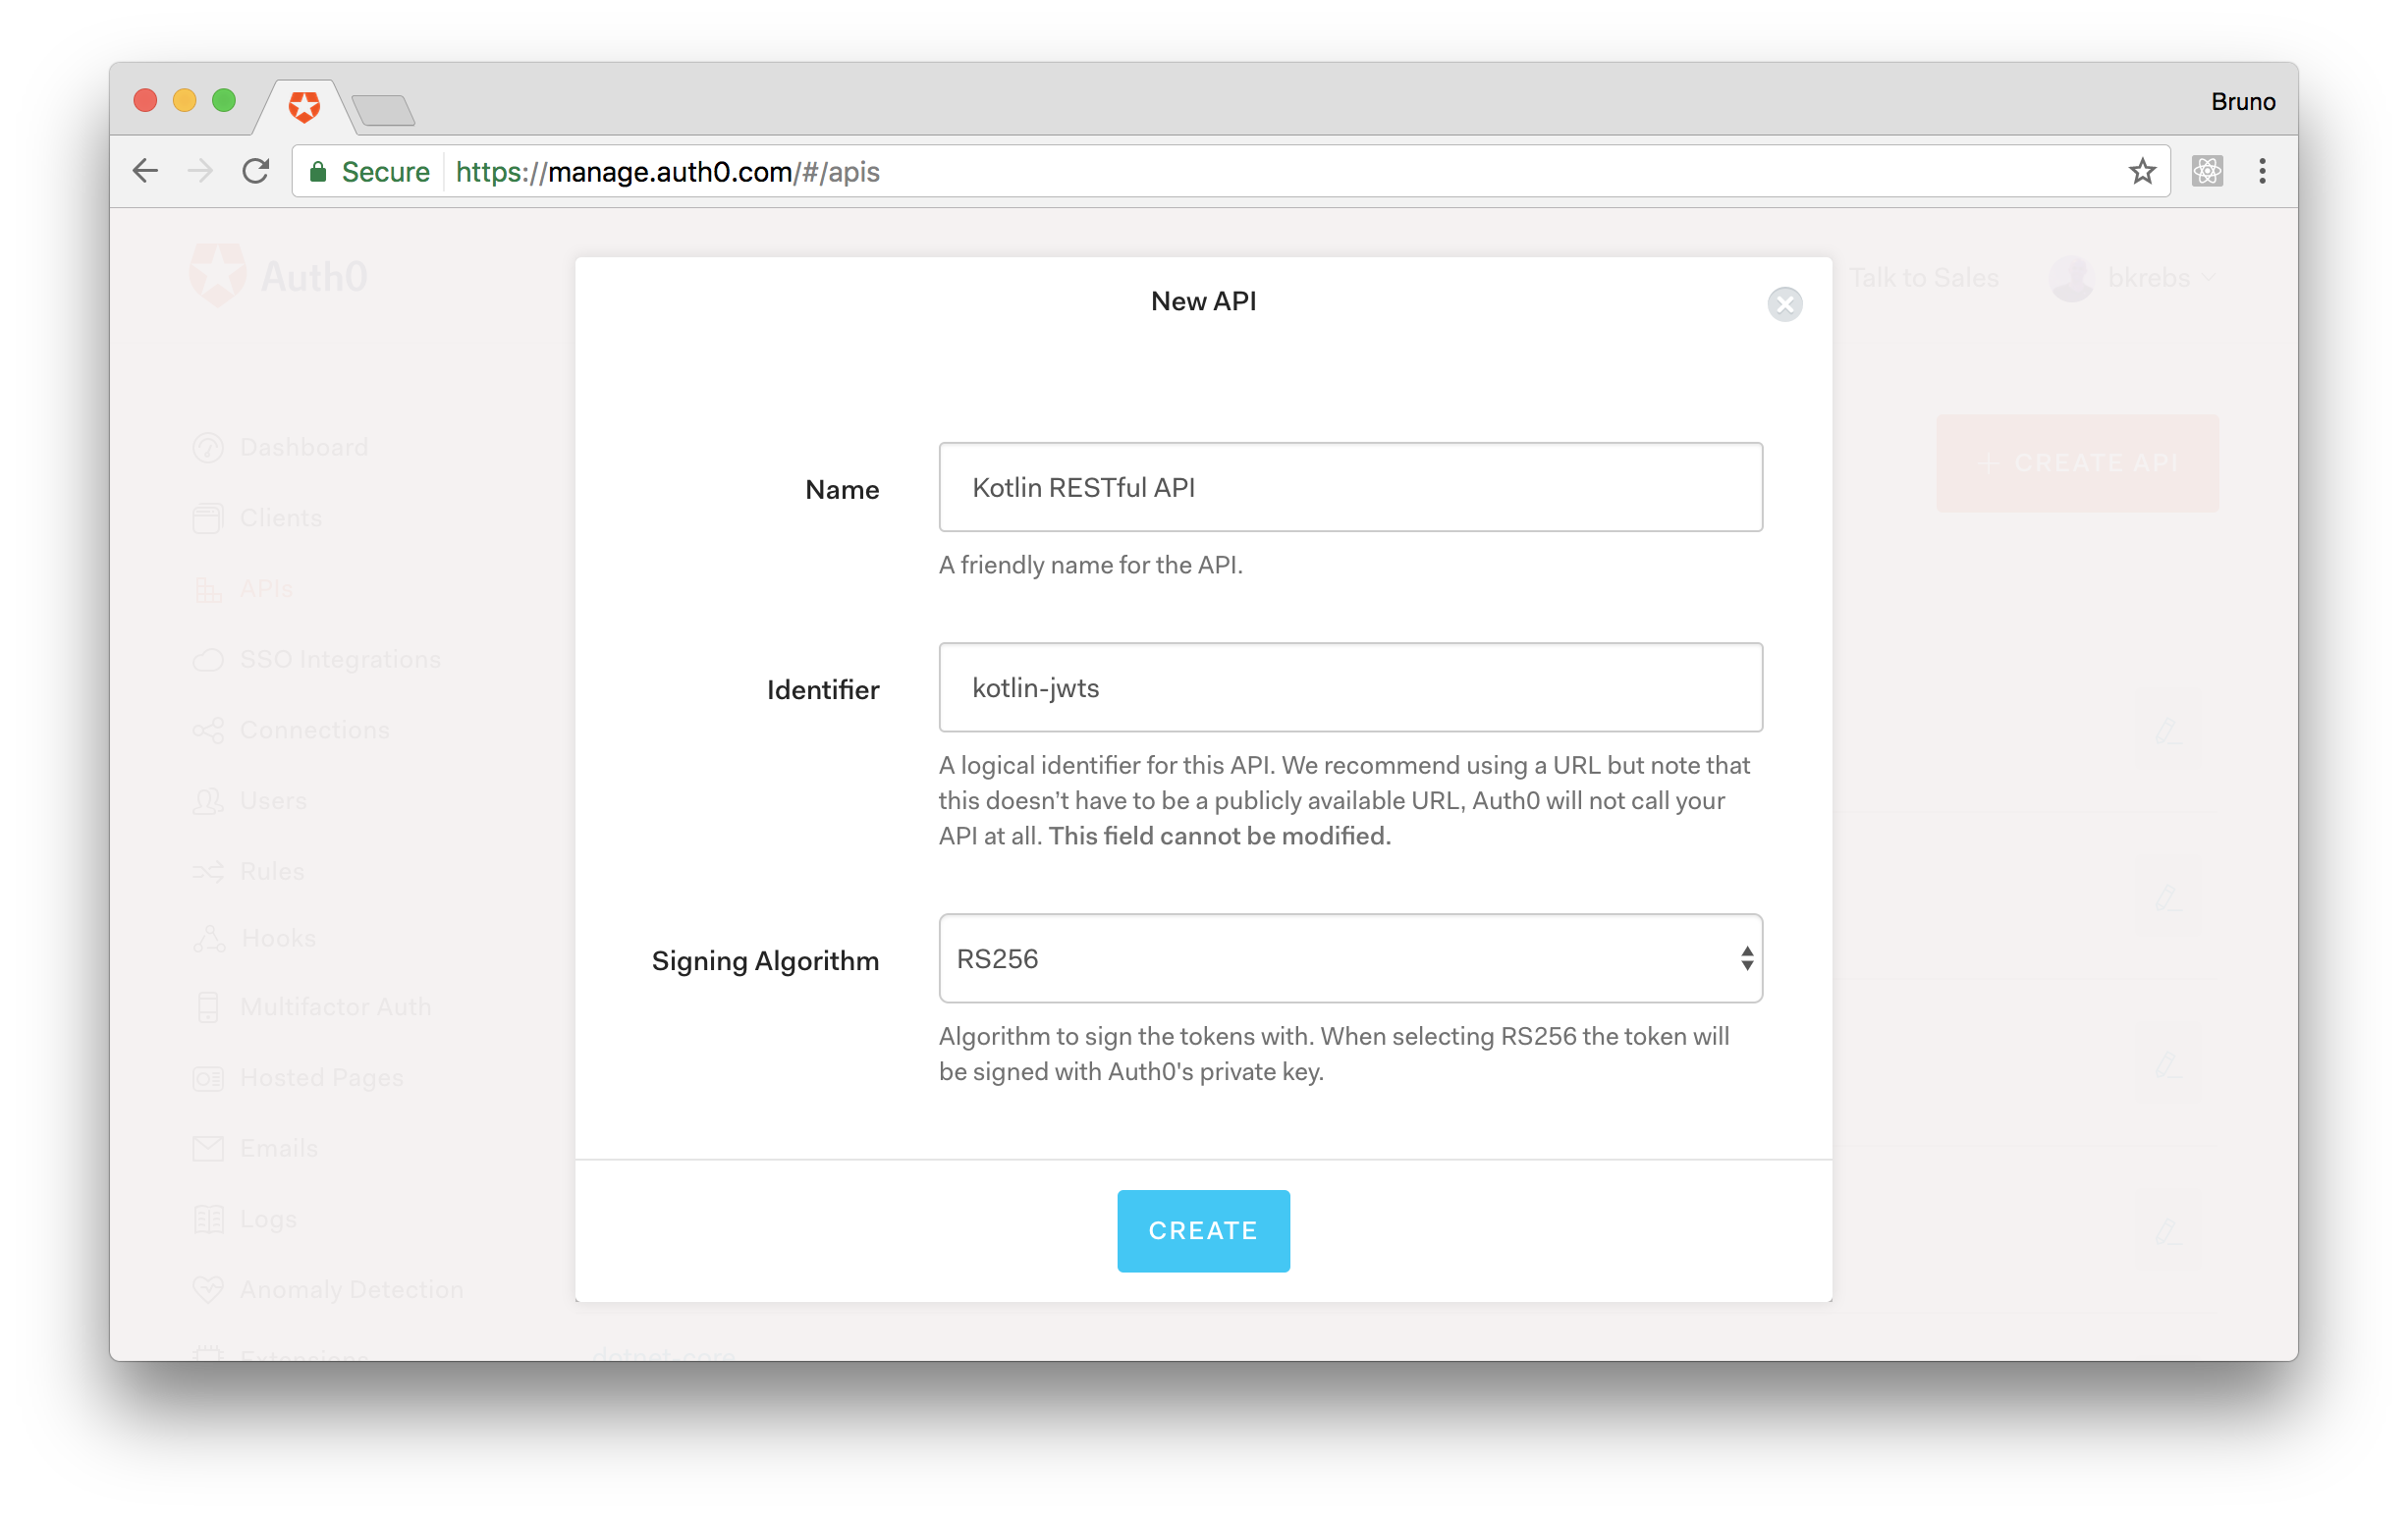
When creating an API, we must define three fields: Name, which is just a friendly name for our new API; Identifier, which is a String that we will use when requesting an access_token; and the Signing Algorithm, which defines if this API will use a symmetric or asymmetric algorithm to sign the access_token. In our case, we will fill these fields, respectively, with: Kotlin RESTful API; kotlin-jwts; and RS256 (i.e. we will use an asymmetric algorithm).
Auth0 supports different OAuth 2.0 flows to request access tokens. In our particular case, to keep the example simple, we are going to use the APIs & Trusted Clients flow. Keep in mind that this flow, although being the easiest one to implement, must be used only when the client app is absolutely trusted. Most situations will require other flows, and the "Which OAuth 2.0 flow should I use?" article on Auth0 can help with choosing the best approach for your needs.
To use the APIs & Trusted Clients flow, we must first configure the Default Directory property on our Auth0 account. To do so, head to the Account settings page and add Username-Password-Authentication as the value of the Default Directory property. This value is the name of the database connection that comes by default on any Auth0 account.
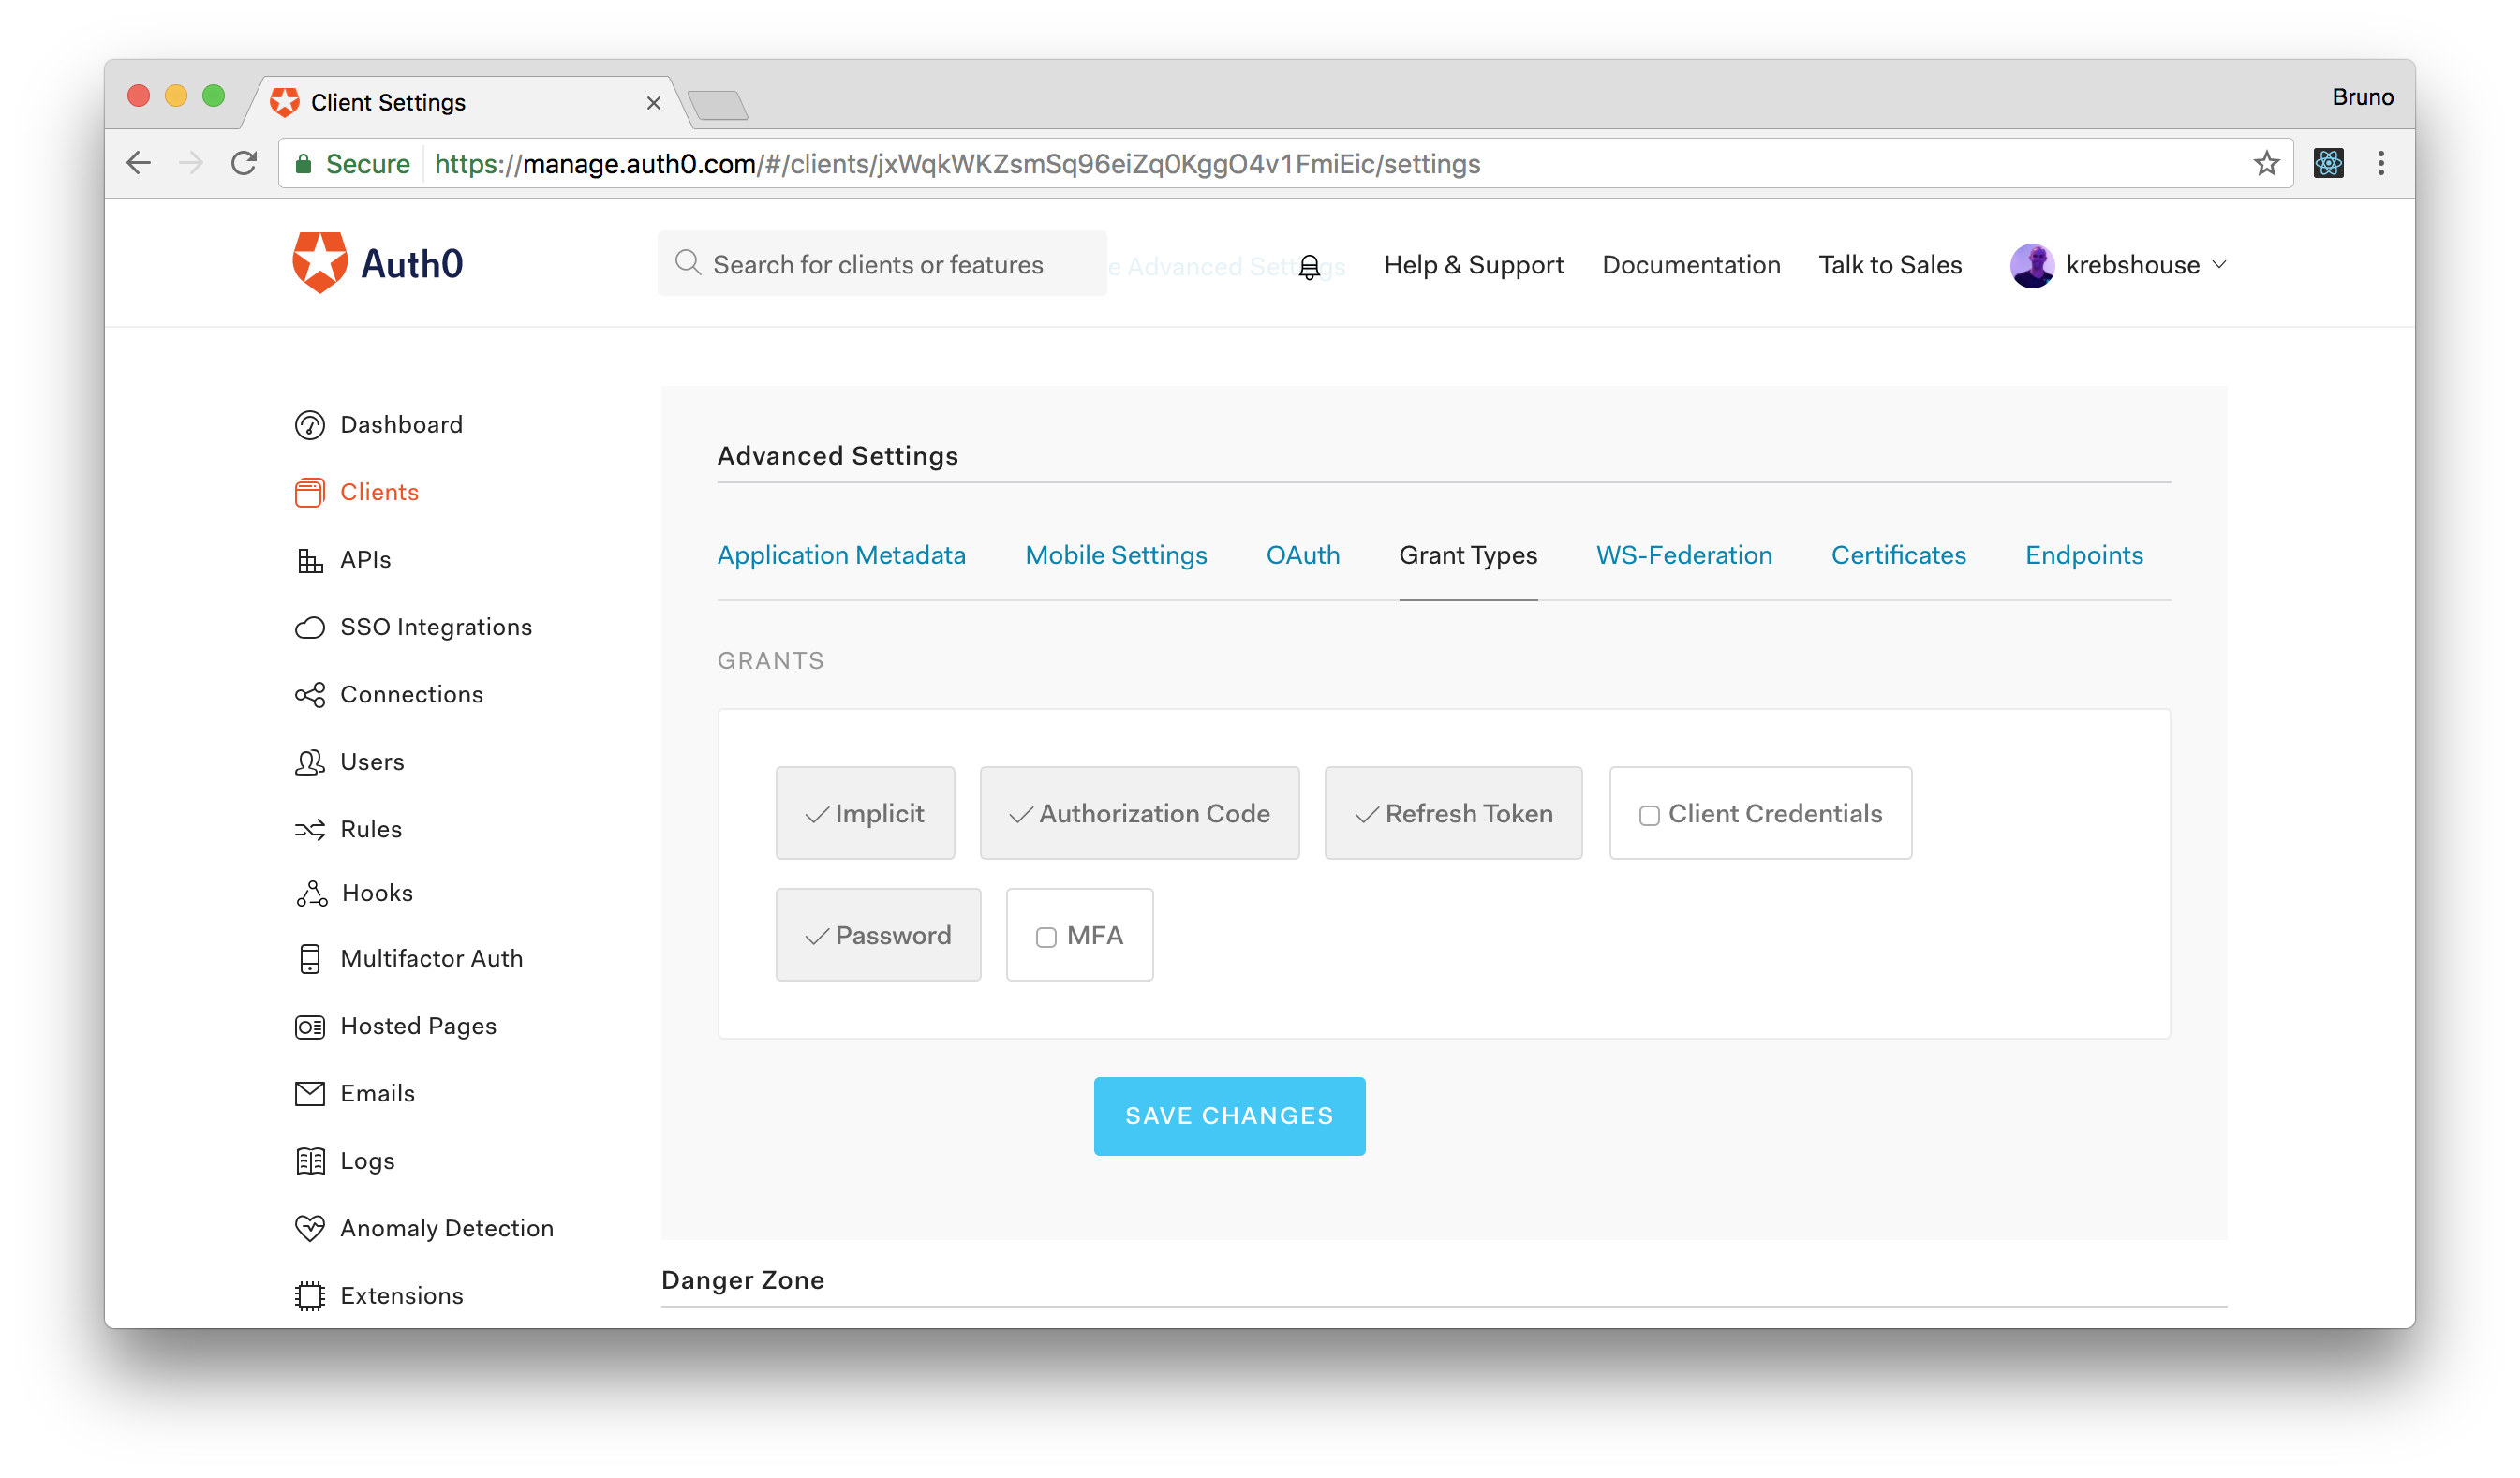
We also need to enable the Password grant type on the client. If we created the API as explained above, Auth0 will have automatically created a client called Kotlin RESTful API (Test Client). Accessing its settings, we can click on the Show Advanced Settings option, check Password on the Grant Types tab and save the change.
Changing the Code
Under ./src/main/resources, there is a file called application.properties. This file needs to be populated with data from our Auth0 account. By default, when creating a new account we get a "Default App", which could be used for this. These are the important parts of that config, so remember to replace the values with the values of your application:
# this is the identifier of the API that we just created
auth0.audience=kotlin-jwts
# replace YOUR-DOMAIN to get something like https://bkrebs.auth0.com/
auth0.issuer=https://YOUR-DOMAIN.auth0.com/
Before we jump into the code, we need to add three dependencies to our Maven configuration:
<dependency>
  <groupId>org.springframework.boot</groupId>
  <artifactId>spring-boot-starter-security</artifactId>
</dependency>

<dependency>
  <groupId>com.auth0</groupId>
  <artifactId>auth0</artifactId>
  <version>1.1.0</version>
</dependency>

<dependency>
  <groupId>com.auth0</groupId>
  <artifactId>auth0-spring-security-api</artifactId>
  <version>1.0.0-rc.2</version>
</dependency>
Once we've done this, let's create a file called WebSecurityConfig.kt, under the src/main/kotlin/com/auth0/samples/kotlinspringboot/ directory, with the following source code:
package com.auth0.samples.kotlinspringboot.security

import org.springframework.context.annotation.Bean
import org.springframework.context.annotation.Configuration
import org.springframework.http.HttpMethod
import org.springframework.security.config.annotation.authentication.builders.AuthenticationManagerBuilder
import org.springframework.security.config.annotation.web.builders.HttpSecurity
import org.springframework.security.config.annotation.web.configuration.EnableWebSecurity
import org.springframework.security.config.annotation.web.configuration.WebSecurityConfigurerAdapter
import org.springframework.security.core.userdetails.UserDetailsService
import org.springframework.security.crypto.bcrypt.BCryptPasswordEncoder
import com.auth0.spring.security.api.JwtWebSecurityConfigurer
import org.springframework.beans.factory.annotation.Value


@Configuration
@EnableWebSecurity
open class WebSecurity : WebSecurityConfigurerAdapter() {

    @Value("${auth0.audience}")
    private val audience: String? = null

    @Value("${auth0.issuer}")
    private val issuer: String? = null

    @Throws(Exception::class)
    override fun configure(http: HttpSecurity) {
        http.authorizeRequests()
                .anyRequest().authenticated()

        JwtWebSecurityConfigurer
                .forRS256(audience, issuer!!)
                .configure(http)
    }
}
And that's it. This is everything that we need to do to use Auth0 with our Kotlin Spring Boot RESTful API. To test our application's security, let's re-run the application:
mvn spring-boot:run
Before getting an access token to issue requests to our API, we first need to create a new user on Auth0. To do that we have to issue a POST request to the /dbconnections/signup endpoint. This request requires a Content-Type header with application/json following JSON body:
curl -H "Content-Type: application/json" -X POST -d '{
 "client_id": "hfs2Au7Zka9XYbXs0CRpdmaL33IKy4mA",
 "email": "user@test.com",
 "password": "123123",
 "connection": "Username-Password-Authentication"
}' https://bkrebs.auth0.com/dbconnections/signup

# response:
# {"_id":"xxx","email_verified":false,"email":"user123@test.com"}
After that, we can get the access_token by issuing a POST request to https://YOUR-DOMAIN.auth0.com/oauth/token. This request must also contain a JSON object in the body and the Content-Type header:
curl -H "Content-Type: application/json" -X POST -d '{
 "grant_type":"password",
 "username": "user@test.com",
 "password": "123123",
 "audience": "kotlin-jwts",
 "client_id": "hfs2Au7Zka9XYbXs0CRpdmaL33IKy4mA",
 "client_secret": "Hx4eFNAT8TI2TUVDXhxWDJ8vWpZxt79DQYUl7e178Uw0ASfc7eY42zPf2H-Gv1n1"
}' https://bkrebs.auth0.com/oauth/token

# response:
# {"access_token":"xxx.yyy.zzz","expires_in":86400,"token_type":"Bearer"}
Note that the client_id and client_secret properties, on both requests, must be changed accordingly. Their values can be found in the Kotlin RESTful API (Test Client) client that Auth0 created for us. Head to the Clients page to get them.
Issuing this last request will give us an access_token. From now on, we will use this token in the header of the requests that we will send to our Kotlin API. Therefore, if we query our endpoints with this access_token, we will be able to manage the set of customers again.
# no token = no access:
curl http://localhost:8080/customers

# token = access
curl -H "Authorization: Bearer xxx.yyy.zzz" http://localhost:8080/customers
“Securing Kotlin RESTful APIs is easy with Auth0”
Tweet This
Securing Kotlin with a Home Made Solution
If, for whatever reason, we prefer not to have a RESTful API as secure as we would have with Auth0, we would have to proceed as explained in this section. First, we would need to remove Auth0's dependencies from pom.xml:
<dependency>
  <groupId>com.auth0</groupId>
  <artifactId>auth0</artifactId>
  <version>1.1.0</version>
</dependency>

<dependency>
  <groupId>com.auth0</groupId>
  <artifactId>auth0-spring-security-api</artifactId>
  <version>1.0.0-rc.2</version>
</dependency>
After that, we could also remove the two properties that we've added to the application.properties file, as they won't be used anymore. Then, to issue and validate JWTs, we would need to add the following Maven dependency:
<dependency>
    <groupId>io.jsonwebtoken</groupId>
    <artifactId>jjwt</artifactId>
    <version>0.7.0</version>
</dependency>
Handling Users
To support multiple users in our API, we will first create three classes: ApplicationUser.kt, ApplicationUserRepository.kt, and SignUpController.kt. These classes will behave pretty much like the classes that support customers' management. The first class, ApplicationUser.kt class, will be created in the model package and will contain the following code:
package com.auth0.samples.kotlinspringboot.model

import javax.persistence.Entity
import javax.persistence.GeneratedValue
import javax.persistence.GenerationType
import javax.persistence.Id

@Entity
class ApplicationUser(
        @Id @GeneratedValue(strategy = GenerationType.AUTO)
        var id: Long = 0,

        var username: String = "",

        var password: String = ""
)
Nothing new over here. Just another data class that holds users' properties. After that, we will create the ApplicationUserRepository.kt class in the persistence package with the following code:
package com.auth0.samples.kotlinspringboot.persistence

import com.auth0.samples.kotlinspringboot.model.ApplicationUser
import org.springframework.data.repository.CrudRepository

interface ApplicationUserRepository : CrudRepository<ApplicationUser, Long> {
    fun findByUsername(username: String): ApplicationUser?
}
In this case, the only difference when compared to CustomerRepository is that we defined a method called findByUsername. This method will be used by our homegrown solution to find users by their usernames. Now the last class, SignUpController.kt, will be created in the controller package with the following code:
package com.auth0.samples.kotlinspringboot.controller

import com.auth0.samples.kotlinspringboot.model.ApplicationUser
import com.auth0.samples.kotlinspringboot.persistence.ApplicationUserRepository
import org.springframework.security.crypto.bcrypt.BCryptPasswordEncoder
import org.springframework.web.bind.annotation.PostMapping
import org.springframework.web.bind.annotation.RequestBody
import org.springframework.web.bind.annotation.RequestMapping
import org.springframework.web.bind.annotation.RestController

@RestController
@RequestMapping("/sign-up")
class SignUpController(val applicationUserRepository: ApplicationUserRepository, val bCryptPasswordEncoder: BCryptPasswordEncoder) {

    @PostMapping
    fun signUp(@RequestBody applicationUser: ApplicationUser) {
        applicationUser.password = bCryptPasswordEncoder.encode(applicationUser.password)
        applicationUserRepository.save(applicationUser)
    }
}
The only endpoint defined in this controller is the signUp one, which allows new users to register in our application. The sign in process and token validation will be handled in a different area, as we will see soon. Note that to keep our users' password secure even in an eventual data breach, we have used the BCryptPasswordEncoder class, that comes along with Spring Security, to encode all passwords.
Issuing and Validating JWTs with Kotlin
Now that we have our User data class mapped and an endpoint to allow new users to register themselves, we need to allow these users to sign in and also validate JWTs before enabling them to interact with our API. To achieve this, we will create two filters and one class: JWTAuthenticationFilter, JWTAuthorizationFilter, and UserDetailsServiceImpl. The first filter, which will be responsible for the sign in feature, will be created in a new directory file called JWTAuthenticationFilter.kt in the same package as the WebSecurity class. This file will have the following source code:
package com.auth0.samples.kotlinspringboot

import com.auth0.samples.kotlinspringboot.model.ApplicationUser
import com.fasterxml.jackson.databind.ObjectMapper
import io.jsonwebtoken.Jwts
import io.jsonwebtoken.SignatureAlgorithm
import org.springframework.security.authentication.AuthenticationManager
import org.springframework.security.authentication.UsernamePasswordAuthenticationToken
import org.springframework.security.core.Authentication
import org.springframework.security.core.AuthenticationException
import org.springframework.security.core.GrantedAuthority
import org.springframework.security.core.userdetails.User
import org.springframework.security.web.authentication.UsernamePasswordAuthenticationFilter
import java.io.IOException
import java.util.Date
import javax.servlet.FilterChain
import javax.servlet.ServletException
import javax.servlet.http.HttpServletRequest
import javax.servlet.http.HttpServletResponse


class JWTAuthenticationFilter(authManager: AuthenticationManager) : UsernamePasswordAuthenticationFilter() {
    init {
        authenticationManager = authManager
    }

    @Throws(AuthenticationException::class, IOException::class, ServletException::class)
    override fun attemptAuthentication(
            req: HttpServletRequest, res: HttpServletResponse): Authentication {
        val creds = ObjectMapper()
                .readValue(req.inputStream, ApplicationUser::class.java)
        return authenticationManager.authenticate(
                UsernamePasswordAuthenticationToken(
                        creds.username,
                        creds.password,
                        emptyList<GrantedAuthority>()
                )
        )
    }

    @Throws(IOException::class, ServletException::class)
    override fun successfulAuthentication(
            req: HttpServletRequest,
            res: HttpServletResponse, chain: FilterChain?,
            auth: Authentication) {
        val JWT = Jwts.builder()
                .setSubject((auth.principal as User).username)
                .setExpiration(Date(System.currentTimeMillis() + EXPIRATION_TIME))
                .signWith(SignatureAlgorithm.HS512, SECRET)
                .compact()
        res.addHeader(HEADER_STRING, TOKEN_PREFIX + " " + JWT)
    }
}
This filter defines two functions:
attemptAuthentication, which will parse the credentials from the user and try to authenticate them- and
successfulAuthentication, which will generate a JWT if the user is successfully authenticated.
Note that both filters use some undefined constants like SECRET and EXPIRATION_TIME. To define these constants, we will create a file called SecurityConstants.kt in this same directory with the following code:
package com.auth0.samples.kotlinspringboot

val SIGN_UP_URL = "/sign-up"
val SECRET = "SecretKeyToGenJWTs"
val TOKEN_PREFIX = "Bearer "
val HEADER_STRING = "Authorization"
val EXPIRATION_TIME: Long = 864_000_000 // 10 days
To validate tokens that the filter above generates, we will need the second filter, JWTAuthorizationFilter. This filter will be created in the same directory with the following code:
package com.auth0.samples.kotlinspringboot

import io.jsonwebtoken.Jwts
import org.springframework.security.authentication.AuthenticationManager
import org.springframework.security.authentication.UsernamePasswordAuthenticationToken
import org.springframework.security.core.Authentication
import org.springframework.security.core.GrantedAuthority
import org.springframework.security.core.context.SecurityContextHolder
import org.springframework.security.web.authentication.www.BasicAuthenticationFilter
import java.io.IOException
import java.util.Collections.emptyList
import javax.servlet.FilterChain
import javax.servlet.ServletException
import javax.servlet.http.HttpServletRequest
import javax.servlet.http.HttpServletResponse


class JWTAuthorizationFilter(authManager: AuthenticationManager) : BasicAuthenticationFilter(authManager) {
    @Throws(IOException::class, ServletException::class)
    override fun doFilterInternal(request: HttpServletRequest,
                                  response: HttpServletResponse,
                                  chain: FilterChain) {
        val header = request.getHeader(HEADER_STRING)

        if (header == null || !header.startsWith(TOKEN_PREFIX)) {
            chain.doFilter(request, response)
            return
        }

        val authentication = getAuthentication(request)

        SecurityContextHolder.getContext().authentication = authentication
        chain.doFilter(request, response)
    }

    fun getAuthentication(request: HttpServletRequest): Authentication? {
        val token = request.getHeader(HEADER_STRING)
        if (token != null) {
            // parse the token.
            val user = Jwts.parser()
                    .setSigningKey(SECRET)
                    .parseClaimsJws(token.replace(TOKEN_PREFIX, ""))
                    .getBody()
                    .getSubject()

            return if (user != null)
                UsernamePasswordAuthenticationToken(user, null, emptyList<GrantedAuthority>())
            else
                null
        }
        return null
    }
}
This filter will be utilized whenever a secured endpoint is requested and will start by checking if there is a token in the Authorization header. If it manages to find one, it will try to validate it and set the user in the SecurityContext. If no token is found, it will simply let the request move along the Spring Security filter chain, and then this request will be answered with a 401 (Unauthorized) status code.
The last class that we will need to create is UserDetailsServiceImpl. This class will extend the UserDetailsService class from Spring Security and will be responsible for finding users in our database so Spring Security can check their credentials. This class will be created in the main kotlinspringboot directory and will contain the following source code:
package com.auth0.samples.kotlinspringboot

import com.auth0.samples.kotlinspringboot.model.ApplicationUser
import com.auth0.samples.kotlinspringboot.persistence.ApplicationUserRepository
import org.springframework.security.core.userdetails.User
import org.springframework.security.core.userdetails.UserDetails
import org.springframework.security.core.userdetails.UserDetailsService
import org.springframework.security.core.userdetails.UsernameNotFoundException
import org.springframework.stereotype.Service
import org.springframework.transaction.annotation.Transactional


@Service
open class UserDetailsServiceImpl(val userRepository: ApplicationUserRepository) : UserDetailsService {
    @Transactional(readOnly = true)
    @Throws(UsernameNotFoundException::class)
    override fun loadUserByUsername(username: String): UserDetails {
        val user = userRepository.findByUsername(username) ?: throw UsernameNotFoundException(username)
        return User(user.username, user.password, emptyList())
    }

    fun save(user: ApplicationUser) {
        userRepository.save(user)
    }
}
To wrap up this home made solution, we need to replace the contents of the WebSecurity class with the following:
package com.auth0.samples.kotlinspringboot

import org.springframework.context.annotation.Bean
import org.springframework.context.annotation.Configuration
import org.springframework.http.HttpMethod
import org.springframework.security.config.annotation.authentication.builders.AuthenticationManagerBuilder
import org.springframework.security.config.annotation.web.builders.HttpSecurity
import org.springframework.security.config.annotation.web.configuration.EnableWebSecurity
import org.springframework.security.config.annotation.web.configuration.WebSecurityConfigurerAdapter
import org.springframework.security.core.userdetails.UserDetailsService
import org.springframework.security.crypto.bcrypt.BCryptPasswordEncoder

@Configuration
@EnableWebSecurity
open class WebSecurity(val userDetailsService: UserDetailsService) : WebSecurityConfigurerAdapter() {

    @Bean
    fun bCryptPasswordEncoder(): BCryptPasswordEncoder {
        return BCryptPasswordEncoder()
    }

    override fun configure(http: HttpSecurity) {
        http.csrf().disable().authorizeRequests()
                .antMatchers(HttpMethod.POST, SIGN_UP_URL).permitAll()
                .anyRequest().authenticated()
                .and()
                .addFilter(JWTAuthenticationFilter(authenticationManager()))
                .addFilter(JWTAuthorizationFilter(authenticationManager()))
    }

    override fun configure(auth: AuthenticationManagerBuilder?) {
        auth!!.userDetailsService(userDetailsService).passwordEncoder(bCryptPasswordEncoder())
    }
}
After applying these changes, we can interact with our API again and check if it's properly generating and validating JWTs:
# run Kotlin app again
mvn spring-boot:run

# register a new user
curl -H "Content-Type: application/json" -X POST -d '{
    "username": "admin",
    "password": "password"
}' http://localhost:8080/sign-up

# login to get the JWT (in the Authorization header)
curl -i -H "Content-Type: application/json" -X POST -d '{
    "username": "admin",
    "password": "password"
}' http://localhost:8080/login

# get customers passing the JWT contained by the Authorization header
curl -H "Authorization: Bearer xxx.yyy.zzz" http://localhost:8080/customers
As you can see, creating our own security solution with JWTs is not that hard. However, it requires much more work than what we had to do to integrate with Auth0. And keep in mind that we didn't even address more advanced topics like Multifactor Authentication, social identity providers, enterprise connections (Active Directory, LDAP, SAML, etc.), etc. Handling such cases would require a lot more work. Even if we managed to deliver these features swiftly, we wouldn't have as many security measures as we would while using Auth0.
Conclusion
Writing code in Kotlin is not that hard for a Java developer, as there are not that many pitfalls to be aware of. But, to become a true Kotlin developer, using the full power and best features of the language, is not straightforward and requires a few hours of study and development. Kotlin integration with existing Java libraries is very good, as we could while using Spring Boot, and the code developed was very concise and easy to read. We haven't covered that many features of Kotlin, but we managed to validate its applicability on the backend.
“Developing backend Kotlin applications is perfectly fine and easy.”
Tweet This
What do you think? Would you consider abandoning Java in favor of Kotlin?
About the author

Bruno Krebs
R&D Content Architect (Auth0 Alumni)