
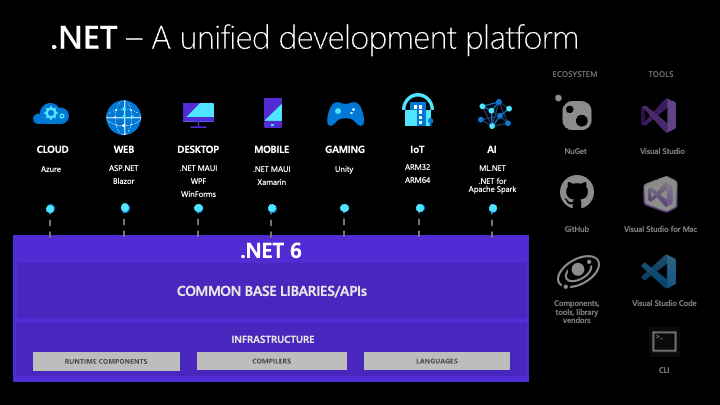
With the release of .NET 6, Microsoft consolidates its plan to create a unified platform to develop applications for any device and operating system. Together with this vision, .NET 6 brings many new features aiming to simplify development and gain performance. Let's take a quick look at the main points.
Unified Platform Support
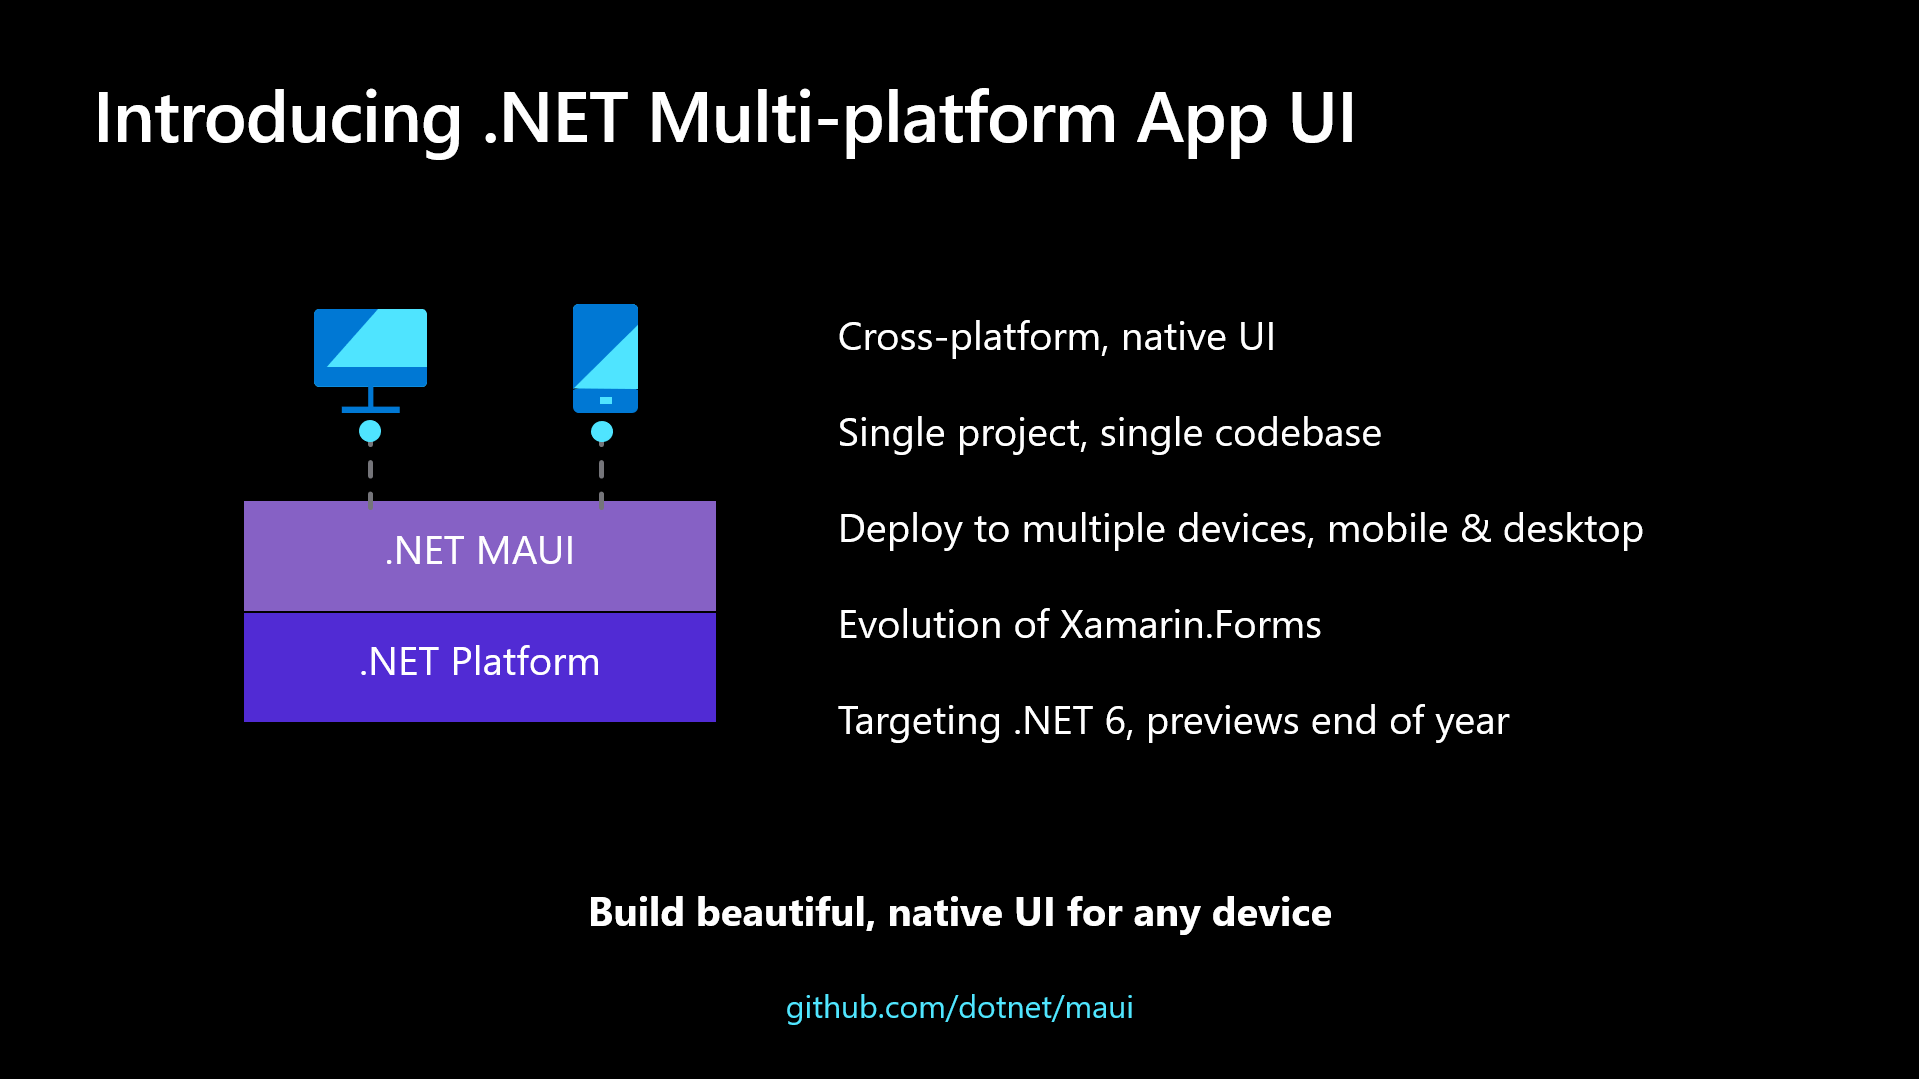
The vision of a unified platform for the .NET world started with .NET 5. That release was meant to be the unified successor of the various .NET flavors: .NET Framework, .NET Standard, .NET Core, Mono, etc. Beyond this goal, .NET 5 wanted to be a development platform to create any kind of application for any platform. However, at that time, an important piece was missing to complete the puzzle: a unified framework to create cross-platform UIs. Now, with .NET MAUI, i.e., the .NET Multi-platform App UI framework, the puzzle is complete. Although at the time of writing .NET MAUI is in preview, it is mature enough to be considered part of the .NET 6 release.
Now with .NET 6, you can really create the application you want and run it practically everywhere: from desktop to mobile, from the web to the cloud.
In particular, the new .NET MAUI framework allows you to build desktop and mobile native user interfaces with a single codebase.
Simplified Development
One of the main goals of the .NET 6 release is to provide developers with features that simplify their work. You can find support for simplified development throughout the platform, but three contexts are really exciting: new C# features, Hot Reload support, and minimal web APIs.
C# 10 features
.NET 6 brings you C# 10 with plenty of new features that help you write code more easily. Let's take a quick look at a few of them.
Global and implicit usings
As a C# developer, you know how annoying it is to declare the same namespace in every file of your project. Consider, for example, the System namespace. Its use is very common, and I'm pretty sure you forget it all the time and let Visual Studio suggest it.
Now you can declare namespaces using a global using, as shown in the following example:
global using System;
With this declaration, you don't need to insert the using System; declaration in all files anymore. You can declare a namespace through global using in any file, and it will be available in the entire project.
If you prefer (and I think it's a good practice), you can declare your namespaces in a file named GlobalUsings.cs.
You can also take advantage of implicit usings by configuring the <ImplicitUsings> element in your .csproj file, as shown below:
<PropertyGroup>
    <!-- ...existing properties... -->
    <ImplicitUsings>enable</ImplicitUsings>
</PropertyGroup>
This way, the compiler will automatically add the required global using directives based on the type of your project.
New namespace syntax
You know that the usual way to declare a namespace is as follows:
namespace Geometry
{
  class Triangle
  {
    // ...class members...
  }
}
Now you can use the file-scoped namespace syntax to get the same result:
namespace Geometry

class Triangle
{
  // ...class members...
}
With this approach, everything you define in the current file belongs to the declared namespace. By removing a nesting level, you make the code a bit cleaner. However, you can't create nested namespaces with this new syntax.
Natural types for lambda expressions
Consider the following assignment of a lambda expression to a variable:
Func<string, int> parse = (string s) => int.Parse(s);
You need to declare the target type of the lambda expression, Func<string, int> in the example. Starting with C# 10, you can write the above code as follows:
var parse = (string s) => int.Parse(s);
The compiler will try to infer the "natural" type of the lambda expression.
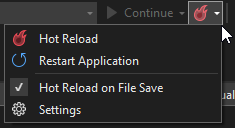
Hot Reload
To improve the developer's productivity, .NET 6 extends the Hot Reload feature to Visual Studio and almost any type of project. It allows you to run an application in your development environment, make changes, and get the changes applied without stopping, rebuilding, and rerunning the application.
In previous .NET releases, this feature was available just for the .NET CLI via the dotnet watch command. Not without some minor hiccups with the community, you can now benefit from it in Visual Studio 2022 as well by simply clicking a button:
Minimal web APIs
One astonishing feature introduced by .NET 6 to simplify your code is minimal web APIs. Along the lines of top-level statements, now you can build a fully working web API application with a few lines of code. Consider the following sample:
//Program.cs
var app = WebApplication.CreateBuilder(args).Build();

app.MapGet("/", () => "Hello World!");
app.Run();
This is all the code you need to run a simple Hello World! web API.
If you have some experience building web APIs with ASP.NET Core, you know that you usually need a more articulate project. You need at least a Program.cs file with the setup code for the application, a Startup.cs file where you configure your API, and a controller class defining the API routes and implementing the endpoints.
That's a lot of simplification!
Performance Improvements
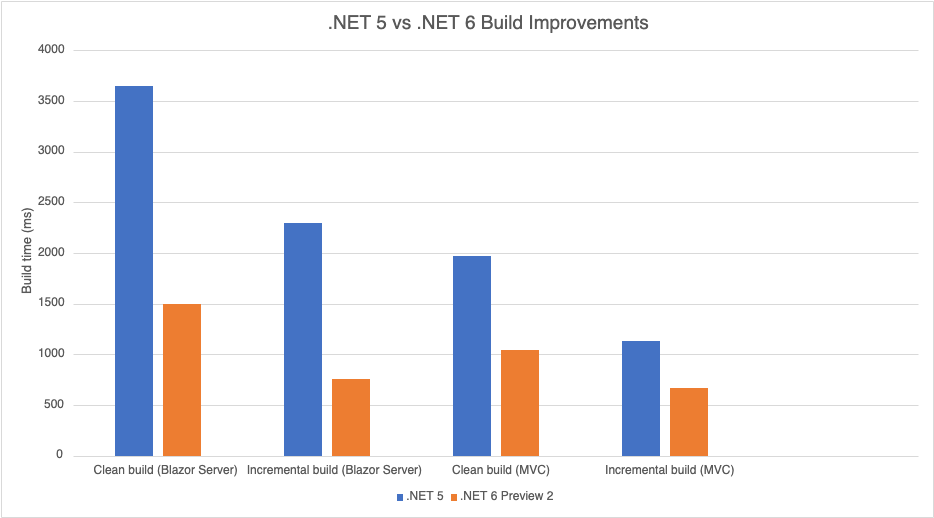
In the last years, the .NET team put a lot of effort into improving the platform performance in compiling and execution time and reducing memory consumption. With .NET 6, you can appreciate these improvements in many parts of the framework. For example, the effort to improve inner-loop performance in building .NET projects has given awesome results, as you can see from the following diagram:
Other performance improvements include the IO subsystem. For example, the FileStream class was almost completely rewritten with amazing results even with respect to .NET 5, as the following table summarizes for the writing operation:

You can check out a detailed report on performance improvements in .NET 6 with related benchmarks for more information.
Summary
This quick overview of .NET 6 shows that this is a consolidation release of the .NET platform. It aims to complete the unified platform vision started with .NET 5, improves the internals of the platform to provide the best performance, and starts a process of development simplification that probably will go further in future releases.
Aside: Securing ASP.NET Core with Auth0
Securing ASP.NET Core applications with Auth0 is easy and brings a lot of great features to the table. With Auth0, you only have to write a few lines of code to get a solid identity management solution, single sign-on, support for social identity providers (like Facebook, GitHub, Twitter, etc.), and support for enterprise identity providers (like Active Directory, LDAP, SAML, custom, etc.).
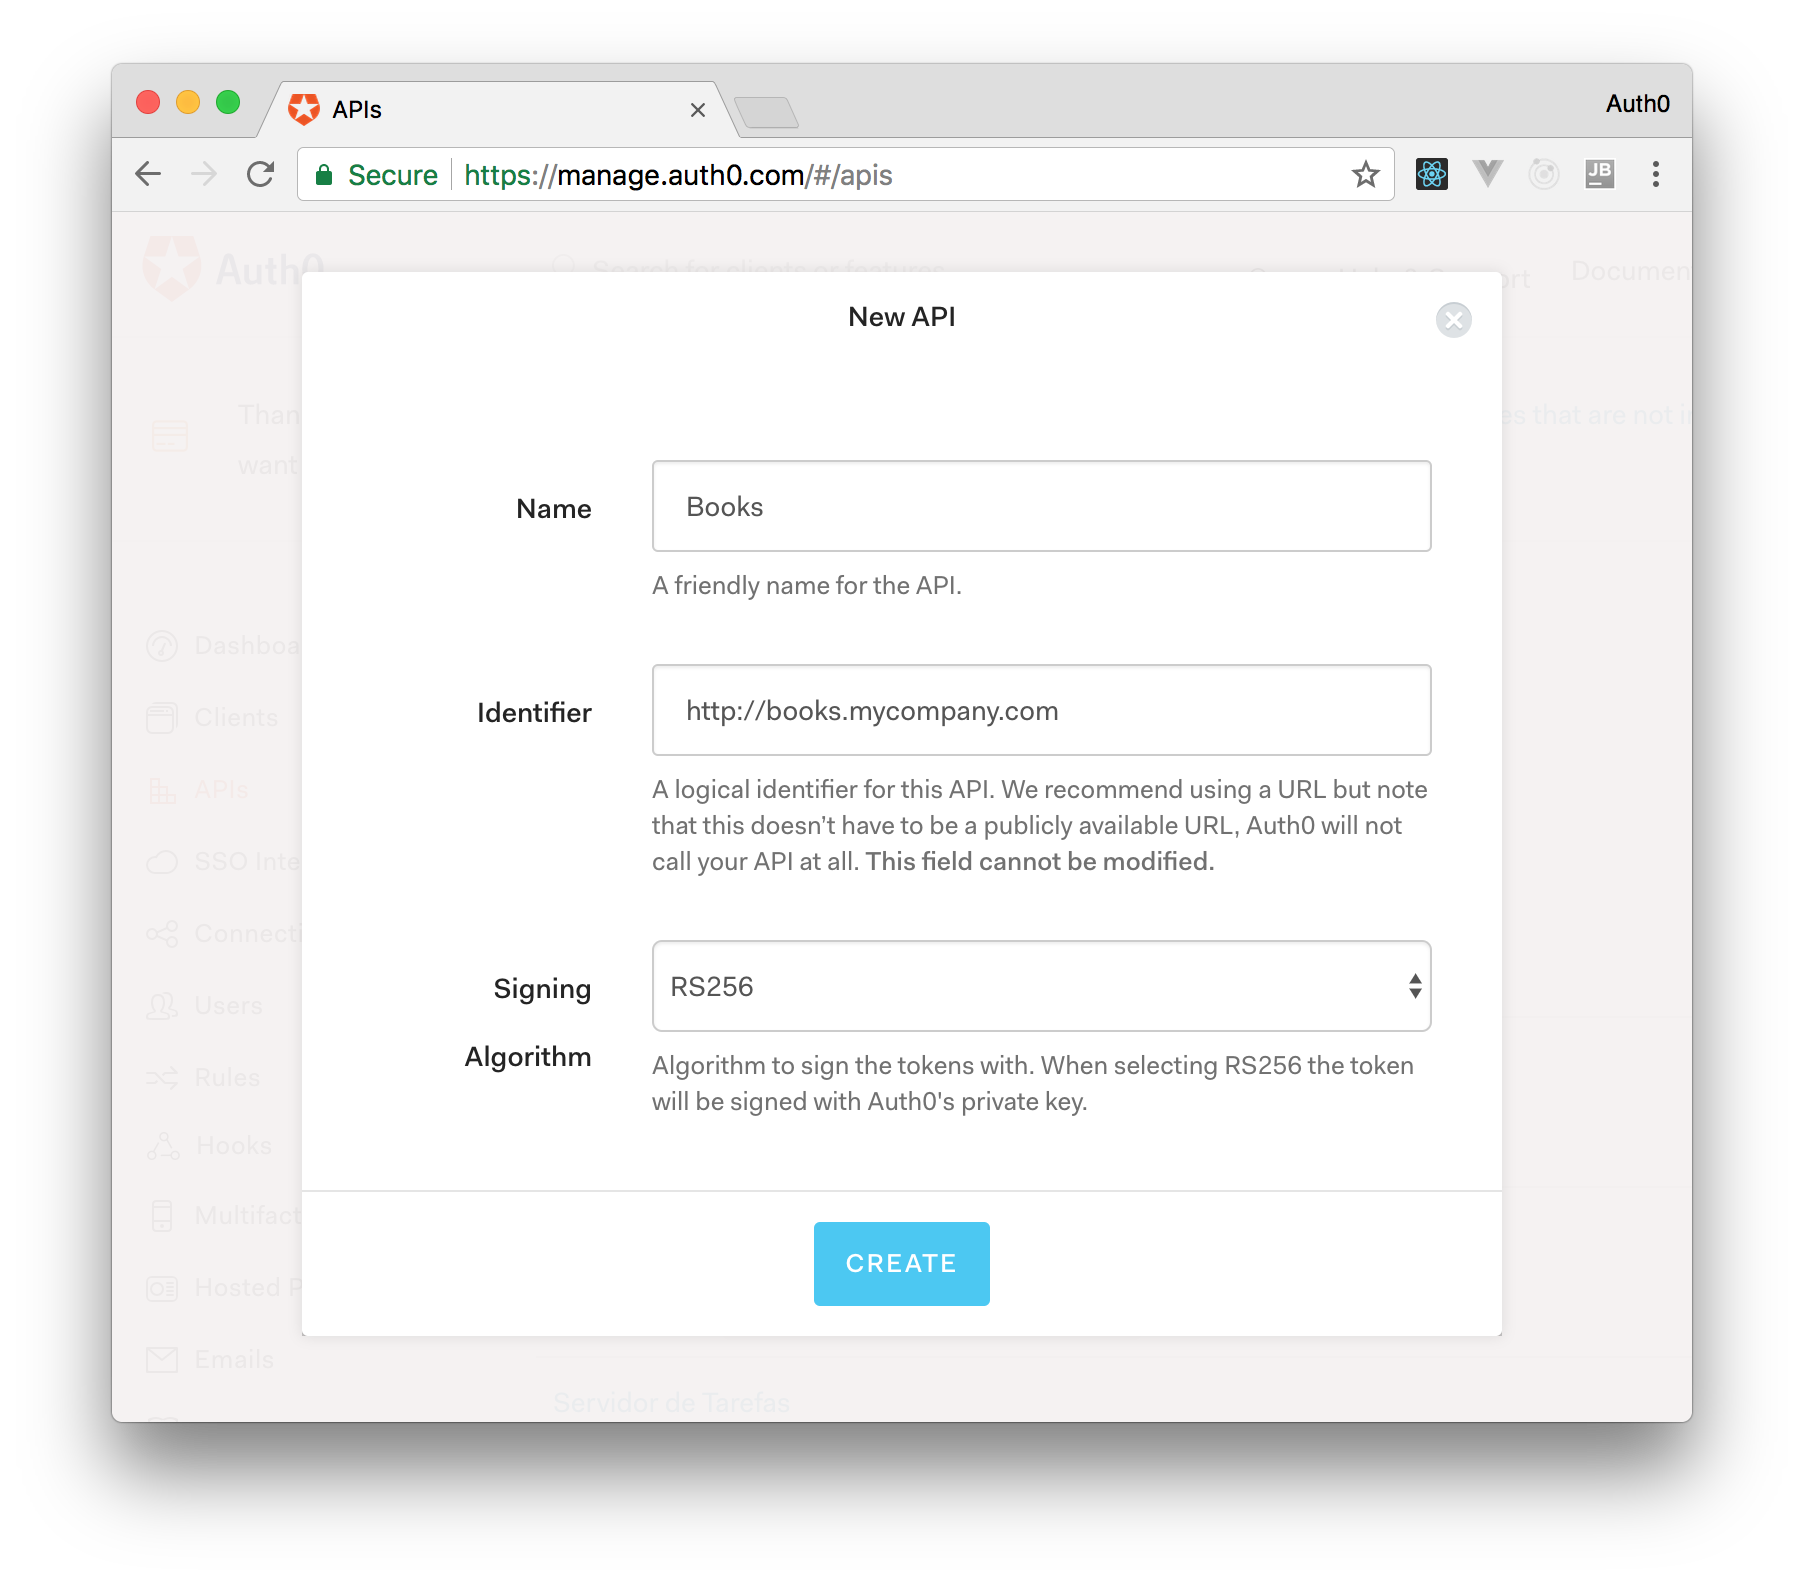
On ASP.NET Core, you need to create an API in your Auth0 Management Dashboard and change a few things on your code. To create an API, you need to sign up for a free Auth0 account. After that, you need to go to the API section of the dashboard and click on "Create API". On the dialog shown, you can set the Name of your API as "Books", the Identifier as "http://books.mycompany.com", and leave the Signing Algorithm as "RS256".
After that, you have to add the call to services.AddAuthentication() in the ConfigureServices() method of the Startup class as follows:
string authority = $"https://{Configuration["Auth0:Domain"]}/";
string audience = Configuration["Auth0:Audience"];

services.AddAuthentication(options =>
{
  options.DefaultAuthenticateScheme = JwtBearerDefaults.AuthenticationScheme;
  options.DefaultChallengeScheme = JwtBearerDefaults.AuthenticationScheme;
}).AddJwtBearer(options =>
{
  options.Authority = authority;
  options.Audience = audience;
});
In the body of the Configure() method of the Startup class, you also need to add an invocation to app.UseAuthentication() and app.UseAuthorization() as shown below:
app.UseRouting();
app.UseAuthentication();
app.UseAuthorization();
app.UseEndpoints(endpoints =>
{
    endpoints.MapControllers();
});
Make sure you invoke these methods in the order shown above. It is essential so that everything works properly.
Finally, add the following element to the appsettings.json configuration file:
{
  "Logging": {
    // ...
  },
  "Auth0": {
    "Domain": "YOUR_DOMAIN",
    "Audience": "YOUR_AUDIENCE"
  }
}
Note: Replace the placeholders
YOUR_DOMAINandYOUR_AUDIENCEwith the actual values for the domain that you specified when creating your Auth0 account and the Identifier you assigned to your API.
About the author

Andrea Chiarelli
Principal Developer Advocate
I have over 20 years of experience as a software engineer and technical author. Throughout my career, I've used several programming languages and technologies for the projects I was involved in, ranging from C# to JavaScript, ASP.NET to Node.js, Angular to React, SOAP to REST APIs, etc.
In the last few years, I've been focusing on simplifying the developer experience with Identity and related topics, especially in the .NET ecosystem.