The very first thing to do when a user signs up for your application is to verify that they actually have access to the email address they provide. Although email verification is not the only security measure you should take to ensure the user's identity, this contributes to reducing spam and fraud. Auth0 provides a few approaches to email verification, depending on your specific use case. In this article, you will learn how to leverage the built-in email verification process based on verification links to validate the email address provided by the user during their signup for a Blazor Web application.
The Sample Application
A previous article showed how to manage the onboarding of a customer who signs up for a service offered by a B2B SaaS application implemented with Blazor. On that occasion, we did not consider verifying the client's email address as we wanted to focus mainly on self-registration and creating an Organization via code. Now, we will integrate that application by adding the verification step for the self-registering customer's email address.
Download the sample project to start with this command:
git clone --branch organization-via-code --single-branch https://github.com/andychiare/MyBlazorSaaS
Follow the attached README file instructions to register and configure the application with Auth0. If you don't have an Auth0 account, you can sign up for free.
The Email Verification Process
By default, Auth0 sends a verification link to users when they sign up, but it's up to you to check if their email is verified before allowing them to access your application or perform specific actions.
In the context of your Blazor application, you will implement the following email verification process:
- Once the customer signs up, Auth0 automatically sends an email to the user, and your application shows a message inviting the user to check their inbox.
- The page showing the message provides a button to resend a new verification link in case the user didn't receive the first email.
- If the user attempts to access any other application page, your app checks if the user's email has been verified before granting access.
- Once the email is verified, the customer can create the Organization for their new subscription.
Wait for Email Verification
The current customer onboarding flow implemented in your Blazor App allows users to create their Organizations as soon as they sign up. From a visual perspective, they pass from the signup form to the Organization creation form. You need to make sure the customer's email has been verified before allowing them to create their new Organization. Let's start by implementing a page that fulfills points 1. and 2. mentioned earlier.
The verification waiting page
In the MyBlazorSaaS/Components/Pages/Onboarding folder, create a new file named Verify.razor and add the following code:
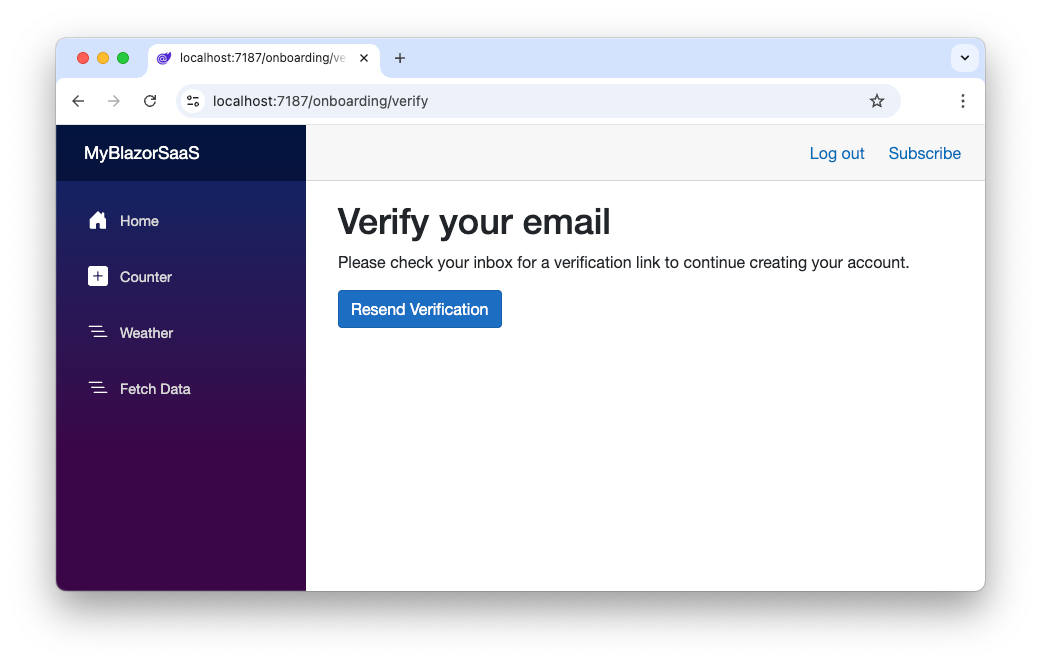
<!-- MyBlazorSaaS/Components/Pages/Onboarding/Verify.razor -->

@page "/Onboarding/Verify"
@rendermode InteractiveServer
@using Auth0.ManagementApi.Models
@using System.Security.Claims

@inject NavigationManager NavigationManager
@inject IAuth0Management auth0Management

<h1>Verify your email</h1>
<p>
 Please check your inbox for a verification link to continue creating your account.
</p>

<div>
  <button class="btn btn-primary" @onclick="ResendVerificationEmail">Resend Verification</button>
</div>

<div>
@Message
</div>

@code {
  [CascadingParameter]
  private Task<AuthenticationState>? authenticationState { get; set; }
  private string Message = "";

  private async Task ResendVerificationEmail()
  {
    if (authenticationState is not null)
    {
      var state = await authenticationState;
      var userId = state?.User?.FindFirst(c => c.Type == ClaimTypes.NameIdentifier)?.Value;

      try {
        var managementClient = await auth0Management.getClient();
        await managementClient.Jobs.SendVerificationEmailAsync(new VerifyEmailJobRequest() { UserId = userId });
        Message = "The verification e-mail has successfully been sent. Please check your inbox";
      } catch (Exception) {
        Message = "Failed to resend verification e-mail.";
      }
    } else {
        NavigationManager.NavigateTo("/Onboarding/Signup");
    }
  }
}
This page will display a message that invites the user to check their inbox and offers a button to resend the verification link if needed. It will be rendered as shown in the following image:
Since the current onboarding flow shows the Organization creation page after the user signup, you need to change it. Open the Program.cs file in the MyBlazorSaaS folder and replace the line of code shown below:
// MyBlazorSaaS/Program.cs

//...existing code...

app.MapGet("/account/signup", async (HttpContext httpContext, string login_hint) =>
{
  var authenticationProperties = new LoginAuthenticationPropertiesBuilder()
          //.WithRedirectUri("/onboarding/createOrganization") // 👈 old code
          .WithRedirectUri("/onboarding/verify")  // 👈 new code
          .WithParameter("screen_hint", "signup")
          .WithParameter("login_hint", login_hint)
          .Build();

  await httpContext.ChallengeAsync("OnboardingScheme", authenticationProperties);
});

//...existing code...
This ensures that the user will be redirected to the verification waiting page instead of the Organization creation page.
Resend the verification link
The verification waiting page shows a "Resend Verification" button. Let's take a closer look at the code triggered by that button to learn how to resend the verification link:
<!-- MyBlazorSaaS/Components/Pages/Onboarding/Verify.razor -->

//...existing code...

@code {
  [CascadingParameter]
  private Task<AuthenticationState>? authenticationState { get; set; }
  private string Message = "";

  private async Task ResendVerificationEmail()
  {
    if (authenticationState is not null)
    {
      var state = await authenticationState;
      var userId = state?.User?.FindFirst(c => c.Type == ClaimTypes.NameIdentifier)?.Value;

      try {
        var managementClient = await auth0Management.getClient();
        await managementClient.Jobs.SendVerificationEmailAsync(new VerifyEmailJobRequest() { UserId = userId });
        Message = "The verification e-mail has successfully been sent. Please check your inbox";
      } catch (Exception) {
        Message = "Failed to resend verification e-mail.";
      }
    } else {
        NavigationManager.NavigateTo("/Onboarding/Signup");
    }
  }
}
The ResendVerificationEmail() method gets the user ID from the authentication state, gets an instance of the management client, and uses the SendVerificationEmailAsync() method, passing an instance of VerifyEmailJobRequest with the user ID value. This method of the Management API client corresponds to calling the email address verification endpoint, which will generate a new ticket, include it in a verification link, and send it to the user via email.
Customize the Email Verification Template
The default email message with the verification link sent to the user will look like the following:
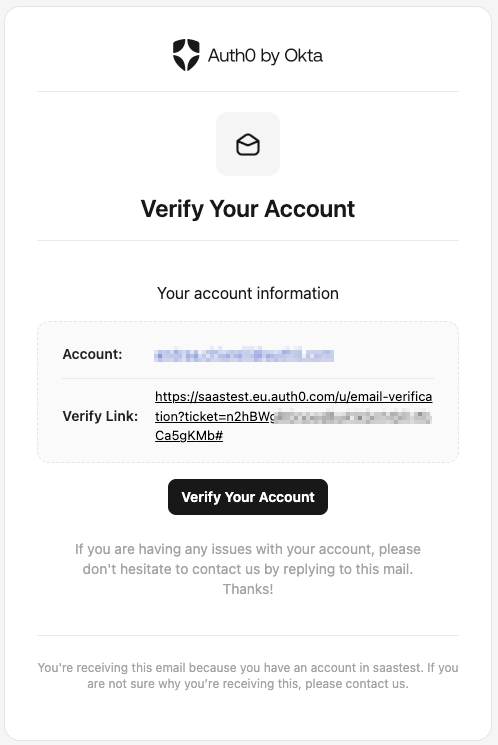
You can customize this message using your Auth0 dashboard. Go to the Branding > Email Templates page, select the Verification Email (Link) template, and apply the changes you want. You can customize the sender address, the subject, and the message body using HTML and Liquid syntax. You can also customize other settings and use common variables to include some contextual values in your message. Read this document to learn more about email template customization.
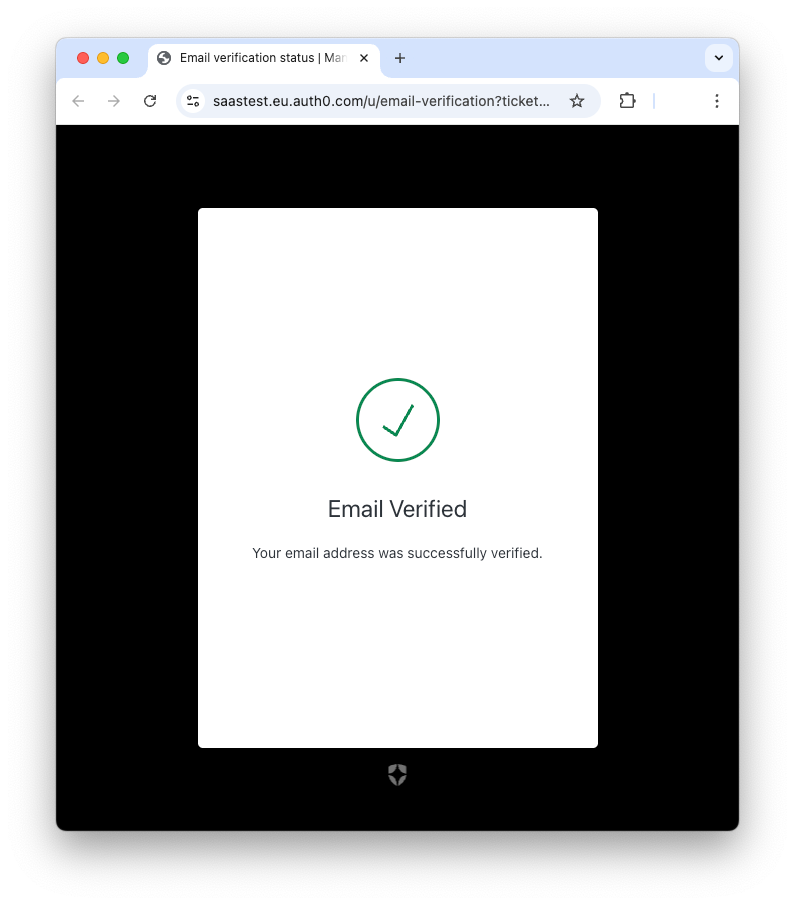
By default, nothing visible happens on your application when a user clicks the verification link. Auth0 will mark the user's email field as verified and show a page confirming that the email verification process was successful, as you can see in the following image:
However, in our self-subscription flow, we would like the user to be redirected to the next onboarding step after their email is verified, which is the organization creation screen. The email verification template provides a Redirect To field that allows you to specify the URL of the page you want the user to land after the email verification. You can parametrize the URL using one of the common variables mentioned above. Specifically, enter the following value in the Redirect To field and click the Save button:
{{ application.callback_domain }}/onboarding/createOrganization
That's all! Now, your user will be redirected to the Organization creation page after the email verification.
A new Auth0-powered .NET app in less than a minute? Try out our templates
Install the Nugget package
Require Email Verification
One small piece is missing to complete the customer onboarding flow. You need to ensure that they cannot access the protected pages of your application if their email has not been verified yet. This means that when you check if the user is authenticated, you also need to consider checking that their email is verified too.
A basic approach
You don't need to check if the user's email is verified when they access the Home.razor page, Signup.razor, and Verify.razor pages: the first two are public pages, and the third one is specifically designed for users who haven't verified their email yet.
You need to check the validity of the user's email on the CreateOrganization.razor page. To this purpose, apply the changes highlighted here on the CreateOrganization.razor page:
<!-- MyBlazorSaaS/Components/Pages/Onboarding/CreateOrganization.razor -->

//...existing code...

  protected override async Task OnInitializedAsync()
  {
    if (authenticationState is not null)
    {
      var state = await authenticationState;

      // 👇 new code
      var isEmailVerified = state.User?.FindFirst(c => c.Type == "email_verified")?.Value?.ToLowerInvariant() == "true";
      // ☝️ new code

      // 👇 changed code
      if (state.User?.Identity?.IsAuthenticated??false && isEmailVerified)
      // ☝️ changed code
      {
        Email = state.User?.FindFirst(c => c.Type == ClaimTypes.Email)?.Value??String.Empty;
        UserId = state.User?.FindFirst(c => c.Type == ClaimTypes.NameIdentifier)?.Value??String.Empty;
      } else {
        NavigationManager.NavigateTo("/Onboarding/Signup");
      }
    }
  }

//...existing code...
You can see that a new variable isEmailVerified has been introduced. This variable gets a boolean value coming from the value of the email_verified claim. You will use this variable as an additional condition to go ahead with the Organization creation step.
A more structured approach
You need to apply the email verification check to most of the protected pages of your application. This depends on your application, of course. In our case, you should also apply the same check to the Weather.razor page on the server side and the Counter.razor and FetchDat.razor pages on the client side.
Applying the earlier approach would work, but it's ineffective in terms of code duplication and maintenance. You will use ASP.NET Core policy-based authorization instead.
First, open the Program.cs file in the MyBlazorSaaS folder and add the code highlighted below:
// MyBlazorSaaS/Program.cs

//... existing code...

// 👇 new code
builder.Services
    .AddAuthorization(options => {
      options.AddPolicy("VerifiedEmail", policy =>
        policy.RequireAssertion(context =>
          context.User.HasClaim(claim =>
            ( claim.Type == "email_verified" &&
              claim.Value?.ToLowerInvariant() == "true")
          )
        )
      );
    });
// ☝️ new code

// Add services to the container.
builder.Services.AddRazorComponents()
    .AddInteractiveServerComponents()
    .AddInteractiveWebAssemblyComponents()
    .AddAuthenticationStateSerialization();

//... existing code...
This code defines an authorization policy named "VerifiedEmail". This policy checks if the current user has a claim email_verified set to true. This is the standard claim coming from the ID token issued by Auth0.
Now, let's create a page to which the user will be redirected when attempting to access a page without the required authorization. By default, Blazor redirects unauthorized users to an Account/AccessDenied page. So, create an Account folder in the MyBlazorSaaS/Components/Pages folder and add an AccessDenied.razor page with the following code:
<!-- MyBlazorSaaS/Components/Pages/Account/AccessDenied.razor -->

@page "/account/accessdenied"

<PageTitle>Access Denied</PageTitle>

<h2>You are not authorized to access this page</h2>

<p>@Reason</p>

@code {
  [CascadingParameter]
  private Task<AuthenticationState>? authenticationState { get; set; }
  private string Reason = "";

  protected override async Task OnInitializedAsync()
  {
    if (authenticationState is not null)
    {
      var state = await authenticationState;

      var isEmailVerified = state.User?.FindFirst(c => c.Type == "email_verified")?.Value?.ToLowerInvariant() == "true";

      if (state.User?.Identity?.IsAuthenticated??false && isEmailVerified)
      {
        Reason = "Your email is not verified yet!";
      }
    }
  }
}
This page shows a generic message to the unauthorized user and attempts to show a specific message about the actual reason. In particular, it checks if the user has the email_verified claim set to true and displays a message accordingly.
Finally, specify the policy VerifiedEmail in the Authorize attribute of your protected pages as shown below:
<!-- MyBlazorSaaS/Components/Pages/Weather.razor -->

@page "/weather"
// 👇 changed code
@attribute [Authorize(Policy = "VerifiedEmail")]
// ☝️ changed code
@attribute [StreamRendering]

//...existing code...
Apply this change to the Counter.razor and FetchData.razor pages in the MyBlazorSaaS.Client/Pages folder as well.
That's all! Your customer onboarding flow now includes the email verification step to mitigate the risks of spam and fraud.
Try out Auth0 authentication for free.
Get started →Recap
Auth0 always sends an email verification message when a user signs up for your application. However, it's up to you to determine in which scenario to check whether the user's email has been verified.
In the example shown in this article, we took the case of onboarding a customer of a B2B SaaS application developed with Blazor and added the email verification step before allowing them to create a new Organization.
We also saw how to allow the resend of the verification email and prevent access to the application's protected pages when the user's email has not been verified yet.
You can find the final code of the project created during the article on this GitHub repository.
About the author

Andrea Chiarelli
Principal Developer Advocate
I have over 20 years of experience as a software engineer and technical author. Throughout my career, I've used several programming languages and technologies for the projects I was involved in, ranging from C# to JavaScript, ASP.NET to Node.js, Angular to React, SOAP to REST APIs, etc.
In the last few years, I've been focusing on simplifying the developer experience with Identity and related topics, especially in the .NET ecosystem.