In the exercise from the previous section, you added Auth0 authentication to an existing Flutter app. This added a username/password authentication flow to the app. You also gave the app the ability to request and submit refresh tokens, which enhance the user experience by not requiring the user to authenticate every time they use the app.
This section will expand on the app by examining some useful Auth0 features:
- Refresh token rotation
- Social logins
- Managing your Auth0 account
Look for the 🛠 emoji if you’d like to skim through the content while focusing on the build and execution steps.
Add Refresh Token Rotation
When the app makes an authentication request to Auth0’s authentication server, it includes the offline_access scope. This causes the authentication server to issue a refresh token, which the app can use to re-authenticate without requiring the user to log in again. The app stores this token in the device’s secure storage.
While this enhances the app’s user experience, it also introduces risk. The refresh token is long-lived, and the app could use it as a “lifetime pass” to endlessly request new access tokens and keep the user logged in forever.
I highly recommend taking advantage of Refresh Token Rotation and Automatic Reuse Detection to help mitigate this risk. With these features enabled, each refresh token can be used only once. When the app exchanges its refresh token for a new access token, the authentication server also returns a new refresh token and invalidates the old one.
Let’s enable these features!
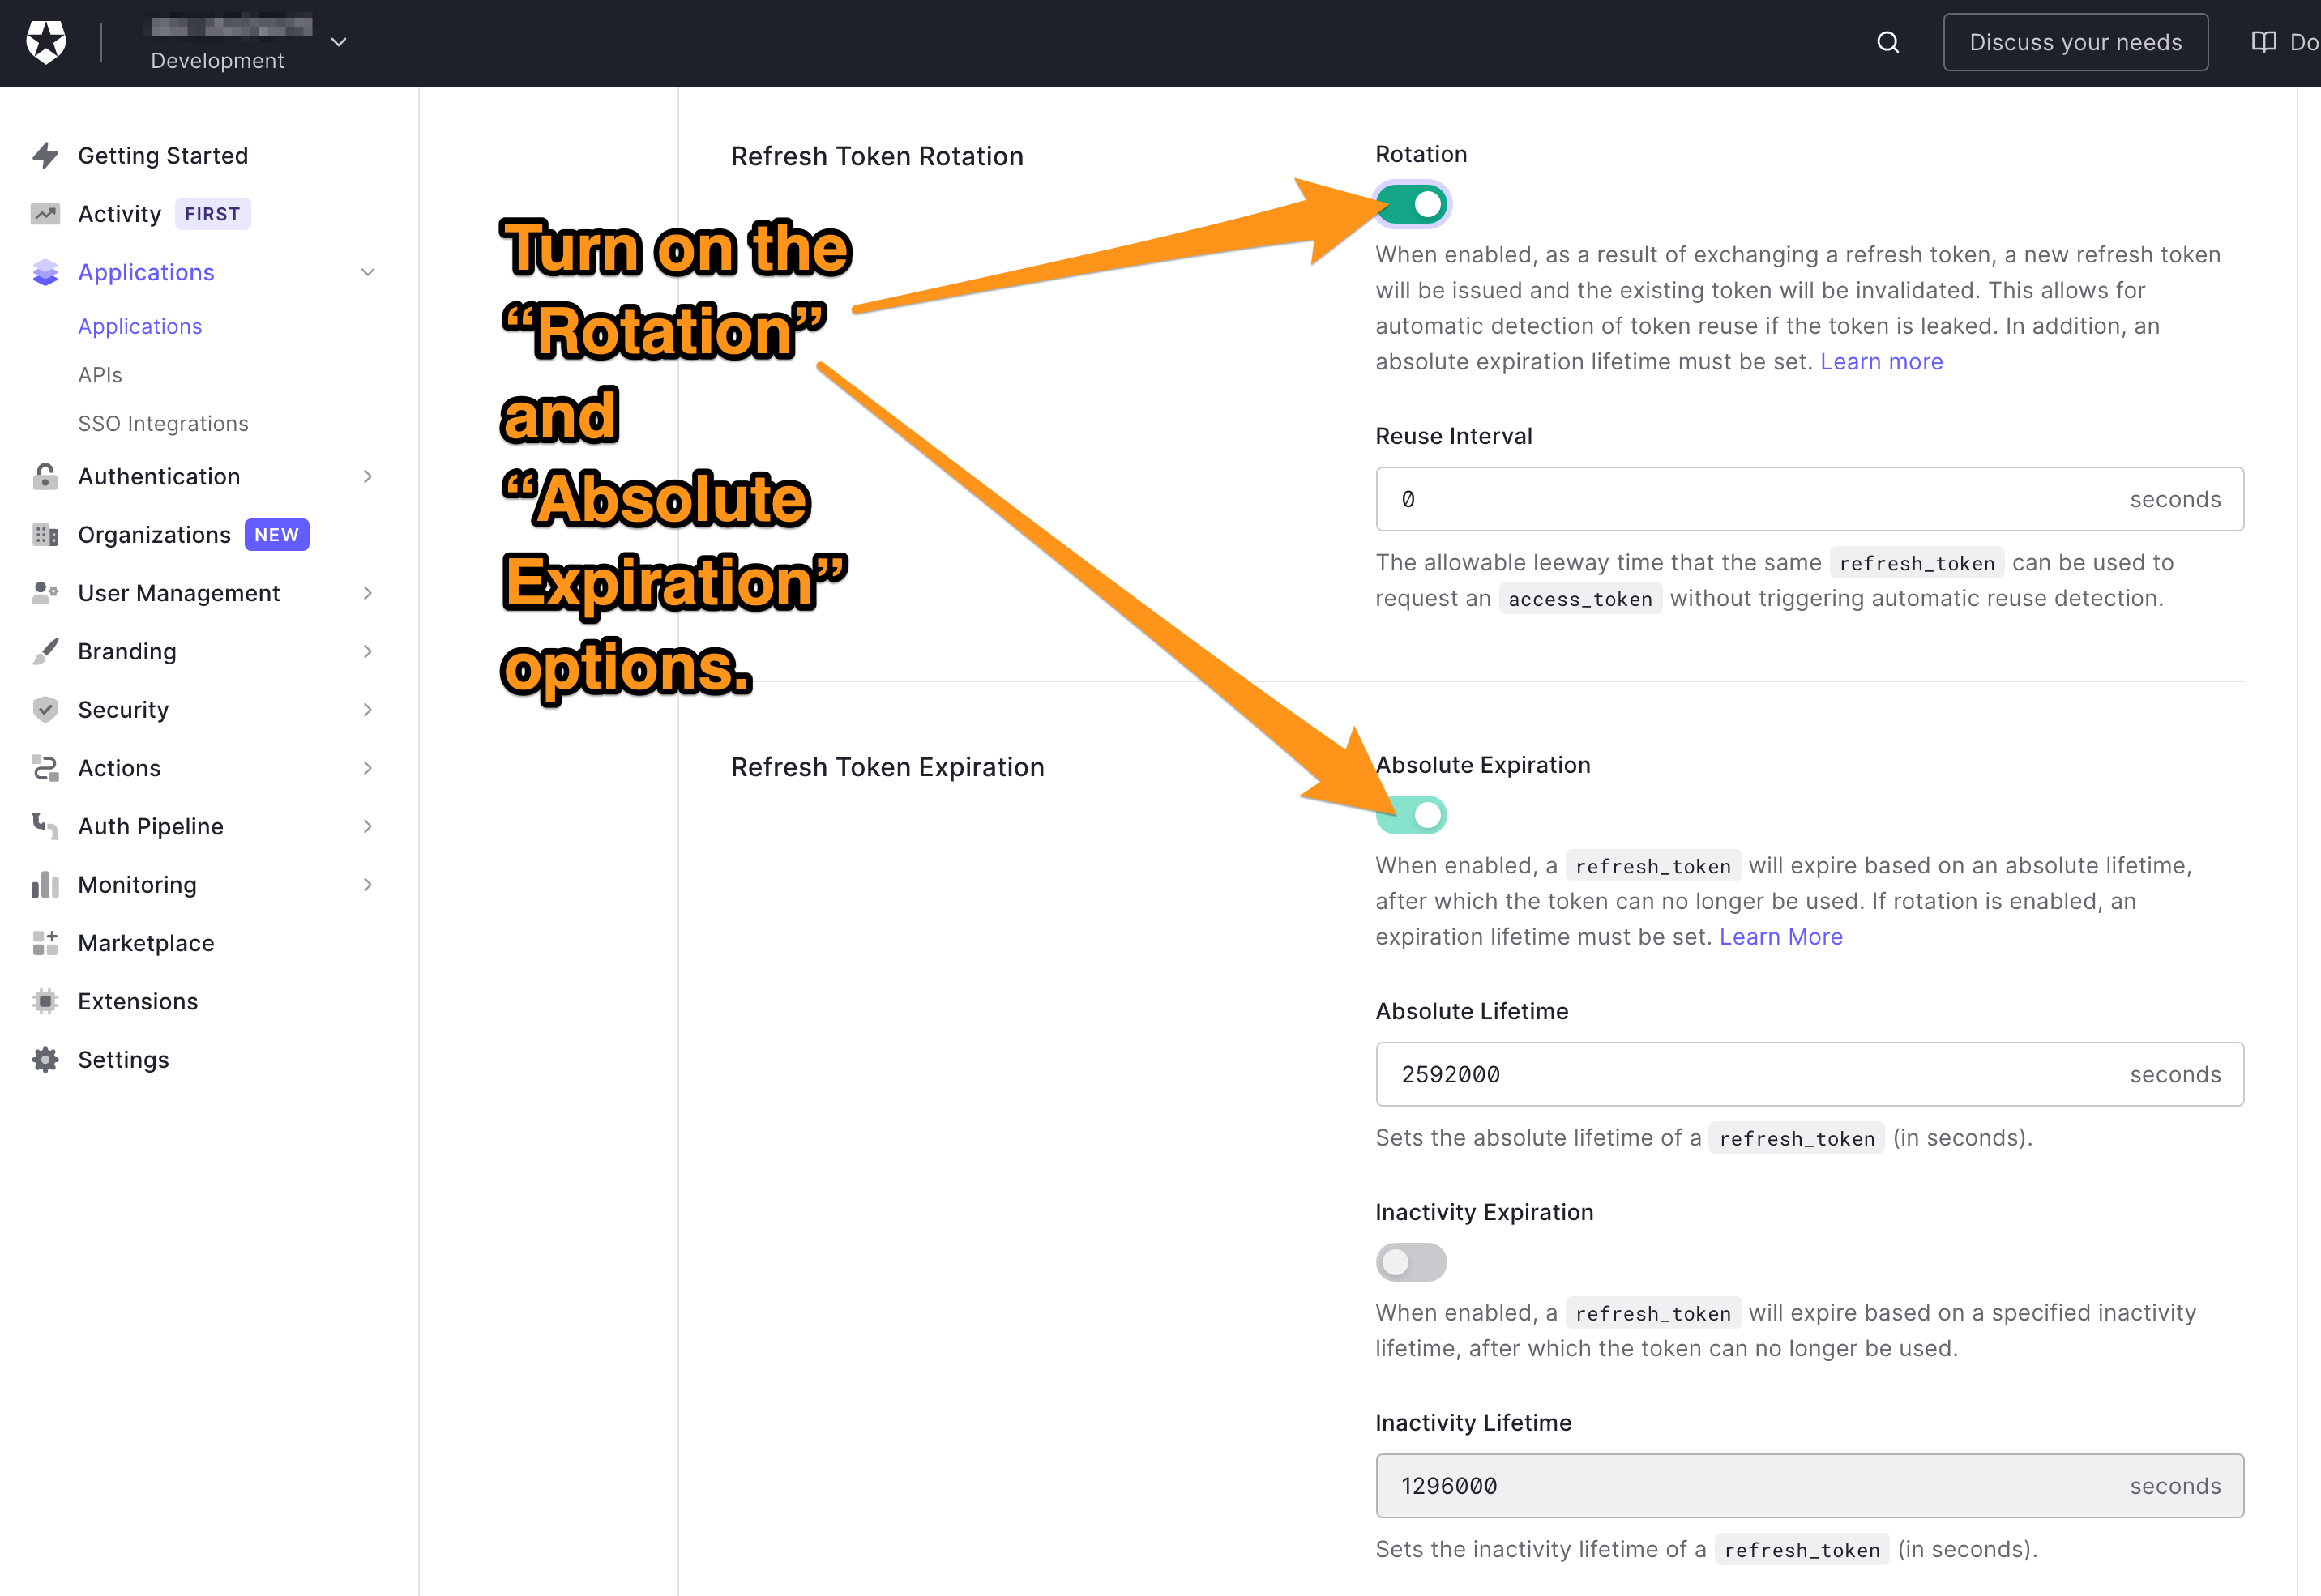
🛠 Navigate to the Applications section of your Auth0 dashboard, select the MJ Coffee application, and then select its Settings tab. Scroll down the page to the Refresh Token Rotation section and turn on the Rotation and Absolute Expiration options:
It is recommended that you issue a refresh token that expires after a preset lifetime. The refresh token’s lifetime can be extended each time one is used to get a new access token or access token/refresh token pair.
There are two options for token lifetimes, and they can be set independently of each other:
- Absolute Lifetime: Enabling Absolute Expiration sets a specified absolute lifetime for the application’s refresh tokens. Refresh tokens can be exchanged for new access tokens during this lifetime. Once the token’s age goes past its lifetime, the user will need to re-authenticate in order to get a new access token. If Absolute Expiration is disabled, the refresh token has an indefinite absolute lifetime.
- Inactivity Lifetime: Enabling Inactivity Expiration specified inactivity lifetime for the application’s refresh tokens. Refresh tokens can be exchanged for new access tokens if the user is active in the application during this lifetime. If the user is inactive in the application for a period longer than the inactivity lifetime, they will need to re-authenticate in order to get a new access token.
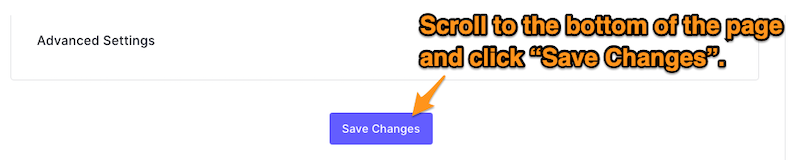
🛠 Scroll to the bottom of the page and click the Save Changes button:
Social Logins
These days, it's pretty common to have login methods beyond the standard username/password combination. These include logging in with social media account, which will significantly enhance your users’ experiences.
Implementing these additional login methods and adding them to your authorization server is time-consuming and will come with many considerations and risks.
Luckily, Auth0 provides lots of integration with well-known third parties’ authentication systems, and even allows you to write your custom connections. Let's add connections to both Google’s and Apple’s authentication systems.
Create a Google/Gmail social connection
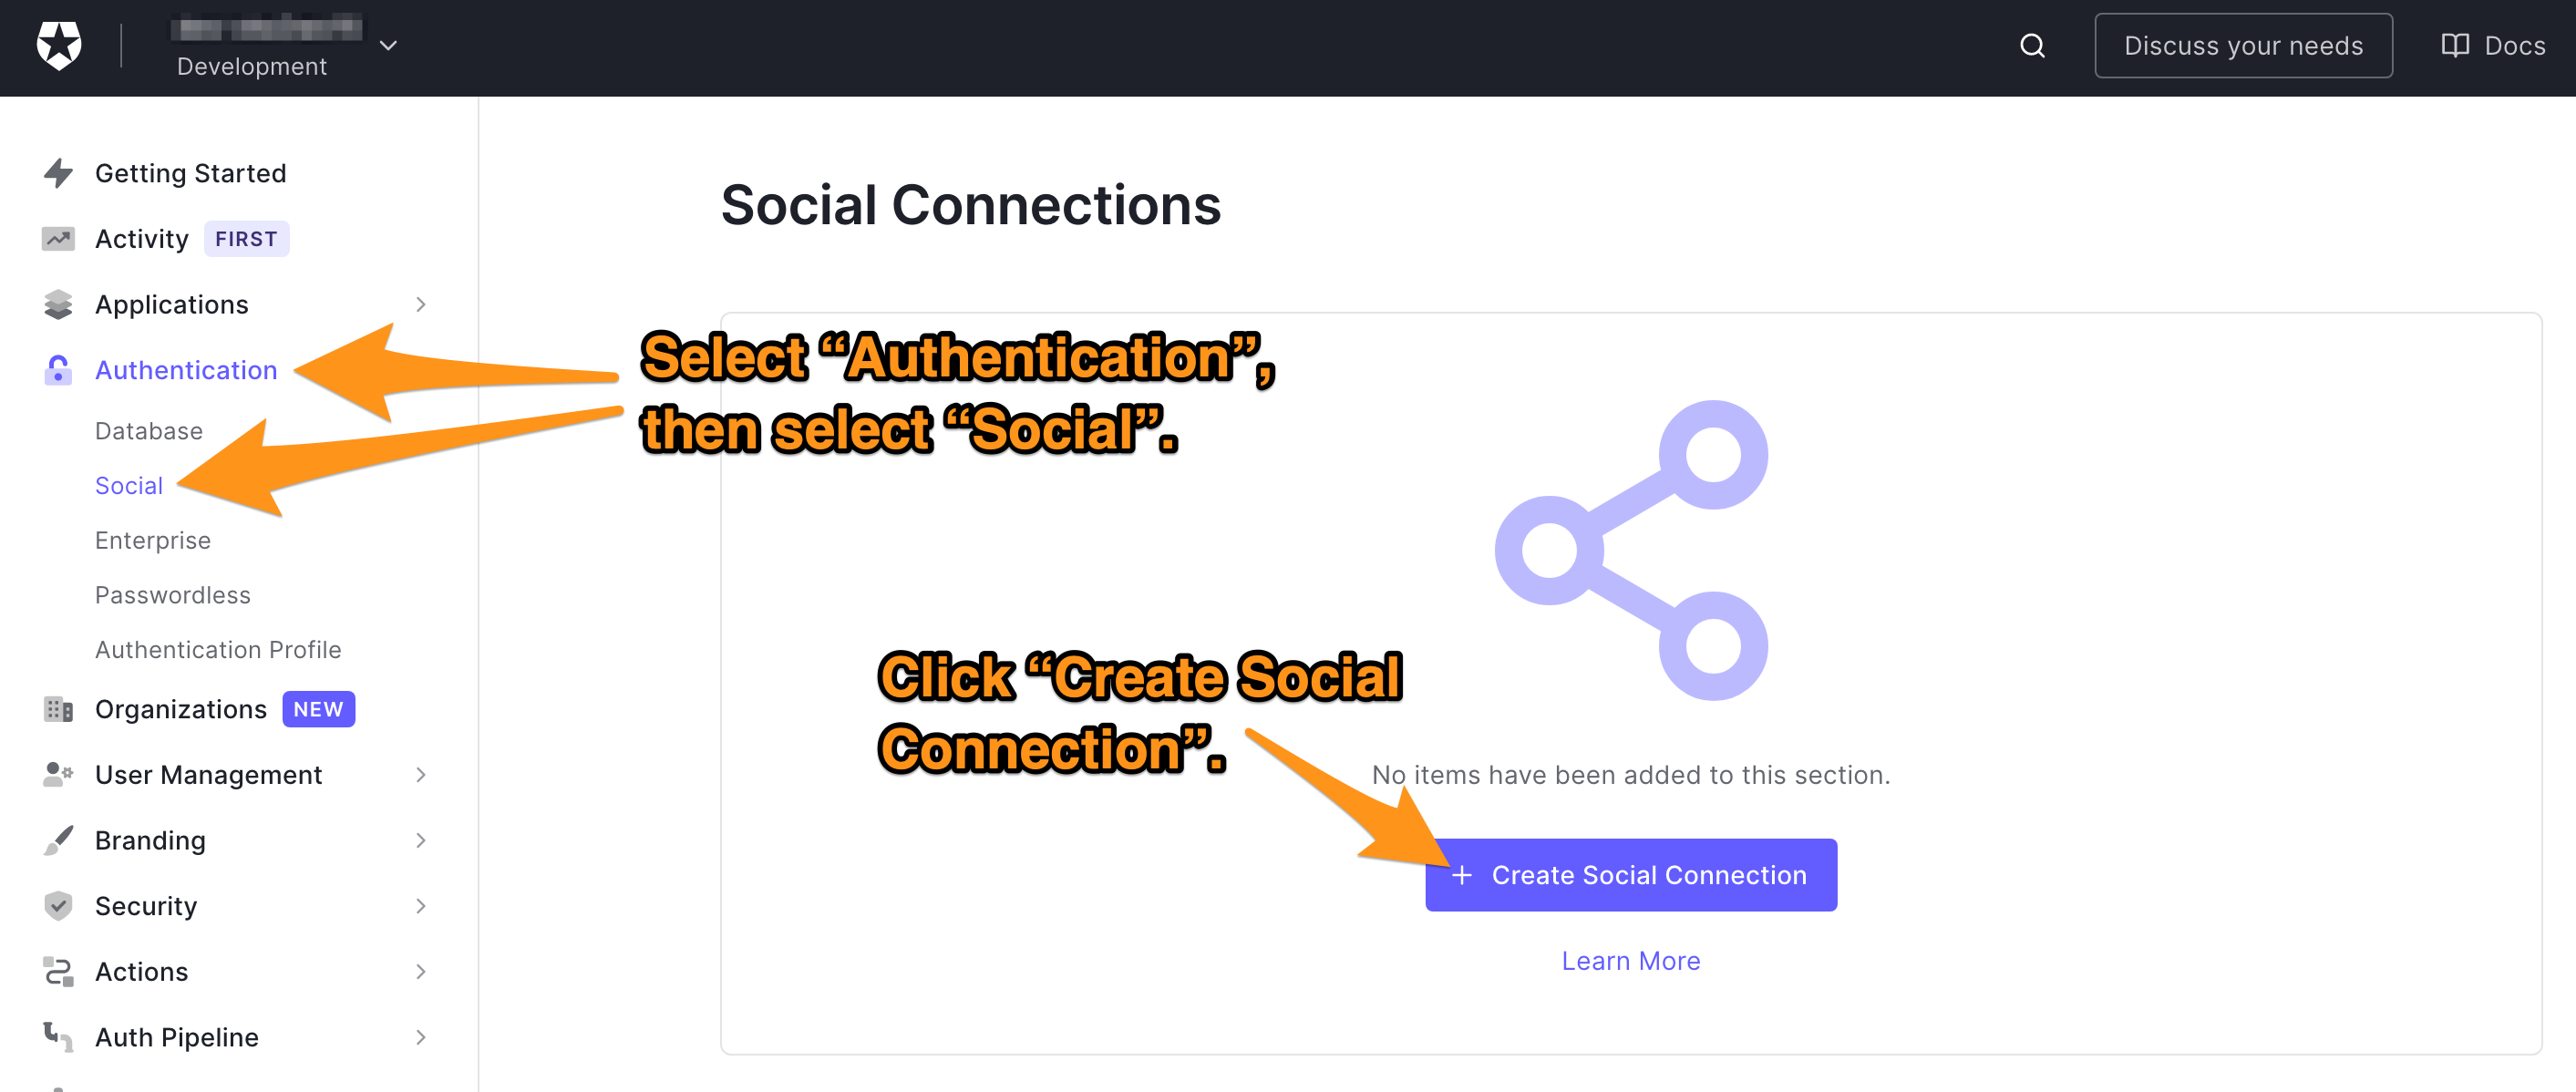
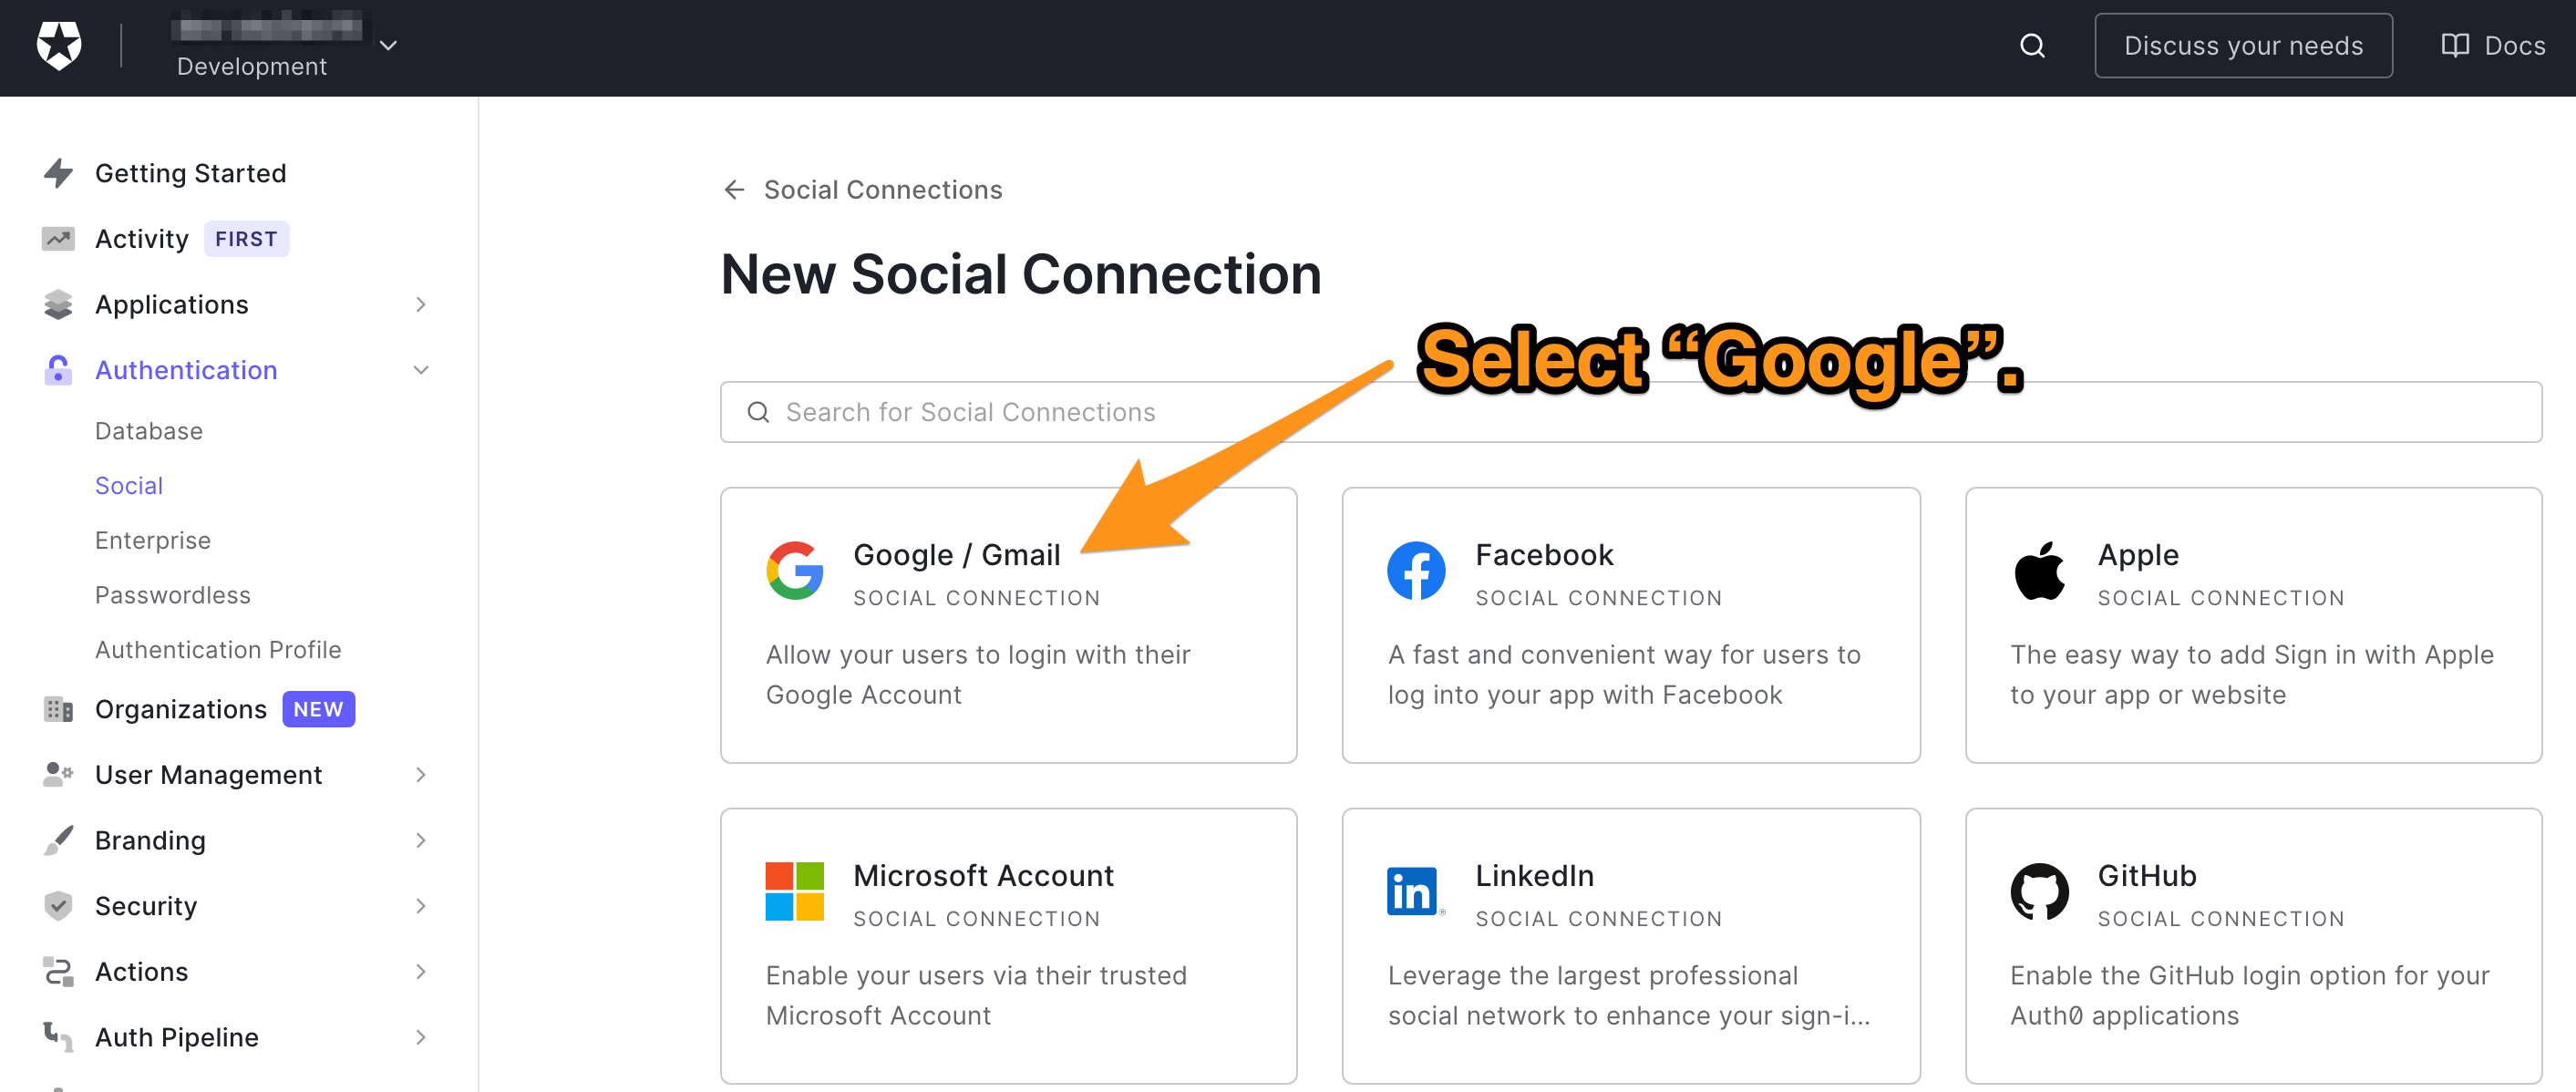
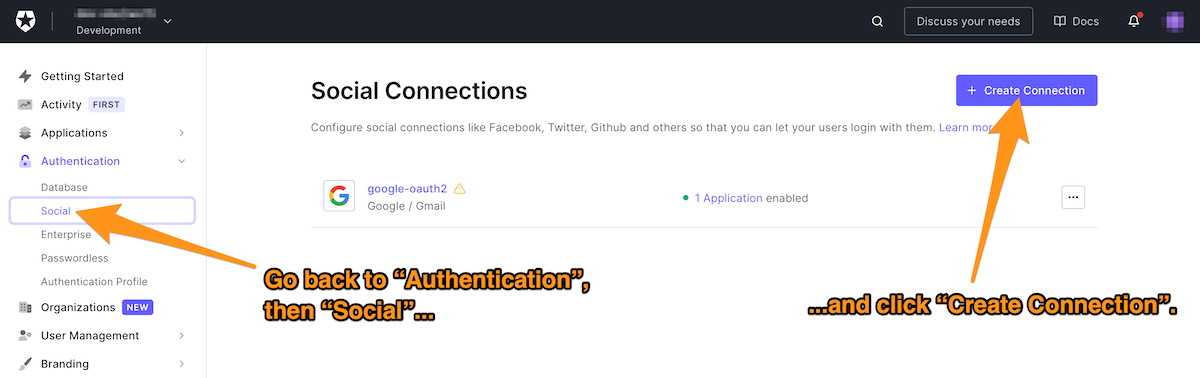
🛠 In the Auth0 dashboard, select Authentication in the left column menu, then select Social. This takes you to the Social Connections page, where you should click the Create Social Connection button:
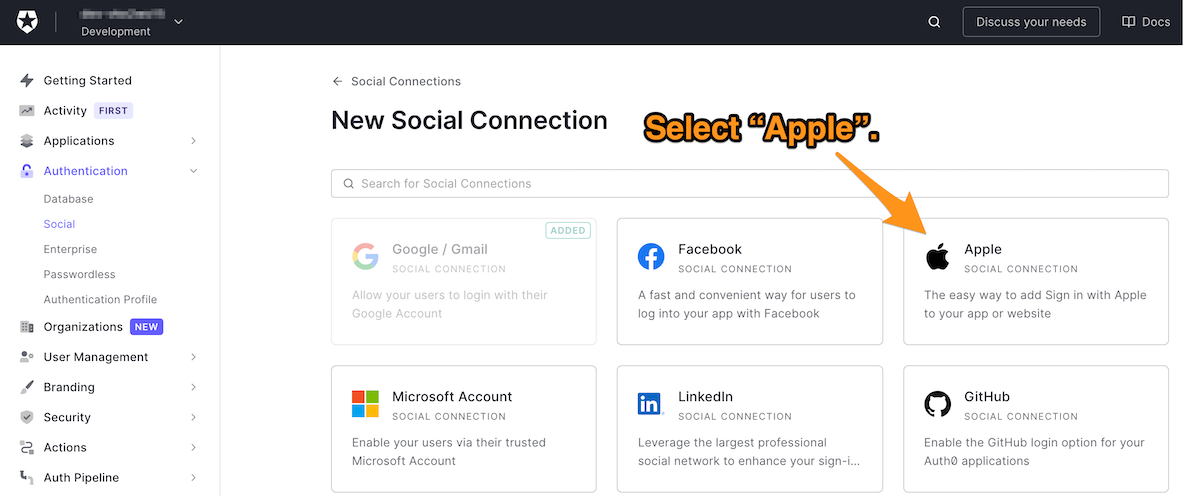
You will be taken to the New Social Connection page, which has a list of social login providers that integrate with Auth0.
🛠 Select Google:
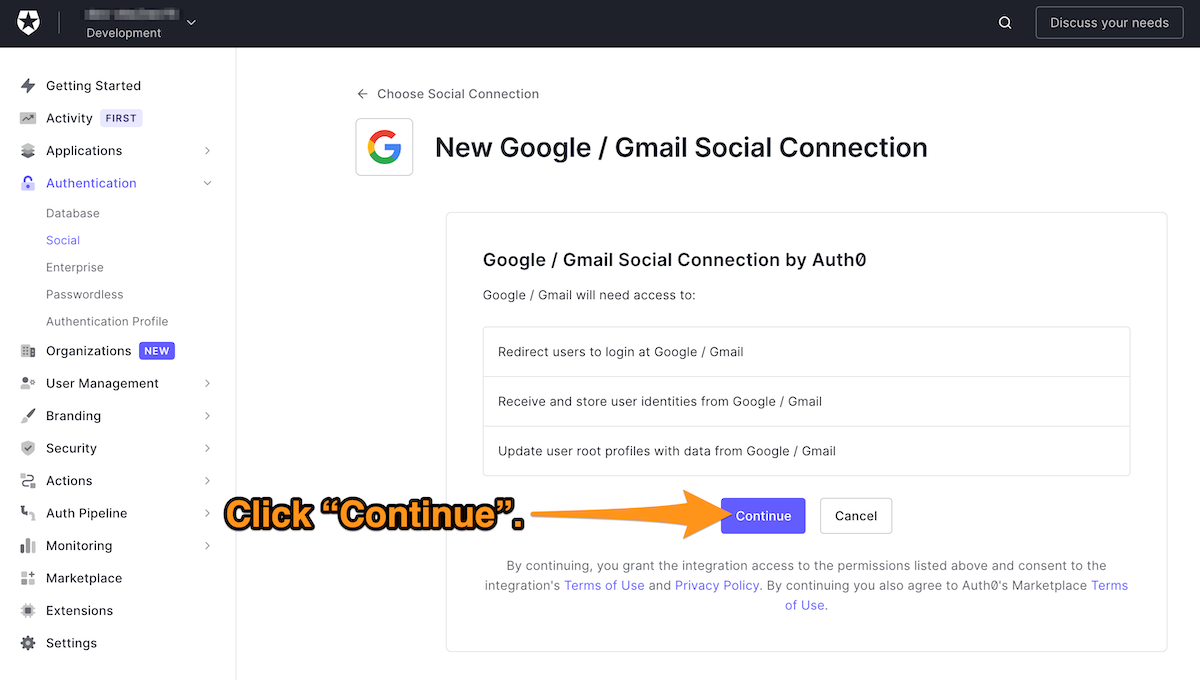
You will now be on the New Google / Gmail Social Connection page, which tells you what kind of user information is accessed by Google social login.
🛠 Click Continue:
A new page with a number of fields will appear; this is the connection’s Settings tab.
As long as you’re working in a development environment, you only need to fill the Name field (which provides a name for this connection) and leave all the other fields empty. You can always use the default value in the Name field:
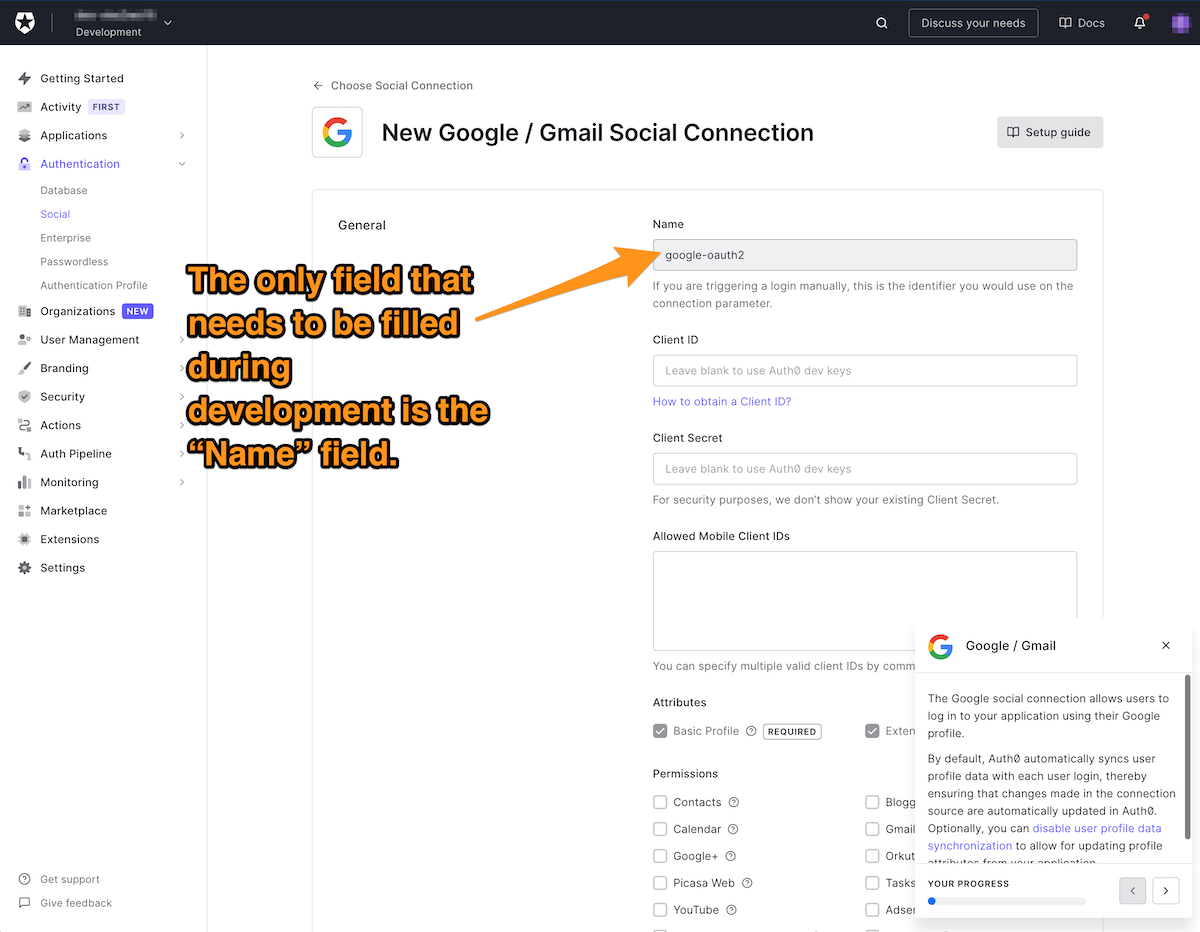
However, production apps require you to provide a Client ID and Client Secret (doc) and specify the Allowed Mobile Client IDs. These topics will be covered in another video or article.
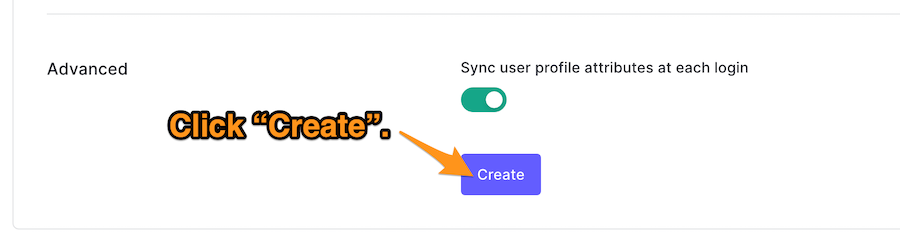
🛠 Create the Google/Gmail connection by scrolling to the bottom of the page and clicking Create:
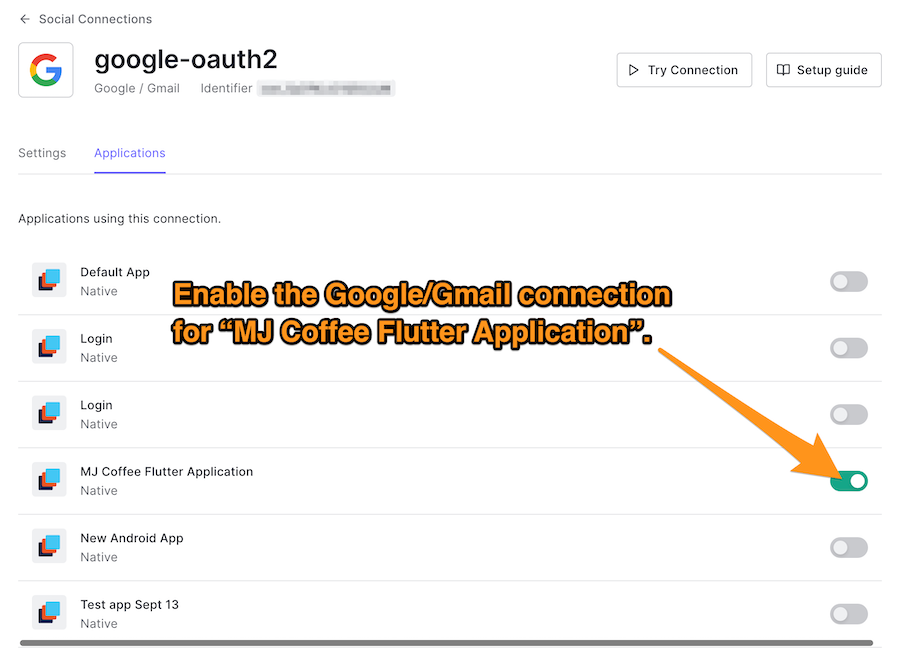
This will create the connection, and you’ll be taken to its Applications tab. You’ll see a list of your applications, which will allow you to enable the Google/Gmail connection for any of them. Enable the connection for the MJ Coffee application:
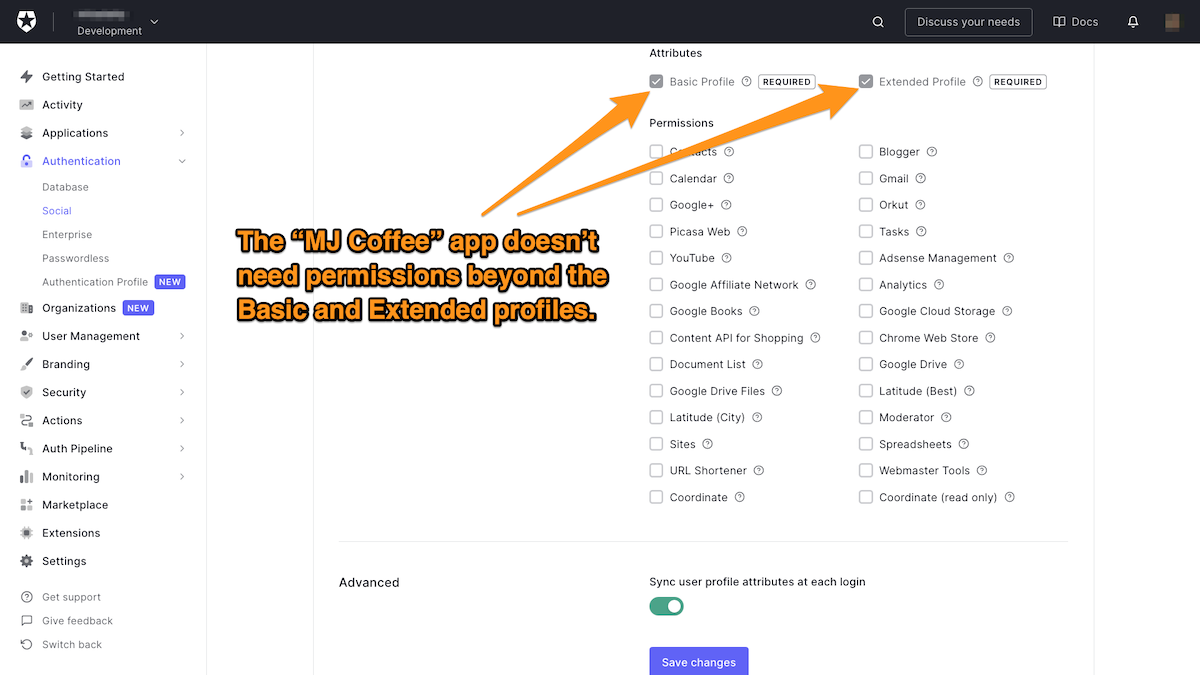
You may also set more permissions that the end-user will need to approve during authorization. These permissions depend on your application and what you want to do on behalf of the user. The MJ Coffee app doesn’t need any extra permissions beyond the basic and extended profile.
🛠 Make sure you sync user profile attributes at each login and hit the Save button.
Create an Apple ID social connection
🛠 Once again in the Auth0 dashboard, select Authentication in the left column menu, then select Social. This takes you to the Social Connections page, where you should click the Create Social Connection button:
🛠 This time, select Apple:
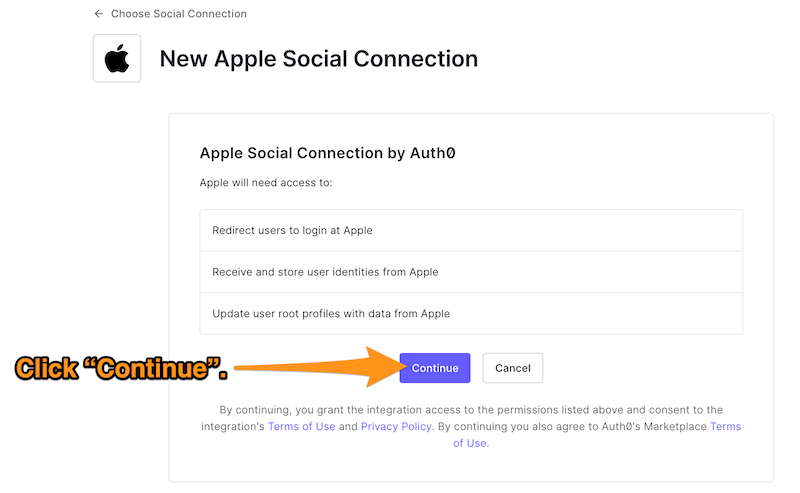
You will now be on the New Apple Social Connection page, which tells you what kind of user information is accessed by Apple social login.
🛠 Click Continue:
As long as you’re working in a development environment, you can leave the Client ID and Client Secret Signing Key fields empty. You will need proper keys for those fields when the app goes to production; this document covers that topic in more detail.
The Apple Team ID and Key ID values are required:
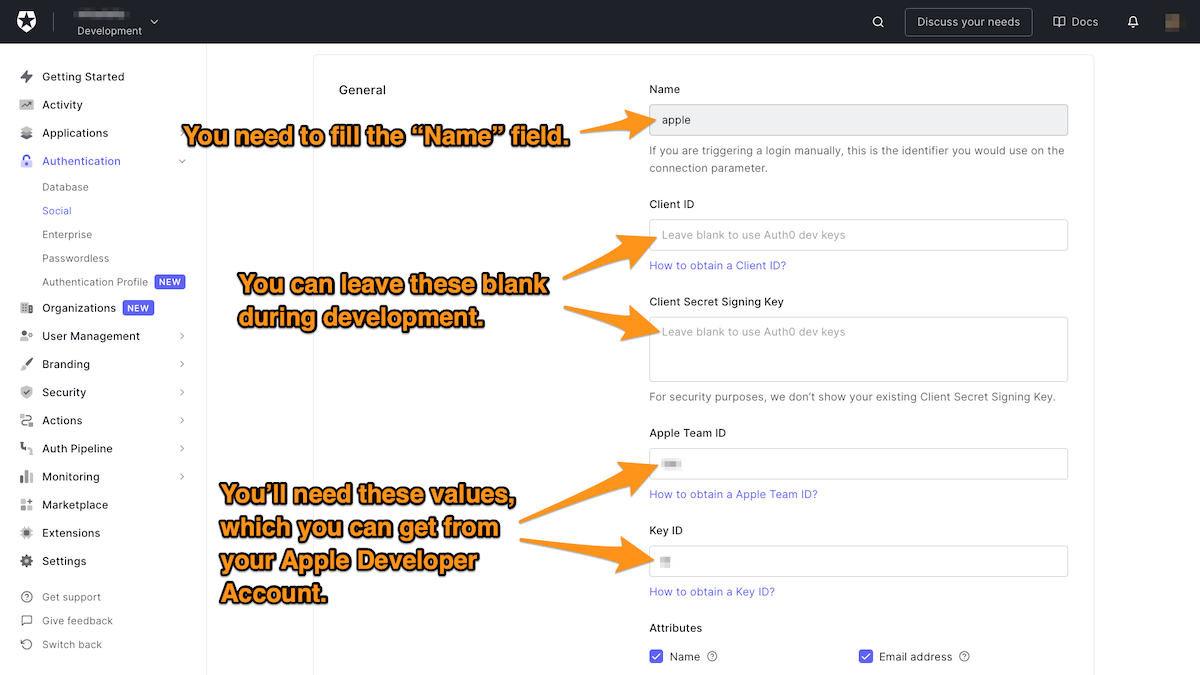
- To get your Apple Team ID, you need an Apple Developer Account.
- To get a Key ID for your app, you need to register that app using your Apple Developer Account.
🛠 Sign in to your Apple Developer Account, and go to the Membership page and make a note of your Team ID.
🛠 If you have a registered app, you can skip the following steps and jump to the list of tasks for creating a service ID. Otherwise, follow the steps below:
- In the Apple Developer Portal, go to Certificates, IDs, & Profiles > Identifiers and click the blue “plus” icon next to Identifiers to create a new App ID.
- Choose App IDs as the identifier type and click Continue.
- Provide a description and a Bundle ID in reverse-domain name format (e.g.:
com.mydomain.mjcoffee). - Scroll down and check Sign In with Apple.
- Click Continue, and then click Register.
🛠 Once the app is registered, it’s time to create a service ID:
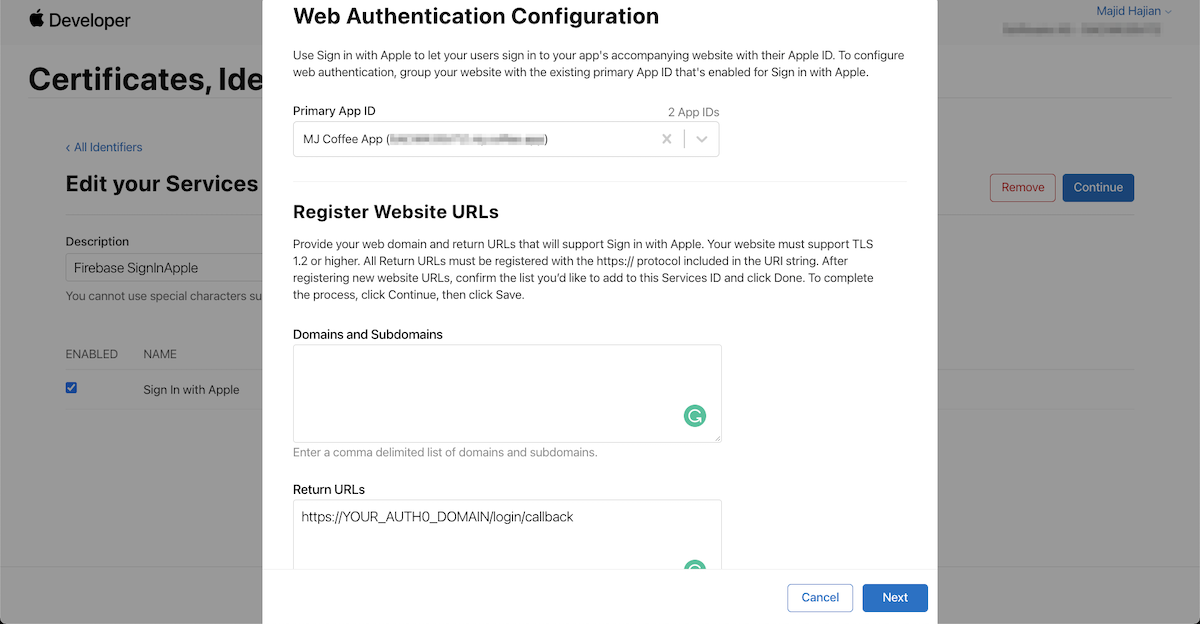
- Return to the Certificates, IDs, & Profiles section, and click the blue “plus” icon next to Identifiers.
- Choose Service IDs and select Continue. Fill in the description and identifier (e.g.:
com.mydomain.mjcoffee). - After checking Sign In with Apple, select Configure, and define your Web Domain (e.g.:
com.mydomain.mjcoffee) and your "Return URL". Ensure that your Return URL is your Auth0 domain and that it follows this format:https://YOUR_AUTH0_DOMAIN/login/callback.
🛠 Finally: save, continue and then register the service.
Set up your Client Secret Signing Key
🛠 Follow these steps:
- Go to Keys, which is located in the Certificates, Identifiers, & Profiles section of your Apple developer dashboard.
- Select the blue “plus” icon to add a new key.
- Enter a Key Name and check the Sign In with Apple option.
- Select Configure to make sure the Choose a Primary App ID field is filled with the correct App ID.
- Select Save, Continue, and then Register.
- On the page to which you're redirected after registering, make a note of the Key ID. Then download the key; it will have a
.p8filename extension.
🛠 Go back to your Apple social connection settings and paste the Key ID. Ensure the proper attributes are selected (Name, Email) and sync user profile at each login is enabled. Hit Save.
Enable Social Connections
🛠 Once you have created all your social connections and set them up correctly, go back to your applications. Go to the Connections tab and enable your newly-made social connections:
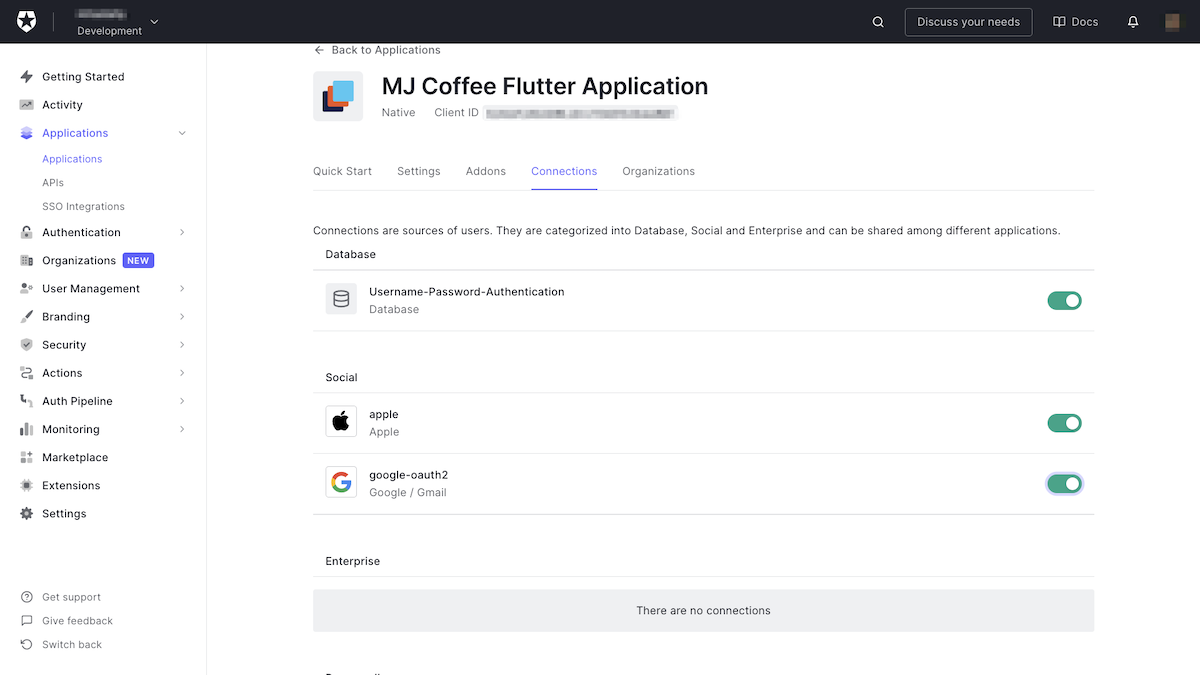
As you can see, adding and removing social connections for your apps is now as simple and flicking a switch.
On the Flutter side, I have good news: you don’t need to implement anything there!
Restart the app, log out, then try to log in. You’ll see this:
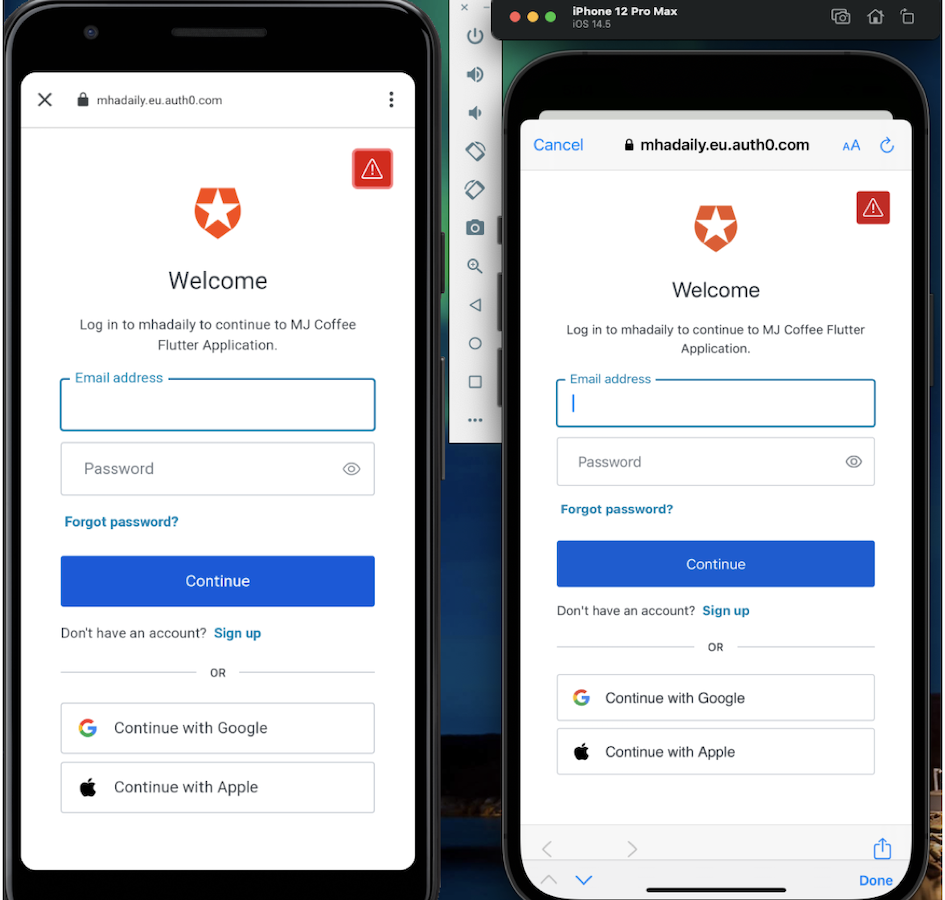
That's it! The login screen will now display social login buttons, and their login flows will be ready to use.
Branding
While it’s fine to use the default branding in development, you want the login page to be customized to your “look and feel” once the app’s in production.
Auth0 allows you to customize your login page through a number of options. You can change the look and feel of the login page by adding colors and logos, and you can customize the user notification part of the process as well: email templates, text messages, and so on. It’s all in the Branding section of the Auth0 dashboard:

Add Roles
You may want to provide certain functionalities to the user based on their roles. This is easy with proper authorization server such as Auth0, which facilitates adding roles and specifying what users in each role are allowed to do.
In the MJ Coffee app, there are three different roles:
- Admin: These are administrators, and they will have access to all the app’s functionality with full permissions.
- Customer: This is the default role for registered or logged-in users. They are limited to the app’s customer-facing features. You will automatically assign this role to all users upon registration or login, and you will learn how to do so later on in this tutorial.
- Employee: These are coffee shop employees. They can access the community screen to answer customer requests in the support chat, as well as other employee-facing features.

You can add more roles to the app as the need arises.
User Management in Auth0
Auth0 provides the infrastructure to store users and their information on its cloud database.
For the MJ Coffee app, Auth0’s cloud database is sufficient. One of Auth0’s goals is to reduce the cost of extra infrastructure maintenance and cost.
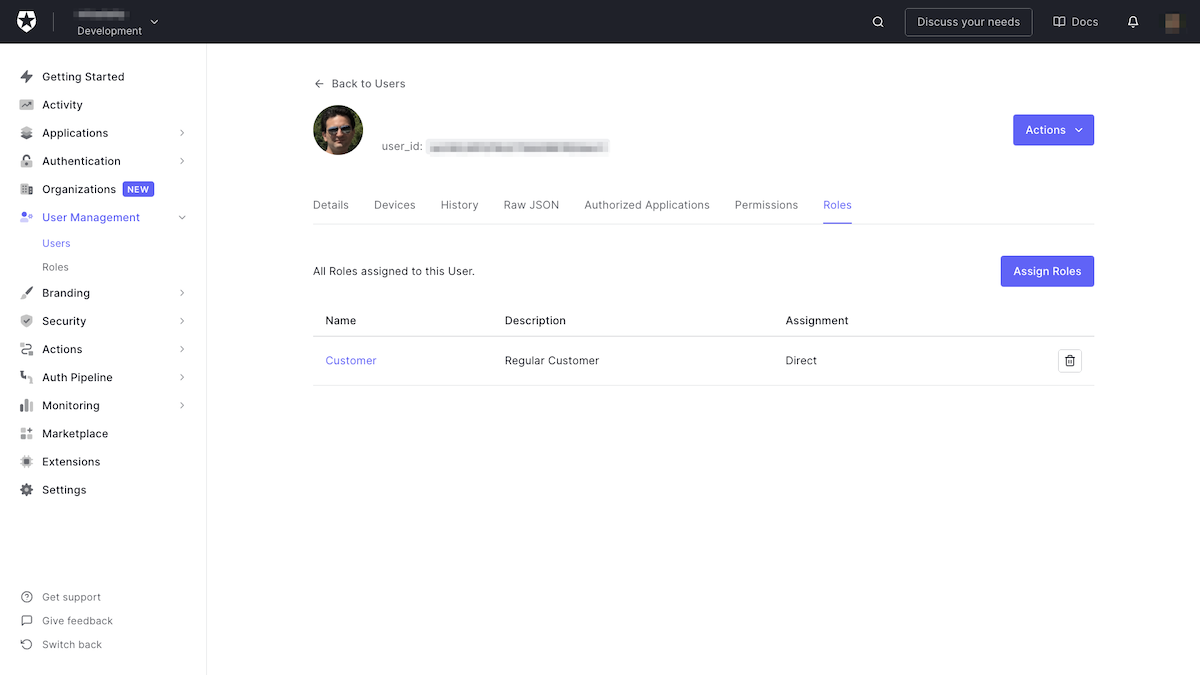
You can access users by selecting User Management in the left column menu of the Auth0 dashboard. The Users page allows you to create new users and manage your existing ones by changing their details, adding permissions and roles, or revoking their access.
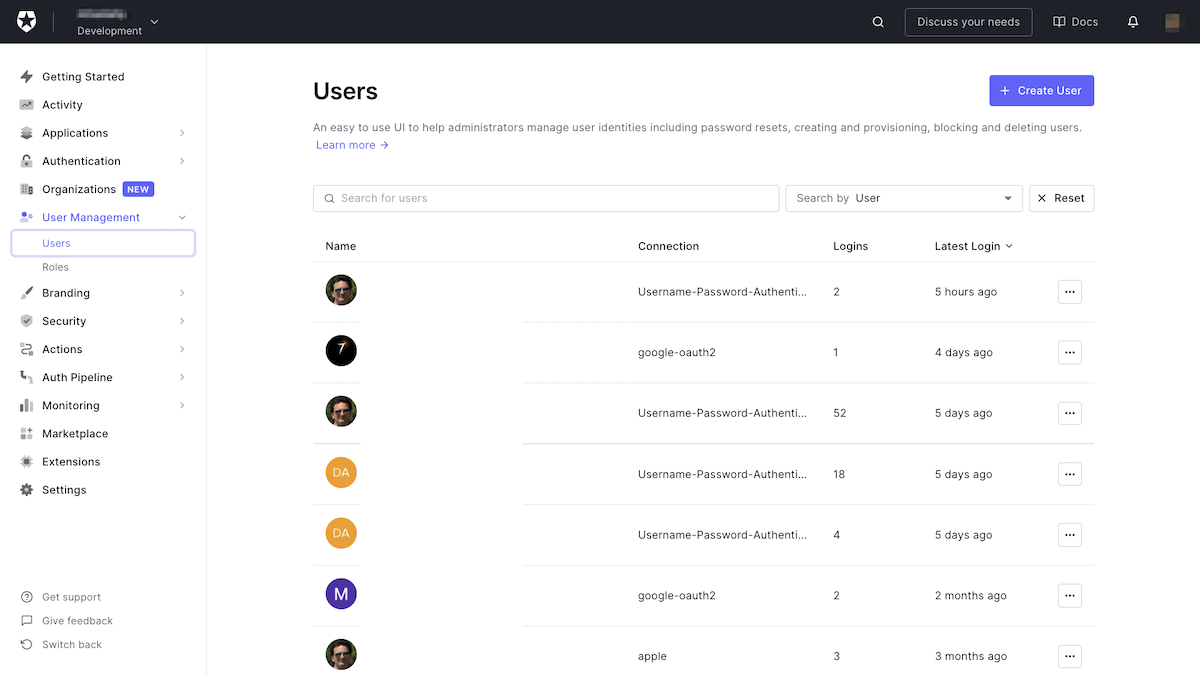
When you open a user, you’ll see that Auth0 provides in-depth details about that user, including basic account data, metadata, their devices, and their history, which might be pretty helpful for debugging the application or investigating a particular user’s access activity, permissions, and roles.
Each user account stores some basic information about the user: name, email address, the date and time when the account was created, and so on.
Additional information can be attached to a user by adding to these metadata stores: their user metadata, which is a key-value structure for storing information about the user. You can also store information in the usermetadata or manipulating `appmetadata`, which helps to provide more information to the Flutter application while receiving user details.
Moving Forward
In the next section of this tutorial, you will learn how to add real-time chat to the app.
About the author

Majid Hajian
Google Developer Expert