
TL;DR: Relay is an open source framework from Facebook for declarative data interaction with GraphQL. It fills the data fetching gap that existed with React + Flux applications and allows developers to request exactly the data they need for each component. In this tutorial, we see how to set up a basic Relay application and how to protect GraphQL with JWT authentication. You can check out the repo for the tutorial, as well as the Auth0 docs for an integration with express-jwt.
---
Relay and GraphQL
Facebook has just open sourced Relay, a JavaScript framework for data interaction. Using GraphQL, Relay makes it easier to get data to and from the server and also eases tight coupling between client-side components and the server. It allows developers to focus more on their actual applications and less on the details of moving data around.
Those familiar with Flux will know that it allows apps to have one-way data flow, which means that the data needs for each component are easy to reason about. However, Flux didn't provide a good way to interact with the server, so Relay can be thought of as the next evolution of Flux.
Often, crafting application data sources can come down to trade-offs between performance and duplication of code. To make sure all the data our application needs for a given component is ready at the same time, we could set up an endpoint to request everything. However, this will have impact performance. We could define a lot of custom endpoints that serve us only the data we need, but this would mean writing a lot of code and potentially making a lot of HTTP requests. In either case, if we were to change our components so they required more data, we would probably need to adjust the structure of the data coming from our server. Ultimately, this arrangement between client and server can be somewhat brittle.
To address these issues, Relay allows us to specify exactly the shape of the data that we want from the server for a given component. Because we can place our queries within our components, we can better reason about the data associations for each component.
“Relay let us specify exactly the shape of the data that we want from the server for a given component.”
Tweet This
Without Relay, components make requests to many different endpoints.

With Relay however, all requests are made to a single GraphQL endpoint through queries and fragments.

Getting Started
In this tutorial, we will take a cursory look at Relay and GraphQL by building a simple application that allows us to display programming conferences that a user is registered to attend. This tutorial will focus on the core concepts of Relay and will cover only data retrieval. We will see how to write data in the next article of this series.
Schemas
Since Relay uses GraphQL, we need to expose a GraphQL server that serves data when requested. After setting up the database interaction, the first step is to define a schema for GraphQL to use. The schema can be thought of as where we register anything that we want to pull out of GraphQL. This includes declarations for our data types, queries, and mutations (changes to data). GraphQL enforces strong typing and provides methods for us to register types.
Containers
Relay lets us do composition with our React components in much the same way that we're used to. It provides a higher-order component known as a container, which is a wrapper around regular React components. Containers let us tell Relay about our React components' data needs. They are where we specify fragments to query on the server before passing them down to other components via this.props.
Queries and Fragments
A query looks a little bit like a JSON object, but with keys only and not values. GraphQL uses a query string to look for matches and serves them back to the client. When we build our schemas, we need to tell GraphQL about the fields associated with each query type we want. On those types, we can create relationships with other types. Once those are set up, we use query to retrieve the root fields of the given type, or `fragment to retrieve the fields from whatever relationship we defined.
Installing a Starter Package
The best way to get started and follow along is to clone and install a prepared Relay package. We're basing this tutorial on Michael Hart's simple-relay-starter. This repo is a modification of Facebook's relay-starter-kit. It makes getting up and running with Relay easier because it requires less boilerplate on the backend.
Clone the repo and then run:
npm install
npm run dev
Relay needs a schema.json file to be built from the main schema, and running with dev will allow these changes to be picked up.
Setting Up the Mock Database
We won't set up a real database for this example, because we want to focus on Relay and its features. Instead, we'll set up a mock database that could easily be substituted for a real one.
First, let's set up the models for our data.
// schema/database.js

function User(id, name) {
  this.id = id.toString();
  this.name = name;
}

function Framework(id, name) {
  this.id = id.toString();
  this.name = name;
}

function Conference(id, frameworkId, name, description, attendees) {
  this.id = id.toString();
  this.framework = frameworkId;
  this.name = name;
  this.description = description;
  this.attendees = attendees;
}
We'll also need to populate some arrays to hold some mocked out data.
// schema/database.js

...

var users = [
  new User(1, 'Ryan'),
  new User(2, 'George')
];

var frameworks = [
  new Framework(1, 'AngularJS'),
  new Framework(2, 'React'),
  new Framework(3, 'JavaScript'),
  new Framework(4, 'NodeJS')
];

var conferences = [
  new Conference(1, 1, 'ng-conf', 'The world's best Angular conference', [1,2]),
  new Conference(2, 2, 'React Rally', 'Conference focusing on Facebook's React', [1]),
  new Conference(3, 1, 'ng-Vegas', 'Two days jam-packed with Angular goodness with a focus on Angular 2', [2]),
  new Conference(4, 3, 'Midwest JS', 'Midwest JS is a premier technology conference focused on the JavaScript ecosystem.', [2]),
  new Conference(5, 4, 'NodeConf', 'NodeConf is the longest running community driven conference for the Node community.', [1,2])
];

...
Here we're using the models to create some users, frameworks, and conferences. The final step in the database will be to export methods that use this data.
// schema/database.js

...

module.exports = {
  User: User,
  Framework: Framework,
  Conference: Conference,

  getUser: function(id) {
    return users.filter(function(user) {
      return user.id == id
    })[0]
  },

  getConference: function(id) {
    return conferences.filter(function(conference) {
      return conference.id == id
    })[0]
  },

  getConferencesByUser: function(userId) {
    var confs = [];
    conferences.forEach(function(conf) {
      conf.attendees.forEach(function(user) {
        if (user == userId) {
          confs.push(conf);
        }
      });
    });
    return confs;
  }
}
Setting Up the Schema
When putting together the schema for GraphQL, we'll need to set up our node definitions; in other words, the object and type that should be associated with a given node based on a global ID. GraphQL tracks nodes based on a global ID, from which we can check the type.
// schema/schema.js

var GraphQL = require('graphql')
var GraphQLRelay = require('graphql-relay')
var db = require('./database')

// The schema describes the types and queries for our data and
// is the spot to register them

// We need to set up our node definitions to provide a node interface.
// Relay uses global ids for entities

var nodeDefinitions = GraphQLRelay.nodeDefinitions(function(globalId) {
  var idInfo = GraphQLRelay.fromGlobalId(globalId)
  if (idInfo.type == 'User') {
    return db.getUser(idInfo.id)
  } else if(idInfo == 'Conference') {
    return db.getConference(idInfo.id)
  }
  return null;
});
Next, we'll need to define our user type. This is where we detail all of fields involved with the type, as well as the associations with other types.
// schema/schema.js

...

var conferenceType = new GraphQL.GraphQLObjectType({
  name: 'Conference',
  description: 'A conference',

  // Relay will use this function to determine if an object in your system is
  // of a particular GraphQL type
  isTypeOf: function(obj) { return obj instanceof db.Conference },

  fields: {
    id: GraphQLRelay.globalIdField('Conference'),
    name: {
      type: GraphQL.GraphQLString,
      description: 'The name of the conference',
    },
    description: {
      type: GraphQL.GraphQLString,
      description: 'The description of the conference'
    }
  },
  // This declares this GraphQL type as a Node
  interfaces: [nodeDefinitions.nodeInterface],
});

var userType = new GraphQL.GraphQLObjectType({
  name: 'User',
  description: 'A person who uses our app',
  isTypeOf: function(obj) { return obj instanceof db.User },

  fields: function() {
    return {
      id: GraphQLRelay.globalIdField('User'),
      name: {
        type: GraphQL.GraphQLString,
        description: 'The name of the user',
      },

      // We can set up a relationship between users and conferences here
      conferences: {
        description: 'A listing of the user's conferences',

        // Relay gives us helper functions to define the Connection and its args
        type: GraphQLRelay.connectionDefinitions({name: 'Conference', nodeType: conferenceType}).connectionType,

        // argument to tell GraphQL which user to pass back
        // in the resolve block
        args: {
          userToShow: { type: GraphQL.GraphQLInt }
        },

        // The resolve block will complete a query and pass back
        // data for the user id supplied by the arguments we pass in
        resolve: function(user, args) {
          return GraphQLRelay.connectionFromArray(db.getConferencesByUser(args.userToShow), args)
        },
      },
    }
  },
  interfaces: [nodeDefinitions.nodeInterface],
});

...
We've now registered the conferenceType and userType with GraphQLObjectType and named and described them. The isTypeOf method checks whether objects used in the application are instances of those we defined in our mock database. We register root fields and relationships in fields, and in the case of userType, we define a relationship with conferences.
On the type key within the conferences relationship, we use connectionDefinitions to refer to the conference type defined above. We've got an argument defined on args called userToShow, which we will use later to find users by id from the front end. It is this argument that is passed into the getConferencesByUser method to pull out a listing of conferences for a given user.
Finally, we need to export the GraphQLSchema so that it can be used from the app.
// schema/schema.js

...

// Types and queries are exported with GraphQLSchema
module.exports = new GraphQL.GraphQLSchema({
  query: new GraphQL.GraphQLObjectType({
    name: 'Query',
    fields: {
      // Relay needs this to query Nodes using global IDs
      node: nodeDefinitions.nodeField,
      // Root queries
      user: {
        type: userType,
        resolve: function() {
          return db.getUser(1)
        },
      },
    },
  }),
});

...
We point the user query to its type, userType, and tell it what database operation to perform on initialization in the resolve function.
Setting Up the React Components
With the database and the schema done, we can now focus on building the components for the application. The app will show conferences that each user is attending, so we'll make a component that displays each in a card. We'll use Bootstrap for styling. Before that, we'll need a top-level component that will call on the conference card child component.
// ConferenceApp.js

/* eslint-env es6 */
var React = require('react')
var Relay = require('react-relay')

// ConferenceApp is our top-level component
class ConferenceApp extends React.Component {
  render() {
    return(
      <div className="container">
        <h2>{this.props.user.name} Conferences</h2>
        {this.props.user.conferences.edges.map(edge =>
          <Conference edge={edge} />
        )}
      </div>
    )
  }
}
In this component, we map over the edges from the data that will be returned once everything has been set up. We're mapping the edges of a component called Conference, which we're passing the edge information into. Now, let's make use of this data in the conference component.
// ConferenceApp.js

...

class Conference extends React.Component {
  render() {
    // We get the conference edges passed in from the top-level container
    // The edges have data like name and id on them
    var edge = this.props.edge;
    return (
      <div className="col-sm-4">
        <div className="panel panel-default" key={edge.node.id}>
          <div className="panel-heading">
            <h3>{edge.node.name}</h3>
          </div>
          <div className="panel-body">
            {edge.node.description}
          </div>
        </div>
      </div>
    )
  }
}

...
In this component, we get the name and description of the nodes within each edge.
We need to wrap the higher-order Relay container around the ConferenceApp component and export it.
// ConferenceApp.js

// We need to export a Relay container that wraps around
// the top-level ConferenceApp component
exports.Container = Relay.createContainer(ConferenceApp, {
  // We initially want to get the first user's conferences
  initialVariables: {
    userToShow: 1
  },
  fragments: {
    // Results from this query will be placed on this.props for access in
    // our component
    user: () => Relay.QL`
      fragment on User {
        name,
        conferences(userToShow: $userToShow) {
          edges {
            node {
              id,
              name,
              description
            },
          },
        },
      }
    `
  },
});
The container allows us to define some initialVariables which are useful for querying specific data when the app loads. In this case, we're saying that we want the first user. You'll recall that in the schema we received an argument call userToShow when we defined conferences on the userType. This is that variable. The object on fragments is a string that is parsed by GraphQL to execute the query. In it, we ask for the user's name and then the conferences that are attending. For the conferences, we get back the id, name and description on nodes.
We also need to export the queries for the RootContainer to use. This is called the route for the component, but as Facebook states, this name is a bit misleading and will likely change.
// ConferenceApp.js

...

// The queries to be used by the root container
exports.queries = {
  name: 'ConferenceQueries',
  params: {},
  queries: {
    // user in this case matches the fragment in the container above
    user: () => Relay.QL`query { user }`
  },
}
The query names here line up with the fragment names specified above.
Rendering in the Browser
As the last step, we'll specify our RootContainer as the entry point for the browser to pick up. If you're following along in simple-relay-starter, this will be in browser.js.
// browser.js

/* eslint-env es6 */
var React = require('react')
var ReactDOM = require('react-dom')
var Relay = require('react-relay')
var ConferenceApp = require('./ConferenceApp')

ReactDOM.render(
  <Relay.RootContainer
    Component={ConferenceApp.Container}
    route={ConferenceApp.queries}
    onReadyStateChange={({error}) => { if (error) console.error(error) }} />,

  document.getElementById('content')
)
The Relay.RootContainer is passed the Relay container we specified as our component, as well as the set of queries for its route.
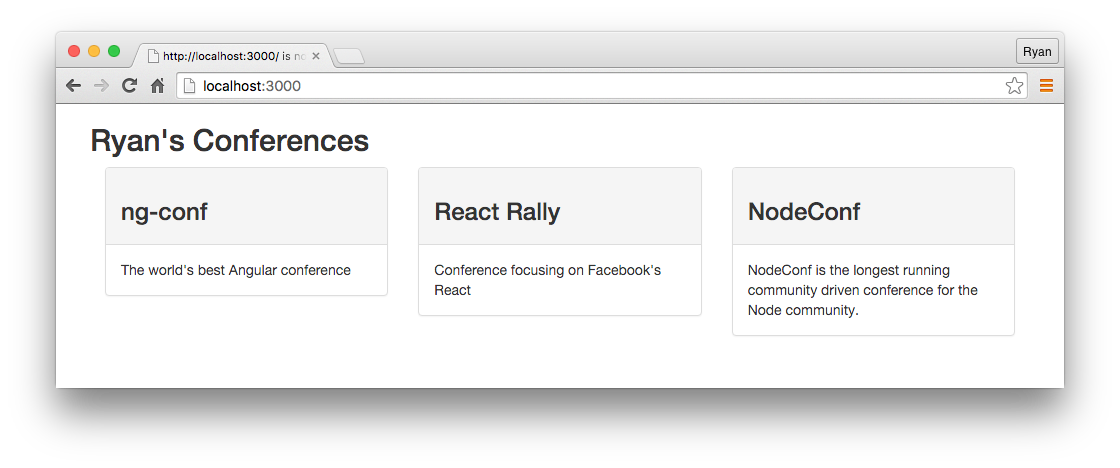
If everything is set up correctly, you should be able to see the app in the browser.
Aside: Authentication is Easy with Auth0
Auth0 issues JSON Web Tokens on every login for your users. This means that you can have a solid identity infrastructure, including Single Sign On, User Management, support for Social (Facebook, Github, Twitter, etc.), Enterprise (Active Directory, LDAP, SAML, etc.) and your own database of users with just a few lines of code. Auth0 is perfect for Single Page Applications and very easy to set up.
Auth0 provides an integration for Relay apps that makes it easy to implement authentication. Have a look at the docs page or open a support ticket with us to find out more.
Implementing Auth in Your Relay App
Relay provides a network layer that allows us to modify the requests that go to the GraphQL endpoint on our server. With it, we can send custom headers with our requests, which is perfect for adding authentication. Let's see how we can protect the whole GraphQL endpoint with express-jwt middleware on the server. We'll authenticate against an Auth0 account, but setting up JWT authentication on your own server will work the same way.
First, we'll need to install express-jwt and some other helpers.
npm install express-jwt dotenv body-parser --save
Next, we need to add in the authentication middleware on the server.
// server.js

var express       = require('express');
var graphqlHttp   = require('express-graphql');
var schema        = require('./schema/schema');
var jwt           = require('express-jwt');
var dotenv        = require('dotenv');
var bodyParser    = require('body-parser');

// The server is just a simple Express app
var app = express()

dotenv.load();

var authenticate = jwt({
  secret: new Buffer(process.env.AUTH0_CLIENT_SECRET, 'base64'),
  audience: process.env.AUTH0_CLIENT_ID
});

app.use('/graphql', authenticate, graphqlHttp({schema: schema}));

...
We're using a .env file to store our Auth0 credentials in this case, and then we're calling them when we set up the jwt middleware. We then just need to pass this middleware into app.use and our endpoint will be protected.
The .env file for Auth0 accounts typically looks like this:
# .env

AUTH0_CLIENT_ID=AUTH0_CLIENT_SECRET
AUTH0_CLIENT_SECRET=AUTH0_CLIENT_ID
Now from the client, we just need to retrieve and store a JWT in local storage. How you implement the request for the JWT is left to your discretion.
With the JWT in local storage, we can set up the network layer to send the JWT as a header one requests to the GraphQL endpoint.
// ConferenceApp.js

var token = localStorage.getItem('id_token');

Relay.injectNetworkLayer(
  new Relay.DefaultNetworkLayer('http://localhost:3000/graphql', {
    headers: {
      Authorization: 'Bearer ' + token
    }
  })
);
With that, our data is protected and we have a way to access it with a JWT.
Wrapping Up
When it comes to data interaction, Relay takes care of details that developers would normally need to worry about on their own. Although quite a bit of boilerplate is needed, querying is more efficient and problematic common edge cases are handled out of the box. The ability to request only the data we require is beneficial, and having queries live right beside the components they serve helps us to reason about our app.
This first look at Relay showed only how to retrieve data from a server. In a future post, we'll cover how to do mutation with Relay.
Big thanks to Michael Hart for his simple-relay-starter repo.
About the author

Ryan Chenkie
Developer
Ryan is a Google Developer Expert, the host of the Entrepreneurial Coder Podcast, the author of Securing Angular Applications, and an all-around fanatic about application security.View profile