
We recently announced the Limited EA for Native Login with passkeys for Android applications, which you can request in your Auth0 tenant by reaching out to your account manager.
In this blog post, you'll learn how to implement signup, login, and logout in your Android application using Auth0's Native Login with passkeys.
Passkeys on Android
Google has extensive documentation on how passkeys should be implemented in its ecosystem, and it's recommended that you always follow their advice and best practices.
On Android, creating and signing in with passkeys happens using the Credential Manager API, which is a Jetpack API that manages user authentication flows and supports multiple sign-in methods, such as username and password, passkeys, and federated sign-in solutions.
Let's look at what the signup and login ceremonies look like in general in an Android app using Auth0.
Sign Up
To create a new account and your passkey, you have to go through the sign up process:
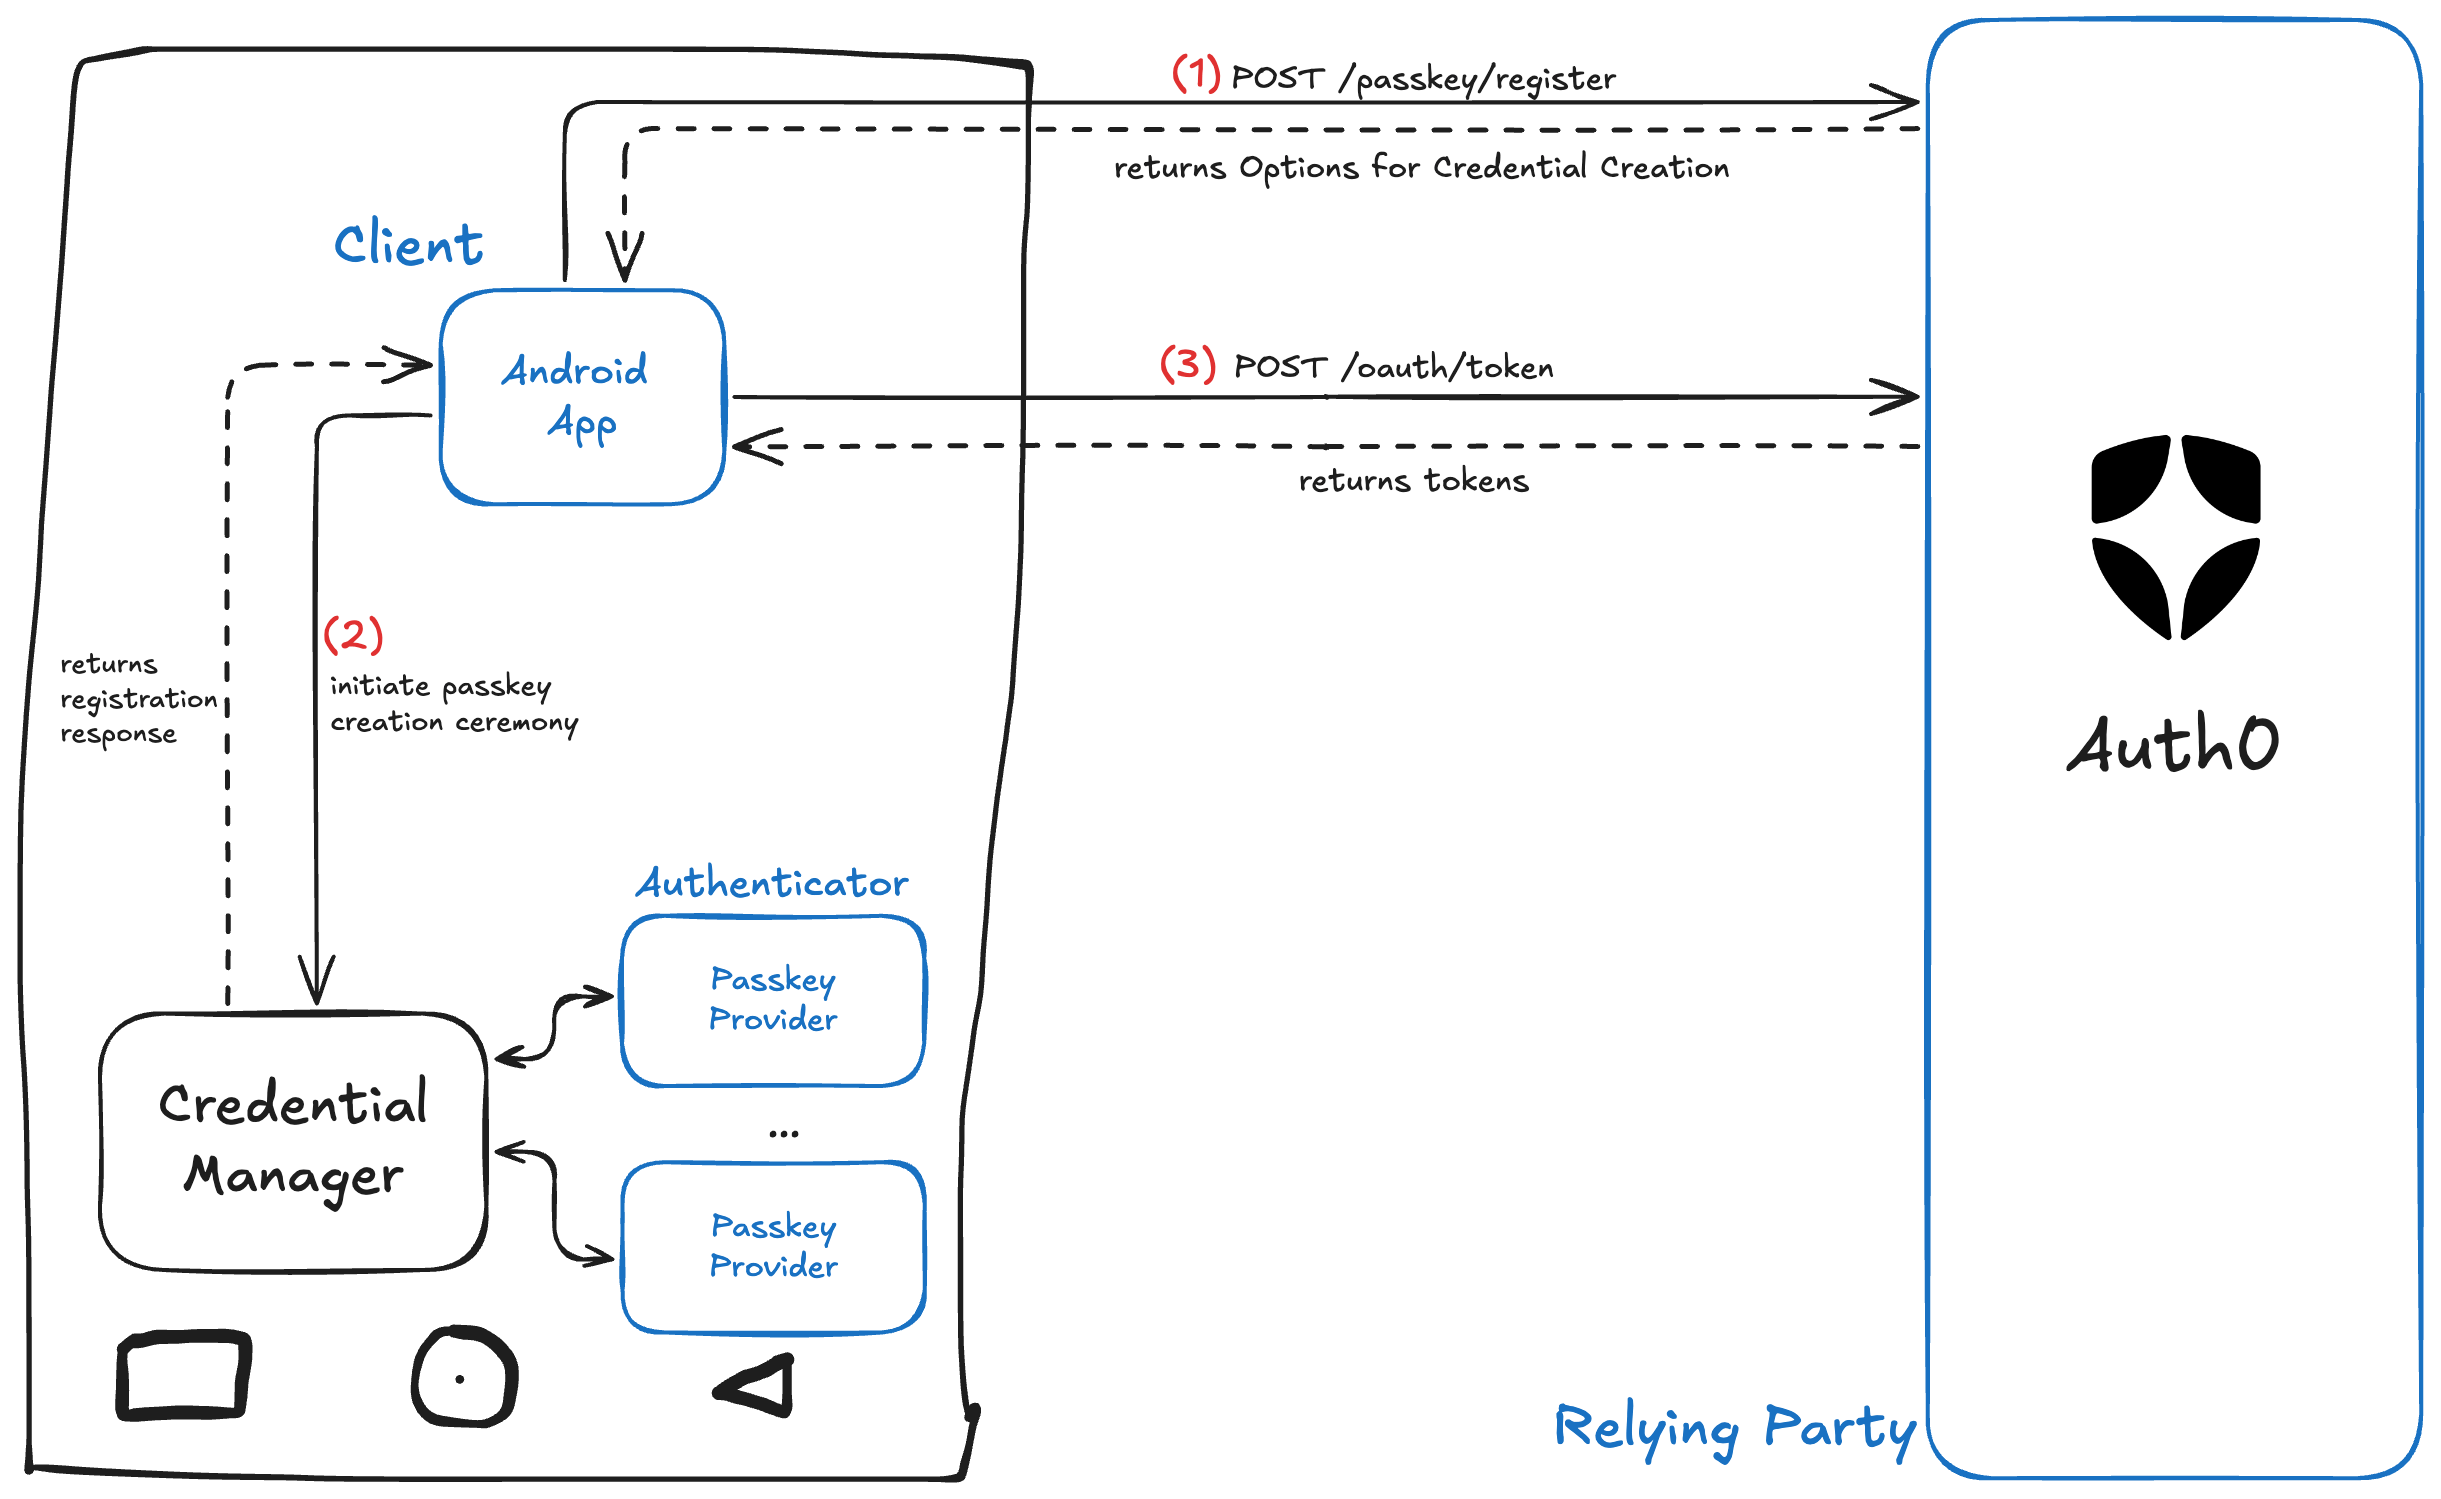
As you see, Auth0 acts as the relying party, your Android app is the client, and what you see as "passkey provider" is the authenticator, but what does that mean? Well, you can have more than one passkey provider; for example, in a Samsung device, you could choose to use Google Password Manager or Samsung Pass, which often come pre-installed, or you could use another provider such as Bitwarden; in each case, Credential Manager will rely on the selected provider to create your credential (as the provider is a passkey authenticator).
Let's analyze the order of events in the diagram above. The first thing that happens (1) is your app calls the POST /passkey/register endpoint via the Android SDK. When successful, Auth0 responds with a challenge and registration options as specified in the WebAuthn Standard.
Then, in (2) your app will create a new credential using Android's CredentialManager. Note this happens entirely in the device. Once you've created the credentials, you'll send the registration response back to Auth0 (3) using the POST oauth/token endpoint to retrieve your ID Token, Access Token, etc.
Login
Similarly to sign up, the login process looks as follows:
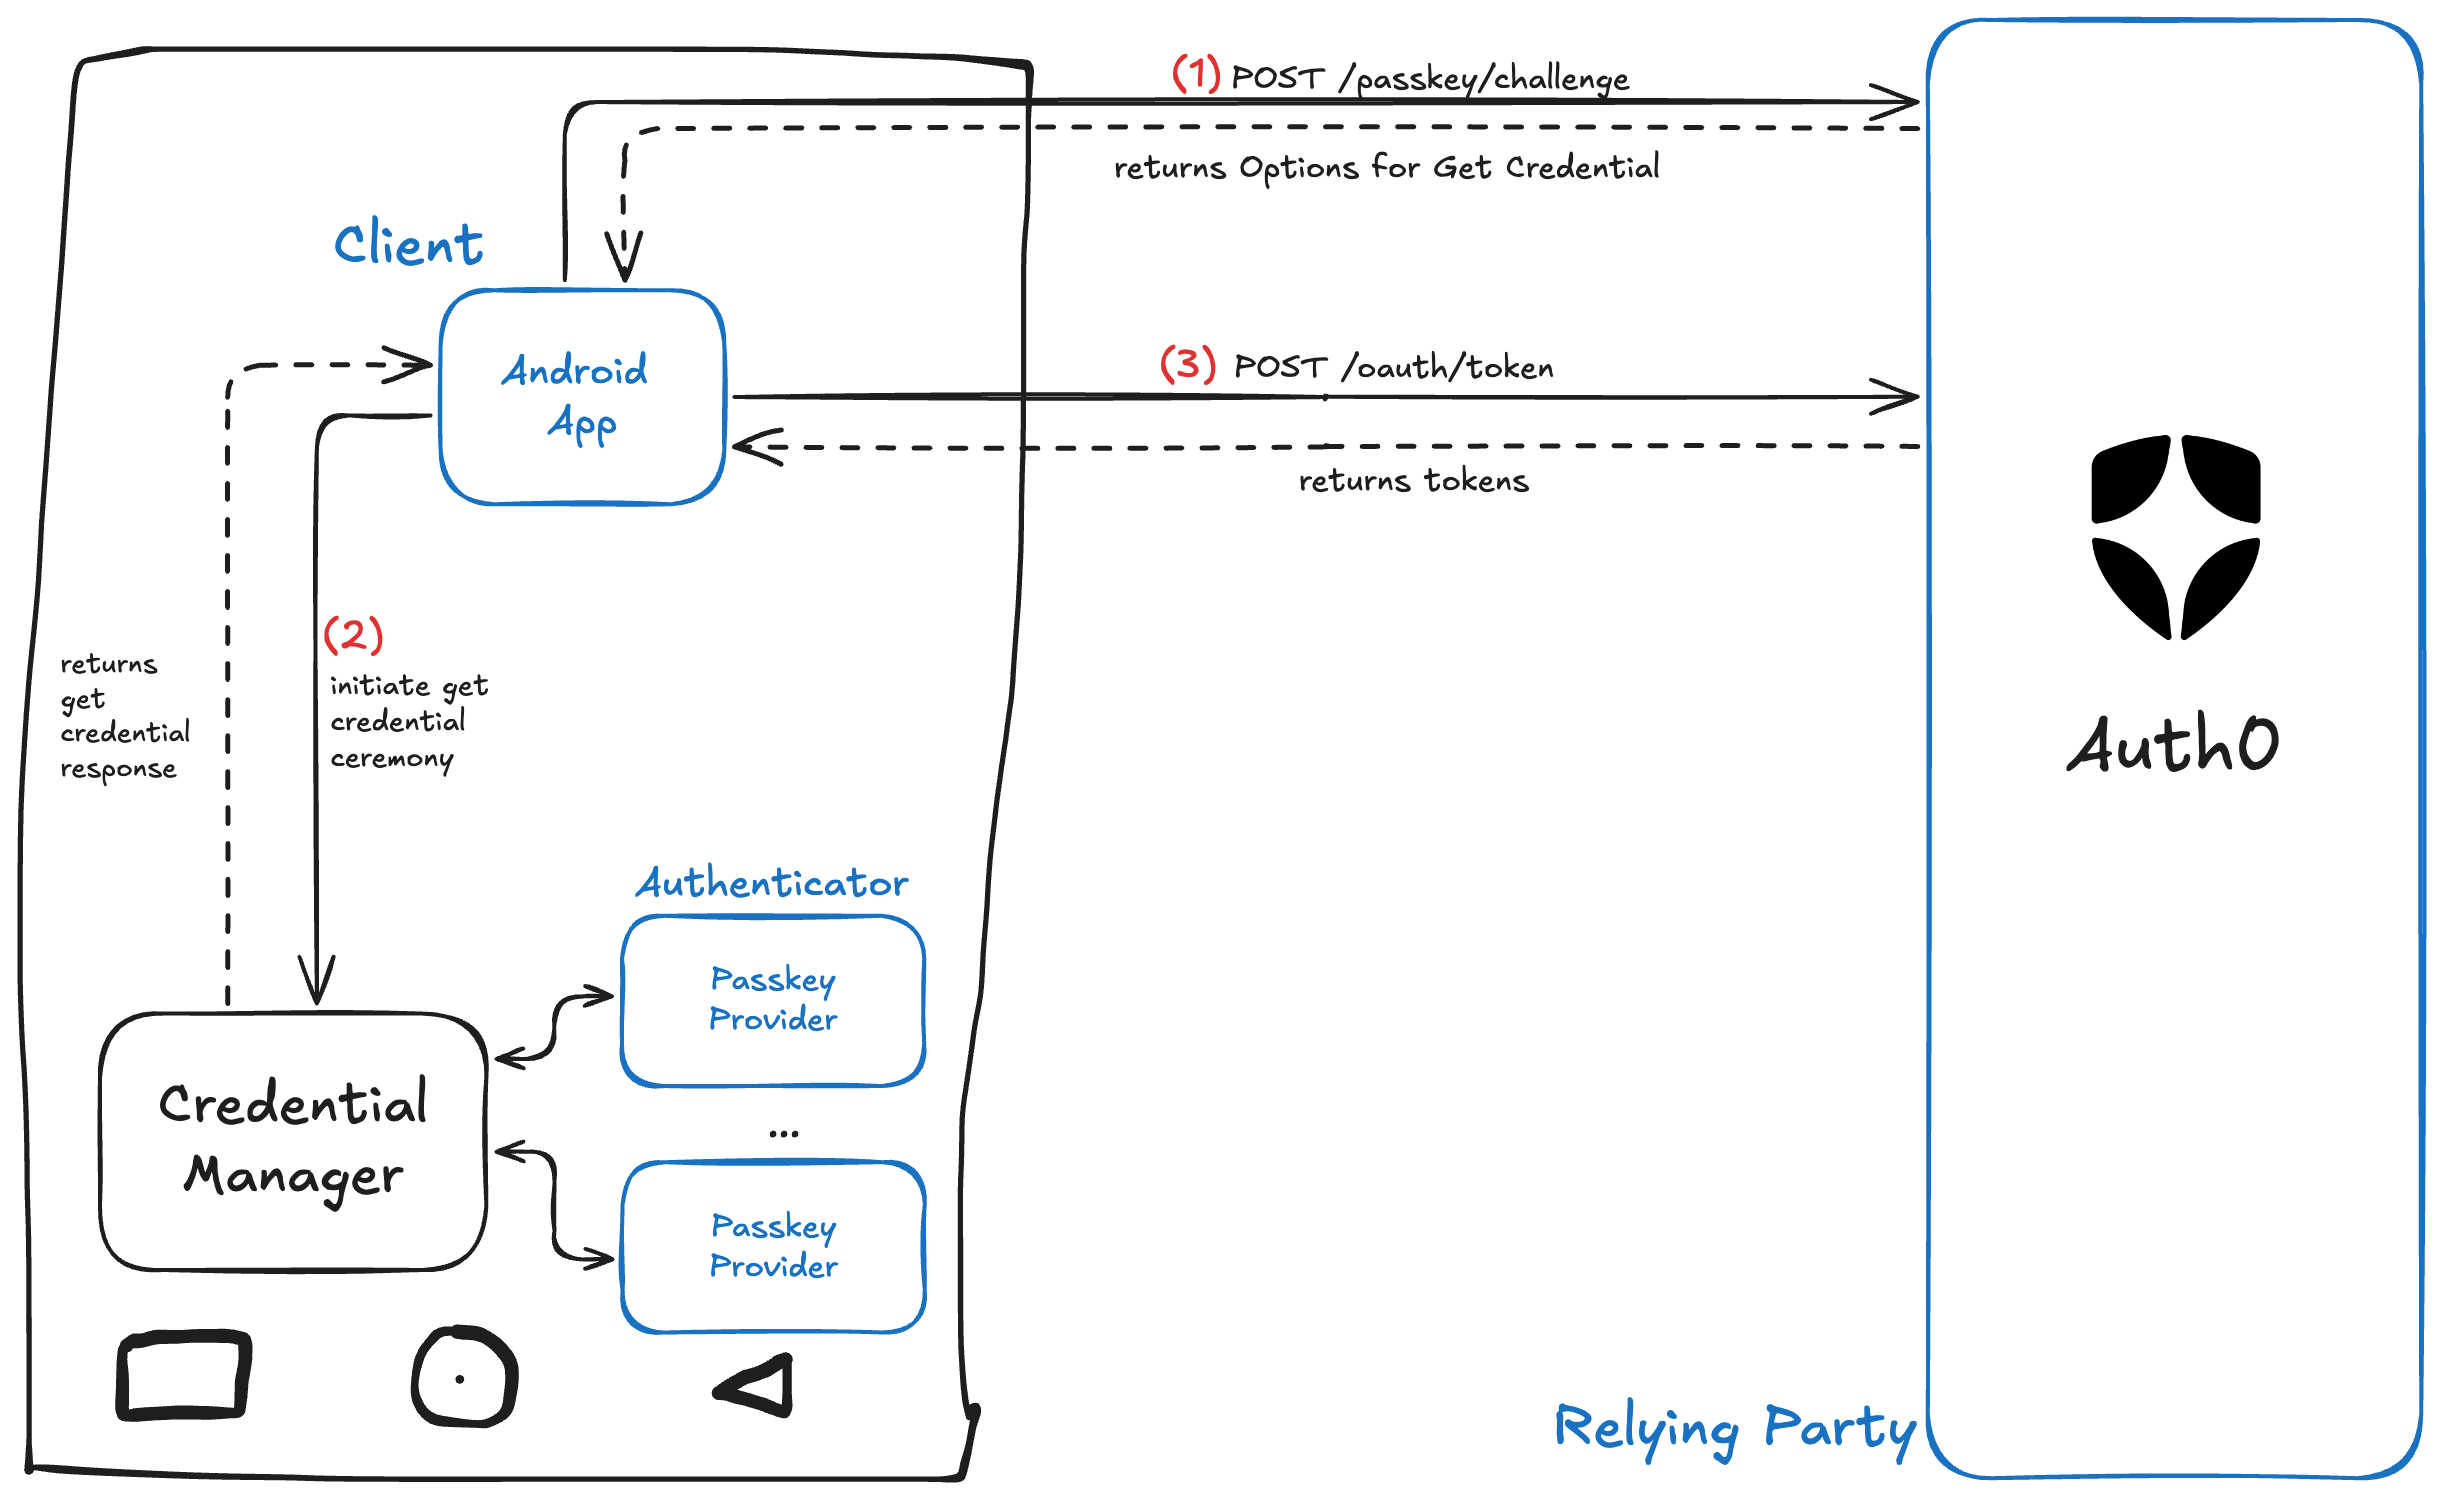
In this case, the first thing to do (1) is to request a challenge to Auth0. To do so, you'll call the POST passkey/challenge endpoint via the Android SDK. Auth0 will return the PublicKeyCredentialRequestOptions. Once again, in (2) your Android app needs to call Credential Manager, but this time to look for the credential in the device instead of the creating a new one. Finally, you'll send the response back to Auth0 (3) for verification and to retrieve your tokens (access token, ID token, etc) using the POST oauth/token endpoint.
You can get started now that you have some context on signup and login!
Get the Starter App
The following code sample is available for this tutorial. It's a straightforward Android app that allows you to create a new passkey, authenticate with it, and log out.
git clone https://github.com/oktadev/auth0-android-native-login-passkeys.git
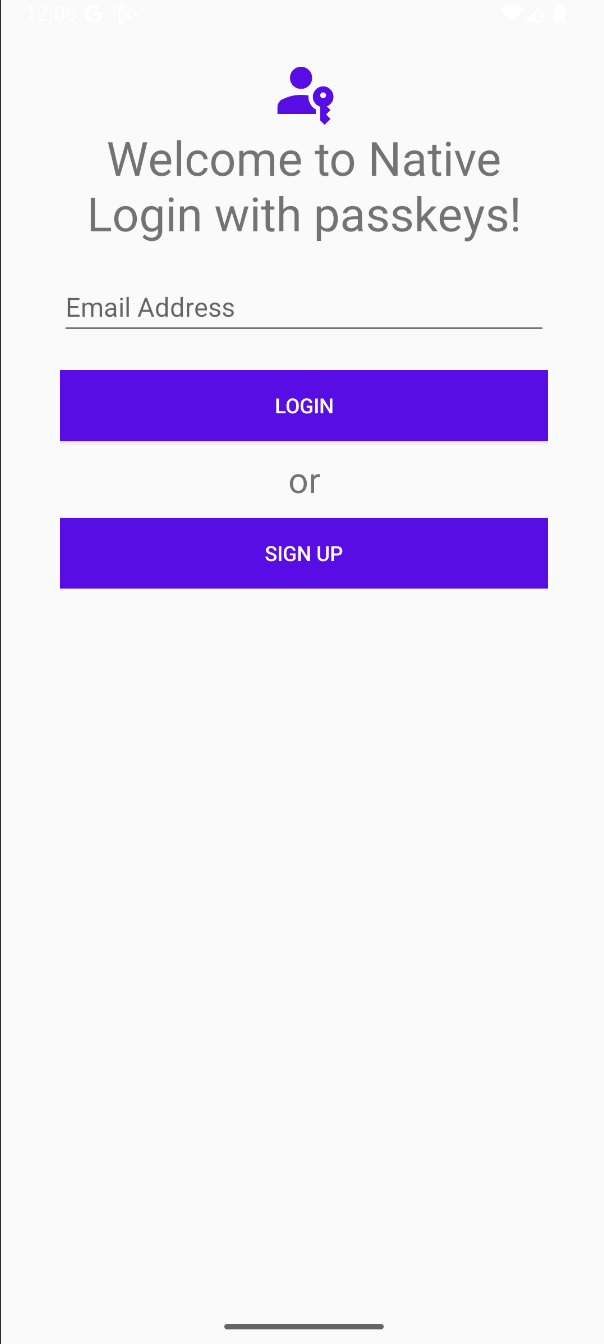
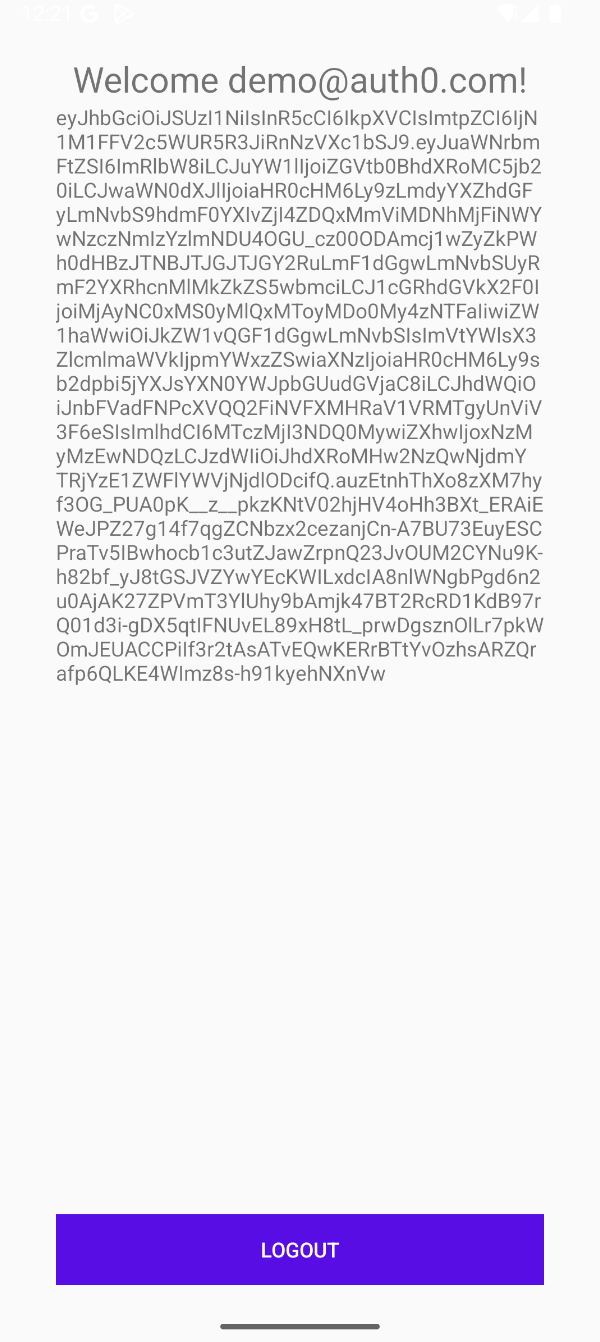
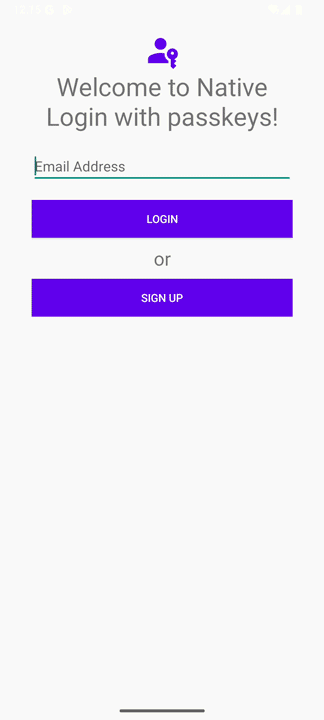
Note that this sample app does not manage passwords; it is only used to demonstrate passkey ceremonies. The app consists of two activities: the
MainActivity, where you'll see an email input field and signup or login buttons, and theHomeActivity, where you'll see a welcome message, your user's ID token, and a logout button.
| MainActivity | HomeActivity |
|---|---|
|
|
At the end of this tutorial, your app will sign up and login using Auth0's Native Login, and it will look as follows:
Note: if you want the complete code from this tutorial, you can check out the
add-auth0branch in the Github repository.
Pre-requisites
To make the demo app work, you need to have the following:
- An Auth0 Account
- An Auth0 Native Application
Try out Auth0 authentication for free.
Get started →Now, let's configure Auth0 to work with your Android app and, most importantly, support passkeys! 🚀
Configure Auth0 with your Android App
You have to do a few things in your Auth0 Tenant to make this work, so let's go through it:
Enable Passkeys in Auth0
You must enable passkeys in your database connection if you haven't already.
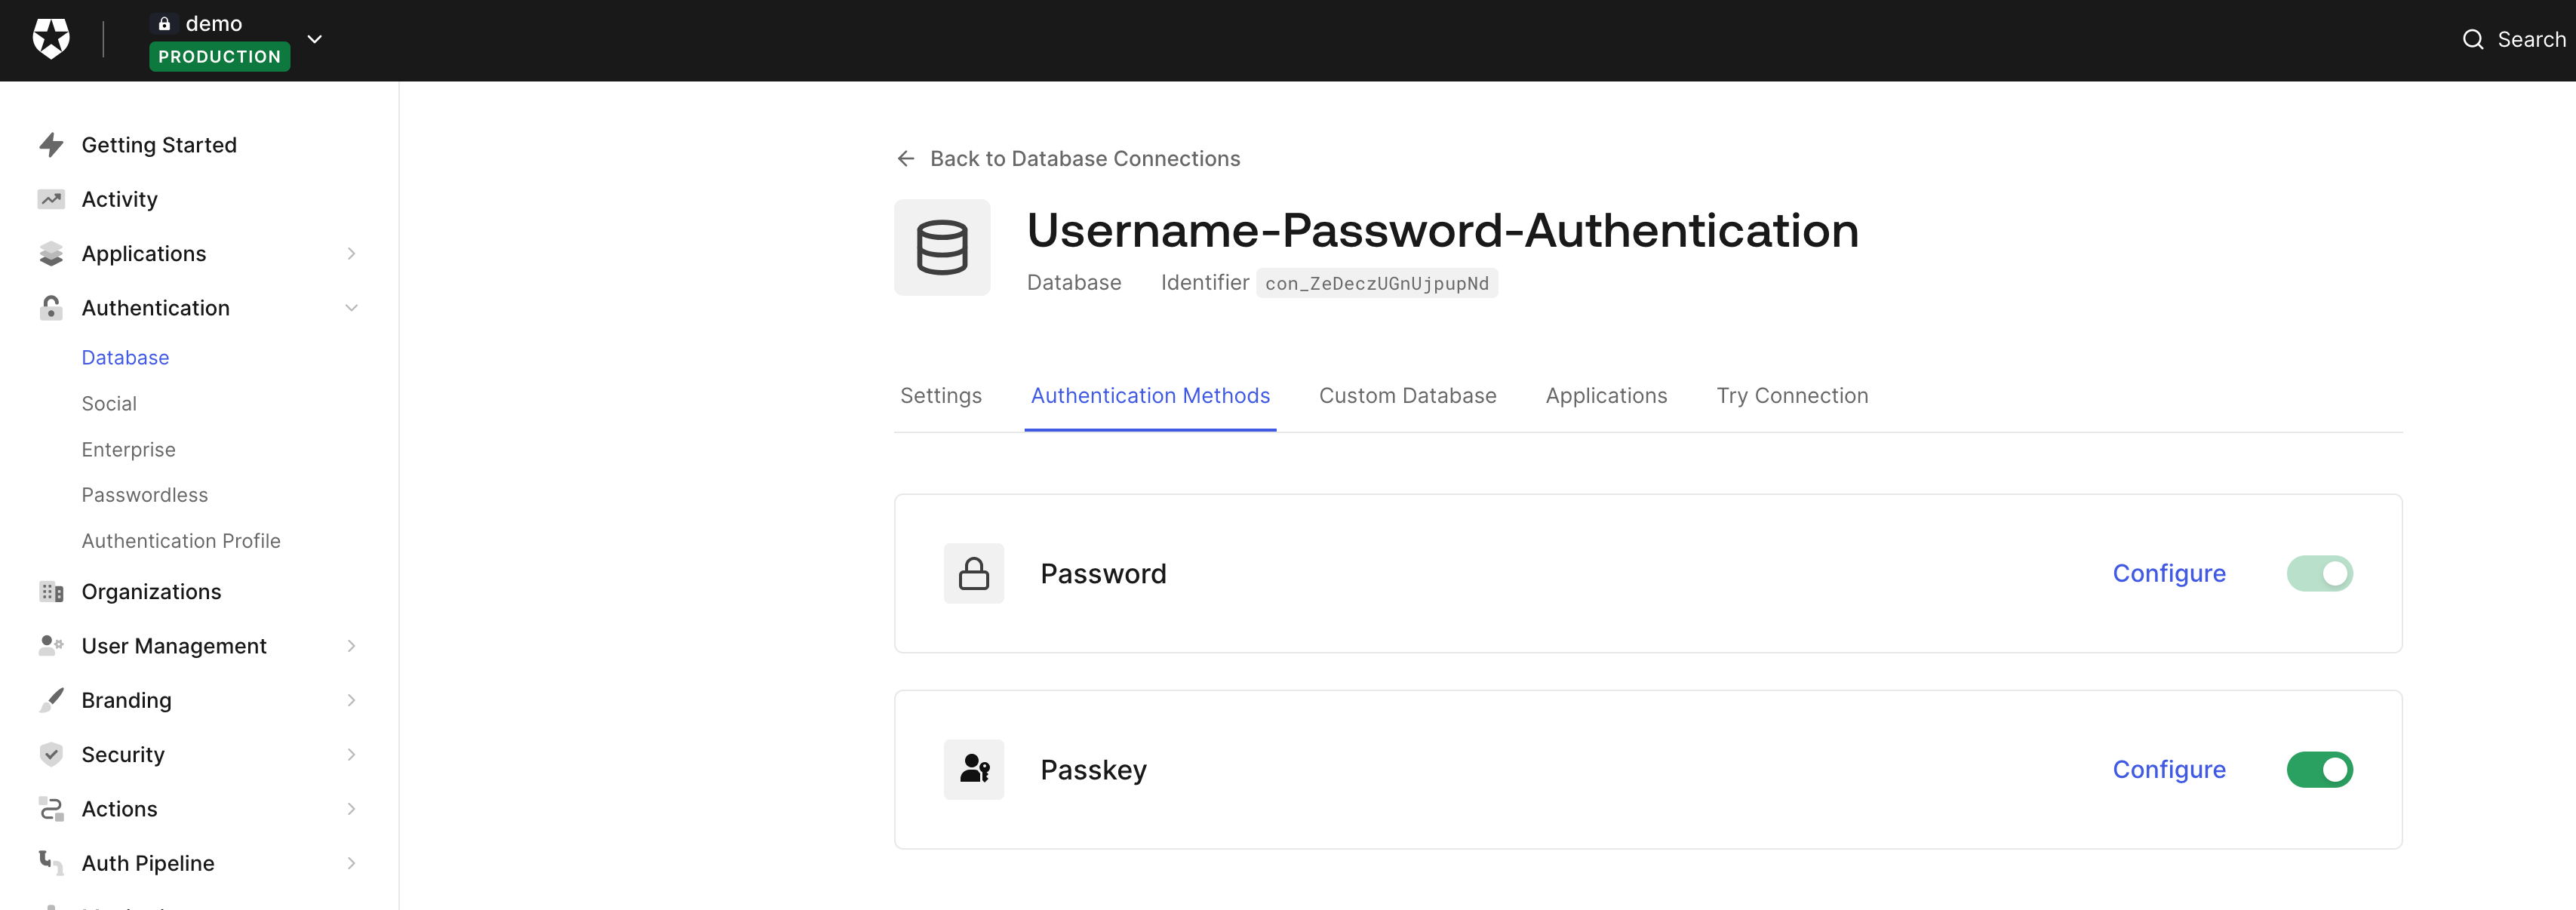
To learn more how to do this, take a look at our docs or this step-by-step tutorial.
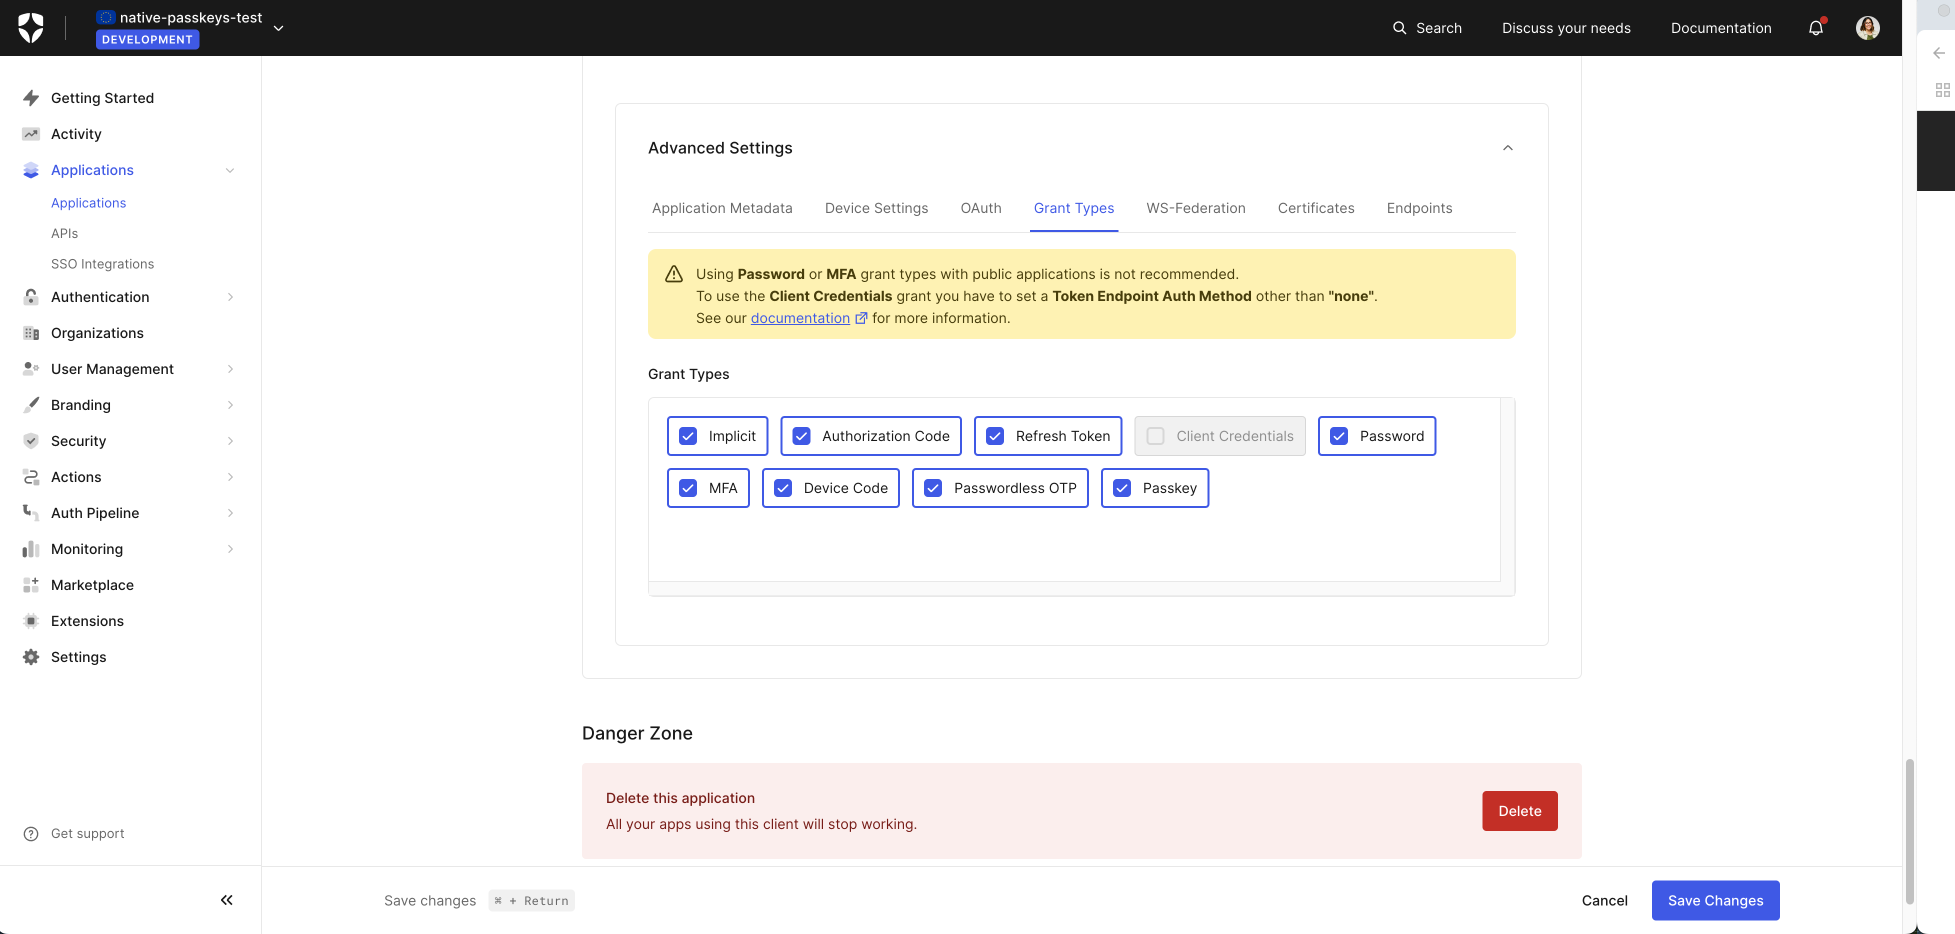
Enable Passkey Grant
You need to let your native application in Auth0 know it can grant passkeys to your users. To do so, from the sidebar, go to Applications > Your Native Application > Settings, then scroll to the bottom to Advanced Settings > Grant Types and check for the Passkey grant. Finally, click on Save Changes.
Configure Android App Links Support
You must add support for Digital Assets Links, which means associating your app with a website your app owns. This allows your app to create and use passkeys in the context of your web domain. To do that, you can follow the steps in the docs to Enable Android App Links Support.
Configure a Custom Domain
You may remember that passkeys are bound to a specific replying party (RP), which uses the RP's domain as the identifier, so you'll need to configure your custom domain to use it with your Android app (you should configure a custom domain in general when using passkeys). The good news is this is also included in the free plan😜
To configure a custom domain, you can follow the docs
You're all set from the Auth0 side! Now, let's start implementing signup in your Android app.
Sign Up with a Passkey in Auth0
Let's add the Android SDK and Credential Manager dependency to the project. In your app/build.gradle.kts add the following:
// ...

dependencies {
  // ...

  // Auth0
    implementation(libs.auth0.v320)
    implementation(libs.jwtdecode)

    // gson converter
    implementation(libs.converter.gson)

    // credential manager
    implementation(libs.androidx.credentials)

    // optional - needed for credentials support from play services, for devices running
    // Android 13 and below.
    implementation(libs.androidx.credentials.play.services.auth)
}
Next, in your AndroidManifest.xml file, add internet permissions with the following code:
<?xml version="1.0" encoding="utf-8"?>
<manifest xmlns:android="http://schemas.android.com/apk/res/android"
    xmlns:tools="http://schemas.android.com/tools">
    xmlns:tools="http://schemas.android.com/tools" >

    <uses-permission android:name="android.permission.INTERNET" />

    <application
        android:allowBackup="true"
    ...
    />
Next, add the information about your Auth0 Native Application to your strings.xml file as environment variables and also add some strings your app will use:
<string name="auth0_domain">YOUR CUSTOM DOMAIN</string>
<string name="auth0_scheme">demo</string>
<string name="auth0_client_id">YOUR CLIENT ID</string>
<string name="main_welcome">Welcome to Native Login with passkeys!</string>
<string name="email_hint">Email Address</string>
<string name="login">Login</string>
<string name="sign_up">Sign Up</string>
<string name="logout">Logout</string>
<string name="home_welcome">Welcome %1$s!</string>
Add the layout file for the MainActivity
In the MainActivity, you want to have an input field and two buttons, along with some image and text, so go ahead and create the following file app/src/main/res/layout/activity_main.xml and add this code:
<?xml version="1.0" encoding="utf-8"?>
<LinearLayout xmlns:android="http://schemas.android.com/apk/res/android"
    xmlns:app="http://schemas.android.com/apk/res-auto"
    android:orientation="vertical"
    android:id="@+id/main_view"
             android:layout_width="match_parent"
             android:padding="40dp"
             android:layout_height="match_parent">

    <ImageView
        android:id="@+id/main_header_image"
        android:layout_width="match_parent"
        android:layout_height="wrap_content"
        android:src="@drawable/ic_passkey" />

    <TextView
        android:id="@+id/main_welcome_textview"
        android:layout_width="match_parent"
        android:layout_height="wrap_content"
        android:textAlignment="center"
        android:textSize="32dp"
        android:text="@string/main_welcome" />

    <EditText
        android:id="@+id/main_email_edittext"
        android:layout_width="match_parent"
        android:layout_height="wrap_content"
        android:ems="10"
        android:isCredential="true"
        android:layout_marginTop="20dp"
        android:hint="@string/email_hint"
        android:inputType="textEmailAddress" />

    <LinearLayout
        android:layout_width="match_parent"
        android:layout_height="wrap_content"
        android:id="@+id/main_buttons_container"
        android:layout_marginTop="20dp"
        android:orientation="vertical">
    <Button
        android:id="@+id/main_login_btn"
        android:layout_width="match_parent"
        android:layout_height="wrap_content"
        android:background="@color/purple_500"
        android:textColor="@color/white"
        android:text="@string/login" />

        <TextView
            android:layout_width="match_parent"
            android:layout_height="match_parent"
            android:text="or"
            android:layout_margin="10dp"
            android:textAlignment="center"
            android:textSize="24dp"
            />

    <Button
        android:id="@+id/main_signup_btn"
        android:layout_width="match_parent"
        android:layout_height="wrap_content"
        android:background="@color/purple_500"
        android:textColor="@color/white"
        android:text="@string/sign_up" />
    </LinearLayout>

    <ProgressBar
        android:id="@+id/main_progress_bar"
        android:layout_width="match_parent"
        android:layout_height="wrap_content"
        android:indeterminateTint="@color/purple_200"
        android:visibility="gone" />
</LinearLayout>
Note: you can get the passkey icon from this file You'll end up with a layout like the one shown at the beginning of the blog post. Let's add some functionality!
Implement signUpWithPasskey
The first thing to implement is signup with a passkey. For that, you'll use the method signUpWithPasskey available in the Android SDK under the AuthenticationAPIClient
At the moment, your MainActivity is either non-existent or has the Android template for an activity, so let's replace the code with the following in your app/src/main/java/.../activities/MainActivity.kt file:
package com.example.nativepasskeys.activities // this is my package name, yours might be different

// here you'll have a bunch of imports Android Studio will import for you 😜
import ...

class MainActivity : ComponentActivity() {
  private val TAG: String = "MainActivity"
  private val DB_CONNECTION: String = "Username-Password-Authentication" // 👈 the name of your DB connection

  // Instantiate Auth0 Client
  private val auth0: Auth0 by lazy {
    val account = Auth0.getInstance(
      getString(R.string.auth0_client_id),
      getString(R.string.auth0_domain)
    )
    account
  }

  // Instantiate the AuthenticationAPIClient
  private val apiClient: AuthenticationAPIClient by lazy {
    AuthenticationAPIClient(auth0)
  }

  override fun onCreate(savedInstanceState: Bundle?) {
    super.onCreate(savedInstanceState)

    setContentView(R.layout.activity_main)

    initWidgets()
  }

  private fun initWidgets(){
    val signUpBtn: Button = findViewById(R.id.main_signup_btn)
    val email: EditText = findViewById(R.id.main_email_edittext)

    signUpBtn.setOnClickListener {
      if (TextUtils.isEmpty(email.text.toString())){
        email.error = "Email is mandatory"
      } else {
        email.error = null
        signUpWithNativePasskey(email.text.toString())
      }
    }

  }

  // This is where the fun begins!
  // 👇
  private fun signUpWithNativePasskey(email: String){
    Log.d(TAG, "calling signUpWithNativePasskey!")

    val userData = UserData(email = email)

    apiClient.signupWithPasskey(
      userData, DB_CONNECTION
    ).start(object : Callback<PasskeyRegistrationChallenge, AuthenticationException> {

      override fun onSuccess(result: PasskeyRegistrationChallenge) {
        // fun stuff will happen here
      }

      override fun onFailure(error: AuthenticationException) {
        Log.d(TAG, "Failure creating passkey " + error.getDescription())
      }
    })

  }
}
So far, you're initializing the Auth0 Client using your Auth0 application's Client ID that you previously added to your strings.xml file. Then, you're initializing the AuthenticationAPIClient where the passkey endpoints live. I've also added a helper function, initWidgets, to initialize the buttons and input text views.
The fun begins with the function signUpWithNativePasskey. This function receives the user's email and builds a UserData object. It calls signUpWithPasskey and passes the userData along with the database connection name, which you can find in your Auth0 Dashboard > Authentication > Database; if you didn't change anything, the name should be Username-Password-Authentication. The signupWithPasskey has a callback with a PasskeyRegistrationChallenge and an AuthenticationException for the onSuccess and onFailure methods. If you remember from the diagram at the beginning of this blog post, when you start to register a passkey with Auth0, you'll get back some registration options along with a challenge; this is all contained in the PasskeyRegistrationChallenge, and all you have to do is pass that information to Android's Credential Manager.
Using Android's CredentialManagerAPI
At this point, Auth0 gave you the passkey registration options, but now you have to tell Android's Credential Manager that it's time to create a new credential.
First, you need a new instance of the CredentialManager, so let's initialize it with the following code in your MainActivity:
class MainActivity : ComponentActivity() {
  private val TAG: String = "MainActivity"
  private val DB_CONNECTION: String = "Username-Password-Authentication"

  private val auth0: Auth0 by lazy {
    val account = Auth0.getInstance(
      getString(R.string.auth0_client_id),
      getString(R.string.auth0_domain)
    )
    account
  }

  private val apiClient: AuthenticationAPIClient by lazy {
    AuthenticationAPIClient(auth0)
  }

  // 👇 new code
  private val credentialManager: CredentialManager by lazy {
    CredentialManager.create(this@MainActivity)
  }
  // 👆

  override fun onCreate(savedInstanceState: Bundle?) {
    // ...
  }
  // ...
}
Then, once Auth0 has responded with registration options, you'll tell the Credential Manager it's time to create a new credential. Let's do that in the onSuccess method by adding the following code:
private fun signUpWithNativePasskey(email: String){
    Log.d(TAG, "calling signUpWithNativePasskey!")

    val userData = UserData(email = email)

    apiClient.signupWithPasskey(
      userData, DB_CONNECTION
    ).start(object : Callback<PasskeyRegistrationChallenge, AuthenticationException> {

      override fun onSuccess(result: PasskeyRegistrationChallenge) {
        // 👇 new code
        val passKeyRegistrationChallenge = result
        val request = CreatePublicKeyCredentialRequest(
          Gson().toJson(
            passKeyRegistrationChallenge.authParamsPublicKey
          )
        )
        var response: CreatePublicKeyCredentialResponse?

        credentialManager.createCredentialAsync(
          this@MainActivity,
          request,
          CancellationSignal(),
          Executors.newSingleThreadExecutor(),
          object :
            CredentialManagerCallback<CreateCredentialResponse, CreateCredentialException> {

            override fun onError(e: CreateCredentialException) {
              Log.e(TAG, "Error creating credential, " + e.message)
            }

            override fun onResult(result: CreateCredentialResponse) {

              response = result as CreatePublicKeyCredentialResponse
              val authRequest = Gson().fromJson(
                response?.registrationResponseJson,
                PublicKeyCredentials::class.java
              )

              Log.d(TAG, "Starting signin...")
              handleSignIn(passKeyRegistrationChallenge.authSession,
                authRequest)
            }
          })
        // 👆 new code
      }

      override fun onFailure(error: AuthenticationException) {
        Log.d(TAG, "Failure creating passkey " + error.getDescription())
      }
    })

  }
Let's break this code down a bit, starting with:
val passKeyRegistrationChallenge = result
val request = CreatePublicKeyCredentialRequest(
  Gson().toJson(
    passKeyRegistrationChallenge.authParamsPublicKey
  )
)
var response: CreatePublicKeyCredentialResponse?
First, you're storing the PasskeyRegistrationChallenge Auth0 returned in a new variable called passkeyRegistrationChallenge. Then, you're formatting the request to match the format Credential Manager requires, and that is a CreatePublicKeyCredentialRequest. Using the Gson library, you're formatting the response Auth0 gave you, which contains the request in JSON format that uses the standard JSON payload defined in WebAuthn. The last thing that happens is that you're creating a new variable, response, to get the result of creating the credential with the Credential Manager.
Now, let's look at the actual call to the Credential Manager:
credentialManager.createCredentialAsync(
          this@MainActivity,
          request,
          CancellationSignal(),
          Executors.newSingleThreadExecutor(), // or another executor
          object :
            CredentialManagerCallback<CreateCredentialResponse, CreateCredentialException> {

            override fun onError(e: CreateCredentialException) {
              Log.e(TAG, "Error creating credential, " + e.message)
            }

            override fun onResult(result: CreateCredentialResponse) {

              response = result as CreatePublicKeyCredentialResponse
              val authRequest = Gson().fromJson(
                response?.registrationResponseJson,
                PublicKeyCredentials::class.java
              )

              Log.d(TAG, "Starting verification and sign in...")
              // not giving any spoilers, you gotta go to the login section now
            }
          })
When you call createCredentialAsync, you're now delegating the credential creation to your passkey provider. Depending on your Android device, you might use the Google Password Manager or something like 1Password; either way, now your passkey provider is in charge of the credential creation, which is why this is running asynchronously. If everything goes well, you'll land in onResult, and have your credential response ready; this will include information about your passkey, like the public key, for example. Otherwise, you'll land in onError and have to handle the error appropriately.
At this point, your passkey provider has created the credential in your device and signed the challenge, but now you have to send that back to the relying party (Auth0) so it can verify it, and that will happen when you call signinWithPasskey. The handleSignIn method will do exactly what you need, but before we implement it, let's talk about login because you'll reuse this method for both flows.
If you have more questions on how the credential creation works in Android, look at their docs.
Login with a Passkey in Auth0
After creating a new passkey and any time you'd like to log in, you'll need to start the login flow by requesting a challenge to Auth0; for that you'll use the method passkeyChallenge from the AuthenticationAPIClient class from the SDK.
Let's create a new method called loginWithPasskey in your MainActivity, that is in the app/src/main/java/.../activities/MainActivity.kt file:
private fun loginWithNativePasskey() {
    Log.d(TAG, "Starting signin...")

    apiClient.passkeyChallenge(DB_CONNECTION)
      .start(object : Callback<PasskeyChallenge, AuthenticationException> {
        override fun onSuccess(result: PasskeyChallenge) {
          //handle success
        }

        override fun onFailure(error: AuthenticationException) {
          Log.d(TAG, "error on signin: " + error.getDescription())
        }
      })

  }
Again, let's break it down. Let's begin with the endpoint. You're calling apiClient.passkeyChallenge, which is calling POST passkey/challenge under the hood. So you're initiating the passkey login flow by requesting a challenge from Auth0. You're also passing the database connection name DB_CONNECTION.
In the passkeyChallenge callback, you'll get a PasskeyChallenge and an AuthenticationException as possible responses depending on the case. If everything goes well and you get a PasskeyChallenge response, then the onSuccess method will be called, and you need to get the response and build the credential request:
override fun onSuccess(result: PasskeyChallenge) {
  // 👇 new code
  val passkeyChallengeResponse = result
  val request =
    GetPublicKeyCredentialOption(Gson().toJson(passkeyChallengeResponse.authParamsPublicKey))
  //...
}
Similarly to sign up, you're storing the result and formatting it into a GetPublicKeyCredentialOption object from a JSON that complies with the WebAuthn stardard.
Next, you're going to use Android's GetCredentialRequest, which encapsulates a request to get a user credential.
override fun onSuccess(result: PasskeyChallenge) {
  val passkeyChallengeResponse = result
  val request =
    GetPublicKeyCredentialOption(Gson().toJson(passkeyChallengeResponse.authParamsPublicKey))
  // 👇 new code
  val getCredRequest = GetCredentialRequest(
    listOf(request)
  )
}
Note you're passing a
listOf, that's because if you support password and passkeys, for example, you can delegate both to the Credential Manager like so:GetCredentialRequest(listOf(getPasswordOption, getPublicKeyCredentialOption)). More info on this on Android's docs.
Get a Credential from CredentialManager
You already used the Credential Manager to create a credential; now you want to retrieve a previously created one. For that, you could use the getCredentialAsync method, so in the onSuccess callback method, add the following code:
private fun loginWithNativePasskey() {
    Log.d(TAG, "Starting signin...")

    apiClient.passkeyChallenge(DB_CONNECTION)
      .start(object : Callback<PasskeyChallenge, AuthenticationException> {
        override fun onSuccess(result: PasskeyChallenge) {
          val passkeyChallengeResponse = result
          val request =
            GetPublicKeyCredentialOption(Gson().toJson(passkeyChallengeResponse.authParamsPublicKey))
          val getCredRequest = GetCredentialRequest(
            listOf(request)
          )

          // 👇 new code
          credentialManager.getCredentialAsync(this@MainActivity,
            getCredRequest,
            CancellationSignal(),
            Executors.newSingleThreadExecutor(),
            object :
              CredentialManagerCallback<GetCredentialResponse, GetCredentialException> {

              override fun onResult(result: GetCredentialResponse) {
                when (val credential = result.credential) {
                  is PublicKeyCredential -> { // passkey
                    val authRequest = Gson().fromJson(
                      credential.authenticationResponseJson,
                      PublicKeyCredentials::class.java
                    )
                    handleSignIn(passkeyChallengeResponse.authSession, authRequest)
                  }

                  else -> { // different credential type you don't support
                    // Catch any unrecognized custom credential type here.
                    Log.e(TAG, "Unexpected type of credential")
                  }
                }
              }

              override fun onError(e: GetCredentialException) {
                Log.d(TAG, "error getting credential: " + error.getDescription())
                // handle error
              }
            })
            // 👆 new code
        }

        override fun onFailure(error: AuthenticationException) {
          Log.d(TAG, "error on signin: " + error.getDescription())
        }
      })

  }
Now you're calling the getCredentialAsync method of the CredentialManager and passing the credential request you built above. When successful, you'll land in the onResult callback, and you'll need to handle the scenario depending on the type of credential; for the sake of this code sample, you're only using passkeys (PublicKeyCredential). In this case, you'll get the authentication response JSON, which Auth0 will use to validate.
You've reached the same point as with the signup scenario: you've created or retrieved a passkey, but now you need Auth0 to verify it and this is where that handleSignIn method comes into play, so in your MainAcitivity, let's add the following code:
private fun handleSignIn(authSession: String, authRequest: PublicKeyCredentials){
  apiClient.signinWithPasskey(
    authSession,
    authRequest,
    DB_CONNECTION
  )
    .validateClaims()
    .start(object :
      Callback<Credentials, AuthenticationException> {
      override fun onSuccess(result: Credentials) {
        credentialsManager.saveCredentials(result)
        Log.d(TAG, "SUCCESS: " + result.idToken)
        navigateToHomeActivity()
      }

      override fun onFailure(error: AuthenticationException) {
        Log.d(TAG, "error on signin: " + error.getDescription())
      }
    })
}
In both flows, after signup and after login, you'll need to verify the response the Credential Manager gave you and the authSession, which corresponds to the session ID. This verification happens when you call signinWithPasskey and pass an authSession, an authRequest, which is a PublicKeyCredentials object, and the database connection name DB_CONNECTION.
When successful, you'll land in the onSuccess callback where you can store the Auth0 Credentials using the credentialsManager, you'll need to declare this variable at the beginning of the class like so:
class MainActivity : ComponentActivity() {
  private val TAG: String = "MainActivity"
  private val DB_CONNECTION: String = "Username-Password-Authentication"

  private val auth0: Auth0 by lazy {
    val account = Auth0.getInstance(
      getString(R.string.auth0_client_id),
      getString(R.string.auth0_domain)
    )
    account
  }

  private val apiClient: AuthenticationAPIClient by lazy {
    AuthenticationAPIClient(auth0)
  }

  // 👇 new code
  private val credentialsManager: CredentialsManager by lazy {
    val storage = SharedPreferencesStorage(this@MainActivity)
    val manager = CredentialsManager(apiClient, storage)
    manager
  }
  // 👆 new code

  private val credentialManager: CredentialManager by lazy {
    CredentialManager.create(this@MainActivity)
  }

  override fun onCreate(savedInstanceState: Bundle?) {
    super.onCreate(savedInstanceState)
    // ...
  }
  //...
}
Auth0. Android's CredentialManager provides a utility class to streamline the process of storing and renewing credentials. You can access the
accessTokenoridTokenproperties from the Credentials instance, which is the preferred method of managing user credentials.
Finally, you can optionally implement a helper function navigateToHomeActivity like so:
fun navigateToHomeActivity(){
  val intent = Intent(this, HomeActivity::class.java)
  startActivity(intent)
}
Implement HomeActivity
The HomeActivity is a straightforward screen with a greeting message, your user's ID Token, and a logout button. For the layout, you can create a new file, app/src/main/res/layout/activity_home.xml and add the following code:
<?xml version="1.0" encoding="utf-8"?>
<LinearLayout xmlns:android="http://schemas.android.com/apk/res/android"
    android:orientation="vertical"
    android:layout_width="match_parent"
    android:layout_height="match_parent"
    android:padding="40dp">

    <TextView
        android:id="@+id/home_greeting_txt"
        android:layout_width="match_parent"
        android:layout_height="wrap_content"
        android:text="@string/home_welcome"
        android:textSize="24sp"
        android:textAlignment="center"/>

    <ScrollView
        android:layout_width="match_parent"
        android:layout_height="0dp"
        android:fillViewport="true"
        android:layout_weight="1">

        <TextView
            android:id="@+id/home_token"
            android:layout_width="match_parent"
            android:layout_height="wrap_content"
            android:text="ID TOKEN" />
    </ScrollView>

    <Button
        android:id="@+id/home_logout_btn"
        android:layout_width="match_parent"
        android:layout_height="wrap_content"
        android:background="@color/purple_500"
        android:textColor="@color/white"
        android:layout_marginTop="50dp"
        android:text="@string/logout" />

</LinearLayout>
Then, create a HomeActivity class in app/src/main/java/.../activities/HomeActivity.kt
package com.example.nativepasskeys.activities //your package name

import android.os.Bundle
//... more imports

class HomeActivity : ComponentActivity() {
    private val TAG = "HomeActivity"

    // initialize Auth0 client
    private val auth0: Auth0 by lazy {
        val account = Auth0.getInstance(
            getString(R.string.auth0_client_id),
            getString(R.string.auth0_domain)
        )
        account
    }

    // initialize Authentication API Client
    private val apiClient: AuthenticationAPIClient by lazy {
        AuthenticationAPIClient(auth0)
    }

    // Initialize Auth0 Credential Manager
    private val credentialsManager: CredentialsManager by lazy {
        val storage = SharedPreferencesStorage(this@HomeActivity)
        val manager = CredentialsManager(apiClient, storage)
        manager
    }

    override fun onCreate(savedInstanceState: Bundle?) {
        super.onCreate(savedInstanceState)

        setContentView(R.layout.activity_home)
    }
}
Retrieve Auth0 Credentials
In your MainActivity, you used Auth0. Android's Credential Manager saveCredentials method to store the credentials. Similarly, you can retrieve those credentials using the getCredentials method, so in the onCreate method of your HomeActivty, add the following code:
override fun onCreate(savedInstanceState: Bundle?) {
        super.onCreate(savedInstanceState)

        setContentView(R.layout.activity_home)

        // 👇 new code
        val greeting = findViewById<TextView>(R.id.home_greeting_txt)
        val idToken = findViewById<TextView>(R.id.home_token)

        credentialsManager.getCredentials(object: Callback<Credentials, CredentialsManagerException> {
            override fun onSuccess(credentials: Credentials) {
                val jwt = JWT(credentials.idToken)
                greeting.text = (getString(R.string.home_welcome, jwt.claims["name"]?.asString()))
                idToken.text = credentials.idToken
            }

            override fun onFailure(error: CredentialsManagerException) {
                Log.d(TAG, "No credentials were previously saved or they couldn't be refreshed")
                // handle error, you could send the user back to the MainActivity, or such depending on your business case
            }
        })
        // 👆 new code
    }
When successful, you'll land in the onSuccess callback because you want to get some of the user's information from the ID Token you're using the JWTDecode.Android library to decode the ID token and get the name from it so you can set it into the corresponding views.
Note: If the
accessTokenhas expired, the manager automatically uses therefreshTokenand renews the credentials for you. New credentials will be stored for future access.Logout
You can now sign up and log in using a passkey, but now you need to log out. Let's create a logout method in the HomeActivity:
override fun onCreate(savedInstanceState: Bundle?) {
  super.onCreate(savedInstanceState)

  setContentView(R.layout.activity_home)

  Log.d(TAG, credentialsManager.hasValidCredentials().toString())
  val greeting = findViewById<TextView>(R.id.home_greeting_txt)
  val idToken = findViewById<TextView>(R.id.home_token)

  credentialsManager.getCredentials(object: Callback<Credentials, CredentialsManagerException> {
      override fun onSuccess(credentials: Credentials) {
          val jwt = JWT(credentials.idToken)
          greeting.text = (getString(R.string.home_welcome, jwt.claims["name"]?.asString()))
          idToken.text = credentials.idToken
      }

      override fun onFailure(error: CredentialsManagerException) {
          // No credentials were previously saved or they couldn't be refreshed
          Log.d(TAG, "")
      }
  })

  val logoutBtn = findViewById<Button>(R.id.home_logout_btn)
  logoutBtn.setOnClickListener {
      logout()
  }

}

private fun logout(){
  credentialsManager.clearCredentials()
  finish()
}
To log the user out of your application, you can remove the stored credentials and, in this case, finish the HomeActivity so the user will land on MainActivity, the login screen in our case. You can read more on getting the current state of authentication in the docs.
Summary
In this blog post, you learned how passkeys work in an Android application and how to integrate it with Auth0 using Native Login. You learned how to create a new passkey using Android's Credential Manager and retrieve an existing credential. You also learned to validate this credential against Auth0 and to logout the user from your application.
Native login with passkeys is still in Limited EA, so if you want to use this feature, please get in touch with your account manager.
About the author

Carla Urrea Stabile
Staff Developer Advocate
I've been working as a software engineer since 2014, particularly as a backend engineer and doing system design. I consider myself a language-agnostic developer but if I had to choose, I like to work with Ruby and Python.
After realizing how fun it was to create content and share experiences with the developer community I made the switch to Developer Advocacy. I like to learn and work with new technologies.
When I'm not coding or creating content you could probably find me going on a bike ride, hiking, or just hanging out with my dog, Dasha.