
In our previous article, we explored the inner workings of Demonstrating Proof of Possession (DPoP), a powerful standard that binds access tokens to a specific client. You learned how DPoP uses public key cryptography to ensure that even if an access token is leaked, it's useless to an attacker without the corresponding private key.
We discussed DPoP’s security benefits and highlighted its flexibility for modern applications. Since DPoP is implemented at the application level, it is particularly well-suited for Single-Page Applications (SPA), for example. However, you may have concerns about this. Implementing cryptographic key management and signing proofs for every API request sounds complicated. Actually, manually handling DPoP would indeed add significant complexity to your application code.
The good news is that you don't have to. The Auth0 SDKs are designed to handle this complexity for you. With just a few lines of configuration, you can enable robust DPoP protection in both your client-side application and your backend API.
This article will show you how by walking through practical examples. We will focus on a JavaScript SPA and an Express.js-based API, but our SDKs allow you to easily implement DPoP support in other programming languages and frameworks as well.
At the time of writing, DPoP support for Auth0 is in Early Access and not all the SDKs provide support for it at the moment.
Enabling DPoP in Auth0
Before you write any code, you must enable DPoP in Auth0 for both your API and client application. This ensures the entire authentication and authorization flow enforces Proof of Possession.
Enable DPoP in your API
First, you must tell Auth0 that your API requires DPoP-bound tokens. Navigate to your Auth0 dashboard and follow these steps:
- Go to Applications > APIs and select the API you want to secure.
- Click on the Settings tab.
- Scroll down to the "Token Sender-Constraining" section.
- Select “DPoP” as the sender-constraining method and switch on the “Require Token Sender-Constraining” toggle as shown below:
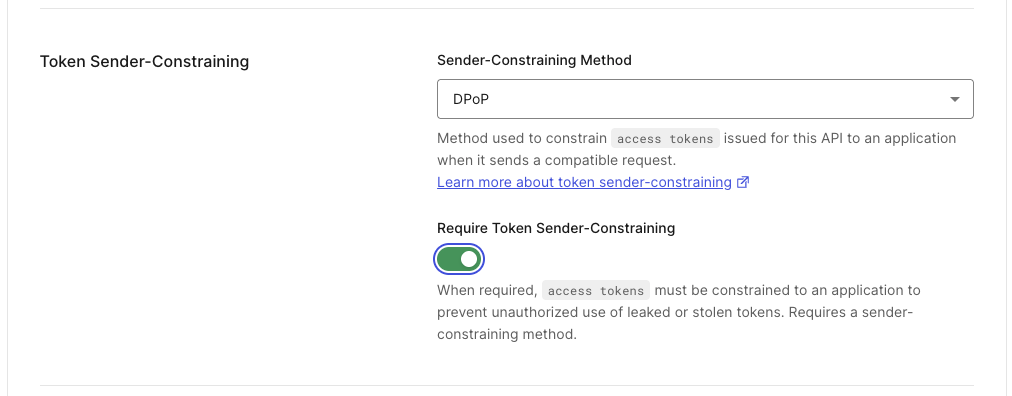
- Click Save.
Note: In our example we are going to make DPoP mandatory for API requests. This is why you needed to switch the toggle button in addition to selecting DPoP as the sender-constraining method. If you don’t switch the toggle button, the API can accept both bearer and bound access tokens.
Enable DPoP in your client application
Next, you should enforce DPoP on your client application. This setting ensures that your application must use DPoP and cannot fall back to using regular bearer tokens. Follow these steps in your Auth0 dashboard:
- Go to Applications > Applications and select your client application (e.g., your SPA).
- Click on the Settings tab and scroll down to the "Token Sender-Constraining" section.
- Toggle on the “Require Token Sender-Constraining” switch, as shown here:
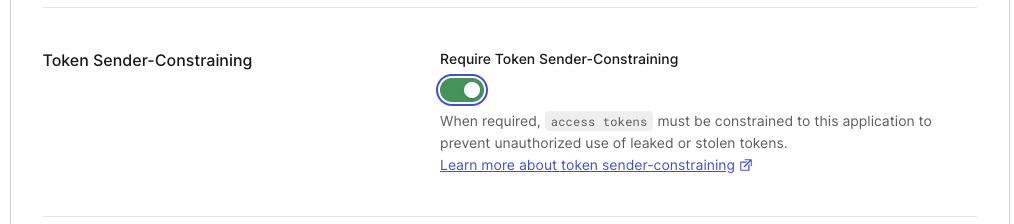
- Scroll down and click Save.
With both the API and the client application configured, your Auth0 environment is now ready to enforce DPoP from end to end:
- Any token request for this API's audience that doesn't include a valid DPoP proof will be rejected.
- Any API request without a bound access token will be rejected.
Securing Your SPA with DPoP and Auth0
For a JavaScript SPA, the auth0-spa-js SDK simplifies identity management. It also provides first-class support for DPoP, handling key generation, storage, and proof creation automatically. Let’s see how to configure this SDK to support DPoP and how to request and use bound access tokens.
Note: Make sure you have installed
auth0-spa-jsversion 2.4.0 or later to include DPoP support.
Configuring the Auth0 SPA SDK
To enable DPoP, you need to configure your Auth0 client instance with the useDpop: true setting. It tells the SDK to generate and manage a private/public key pair for the application instance. The SDK will then automatically create and attach DPoP proofs whenever it communicates with your Auth0 tenant's token endpoint.
Here is a typical initialization of the Auth0 client instance with DPoP enabled:
import { createAuth0Client } from '@auth0/auth0-spa-js';

const auth0Client = await createAuth0Client({
  domain: 'YOUR_AUTH0_DOMAIN',
  clientId: 'YOUR_APPLICATION_CLIENT_ID',
  authorizationParams: {
    audience: 'YOUR_API_IDENTIFIER',
    redirect_uri: window.location.origin,
  },
  useDpop: true  //👈 DPoP setting
});
Note: The
auth0-spa-jsSDK uses the CryptoAPI and IndexedDB APIs to use cryptographic keys and storage on the browser.
Getting and using DPoP-bound tokens
The beauty of the SDK is that your application code for fetching and using tokens doesn't change. When you call getTokenSilently(), the SDK works its magic in the background. It will automatically create a DPoP proof specific to the API request and attach it to the DPoP header.
Once you get your access token, you could use it in the usual way with the DPoP scheme in the Authorization header instead of the Bearer scheme. However, things are not as easy as they seem. You need to generate the DPoP proof and take care of nonces. The SDK provides methods to help you perform these tasks, but you still need to store nonces, manage retries, etc.
Fortunately, the SDK helps you with a powerful feature: fetchWithAuth(). In its simplest form, fetchWithAuth() can be used as shown in the following example:
const fetcher = client.createFetcher({
  dpopNonceId: 'my_api_request'
});

try {
   const response = await fetcher.fetchWithAuth('https://api.example.com/products', {
     method: 'GET'
   });

    const data = await response.json();
    console.log(data);
  } catch (error) {
    console.error('Error calling the API', error);
  }
As you can see, you use fetchWithAuth() just like in the built-in fetch() function. However, under the hood, fetchWithAuth() takes care of getting an access token and injecting it into the HTTP header, generating and injecting DPoP proofs, managing nonces, handling retries, etc.
To learn more, see the auth0-spa-js DPoP examples.
Validating DPoP Tokens in Your Auth0-Secured Express API
On the server side, your API must be configured to validate not just the access token but also the accompanying DPoP proof. The express-oauth2-jwt-bearer library provides middleware to handle this validation seamlessly.
Configuring the Express Middleware
First, install the necessary package with the following command:
npm install express-oauth2-jwt-bearer
Note: Make sure you install the latest version of the package (version 1.7.0 and later)
The good news is that the library enables server-side DPoP support by default. In fact, it supports both bearer tokens and bound tokens, so standard API protection code like the one shown below allows you to validate a DPoP-bound token without any changes:
const express = require('express');
const { auth } = require('express-oauth2-jwt-bearer');

const app = express();
const port = 3001;

app.use(
  auth({
    issuerBaseURL: 'https://YOUR_AUTH0_DOMAIN',
    audience: 'YOUR_API_IDENTIFIER'
  })
);

app.get('/products', (req, res) => {
  //...your code...
});

app.listen(port, () => {
  console.log(`API server listening on port ${port}`);
});
However, according to the default behavior, this API will also accept HTTP requests with standard bearer access tokens. This is not how you configured DPoP in the Auth0 dashboard. You made it mandatory.
Then you need to make DPoP mandatory in your API too. That’s just a matter of enabling a flag, as shown in the following code snippet:
//...existing code...

app.use(
  auth({
    issuerBaseURL: 'https://YOUR_AUTH0_DOMAIN',
    audience: 'YOUR_API_IDENTIFIER',
    //👇 new code
    dpop: {
      required: true
    }
    //👆 new code
  })
);

//...existing code...
The middleware now ensures that every request is checked against a valid access token and a DPoP proof that is bound to the token and the specific request. However, it rejects requests that have a valid access token but are missing the corresponding DPoP proof.
The middleware also allows you to control other parameters. Check out the express-oauth2-jwt-bearer DPoP examples to learn more.
Conclusion
Sender-constrained tokens represent a significant step forward in API security, and DPoP is the standard leading the way. While the underlying cryptography is complex, implementing it doesn't have to be. By leveraging Auth0 SDKs on both the client and server, you can adopt DPoP with minimal changes to your application code.
Throughout this article, you've seen how to enable DPoP for your API and your SPA in the Auth0 dashboard. You also configured your SPA with auth0-spa-js to request and use DPoP-bound access tokens. Finally, you enforced DPoP validation in your Express.js API using the express-oauth2-jwt-bearer middleware.
By abstracting the complexity, the SDKs empower you to focus on building your application's features while ensuring your users' data is protected by a state-of-the-art security mechanism.
About the author

Andrea Chiarelli
Principal Developer Advocate
I have over 20 years of experience as a software engineer and technical author. Throughout my career, I've used several programming languages and technologies for the projects I was involved in, ranging from C# to JavaScript, ASP.NET to Node.js, Angular to React, SOAP to REST APIs, etc.
In the last few years, I've been focusing on simplifying the developer experience with Identity and related topics, especially in the .NET ecosystem.