
TL;DR: In this article, you will get acquainted with FuseBox, a JavaScript and TypeScript module bundler that is simple to configure but rich of powerful features. In fact, FuseBox is so powerful and mature that it can be a valid alternative to WebPack. Throughout the article, you will configure a simple React application, and so you can explore the main options of FuseBox. If needed, you can find the final project built on this GitHub repository.
“Meet FuseBox, a young (but mature) #JavaScript bundler that can replace WebPack with its easier approach.”
Tweet This
Why FuseBox?
If you have previous experience developing modern JavaScript applications (that is, applications using the latest ECMAScript features like classes and modules), you surely set up a development environment based on Node.js and a building system (most likely based on Webpack).
Actually, Webpack is a de facto standard to configure the building system of modern JavaScript applications nowadays, but often newbies consider it hard to use, especially when they deal with complex applications. A few tools may help developers to create a Webpack bundling configuration, but this is a clear symptom of its complexity.
If you are among those that consider Webpack too complex, well, you may take into account FuseBox.
FuseBox is a young (but mature) project with a few clear principles:
- Speed: Building an application must be as quick as possible.
- Simplicity: Configuring a build system should not cause headaches.
- Extensibility: Anything that the FuseBox core doesn't take care of must be done through plugins.
FuseBox sticks to these principles by adopting a few approaches such as using TypeScript compiler by default, exploiting a powerful cache system, allowing zero-configuration code splitting, providing a simple-to-understand configuration syntax, supporting an integrated task runner, providing a rich set of plugins that are able to cover everything most applications need, and many other things.
FuseBox in Action
Now that you know a little bit more about FuseBox and its principles, you are ready to start learning about it in practice. To do so, you will start by setting up a basic React project, then you will configure and build the app with FuseBox.
Setting Up a Basic React Project
Consider a basic React-based project, like the one you can create with create-react-app, but without the Webpack stuff for building it. You can download this basic project from the initial-react-project branch of this GitHub repository:
# clone the repo
git clone https://github.com/andychiare/fusebox-react-tutorial.git

# move into the project directory
cd fusebox-react-tutorial

# checkout the desired branch
git checkout initial-react-project
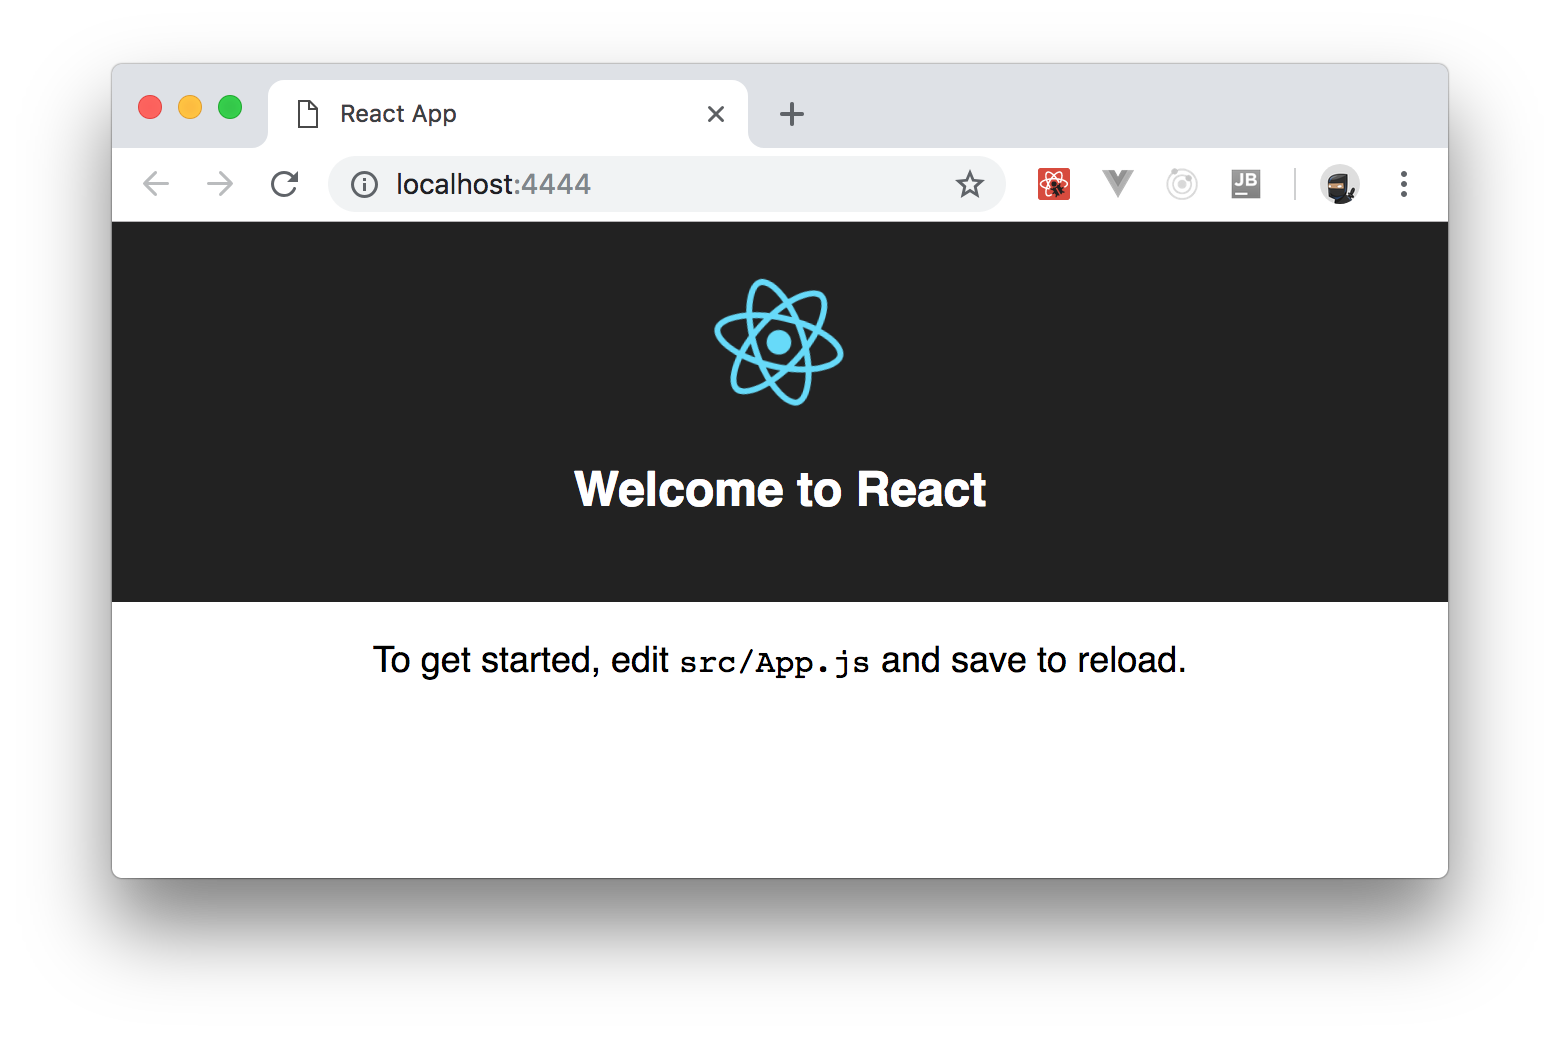
After cloning this repo and checking out the branch mentioned, you will get a project that contains the following structure:
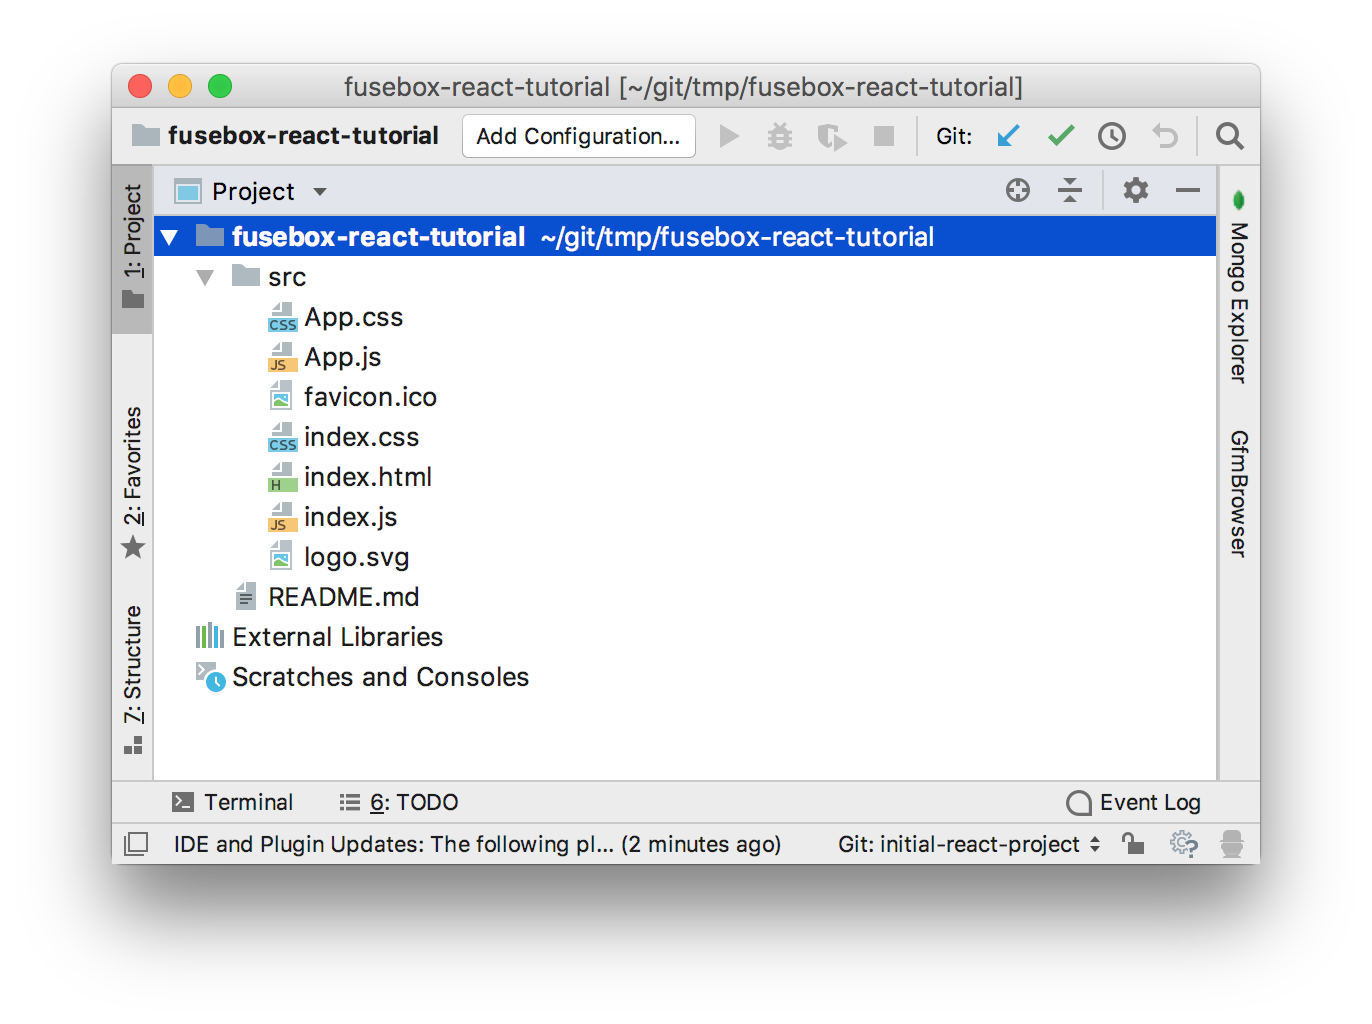
These files implement the classic React application shown in the following screenshot:
Of course, the project is not ready to run since a building system is missing. So, ensure you have Node.js v8.2+ installed and create a package.json file (inside the project root directory) describing the project and its dependencies with this content:
// ./package.json
{
  "name": "fusebox-react-example",
  "version": "1.0.0",
  "description": "This is a simple project showing how to use FuseBox to setup a building system for React applications",
  "main": "index.js",
  "license": "ISC",
  "dependencies": {
    "react": "^16.5.2",
    "react-dom": "^16.5.2"
  },
  "devDependencies": {
    "fuse-box": "^3.5.0",
    "typescript": "^3.0.3",
    "uglify-es": "^3.3.9"
  }
}
Beyond the name, the description and the other informative data, the package.json file declares react and react-dom as dependencies needed to use React in your project. The devDependencies section contains references to the packages you need in order to build the project. You will find references to FuseBox, to TypeScript, and to Uglify. Maybe you are wondering why you need TypeScript and Uglify. FuseBox considers TypeScript as its first class language. That is, you can write your application in TypeScript. Of course, since JavaScript is a subset of TypeScript, any JavaScript application may be compiled by the TypeScript transpiler (so no worries if you won't use any TypeScript features). Finally, Uglify is used to, well, uglify the resulting JavaScript code (i.e., make it harder to read).
Now, you can install the specified dependencies by typing the following command in the root directory of the project:
npm install
After a few moments, you will find the node_modules directory populated with the required packages.
Configuring FuseBox
Now it's time to configure FuseBox in order to build your React project. To do so, start by creating a file named fuse.js in the project root with the following contents:
// ./fuse.js
const { FuseBox, WebIndexPlugin, SVGPlugin, CSSPlugin } = require("fuse-box");

const fuse =  FuseBox.init({
  homeDir : "./src",
  output : "./dist/$name.js",
  useTypescriptCompiler : true,
  plugins: [
    CSSPlugin(),
    SVGPlugin(),
    WebIndexPlugin({
        template : "src/index.html"
    })
  ]
});

fuse
  .bundle("app")
  .instructions(" > index.js");
fuse.run();
As you can see, the contents of the fuse.js file are regular JavaScript code. The first line imports a few items from the fuse-box module. In particular, the FuseBox object is used to create an instance of the engine through the init() method. The object passed as an argument to init() defines the settings of the FuseBox engine. The homeDir property specifies the relative path of the folder containing your project. The output property defines the folder where will be created the result of the building process and the name of the generated bundle. You can notice the placeholder $name in the string defining the output bundle. This is a macro variable that refers to the bundle name specified later.
The useTypescriptCompiler property tells FuseBox to use the TypeScript transpiler to generate ECMAScript 5 code. Currently, this option is required in order to force using the TypeScript compiler (see this discussion for more information).
The plugins property contains a list of plugins adding functionalities to the FuseBox engine. In particular, it specifies the CSSPlugin() plugin, that processes and loads the CSS code, the SVGPlugin() plugin, that allows importing SVG files into JavaScript code, and the WebIndexPlugin() plugin, that configures the specified HTML file as a template. You will see how to define the HTML template in a few moments.
The bundle() method of the FuseBox instance fuse defines the name to assign to the resulting bundle, while the instructions() method defines the starting point of the building process, that is the JavaScript file the building process should start from. Later you will learn more about the string values you can pass to this method.
The last statement, fuse.run(), launches the actual build process.
Defining an HTML File
Before launching the build process, you will need to bind the main HTML file (i.e., index.html) to the resulting bundle or bundles. You used WebIndexPlugin() to specify the path and the name of the main HTML file. Actually, if you don't specify any file, FuseBox will generate a new HTML for you. But if you want more control over the content of this file, it is convenient to define your own HTML file.
For example, in the case of the React application you are going to build, you want to define a root element to attach the application to. In fact, the index.html file contains the following markup:
<!-- src/index.html -->
<!DOCTYPE html>
<html lang="en">
  <head>
    <meta charset="utf-8">
    <meta name="viewport" content="width=device-width, initial-scale=1, shrink-to-fit=no">
    <title>React App</title>
  </head>
  <body>
    <noscript>
      You need to enable JavaScript to run this app.
    </noscript>
    <div id="root"></div>
  </body>
</html>
As you can see, it is a simple and almost-empty HTML page. However, you want FuseBox to insert the references to the bundles it will generate as the result of its building process. So, replace the contents of this file with this:
<!-- src/index.html -->
<!DOCTYPE html>
<html lang="en">
  <head>
    <meta charset="utf-8">
    <meta name="viewport" content="width=device-width, initial-scale=1, shrink-to-fit=no">
    <title>React App</title>
    $css
  </head>
  <body>
    <noscript>
      You need to enable JavaScript to run this app.
    </noscript>
    <div id="root"></div>
    $bundles
  </body>
</html>
Notice the two macro variables added to the markup: $css and $bundles. The first one will be replaced by the references to the bundles that will be generated from the CSS code, if any, while the second one will be replaced by the references to the bundles that will be generated from the JavaScript/TypeScript code.
In addition to $css and $bundles, FuseBox provides a set of macros to allow injecting data into the HTML template. For example, you can use $author to put the application's author name inside the markup, $title for the value to use as the HTML page title, or $keywords to provide a list of meta tags. Each of these macros corresponds to properties of the configuration object passed to the WebIndexPlugin() plugin, as shown below:
WebIndexPlugin({
  template : "src/index.html",
  author : "Auth0 Inc.",
  title : "A simple React application",
  keywords : "react, fusebox, building system, bundle"
})
Building the Project with FuseBox
Now you are ready to launch FuseBox in order to build your React application. So, type the following command in the project root directory:
node fuse
In a few seconds, the building process generates the following files in the dist folder, and you will get the index.html file and the app.js bundle resulting out of the compilation of the React application's files. Notice that the bundle resulting out of the current FuseBox configuration is a development bundle and it contains ES5 code that is not optimized. In addition, the building process in development mode always generates one bundle. Later you will learn how to produce multiple bundles and production-ready code.
As a side effect of the building process, you will notice a tsconfig.json file in the src folder and a .fusebox folder in the project's root folder. The tsconfig.json file contains configuration options for the TypeScript transpiler. Usually, you don't need to change it. The .fusebox folder contains the cache that allows to speed up the building process. In fact, the builds following the first one are executed much faster. You can manually remove the folder in some exceptional circumstances, for example when you update an NPM package and the new version isn't loaded.
Setting Up a FuseBox Development Environment
Once you have configured your application, you'd like to run it. You could publish the content under the dist directory to a web server, but this could be a cumbersome task during the development process. Fortunately, FuseBox provides a development web server based on Express.js that helps you to run and test your app quickly. All you need to do is to call the dev() method of the FuseBox instance. To see this in action, replace the contents of the fuse.js file with this:
// ./fuse.js
const { FuseBox, WebIndexPlugin, SVGPlugin, CSSPlugin } = require("fuse-box");

const fuse =  FuseBox.init({
  homeDir : "./src",
  output : "./dist/$name.js",
  useTypescriptCompiler : true,
  plugins: [
    CSSPlugin(),
    SVGPlugin(),
    WebIndexPlugin({
        template : "src/index.html"
    })
  ]
});

fuse.dev();
fuse
  .bundle("app")
  .instructions(" > index.js");
fuse.run();
Note: The only difference here is the call to
fuse.dev();on line 16.
Now, when you build your application by typing node fuse, you will find a message after the building process has finished, like the following:
-----------------------------------------------------------------
Development server running http://localhost:4444 @ 3.5.0
-----------------------------------------------------------------
So, you can open a browser and point to http://localhost:4444 and see your application in action. The port number 4444 is the default TCP port assigned by FuseBox to the development server. If you want to assign a different port, you can pass it to dev() as shown here:
fuse.dev({port: 8080});
You can also configure FuseBox to rebuild your bundles and reload the application when a change to the source code is made. This behaviour, commonly referred to as Hot Module Replacement, can be accomplished by using the watch() and hmr() methods, as shown below:
// ./fuse.js
// ... import statement ...
// ... FuseBox.init and fuse.dev ...
fuse
  .bundle("app")
  .instructions(" > index.js")
  .watch()
  .hmr();
fuse.run();
Now, if you make any changes to your code, FuseBox will automatically compile it, then bundle the result, and reload it in your browser.
A Word About the Import Syntax
Running the app you built with FuseBox might end up resulting in the following problem:
Uncaught TypeError: Cannot read property 'createElement' of undefined
You could waste a lot of time trying to figure out what the problem is. Your code may seem correct, but most likely you used an incorrect syntax to load a JavaScript module, like in the following example:
import React from 'react';
OK, this is a very common syntax. Even create-react-app generates this code to import React into your application's modules. However, this syntax is formally wrong since it doesn't follow the ECMAScript specifications. Unfortunately, Babel facilitated this misunderstanding until version 5. In fact, ECMAScript specifications allows you to import a default object only from a module exporting a default object. The react module doesn't export a default object, so that code doesn't import anything. This is the reason for the runtime error shown above.
The correct syntax should be as follows:
import * as React from 'react';
In this way, you are importing all items exported by the react module under the React namespace.
In case you have an existing codebase using the wrong syntax and don't want to change it, or for some reason you want to continue using that syntax, you can configure FuseBox to accept the incorrect syntax by specifying the allowSyntheticDefaultImports option, as in the following example:
const fuse =  FuseBox.init({
  // ... other properties
  allowSyntheticDefaultImports : true,
});
Using plugins in FuseBox
You've already seen how to use plugins in a FuseBox configuration. You can just add the plugins option and assign to it an array of imported plugins. The FuseBox community maintains a lot of plugins for most common tasks. The following is a short list of useful plugins:
- EnvPlugin allows you to define environment variables that can be accessed at build time and at runtime.
- JSONPlugin allows you to import JSON files as JavaScript objects.
- CSSModulesPlugin enables CSS module support in your application.
- CSSResourcePlugin allows you to copy CSS assets into a single folder when building.
- LESSPlugin allows you to use the Less CSS pre-processor.
- PostCSSPlugin enables PostCSS in your application.
- SassPlugin allows you to use Sass to process your
.scssfiles. - UglifyESPlugin enables to minify your code by using UglifyES, a version of
uglify.jssupporting ES6+. - UglifyJSPlugin allows you to compress your code using UglifyJS2.
In most cases, you simply import them from the fuse-box module, as you have seen before:
const { WebIndexPlugin, SVGPlugin, CSSPlugin } = require("fuse-box");
However, some plugins require you to install some external package. See their documentation for more information.
If the default behaviour is satisfactory, you can use a plugin without any parameter. Otherwise, you can pass an object with specific options, as you did with WebIndexPlugin().
Using Sass with FuseBox
In some cases, you want to chain multiple plugins so that the output of one plugin is passed as the input of the other one. This could be the case when you are using Sass, for example. You want to write your .scss files and get the resulting .css files as the output of the build process. Then you want FuseBox processes these resulting .css files to produce the appropriate bundles.
To do this, you will need to install the node-sass package by typing the following command in the project root directory:
npm install node-sass --save-dev
After node-sass is installed, change the file extension of the App.css file into App.scss. Now, open the App.scss file and replace its content with this:
/* ./src/App.scss */
$bg-color: #222;

.App {
  text-align: center;
}

.App-logo {
  animation: App-logo-spin infinite 20s linear;
  height: 80px;
}

.App-header {
  background-color: $bg-color;
  height: 150px;
  padding: 20px;
  color: white;
}

.App-title {
  font-size: 1.5em;
}

.App-intro {
  font-size: large;
}

@keyframes App-logo-spin {
  from { transform: rotate(0deg); }
  to { transform: rotate(360deg); }
}
In this example, you are defining the Sass variable $bg-color and using it as the background colour of the App-header class. Of course, this is just a simple example to test Sass support in the FuseBox's building process.
Now, open the fuse.js file and change its content with this:
// ./fuse.js
const { FuseBox, WebIndexPlugin, SVGPlugin, CSSPlugin, SassPlugin } = require("fuse-box");

const fuse =  FuseBox.init({
  homeDir : "./src",
  output : "./dist/$name.js",
  useTypescriptCompiler : true,
  plugins: [
    [ SassPlugin({outputStyle: "compressed"}),
      CSSPlugin()
    ],
    CSSPlugin(),
    SVGPlugin(),
    WebIndexPlugin({
        template : "src/index.html"
    })
  ]
});

fuse.dev();
fuse
  .bundle("app")
  .instructions(" > index.js")
  .watch()
  .hmr();
fuse.run();
As you can see, the SassPlugin plugin is imported in the first line of the file. This plugin is chained with CSSPlugin in the plugins array. You can notice that the first item in the plugins array is an array itself. This array is telling FuseBox that you want to chain the included plugins. Of course, the chained plugins must support chaining. In addition, keep in mind that the order of the plugins in the chaining array is very important.
In this case, the SassPlugin() will process any .scss file, then the CSSPlugin() will take the output of SassPlugin() and will bundle the resulting CSS files. Notice that the SassPlugin() plugin has the option object {outputStyle: "compressed"} as an argument. In fact, you can specify any possible Sass option through a key/value pair. Also, notice that the CSSPlugin() is repeated just after the array of the chained plugins. This is needed in order to process all the remaining CSS files in the project.
The last thing you need to change is the import statement of the App.css stylesheet. So, open the App.js file and change it as follows:
// src/App.js
// ... other import statements ...
import './App.scss';

// ... App definition and export ...
Now, by running the application via the node fuse command, you should continue to get the same application, even if part of its CSS has been generated from Sass code.
Code Splitting with FuseBox
So far, the React project you've built generates a single bundle. In a small project, like the one you are building while reading this article, this may be acceptable. However, in large projects you may want to split your code base in multiple bundles for organization and performance reasons. For example, a common practice while creating JavaScript bundles is to separate the bundle originated by the current project from the bundle generated by third-party libraries, usually called vendors.
You can split the resulting bundle of the building process by working with the instructions() method. In the current FuseBox configuration, the string > index.js is passed to this method. You used it without knowing its meaning. Now it's time to explain.
The instruction() method tells FuseBox how to manage your code in order to create a bundle. In particular, it tells where to start, what to include or to exclude and so on. You provide this information by passing an appropriately formatted string. This string is composed by file names and a few arithmetic symbols. For example, the string you used (> index.js) tells FuseBox to create a bundle by starting from the index.js file and following the flow of the import statements it will find. The resulting bundle will be executed as soon as it is loaded into the Web page (this is the meaning of the > symbol).
You can create a bundle considering just the code of your project by providing the > [index.js] string to the instructions() method. The [] symbols tells FuseBox not to include external dependencies.
The ~ index.js string tells to take into account only the external code, that is only the dependencies.
By using these expressions, you can create one bundle containing only the project code and one bundle containing only the dependencies code. So, open the fuse.js file and change its content as follows:
// ./fuse.js
const { FuseBox, WebIndexPlugin, SVGPlugin, CSSPlugin, SassPlugin } = require("fuse-box");

const fuse =  FuseBox.init({
  homeDir : "./src",
  output : "./dist/$name.js",
  useTypescriptCompiler : true,
  plugins: [
    [ SassPlugin({outputStyle: "compressed"}),
      CSSPlugin()
    ],
    CSSPlugin(),
    SVGPlugin(),
    WebIndexPlugin({
        template : "src/index.html"
    })
  ]
});

fuse.dev();
fuse
  .bundle("vendor")
  .instructions("~ index.js");
fuse
  .bundle("app")
  .instructions("> [index.js]")
  .watch()
  .hmr();
fuse.run();
The only part that has been changed is the definition of the resulting bundle. In this case, you have two bundle definitions. The first definition addresses a bundle named vendor that takes into account only the code outside the current React application, as highlighted by the following snippet of code:
fuse
  .bundle("vendor")
  .instructions("~ index.js");
The second one defines a bundle named app containing just the code of the React application:
fuse
  .bundle("app")
  .instructions("> [index.js]")
  .watch()
  .hmr();
fuse.run();
Now, the building process will generate three separate files: app.js, index.html, and vendor.js.
Code Splitting for Dynamic Loading
In addition to organizational purposes, you might want to split the code of your project for performance reasons. A common approach in this direction is to split the application bundle in multiple bundles so that each one is loaded on demand at runtime, only if needed. This is a common approach to save network bandwidth and to speed up the application's initial loading.
FuseBox allows you to split the code of your application in multiple bundles without any specific configuration. FuseBox will create new bundles simply by analyzing your code. In fact, you tell FuseBox to split your code by using the dynamic import statement. For example, add a new React component to your project by creating the file MainContent.js in the src folder with the following content:
// ./src/MainContent.js
import * as React from 'react';

export class MainContent extends React.Component {
  render() {
    return <div><h1>This is the main content!</h1></div>;
  }
}
This is just a simple component showing a text inside a div element. The goal is to change the current application in order to load this component on demand when the user clicks a button. So, replace the content of App.js file with the following:
// src/App.js
import * as React from 'react';
import { Component } from 'react';
import * as logo from './logo.svg';
import './App.scss';

class App extends Component {
  constructor() {
    super();
    this.state = {mainContent: null};
  }

  render() {
    return (
      <div className="App">
        <header className="App-header">
          <img src={logo} className="App-logo" alt="logo" />
          <h1 className="App-title">Welcome to React</h1>
        </header>
        <p className="App-intro">
          To get started, edit <code>src/App.js</code> and save to reload.
        </p>
        {this.state.mainContent? <this.state.mainContent /> : <button onClick={()=>this.loadMainContent()}>Load main content</button>}
      </div>
    );
  }

  async loadMainContent() {
    const module = await import("./MainContent");
    this.setState({mainContent: module.MainContent});
  }
}

export default App;
The differences with respect with to the previous version concern the addition of the constructor() method to the class. In the constructor, you can find the definition of the component's state with a mainContent property.
Inside the JSX markup returned by the render() method, you find this new block:
{this.state.mainContent? <this.state.mainContent /> : <button onClick={()=>this.loadMainContent()}>Load main content</button>}
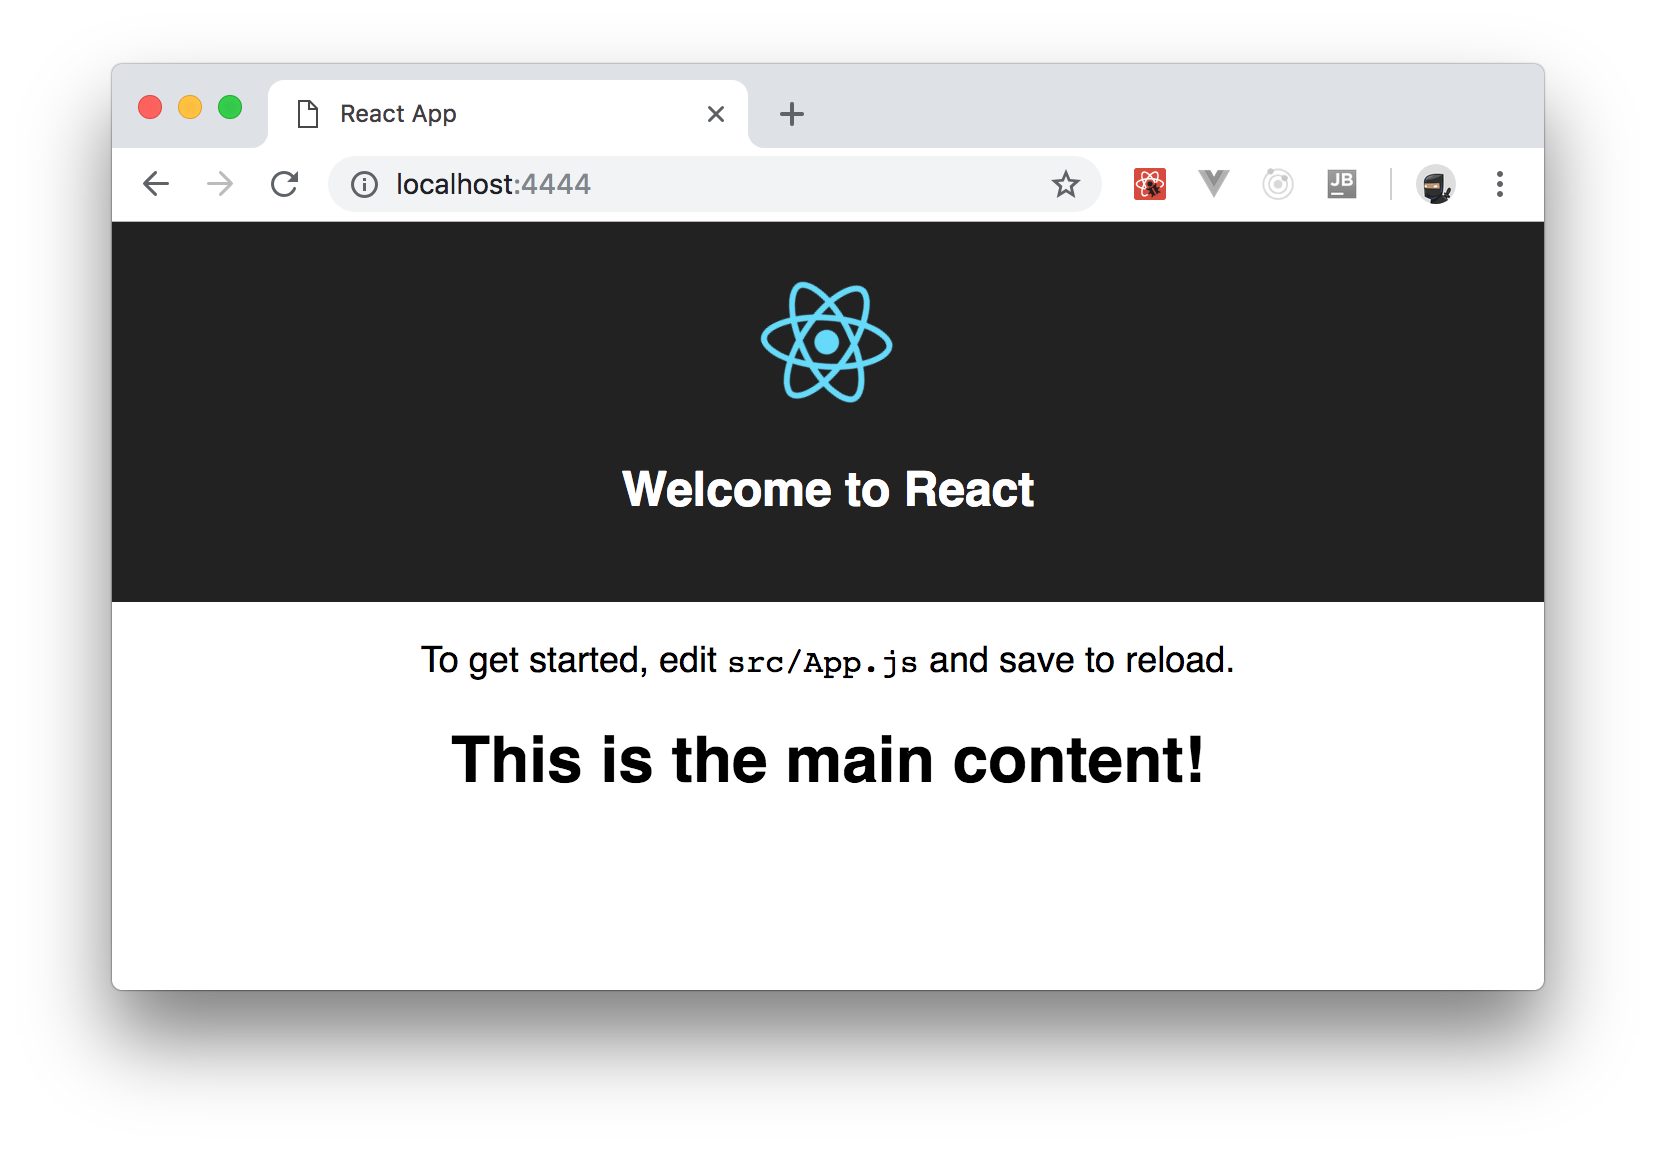
This code shows the mainContent property of the component's state if it is not null or a button that loads the component when the user clicks it. The actual dynamic loading happens into the loadMainContent() method. There, the MainConten.js module is imported with the dynamic import statement import(). Since the dynamic import is asynchronous, you find the await statement and the loadMainContent() method marked as async. After loading the module, you assign the module.MainContent component to the mainContent property of the component's state. This will cause the rendering of the component on the page as in the following picture:
The simple use of the dynamic import will make FuseBox create a second bundle containing the MainContent.js module.
One thing to notice is that, if you look at the result of the building process in the dist folder, you will find just the usual two bundles app and vendor. What happens? Where is the third bundle for the MainContent.js module? Actually, FuseBox performs physical code splitting only when it generates production code, as we will see later. During the development phase, as in the current one, it generates one bundle by design.
Building Production Code with FuseBox and the Quantum Plugin
The code generated by the current FuseBox building process is working just fine. However, you want to have an optimized and high-performant code in your production environment. FuseBox assigns this task to a specialized plugin called Quantum. Quantum creates highly-optimized and compressed bundles by applying a few configurable actions, such as redundant and unused code removal (tree shaking), physical code splitting, and minification. In order to enable Quantum, you just need to import it from the fuse-box package and put it in the plugins list in the fuse.js file, as shown by the following example:
// fuse.js
const { FuseBox, WebIndexPlugin, SVGPlugin, CSSPlugin, SassPlugin, QuantumPlugin } = require("fuse-box");

const fuse =  FuseBox.init({
  // ... other options ...
  plugins: [
    // ... other plugins ...
    QuantumPlugin()
  ]
})

// ... dev, bundle, and run ...
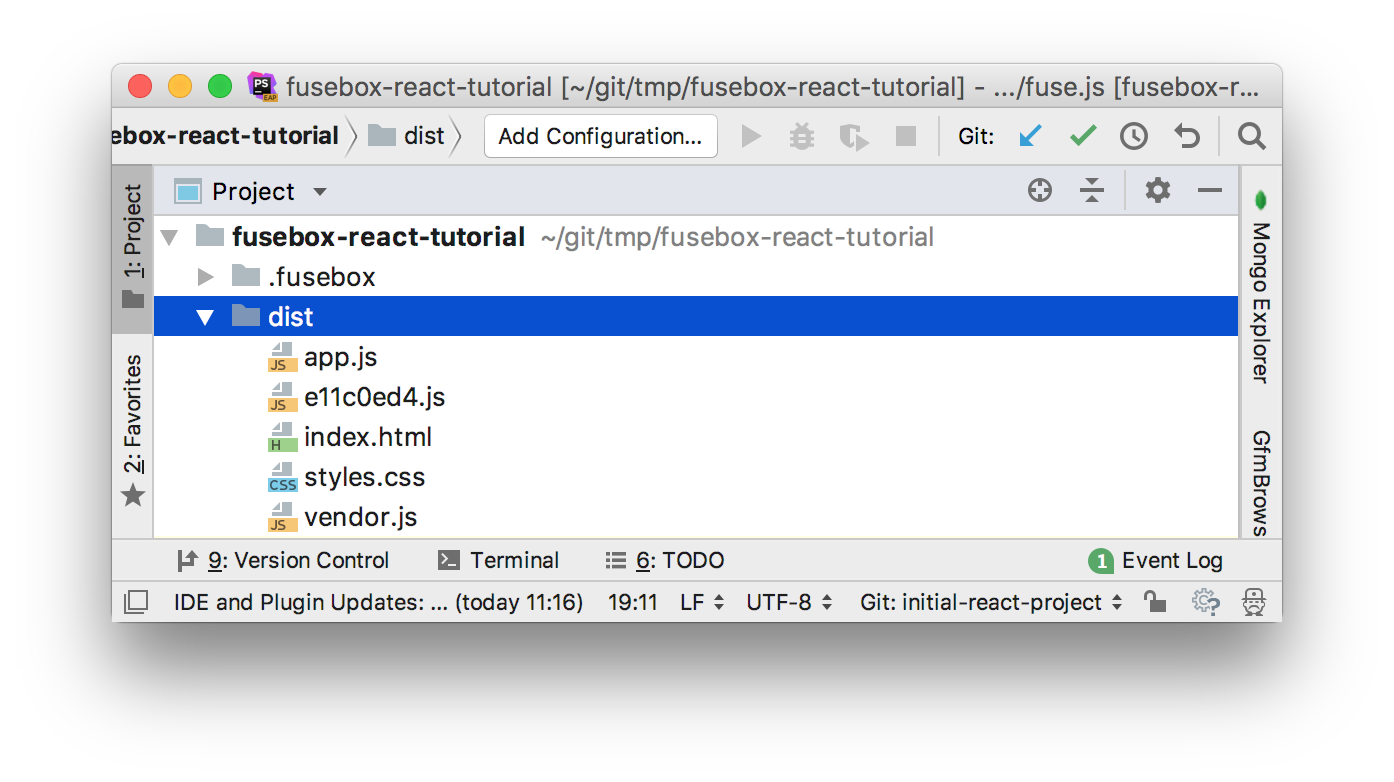
Now, if you clean the dist folder and run npm fuse again, FuseBox will populate the dist folder with the following files:
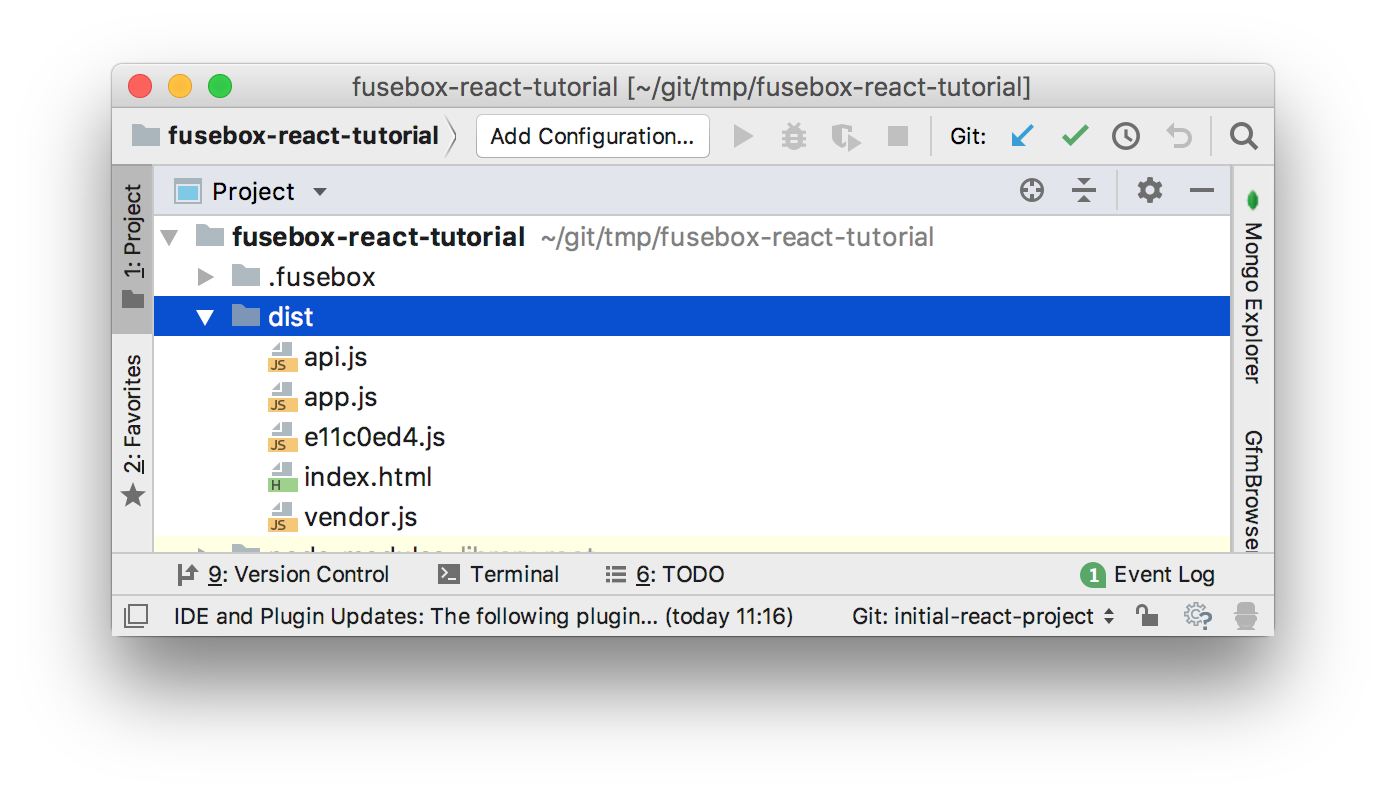
In addition to the index.html file, you can see:
- the
api.jsfile, which contains the FuseBox API code; - the main
app.jsfile, which contains the application's code; - the
vendor.jsfile, which contains third-parties code; - and the
e11c0ed4.jsfile, which contains the code of theMainContentmodule.
As you can see, Quantum generated the bundle from the dynamic import seen in the previous section.
If needed, you can ask Quantum to merge the FuseBox API bundle into another bundle, such as the vendor.js bundle. To do so, you pass an options object with the bakeApiIntoBundle property, as shown by the following example:
QuantumPlugin({bakeApiIntoBundle: "vendor"})
The value assigned to the bakeApiIntoBundle property is the name of the bundle where to merge the FuseBox API. In this case, you will not find the api.js file as the result of the building process, since its code will be inside the vendor.js file.
Note: You need to merge the FuseBox API bundle into the first bundle created by your FuseBox configuration so that it will correctly load all modules of the project. In the current project,
vendoris the first bundle defined infuse.js.
By default, the CSS code of your application is bundled inside the application's code. If you want to get the CSS code in a separate file, you should specify the css property among the Quantum's options properties, like in the following example:
QuantumPlugin({
  bakeApiIntoBundle: "app",
  css : true
})
This will put your CSS code inside the style.css file. Now, clean the dist folder, and launch the building process (node fuse). The output of the building process will look like the following:
In order to enable the optimizations techniques (like tree shaking and uglifying), you can specify corresponding parameters to Quantum, as the following example shows:
QuantumPlugin({
  bakeApiIntoBundle: "app",
  css : true,
  treeshake: true,
  uglify: true
})
I leave it to you the task to compare the difference in size between the non-optimized bundles and the optimized ones using Quantum.
Of course, Quantum has many other options. Please refer the official documentation for more information.
Introducing Sparky, the FuseBox Integrated Task Runner
Managing the development of an application usually requires you to execute a few repetitive tasks. Even in this simple project, you need at least to manually clear the content of the dist folder before launching a new building process. These kinds of tasks are boring and time-consuming. You should automate them.
Most bundling tools leave this job to external task runners, like Gulp or Grunt. However, FuseBox has an integrated task runner covering most common operations: Sparky. By using Sparky, you don't need to install yet another tool since it comes with FuseBox. In addition, you have the ability to access the FuseBox API and its plugins, so you can customize your building process as you want.
Start getting familiar with Sparky by automating a very basic task: cleaning the dist folder. So, open the fuse.js file and import the src() function from the fuse-box/sparky module, as shown in the following snippet of code:
// ./fuse.js
// ... other import statements ...
const { src } = require("fuse-box/sparky");
The src() function allows Sparky to access a folder or the files contained in a folder. For example, src("./dist") selects the folder dist in the current folder, while src("./src/assets/*.png") captures all the png files in the src/assets folder.
In order to clean the dist folder, you will use the clean() method before running the building process. The new content of fuse.js file will look like the following:
// fuse.js
const { FuseBox, WebIndexPlugin, SVGPlugin, CSSPlugin, SassPlugin, QuantumPlugin } = require("fuse-box");
const { src } = require("fuse-box/sparky");

const fuse =  FuseBox.init({
    homeDir : "./src",
    output : "./dist/$name.js",
    useTypescriptCompiler : true,
    plugins: [
        [ SassPlugin({outputStyle: "compressed"}),
            CSSPlugin()
        ],
        CSSPlugin(),
        SVGPlugin(),
        WebIndexPlugin({
            template : "src/index.html"
        }),
        QuantumPlugin({
            bakeApiIntoBundle: "app",
            css : true,
            treeshake: true,
            uglify: true
        })
    ]
});

src("dist").clean("dist").exec();

fuse.dev();
fuse
    .bundle("vendor")
    .instructions("~ index.js");
fuse
    .bundle("app")
    .instructions("> [index.js]")
    .watch()
    .hmr();
fuse.run();
Notice how the commands are used: you define the folder you want to capture via src("dist"), then you declare that you want to clean the dist folder, and finally execute the commands with exec(). Now, by typing node fuse in the console, you will start the building process in a clean dist folder.
Creating Tasks with Sparky
Of course, the last section introduced just a very simple example. You can take a step forward by getting acquainted with task and context definitions. In its basic form, a task is a function taking two parameters: a string defining the task name and a function that is executed when the task runs. The following is the definition of a task cleaning the dist folder:
task("clean", () => src("dist").clean("dist").exec() );
You see that the name of the task is "clean", so you can run this task from the console by typing:
node fuse clean
You passed the task name to the fuse.js script to tell FuseBox to run that specific task. If you define a task with "default" as its name, it will be executed when no task name is provided to node fuse.
Another useful concept in Sparky is the context. Context is an object instantiated when fuse.js is executed, and it is shared between tasks. It can be defined by passing an object or a class or a function to the context() function, as in the following example:
context({
    value: 0,
    addValue(n) {this.value++;}
});
The context defined above can be accessed by any task via parameters, as shown below:
task("myTask", (context) => context.addValue(3));
By combining tasks and context, you can automate the building process in an effective way. For example, the current fuse.js script generates the production code of your React application. You might want to generate the development code and running the web server or just the production code without running the web server. You can accomplish this by defining a context with the FuseBox configuration and a few tasks.
In order to get this result you need to rewrite the content of the fuse.js file. The new content will have the definition of the context, as shown by the following code:
// fuse.js
const { FuseBox, WebIndexPlugin, SVGPlugin, CSSPlugin, SassPlugin, QuantumPlugin } = require("fuse-box");
const { src, task, context } = require("fuse-box/sparky");

context({
  isProduction: false,
  getConfig() {
    return FuseBox.init({
      homeDir : "./src",
      output : "./dist/$name.js",
      useTypescriptCompiler : true,
      plugins: [
        [ SassPlugin({outputStyle: "compressed"}),
          CSSPlugin()
        ],
        CSSPlugin(),
        SVGPlugin(),
        WebIndexPlugin({
            template : "src/index.html"
        }),
        this.isProduction && QuantumPlugin({
          bakeApiIntoBundle: "app",
          css : true,
          treeshake: true,
          uglify: true
        })
      ]
    });
  },
  createAppBundle(fuse) {
    const app = fuse
      .bundle("app")
      .instructions(">[index.js]");
      if (!this.isProduction) {
        app.watch()
          .hmr();
      }
    return app;
  },
  createVendorBundle(fuse) {
    const app = fuse
      .bundle("vendor")
      .instructions("~index.js");
    return app;
  }
});
The object passed to the context() function has four members:
isProduction: This property states if the development or production code needs to be generated.getConfig(): This method returns the instance of the FuseBox engine. As you can see, the Quantum plugin is enabled only if the value ofisProductionproperty istrue.createAppBundle(): This method takes the instance of the FuseBox engine as an argument and defines how theappbundle will be built. The Hot Module Replacement is enabled only when you are not generating the production code.createVendorBundle(): This method takes the instance of the FuseBox engine as an argument and defines how thevendorbundle will be built.
This context will be used by the tasks defined as follows:
task("clean", () => src("dist").clean("dist").exec() );

task("default", ["clean"], async (context) => {
  const fuse = context.getConfig();

  fuse.dev();
  context.createBundle(fuse);
  await fuse.run();
});

task("dist", ["clean"], async (context) => {
  context.isProduction = true;
  const fuse = context.getConfig();

  context.createBundle(fuse);
  await fuse.run();
});
You have three tasks. You already know the first task: it is the task that cleans the dist folder.
The second one is the default task, so it will be executed when no task name is provided to the fuse.js script. Notice that, in this case, the task() function has three arguments. The second argument is an array containing the string "clean". This array defines a list of dependencies, that is a list of other tasks that will be executed before the current task. This means that the "clean" task will be executed before running the default task. The function associated with the default task takes the FuseBox instance from the context, enables the web server, defines the app and vendor bundles and runs the building process. Since the value of isProduction is not changed, the default task will generate the development code.
The third task is named "dist" and will produce the production-ready code. In fact, it assigns true to the isProduction property before getting the FuseBox instance. Then it defines the bundles and runs the building process. No web server is launched in this case.
The following is the complete code for the fuse.js file:
// fuse.js
const { FuseBox, WebIndexPlugin, SVGPlugin, CSSPlugin, SassPlugin, QuantumPlugin } = require("fuse-box");
const { src, task, context } = require("fuse-box/sparky");

context({
  isProduction: false,
  getConfig() {
    return FuseBox.init({
      homeDir : "./src",
      output : "./dist/$name.js",
      useTypescriptCompiler : true,
      plugins: [
        [ SassPlugin({outputStyle: "compressed"}),
          CSSPlugin()
        ],
        CSSPlugin(),
        SVGPlugin(),
        WebIndexPlugin({
            template : "src/index.html"
        }),
        this.isProduction && QuantumPlugin({
          bakeApiIntoBundle: "app",
          css : true,
          treeshake: true,
          uglify: true
        })
      ]
    });
  },
  createAppBundle(fuse) {
    const app = fuse
      .bundle("app")
      .instructions(">[index.js]");
      if (!this.isProduction) {
        app.watch()
          .hmr();
      }
    return app;
  },
  createVendorBundle(fuse) {
    const app = fuse
      .bundle("vendor")
      .instructions("~index.js");
    return app;
  }
});

task("clean", () => src("dist").clean("dist").exec() );

task("default", ["clean"], async (context) => {
  const fuse = context.getConfig();

  fuse.dev();
  context.createVendorBundle(fuse);
  context.createAppBundle(fuse);
  await fuse.run();
});

task("dist", ["clean"], async (context) => {
  context.isProduction = true;
  const fuse = context.getConfig();

  context.createVendorBundle(fuse);
  context.createAppBundle(fuse);
  await fuse.run();
});
Now you can launch your project in the development environment with the internal web server by simply typing node fuse in the console. Also, you can generate the production code by typing node fuse.js dist:
For your convenience, you can define your npm commands by adding the following scripts property in the package.json file:
"scripts": {
    "start": "node fuse",
    "dist": "node fuse dist"
}
With these changes, you can use npm start to launch the development environment with its web server and npm run dist to generate the production code.
“Using FuseBox is straightforward and you can replace WebPack in just a few minutes.”
Tweet This
Aside: Securing React Apps with Auth0
As you will learn in this section, you can easily secure your React applications with Auth0, a global leader in Identity-as-a-Service (IDaaS) that provides thousands of enterprise customers with modern identity solutions. Alongside with the classic username and password authentication process, Auth0 allows you to add features like Social Login, Multifactor Authentication, Passwordless Login, and much more with just a few clicks.
To follow along the instruction describe here, you will need an Auth0 account. If you don't have one yet, now is a good time to sign up for a free Auth0 account.
Also, if you want to follow this section in a clean environment, you can easily create a new React application with just one command:
npx create-react-app react-auth0
Then, you can move into your new React app (which was created inside a new directory called react-auth0 by the create-react-app tool), and start working as explained in the following subsections.
Setting Up an Auth0 Application
To represent your React application in your Auth0 account, you will need to create an Auth0 Application. So, head to the Applications section on your Auth0 dashboard and proceed as follows:
- click on the Create Application button;
- then define a Name to your new application (e.g., "React Demo");
- then select Single Page Web Applications as its type.
- and hit the Create button to end the process.
After creating your application, Auth0 will redirect you to its Quick Start tab. From there, you will have to click on the Settings tab to whitelist some URLs that Auth0 can call after the authentication process. This is a security measure implemented by Auth0 to avoid the leaking of sensitive data (like ID Tokens).
So, when you arrive at the Settings tab, search for the Allowed Callback URLs field and add http://localhost:3000/callback into it. For this tutorial, this single URL will suffice.
That's it! From the Auth0 perspective, you are good to go and can start securing your React application.
Dependencies and Setup
To secure your React application with Auth0, there are only three dependencies that you will need to install:
auth0.js: This is the default library to integrate web applications with Auth0.react-router: This is the de-facto library when it comes to routing management in React.react-router-dom: This is the extension to the previous library to web applications.
To install these dependencies, move into your project root and issue the following command:
npm install --save auth0-js react-router react-router-dom
Note: As you want the best security available, you are going to rely on the Auth0 login page. This method consists of redirecting users to a login page hosted by Auth0 that is easily customizable right from your Auth0 dashboard. If you want to learn why this is the best approach, check the Universal vs. Embedded Login article.
After installing all three libraries, you can create a service to handle the authentication process. You can call this service Auth and create it in the src/Auth/ directory with the following code:
// src/Auth/Auth.js
import auth0 from 'auth0-js';

export default class Auth {
  constructor() {
    this.auth0 = new auth0.WebAuth({
      // the following three lines MUST be updated
      domain: '<AUTH0_DOMAIN>',
      audience: 'https://<AUTH0_DOMAIN>/userinfo',
      clientID: '<AUTH0_CLIENT_ID>',
      redirectUri: 'http://localhost:3000/callback',
      responseType: 'token id_token',
      scope: 'openid profile',
    });

    this.getProfile = this.getProfile.bind(this);
    this.handleAuthentication = this.handleAuthentication.bind(this);
    this.isAuthenticated = this.isAuthenticated.bind(this);
    this.login = this.login.bind(this);
    this.logout = this.logout.bind(this);
    this.setSession = this.setSession.bind(this);
  }

  getProfile() {
    return this.profile;
  }

  handleAuthentication() {
    return new Promise((resolve, reject) => {
      this.auth0.parseHash((err, authResult) => {
        if (err) return reject(err);
        console.log(authResult);
        if (!authResult || !authResult.idToken) {
          return reject(err);
        }
        this.setSession(authResult);
        resolve();
      });
    });
  }

  isAuthenticated() {
    return new Date().getTime() < this.expiresAt;
  }

  login() {
    this.auth0.authorize();
  }

  logout() {
    // clear id token and expiration
    this.idToken = null;
    this.expiresAt = null;
  }

  setSession(authResult) {
    this.idToken = authResult.idToken;
    this.profile = authResult.idTokenPayload;
    // set the time that the id token will expire at
    this.expiresAt = authResult.expiresIn * 1000 + new Date().getTime();
  }
}
The Auth service that you just created contains functions to deal with different steps of the sign in/sign up process. The following list briefly summarizes these functions and what they do:
getProfile: This function returns the profile of the logged-in user.handleAuthentication: This function looks for the result of the authentication process in the URL hash. Then, the function processes the result with theparseHashmethod fromauth0-js.isAuthenticated: This function checks whether the expiry time for the user's ID token has passed.login: This function initiates the login process, redirecting users to the login page.logout: This function removes the user's tokens and expiry time.setSession: This function sets the user's ID token, profile, and expiry time.
Besides these functions, the class contains a field called auth0 that is initialized with values extracted from your Auth0 application. It is important to keep in mind that you have to replace the <AUTH0_DOMAIN> and <AUTH0_CLIENT_ID> placeholders that you are passing to the auth0 field.
Note: For the
<AUTH0_DOMAIN>placeholders, you will have to replace them with something similar toyour-subdomain.auth0.com, whereyour-subdomainis the subdomain you chose while creating your Auth0 account (or your Auth0 tenant). For the<AUTH0_CLIENT_ID>, you will have to replace it with the random string copied from the Client ID field of the Auth0 Application you created previously.
Since you are using the Auth0 login page, your users are taken away from the application. However, after they authenticate, users automatically return to the callback URL that you set up previously (i.e., http://localhost:3000/callback). This means that you need to create a component responsible for this route.
So, create a new file called Callback.js inside src/Callback (i.e., you will need to create the Callback directory) and insert the following code into it:
// src/Callback/Callback.js
import React from 'react';
import { withRouter } from 'react-router';

function Callback(props) {
  props.auth.handleAuthentication().then(() => {
    props.history.push('/');
  });

  return <div>Loading user profile.</div>;
}

export default withRouter(Callback);
This component, as you can see, is responsible for triggering the handleAuthentication process and, when the process ends, for pushing users to your home page. While this component processes the authentication result, it simply shows a message saying that it is loading the user profile.
After creating the Auth service and the Callback component, you can refactor your App component to integrate everything together:
// src/App.js

import React from 'react';
import { withRouter } from 'react-router';
import { Route } from 'react-router-dom';
import Callback from './Callback/Callback';
import './App.css';

function HomePage(props) {
  const { authenticated } = props;

  const logout = () => {
    props.auth.logout();
    props.history.push('/');
  };

  if (authenticated) {
    const { name } = props.auth.getProfile();
    return (
      <div>
        <h1>Howdy! Glad to see you back, {name}.</h1>
        <button onClick={logout}>Log out</button>
      </div>
    );
  }

  return (
    <div>
      <h1>I don't know you. Please, log in.</h1>
      <button onClick={props.auth.login}>Log in</button>
    </div>
  );
}

function App(props) {
  const authenticated = props.auth.isAuthenticated();

  return (
    <div className="App">
      <Route
        exact
        path="/callback"
        render={() => <Callback auth={props.auth} />}
      />
      <Route
        exact
        path="/"
        render={() => (
          <HomePage
            authenticated={authenticated}
            auth={props.auth}
            history={props.history}
          />
        )}
      />
    </div>
  );
}

export default withRouter(App);
In this case, you are actually defining two components inside the same file (just for the sake of simplicity). You are defining a HomePage component that shows a message with the name of the logged-in user (that is, when the user is logged in, of course), and a message telling unauthenticated users to log in.
Also, this file is making the App component responsible for deciding what component it must render. If the user is requesting the home page (i.e., the / route), the HomePage component is shown. If the user is requesting the callback page (i.e., /callback), then the Callback component is shown.
Note that you are using the Auth service in all your components (App, HomePage, and Callback) and also inside the Auth service. As such, you need to have a global instance for this service, and you have to include it in your App component.
So, to create this global Auth instance and to wrap things up, you will need to update your index.js file as shown here:
// src/index.js

import React from 'react';
import ReactDOM from 'react-dom';
import { BrowserRouter } from 'react-router-dom';
import Auth from './Auth/Auth';
import './index.css';
import App from './App';
import registerServiceWorker from './registerServiceWorker';

const auth = new Auth();

ReactDOM.render(
  <BrowserRouter>
    <App auth={auth} />
  </BrowserRouter>,
  document.getElementById('root'),
);
registerServiceWorker();
After that, you are done! You just finished securing your React application with Auth0. If you take your app for a spin now (npm start), you will be able to authenticate yourself with the help of Auth0, and you will be able to see your React app show your name (that is, if your identity provider does provide a name).
If you are interested in learning more, please, refer to the official React Quick Start guide to see, step by step, how to properly secure a React application. Besides the steps shown in this section, the guide also shows:
Summary
This article introduced the main features of FuseBox while guiding you in the configuration of a simple React application. As you've seen, FuseBox supports the most common features that a bundler must have: it allows you to define how to generate your bundles for development and production environments, it provides an integrated development web server with Hot Module Replacement support, and it allows you to configure it. Using these features, you have defined the basic configuration of a React application and built your first bundle.
Despite being relatively young, FuseBox has a wide range of options and plugins that provide you with great flexibility and allows you to easily deal with non-JavaScript files like CSS, SCSS, PNG, and so on. You used these feature by configuring your React project to compile your Sass code into standard CSS.
You've seen how FuseBox provides out-of-the-box support for code splitting and dynamic loading by defining a new component loaded on demand after the user's interaction. In addition, you used its integrated task runner, Sparky, in order to automate repetitive activities like cleaning the output folder and switching from development and production building configurations.
Of course, FuseBox has many other interesting features. To learn about them, check out the official FuseBox website.
About the author

Andrea Chiarelli
Principal Developer Advocate
I have over 20 years of experience as a software engineer and technical author. Throughout my career, I've used several programming languages and technologies for the projects I was involved in, ranging from C# to JavaScript, ASP.NET to Node.js, Angular to React, SOAP to REST APIs, etc.
In the last few years, I've been focusing on simplifying the developer experience with Identity and related topics, especially in the .NET ecosystem.