
本記事は 2025年7月8日に公開された「Unlock Enterprise Readiness: How to Edit Existing Connections with Self-Service SSO in your SaaS App」を機械翻訳した記事です。
以前の記事では、SSOコネクションを作成するセルフサービス機能をWebアプリケーションに追加しました。 これは管理タスクを顧客の管理者に委任できる強力な機能です。しかし、SaaSでは既存SSO設定の編集もサポートする必要があります。
SSOコネクションの編集機能は必須
なぜ編集機能が不可欠なのかを説明します。SSOコネクションを作成した後、顧客の管理者はクライアントシークレットや、コネクションのSAML証明書の更新が必要になる場合があります。このようなシナリオでは、顧客の管理者は依然としてSaaSのサポートや担当者に連絡する必要があります。
真の「セルフサービス」管理を提供するために、Auth0のセルフサービスSSO機能を引き続き活用できます。詳細を見ていきましょう。
サンプルアプリ
本ブログ記事では、以前に構築したサンプルアプリケーションを出発点として使用します。
サンプルのNode.js/Expressアプリケーションは、以下からダウンロードできます。
git clone --branch feature/self-service-sso-create --single-branch https://github.com/neri78/self-service-sso-express.git
注: サンプルコードは、コードをシンプルにするためにエラーハンドリングを省略しています。実際の開発ではエラーハンドリングを正しく実装する必要があります。
READMEファイルの手順に従って、Regular Web ApplicationとMachine-to-Machine (M2M) Applicationを登録および設定してください。
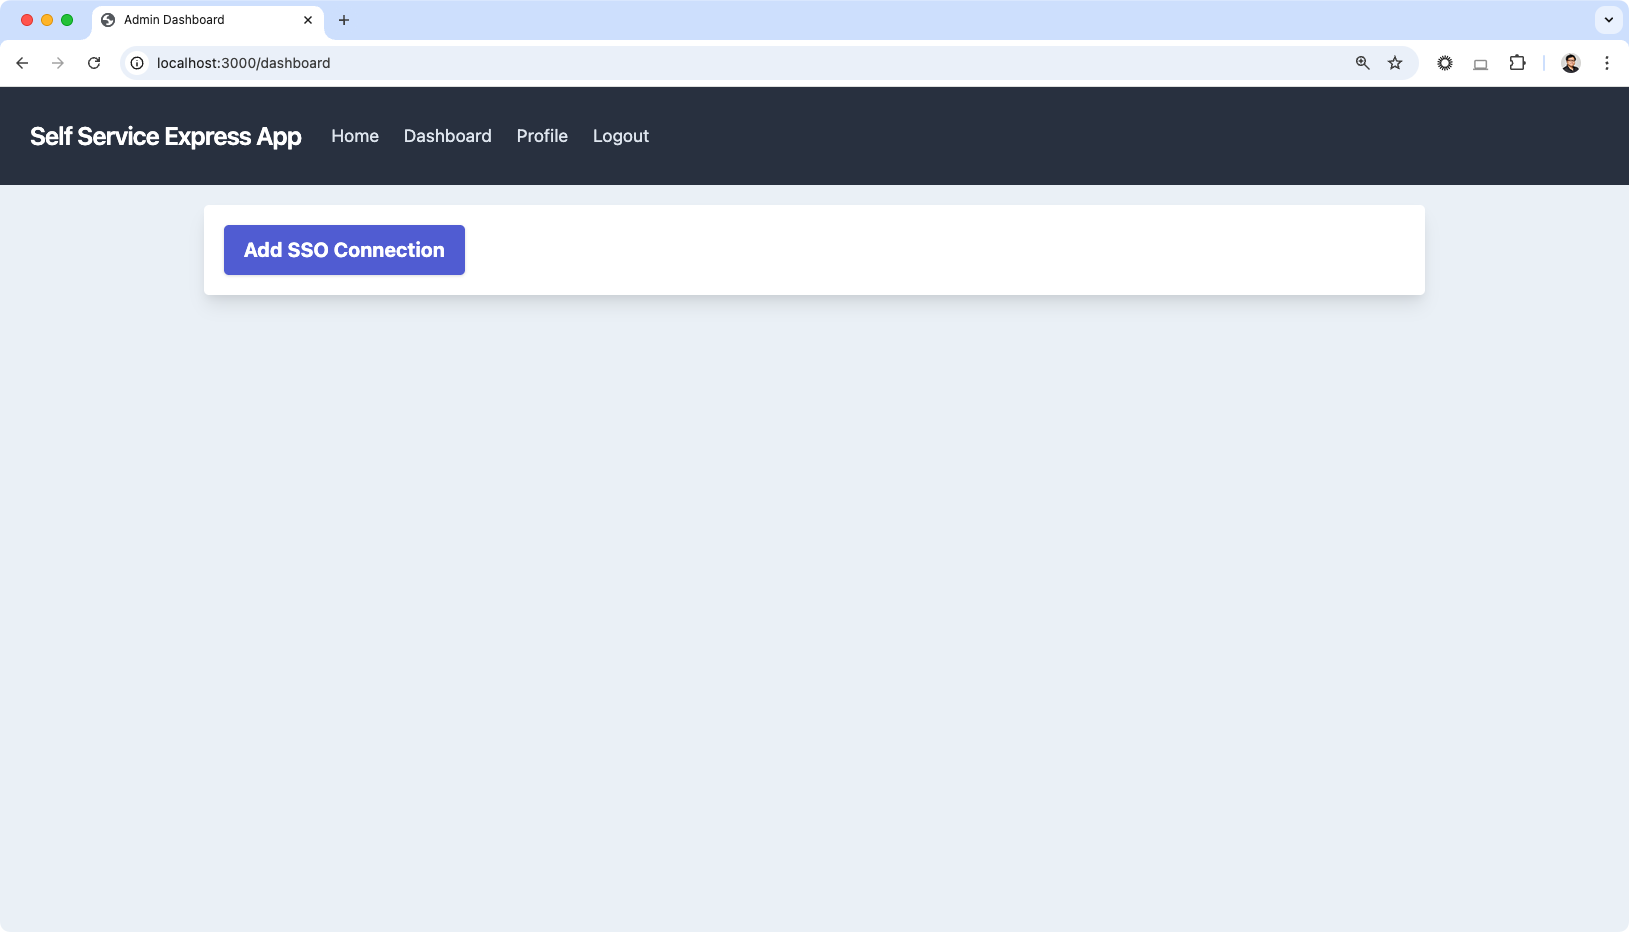
サンプルアプリではユーザーがログインした後にヘッダーナビゲーションのDashboardをクリックするとダッシュボードが開きます。ダッシュボードに移動すると、次のページが表示されます。現在、ダッシュボードには新しいSSOコネクションを作成するためのボタンがあります。
SSOコネクションのセルフサービス編集
ここから編集機能を追加するために、以下の手順を実行します。
- ダッシュボードページのUIを更新
- 既存のコネクションを取得するためにManagement APIの権限を追加
- セルフサービスSSO編集を作成するためにルーターハンドラーを更新
ダッシュボードページのUIを更新
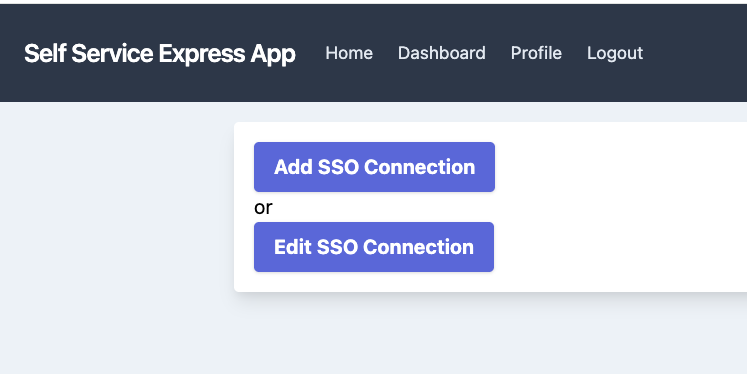
まずviews/dashboard.ejsファイルに編集ボタンを追加します。
<!-- ...existing code.. -->
  <form action="/dashboard" method="post" class="w-full max-w-xl">
    <div class="md:flex md:items-center">
      <div >
      <!-- 👇 change code -->
        <button class="shadow bg-indigo-600 hover:bg-indigo-500 focus:shadow-outline focus:outline-none text-white font-bold py-2 px-4 rounded"
                name="action"
                value="create"
                type="submit">
          Add SSO Connection
        </button>
        <p>or</p>
        <button class="shadow bg-indigo-600 hover:bg-indigo-500 focus:shadow-outline focus:outline-none text-white font-bold py-2 px-4 rounded"
                name="action"
                value="edit"
                type="submit">
          Edit SSO Connection
        </button>
      <!-- 👆 change code -->
      </div>
    </div>
  </form>
<!-- ...existing code.. -->
これでダッシュボードに2つのボタンが表示されます。各ボタンにはvalue属性があり、ルーターハンドラーでロジックを分岐させるために使用します。
既存コネクションを取得するためのManagement APIパーミッションを追加
既存のコネクションを編集するには、Auth0 Management APIを使用して既存のコネクションを取得する必要があります。そのために、Machine-to-Machine (M2M)アプリケーションに次の権限を付与します。
read:connections

セルフサービスSSO編集を作成するためのルーターハンドラーの更新
アプリケーションのrouter/index.jsファイルには、/dashboardに対するPOSTハンドラーがあります。このハンドラーは、コネクションを作成するためのセルフサービスSSOチケットを作成します。編集にもこのハンドラーを使用します。
ロジックの分岐
ハンドラーを更新してボタンのvalue属性に基づいてロジックを分岐します。
// routes/index.js


// ...existing code...
router.post('/dashboard', requiresAuth(), async function (req, res, next) {
  // get an instance of the ManagementClient.
  const management = getManagementClient();


  // get a list of Self-Service Profiles.
  const { data: ssoProfiles } = await management.selfServiceProfiles.getAll();


  // use the 1st profile in this sample.
  const ssoProfile = ssoProfiles[0];


  const requestParameters = {
      id: ssoProfile.id
  };


  // 👇 change code
  let bodyParameters = {};


  const action = req.body.action;


  if (action === 'create') {
      // build bodyParameter for 'create a connection'.
      bodyParameters = {
          ...bodyParameters,
          connection_config: { name: `self-service-sso-${Date.now()}` },
          enabled_clients: [process.env.CLIENT_ID]
      }
  } else if (action === 'edit') {
      // build bodyParameter for 'edit a connection'.
  }
  // 👆 change code


  // generate a Self-Service SSO ticket.
  const { data: ssoTicket } =
      await management.selfServiceProfiles.createSsoTicket(
          requestParameters,
          bodyParameters
      );


  res.render('dashboard', {
      title: 'Admin Dashboard',
      ticketURL: ssoTicket.ticket
  });
});
// ...existing code...
この変更により、新しいコネクションを作成するための既存のロジックを維持できます。
既存コネクションを編集するためのbodyParameterの構築
セルフサービスSSOで既存のコネクションを編集するには、bodyParametersにconnection_idを指定します。更新されたコードは次のとおりです。
// routes/index.js


//...existing code...
router.post('/dashboard', requiresAuth(), async function (req, res, next) {
  // get an instance of the ManagementClient.
  const management = getManagementClient();


  // get a list of Self-Service Profiles.
  const { data: ssoProfiles } = await management.selfServiceProfiles.getAll();


  // use the 1st profile in this sample.
  const ssoProfile = ssoProfiles[0];


  const requestParameters = {
      id: ssoProfile.id
  };


  let bodyParameters = {};
  const action = req.body.action;


  if (action === 'create') {
      // build bodyParameter for 'create a connection'.
      bodyParameters = {
          ...bodyParameters,
          connection_config: { name: `self-service-sso-${Date.now()}` },
          enabled_clients: [process.env.CLIENT_ID]
      }
  } else if (action === 'edit') {


      // build bodyParameter for 'edit a connection'.
      // 👇 add code
      // get connections for the current client
      const { data: enabledConnections } = await management.clients.getEnabledConnections({
          client_id: process.env.CLIENT_ID
      });


      // filter a connection with the name and use the first item for this sample.
      const ssoConnection = enabledConnections.connections.filter(connection => {
      return connection.name.includes('self-service-sso-')
      })[0];


      // add connection_id to the bodyParameter.
      bodyParameters = {
          ...bodyParameters,
          connection_id: ssoConnection.id
      };
      // 👆 add code
  }


  // generate a Self-Service SSO ticket.
  const { data: ssoTicket } =
      await management.selfServiceProfiles.createSsoTicket(
          requestParameters,
          bodyParameters
      );


  res.render('dashboard', {
      title: 'Admin Dashboard',
      ticketURL: ssoTicket.ticket
  });
});
// ...existing code...
コードの詳細を見ていきましょう。
既存コネクションの取得
編集したいコネクションのidを取得する必要があります。Get enabled connections for a clientエンドポイントを使用して、現在のAuth0 Applicationのコネクションリストを取得し、条件でリストをフィルターできます。
// get connections for the current client
const { data: enabledConnections } = await management.clients.getEnabledConnections({
  client_id: process.env.CLIENT_ID
});


// filter a connection with the name and use the first item for this sample.
const ssoConnection = enabledConnections.connections.filter(connection => {
  return connection.name.includes('self-service-sso-')
})[0];
management.clients.getEnabledConnections()メソッドは、指定されたAuth0クライアント(アプリケーション)のコネクションのリストを取得します。前の記事で次の命名規則に従ってセルフサービスSSOコネクションを作成したため、リストにfilterを適用できます。
- コネクションの名前に
self-service-sso-が含まれている。
本記事では、条件に一致する最初のコネクションが適切であると仮定します。
Auth0 Organizationsを使用している場合は、代わりに組織で有効になっているコネクションを取得するエンドポイントを使用できます。
auth0-nodeもこのエンドポイントをサポートしています。Machine-to-MachineアプリケーションがAuth0 Management APIアクセスのためにread:organization_connections権限を持っていることを確認してください。別の記事では、セルフサービスSSOとAuth0 Organizationsの組み合わせについて説明します。
bodyParameterにconnection_idを設定
最後のステップは、bodyParameterにconnection_idの値を設定します。
// add connection_id to the bodyParameter.
bodyParameters = {
  ...bodyParameters,
  connection_id: ssoConnection.id
};
これで既存のコネクションを編集するためのセルフサービスSSOチケットを作成する準備がすべて整いました。既存のコードを使用してチケットを生成します。
// generate a Self-Service SSO ticket
const ssoTicket = await management.selfServiceProfiles.createSsoTicket(
  requestParameters,
  bodyParameters
);
動作の確認
ダッシュボードページでEdit SSO Connectionボタンをクリックすると、生成されたチケットのURLを開くボタンがある次のページが表示されます。
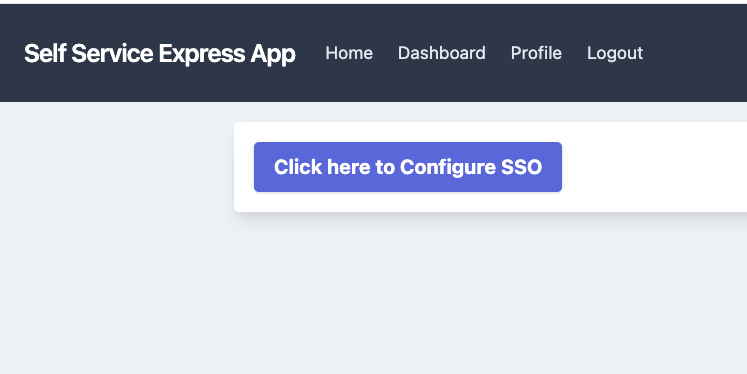
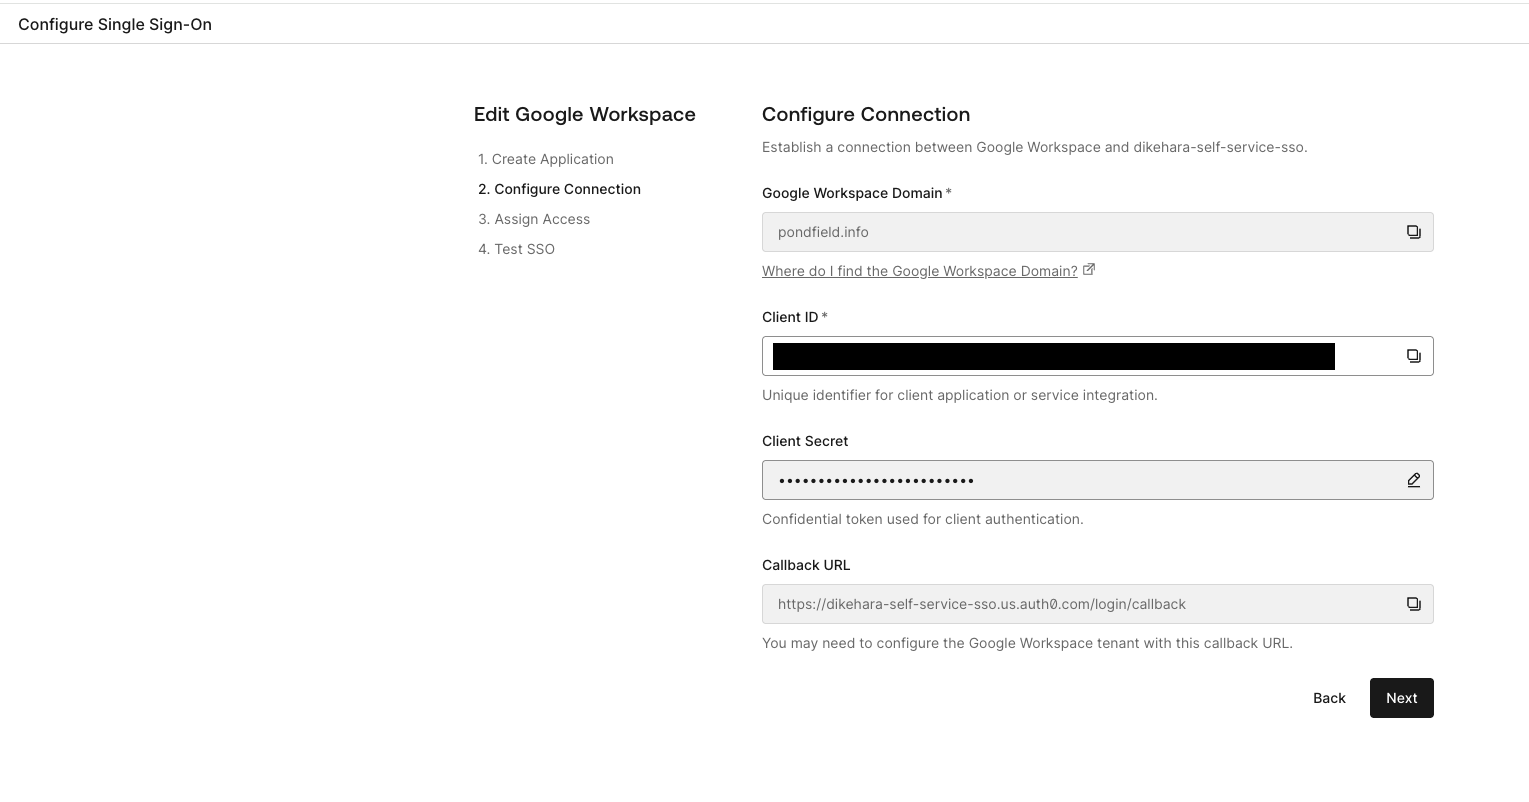
ボタンをクリックすると、ブラウザはSSOセットアップアシスタントページと現在のコネクション設定を含む新しいタブを開きます。顧客の管理者はここで設定を変更できます。
まとめ
本記事では以下の方法を学びました。
- 既存のコネクションに対してセルフサービスSSOチケットを生成するようにアプリケーションを更新する。
セルフサービスSSOの作成および編集機能により、SaaSで管理代行機能を提供できます。今後の記事では、セルフサービスプロファイルの詳細や、B2B SaaSシナリオでAuth0 Organizationsとこの機能を使用する方法について説明します。
SaaStartで試す: Next.js B2B SaaSリファレンスアプリケーション
Auth0は、B2B SaaSアプリケーションを構築するための機能を提供します。本記事では、その機能の1つを紹介するためにNode.js/Expressを使用しました。Next.jsでB2B SaaSの構築を検討している場合は、SaaStartを試してみてください。このアプリは、マルチテナンシー、エンタープライズユーザー向けのログインオプション、セキュリティポリシーなど、B2B SaaSに必要な機能のリファレンス実装を提供します。
About the author

Daizen Ikehara
Principal Developer Advocate
.NETエンジニアとしてキャリアをスタートさせた後、UIコンポーネントベンダーやクラウドコミュニケーションプラットフォームベンダーにおいて様々なロールを歴任。2023年3月よりOktaに参画し、日本市場における開発者リレーションを担当。趣味はゲームと長距離散歩。
Daizen Ikehara joined the Developer Relations team in March 2023 as a Principal Developer Advocate. In the early stages of his professional career, Daizen started using C#. Then, he touched on various JavaScript technologies/frameworks—Angular, React, and Vue. Recently, he’s been using Node.js/JavaScript more often. He is passionate about talking with developers. Outside of work, Daizen likes to take long walks, play video games, and watch Formula 1 racing.