
As serverless deployment is becoming popular, equipping yourself with some serverless skills will be paramount. In this article, you will learn how to build a CRUD API using Azure Functions and Azure Cosmos DB 🤩.
Why Go Serverless with Azure Functions
From Microsoft's site, Azure Functions is a serverless compute service (Function as a service) provided by Azure, Microsoft's cloud service. It lets you run event-triggered code without having to provision or manage any infrastructure explicitly. It contrasts with the classic approach that requires setting up your server, maintaining it, and taking full responsibility for securing it.
Hosting your code on Azure Functions provides you with some cool benefits:
- Cost-effective: Using Azure Functions is probably cheaper for a medium-sized project than running your back-end logic on a dedicated server. In fact, after a function executes, it stops consuming resources, and you are only billed for the number of resources used. Azure Functions only run when triggered by an event. Various services can trigger an Azure Function to run, such as an HTTP request, a Timer, an Azure Blob storage upload, etc.
- Focus on app logic: Since Azure handles the work of provisioning or maintaining a server, you can dedicate your time more to developing the application logic. This boosts productivity.
Setting up Azure Functions
Let's take a concrete look at how Azure Functions work by building a CRUD API to manage a wishlist.
As a first step, go to the Azure portal.
You need an active Azure subscription to use the cloud services on Azure, including Azure Functions.
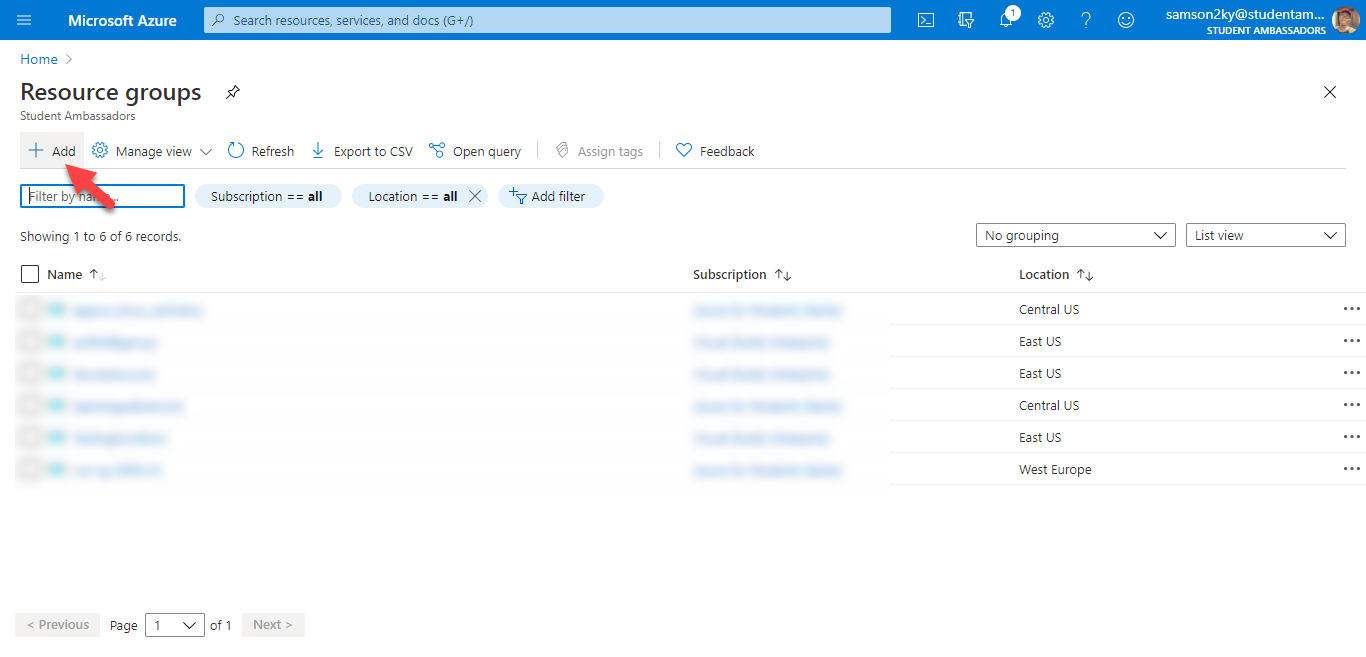
It is good practice to wrap all your resources inside a resource group. This makes deleting all used resources inside a resource group easy. So click on Resource groups icon on your Azure dashboard, as shown below.

Next, click on the Add button in the Resource groups page to create a resource group and wait for the Create a resource group page to load.
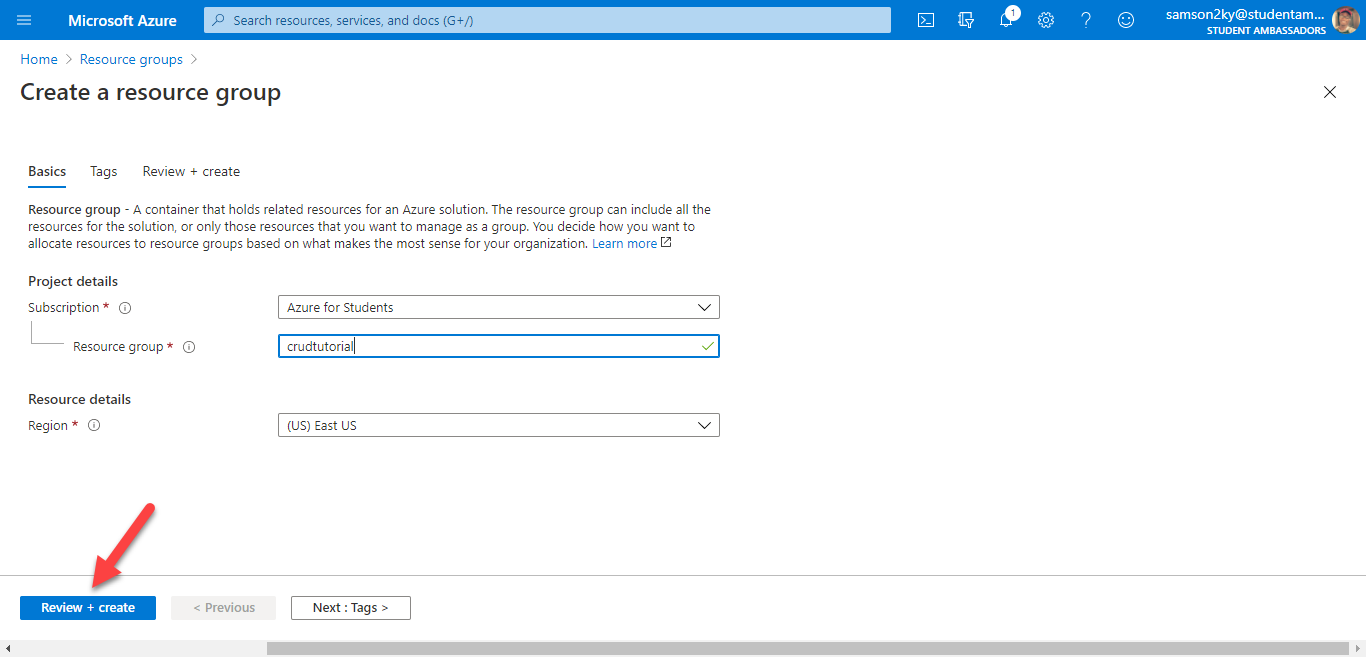
In the Resource group input field, you can the name for your resource group. In this tutorial, I will use crudtutorial as the resource group's name. You can also select any region closer to where you live from the Region field. I will leave that field as it is and click on the Review + create button.
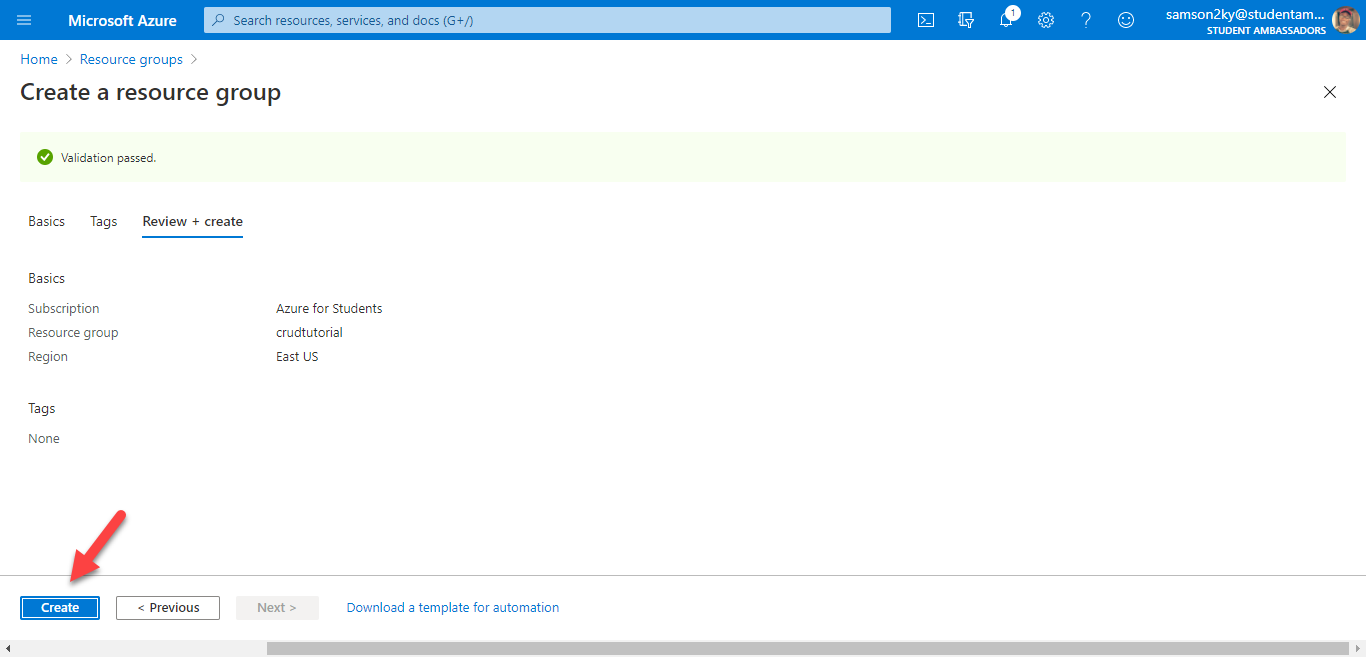
After your settings have been reviewed and validated, the Review + create button will change to Create. Finally, click on the Create button to create your resource group.
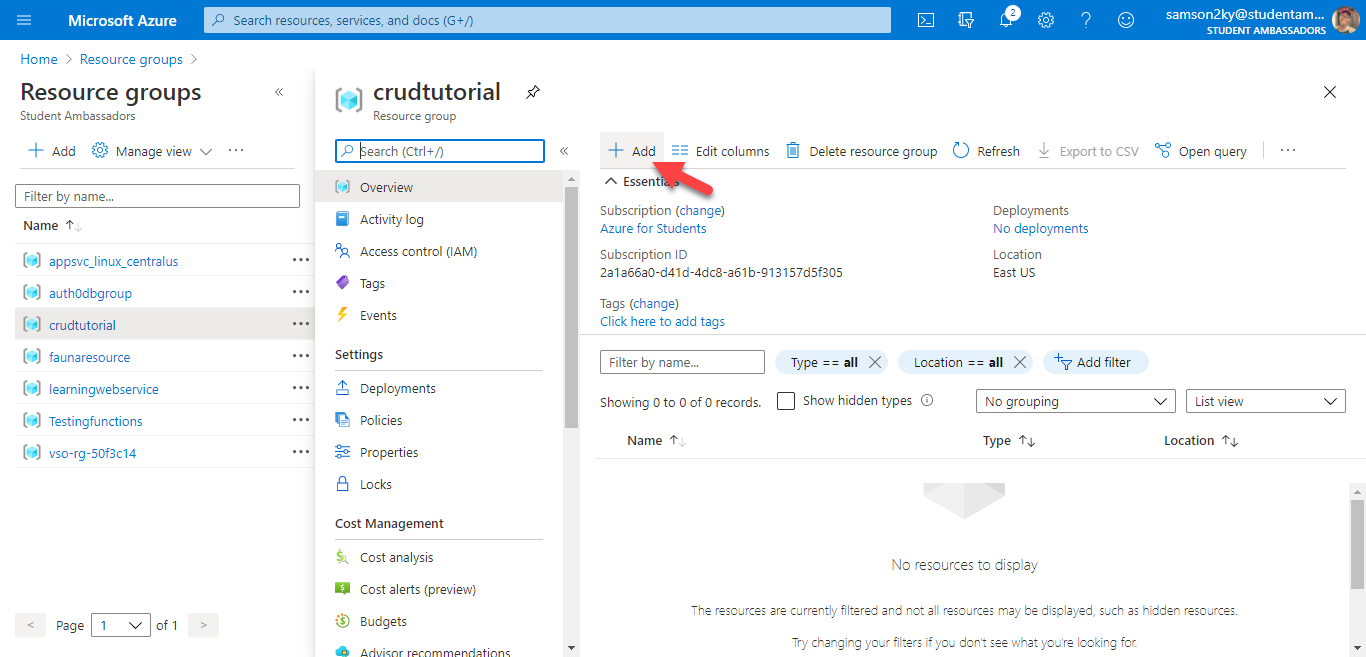
After the resource group has been created, you will be redirected back to the Resource group page. Click on the crudtutorial resource group or whatever name you chose for your resource group.
The crudtutorial resource group page will open. Click on the Add button to add a resource to the resource group, as shown in the following image:
You will be redirected to a search page for selecting the resource to be created. You can either search for Function App in the search field (a) or select Function App from the list of popular resources (b).

The Create Function App page opens. Configure the following settings, as depicted by the image below:
- Assign a unique name to your Function App. I'm using
swacbloomsin the Function App example I'm building. This is also the name that will be prepended to.azurewebsites.netto form the Function App domain name (e.g.,swacblooms.azurewebsites.net). - Select Node.js as the
Runtime stacksince the function logic will be written in JavaScript. - Choose 12 LTS or any other version as the Node.js version.
- Select any region of your choice, preferably a region closer to where you are.
- Finally, click on the
Review + createbutton, wait for validation, and then continue by clicking on theCreatebutton.

Wait for the required resources for your Function App are provisioned. When the Go to resource button becomes active, click on it to navigate to the newly created Function App dashboard.

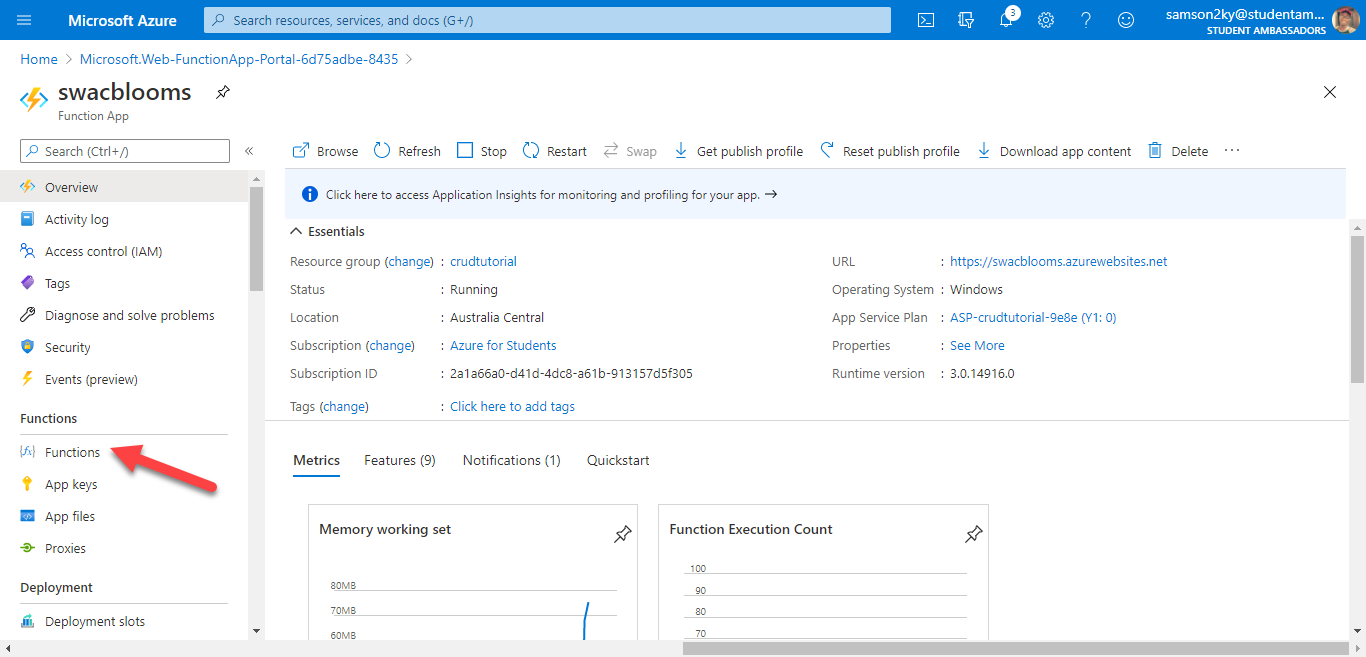
The overview page will display general information related to your Function App.
Now, you can focus on creating the CRUD API for your wishlist. So, click on the Functions menu on the left panel.
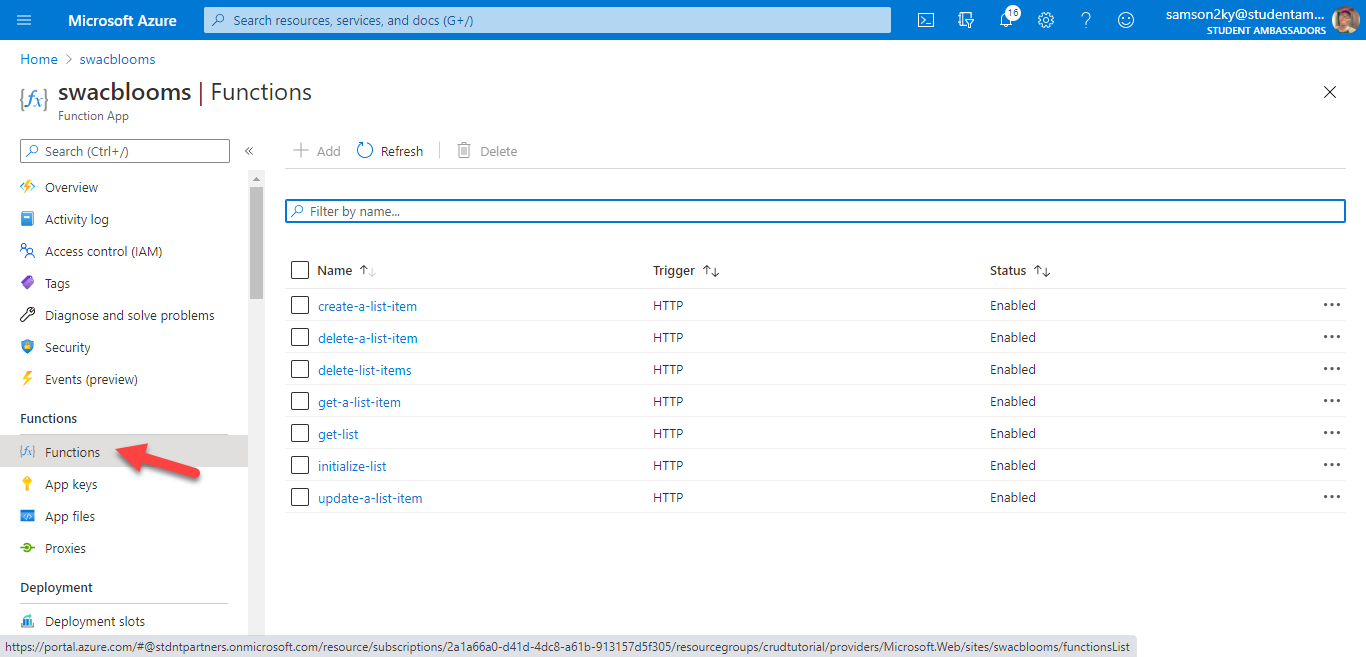
The CRUD API will be implemented by seven functions:
initialize-list: For generating a sample wishlist in the database.get-list: For retrieving all the wishlist items from the database.get-a-list-item: For retrieving a specific wishlist item from the database.delete-list-items: For deleting all the wishlist items in the database.delete-a-list-item: For deleting a wishlist item from the database.create-a-list-item: For inserting a new wishlist item to the database.update-a-list-item: For updating a wishlist item in the database.
To start, click on the Add button to create a function. A right panel will slide in containing the required fields needed to configure the function, as you can see in the following image.
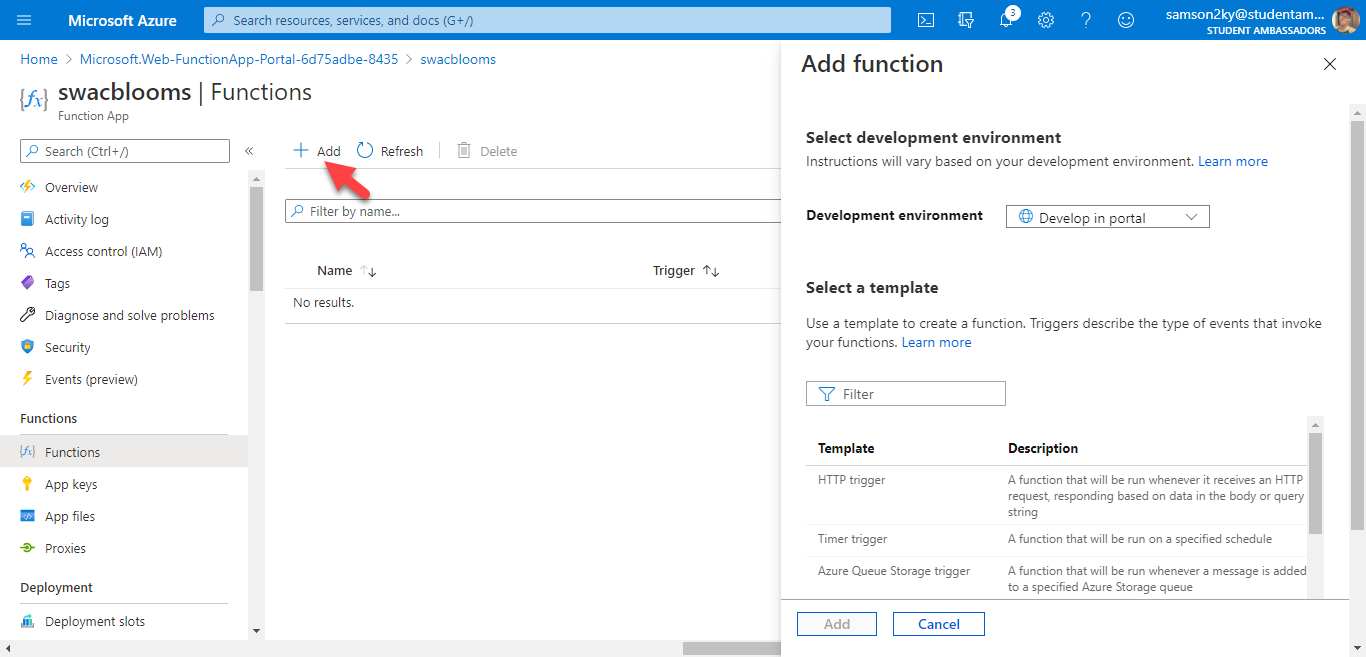
On the right panel, you see various available templates to bootstrap your function. Since this tutorial is centered on making a CRUD API triggered through an HTTP request, select HTTP trigger as the template to use.

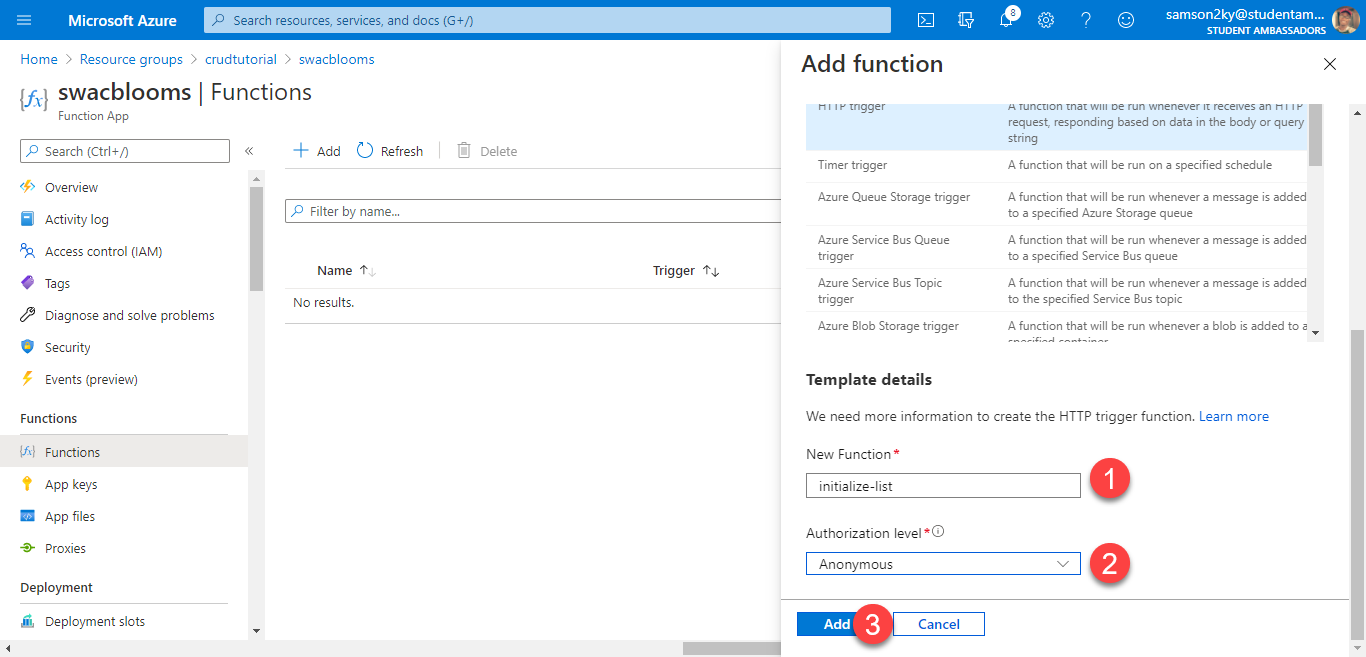
Scroll down a little bit on the right panel, and you will see the New Function field, which allows you to provide the function's name.
- Clear the default function name and replace it with the name of the first function to create, i.e.,
initialize-list. - In the
Authorization levelfield, selectAnonymous. This setting will allow you to call the function without attaching an authorization token to the request. - Finally, click on the
Addbutton.
You will be redirected to the initialize-list function dashboard.
Instead of writing the initialize-list function logic right now, you will create all the functions first. So, click on the Function App's name on the header section, as shown in the following screenshot:

You will see the initialize-list function in the general Function App dashboard.
Follow the steps above to create the remaining functions: get-list, get-a-list-item, delete-list-items, delete-a-list-item, create-a-list-item, and update-a-list-item
Remember to set the trigger to
HTTPand the authorization level toAnonymousduring the creation of the other functions.
At the end of this activity, you will get the following function list:

You will come back here to set up the logic for all the functions. However, since those functions need to access the database, you need to set it up first. So the next step will be setting up Azure Cosmos DB.
Azure Cosmos DB
Azure Cosmos DB is a Microsoft serverless Database. It is very efficient in areas that require low latency performance. It is also cost-effective, letting you pay for only what you use. An awesome Azure Cosmos DB feature is that it supports several APIs to interact with it. So if you have some knowledge of a database like MongoDB, you don't need to learn a new database query language. You can still make use of the MongoDB syntax to interact with Cosmos DB 😎.
Currently, Azure Cosmos DB supports these APIs:
- The native Core (SQL) API
- API for MongoDB
- Cassandra API
- Gremlin API
- Table API
Setting up Azure Cosmos DB
Move back to the Azure portal homepage and click on the resource group you created (crudtutorial in this tutorial's example).
Click on the Add button to create a resource, and then search for Azure Cosmos DB. As before, you can use the search field (a) or select from the popular resource list (b).

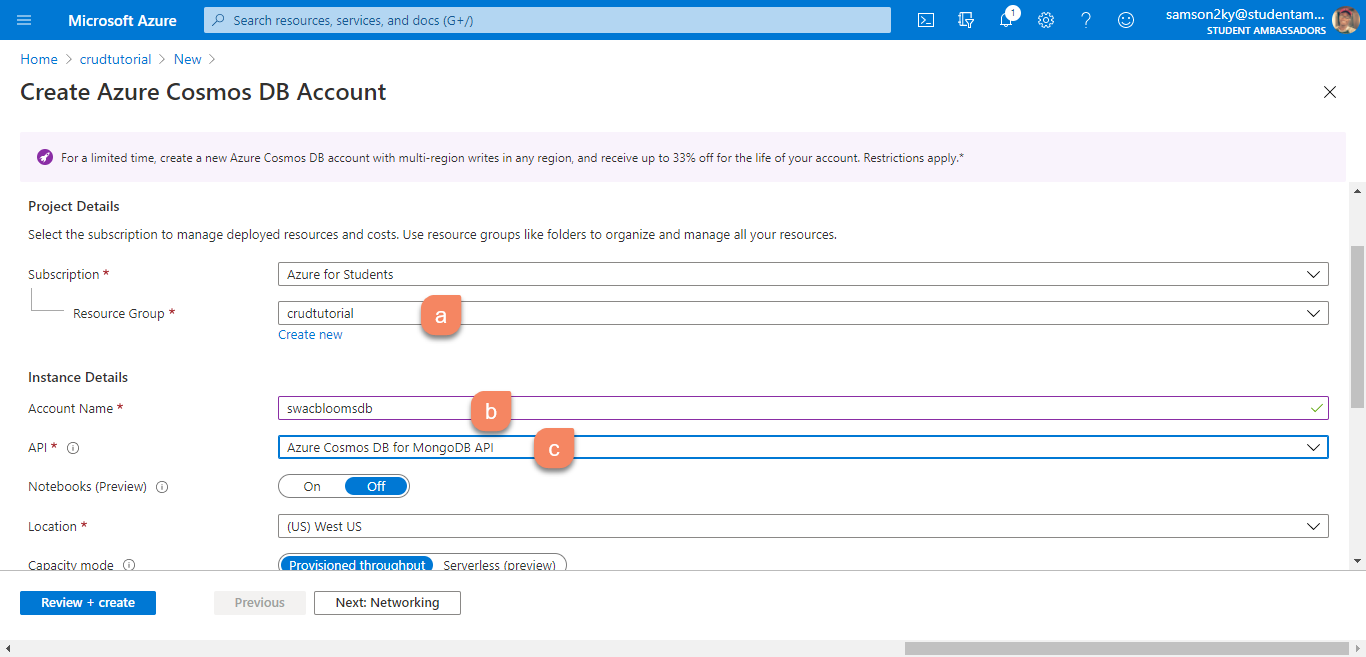
In the Create Azure Cosmos DB Account page, ensure that you choose the right resource group (a) and assign an account name to your database (b), swacbloomsdb in the example shown in the image below. Since this tutorial uses MongoDB's API, select Azure Cosmos DB for MongoDB API in the API field (c).
You can leave the other fields with their default values.
As usual, click on the Review + create button to create your database resource and wait for your configuration to be validated. Once your configuration validation is successful, click on the Create button to finalize the required resource provisioning.
Wait for the Go to resource button to display, and click on it to navigate to the Cosmos DB overview dashboard:

In the dashboard, click on the Connection String menu option in the left panel (a) and copy the value of the PRIMARY CONNECTION STRING field (b). Paste it somewhere as this will be used in your Azure Function.
Setting up Your Azure Function Logic
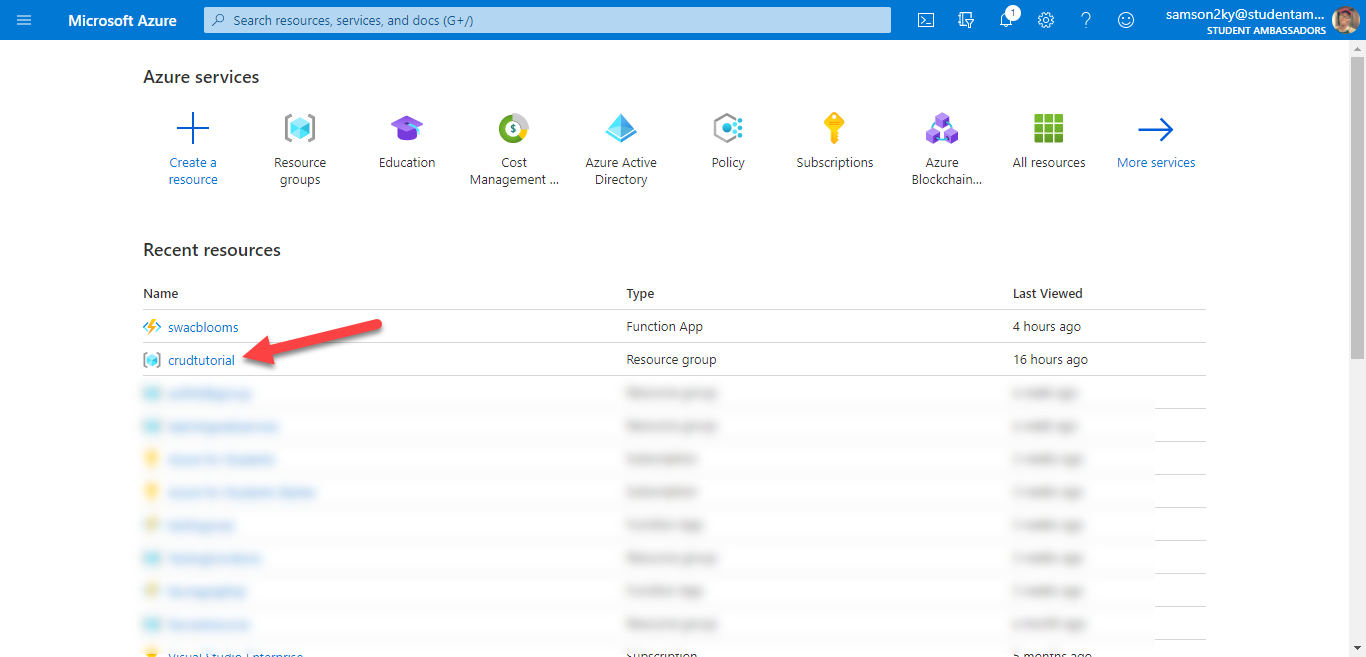
Now that you have the connection string for the database, the next step is to make the previously created functions working. So, again, go to the Azure homepage and select the crudtutorial resource group.
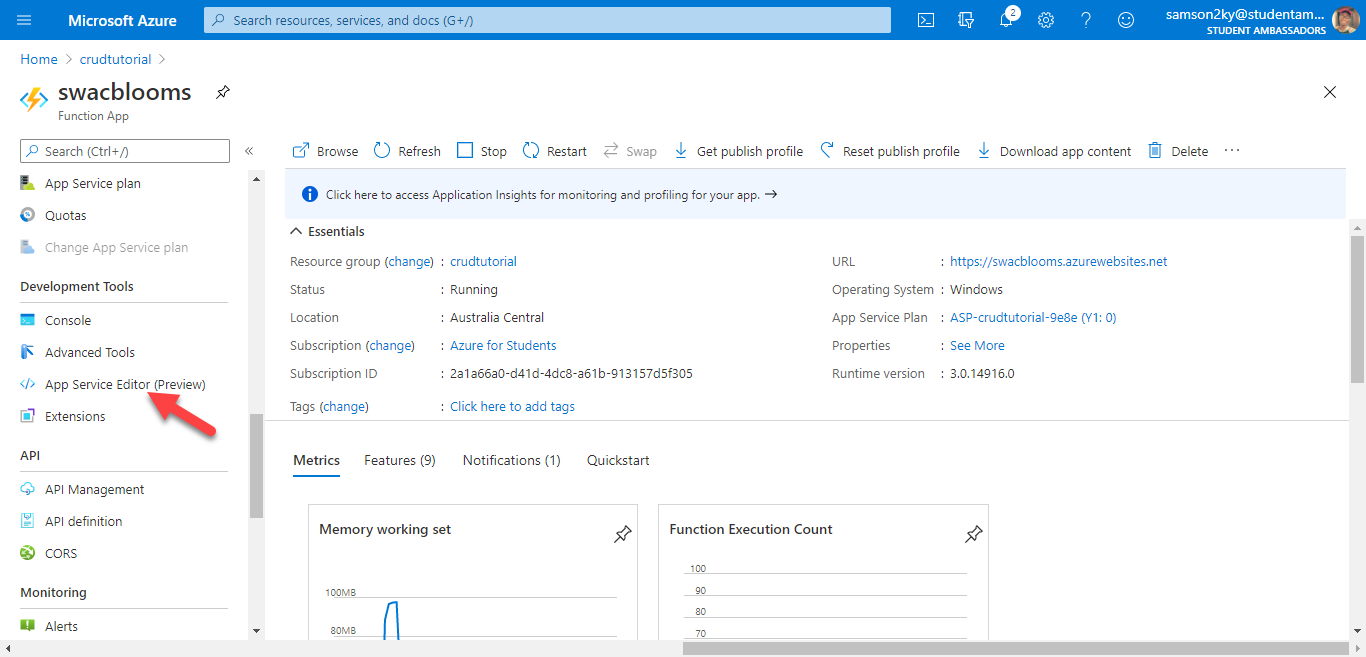
In the list of the available resources, select your Function App (swacblooms):

There are various ways of writing the logic for your Azure Function. In this tutorial, you will use the App Service Editor. It allows you to write your app logic directly on the web. That means you don't need to use a local editor or an extra tool. You get to have an all in one experience of developing your product directly on Azure😎.
On the left panel of the crudtutorial Function App, scroll down until you see the App Service Editor menu option and click on it.
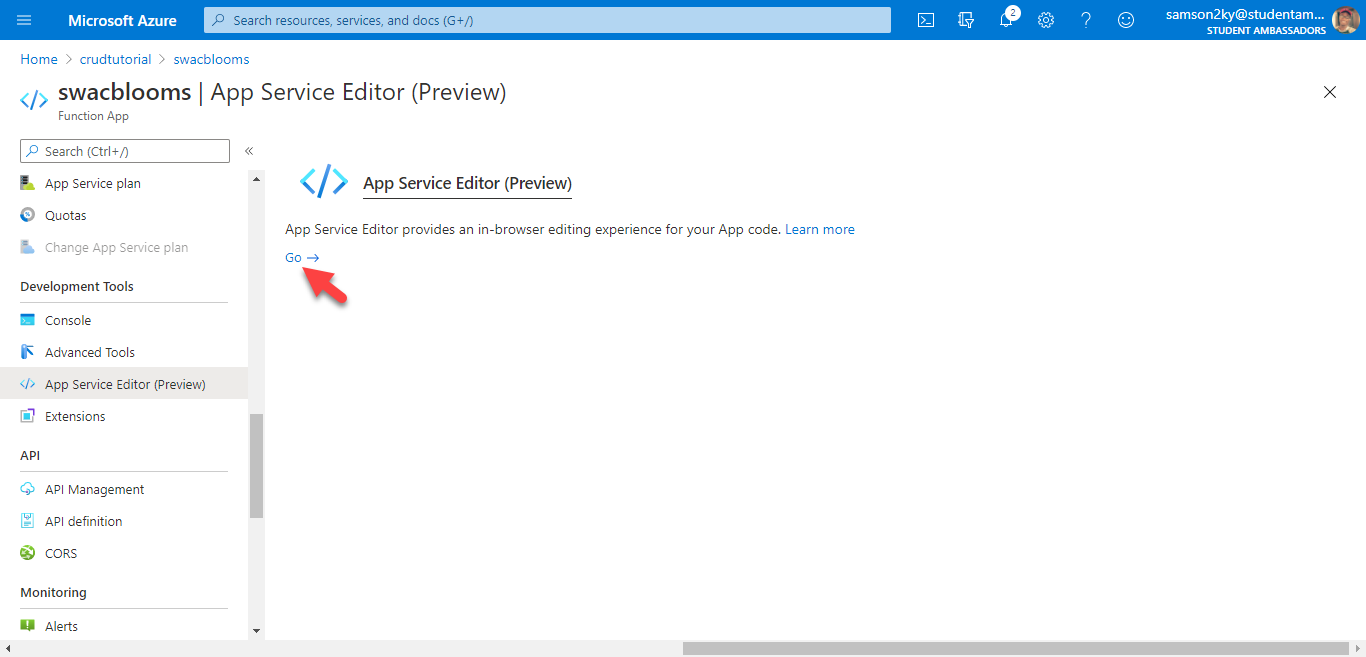
Now, click on the Go -> button to enter the editor interface.
In the online editor, you should see the folders of the previously created functions. Click on the console button, as shown in the screenshot below. This is needed to use the online terminal to install some required dependencies.
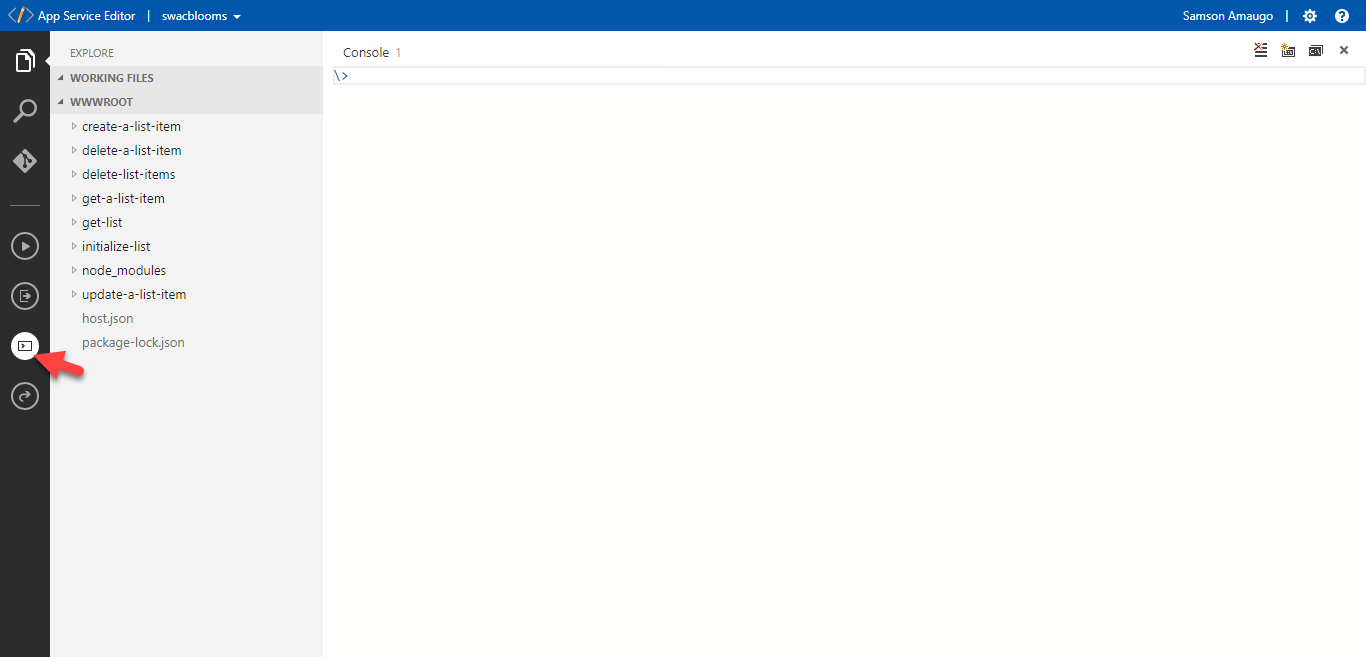
You need to install two Node.js dependencies:
- MongoDB: To enable you to use MongoDB's API to interact with Cosmos DB.
UUID: To generate random IDs for the items in the wishlist.
So run this command in the terminal to install these dependencies.
npm install mongodb uuid

Defining initialize-list logic
Now, click on the initialize-list directory and then on the index.js file. You are going to add the logic that creates the default wishlist items in the database.
The endpoint to call this function will be in this format: {Function-URL}/api/wishlist-init.
The Function-URL from the template link above represents the URL for accessing your Azure Function, which you will see soon.
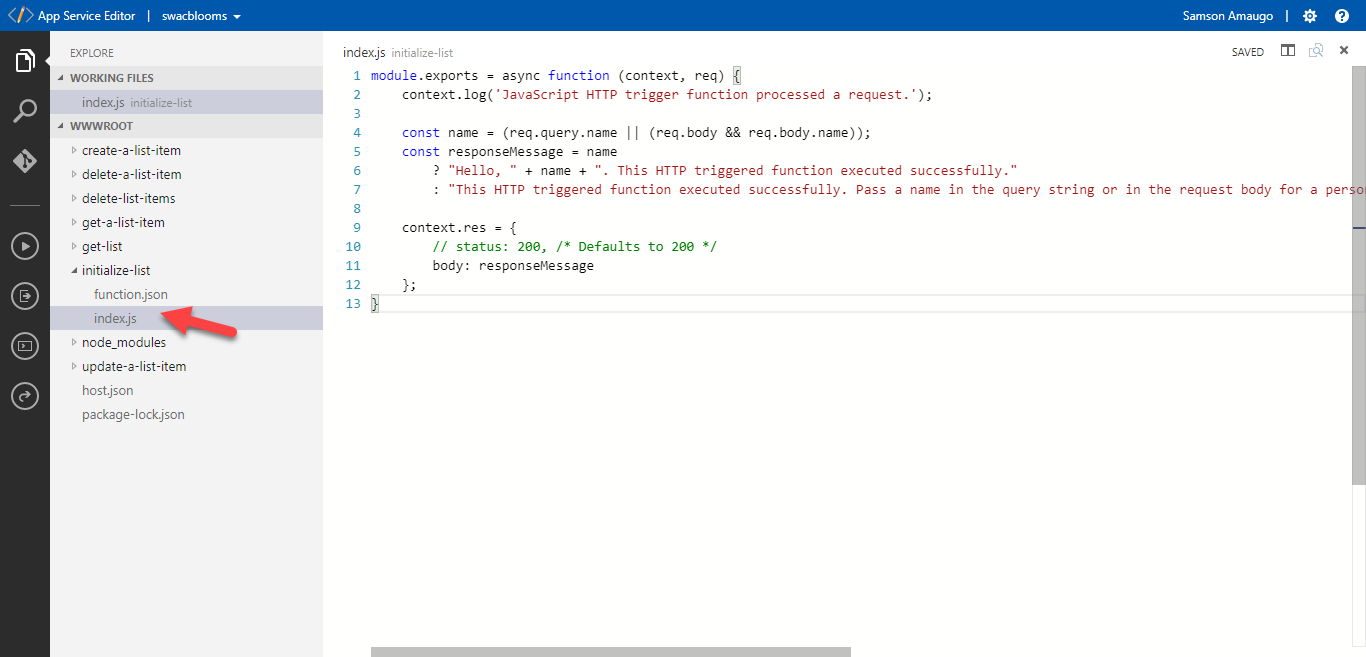
A basic Node.js Azure Function comes in this form:
module.exports = async function (context, req) {

    context.res = {
        // status: 200, /* Defaults to 200 */
        body: responseMessage
    };
}
The context object is used to pass data between your function and the runtime. To log output to the console, you use the context.log function rather than console.log. To return a response, you use the context.res object.
With that being said, I believe Azure Functions is pretty easy to learn.
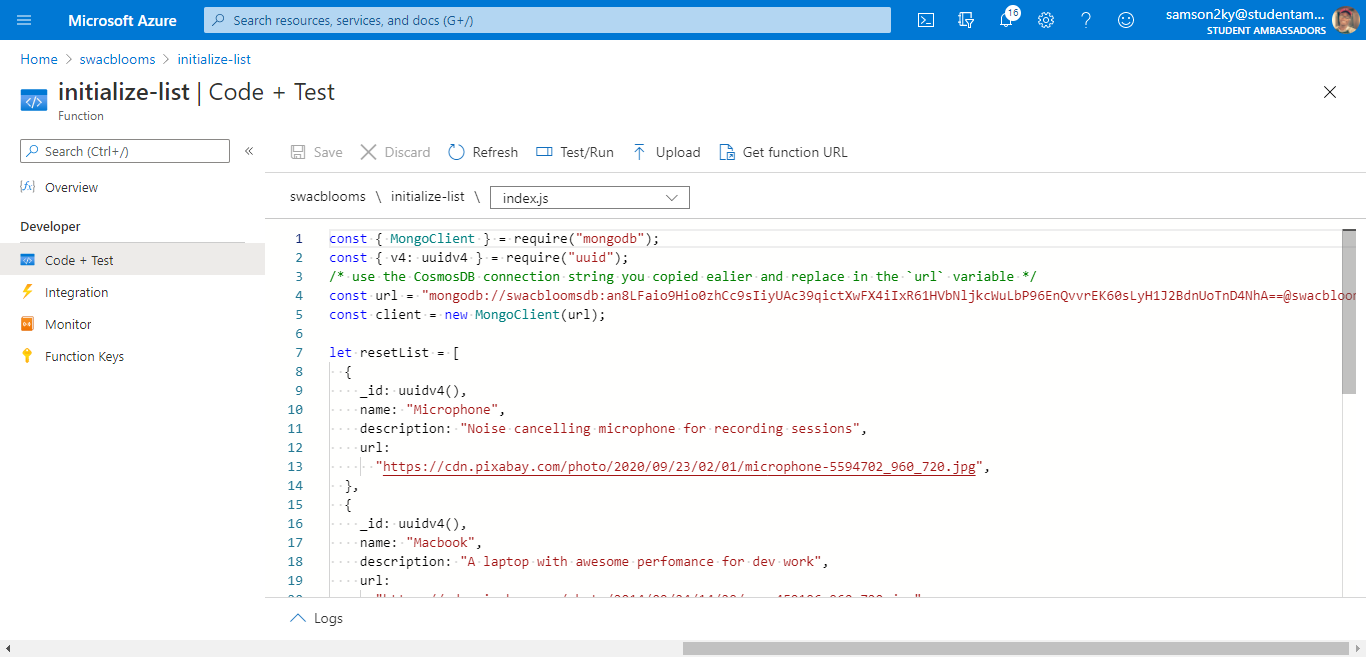
Azure creates a default code for you when a function is created. Replace the default code with the following:
const { MongoClient } = require("mongodb");
const { v4: uuidv4 } = require("uuid");
/* use the Cosmos DB connection string you copied ealier and replace in the `url` variable */
const url = "mongodb://swacbloomsdb:xxxxxxxxxx@swacbloomsdb.mongo.cosmos.azure.com:10255/?ssl=true&replicaSet=globaldb&retrywrites=false&maxIdleTimeMS=120000&appName=@swacbloomsdb@";
const client = new MongoClient(url);

let resetList = [
  {
    _id: uuidv4(),
    name: "Microphone",
    description: "Noise cancelling microphone for recording sessions",
    url:
      "https://cdn.pixabay.com/photo/2020/09/23/02/01/microphone-5594702_960_720.jpg",
  },
  {
    _id: uuidv4(),
    name: "Macbook",
    description: "A laptop with awesome perfomance for dev work",
    url:
      "https://cdn.pixabay.com/photo/2014/09/24/14/29/mac-459196_960_720.jpg",
  },
  {
    _id: uuidv4(),
    name: "Camera",
    description: "Helps to record video sessions",
    url:
      "https://cdn.pixabay.com/photo/2014/05/05/19/53/keyboard-338505_960_720.jpg",
  },
];

module.exports = async function (context, req) {
  await client.connect();
  const database = client.db("crud");
  const collection = database.collection("wishlist");
  await collection.deleteMany({});
  await collection.insertMany(resetList);

  return (context.res = {
    status: 200,
    body: "Initialization successful",
  });
};
The code above populates the database with some sample wishlist items, and the pretty awesome thing is that this makes use of MongoDB API to communicate with Cosmos DB 😎. Of course, replace the fake connection string provided in the code above with your actual one.
By default, an HTTP triggered function accepts a request with either a GET or a POST method. So the next step is to configure this initialize-list function to accept only a GET request.
Click on the function.json file under the initialize-list directory. Replace its content with the code below:
{
  "bindings": [
    {
      "authLevel": "anonymous",
      "type": "httpTrigger",
      "direction": "in",
      "name": "req",
      "route": "wishlist-init",
      "methods": ["get"]
    },
    {
      "type": "http",
      "direction": "out",
      "name": "res"
    }
  ]
}
By default, the URL that triggers the execution of this function ends with the name of the function itself (initialize-list). The route property is used to customize that part of the URL.
The methods property defines the HTTP request method that the function accepts.
Defining get-list logic
Next, open the get-list directory and click on the index.js file to edit it. Clear the default code and paste the following:
const { MongoClient } = require("mongodb");

const { v4: uuidv4 } = require("uuid");

/* use the Cosmos DB connection string you copied ealier and replace in the `url` variable */
const url = "mongodb://swacbloomsdb:xxxxxxxxxx@swacbloomsdb.mongo.cosmos.azure.com:10255/?ssl=true&replicaSet=globaldb&retrywrites=false&maxIdleTimeMS=120000&appName=@swacbloomsdb@";const client = new MongoClient(url);

module.exports = async function (context, req) {
  await client.connect();
  const database = client.db("crud");
  const collection = database.collection("wishlist");
  let list = await collection.find({}).toArray();
  return context.res = {
    status: 200,
    body: list,
  };
};
The function's endpoint will be called with the GET method and will have this URL template: {Function-URL}/api/wishlist.
Also, update the function.json file to only accept the GET request. Its content will look this way:
{
  "bindings": [
    {
      "authLevel": "anonymous",
      "type": "httpTrigger",
      "direction": "in",
      "name": "req",
      "route": "wishlist",
      "methods": ["get"]
    },
    {
      "type": "http",
      "direction": "out",
      "name": "res"
    }
  ]
}
Defining get-a-list-item logic
Next, click on the get-a-list-item directory and select the index.js file. Update the default code with the code below:
const { MongoClient } = require("mongodb");
const { v4: uuidv4 } = require("uuid");

/* use the Cosmos DB connection string you copied ealier and replace in the `url` variable */
const url = "mongodb://swacbloomsdb:xxxxxxxxxx@swacbloomsdb.mongo.cosmos.azure.com:10255/?ssl=true&replicaSet=globaldb&retrywrites=false&maxIdleTimeMS=120000&appName=@swacbloomsdb@";
const client = new MongoClient(url);

module.exports = async function (context, req) {
  await client.connect();
  const database = client.db("crud");
  const collection = database.collection("wishlist");
  let obj = await collection.findOne({ _id: req.params.id });
  if (!obj) {
  return  context.res = {
      status: 400,
      body: "not found"
    };
  }
 return context.res = {
    status: 200,
    body: obj,
  };
};
The associated endpoint will be called through GET to this URL: {Function-URL}/api/wishlist/{id}.
This endpoint requires an id parameter, but by default, Azure Functions doesn't accept parameters. For this reason, you need to update the function.json file to accept route parameters.
Change the function.json file under the get-a-list-item directory to accept only requests with a GET method and route parameters. This is how its content will look like:
{
  "bindings": [
    {
      "authLevel": "anonymous",
      "type": "httpTrigger",
      "direction": "in",
      "name": "req",
      "route": "wishlist/{id}",
      "methods": ["get"]
    },
    {
      "type": "http",
      "direction": "out",
      "name": "res"
    }
  ]
}
Thanks to the template assigned to the route key, the request object in the function can now accept parameters.
Defining create-a-list-item logic
Now, let's continue with the create-a-list-item function. Open the related directory, select the index.js file, and replace the default code with the following:
const { MongoClient } = require("mongodb");
const { v4: uuidv4 } = require("uuid");

/* use the Cosmos DB connection string you copied ealier and replace in the `url` variable */
const url = "mongodb://swacbloomsdb:xxxxxxxxxx@swacbloomsdb.mongo.cosmos.azure.com:10255/?ssl=true&replicaSet=globaldb&retrywrites=false&maxIdleTimeMS=120000&appName=@swacbloomsdb@";
const client = new MongoClient(url);


module.exports = async function (context, req) {
    await client.connect();
    const database = client.db("crud");
    const collection = database.collection("wishlist");
    let data = { _id: uuidv4(), ...req.body };
    await collection.insertOne(data);

  return (context.res = {
    status: 200,
    body: data,
  });
};
The endpoint associated with this function will be called with a POST request to this URL: {Function-URL}/api/wishlist. So, let's modify the function.json file under the create-a-list-item directory to accept only requests with a POST method:
{
  "bindings": [
    {
      "authLevel": "anonymous",
      "type": "httpTrigger",
      "direction": "in",
      "name": "req",
      "route": "wishlist",
      "methods": ["post"]
    },
    {
      "type": "http",
      "direction": "out",
      "name": "res"
    }
  ]
}
Defining update-a-list-item logic
Moving forward, click on the index.js file under the update-a-list-item directory and update its content as follows:
const { MongoClient } = require("mongodb");
const { v4: uuidv4 } = require("uuid");

/* use the Cosmos DB connection string you copied ealier and replace in the `url` variable */
const url = "mongodb://swacbloomsdb:xxxxxxxxxx@swacbloomsdb.mongo.cosmos.azure.com:10255/?ssl=true&replicaSet=globaldb&retrywrites=false&maxIdleTimeMS=120000&appName=@swacbloomsdb@";const client = new MongoClient(url);

module.exports = async function (context, req) {
  await client.connect();
  const database = client.db("crud");
  const collection = database.collection("wishlist");
  let data = {...req.body };
  let query = {_id:req.params.id}
  let newValues ={$set:data}
 let update = await collection.findOneAndUpdate(query,newValues,{returnOriginal:false})

  if (!update) {
    return (context.res = {
      status: 400,
      body: "found",
    });
  }
context.log(update)
  return (context.res = {
    status: 200,
    body: update.value
  });
};
The associated endpoint will be called with a PUT request to this URL template: {Function-URL}/api/wishlist/{id}.
As before, this endpoint requires an id parameter. So, let's update the function.json file to accept the PUT method and route parameters:
{
  "bindings": [
    {
      "authLevel": "anonymous",
      "type": "httpTrigger",
      "direction": "in",
      "name": "req",
      "route": "wishlist/{id}",
      "methods": ["put"]
    },
    {
      "type": "http",
      "direction": "out",
      "name": "res"
    }
  ]
}
Defining delete-list-items logic
Open the delete-list-items directory and click on the index.js file to update it with the following code:
const { MongoClient } = require("mongodb");
const { v4: uuidv4 } = require("uuid");

/* use the Cosmos DB connection string you copied ealier and replace in the `url` variable */
const url = "mongodb://swacbloomsdb:xxxxxxxxxx@swacbloomsdb.mongo.cosmos.azure.com:10255/?ssl=true&replicaSet=globaldb&retrywrites=false&maxIdleTimeMS=120000&appName=@swacbloomsdb@";
const client = new MongoClient(url);

module.exports = async function (context, req) {
  await client.connect();
  const database = client.db("crud");
  const collection = database.collection("wishlist");
  await collection.deleteMany({});
  return (context.res = {
    body: "deleted",
  });
};
You will call this function with a DELETE request to this URL: {Function-URL}/api/wishlist. So, modify the function.json file under the delete-list-items directory to accept only DELETE requests:
{
  "bindings": [
    {
      "authLevel": "anonymous",
      "type": "httpTrigger",
      "direction": "in",
      "name": "req",
      "route": "wishlist",
      "methods": ["delete"]
    },
    {
      "type": "http",
      "direction": "out",
      "name": "res"
    }
  ]
}
Defining delete-a-list-item logic
Finally, update the index.js file under the delete-a-list-item directory with the following code:
const { MongoClient } = require("mongodb");
const { v4: uuidv4 } = require("uuid");

/* use the Cosmos DB connection string you copied ealier and replace in the `url` variable */
const url = "mongodb://swacbloomsdb:xxxxxxxxxx@swacbloomsdb.mongo.cosmos.azure.com:10255/?ssl=true&replicaSet=globaldb&retrywrites=false&maxIdleTimeMS=120000&appName=@swacbloomsdb@";
const client = new MongoClient(url);


module.exports = async function (context, req) {
  await client.connect();
  const database = client.db("crud");
  const collection = database.collection("wishlist");
  let remove = await collection.deleteOne({ _id: req.params.id });

  if (!remove) {
    return (context.res = {
      status: 400,
      body: {
        message: "not found",
      },
    });
  }
  return (context.res = {
    status: 200,
    body: "deleted"
  });
};
The endpoint to call this function will accept DELETE requests to this URL: {Function-URL}/api/wishlist/{id}. Once again, you need to configure the function to accept route parameters. So, change the content of the function.json file under the delete-a-list-item directory, as shown below:
{
  "bindings": [
    {
      "authLevel": "anonymous",
      "type": "httpTrigger",
      "direction": "in",
      "name": "req",
      "route": "wishlist/{id}",
      "methods": ["delete"]
    },
    {
      "type": "http",
      "direction": "out",
      "name": "res"
    }
  ]
}
Now the logic of your functions is ready to run. You just need to test it. The awesome thing here is that Azure Functions Dashboard provides a testing area that allows you to test your functions directly on Azure.
Testing Your Azure Function
In your Function App dashboard, click on the Functions menu option on the left panel.
Next, click on the initialize-list item from the function list.
You will be redirected to the dashboard of the initialize-list function. Click on the Code + Test menu. And you should see the code you created in the App Service Editor.
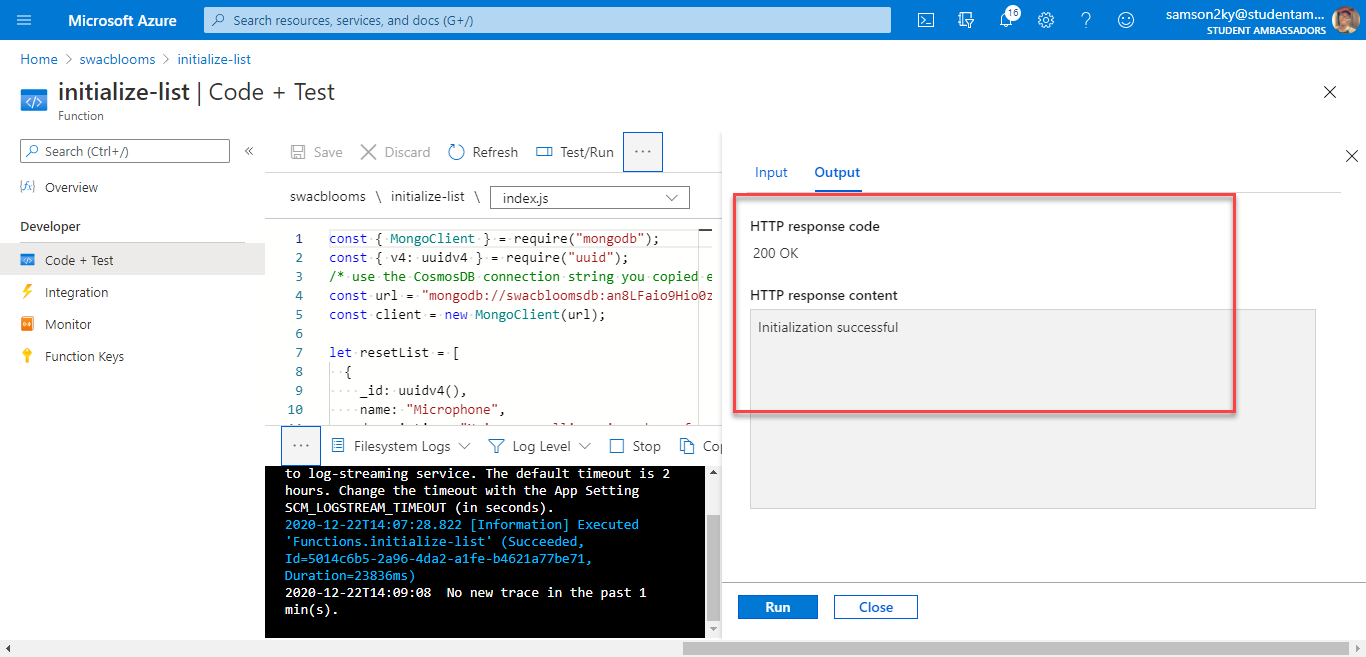
Click on the Test/Run option in the header section of the dashboard. You will see a panel sliding in from the right. There, you can set the required parameters to test your initialize-list function, as shown below:
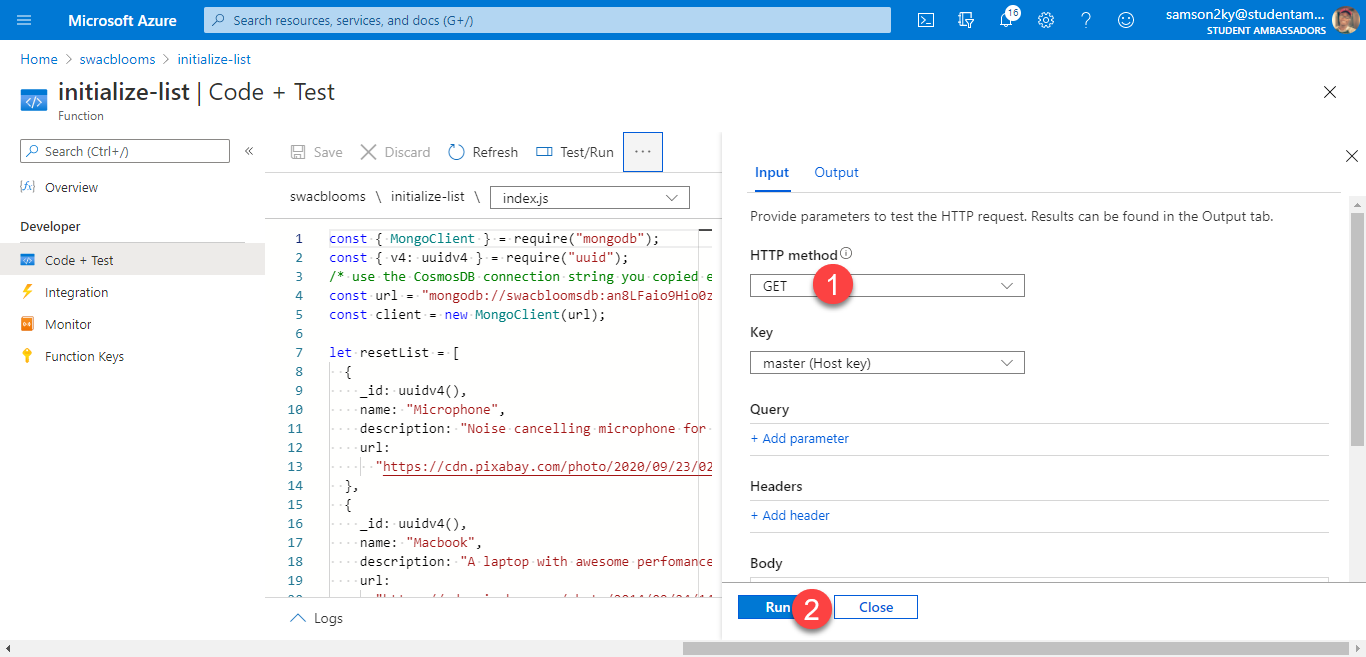
Set the HTTP method field to GET (1) and click on the Run button (2).
Wait for the function to run, and you should see a 200 HTTP response code with a message saying Initialization successful. At this point, you populated your database with sample wishlist items.
To get the URL of the API endpoint implemented by this function, right-click on the three dots in the header section and click on the Get function URL menu option.

This option provides you with the full URL associated with this function.
You can proceed the same way to test out the rest of the functions implemented in this tutorial.
That's all. I hope you enjoyed learning how to create a CRUD API using Azure Functions and Azure Cosmos DB.
Aside: Securing Node.js Applications with Auth0
Securing Node.js applications with Auth0 is easy and brings a lot of great features to the table. With Auth0, we only have to write a few lines of code to get solid identity management solution, single sign-on, support for social identity providers (like Facebook, GitHub, Twitter, etc.), and support for enterprise identity providers (like Active Directory, LDAP, SAML, custom, etc.).
In the following sections, we are going to learn how to use Auth0 to secure Node.js APIs written with Express.
Creating the Express API
Let's start by defining our Node.js API. With Express and Node.js, we can do this in two simple steps. The first one is to use NPM to install three dependencies: npm i express body-parser cors.
Note: If we are starting from scratch, we will have to initialize an NPM project first:
npm init -y. This will make NPM create a new project in the current directory. As such, before running this command, we have to create a new directory for our new project and move into it.
The second one is to create a Node.js script with the following code (we can call it index.js):
// importing dependencies
const express = require('express');
const bodyParser = require('body-parser');
const cors = require('cors');

// configuring Express
const app = express();
app.use(bodyParser.json());
app.use(cors());

// defining contacts array
const contacts = [
  { name: 'Bruno Krebs', phone: '+555133334444' },
  { name: 'John Doe', phone: '+191843243223' },
];

// defining endpoints to manipulate the array of contacts
app.get('/contacts', (req, res) => res.send(contacts));
app.post('/contacts', (req, res) => {
  contacts.push(req.body);
  res.send();
});

// starting Express
app.listen(3000, () => console.log('Example app listening on port 3000!'));
The code above creates the Express application and adds two middleware to it: body-parser to parse JSON requests, and cors to signal that the app accepts requests from any origin. The app also registers two endpoints on Express to deal with POST and GET requests. Both endpoints use the contacts array as some sort of in-memory database.
Now, we can run and test our application by issuing node index in the project root and then by submitting requests to it. For example, with cURL, we can send a GET request by issuing curl localhost:3000/contacts. This command will output the items in the contacts array.
Registering the API at Auth0
After creating our application, we can focus on securing it. Let's start by registering an API on Auth0 to represent our app. To do this, let's head to the API section of our management dashboard (we can create a free account) if needed) and click on "Create API". On the dialog that appears, we can name our API as "Contacts API" (the name isn't really important) and identify it as https://contacts.blog-samples.com/ (we will use this value later).
Securing Express with Auth0
Now that we have registered the API in our Auth0 account, let's secure the Express API with Auth0. Let's start by installing three dependencies with NPM: npm i express-jwt jwks-rsa. Then, let's create a file called auth0.js and use these dependencies:
const jwt = require('express-jwt');
const jwksRsa = require('jwks-rsa');

module.exports = jwt({
  // Fetch the signing key based on the KID in the header and
  // the singing keys provided by the JWKS endpoint.
  secret: jwksRsa.expressJwtSecret({
    cache: true,
    rateLimit: true,
    jwksUri: `https://${process.env.AUTH0_DOMAIN}/.well-known/jwks.json`,
  }),

  // Validate the audience and the issuer.
  audience: process.env.AUTH0_AUDIENCE,
  issuer: `https://${process.env.AUTH0_DOMAIN}/`,
  algorithms: ['RS256'],
});
The goal of this script is to export an Express middleware that guarantees that requests have an access_token issued by a trust-worthy party, in this case Auth0. Note that this script expects to find two environment variables:
AUTH0_AUDIENCE: the identifier of our API (https://contacts.mycompany.com/)AUTH0_DOMAIN: our domain at Auth0 (in my casebk-samples.auth0.com)
We will set these variable soons, but it is important to understand that the domain variable defines how the middleware finds the signing keys.
After creating this middleware, we can update our index.js file to import and use it:
// ... other require statements ...
const auth0 = require('./auth0');

// ... app definition and contacts array ...

// redefining both endpoints
app.get('/contacts', auth0(), (req, res) => res.send(contacts));
app.post('/contacts', auth0(), (req, res) => {
  contacts.push(req.body);
  res.send();
});

// ... app.listen ...
In this case, we have replaced the previous definition of our endpoints to use the new middleware that enforces requests to be sent with valid access tokens.
Running the application now is slightly different, as we need to set the environment variables:
export AUTH0_DOMAIN=blog-samples.auth0.com
export AUTH0_AUDIENCE="https://contacts.blog-samples.com/"
node index
After running the API, we can test it to see if it is properly secured. So, let's open a terminal and issue the following command:
curl localhost:3000/contacts
If we set up everything together, we will get a response from the server saying that "no authorization token was found".
Now, to be able to interact with our endpoints again, we will have to obtain an access token from Auth0. There are multiple ways to do this and the strategy that we will use depends on the type of the client application we are developing. For example, if we are developing a Single Page Application (SPA), we will use what is called the Implicit Grant. If we are developing a mobile application, we will use the Authorization Code Grant Flow with PKCE. There are other flows available at Auth0. However, for a simple test like this one, we can use our Auth0 dashboard to get one.
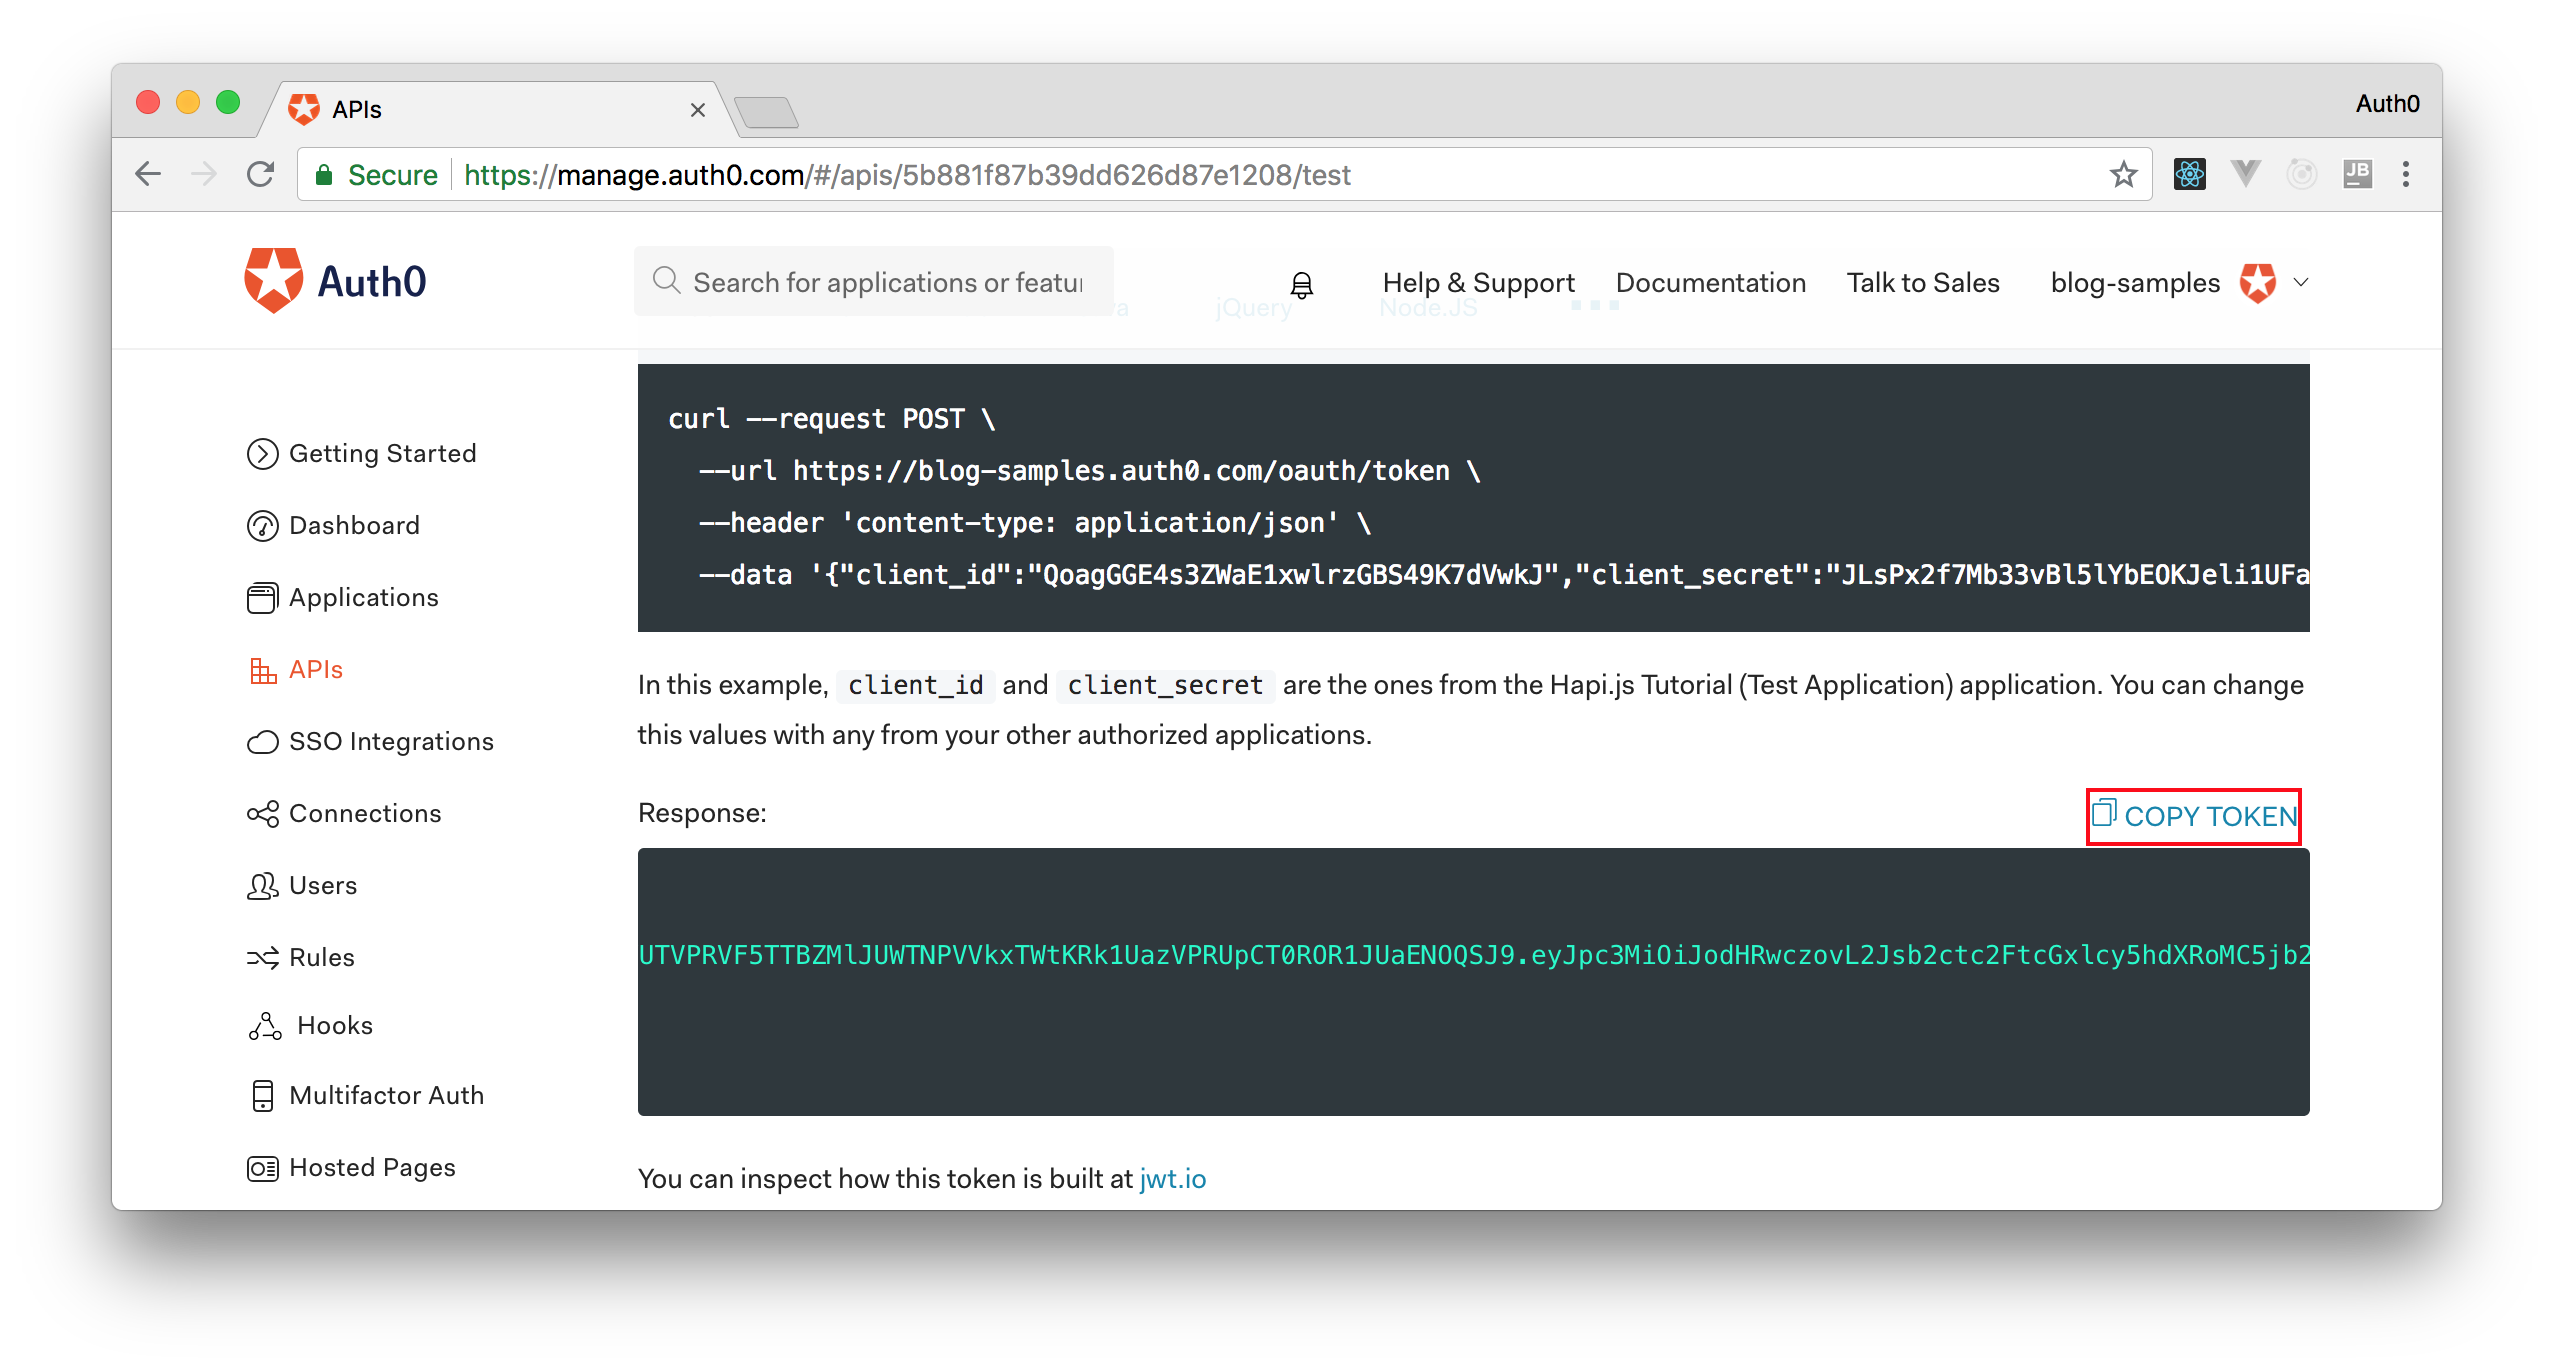
Therefore, we can head back to the APIs section in our Auth0 dashboard, click on the API we created before, and then click on the Test section of this API. There, we will find a button called Copy Token. Let's click on this button to copy an access token to our clipboard.
After copying this token, we can open a terminal and issue the following commands:
# create a variable with our token
ACCESS_TOKEN=<OUR_ACCESS_TOKEN>

# use this variable to fetch contacts
curl -H 'Authorization: Bearer '$ACCESS_TOKEN http://localhost:3000/contacts/
Note: We will have to replace
<OUR_ACCESS_TOKEN>with the token we copied from our dashboard.
As we are now using our access token on the requests we are sending to our API, we will manage to get the list of contacts again.
That's how we secure our Node.js backend API. Easy, right?
About the author

Samson Amaugo
Software Developer