
Description
In today’s digital landscape, securing your APIs is critical to protecting your data and resources. This guide will walk you through setting up an Amazon API Gateway and securing the REST API with Okta's Customer Identity Cloud (aka Auth0). We'll use the Amazon prebuilt Pets API for demonstration and show how to implement a Lambda authorizer that validates Auth0 tokens, including checking a risk assessment claim to control access (Risk assessment evaluation is part of Auth0’s Adaptive MFA, to read more about the Risk assessment go here). Finally, we'll demonstrate the functionality with a sample frontend JavaScript application that authenticates a user and invokes the API.
Functional Components Overview
Before diving into the implementation, let's outline the key components involved:
Amazon API Gateway: Acts as the entry point for your APIs and manages services to enable developers to create, publish, and manage APIs at scale. It acts as an entry point for backend services and supports features like traffic management, authorization, and monitoring to streamline API development and deployment. Find more about Amazon API Gateway here.
Amazon Lambda: serverless compute service that allows you to run code without provisioning or managing servers, automatically scaling based on the number of requests. It supports various programming languages and integrates seamlessly with other Amazon services, making it ideal for building microservices, automating tasks, and processing real-time data. Find more about Amazon Lambda here
Lambda Authorizer: Controls access to your APIs to authenticate and authorize API requests. It offers flexible custom authorization logic based on tokens, roles, or user-defined criteria. Find more about Amazon API Gateway Authorizer here.
Auth0 Tenant: Auth0 is a platform companies and web developers use to verify a user’s identity before giving them access to websites, applications, and APIs. It’s a flexible, secure, and user-friendly way to let genuine customers in while keeping malicious and fraudulent parties out.
Prebuilt Pets API: A simple API hosted on Amazon, which we'll protect using the API Gateway and Lambda authorizer.
JavaScript Application: A front-end application that authenticates users via Auth0 and calls the secured API using the retrieved access token.
Here’s a diagram of how the various parts interact with each other:
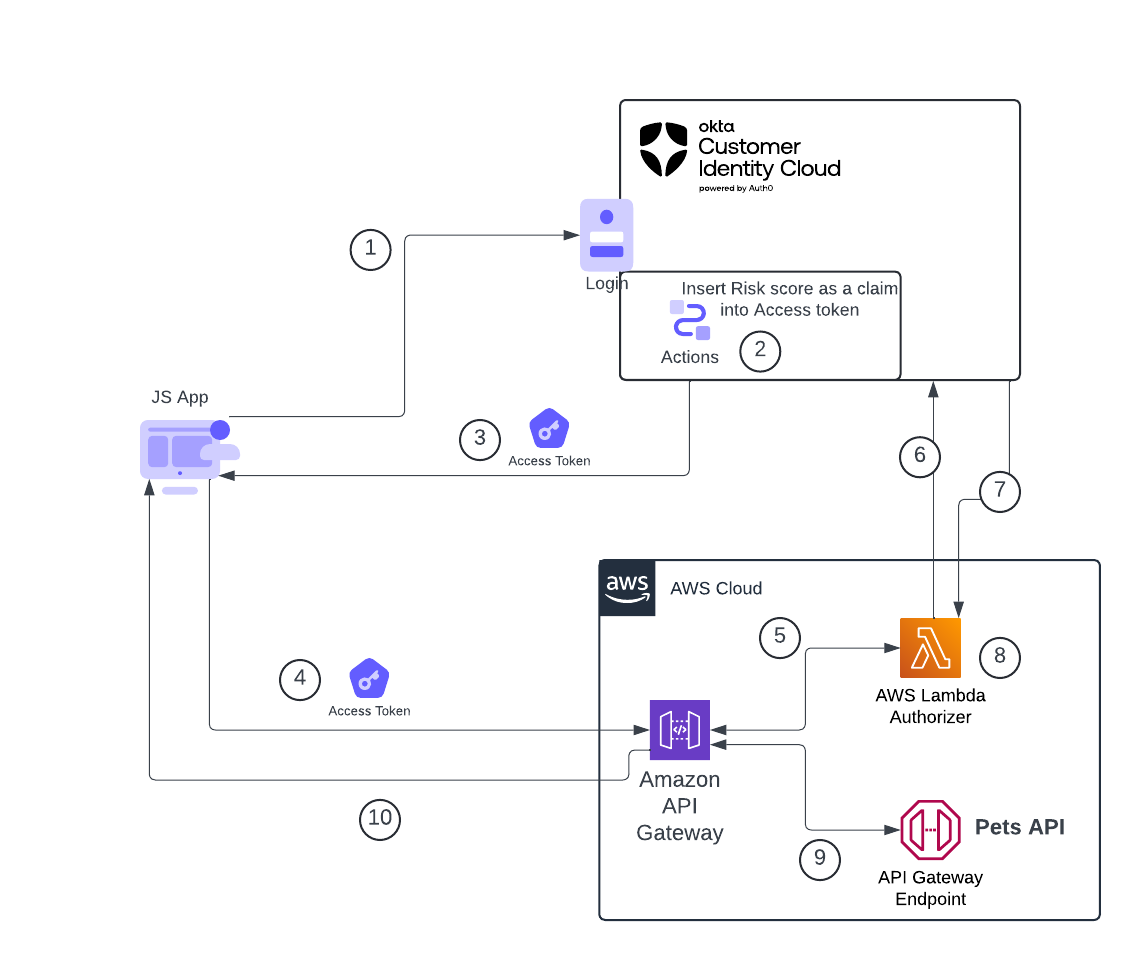
The flow is handled as follows:
- A user visits the Javascript application and clicks on the login button, at which point they are redirected to the Okta login page
- After the user provides their credentials, the Okta authentication pipeline invokes an Action that adds a risk assessment as a claim in the Access Token before issuing the token back to the application
- An Access token containing the risk score claim is returned to the application
- The JavaScript application makes an HTTP request to the API (on the Amazon API Gateway), which includes a JWT-formatted access token as a Bearer token in the Authorization header
- The request is received by API Gateway, which passes the token to the JWT Authorizer for validation.
- The JWT Authorizer sends a request to the JSON Web Key Set (JWKS) endpoint on Auth0 to retrieve the authorization server’s public key used to verify the JWT. (Note: APIGW can cache the authorization decision for up to 5 minutes (configurable), so the authorizer will not be invoked for every single request)
- The Authorization server returns the public key to the JWT Authorizer.
- JWT Authorizer validates the access token as well as the risk assessment claim and returns to API Gateway that the request can (or cannot) continue.
- At this point, if API Gateway can proceed, it will hit the backend API (in our case, the Pets API).
- API Gateway returns an HTTP response from the Pets API to the requesting application. If everything ran ok, you should see a JSON object of returned pets; otherwise, If authorization fails (authorizer returns DENY), the client app will get 401 with a default error message. Custom errors can be configured via Console/CLI/SDK/IaC.
Step 1: Setting Up the Prebuilt Pets API on Amazon API Gateway
First, we'll deploy a simple API on Amazon API Gateway that returns data about pets.
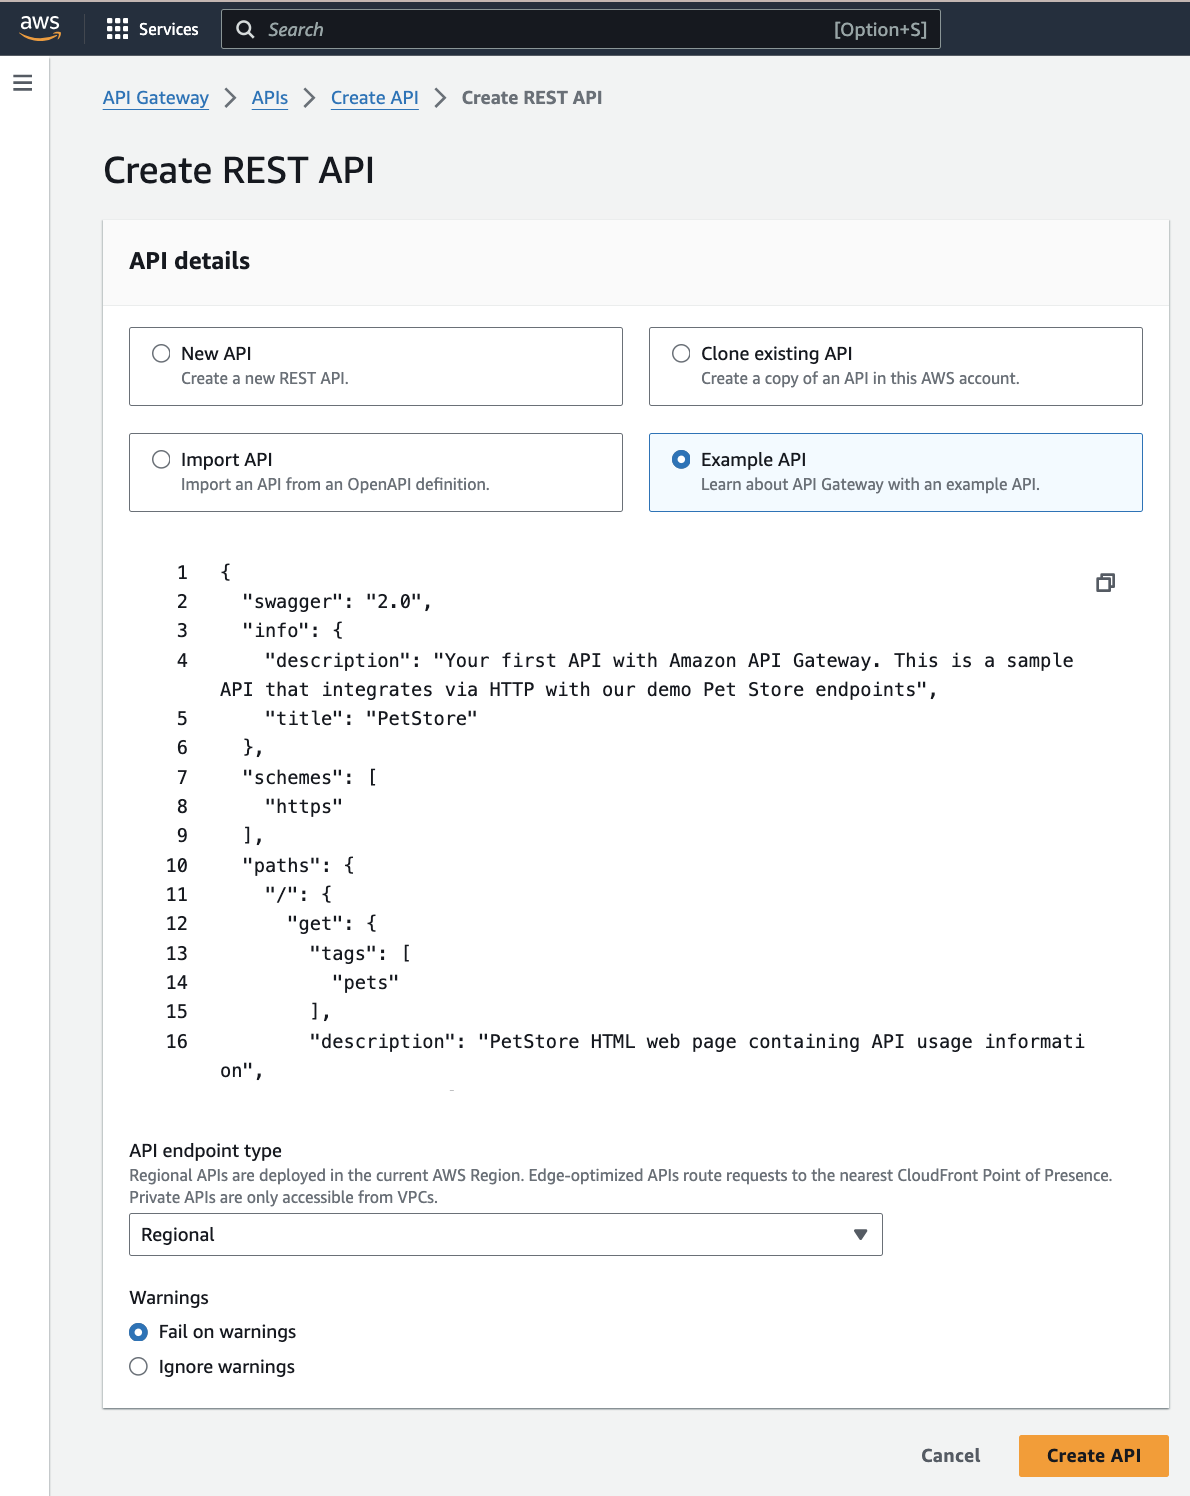
1. Create a new API:
- Log in to the Amazon Management Console.
- Navigate to the API Gateway service.
- Click "Create API" and select "REST API".
- On the next screen, choose “Example API.”
- Click “CREATE API”
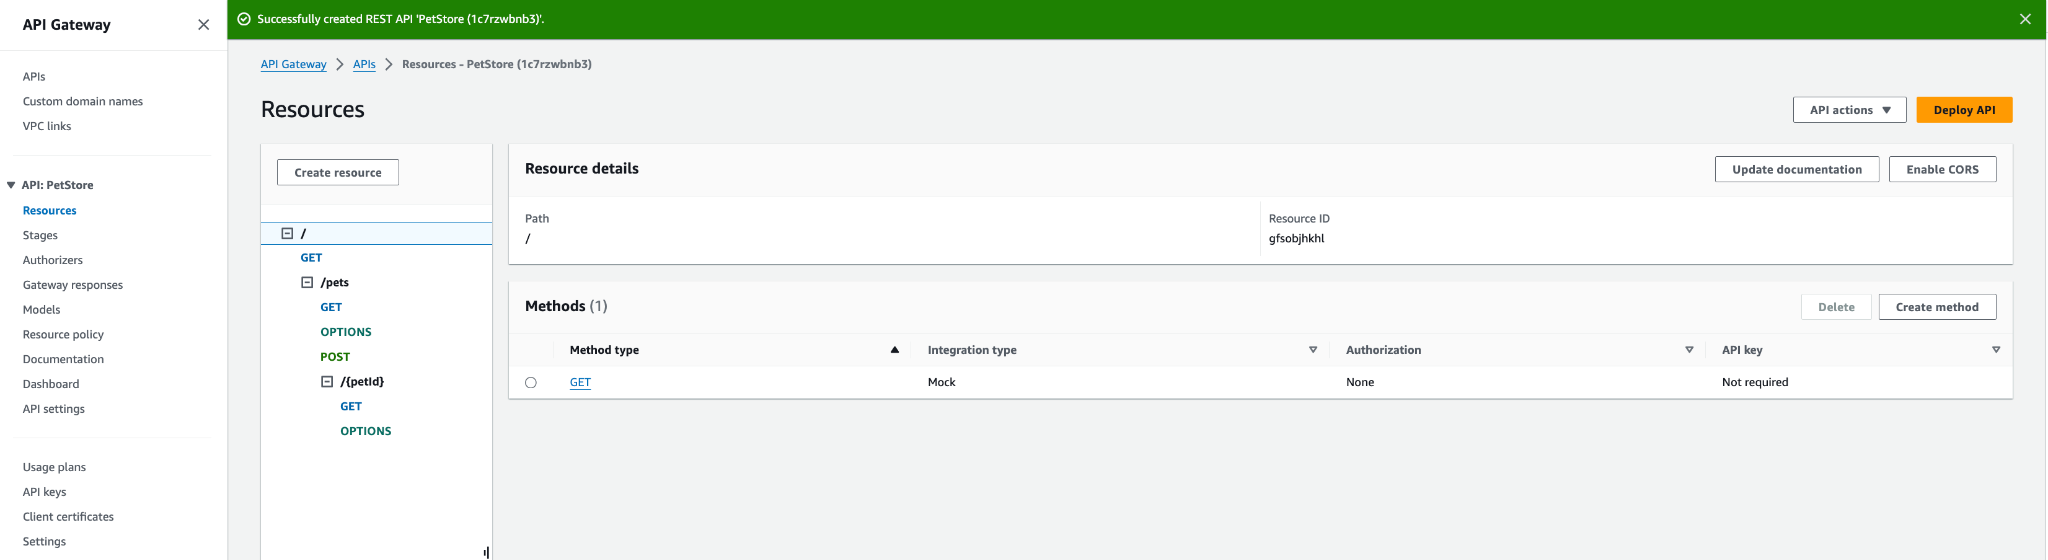
You will end up with a structure like this:
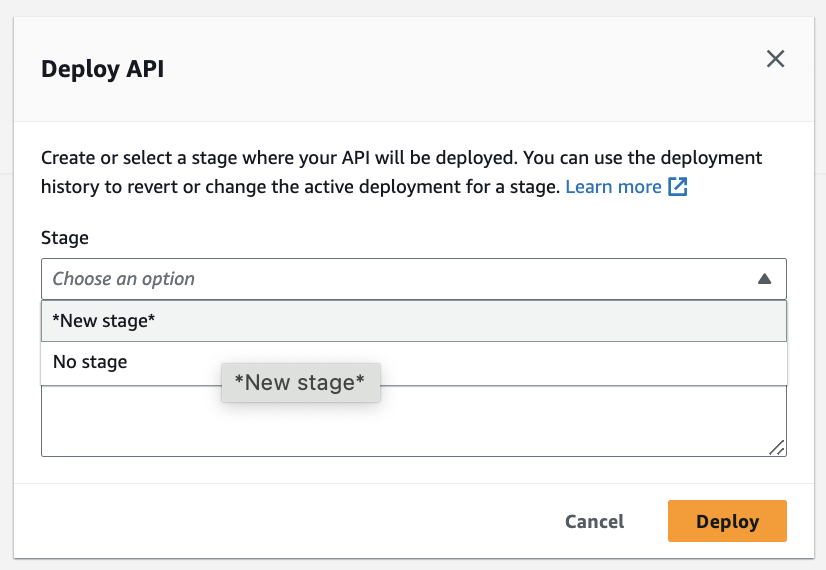
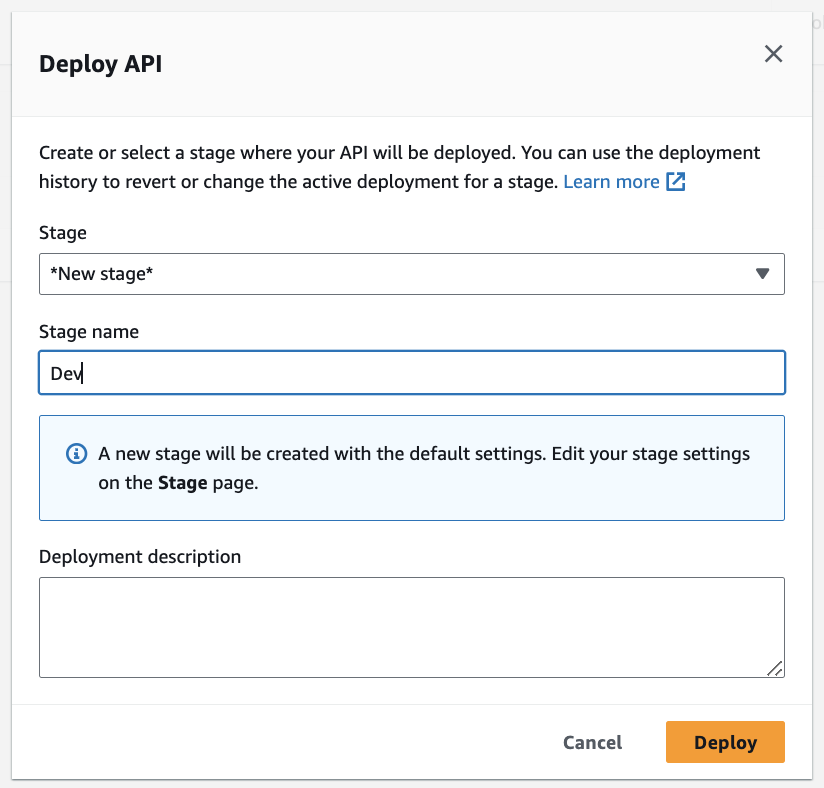
2. Deploy the API:
- If this is your first time deploying the API, you will create a stage (you can call it “Dev”). On each subsequent deployment, simply choose the stage you created)
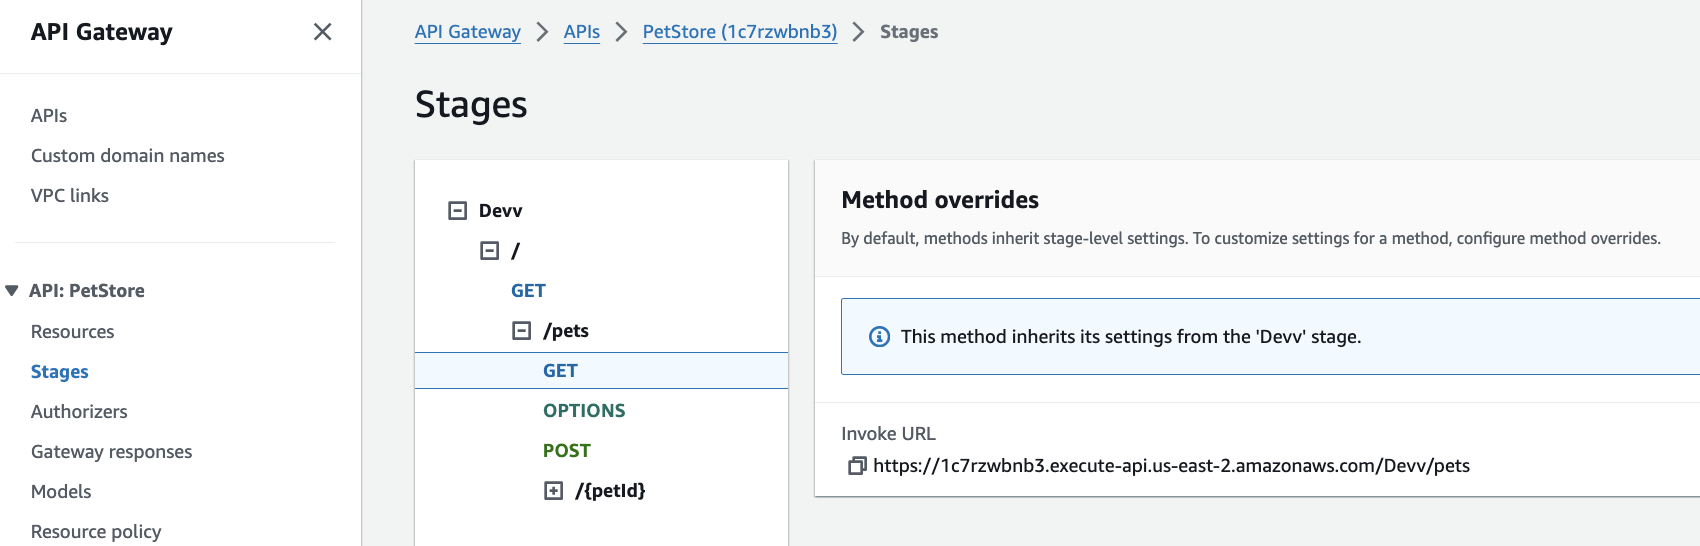
- Deploy the API and note the endpoint URL (“Stages” menu option on the left)
At this point, you should be able to invoke your API. You can test it by simply going to your browser and hitting the “/pets” URL (it is the “Invoke URL” for the GET found under the “Stages” menu on the left)
Step 2: Creating the Lambda Authorizer
Next, while we’re still in the Amazon console, we'll create a Lambda authorizer that will validate Auth0 tokens.
Deploy the Lambda Authorizer
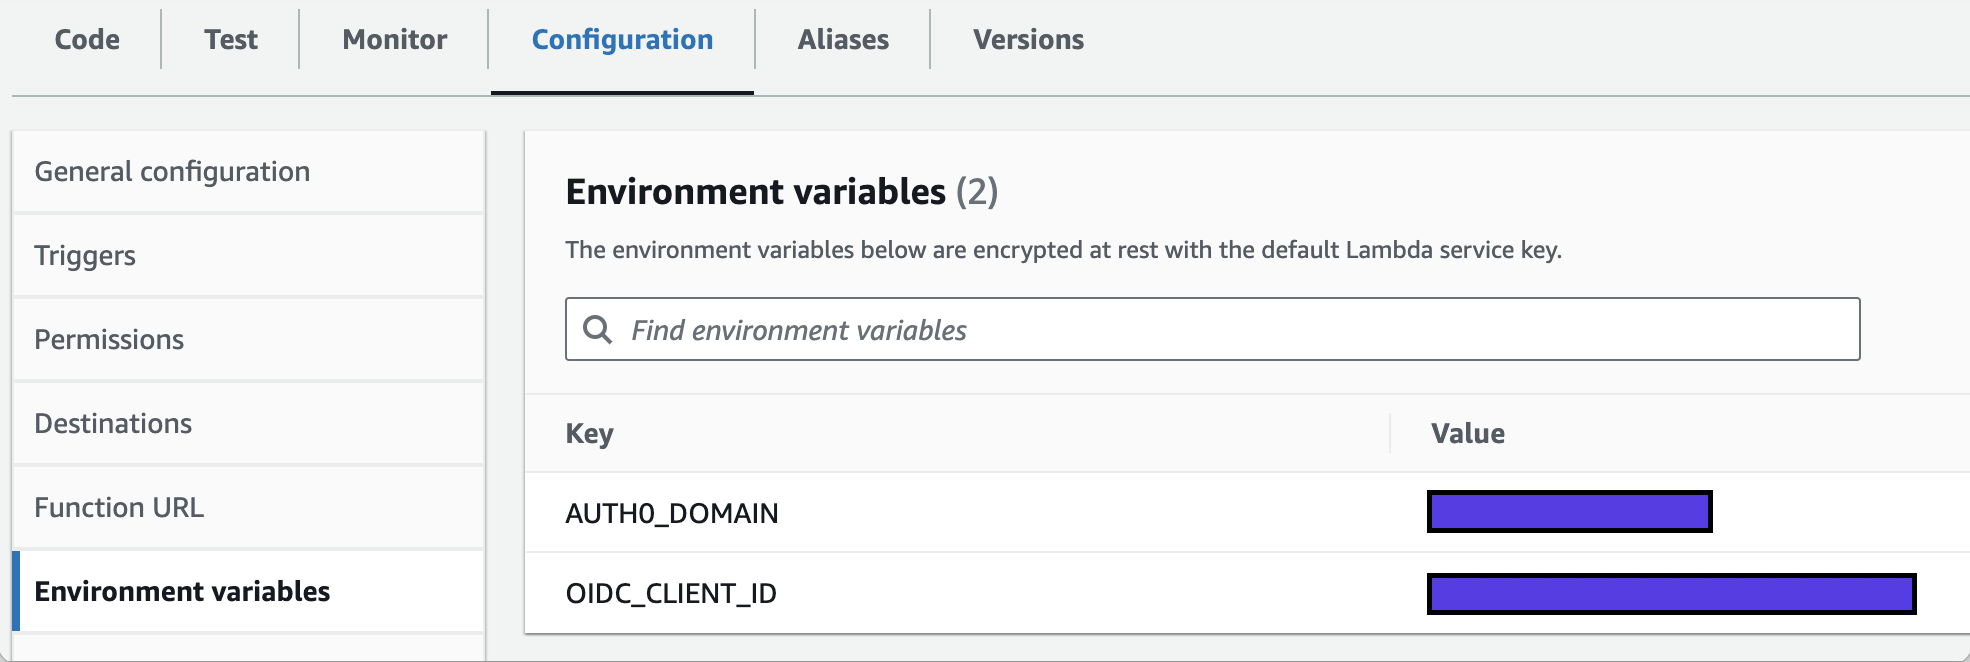
1. Create the Lambda Function
- Go to Amazon Lambda and create a new function.
- Name it
Auth0LambdaAuthorizer.
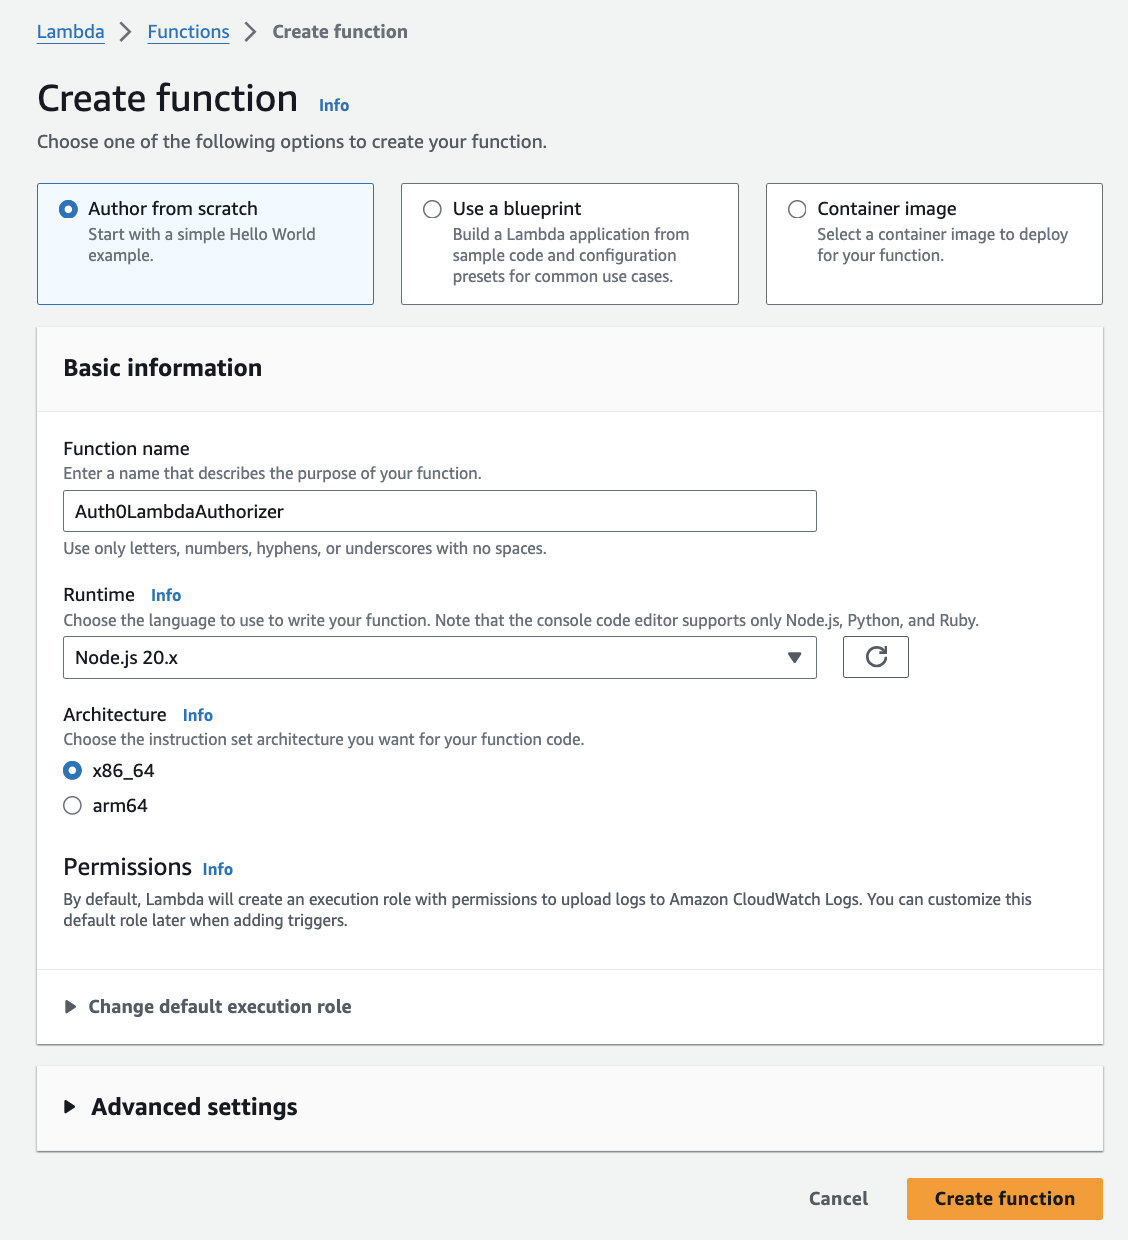
- Click on “Create function” to save your settings
- Copy and paste the code provided below into the Lambda editor and deploy it.
Lambda Authorizer Code
Below is the code for a basic Lambda authorizer. This code validates the JWT token, checks the issuer, and validates a custom risk assessment claim. It does not use any dependencies, so you can simply paste it into the Lambda code without zipping it up and uploading. If you would like to use a prebuilt JWT verification library, you will need to create a project locally, compress the files, and upload it to the Lambda function using the “Upload from” button.
/* global fetch */
import { TextEncoder } from 'util';
import crypto from 'crypto';

//For best practice, you should use the Environmental Variables
const Auth0Domain = process.env.AUTH0_DOMAIN||'<your Auth0 domain';

// Fetch JWKS from Auth0 and cache it so we don't have to fetch it every single time the API is invoked
const jwks_doc = await fetch(`https://${Auth0Domain}/.well-known/jwks.json`)
const jwks = await jwks_doc.json();

// Decode base64 URL encoded strings
const base64UrlDecode = (str) => {
  return Buffer.from(str, 'base64').toString('utf8');
};

// Verify the signature of the JWT
const verifyJwtSignature = async (token, jwks) => {
  const [headerB64, payloadB64, signatureB64] = token.split('.');
  const header = JSON.parse(base64UrlDecode(headerB64));
  const kid = header.kid;

  const key = jwks.keys.find(key => key.kid === kid);
  if (!key) {
    throw new Error('Unable to find the appropriate key');
  }

  const publicKey = crypto.createPublicKey({
    key: `-----BEGIN CERTIFICATE-----\n${key.x5c[0]}\n-----END CERTIFICATE-----`,
    format: 'pem'
  });

  const data = `${headerB64}.${payloadB64}`;
  const signature = Buffer.from(signatureB64, 'base64');

  return crypto.verify(
    'sha256',
    new TextEncoder().encode(data),
    publicKey,
    signature
  );
};

export const handler = async (event) => {
  console.log("event: ",event);
  // If your Authorizer setting for 'Lambda event payload' is Request and you specified 'authorization' as a header
  //const token = event.headers.Authorization?.split(' ')[1];

  // If your Authorizer setting for 'Lambda event payload' is Token and you specified 'Authorization' as a header
  const token = event.authorizationToken?.split(' ')[1];

  if (!token) {
    return generatePolicy(event.methodArn,'Deny');
  }

  try {
    const payload = JSON.parse(base64UrlDecode(token.split('.')[1]));
    // console.log("payload: ",payload);


    // Verify that the clientId in the token matches your client id configured in Auth0
const clientIdValid = payload['azp'] === process.env.OIDC_CLIENT_ID;

//Verify the token signature
    const sig_valid = await verifyJwtSignature(token, jwks);

    //Verify the token has not expired
    var currentTimestamp = new Date().getTime() / 1000;
    const tokenIsNotExpired = payload['exp'] > currentTimestamp;

    const valid = tokenIsNotExpired && sig_valid && clientIdValid;
    if (!valid) {
      throw new Error('Invalid token');
    }

    // Audience claim validation
    if(!payload['aud'].includes('api://pets')) {
      return generatePolicy(event.methodArn,'Deny');
    }

    // Scope validation
    if(!payload['scope'].includes('read:pets')) {
        return generatePolicy(event.methodArn,'Deny');
    }

    // Custom claim validation (e.g., checking the risk level)
    if (payload['risk_score_confidence'] && payload['risk_score_confidence'] === 'high') {
      return generatePolicy(event.methodArn,'Allow', payload.sub);
    } else {
      return generatePolicy(event.methodArn,'Deny', payload.sub);
    }

  } catch (err) {
    console.error('Token validation failed:', err);
    return generatePolicy(event.methodArn,'Deny');
  }
};

const generatePolicy = (methodArn, effect, principalId = 'user') => {
  return {
    principalId,
    policyDocument: {
      Version: '2012-10-17',
      Statement: [
        {
          Action: 'execute-api:Invoke',
          Effect: effect,
          Resource: methodArn,
        }
      ]
    }
  };
};
Explanation
- We fetch the well-known file from the Auth0 URL
- We construct the public key and use it to verify the signature of the Access token that will be provided to the API gateway in the Authorization header as a Bearer token
- The
jwt.verifymethod checks the token's signature. Additionally, as a good practice, you should check the issuer. - We verify the custom claim
risk_assessment_score, assuming it's added in the Auth0 Action (we will do this later) if the claim is anything other thanhigh, access is denied.
2. Attach the Lambda Authorizer to API Gateway
- In your API Gateway, go to “Authorizers” in the menu on the left
- Click on “Create Authorizer”
- Name your authorizer
Auth0_token_validationand choose yourAuth0LambdaAuthorizerfunction. - Under “Lambda event payload”, choose “Token” and enter “Authorization” for the token source header
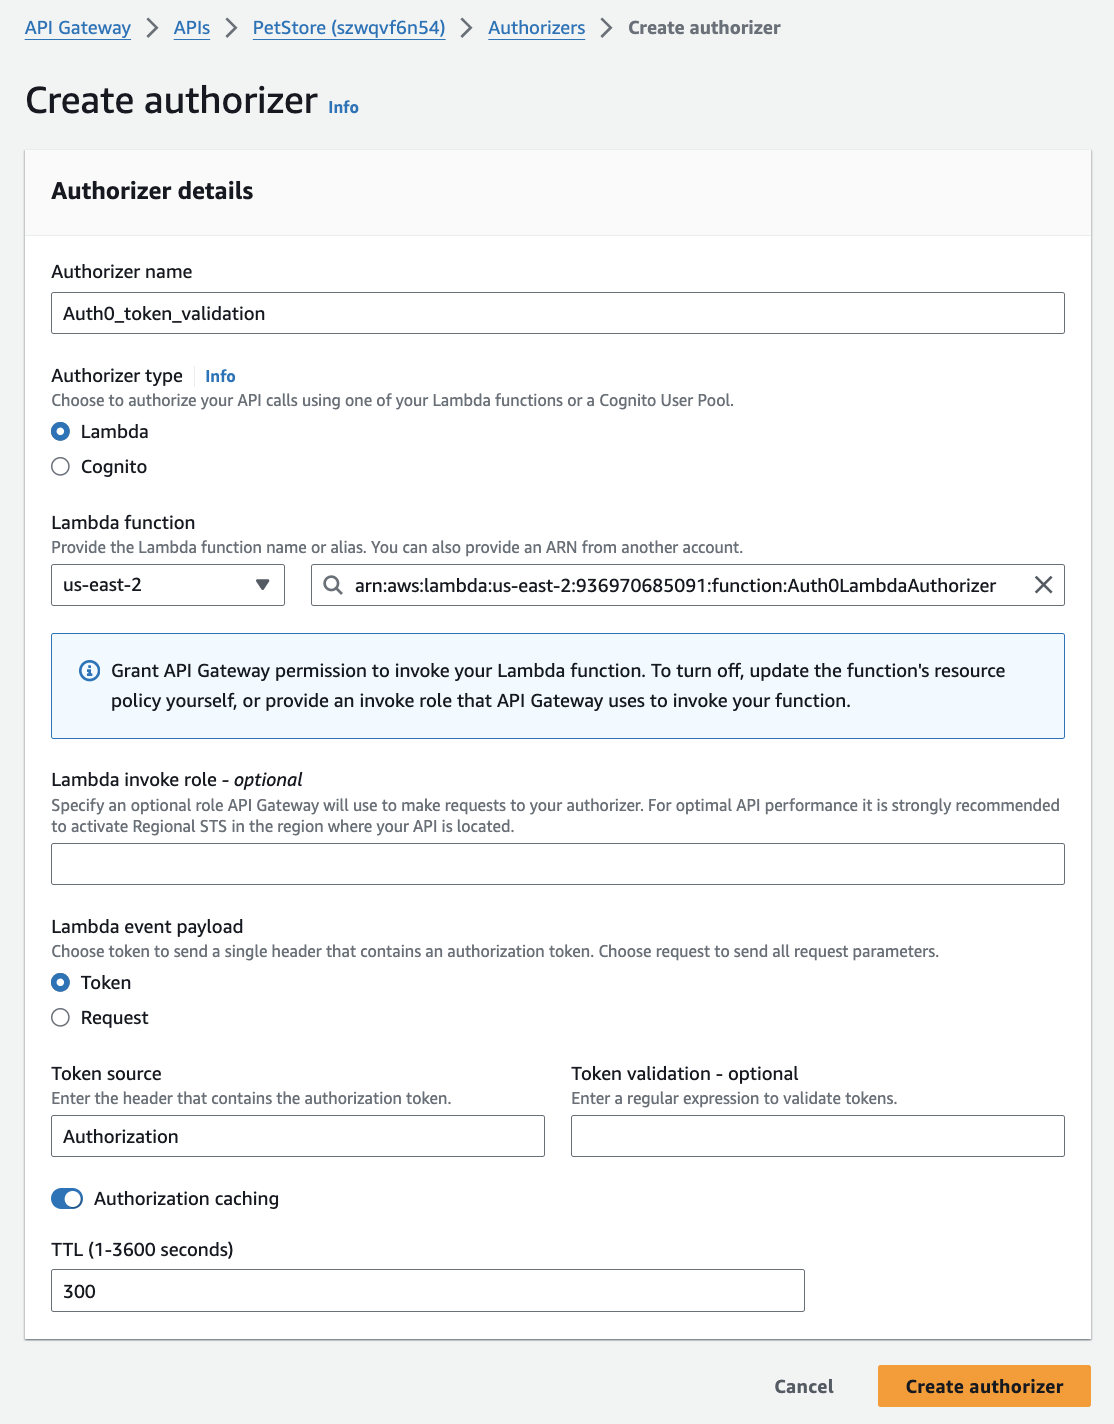
- Click on “Create authorizer” to save your settings
3. Enable the Lambda Authorizer for a specific API Gateway endpoint
- In your API Gateway, choose the GET endpoint and edit the “Method Request” section.
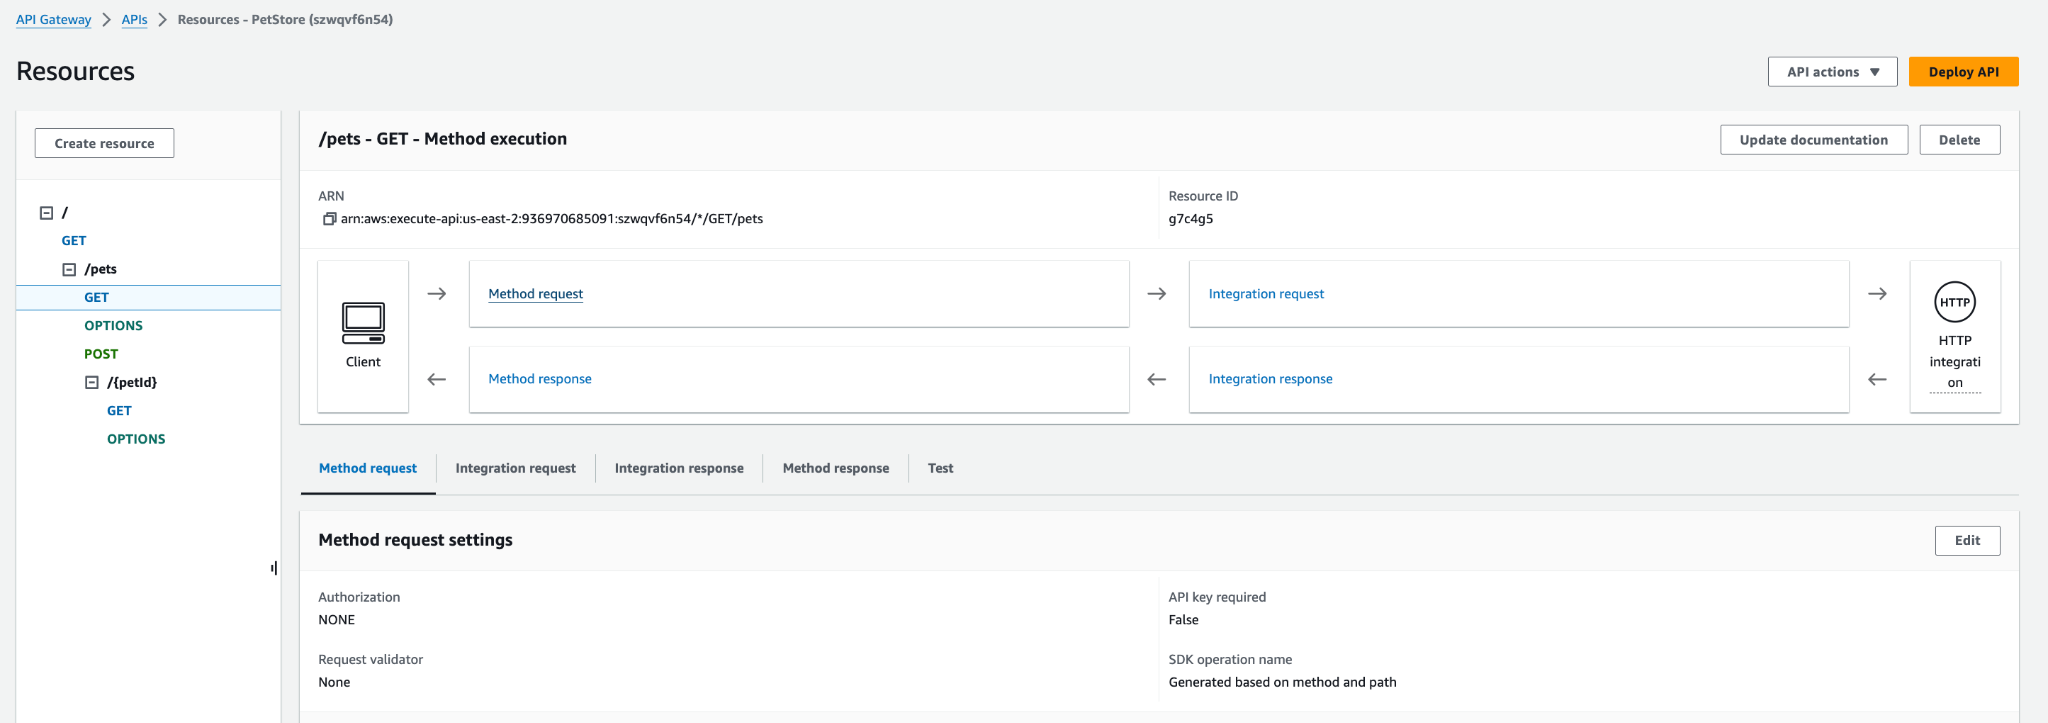
- In the “Authorization” drop-down, choose your
Auth0LambdaAuthorizerfunction.
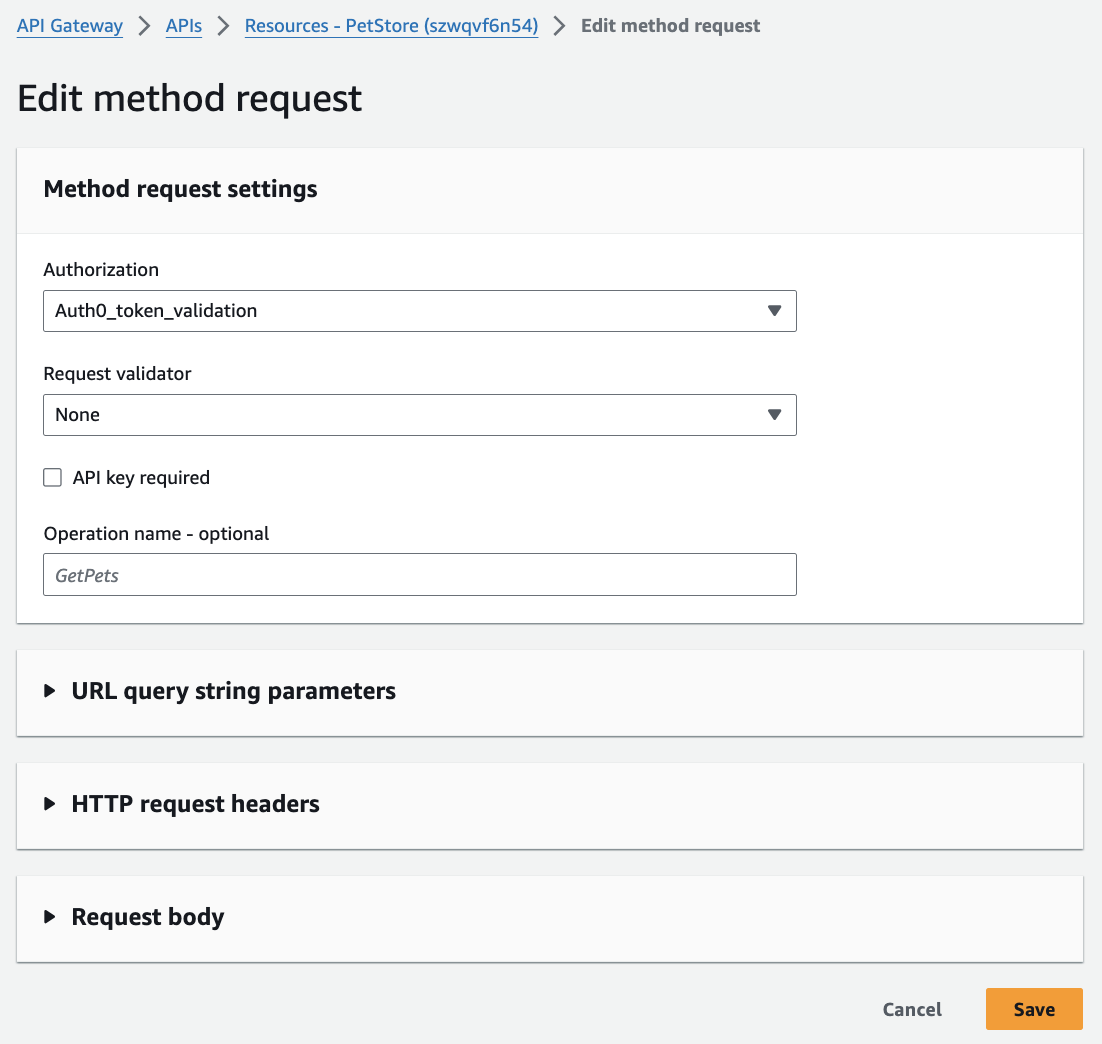
- Click on Save to save your settings
- Click on “Deploy” to deploy your API
Step 3: Setting Up Auth0
Now, we need to configure things in Auth0. We’ll start with creating a logical representation of the Pets API so that we can get an access token after the user authenticates (and effectively authorizes), then we’ll create an Action to enrich the Access token with additional claims (Okta’s own risk assessment score), and finally we’ll create a client (aka application which is the logical representation of the actual Javascript application) for our Javascript frontend in order to be able to test everything out.
Go to your Auth0 tenant (if you do not have one, go here and create it…it’s free!)
1. Create an Auth0 API
- In the Auth0 dashboard, navigate to "Applications -> APIs" on the left side of the menu.
- Click "Create API" and set the Identifier as “api://pets” (this will be your Audience claim in the token)
- Leave the default "RS256" signing algorithm.
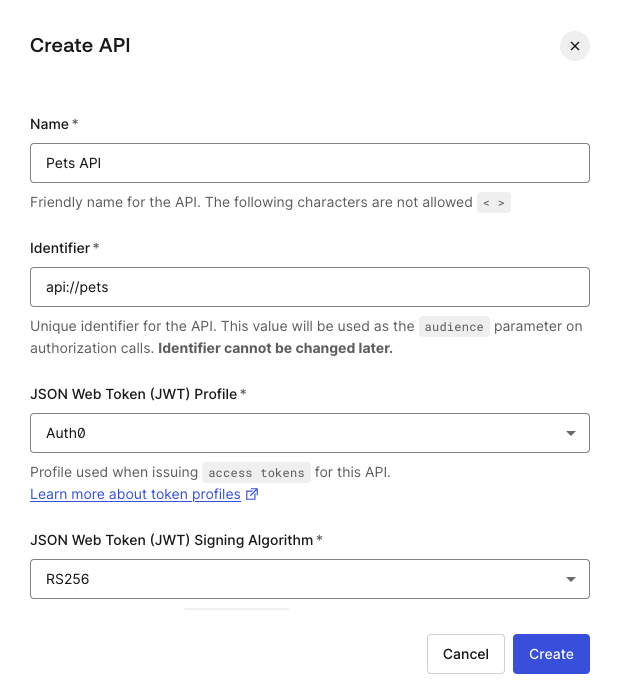
- Click on “Create” to save the settings
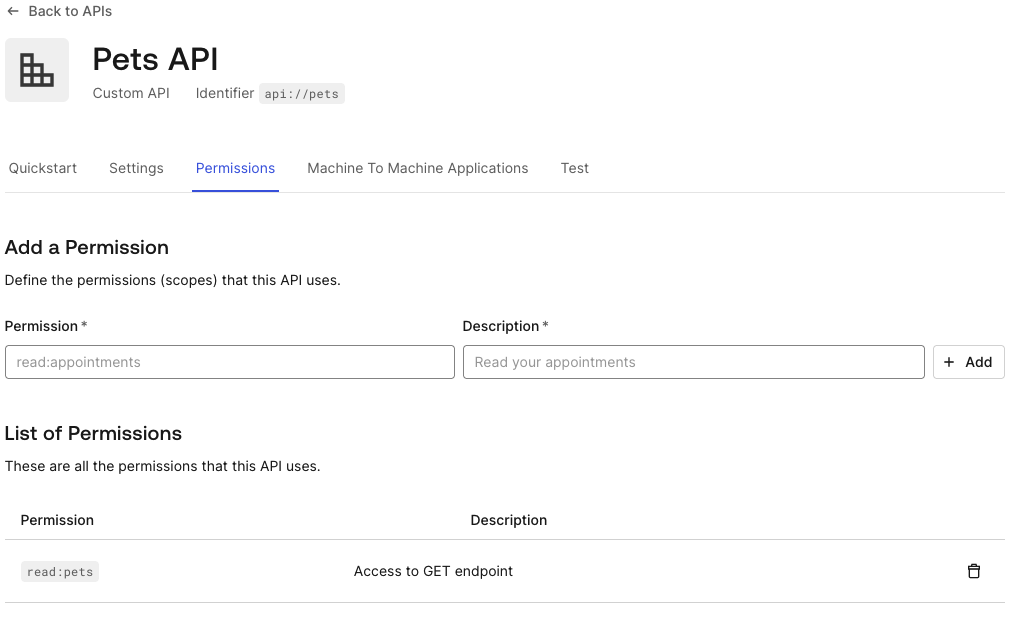
- Add a permission called “read:pets”
2. Create an Action for Custom Claims
- Go to "Actions" > “Library” > "Create Action" in Auth0, and choose “Build from scratch”
- Add the following code to include the risk assessment claim in the token:
exports.onExecutePostLogin = async (event, api) => {
     // Getting a risk score is part of the Adaptive MFA package and might require an Enterprise level license.
 // If you do not have a risk assessment feature enabled in your tenant, you can simply hardcode the claim value for testing purposes
 // e.g. api.accessToken.setCustomClaim('risk_score_confidence',’high’);
 if(event.authentication && event.authentication.riskAssessment)
api.accessToken.setCustomClaim('risk_score_confidence',event.authentication.riskAssessment.confidence);
};
- Click “Deploy” to deploy the Action
- Go to the Flows and add the newly created Action to the Login Flow by dragging and dropping it into the flow

- Deploy the flow.
Step 4: Creating the JavaScript Application
Let's create a simple JavaScript app that authenticates a user and calls the secured API.
First, let’s create an Application (client) in Auth0 so we can get the ClientId and Secret so that we can interact with our sample Javascript app that we will create next.
- In your Auth0 tenant, go to “Applications” and click on “Create Application.”
- Give the application some name and choose SPA (Single Page Application) application type
- Make a note of Domain and Client ID (found under Settings tab)
- Create a file called index.html, paste the code below, and replace the placeholder values (between “< >”) with your own
<!DOCTYPE html>
<html lang="en">
<head>
   <meta charset="utf-8">
   <title>Auth0 API Gateway Example</title>
   <style>
   </style>

</head>
<body>

<h1>Simple app to authenticate with Auth0 then call the Pets API on Amazon API Gateway</h1>

<button id="login" style="display:none">Login</button>
<button id="getATBtn" style="display:none">Get Access Token</button>
<button id="callapi" style="display:none">Call Pets API</button>
<button id="logout" style="display:none">Logout</button>
<div id="result" style="display: none;"></div>

<script src="https://cdn.auth0.com/js/auth0-spa-js/2.0/auth0-spa-js.production.js"></script>
<script>

let loginBtn, logoutBtn, getATBtn, callApiBtn, result;
let accessToken;

//document.addEventListener('DOMContentLoaded', init, false);

//async function init() {
   loginBtn = document.querySelector('#login');
   getATBtn = document.querySelector('#getATBtn');
   logoutBtn = document.querySelector('#logout');
   callApiBtn = document.querySelector('#callapi');
   result = document.querySelector('#result');

   const auth0Client = auth0.createAuth0Client({
       domain: "<your Auth0 domain>",
       clientId: "<your client id>",
       authorizationParams: {
           audience: "api://pets",
           redirect_uri: window.location.origin,
           scope: "read:pets"
       }
   }).then(async (auth0Client) => {

   // handle coming back from login
   if (location.search.includes("state=") &&
       (location.search.includes("code=") ||
       location.search.includes("error="))) {
       await auth0Client.handleRedirectCallback();
       window.history.replaceState({}, document.title, "/");
   }

   const isAuthenticated = await auth0Client.isAuthenticated();
   console.log('isAuthenticated', isAuthenticated);

   if(!isAuthenticated) loginBtn.style.display = '';
   else {
       logoutBtn.style.display = null;
       getATBtn.style.display = null;
   }

   loginBtn.addEventListener("click", e => {
       e.preventDefault();
       auth0Client.loginWithRedirect();
   });

   logoutBtn.addEventListener("click", e => {
       e.preventDefault();
       auth0Client.logout();
   });

   getATBtn.addEventListener("click", async e => {
       e.preventDefault();
       /*const differentAudienceOptions = {
           authorizationParams: {
               audience: "api://pets2",
               scope: "read:pets",
               redirect_uri: window.location.origin
           },
           cacheMode: "off"
       };*/
       accessToken = await auth0Client.getTokenSilently();
       result.style.display = null;
       document.getElementById('result').innerHTML = "Access token: " + `<a href='https://jwt.io?token=${accessToken}' target="_blank">` + JSON.stringify(accessToken, null, 2) + "</a>";
       callApiBtn.style.display = null;
   });

   callApiBtn.addEventListener('click', async e => {
       e.preventDefault();
       if (!accessToken) {
           alert('No access token found locally');
           return;
       }

       try {
           const response = await fetch('<Amazon API endpoint for GET /pets>', {
               headers: {
                   Authorization: `Bearer ${accessToken}`
               }
           });

           const data = await response.json();
           result.style.display = null;
           document.getElementById('result').textContent = "Pets API call response: " + JSON.stringify(data, null, 2);
       } catch (err) {
           console.error('API call failed', err);
       }
   });

})
</script>
</body>
</html>
To test:
- Create a user in the Auth0 tenant in the Admin interface under “User Management.”
- Make sure you replace the placeholder variables for the clientId, auth0 domain, and your Amazon API Gateway endpoint
- Run this page on a local server, e.g., on Mac, you can run the python http command from the folder where your index.html file is located (i.e., python3 -m http.server 12345). Open this page in a browser (i.e.
http://localhost:12345if you ran the previous python command) and authenticate. After you are back on the application, you should see the “Get Access token” button. Clicking on that should fetch the Access token (you can click on the token link, which will take you to jwt.io to see the content of the token) and enable the “Call Pets API” button, which, when clicked, should call the API on Amazon and (hopefully 🙂) return the list of pets. Ta-da!
Conclusion
In this article, we covered how to protect a REST API behind Amazon API Gateway using Okta's Customer Identity Cloud (powered by Auth0). By leveraging a Lambda authorizer, we were able to validate Auth0 tokens and control access based on custom claims. Finally, we demonstrated the setup with a simple JavaScript application that authenticated a user and called the API using the Bearer token. This setup ensures that only authenticated and risk-assessed users can access your API, providing a robust security layer.
About the author

Nesh Popovic
Principal Solutions Engineer - CIAM