

TL;DR: In this tutorial, we’ll be learning how to use the RxPy library to create asynchronous and event-based programs by implementing observables, observers/subscribers, and subjects. We will start by getting our data stream from the GitHub API with a Tornado web socket and then we will filter and process it asynchronously. In this GitHub repository, you can find the code that we are going to create in this tutorial.
Why Reactive Programming?
In a way, reactive programming isn't a new thing. Our typical click events are an asynchronous data stream which we can observe and trigger actions from it. That's how it works, but Reactive Programming makes things so much easier by adding a toolbox of operators to filter, create, transform, and unify any of those streams. In just a few lines of maintainable code, we can have web sockets that receive multiple requests and handle them on an asynchronous process that serves a filtered output.
Web applications contain lots of database operations, network calls, nested callbacks, and other computationally expensive tasks that might take a long time to complete (or even block other threads until it's done). This is where Reactive Programming enters, it gives us the facility to convert almost anything to streams (like variables, properties, user inputs, caches, etc) to manage it asynchronously. Besides that, it also gives us an easy way to handle errors. A task that is usually hard task within asynchronous programming. Reactive Programming makes our code more flexible, readable, maintainable, and easy to write.
“Reactive Programming makes our code more flexible, readable, maintainable, and easy to write.”
Tweet This
What Does Reactive Programming Really Means?
The main difference between Event-Driven programming and Reactive Programming is the real trigger of the action. While the Event-Driven programming focuses on handling any event (such as a button click) to trigger the corresponding action, Reactive Programming wraps data into the reactive system as events. This enables us to do things like listening to user inputs as events that trigger actions only if the input changed from the previous one.
“Reactive, in Reactive Programming, means a dynamic reaction to change in streams.”
Tweet This
Reactive Programming is a programming paradigm oriented around data flows and the propagation of change. This means that, when a data flow is emitted by one component, the Reactive Programming library will automatically propagate those changes to other components until it reaches the final receiver.
How Does Reactive Programming Works?
Let's take into consideration ReactiveX, the most famous implementation of the Reactive Programming paradigm. ReactiveX is mainly based on two classes: the Observable and Observer classes. The Observable class is the source of data streams or events and the Observer class is the one that consumes (or reacts to) the emitted elements.
Observables in Reactive Programming
An Observable packs the incoming data so it can be passed from one thread to another. The Observable can be configured so it regulates when to supply data. For example, it could be triggered periodically or only once in their life cycle. There are also various functions that can be used to filter or transform the observable so the observer only emits certain data. All this is used instead of callbacks, which means that our code becomes more readable and less fallible.
from rx import Observable, Observer

source = Observable.from_list([1,2,3,4,5,6])
It’s common to use Observables in a way that it doesn’t give data until some Observer subscribes to it. Known as "call by need", this is an evaluation strategy which delays the evaluation of an event until its value is needed.
Observers in Reactive Programming
The Observer consumes the data stream emitted by the Observable. An Observable can have multiple Observers so each data item emitted will be received by each Observer. The "listening" to the stream is called subscribing. Observers subscribe to the Observable with the subscribe() method to receive the emitted data.
The Observer can receive three types of events:
- on_next(): when there is an element in the data stream;
- on_completed(): when no more items are coming, it implies end of emission.
- on_error(): when there is an error thrown from the
Observable(it also implies end of emission);
class PrintObserver(Observer):

    def on_next(self, value):
        print("Received {0}".format(value))

    def on_completed(self):
        print("Done!")

    def on_error(self, error):
        print("Error Occurred: {0}".format(error))

source.subscribe(PrintObserver())
We don't have to specify all three event types in the code. We can choose which events to observe using the named arguments, or simply providing a lambda for the on_next function. Typically, in production, we will want to provide an on_error handler so errors are explicitly handled by the subscriber.
source = Observable.from_list([1,2,3,4,5,6])

source.subscribe(lambda value: print("Received {0}".format(value)))
Subjects in Reactive Programming
The Subject is the Observable extension that simultaneously implements the Observer interface. That is, Subjects acts like both Observers and Observables. They receive messages about events (like Observers) and notify their subscribers (like Observables). This implies two things:
- We can subscribe to a
Subject, just like anObservable. - A
Subjectcan subscribe to otherObservables.
Therefore, the main difference between a Subject and an Observable is that all of the Subject subscribers share the same action. This means that, when a Subject produces data, all of its subscribers will receive the same data. This is unlike Observables, where each subscription causes an independent execution of the observable.
A Subscriber can not only subscribe to an Observable but also unsubscribe from it. It is important to remember to unsubscribe from the asynchronous calls. When calling unsubscribe(), all the operators unsubscribe from one another in sequence from top to bottom. So we can avoid memory leaks. In the case of the Subjects, we will use the dispose method which can be thought of as the subscription itself, or perhaps a token representing the subscription. Disposing it will dispose the subscription and also unsubscribe. The unsubscribe call can be placed in the socket on_close() method:
def on_close(self):
    self.combine_latest_sbs.dispose()
    print("WebSocket closed")
Data Operators in Reactive Programming
The essence of Reactive Programming is working with streams. As we saw before, we have an Observable class that supplies the data stream and an Observer which consumes it. But, along the way from the Observable to the subscriber, we can apply many Operators to the stream. These Operators define how and when the Observables should emit streams.
Most Operators execute a function on an Observable and return an Observable. So we can apply these operators one after the other, in a chain. Each operator in the chain modifies the Observable that results from the operation of the previous operator.
There are plenty of operators available. We will be exploring only the ones that we use for this tutorial. The operators can be classified by categories of their utility as:
- Creating Observables
- Transforming Observables
- Filtering Observables
- Combining Observables
- Error Handling Operators
- Observable Utility Operators
- Conditional and Boolean Operators
- Mathematical and Aggregate Operators
- Connectable Observable Operators
Creating Observables Category
The just() operator, as the name suggests, emits Observables with the same values provided in the arguments.
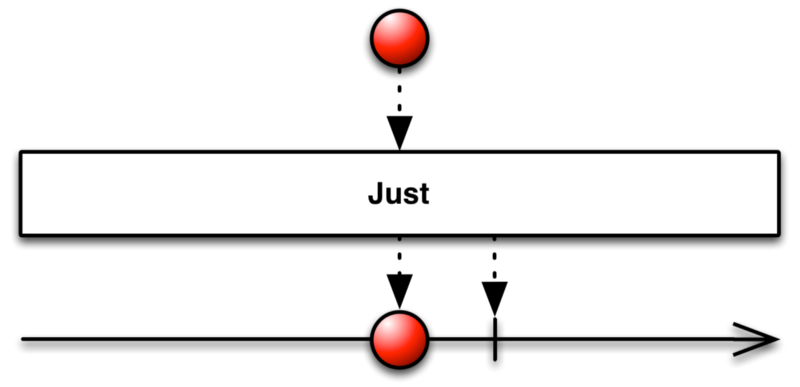
As we can see in the following example, our Observable just emits a, b, c, d one after another:
Observable.just(a,b,c,d)
The interval() operator creates an Observable that emits a sequence of integers spaced by a given time interval.

For example, the following Observable refreshes the value every 60 Seconds for periodic updates:
Observable.interval(60000)
Filtering Observables Category
The filter() operator emits only those items from an Observable that pass a predicate test.
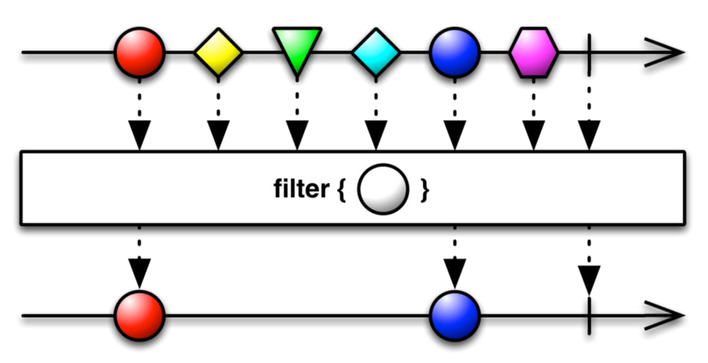
In the following example, we are filtering by the text size so it emits only the strings that exceed a length of 2 characters.
Subject.filter( lambda text: not text or len(text) > 2 )
The throttle_last() operator emits the most recent items emitted by an Observable within periodic time intervals.
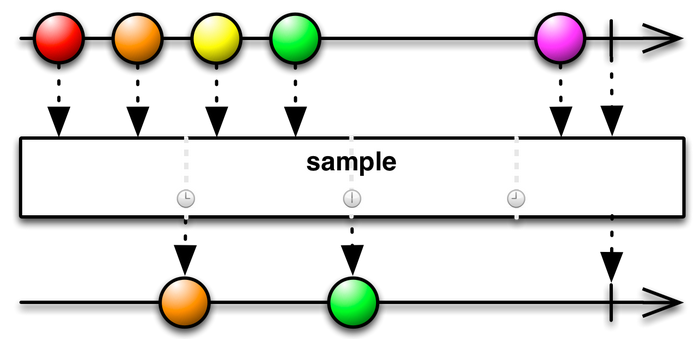
For example, to get the last value in a given time interval we could use RxPy as follows:
Subject.throttle_last( 1000 )
Transforming Observables Category
The flat_map() operator transforms the items emitted by an Observable into Observables, then flatten the emissions from those into a single Observable.
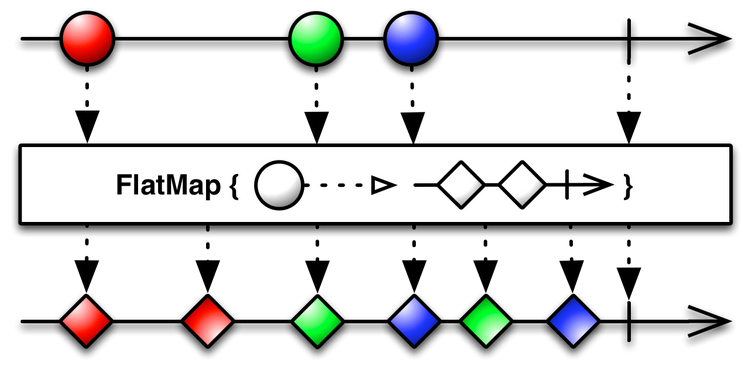
Here we get the repositories information by the user input which is the name of the organization repository. As you can see, we are calling a from_future() observable, since we use an asynchronous tornado web socket to request the API information.
Subject.flat_map( lambda name: Observable.from_future(self.get_org_repos(name)) )
Observable Utility Operators Category
The do_action() operator registers an action to take upon a variety of Observable lifecycle events.
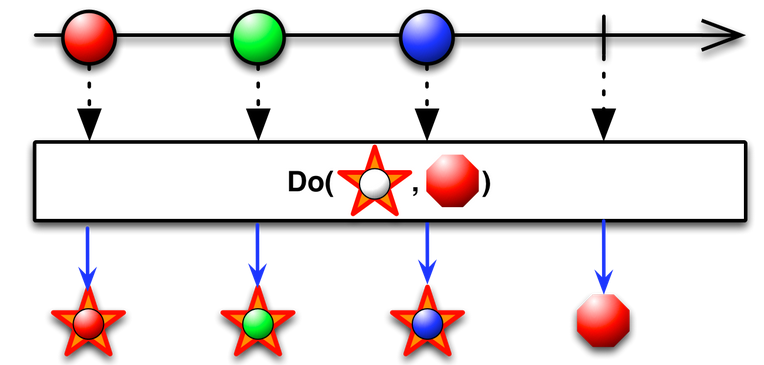
Here we call the send_response function for each item in the data stream.
Subject.do_action( lambda x: send_response('clear') )
Combining Observables Category
The combine_latest() operator combines, when an item is emitted by either of two Observables, the latest item emitted by each Observable via a specified function and emit items based on the results of this function.
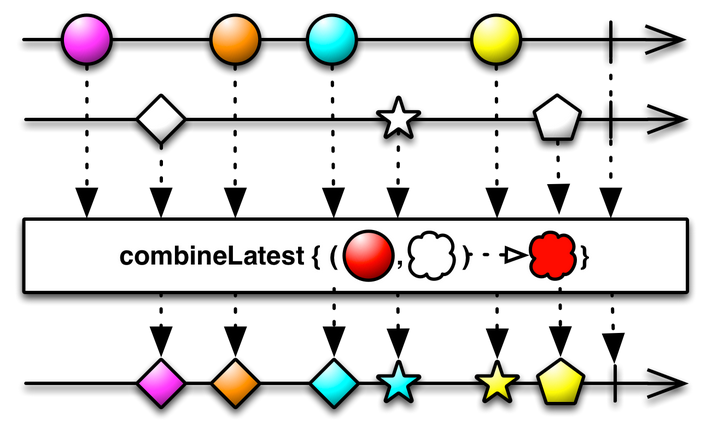
Here we combine an interval Observable which will be sending the last input of the user every 60 seconds and the input_value Observable itself which will be emitted every time it changes:
user_input.combine_latest( interval_observable, lambda input_value, i: input_value )
Advantages of Reactive Programming
With Reactive Programming, we can raise the level of abstraction of our code so we can focus on the interdependence of events that define the business logic, rather than having to constantly fiddle with a large number of implementation details. With the help of the functional programming, the code will also be more concise.
We can use Reactive Programming to process asynchronous incoming data—perhaps tasks with a lot of user interaction (clicks, gestures, etc.)—or processing system events (sensors, gyroscope, etc.). That is, we can use with all kind of interactions where the events are portrayed as the object states. Such an approach allows better dynamic process description, also simplifying the asynchronous code writing. Finally, we've got better performance in the asynchronous context and the parallel processing of the data streams.
Building an App with RxPy
First of all, we need to set up our environment by installing all the requirements we need to get our reactive web socket working. To do that in an easier and more organized way we are going to use Pipenv. Pipenv is a dependency manager that isolates projects on private environments, replacing pip and allowing us to install only what we really need for a certain project. With Pipenv, we will easily manage the environment and the libraries we need to install.
# we might need to use pip3 instead of pip
pip install pipenv
Now, we have to create the new environment by executing the following commands:
# create our project directory and move to it
mkdir rxtornado && cd rxtornado

# run pipenv to create a Python 3 (--three) virtualenv for our project
pipenv --three

# you might need to define what SSL library to use
# http://pycurl.io/docs/latest/install.html#ssl
export PIP_GLOBAL_OPTION="--with-openssl"

# install the dependencies we need
pipenv install tornado rx pycurl
Once we execute these commands we can find two new files created on our project's root directory:
Pipfile: a file that contains details about our project, like the Python version that we are using and the packages that our project needs.Pipenv.lock: a file that contains exactly what version of each package our project depends on, and their transitive dependencies.
Now that we are ready with the environment, we need to create a file called config.py which will contain constants (like the address of the organizations we will be searching for in GitHub) and also a token to use the GitHub API. We will have to replace <TOKEN> with our own GitHub Token. To get one, we need to follow the instructions on this page.
TOKEN = <TOKEN>
headers = {
    "Content-Type": "application/json",
    "Authorization": "token " + TOKEN
}
GITHUB_API_URL = "https://api.github.com"
orgs = ["/twitter/repos", "/auth0/repos", "/nasa/repos", "/mozilla/repos", "/adobe/repos"]
After that, we need to create a file called server.py which will contain the main code for the project. For this code, we need to import certain modules from the libraries we just installed:
import json
import os
import config as conf

from rx import Observable
from rx.subjects import Subject
from tornado import ioloop
from tornado.escape import json_decode
from tornado.httpclient import AsyncHTTPClient
from tornado.web import Application, RequestHandler, StaticFileHandler, url
from tornado.websocket import WebSocketHandler
Here we have imported the Observable and Subject modules from the RxPy library and the async and websocket modules from Tornado to handle the requests.
It is important to notice that, to use the GitHub API authentication, we need to configure the Tornado HttpClient as a curl async client with the following line right after the imported libraries:
AsyncHTTPClient.configure("tornado.curl_httpclient.CurlAsyncHTTPClient")
We also need to initialize our headers and the organizations' addresses we already declared on the config file.
headers = conf.headers
GIT_ORG = conf.GITHUB_API_URL+"/orgs"
Building a WebSocket Handler
Our application will exchange messages with a browser using web sockets. Web sockets allow bidirectional communication between the browser and server in real time. The main idea is to define a class that inherits from the WebSocketHandler class. We can find more information about Tornado WebSockets here.
Let's define the WebSocketHandler class with the following code:
class WSHandler(WebSocketHandler):
    orgs = conf.orgs

    def check_origin(self, origin):
        #Override to enable support for allowing alternate origins.
        return True
Here we are initializing the organizations names and defining the origin check, which we can override if we need support for alternate origins.
Obtaining Data
To obtain the data from the GitHub API, first we need to define a function inside our WebSocketHandler. This function will create an asynchronous http_client which will take the organization names received and return the requested repository information asynchronously as a response.
def get_org_repos(self, org):
    """request the repos to the GitHub API"""
    http_client = AsyncHTTPClient()
    response = http_client.fetch(GIT_ORG + org, headers=headers, method="GET")
    return response
In our implementation of the WebSocketHandler class, we will override the following methods:
on_message(): This function will be called when there is an incoming message on the web socket. As our response is formatted as JSON objects, we have to decode it and then push it to theSubjectwith theon_next()operator.on_close(): This function will be called once we close the web socket. As we read before, it is very important to unsubscribe theObservableonce the operation has been terminated to avoid memory leaks. As such, in this method we are going to use thedispose()method.open(): This function will be called when the web socket is opened for the first time.
Inside the open() method, we are also going to define the send_response() and on_error() methods to handle this two kinds of events. In this case, we are printing the message or the exception on the log.
def on_message(self, message):
    obj = json_decode(message)
    self.subject.on_next(obj['term'])

def on_close(self):
    # Unsubscribe from observable
    #  will stop the work of all observable
    self.combine_latest_sbs.dispose()
    print("WebSocket closed")

def open(self):
    print("WebSocket opened")
    self.write_message("connection opened")

    def send_response(x):
        self.write_message(json.dumps(x))

    def on_error(ex):
        print(ex)

    self.subject = Subject()

    user_input = self.subject.throttle_last(
        1000  # Given the last value in a given time interval
    ).start_with(
        ''  # Immediately after the subscription sends the default value
    ).filter(
        lambda text: not text or len(text) > 2
    )

    interval_obs = Observable.interval(
        60000  #refresh the value every 60 Seconds for periodic updates
    ).start_with(0)

    self.combine_latest_sbs = user_input.combine_latest(
        interval_obs, lambda input_val, i: input_val
    ).do_action(
        lambda x: send_response('clear')
    ).flat_map(
        self.get_data
    ).subscribe(send_response, on_error)
We are going to filter the incoming user input by the size of the string to consider values with a length higher than 2 characters. Then, we are going to emit these values.
After that, we are going to create an interval Observable which will help us to "refresh" the input every 60 seconds and push this input again to the Subject.
Finally, we will combine both the interval Observable and the input value Subject so when either of it has a change it will be emitting a Subject to the chain. The chain will send it to the send_response method and then to the get_data method to be filtered and showed as the result.
Filtering Incoming Data
To get the data filtered, we are going to use a chain of Observable maps which are going to take the query (the user input) and evaluate it according to the requirements we have set.
First we need to create the get_info method inside the WebSocketHandler class with the following:
def get_info(self,req):
    """managing error codes and returning a list of json with content"""
    if req.code == 200:
        jsresponse = json.loads(req.body)
        return jsresponse
    elif req.code == 403:
        print("403 error")
        jsresponse = json.loads(req.body)
        return json.dumps("clear")
    else:
        return json.dumps("failed")
This method will help us to handle the exceptions of the request or, if everything's ok (code == 200), we will get a JSON formatted response with the information.
Now, we create the get_data method also inside the WebSocketHandler class with:
def get_data(self,query):
    """ query the data to the API and return the contet filtered"""
    return Observable.from_list(
        self.orgs
    ).flat_map(
        lambda name: Observable.from_future(self.get_org_repos(name))
    ).flat_map(
        lambda x: Observable.from_list(

            self.get_info(x) #transform the response to a json list

         ).filter(

            lambda val: (val.get("description") is not None
        and (val.get("description").lower()).find(query.lower())!= -1)
                or (val.get("language") is not None
                and (val.get("language").lower()).find(query.lower())!= -1)
         ).take(10)  #just take 10 repos from each org

    ).map(lambda x: {'name': x.get("name"),
    'stars': str(x.get("stargazers_count")),
    'link': x.get("svn_url"),'description': x.get("description"),
    'language': x.get("language")})
First, we are iterating by the organizations list defined on the config file. We get the organization repository information and then transform the response to the desired format with the get_info method. After that, we are making the query to the information we just got and take only the first 10 results that accomplish with this query. Finally, we emit the Observable as a dictionary with the characteristics we will be showing in the page as a result.
Finally we need to initialize and start the ioLoop for the web socket and render the index.html page which is going to show the results of the request with the following code:
class MainHandler(RequestHandler):
    def get(self):
        self.render("index.html")

def main():
    port = os.environ.get("PORT", 8080)
    app = Application([
        url(r"/", MainHandler),
        (r'/ws', WSHandler),
        (r'/static/(.*)', StaticFileHandler, {'path': "."})
    ])
    print("Starting server at port: %s" % port)
    app.listen(port)
    ioloop.IOLoop.current().start()

if __name__ == '__main__':
    main()
Here we are starting the web socket so it can listen on port 8080.
We can check the entire code of the server.py here
Showing the results on the page
To show the results, we will use two static files: index.html and feeder.js. Let's create the index.html in the project root and add the following code:
<!DOCTYPE html>
<html>
<head>
  <meta http-equiv="X-UA-Compatible" content="IE=edge" >
  <meta name="viewport" content="width=device-width, initial-scale=1.0">
  <meta charset="utf-8">
  <meta name="description" content="">
  <meta name="author" content="">
  <title>Github Searcher</title>
  <link rel="stylesheet" href="//maxcdn.bootstrapcdn.com/bootstrap/3.3.7/css/bootstrap.min.css">
</head>
<body>
  <div class="container">
    <div class="col-xs-12 col-md-10 col-md-offset-1 col-lg-8 col-lg-offset-2">
      <div class="page-header">
        <h1>Github Repositories Searcher with RxPY</h1>
        <p class="lead">You are searching repositories from Auth0, Mozilla, Adobe, Twitter and Nasa</p>
      </div>
      <form role="form">
        <div class="form-group">
          <label for="textInput">Enter keywords or a programming language to search on the repos</label>
          <input type="text" id="textInput" class="form-control" placeholder="Query...">
        </div>
      </form>
      <ul id="results"></ul>
    </div>
  </div>
  <script src="//code.jquery.com/jquery-2.2.4.min.js"></script>
  <script src="static/feeder.js"></script>
</body>
</html>
As you can see, we will be replacing the <ul id="results"></ul> with the results of the request to the GitHub API dynamically.
Now, let's create the feeder.js file in the project root and add the following to it:
(function (global, $, undefined) {
    function main() {
        var $input = $('#textInput'),
            $results = $('#results');
        var ws = new WebSocket("ws://localhost:8080/ws");

        $input.keyup(function(ev) {
            var msg = { term: ev.target.value };
            ws.send(JSON.stringify(msg));
        });
    ws.onmessage = function(msg) {
        var value = JSON.parse(msg.data);
        if (value === "clear") {$results.empty(); return;}
            $('<li><h3><a tabindex="-1" href="' + value.link +
                '">' + value.name +'</a></h3> <p> Description : '
            + value.description +
                '</p><p> Language : ' + value.language +
                '</p><p> Stars : ' + value.stars + '</p></li>'
            ).appendTo($results);
            $results.show();
    }
    }
    main();
}(window, jQuery));
There you go!
Now to run it we just execute the server.py file and the app will be served at http://localhost:8080:
# activate virtualenv
pipenv shell

# run the server
python server.py
Conclusions
Apps and systems nowadays have a lot of real-time computationally expensive events that enables a highly interactive experience for the user. Here is where Reactive Programming shows up to help us properly dealing with that. With the help of the Reactive Programming operators, we can not only manage these events but filter, unify, and transform them on an inherent declarative style way.
I hope this serves as a useful introduction to Reactive Programming in Python and as an overview of its basic capabilities. To learn more about Reactive Programming, I encourage you to browse the resources available at ReactiveX.
Thanks for reading!