
TL:DR: This is the first of a two-articles series showing how to build client-server systems by actually applying the REST architecture principles. In this part, you will learn how to create a RESTful API by implementing a simple dashboard wrapper for the Auth0 Management API. In the second part, REST Architecture - Building the Client, you will learn how to implement a RESTful client that consumes the API.
In order to build the application, you will use Express.js and React.js, but the principles are valid for any language and platform. You find the code for the final project on this GitHub repository.
“Most RESTful APIs out there are not really RESTful. Learn how to build an API that truly implements the paradigm and how to create a client that knows how to navigate the system.”
Tweet This
What Exactly is REST?
Most developers have heard at least one time about REST and RESTful APIs and many of them have implemented and consumed such kind of API. Or at least, they think so.
The REST and RESTful terms are so widely used that often people forget the original meaning and purpose. In other words, we all are so used to talk about REST and RESTful APIs that we are no longer aware that in many cases it is an improper use of the terms.
Let's briefly recap what REST is. According to the original definition provided by Roy Thomas Fielding in his Ph.D. dissertation, the Representational State Transfer (REST) is an architectural style for distributed hypermedia systems. It defines a set of principles that a system must comply with in order to get some benefits such as loose coupling between the client and the server, scalability, reliability, and better performance. In his discussion, Fielding described the World Wide Web as a concrete example of a RESTful system, which is a system that implements the REST architecture principles. Most developers took this suggestion as an inspiration and started developing their APIs by using existing Web standards such as HTTP, JSON and so on.
RESTful APIs vs HTTP APIs
Unfortunately, most developers are using just a part of the principles on which a true RESTful system is built. In most cases, the design of a so-called RESTful API consists of:
- defining the resources accessible via HTTP
- identifying such resources with URLs
- mapping the CRUD (Create, Retrieve, Update, Delete) operations on these resources to the standard HTTP methods (POST, GET, PUT, DELETE)
Maybe in some cases, you could find the content negotiation, that is the client's ability to ask the server for a resource representation in a specific format instead of the usual JSON. But nothing else is usually implemented.
What almost always is missing for an API to be properly called RESTful is the support of HATEOAS (or simply hypermedia), that is the client's ability to discover related resources and to drive the application's state transition. It may seem a detail, but after all the architectural model name reflects right this: the state transfer. And this state transfer management is a mandatory requirement for an API to be called RESTful, as Fielding has stressed.
In light of all this, most of the existing APIs could not be called RESTful. Since most of them just rely on using HTTP as a communication protocol, they should be called HTTP APIs or something similar.
But how can you implement hypermedia in your API? What does it mean for the client? What benefits will you get by applying all the principles of the REST architecture?
This is what you will discover by going ahead and reading both articles of this series.
“Discover what benefits a true RESTful API implementation brings to the table.”
Tweet This
A Few Caveats
Before going ahead, anyway, you need to be aware of a few caveats.
This article is not an introduction to REST and RESTful APIs. This article assumes that you have a basic knowledge of what REST is, even if you just know it as a way to build HTTP APIs. If you don't know so much about REST, please take a look at some online introductory tutorial.
This article will guide you through the practical implementation of a true RESTful system by using Node.js, Express and React. Even though you can apply the REST principles in any platform, you should be familiar with these technologies in order to build and run the example application you are going to implement.
The Auth0 Dashboard Project
You are going to learn how to build a true RESTful system by implementing a simple Auth0 custom dashboard. Auth0 helps you to add authentication to your application with multiple authentication sources and to control access authorization to your application resources. You can configure and manage the integration of your application with Auth0 via a powerful dashboard. However, Auth0 also provides you with the Auth0 Management API, allowing you to automate your administrative tasks or to create your own custom dashboard.
So, you are going to create your own Auth0 custom dashboard that allows you to view the list of client applications you have configured (we will call them Auth0 clients) and change their name and description. The project consists of the components shown by the following picture:
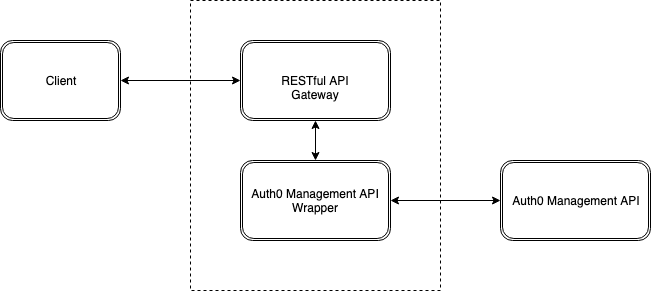
Their role in the system are:
- the client: this is the RESTful client that you will build in the second part of this series; it will implement the dashboard UI by consuming the RESTful API you are going to build in this first part
- the RESTful API gateway: this is the RESTful API you are going to implement; it uses the Auth0 Management API to actually perform actions, so it acts as an API gateway
- the Auth0 Management API wrapper: this component is a wrapper around the Auth0 Management API just to simplify the code and let you focus on the RESTful API implementation; it is a slightly modified version of the project described in this article
- the Auth0 Management API: this is the actual Auth0 Management API that allows you to manage your tenant like the official Auth0 dashboard and more.
Setting up the Project
Now you should have a clearer idea about what you are going to build. So, start to set up your project.
The first step is to get the Auth0 Management API wrapper. You get it by typing the following command in a console window:
git clone -b starting-point --single-branch https://github.com/auth0-blog/auth0-restful-dashboard
This command will clone in your machine just the branch starting-point of the repository containing the full source code of this project. This branch acts as the starting of the project. After cloning the branch, you should have the following content in your folder:
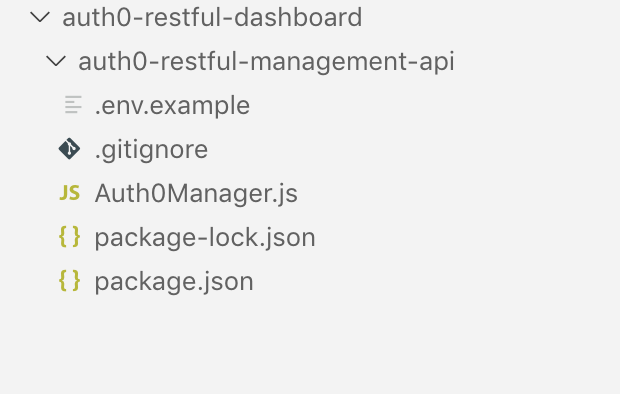
Now, move to the auth0-restful-management-api folder under auth0-restful-dashboard folder and install the dependencies of the project by typing the following commands:
cd auth0-restful-dashboard
cd auth0-restful-management-api
npm install
After a few seconds, you should have the needed libraries installed.
Configuring the Auth0 Management API Wrapper
The Auth0 Management API wrapper is an application on itself that needs to be configured in the Auth0 Dashboard in order to authorize it to access the Auth0 Management API. If you have not one, you can sign up for a free Auth0 account here. So, access the dashboard and follow these steps:
- Click on
+ Create Application - Give a name to the application (for example, Management API Wrapper)
- Click on
Machine to Machine Applications - Click on
Create - In the next dialog, select the
Auth0 Management APIitem - Then choose the scopes
read:clientsandupdate:clients - Click on
Authorize.
Now, select the Settings tab of your application and take note of the Domain, the Client ID and Client Secret values.
Now, go to the auth0-restful-management-api folder and create a .env file from the .env.example file. Edit the .env file and put the required values taken from the Settings section:
CLIENT_DOMAIN="your domain"
CLIENT_ID="the client id from Auth0 application"
CLIENT_SECRET="the client secret from Auth0 application"
Save the changes.
If you take a look at the content of the Auth0Manager.js file, you will find the definition of a few functions that you will learn more about later. From now on, we'll be calling the Auth0 Management API wrapper as Auth0Manager. If you are curious and want to learn more about the internals of the Auth0Manager, please read the article Update Auth0 Applications using the Management API.
Creating the RESTful API Gateway
Once you have created and configured the interface to the Auth0 Management API, now you are ready to create the RESTful API gateway. Remember that this is the component that provides RESTful access to the Auth0 Management API.
Creating the Root Endpoint
The root endpoint of a RESTful API is the initial endpoint of the API. It is the entry point of the API and the only endpoint that a RESTful client should know.
“The root endpoint is the only endpoint that a RESTful client should know.”
Tweet This
It may seem surprising, but you will understand why and which benefits it brings when you'll implement the RESTful client.
In order to create the RESTful API gateway, install Express.js and the body-parser dependency by typing the following command:
npm install express body-parser
Now, in the same folder create an index.js file and put the following code inside:
//index.js
const express = require('express');
const Auth0Manager = require('./Auth0Manager');

require('dotenv').config();

const app = express();
const apiPrefix = '/api';

//Define the root endpoint
app.get(apiPrefix, async (req, res) => {
    const clientsState = await getClients();

    res.send(clientsState);
});

app.listen(3001, () => {
    console.log('listening on port 3001');
});

//Use the Auth0 Management API wrapper and build the response with hypermedia
async function getClients() {
    await Auth0Manager.init();

    const clients = await Auth0Manager.getClients();
    const clientList = clients.map(client => ({
        id: client.client_id,
        name: client.name,
        description: client.description || "",
        links: [{
            uri: `${apiPrefix}/clients/${client.client_id}`,
            rel: "client"
        }]
    }));

    return { resourceType: "client-list", clients: clientList };
}
The first two lines import the dependencies while the third line uses dotenv in order to make the configuration data in the .env file available to the Auth0Manager. You also defined the apiPrefix constant that will be the initial part of any endpoint of the API you are going to create. The apiPrefix constant itself is the root endpoint of the API, defined by the following code:
//index.js
...

//Define the root endpoint
app.get(apiPrefix, async (req, res) => {
    const clientsState = await getClients();

    res.send(clientsState);
});

...
As you can see, the API endpoint simply calls the asynchronous getClients() function and returns the result. The response sent by the API endpoint determines the application state of the requesting client, hence the name of the variable clientState.
The getClients() function is the core of the system you are building. Basically, it uses the Auth0Manager to get a list of the configured clients on your Auth0 dashboard and builds a response in a RESTful way. Take a look at the code:
//index.js
...

//Use the Auth0 Management API wrapper and build the response with hypermedia
async function getClients() {
    await Auth0Manager.init();

    const clients = await Auth0Manager.getClients();
    const clientList = clients.map(client => ({
        id: client.client_id,
        name: client.name,
        description: client.description || "",
        links: [{
            uri: `${apiPrefix}/clients/${client.client_id}`,
            rel: "client"
        }]
    }));

    return { resourceType: "client-list", clients: clientList };
}

...
The first line of the function initializes the Auth0Manager component. Then the Auth0Manager.getClients() method is called in order to get the list of clients configured in your Auth0 dashboard. From the original list of clients, you create a new list with a simplified version of each client. This simplified version contains just the client id, the name and the description of the client. Just what you need for your customized dashboard.
Here, the most important thing is the presence of a links property in each Auth0 client representation. This property is what makes your API true RESTful. It implements the relationship between the current resource (the list of clients) and other accessible resources (the single client).
As you can see, the links property is an array of objects. This means that you may have multiple relationships. Each link has two properties:
uri: the identifier of the related resource, that is the URL that enables the client to get the single Auth0 clientrel: the relationship with the current resource; the specific relationship may affect the behavior if the RESTful client
Note: Keep in mind that REST is a set of principles, it is not a formal standard. You may use the names that you prefer to define the resource relationship, but it is strongly suggested to adopt any existing standard in order to build a common understanding. For example, to describe the resource relationships the RFC 5988 is usually used.
“REST is a set of principles, it is not a formal standard.”
Tweet This
The final resource that will be sent to the RESTful client contains the list of customized clients and is tagged as client-list via the resourceType property.
With this response you are telling your RESTful client: this is a list of Auth0 clients and, for each client, you will find the URL where you can get its details.
Testing the Root Endpoint
To test the root endpoint, type the following command in order to start the server:
node index.js
When the server is running, you should see the listening on port 3001 message in the console.
Now, in another console type the following command:
curl localhost:3001/api
This should display a JSON object containing the list of Auth0 clients like in the following:
{
  "resourceType": "client-list",
  "clients": [
    {
      "id": "2l4IWMLUjpsNW7Sy27bMMHDJD0Roza2W",
      "name": "Default App",
      "description": "test",
      "links": [
        {
          "uri": "/api/clients/2l4IWMLUjpsNW7Sy27bMMHDJD0Roza2W",
          "rel": "client"
        }
      ]
    },
    {
      "id": "QY6jvk6ezagmbXMxCzJ4WbVSfgDNUlZf",
      "name": "My App",
      "description": "",
      "links": [
        {
          "uri": "/api/clients/QY6jvk6ezagmbXMxCzJ4WbVSfgDNUlZf",
          "rel": "client"
        }
      ]
    },
    {
      "id": "b70x8VE7vleS4Ag7DOb9PcaDEuRl0QfP",
      "name": "auth0-authz",
      "description": "",
      "links": [
        {
          "uri": "/api/clients/b70x8VE7vleS4Ag7DOb9PcaDEuRl0QfP",
          "rel": "client"
        }
      ]
    }
  ]
}
You can get the same result by using Postman or a browser.
Getting the Single Resource
The list of Auth0 clients includes the URL to get the details of each client. Of course, you need to implement the single client API endpoint to make the API consistent.
So, add the following function definition at the bottom of the index.js file:
//index.js
...

async function getClient(clientId) {
    await Auth0Manager.init();

    const client = await Auth0Manager.getClient(clientId);

    return {
        resourceType: "client",
        id: client.client_id,
        name: client.name,
        description: client.description || "",
        links: [{
            uri: `${apiPrefix}/clients/${client.client_id}`,
            rel: "self"
        },
        {
            uri: `${apiPrefix}/clients/${client.client_id}`,
            rel: "self",
            type: "PUT"
        }]
    };
}
The getClient() function takes the Auth0 client id as input and uses the Auth0Manager.getClient() method to get the details of the specific client. Then it builds a customized response for the RESTful client by taking into account just the client_id, the name and the description of the Auth0 client. It also adds the resourceType property saying that this resource represents a client and a links array with two items.
The first item of the links array describes the relationship with the current resource on itself. It may seem weird, but it should become clearer in a while. It simply defines the URL to get the current resource.
The second item again describes the relationship with the resource itself, but in this case, it specifies the type of relationship by adding the type property. In this case, the link is telling that, in order to modify (type: "PUT") the current resource, you have to send an HTTP PUT request to the specified URL.
Note: when no type is specified for a link, the GET method is implied.
As you can see, the response sent by the API tells the RESTful client all it needs to know in order to manage the resource. Notice that the API could add a link to the DELETE relationship as well, but it didn't. This means that your customized dashboard will not have the possibility to delete an Auth0 client.
Now, expose the getClient() function through an API endpoint definition. Put the following code just after the definition of the root endpoint:
app.get(`${apiPrefix}/clients/:clientId`, async (req, res) => {
    const clientState = await getClient(req.params.clientId);

    res.send(clientState);
});
This definition will enable your API to send the details of a specific Auth0 client with all the available relationships.
Updating the Single Resource
In order to complete your RESTful API, you need to implement the Auth0 client updating.
Since you will have to deal with the body of the HTTP request, you need to add a few statements at the top of the index.js file, as shown below:
//index.js
const express = require('express');
const Auth0Manager = require('./Auth0Manager');
const bodyParser = require('body-parser');    //import the body-parser library

require('dotenv').config();

const app = express();
const apiPrefix = '/api';

app.use(bodyParser.json());            // enable the body-parser middleware

...
The new statements are followed by a comment. The first one imports the body-parser library. The second one enables the same library as a middleware so that you will be able to parse the body of an HTTP request transparently.
Now define the function that updates an Auth0 client by adding the following code at the bottom of the index.js file:
//index.js
...

async function updateClient(clientId, updatedData) {
    await Auth0Manager.init();
    await Auth0Manager.updateClient(updatedData, clientId);
}
This code simply invokes the Auth0Manager.updateClient() method by passing the client id and the new values represented as a JSON object.
To expose this function, add the following code after the definition of the single client endpoint:
//index.js
...

app.put(`${apiPrefix}/clients/:clientId`, async (req, res) => {
    const updatedData = req.body;

    await updateClient(req.params.clientId, updatedData);

    res.sendStatus(200);
});
Here you get the body of the current HTTP request and pass it to the updateClient() function along with the client id. The body is already parsed as a JSON object thanks to the body-parser middleware you configured above.
Testing the Resource Update
In order to test the update endpoint, restart the RESTful API and get the list of Auth0 clients by typing the following command in a console window:
curl localhost:3001/api
Then, choose the client you want to update and take note of the link's uri, say /api/clients/QY6jvk6ezagmbXMxCzJ4WbVSfgDNUlZf. Now, type the following command to assign a description to the Auth0 client, remembering to replace the example client id with yours:
curl -H 'Content-Type: application/json' -X PUT -d '
{"description": "This is my app"}'     http://localhost:3001/api/clients/QY6jvk6ezagmbXMxCzJ4WbVSfgDNUlZf
This command sends an HTTP PUT request to the update endpoint with the value of the Auth0 client description in the body.
After running the command, type the following one to ensure that the change was applied:
curl localhost:3001/api/clients/QY6jvk6ezagmbXMxCzJ4WbVSfgDNUlZf
You should get the details of the specified Auth0 client as in the following example:
{
  "resourceType": "client",
  "id": "QY6jvk6ezagmbXMxCzJ4WbVSfgDNUlZf",
  "name": "My App",
  "description": "This is my app",
  "links": [
    {
      "uri": "/api/clients/QY6jvk6ezagmbXMxCzJ4WbVSfgDNUlZf",
      "rel": "self"
    },
    {
      "uri": "/api/clients/QY6jvk6ezagmbXMxCzJ4WbVSfgDNUlZf",
      "rel": "self",
      "type": "PUT"
    }
  ]
}
Notice the new value for the description property.
Securing the RESTful API
Now you have a true RESTful API that allows any client to get a list of Auth0 clients and to update their name and description. Of course, you don't want that unauthorized persons can see and change your Auth0 clients. So, you need to secure your API by restricting access to authorized clients. Auth0 makes it simple.
The first thing you need to do is to register your RESTful API through the API section of the Auth0 Dashboard by following these steps:
- Click on
+ Create API - Provide a friendly name for your API (for example, RESTful dashboard) and a unique identifier in the URL format (for example, https://restful-dashboard-api)
- Leave the signing algorithm to RS256 and click the
Createbutton
These steps make Auth0 aware of your RESTful API and will allow you to control access.
Now, go back to the project and add a new key in the .env file with the value of your API identifier, as shown below:
API_IDENTIFIER="the unique identifier of your API"
Then, install the required libraries that will allow your API to restrict access to requests carrying access tokens:
npm install express-jwt jwks-rsa
After the installation is completed, import the dependencies at the top of the index.js file as shown in the following:
//index.js

const express = require('express');
const bodyParser = require('body-parser');
const Auth0Manager = require('./Auth0Manager');
const jwt = require('express-jwt');        //<--- newly added
const jwksRsa = require('jwks-rsa');    //<--- newly added

require('dotenv').config();
const apiPrefix = '/api';
Then, configure the application so that it is able to validate the JWTs sent by Auth0 by adding in the same file a couple of statements after instantiating Express.js, as in the following:
//index.js
...

const app = express();

const checkJwt = jwt({
    secret: jwksRsa.expressJwtSecret({
      cache: true,
      rateLimit: true,
      jwksRequestsPerMinute: 5,
      jwksUri: `https://${process.env.CLIENT_DOMAIN}/.well-known/jwks.json`
    }),
    audience: process.env.API_IDENTIFIER,
    issuer: `https://${process.env.CLIENT_DOMAIN}/`,
    algorithms: ['RS256']
  });

app.use(checkJwt);
The first statement configures the JWT management middleware with the parameters for Auth0. The second statement enables the middleware so that any HTTP request will be checked for a valid token.
Now, restart the RESTful API and type the following command in a console window:
curl localhost:3001/api
Instead of the list of Auth0 clients, you will get an error message like UnauthorizedError: No authorization token was found. Now, only authorized clients can access your API.
To test your secured API, head again to your Auth0 Dashboard, access the section for the API you created before and select the Test tab. In this section, you can get a temporary token to test your API by clicking the Copy Token link as shown in the following picture:
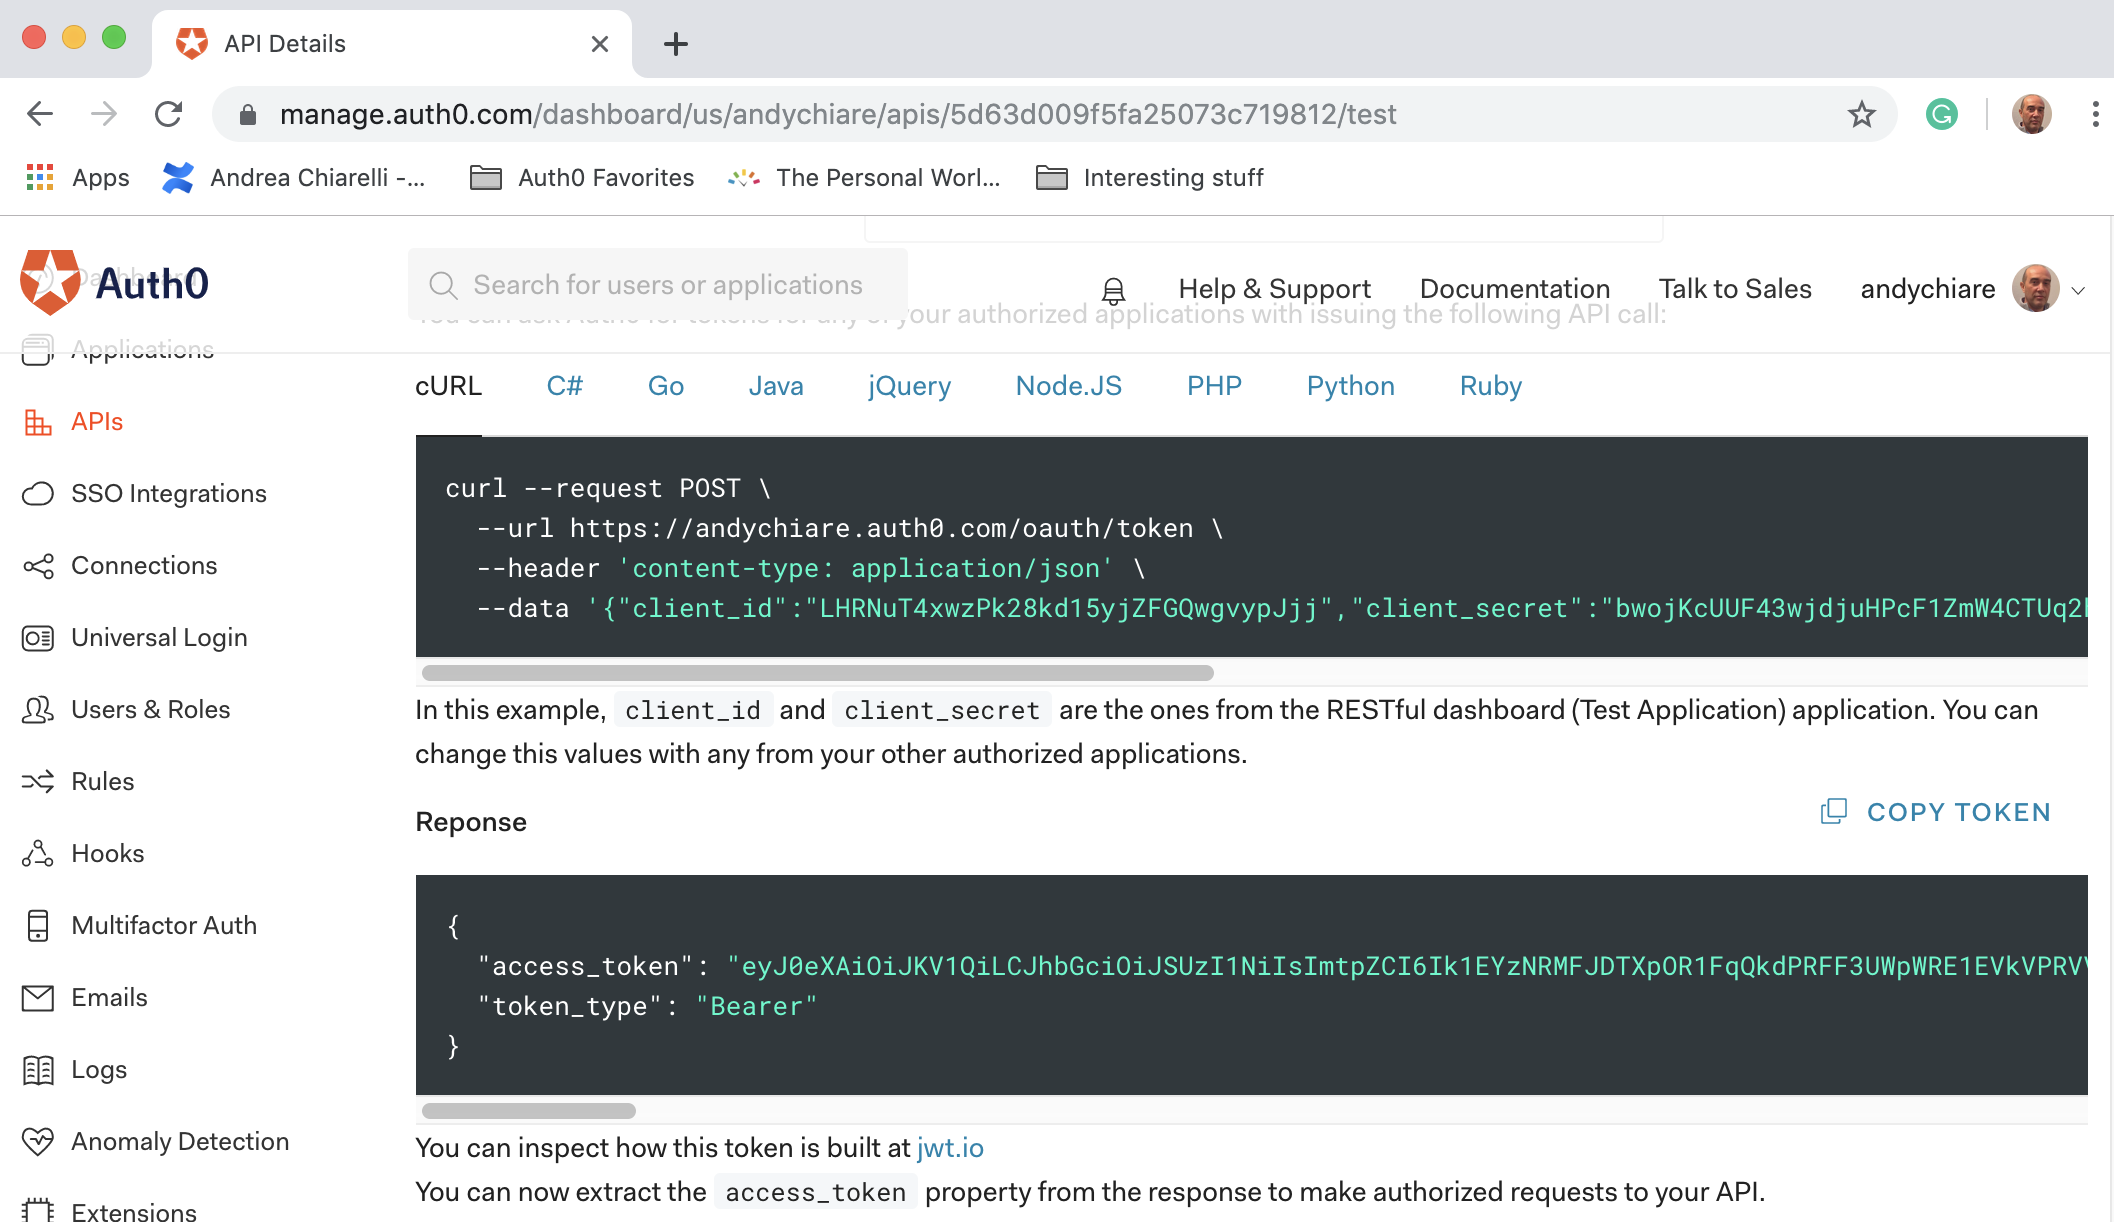
Now, back in your console window, use the copied token to replace the placeholder YOUR_TOKEN in the following command:
curl -H 'Authorization: Bearer YOUR_TOKEN' localhost:3001/api
Finally, you should be able again to get the list of your Auth0 clients.
Conclusion
In this article, you learned the difference between true RESTful APIs and HTTP APIs. You built a true RESTful API that provides simplified info about Auth0 clients and, in particular, you experienced how to add hypermedia to the HTTP responses in order to describe the resources relationships. Then you learned how to secure your RESTful API by using Auth0 identity services.
You can continue with the second part of this series, REST Architecture - Building the Client, where you will learn how to build a RESTful client that is able to leverage the power of the REST architectural model.
About the author

Andrea Chiarelli
Principal Developer Advocate
I have over 20 years of experience as a software engineer and technical author. Throughout my career, I've used several programming languages and technologies for the projects I was involved in, ranging from C# to JavaScript, ASP.NET to Node.js, Angular to React, SOAP to REST APIs, etc.
In the last few years, I've been focusing on simplifying the developer experience with Identity and related topics, especially in the .NET ecosystem.