
In this tutorial series, we'll learn how to build a small app with some big concepts. We'll cover reactive programming with Reactive Extensions (Rx*), JS framework component interaction in Angular, and speech recognition with the Web Speech API. The completed Madlibs app code can be found at this GitHub repo.
In this part, we will cover:
- Keyboard component fallback if user's browser does not support speech recognition
- Generating words by fetching them from an API
- RxJS operators to work with API requests
- Creating an observable for a Progress Bar component
- Displaying the user's madlib story
- Aside: authentication of an Angular app and Node API with Auth0
Let's pick up right where we left off.
Angular App Keyboard Component
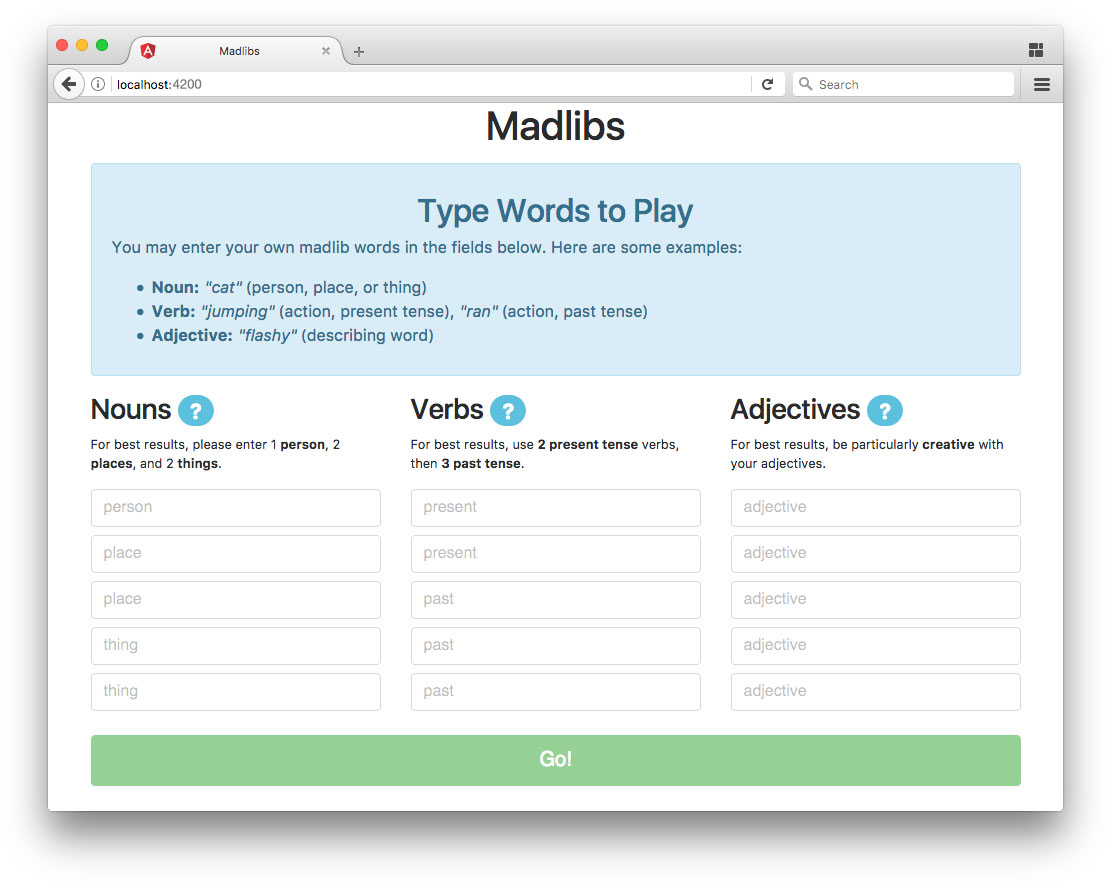
Not all browsers support speech recognition. If we view our app right now in a browser that doesn't, we'll see nothing but a header. An app that doesn't work in most browsers isn't useful. Let's make a Keyboard component to use in place of the Listen component so users with unsupported browsers can still create a fun madlib using the Words Form component.
“An app that doesn't work in most browsers isn't useful: implement fallbacks for browsers that don't support features.”
Tweet This
Create another new component with the Angular CLI like so:
$ ng g component keyboard
Keyboard Component Class
Open the keyboard.component.ts file and implement the following code:
// src/app/keyboard/keyboard.component.ts
import { Component } from '@angular/core';
import { Words } from './../words';

@Component({
  selector: 'app-keyboard',
  templateUrl: './keyboard.component.html',
  styleUrls: ['./keyboard.component.scss']
})
export class KeyboardComponent {
  nouns: string[] = new Words().array;
  verbs: string[] = new Words().array;
  adjs: string[] = new Words().array;

  constructor() { }

}
This is a very simple component that primarily consists of a template. It is, however, still going to be a parent component (with Words Form as a child), so we'll import the Words class and set up the nouns, verbs, and adjs arrays like we did in the Listen component. We can then pass these as inputs to the Words Form component.
Keyboard Component Template
Let's open the keyboard.component.html file and add our template:
<!-- src/app/keyboard/keyboard.component.html -->
<div class="alert alert-info mt-3">
  <h2 class="text-center mt-3">Type Words to Play</h2>
  <p>You may enter your own madlib words in the fields below. Here are some examples:</p>
  <ul>
    <li><strong>Noun:</strong> <em>"cat"</em> (person, place, or thing)</li>
    <li><strong>Verb:</strong> <em>"jumping"</em> (action, present tense), <em>"ran"</em> (action, past tense)</li>
    <li><strong>Adjective:</strong> <em>"flashy"</em> (describing word)</li>
  </ul>
</div>
<app-words-form
  [nouns]="nouns"
  [verbs]="verbs"
  [adjs]="adjs"></app-words-form>
This simply adds some instructions similar to the Listen component and displays the WordsForm component.
Add Keyboard Component to App Component
Now let's display the Keyboard component instead of the Listen component if speech is not supported. Open the app.component.html template and make the following addition:
<!-- src/app/app.component.html -->
<div class="container">
  <h1 class="text-center">Madlibs</h1>
  <app-listen *ngIf="speech.speechSupported"></app-listen>
  <app-keyboard *ngIf="!speech.speechSupported"></app-keyboard>
</div>
Now if speech recognition is not supported, the user will see the Keyboard component and can still enter words manually with the form. The app should look like this in a browser that doesn't support speech recognition:
Generate Words With Madlibs API
Now that we can speak and type words to generate a madlib, there's one more method we want to offer to users to create their custom story: automatic word generation using a prebuilt Node API.
Set Up Madlibs API
Clone the madlibs-api locally to a folder of your choosing. Then open a command prompt or terminal window in that folder and run the following commands:
$ npm install
$ node server
This will install the required dependencies and then run the API on localhost:8084. You should be able to visit the API in the browser at http://localhost:8084/api to confirm it's working properly. You can then access its endpoints. Check out the repository's README to see all the available endpoints. You can try them out in the browser to see what they return (for example, http://localhost:8084/api/noun). Take a minute to become familiar with the API and its endpoints and give some thought to how we might leverage the API in our application to generate arrays of the different parts of speech.
Intended Functionality to Generate Words With API
Now that you have the madlibs API set up and running and you've familiarized yourself with how it works, let's consider what our intended functionality is.
Recall the specifics of what we're expecting the user to respond with based on our word arrays and the Words Form placeholders. In order to generate the appropriate words automatically, we'll need the following from the API:
- An array containing 5 nouns: 1 person, 2 places, and 2 things
- An array containing 5 verbs: 2 present tense and 3 past tense
- An array containing 5 adjectives
The API, however, does not return arrays, it returns single text strings. Also, we have different endpoints for people, places, things, present and past tenses, etc. How can we reconcile the API functionality with our requirements?
Luckily, we have RxJS available to us! Let's explore how we can use this powerful library to get exactly what we want from the API.
Add HTTP to App Module
The first thing we need to do is add Angular HTTP to our App module. Open the app.module.ts file and add:
// src/app/app.module.ts
...
import { HttpClientModule } from '@angular/common/http';
...

@NgModule({
  ...,
  imports: [
    ...,
    HttpClientModule
  ],
  ...
We'll import the HttpClientModule and add it to the NgModule's imports array, making the module available to our application.
Add HTTP Requests to Madlibs Service
Now open the madlibs.service.ts file. We'll add our HTTP requests to this file.
// src/app/madlibs.service.ts
...
import { HttpClient, HttpErrorResponse } from '@angular/common/http';
import { Observable } from 'rxjs/Observable';
import 'rxjs/add/operator/map';
import 'rxjs/add/operator/catch';
import 'rxjs/add/observable/zip';
import 'rxjs/add/observable/forkJoin';

@Injectable()
export class MadlibsService {
  ...
  private _API = 'http://localhost:8084/api/';

  constructor(private http: HttpClient) { }

  ...

  private _stringSuccessHandler(res: string): string {
    // Remove all double quotes from response
    // This is a product of receiving text response
    return res.replace(/"/g, '');
  }

  private _errorHandler(err: HttpErrorResponse | any) {
    const errorMsg = err.message || 'Error: Unable to complete request.';
    return Observable.throw(errorMsg);
  }

  getNouns$() {
    const nounPerson$ = this.http
      .get(`${this._API}noun/person`, {responseType: 'text'})
      .map(this._stringSuccessHandler)
      .catch(this._errorHandler);

    const nounPlace$ = this.http
      .get(`${this._API}noun/place`, {responseType: 'text'})
      .map(this._stringSuccessHandler)
      .catch(this._errorHandler);

    const nounThing$ = this.http
      .get(`${this._API}noun/thing`, {responseType: 'text'})
      .map(this._stringSuccessHandler)
      .catch(this._errorHandler);

    return Observable.forkJoin([nounPerson$, nounPlace$, nounPlace$, nounThing$, nounThing$]);
  }

  getVerbs$() {
    const verbPresent$ = this.http
      .get(`${this._API}verb/present`, {responseType: 'text'})
      .map(this._stringSuccessHandler)
      .catch(this._errorHandler);

    const verbPast$ = this.http
      .get(`${this._API}verb/past`, {responseType: 'text'})
      .map(this._stringSuccessHandler)
      .catch(this._errorHandler);

    return Observable.forkJoin([verbPresent$, verbPresent$, verbPast$, verbPast$, verbPast$]);
  }

  getAdjs$() {
    const adj$ = this.http
      .get(`${this._API}adjective`, {responseType: 'text'})
      .map(this._stringSuccessHandler)
      .catch(this._errorHandler);

    return Observable.forkJoin([adj$, adj$, adj$, adj$, adj$]);
  }

  getWords$() {
    return Observable
      .zip(this.getNouns$(), this.getVerbs$(), this.getAdjs$())
      .map((res) => {
        return {
          nouns: res[0],
          verbs: res[1],
          adjs: res[2]
        };
      });
  }

}
Let's go over these additions step by step. First we'll add some new imports: HttpClient and HttpErrorResponse from Angular common, Observable from RxJS, and the map and catch RxJS operators.
Next we'll add some new properties: _API to store the API URI and a words object to store the words retrieved from the API.
We'll make HttpClient available to our component in the constructor.
Next we have our private _stringSuccessHandler(). This method takes a text HTTP response and strips the double quotes (") that are automatically added to it, leaving just the word. We'll use this success handler with all of our API requests that return a text response.
The private _errorHandler() method cancels the observable with an error message in case something went wrong with the request.
Combining Observables With ForkJoin
Next, let's take a closer look at the getNouns$() method (and the two methods that follow it, getVerbs$() and getAdjs$()).
  getNouns$() {
    const nounPerson$ = this.http
      .get(`${this._API}noun/person`, {responseType: 'text'})
      .map(this._stringSuccessHandler)
      .catch(this._errorHandler);

    const nounPlace$ = this.http
      .get(`${this._API}noun/place`, {responseType: 'text'})
      .map(this._stringSuccessHandler)
      .catch(this._errorHandler);

    const nounThing$ = this.http
      .get(`${this._API}noun/thing`, {responseType: 'text'})
      .map(this._stringSuccessHandler)
      .catch(this._errorHandler);

    return Observable.forkJoin([nounPerson$, nounPlace$, nounPlace$, nounThing$, nounThing$]);
  }
Notice that there are three HTTP requests declared as constants in the getNouns$() function: one each for retrieving a person, place, and thing. Each GET request expects a responseType: 'text'. Each text request is then mapped with our _stringSuccessHandler and has a catch method with our _errorHandler in case something went wrong. Recall that our app expects an array of nouns that includes one person, two places, and two things. Now that we have nounPerson$, nounPlace$, and nounThing$ observables set up, we can use the RxJS combination operator forkJoin to execute all observables at the same time and then emit the last value from each one once they are all complete.
We'll return Observable.forkJoin(), passing in the array of observables we'd like to use in the expected order. If all requests are successful, subscribing to this observable will produce an array that looks like this:
[person, place, place, thing, thing]
We'll use forkJoin again with our getVerbs$() method to return a stream that emits an array of verbs in the following tenses:
[present, present, past, past, past]
To get adjectives, we'll forkJoin an adjective request five times, since all adjectives are the same, but each one requires its own request. This will result in:
[adjective, adjective, adjective, adjective, adjective]
Combining Observables With Zip
Now we have observables for each of the three parts of speech our app expects: getNouns$(), getVerbs$(), and getAdjs$(). However, these are still separate streams. Ultimately, we don't want to subscribe to three different observables and wait for each to emit independently.
Thanks again to RxJS, we can combine all three streams into a single observable: getWords$(). The zip combination operator allows us to pass multiple observables as arguments. After all the observables have emitted, the zipped observable emits the results in an array.
  getWords$() {
    return Observable
      .zip(this.getNouns$(), this.getVerbs$(), this.getAdjs$())
      .map((res) => {
        return {
          nouns: res[0],
          verbs: res[1],
          adjs: res[2]
        };
      });
  }
Once we receive the resulting array that includes the zipped arrays from the nouns, verbs, and adjectives observables, we'll map the response to an easy-to-read object.
We can now subscribe to the getWords$() observable in components and receive an object that looks like this:
{
  nouns: [person, place, place, thing, thing],
  verbs: [present, present, past, past, past],
  adjs: [adjective, adjective, adjective, adjective, adjective]
}
This is exactly what we want from the API when generating words, and it's easy to accomplish, thanks to RxJS.
“RxJS operators like forkJoin and zip make it simple to combine HTTP request observables.”
Tweet This
Generate Words Component
Now that we've implemented the necessary methods to get nouns, verbs, and adjectives from the API, it's time to put them to use in our application.
Let's create a Generate Words component. This component will use the Madlibs service to set up a subscription to fetch the words from the API when the user clicks a button. It will then emit an event containing the API data so that other components (such as the Words Form component) can use that data.
Generate the new component:
$ ng g component generate-words
Generate Words Component Class
Open the generate-words.component.ts file and add the following code:
// src/app/generate-words/generate-words.component.ts
import { Component, Output, OnDestroy, EventEmitter } from '@angular/core';
import { MadlibsService } from './../madlibs.service';
import { Subscription } from 'rxjs/Subscription';

@Component({
  selector: 'app-generate-words',
  templateUrl: './generate-words.component.html',
  styleUrls: ['./generate-words.component.scss']
})
export class GenerateWordsComponent implements OnDestroy {
  @Output() fetchedWords = new EventEmitter;
  wordsSub: Subscription;
  loading = false;
  generated = false;
  error = false;

  constructor(private ml: MadlibsService) { }

  fetchWords() {
    this.loading = true;
    this.generated = false;
    this.error = false;

    this.wordsSub = this.ml.getWords$()
      .subscribe(
        (res) => {
          this.loading = false;
          this.generated = true;
          this.error = false;
          this.fetchedWords.emit(res);
        },
        (err) => {
          this.loading = false;
          this.generated = false;
          this.error = true;
          console.warn(err);
        }
      );
  }

  ngOnDestroy() {
    if (this.wordsSub) {
      this.wordsSub.unsubscribe();
    }
  }
}
First we'll add some imports. The OnDestroy lifecycle hook is necessary to clean up subscriptions when the component is destroyed. Output and EventEmitter are needed to emit an event from this component to a parent. Then we'll import our MadlibsService to get API data, as well as Subscription from RxJS.
We'll implement the OnDestroy lifecycle hook when we export our GenerateWordsComponent class.
We'll set up an @Output() fetchedWords = new EventEmitter property for a parent component to listen for a child event. We also need a wordsSub subscription to the getWords$() observable, and three boolean properties so the UI can reflect the appropriate states of the app: loading, generated, and error.
We'll make MadlibsService available to the component in the constructor function.
The fetchWords() method will be executed when the user clicks a button to generate words via the API. When run, this function should indicate that the app is loading, words have not yet been generated, and there are currently no errors.
The wordsSub subscription should be set up as well. This subscribes to the getWords$() observable from the Madlibs service. On successful response, it updates the app states and emits the fetchedWords event with a payload containing the API response. If you recall from our code above, this is an object containing the noun, verb, and adjective arrays. If an error occurs, the app states reflect this and a warning is raised in the console.
Finally, in the ngOnDestroy() lifecycle function, we'll check to see if the wordsSub exists and unsubscribe() from it if so.
Generate Words Component Template
Now open the generate-words.component.html template:
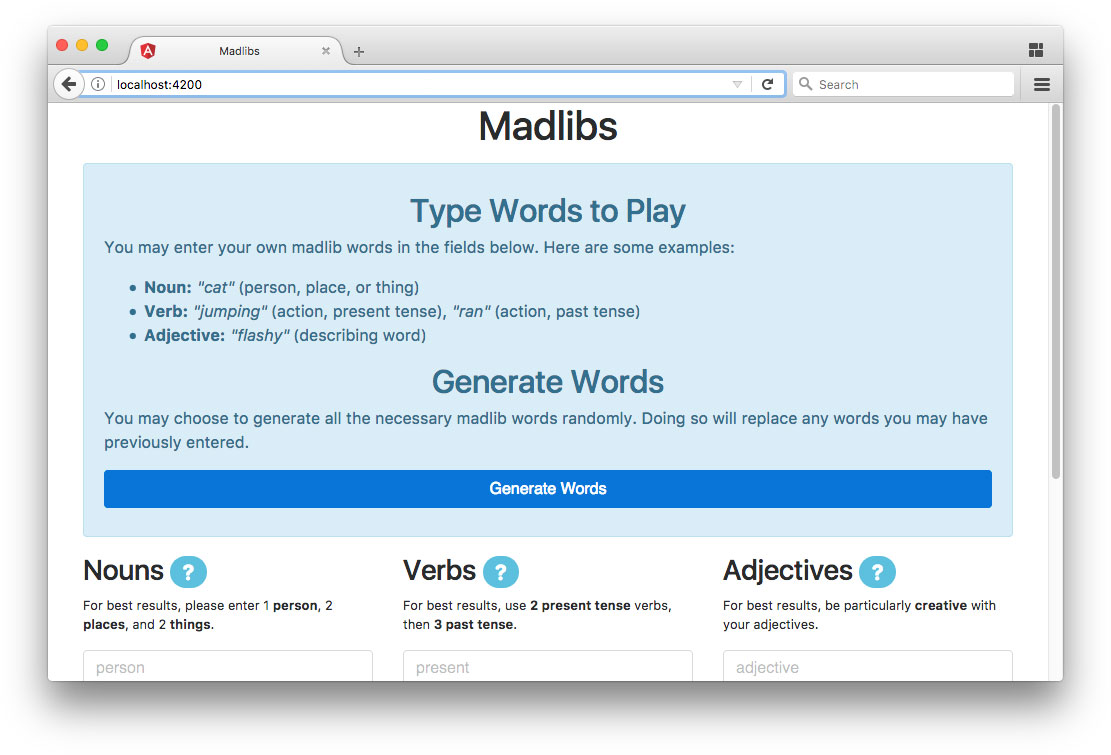
<!-- src/app/generate-words/generate-words.component.html -->
<h2 class="text-center mt-3">Generate Words</h2>
<p>You may choose to generate all the necessary madlib words randomly. Doing so will replace any words you may have previously entered.</p>
<p>
  <button
    class="btn btn-primary btn-block"
    (click)="fetchWords()">
      <ng-template [ngIf]="!loading">Generate Words</ng-template>
      <ng-template [ngIf]="loading">Generating...</ng-template>
  </button>
</p>
<p *ngIf="generated" class="alert alert-success">
  <strong>Success!</strong> Madlib words have been generated. Please scroll down to view or edit your words.
</p>
<p *ngIf="error" class="alert alert-danger">
  <strong>Oops!</strong> An error occurred while trying to automatically generate words. Please try again or enter your own words!
</p>
This is a straightforward template that displays some copy informing the user that they can generate words from the API, but doing so will replace any words they may have already entered using speech recognition or the form.
It shows a button that executes the fetchWords() method when clicked and changes label depending on the loading state.
If data is successfully generated using the API, a "Success!" message is shown. Simultaneously (and behind the scenes), an event is emitted with the API data. If an error occurred, an error message is displayed.
Update Listen and Keyboard Components
We now need to add our Generate Words component to both the Listen and Keyboard Components. We'll also need to add a little bit of functionality to these components so they can listen for the fetchedWords event and react to it by updating their local property data with the words from the API.
Update Listen and Keyboard Component Classes
Open the listen.component.ts and keyboard.component.ts component classes and add the following method to each file:
// src/app/listen/listen.component.ts
// src/app/keyboard/keyboard.component.ts
...
  onFetchedAPIWords(e) {
    this.nouns = e.nouns;
    this.verbs = e.verbs;
    this.adjs = e.adjs;
  }
  ...
This is the handler for the fetchedWords event. It takes the event payload and uses it to define the values of the local nouns, verbs, and adjs properties, thus updating all of these arrays to the data from the API.
Update Listen Component Template
Open the listen.component.html template and at the top, add the <app-generate-words> element right inside the opening <div>:
<!-- src/app/listen/listen.component.html -->
<div class="alert alert-info mt-3">
  <app-generate-words
    (fetchedWords)="onFetchedAPIWords($event)"></app-generate-words>
  ...
This element listens for the (fetchedWords) event and runs the onFetchedAPIWords($event) handler when the event is emitted, sending the $event data as a parameter.
If speech recognition is supported, the app should now look like this in the browser:

Update Keyboard Component Template
Now open the keyboard.component.html template. Below the unordered list in the keyboard instructions, add the Generate Words component like so:
<!-- src/app/keyboard/keyboard.component.html -->
...
  </ul>
  <app-generate-words
    (fetchedWords)="onFetchedAPIWords($event)"></app-generate-words>
</div>
...
Now both the Listen and Keyboard components support word generation with the API. Make sure the API is running locally.
If speech recognition is not supported, the app should now look like this in the browser:
Playing With the API
You (or the user) should now be able to click the "Generate Words" button whether speech recognition is supported or not. The form should populate with words retrieved from the API. If the user clicks the button again, new random words should be fetched and will overwrite any existing words.
In browsers that support speech recognition, the user should be able to delete API-generated words and then use the speech commands to fill them back in. In any browser, the user can edit or replace words manually by typing in the form.
Progress Bar Component
The next component we're going to add is a bit of flair. It's a progress bar that we'll build with RxJS. Although it won't represent the app actually generating the madlib story (because that happens so quickly a progress indicator would be essentially pointless), it does lend a nice visual and helps us explore another feature of RxJS: creating timer observables.
We'll also call the API and fetch a pronoun while the progress bar is running, but again, with a server running on localhost, this happens so quickly the UI progress bar won't represent the API request and response speed.
Note: If you deploy your Madlibs app to a server, a great exercise would be to modify the progress bar so that it does actually represent the API request in some way.
The progress bar will appear after the user clicks the "Go!" button to generate their madlib. When we're finished, it will look like this in the browser:
Let's go over the features of our Progress Bar component:
- Subscribe to the Madlibs service's
submit$subject. - Replace the submit ("Go!") button with a progress bar.
- Have a timer observable.
- Make an API request for a pronoun which should be stored in the Madlibs service so other components can make use of it.
- The timer observable's subscription should increment the UI to show a progress bar filling up.
- Once the progress bar reaches completion, the Madlib service should be notified so the app knows the madlib story is ready.
As you can see, several of these features rely on the Madlibs service, so let's make some updates there before we tackle the Progress Bar component itself.
Add Features to the Madlibs Service
Open the madlibs.service.ts file:
// src/app/madlibs.service.ts
...
export class MadlibsService {
  ...
  madlibReady = false;
  pronoun: any;

  ...

  setMadlibReady(val: boolean) {
    this.madlibReady = val;
  }

  setPronoun(obj) {
    this.pronoun = obj;
  }

  ...

  getPronoun$() {
    return this.http
      .get(`${this._API}pronoun/gendered`)
      .catch(this._errorHandler);
  }

}
First we'll add some new properties: madlibReady to indicate when the timer observable has completed, and the pronoun object acquired from the API.
We'll need a way for components to set the value of madlibReady, so we'll create a setter method called setMadlibReady() that accepts a boolean argument that updates the value of the madlibReady property.
We'll also need a way for components to set the value of pronoun, so we'll create another setter method called setPronoun().
In this fashion, madlibReady and pronoun are data stored in the Madlibs service, but set by other components. This way, they are accessible anywhere in the app.
Finally, we'll add a getPronoun$() HTTP request that returns an observable. This request fetches a pronoun object from our API, which can be accessed via subscription in our Progress Bar component.
Progress Bar Component Class
Now let's generate the new Progress Bar component with the Angular CLI:
$ ng g component progress-bar
Open the progress-bar.component.ts file:
// src/app/progress-bar/progress-bar.component.ts
import { Component, OnInit, OnDestroy } from '@angular/core';
import { Subscription } from 'rxjs/Subscription';
import { Observable } from 'rxjs/Observable';
import 'rxjs/add/observable/timer';
import 'rxjs/add/operator/takeUntil';
import { MadlibsService } from './../madlibs.service';

@Component({
  selector: 'app-progress-bar',
  templateUrl: './progress-bar.component.html',
  styleUrls: ['./progress-bar.component.scss']
})
export class ProgressBarComponent implements OnInit, OnDestroy {
  progress = 0;
  progress$: Observable<number>;
  progressSub: Subscription;
  width: string;
  submitSub: Subscription;
  pronounSub: Subscription;

  constructor(private ml: MadlibsService) { }

  ngOnInit() {
    this._setupProgress();
    this._setupSubmit();
  }

  private _setupProgress() {
    this.progress$ = Observable
      .timer(0, 50)
      .takeUntil(Observable.timer(2850));
  }

  private _getPronoun() {
    this.pronounSub = this.ml.getPronoun$()
      .subscribe(res => this.ml.setPronoun(res));
  }

  private _setupSubmit() {
    this.submitSub = this.ml.submit$
      .subscribe(words => this._startProgress());
  }

  private _startProgress() {
    this._getPronoun();
    this.progressSub = this.progress$
      .subscribe(
        p => {
          this.progress = p * 2;
          this.width = this.progress + '%';
        },
        err => console.warn('Progress error:', err),
        () => this.ml.setMadlibReady(true)
      );
  }

  ngOnDestroy() {
    if (this.progressSub) {
      this.progressSub.unsubscribe();
    }
    if (this.pronounSub) {
      this.pronounSub.unsubscribe();
    }
    this.submitSub.unsubscribe();
  }

}
Let's go over this code step by step.
We'll need to import several things. Let's import OnDestroy so we can clean up subscriptions when the component is destroyed. We'll also need Subscription and Observable from RxJS. We'll use methods from MadlibsService so we'll import that as well.
Next we'll set up some properties. The progress property will be used to track the number (out of 100) that represents the status of the progress bar. The progress$ property has a type annotation indicating that we'll use it as an observable that emits numbers. We'll then subscribe to this observable with progressSub. We'll also create a width string to store a style we can use to set width with CSS in the template for the progress bar. Finally, we need submitSub and pronounSub subscriptions.
We'll make the MadlibsService available to the component in our constructor function.
On initialization of the component (ngOnInit() lifecycle function), we'll _setupProgress() and _setupSubmit().
Create Progress Observable
Let's take a closer look at the private _setupProgress() method:
  private _setupProgress() {
    this.progress$ = Observable
      .timer(0, 50)
      .takeUntil(Observable.timer(2850));
  }
Here we're creating a custom observable. This observable uses the RxJS timer operator. It emits the first value after 0 seconds, and then emits subsequent values every 50 milliseconds.
Note: We want to emit values often to make the animation of our progress bar reasonably smooth in the browser.
The RxJS takeUntil operator discards any items emitted by our timer observable after a second observable (passed as a parameter) emits or terminates. This way, we can end our timer observable once a certain amount of time has elapsed. In this case, we'll run our first timer observable until a second one has run for 2850ms. This way, the progress$ observable runs for long enough to emit values from 0 to 49. We'll work with these values when we subscribe to the progress$ observable.
Get Pronoun and Set Up Submit
Let's review the next two functions.
The private _getPronoun() method sets up the pronounSub subscription. It uses the Madlibs service method getPronoun$(), subscribing to the returned observable. On emission of a value, the Madlibs service method setPronoun() is executed, storing the pronoun in the service for access throughout the application.
The private _setupSubmit() method sets up the submitSub subscription. It subscribes to the Madlibs service's submit$ subject. On emission of a value (e.g., the words form has been submitted), a _startProgress() function is run.
Start Progress Bar
The _startProgress() function is executed when the user submits the form with their desired words for the madlib story. The method looks like this:
  private _startProgress() {
    this._getPronoun();
    this.progressSub = this.progress$
      .subscribe(
        p => {
          this.progress = p * 2;
          this.width = this.progress + '%';
        },
        err => console.warn('Progress error:', err),
        () => this.ml.setMadlibReady(true)
      );
  }
While the progress bar is running, we want to execute _getPronoun() to fetch a pronoun from the API. Then we'll subscribe to our progress$ observable with progressSub. This subscription makes use of the onNext, onError, and onCompleted methods.
When a value is successfully emitted, we'll set our progress property to the value multipled by 2. Recall that the values emitted by progress$ range from 0 to 49. Therefore, the progress property will iterate in such a manner:
0, 2, 4, 6, ... 94, 96, 98
We also want to create a string value with a % symbol after it to style the width of the progress bar, so we'll set the width property appropriately.
If an error occurs, we'll log it to the console with a warning.
When the observable completes, we'll use the Madlibs service's setMadlibReady() setter method with an argument of true. This will update the service's madlibReady property, which is accessible throughout the app.
Unsubscribe On Destroy
Finally, we have our ngOnDestroy() lifecycle function. We'll check if the progressSub and pronounSub subscriptions exist. If so, we'll unsubscribe from them. They will only exist if the user submitted the words form, thus triggering the progress bar. We'll also unsubscribe from the submitSub subscription.
Progress Bar Component Template
For markup and styling, we'll use the Bootstrap v4 Progress Bar, so before we go much further, take a moment to familiarize yourself with its markup and customization.
Then open the progress-bar.component.html template and add the following markup:
<!-- src/app/progress-bar/progress-bar.component.html -->
<div class="progress">
  <div
    class="progress-bar progress-bar-striped progress-bar-animated bg-success"
    role="progressbar"
    [style.width]="width"
    [attr.aria-valuenow]="progress"
    aria-valuemin="0"
    aria-valuemax="100">
  </div>
</div>
Most of the markup is standard Bootstrap CSS. However, we have a [style.width] attribute which is data bound to our component's width property: a string that consists of a number and percentage symbol. As this member is updated by our progressSub subscription, the width of the progress bar UI element will change dynamically. The attr.aria-valuenow attribute will also be updated with the progress property.
Note: In Angular, the declarative data-bound attributes are not HTML attributes. Instead, they're properties of the DOM node. You can read more about this shift in the mental model in the documentation here.
Progress Bar Component Styles
Now we want to make sure our progress bar is the same height as our "Go!" button so it can fill the same space.
Open the progress-bar.component.scss file and add:
/* src/app/progress-bar/progress-bar.component.scss */
.progress-bar {
  font-size: 14px;
  height: 51px;
  line-height: 51px;
}
Add Progress Bar to Words Form Component
Now we have our Progress Bar component. It's time to display it in the Words Form component at the right time.
Open the words-form.component.html template:
<!-- src/app/words-form/words-form.component.html -->
...
  <div class="row">
    <div class="col mt-3 mb-3">
      <button
        *ngIf="!generating"
        class="btn btn-block btn-lg btn-success"
        [disabled]="!wordsForm.form.valid">Go!</button>
      <app-progress-bar [hidden]="!generating"></app-progress-bar>
    </div>
  </div>
...
First we'll add *ngIf="!generating" to the "Go!" button. This will remove the button after clicking, allowing us to show the progress bar in its place.
Next we'll add our <app-progress-bar> element below the "Go!" button near the bottom of our template. We'll use the [hidden] binding to hide the Progress Bar component except when generating is true.
Why aren't we using NgIf for the progress bar? NgIf doesn't load the component into the template at all until its expression is truthy. However, using [hidden] means the component initializes (but remains hidden) when the parent template loads. This will ensure the Progress Bar component is ready to go with the appropriate subscriptions already set up as soon as we might need to display it. Because it subscribes to the submit$ subject, if we used NgIf and therefore didn't load the component until after the user clicked the "Go!" button, the progress bar wouldn't initialize properly.
Madlib Component
Our final component is the Madlib component. This component utilizes the user's words to create a silly, customized story.
Create the component with the Angular CLI like so:
$ ng g component madlib
We can now use the data we've stored in the Madlibs service to generate our story.
Madlib Component Class
Open the madlib.component.ts file:
// src/app/madlib/madlib.component.ts
import { Component } from '@angular/core';
import { MadlibsService } from './../madlibs.service';

@Component({
  selector: 'app-madlib',
  templateUrl: './madlib.component.html',
  styleUrls: ['./madlib.component.scss']
})
export class MadlibComponent {
  constructor(public ml: MadlibsService) { }

  aOrAn(word: string, beginSentence: boolean) {
    const startsWithVowel = ['a', 'e', 'i', 'o', 'u'].indexOf(word.charAt(0).toLowerCase()) !== -1;

    if (startsWithVowel) {
      return beginSentence ? 'An' : 'an';
    } else {
      return beginSentence ? 'A' : 'a';
    }
  }

}
This is a simple component. Most of the meat and potatoes will be in the template, which displays the actual story. We need to import the MadlibsService to gain access to the stored data. We'll make this available to our template publicly in the constructor function.
Then we need a simple aOrAn() method that returns different capitalizations of "a" or "an" depending on the word it precedes and whether or not it's at the beginning of a sentence. If the word argument starts with a vowel, we'll return "an". If not, we'll return "a". We'll also implement logic for sentence capitalization.
Madlib Component Template
Now it's time to display the user's completed madlib. Open the madlib.component.html template file and add:
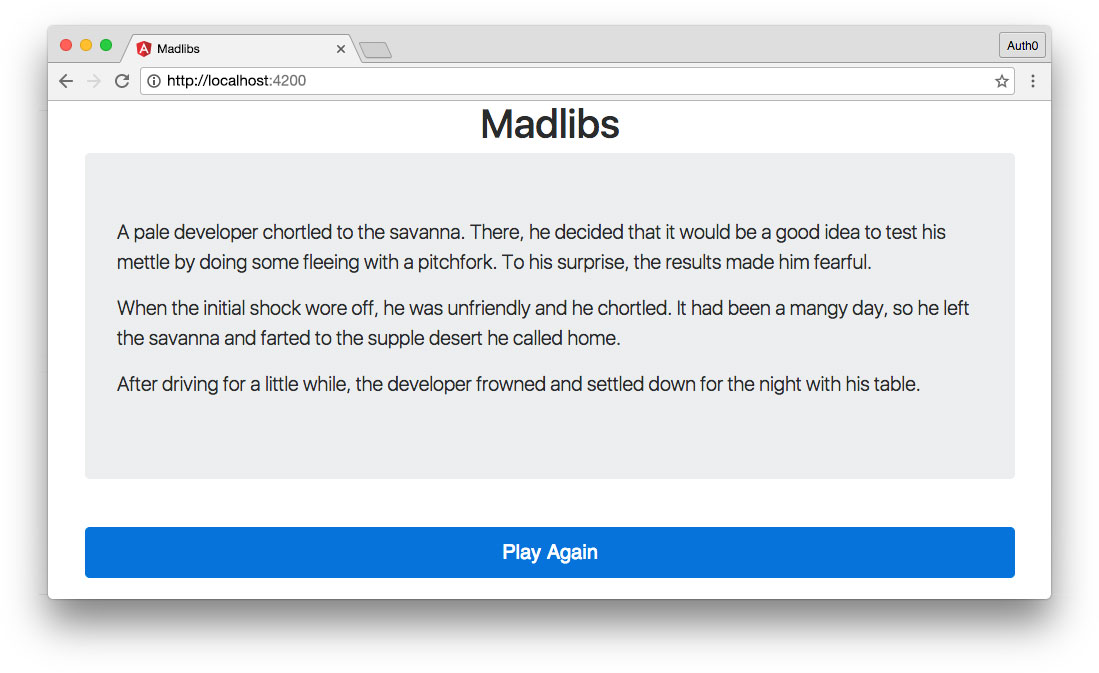
<!-- src/app/madlib/madlib.component.html -->
<div class="row">
  <div class="col">
    <div class="jumbotron lead">
      <p>{{aOrAn(ml.words.adjs[0], true)}} {{ml.words.adjs[0]}} {{ml.words.nouns[0]}} {{ml.words.verbs[2]}} to the {{ml.words.nouns[1]}}. There, {{ml.pronoun.normal}} decided that it would be a good idea to test {{ml.pronoun.possessive}} mettle by doing some {{ml.words.verbs[0]}} with {{aOrAn(ml.words.nouns[3], false)}} {{ml.words.nouns[3]}}. To {{ml.pronoun.possessive}} surprise, the results made {{ml.pronoun.third}} {{ml.words.adjs[1]}}.</p>
      <p>When the initial shock wore off, {{ml.pronoun.normal}} was {{ml.words.adjs[2]}} and {{ml.pronoun.normal}} {{ml.words.verbs[2]}}. It had been {{aOrAn(ml.words.adjs[3], false)}} {{ml.words.adjs[3]}} day, so {{ml.pronoun.normal}} left the {{ml.words.nouns[1]}} and {{ml.words.verbs[3]}} to the {{ml.words.adjs[4]}} {{ml.words.nouns[2]}} {{ml.pronoun.normal}} called home.</p>
      <p>After {{ml.words.verbs[1]}} for a little while, the {{ml.words.nouns[0]}} {{ml.words.verbs[4]}} and settled down for the night with {{ml.pronoun.possessive}} {{ml.words.nouns[4]}}.</p>
    </div>
  </div>
</div>
<div class="row">
  <div class="col mt-3 mb-3">
    <button
      class="btn btn-block btn-lg btn-primary"
      (click)="ml.setMadlibReady(false)">Play Again</button>
  </div>
</div>
This template displays the story text using the data stored in our Madlibs service, including the words and pronoun objects.
At the bottom, we'll display a "Play Again" button that executes the setMadlibReady() setter, setting madlibReady to false. This will hide the Madlib component and show the appropriate Listen or Keyboard component again so the user can enter new words to generate another variation of the story.
Add Madlib Component to App Component
Now we need to add our Madlib component to our App component and conditionally hide it when we're showing the word entry components.
First we'll update the app.component.ts class:
// src/app/app.component.ts
...
import { MadlibsService } from './madlibs.service';

export class AppComponent {
  constructor(
    public speech: SpeechService,
    public ml: MadlibsService) { }
}
We need to import the MadlibsService and make it available via the constructor so we can use its properties in our template.
Now open the app.component.html template and make the following updates:
<!-- src/app/app.component.html -->
<div class="container">
  <h1 class="text-center">Madlibs</h1>
  <ng-template [ngIf]="!ml.madlibReady || !ml.pronoun">
    <app-listen *ngIf="speech.speechSupported"></app-listen>
    <app-keyboard *ngIf="!speech.speechSupported"></app-keyboard>
  </ng-template>
  <app-madlib *ngIf="ml.madlibReady && ml.pronoun"></app-madlib>
</div>
We'll wrap the Listen and Keyboard components in an <ng-template> with an [ngIf] directive and an expression that is true when the Madlibs service's properties madlibReady or pronoun are falsey. Either of these would indicate that the madlib story is not ready.
We'll then add the <app-madlib> element and display it if both madlibReady and pronoun are truthy. This ensures we have all the data necessary to display a complete madlib story.
Try out your madlib! The Madlib component should look something like this in the browser:
Conclusion
We covered a lot while building a fun little app that generates madlibs. We were able to experience a rapidly-approaching future for web interactivity with the Web Speech API, and we learned about RxJS observables and component communication in Angular. Finally, we learned how to authenticate an Angular app and Node API with Auth0, which you can integrate into your Madlibs app if you wish as a little bit of homework.
Hopefully you now have a better understanding of Angular, speech recognition, and RxJS and are prepared to build your own more complex apps with these technologies!
About the author

Kim Maida
Group Manager, Developer Content