The AI wave is undeniably upon us, reshaping how we think about application development, deployment, and user interaction. We're no longer just building applications; we're crafting intelligent experiences. To bring this intelligence closer to your users for lightning-fast responses and truly global scale, Cloudflare Agents are stepping into the spotlight. They offer a brilliant way to deploy AI logic directly onto Cloudflare's massive global network, transforming how you can leverage Workers AI.
But as these powerful agents spring up at the edge, handling potentially sensitive operations or data, a critical question emerges: How do you secure them? How do you ensure that only authorized users, services, or other functions can interact with your sophisticated AI agents, without compromising that speed and agility?
That's where we come in. In this article, we're going to dive deep into how you can supercharge your Cloudflare Agents with robust, flexible, and developer-friendly authentication and authorization using Auth0. Get ready to build AI that's not just smart and fast, but also secure and trustworthy.
What are Cloudflare Agents?
Cloudflare Agents enable you to run sophisticated AI workloads directly on Cloudflare's global edge network using Cloudflare Workers and Workers AI. They move beyond traditional generative AI, enabling you to build agentic AI systems—applications that integrate autonomy, goal-directed reasoning, and adaptive decision-making.
This means Cloudflare Agents aren't just about passively responding to prompts. Instead, they allow you to create AI that actively:
- Can capture user input from multiple sources such as emails, websockets, pages, and voice calls.
- Plan, reason, and action or generate content using LLM models running directly on Cloudflare or using an AI Gateway to connect to state-of-the-art models from popular providers.
- Execute the required steps thanks to an execution engine that combines state and compute to handle advanced and complex workflows.
- Take real-world action by giving your agent access to tools to complete the given tasks. These tools can extend the agents' functionality by invoking APIs, manipulating data, and integrating with external systems and databases.
The authentication conundrum
So, Cloudflare Agents are incredibly powerful. They can ingest data from various sources, reason with advanced LLM capabilities, execute complex workflows, and even interact with external systems to take real-world action. This is all great for building next-generation AI applications! However, with great power comes great responsibility. Thus, as developers, we need to address other significant challenges, including security, authentication, and authorization.
Therefore, when building these agents, we need to ask ourselves:
- Who (or what) is talking to my agent? With agents potentially triggered from multiple sources, how do you reliably verify the identity of the requester? Is this a legitimate end-user? Another machine? Or is it a malicious attempt to impersonate someone?
- Are they allowed to do that? Once you establish the requester's identity, the next crucial step is determining what they are allowed to do. Should the user have access to all the tools?
- Does the task require confirmation? Some tasks performed by the agent may be critical steps, such as executing transactions or confirming holiday destinations, etc. Should any tool require a human-in-the-loop interaction, such as approval step before execution?
- Does the user have access to the information shared by the AI? When the AI processes documents from other sources to generate responses, are we leaking any unauthorized information to the user? How can we add robust authorization controls to guarantee that users only receive information according to their access level?
Adding authentication to your Cloudflare Agent
The challenges outlined above might seem daunting, but the good news is that you don’t have to solve them from scratch to properly secure your Agent. This is where a robust identity platform like Auth0 comes into play, providing a standardized, secure, scalable, and developer-friendly way to manage authentication and authorization.
At its core, we’ll be implementing token-based authentication. Here’s the high-level flow:
- The client authenticates: The user or service wanting to interact with your Cloudflare Agent first authenticates with Auth0. This could be through Universal Login for a human user or machine-to-machine (M2M) flow for an automated service. The client application can be hosted using Cloudflare, but it can also be a totally separate application, hosted using another service provider, or running locally on a computer or server.
- Auth0 issues a JWT token: When the user successfully authenticates, Auth0 issues a JWT token that contains claims (information) about the authenticated entity, and is verifiable by a digital signature. The JWT is securely stored in the client application using one of the Auth0 SDKs.
- The client sends the JWT to the agent on each request: When the client needs to interact with the Agent, it sends an HTTP request or WebSocket connection request, passing the JWT token, for example, using the
AuthenticationHTTP header. - The Cloudflare Agent verifies the JWT: This part is crucial. When the agent receives a request, it must verify that a valid JWT is present and cryptographically verify its signature against Auth0's public keys.
By implementing this pattern, your Cloudflare Agent can confidently identify who is making a request and then make informed decisions about whether to process it.
These four critical steps must be preformed properly, and this is where Auth0 shines by providing you with SDKs that help you cover each of these steps with ease.
In the next section, we’ll build a chatbot application that uses Auth0 authentication.
Getting started with Auth0 for Cloudflare Agents
Time for us to get hands-on by building a simple chat application that uses tool calling to fetch the time in different cities and allows the user to ask for weather information.
Here’s the Application Demo
Auth0 Cloudflare Agent starter kit
The easiest way to get you started is by using the Auth0 starter kit for Cloudflare Agents. You can clone the starter kit from GitHub:
git clone https://github.com/auth0-lab/cloudflare-agents-starter
This example provides you with both the client chat application, built with Hono and deployed to Cloudflare Workers, and the AI Agent, built with Cloudflare Agents.
Before diving into the instructions on how to run and deploy the starter kit, let’s first understand its main components.
The client
The client (src/client) application is a chat application built with Hono and React to provide a simple UI experience. The application uses the package auth0-hono to add authentication to the web application.
The package acts as a middleware for the server application, providing relevant user information and authentication methods.
Here’s a basic sample code to demonstrate the use of the library:
import { Hono } from "hono";
import { auth } from "@auth0/auth0-hono";

const app = new Hono();

// Configure auth middleware with Auth0 options
app.use(
  auth({
    domain: process.env.AUTH0_DOMAIN,
    clientID: process.env.AUTH0_CLIENT_ID,
    clientSecret: process.env.AUTH0_CLIENT_SECRET,
    baseURL: process.env.BASE_URL,
    session: {
      secret: "password_at_least_32_characters_long",
    },
  }),
);

app.get("/", (c) => {
  const user = c.var.auth0Client?.getSession(c)?.user;
  return c.text(`Hello ${user?.name}!`);
});

export default app;
To use this library in your own project run:
npm install @auth0/auth0-hono
The agent
The agent (src/agent) uses Cloudflare Agent SDKs to build a chat assistant agent with access to tools. As discussed, the agent is responsible for validating the incoming request and the JWT access token sent from the client. To do that, you can use the package @auth0/auth0-cloudflare-agent-api.
Here’s a basic sample code to demonstrate how to protect an Agent endpoint using the library:
import { AIChatAgent } from "agents/ai-chat-agent";
import { AuthAgent, OwnedAgent } from "@auth0/auth0-cloudflare-agents-api";

const SuperAgent = OwnedAgent(AuthAgent(AIChatAgent<Env>));

/**
 * Chat Agent implementation that handles real-time AI chat interactions
 */
export class Chat extends SuperAgent {
  ...
}
To use this library in your own project run:
npm install @auth0/auth0-cloudflare-agent-api
Prerequisites for running the Starter Kit
To run the starter kit, you’ll need:
- A Cloudflare account with Workers and Workers AI enabled.
- An OpenAI API key.
- An Auth0 account, if you don’t have one, you can sign up now for free.
Configure your Auth0 tenant
- Create an Auth0 API and save the API identifier for later.
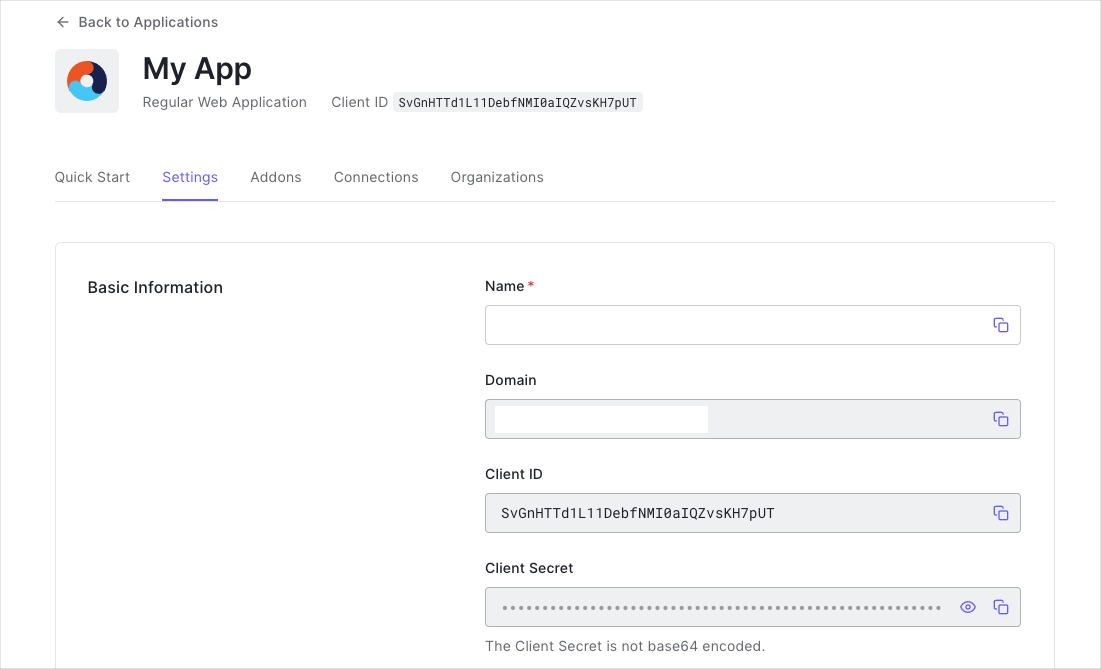
- Create an Auth0 application of type “Regular Web Application”.
- Configure the Auth0 Application with the following settings:
- Allowed Callback URLs:
http://localhost:3000/callback(for development) and your production URL - Allowed Logout URLs:
http://localhost:3000(for development) and your production URL
- Allowed Callback URLs:
- Note your Domain, Client ID, and Client Secret for later use.
Running the starter kit
To run the starter kit locally, ensure you have already cloned the repository. If not, then run:
git clone https://github.com/auth0-lab/cloudflare-agents-starter.git
cd cloudflare-agents-starter
Next, install all dependencies using NPM or your favorite package manager.
npm install
Before you can run the demo, you’ll need to configure your environment variables. Create a .dev.vars file at the root of the project with the following information:
# OpenAI API key
OPENAI_API_KEY=sk-your-openai-api-key

SESSION_STORE=cloudflare-kv
SESSION_STORE_NAMESPACE=Session

#auth0
AUTH0_DOMAIN="YOUR-ACCOUNT.us.auth0.com"
AUTH0_CLIENT_ID="YOUR CLIENT ID"
AUTH0_CLIENT_SECRET="YOUR CLIENT SECRET"
AUTH0_SESSION_ENCRYPTION_KEY="RANDOM 32 CHARS KEY"
AUTH0_AUDIENCE="YOUR AUDIENCE"

BASE_URL="http://localhost:3000"
Note: To generate a random key, you can use the following command:
openssl rand -hex 32.
You are now ready to run the project locally with:
npm start
Deploying your Auth0 powered agent to Cloudflare
Running the application locally is great for development and testing, but the real magic happens when you deploy it to Cloudflare's global network. Let's walk through the steps to get your secured agent and client application live.
Deployment prerequisites
Ensure you have the Wrangler CLI installed and updated, then log in to your Cloudflare account using Wrangler:
wrangler login
Deploy the worker
Deploying to Cloudflare is as easy as building and deploying, and the starter kit simplifies those two steps in a single command with:
npm run deploy
Once that’s done, grab the worker’s URL from the response, you’ll need it next.
If you tried to access the website, you might have noticed that things aren’t working yet. This is because we haven’t set the environment variables in Cloudflare, let’s do that next.
Configure secrets in Cloudflare
Your local .dev.vars file is not used in production. You need to set these environment variables as secrets in Cloudflare.
Run the following commands to set the environment variables in Cloudflare.
wrangler secret put OPENAI_API_KEY

wrangler secret put AUTH0_DOMAIN
wrangler secret put AUTH0_CLIENT_ID
wrangler secret put AUTH0_CLIENT_SECRET
wrangler secret put AUTH0_SESSION_ENCRYPTION_KEY
wrangler secret put AUTH0_AUDIENCE

wrangler secret put BASE_URL
Testing your application
Once deployed and configured, visit the client application using the worker’s URL and have some fun chatting with your new AI agent.
Conclusion
Cloudflare Agents offer a fantastic way to deploy powerful, agentic AI right to the edge, close to your users. As we've seen, this power demands robust security and that's where Auth0 steps in.
By integrating Auth0, you can easily add strong authentication and authorization to your Cloudflare Agents, ensuring only the right users and services can access them.
This guide, along with the provided starter kit, gives you a clear path to building AI applications that are not just intelligent and fast, but also secure.
But the journey to secure AI doesn’t end here. In this blog post, we didn’t discuss authorizing tool calling or how you can use Auth0 to allow your agents to interact with third parties on behalf of the user.
Auth0 for AI Agents offers a new generation of tools and SDKs to help you build secure AI applications and services. Discover resources on building secure AI applications and services at Auth0 for AI Agents.
Thanks for reading!
About the author

Juan Cruz Martinez
Staff Developer Advocate