Having a new person sign up for your website is an exciting experience. You feel a rush of energy every time someone chooses your service, enters their email and password into a "Log in" form, and clicks "Sign Up." Get that jolt of excitement in real-time by creating an Auth0 Action to send a message to Slack when a new user registers an account.
What You Need
Auth0 Account. If you do not have one, you can sign up for a free Auth0 account.
Application in our Auth0 tenant. Any web-based, mobile, or desktop application will work. If you don't have any applications that use Auth0, you can download one from the Auth0 Quickstarts page.
Slack account. If you belong to a Slack workspace, you already have one. If you don't have a Slack account, don't worry — you can create one after creating a Slack workspace.
Slack workspace. You need access to a Slack workspace where the admins will approve your app, or one where you're an admin. If neither of these apply to you, follow the steps in the next section, where you'll set up a Slack workspace under your administrative control.
Create a Slack Workspace
To approve apps in Slack, you need admin permissions. If you don't have a Slack workspace that you are the admin of, you can create your own free Slack workspace that will give you admin privileges. Go to the Slack Get Started page.
Enter your email address and click Continue, or continue with Apple or Google. Check your email for a confirmation code. Enter your code, then click Create a Workspace. Go through the following pages to name the workspace and a channel. You can skip inviting people for this example. Congrats! Now you have a workspace, and you can create a Slack webhook.
Create a Slack Webhook
To post messages into Slack from outside sources, you need a webhook URL. Webhooks enable apps to "talk" to each other when something new happens. In this post, you'll take the email address the user entered into the Auth0 login box and send it to Slack as a message.
First, you'll need an app in your Slack workspace to send the webhook information to your Slack channel. Go to api.slack.com and click Create an app.
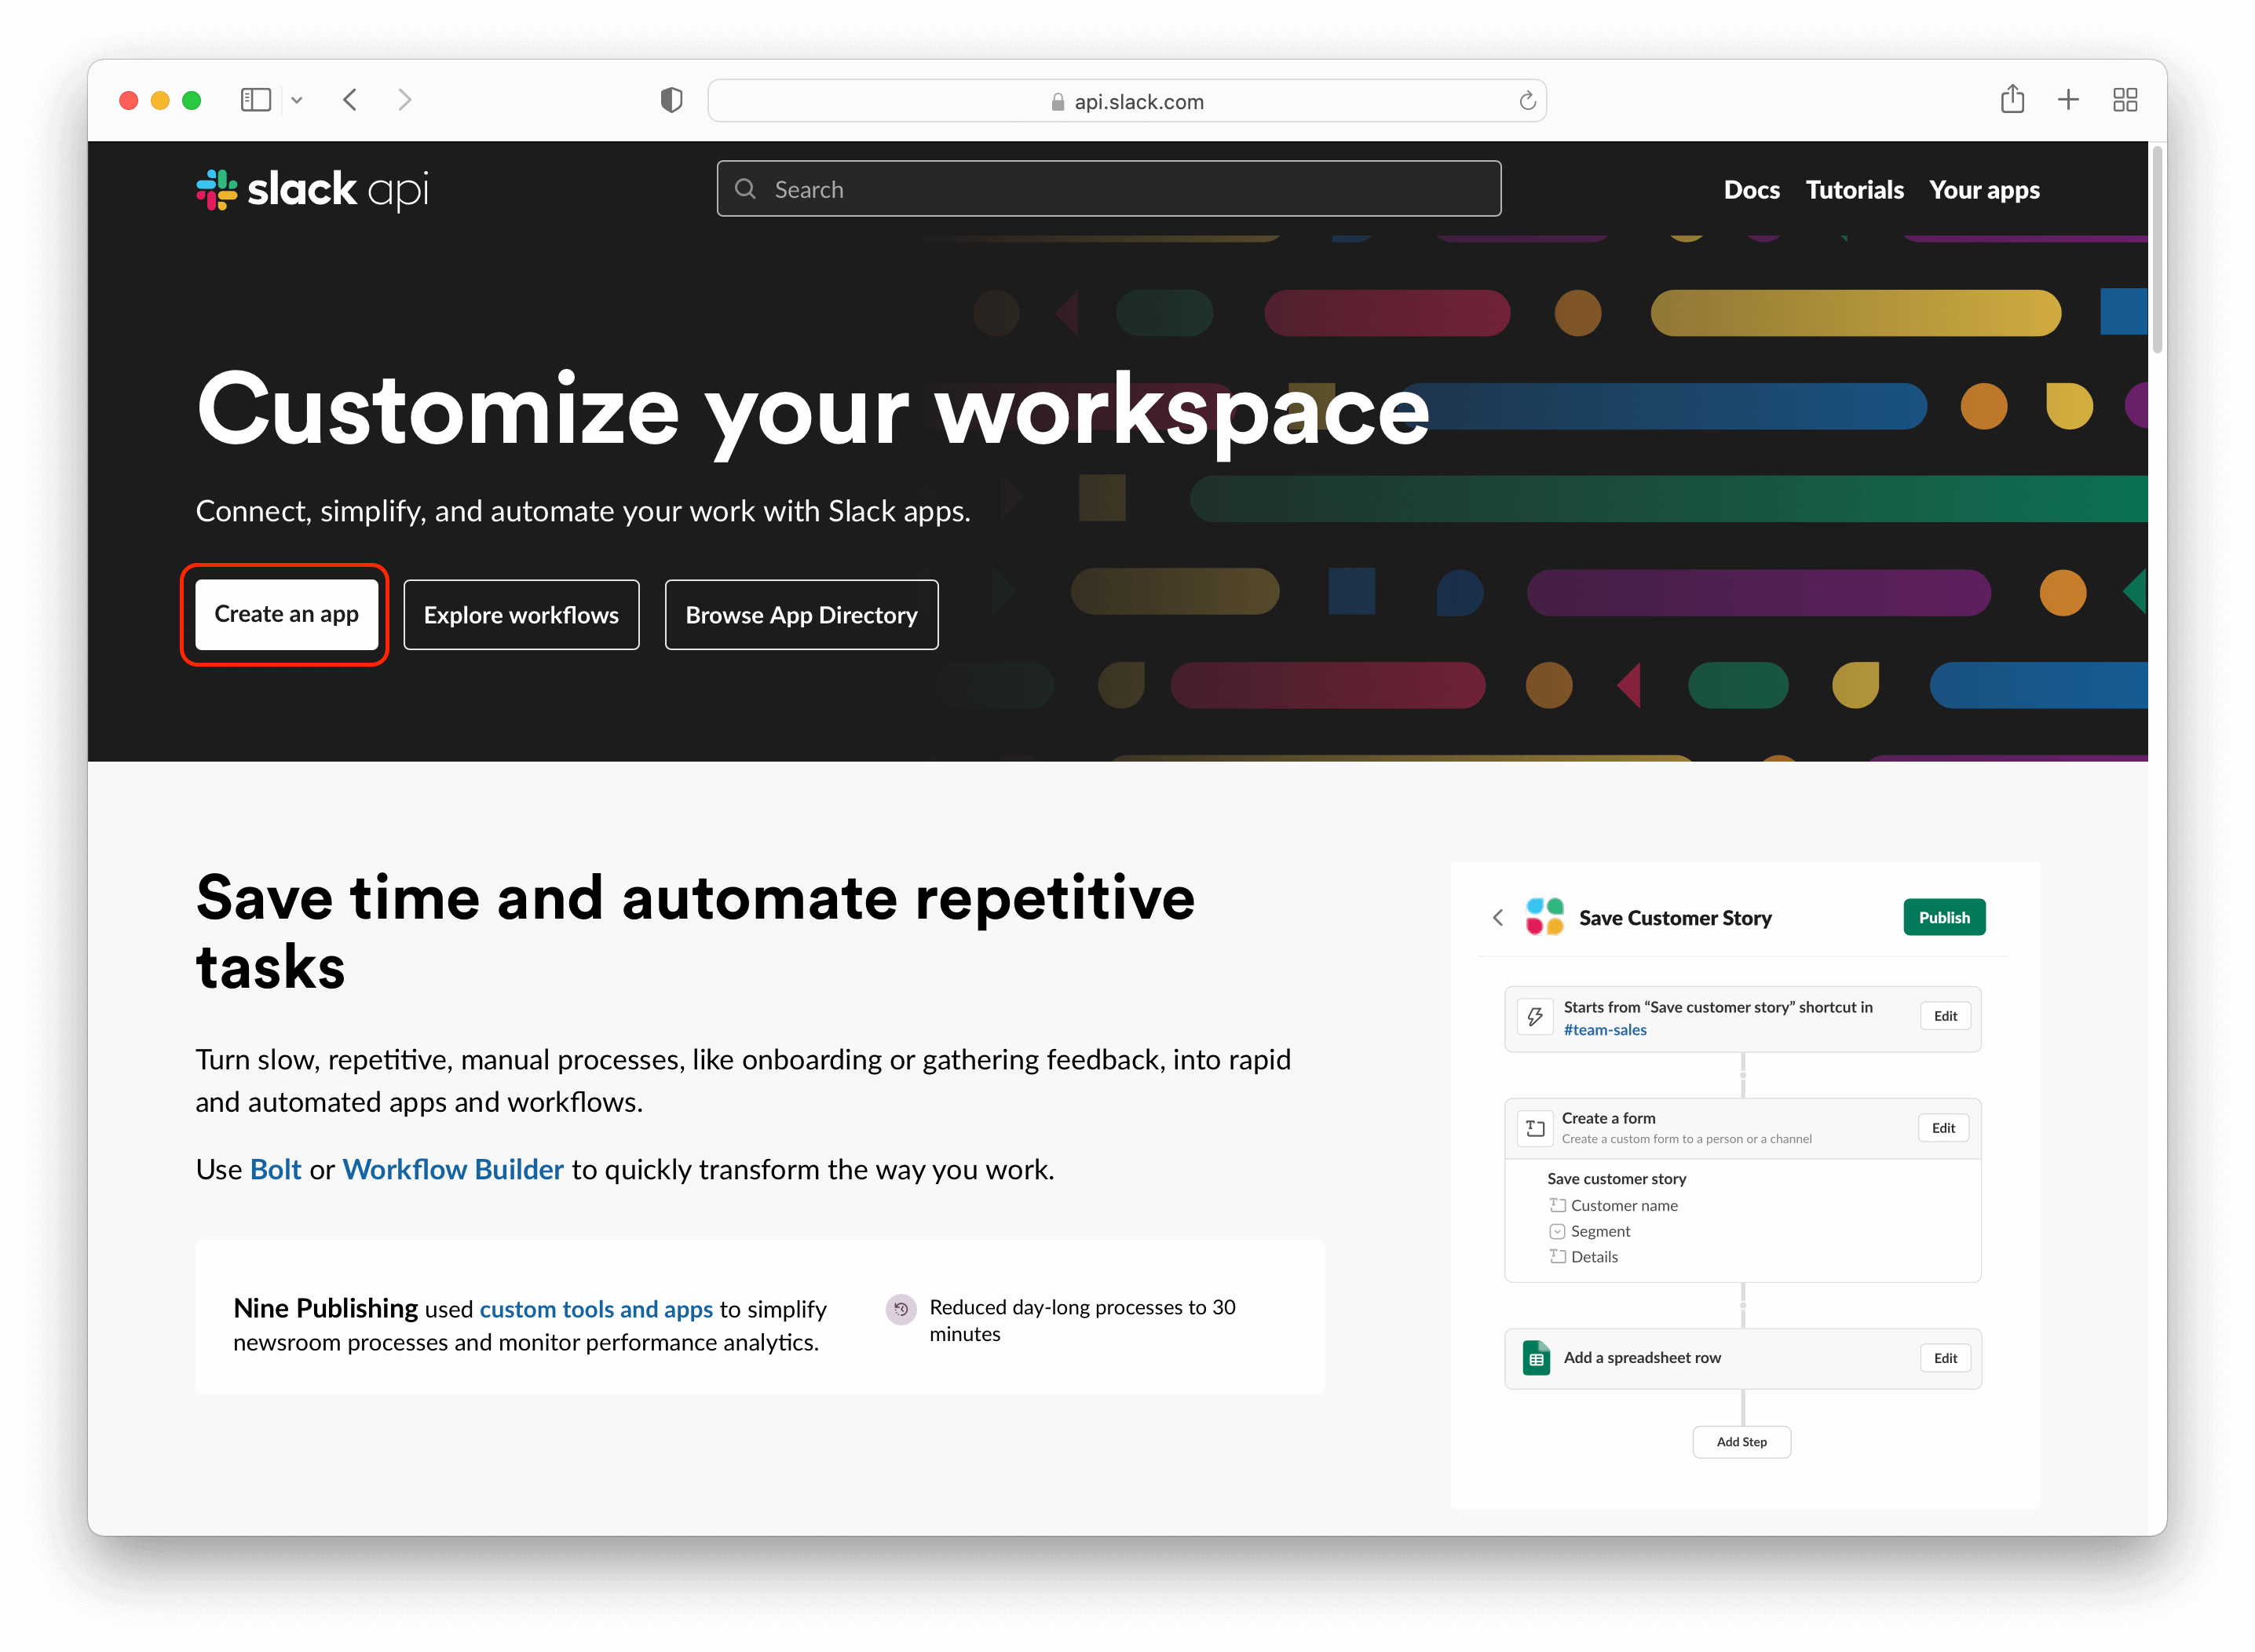
This will bring up the Create an App modal. Click From scratch.
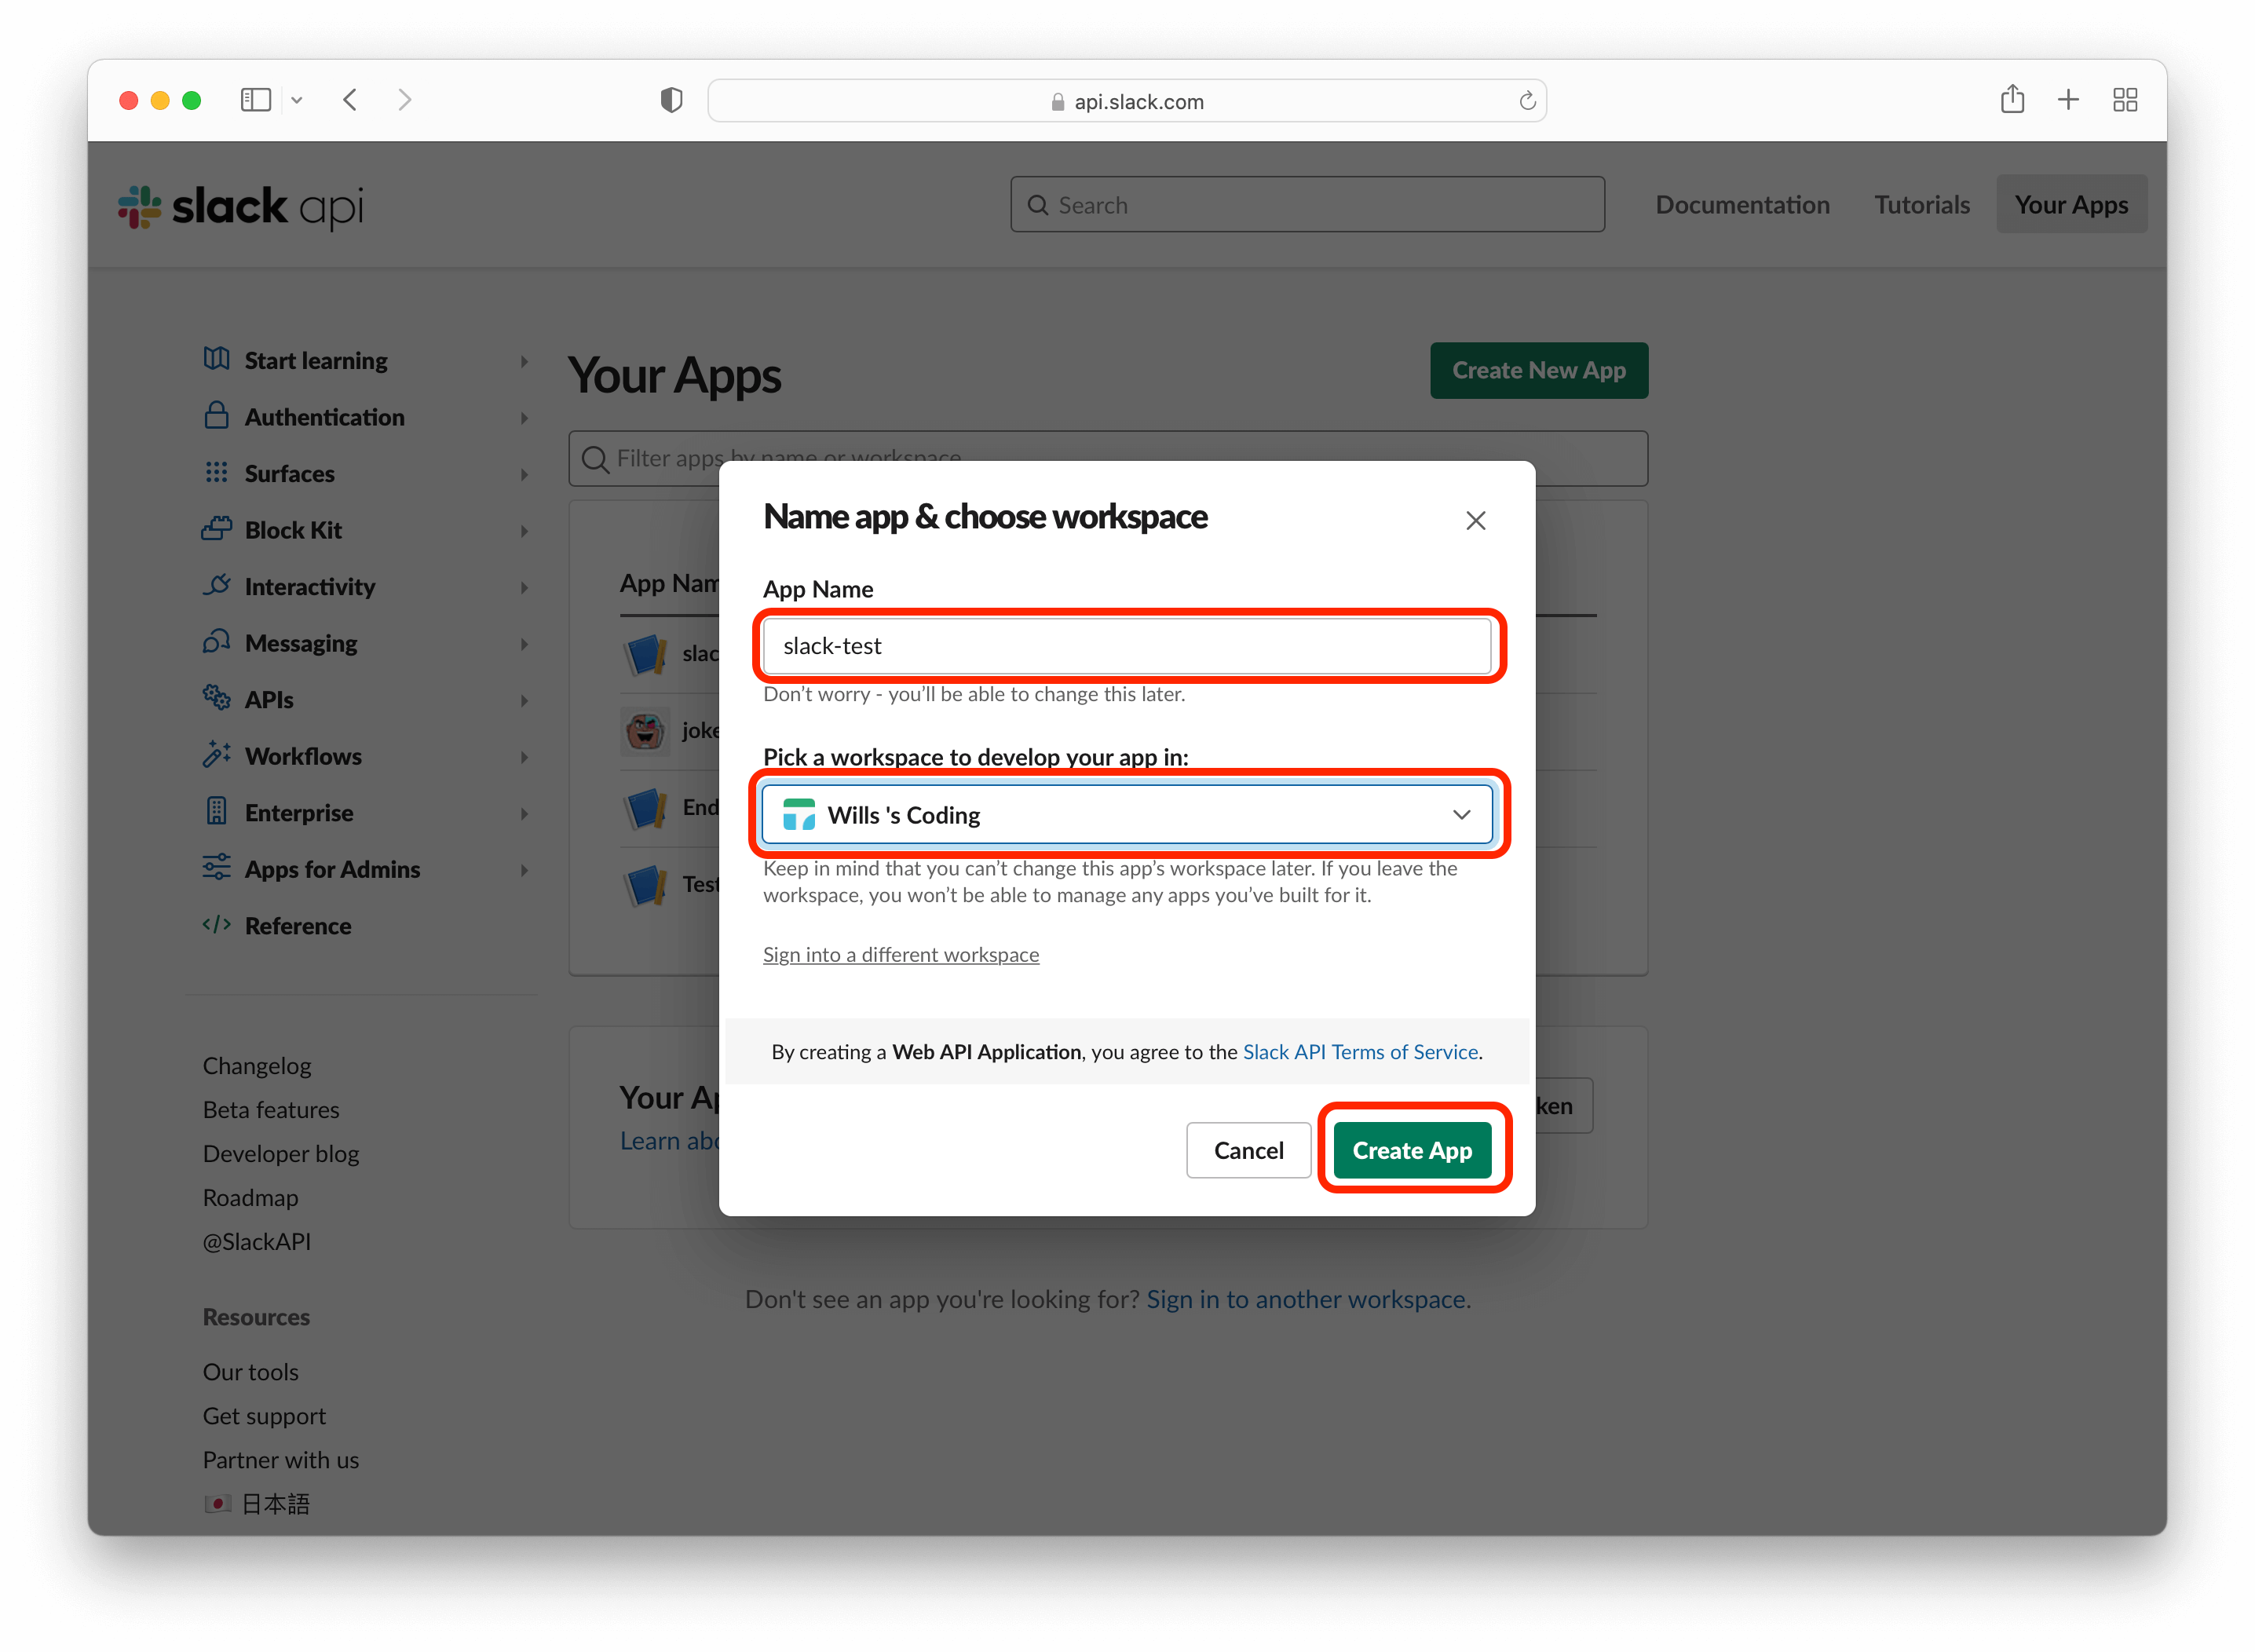
The next modal you'll see is Name app & choose workspace. Fill in an app name; you can use "slack-test" if you can't come up with something better. You can always change the name later when you think of something else.
Then select the workspace that you want to connect the app to. Make sure this is the correct app because you can't change the app's workspace later. After you pick a workspace, click Create App.
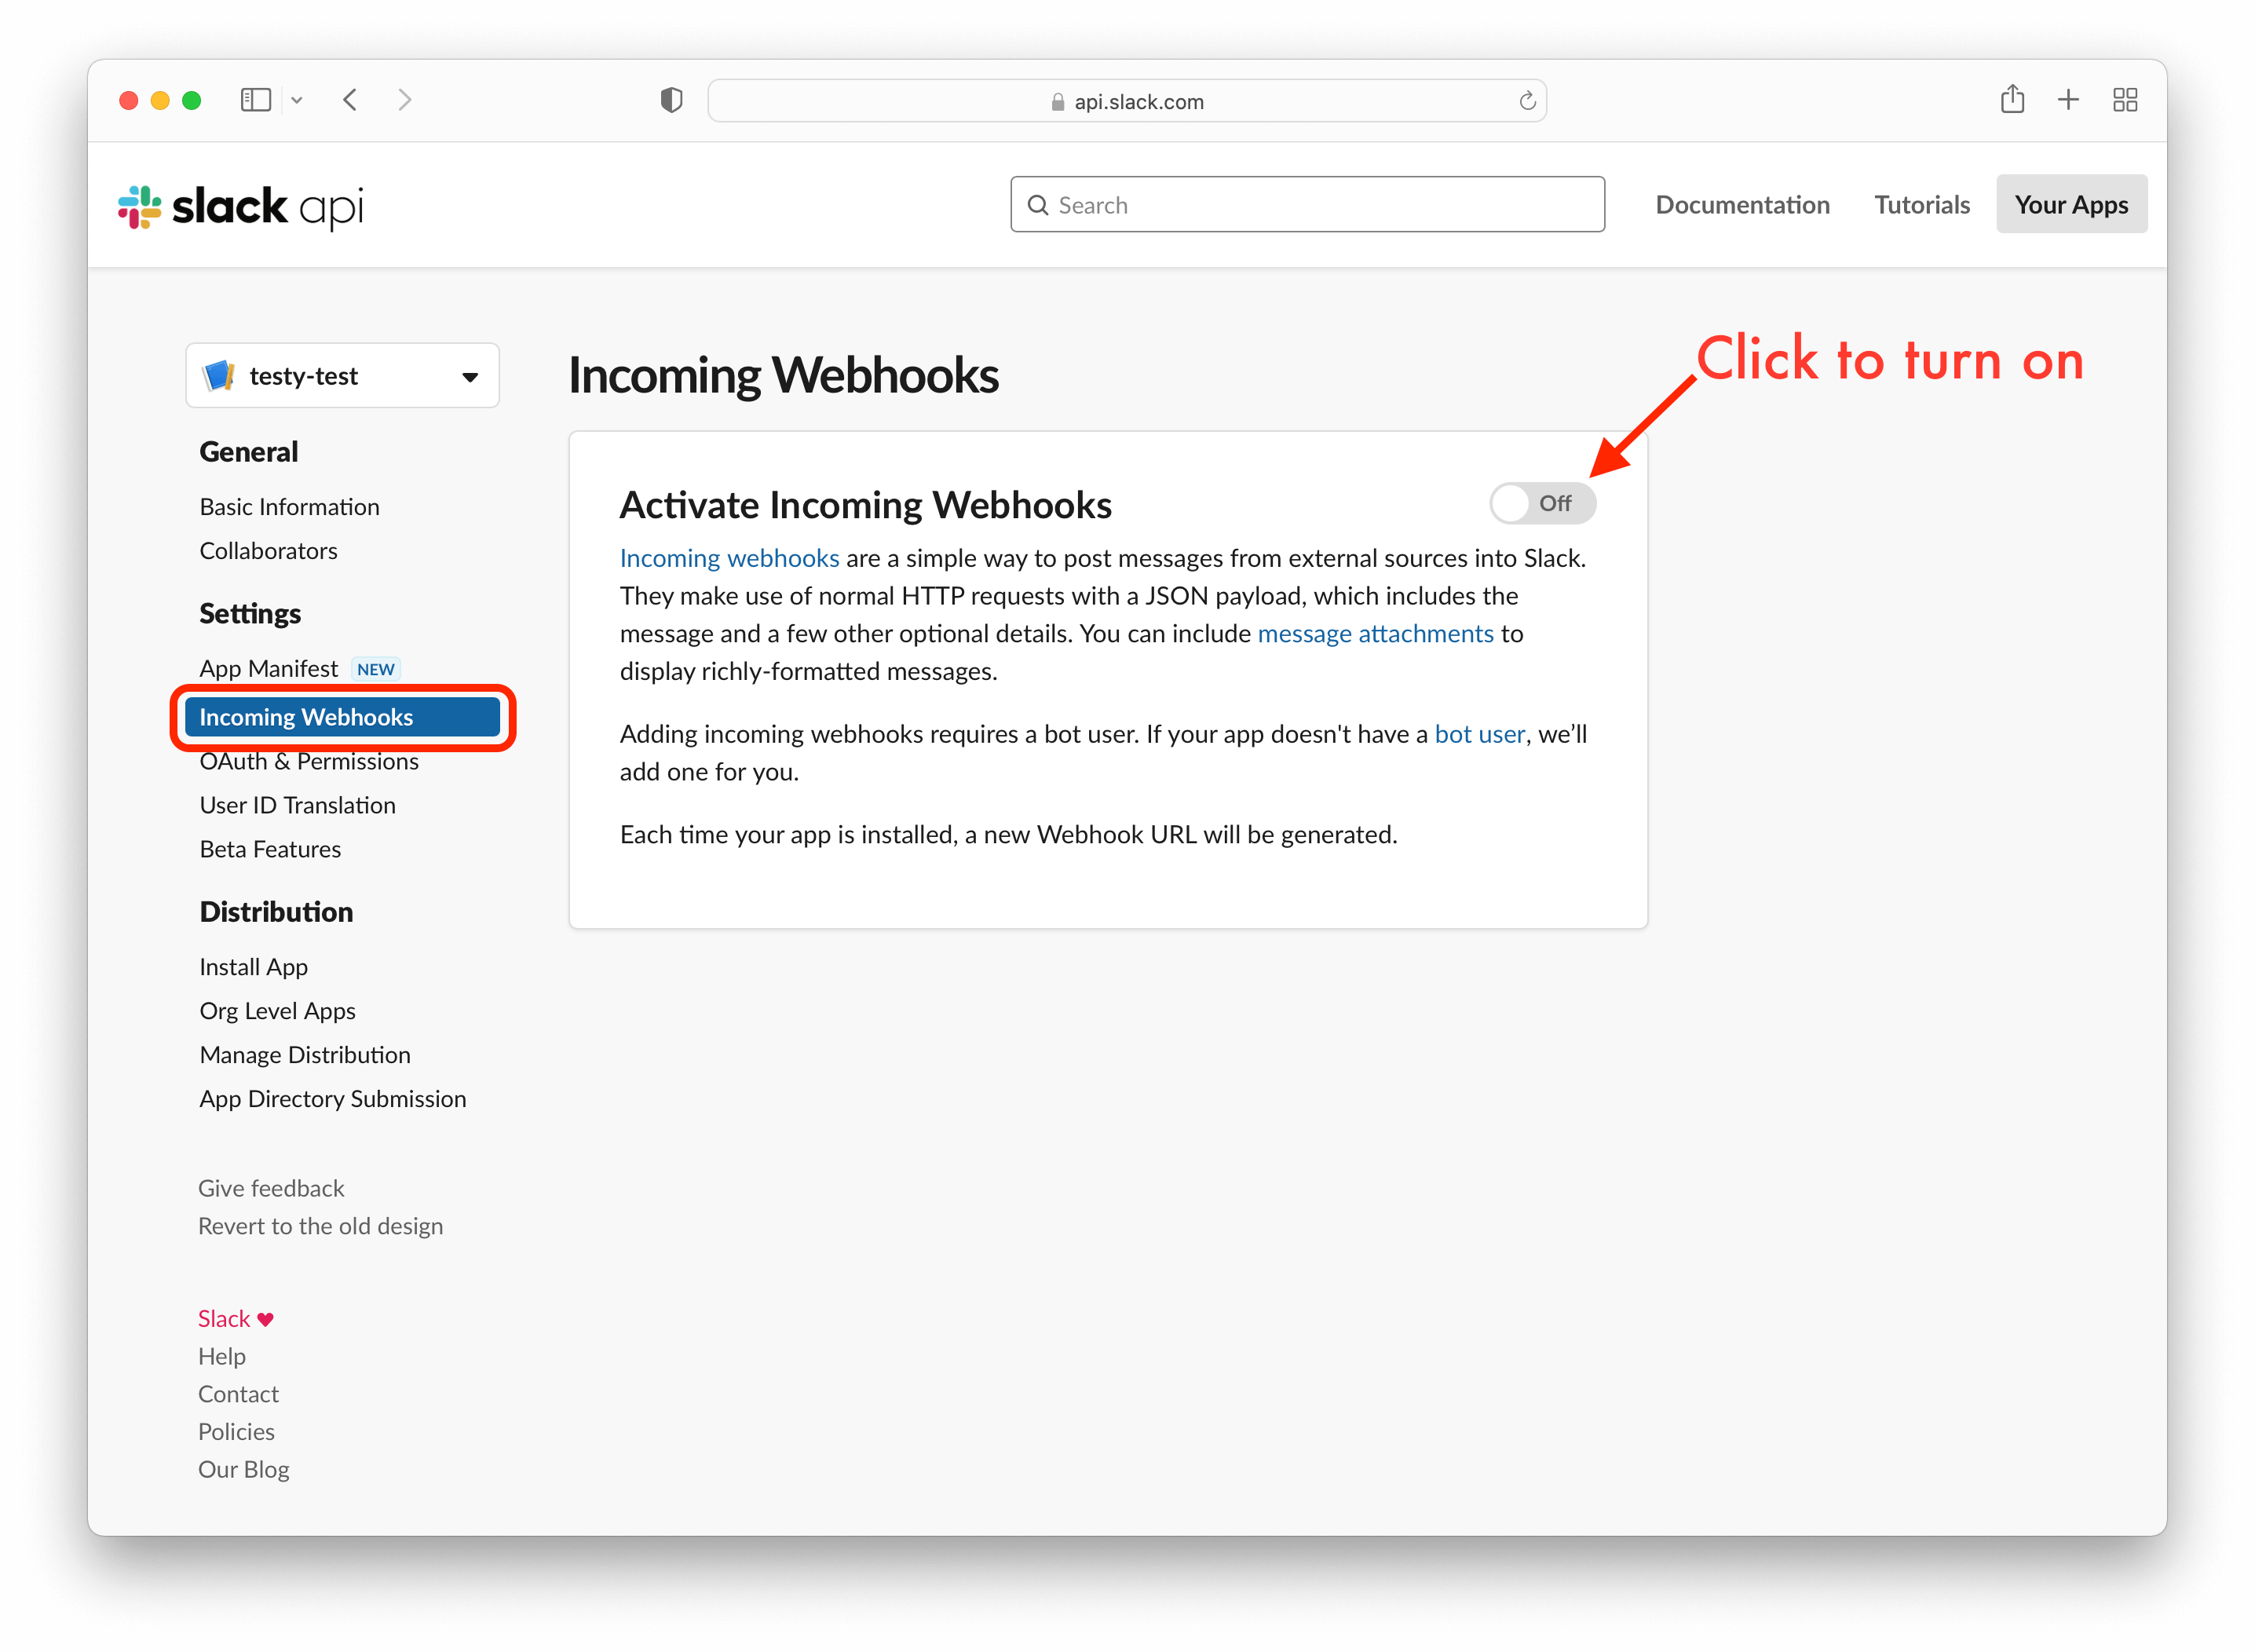
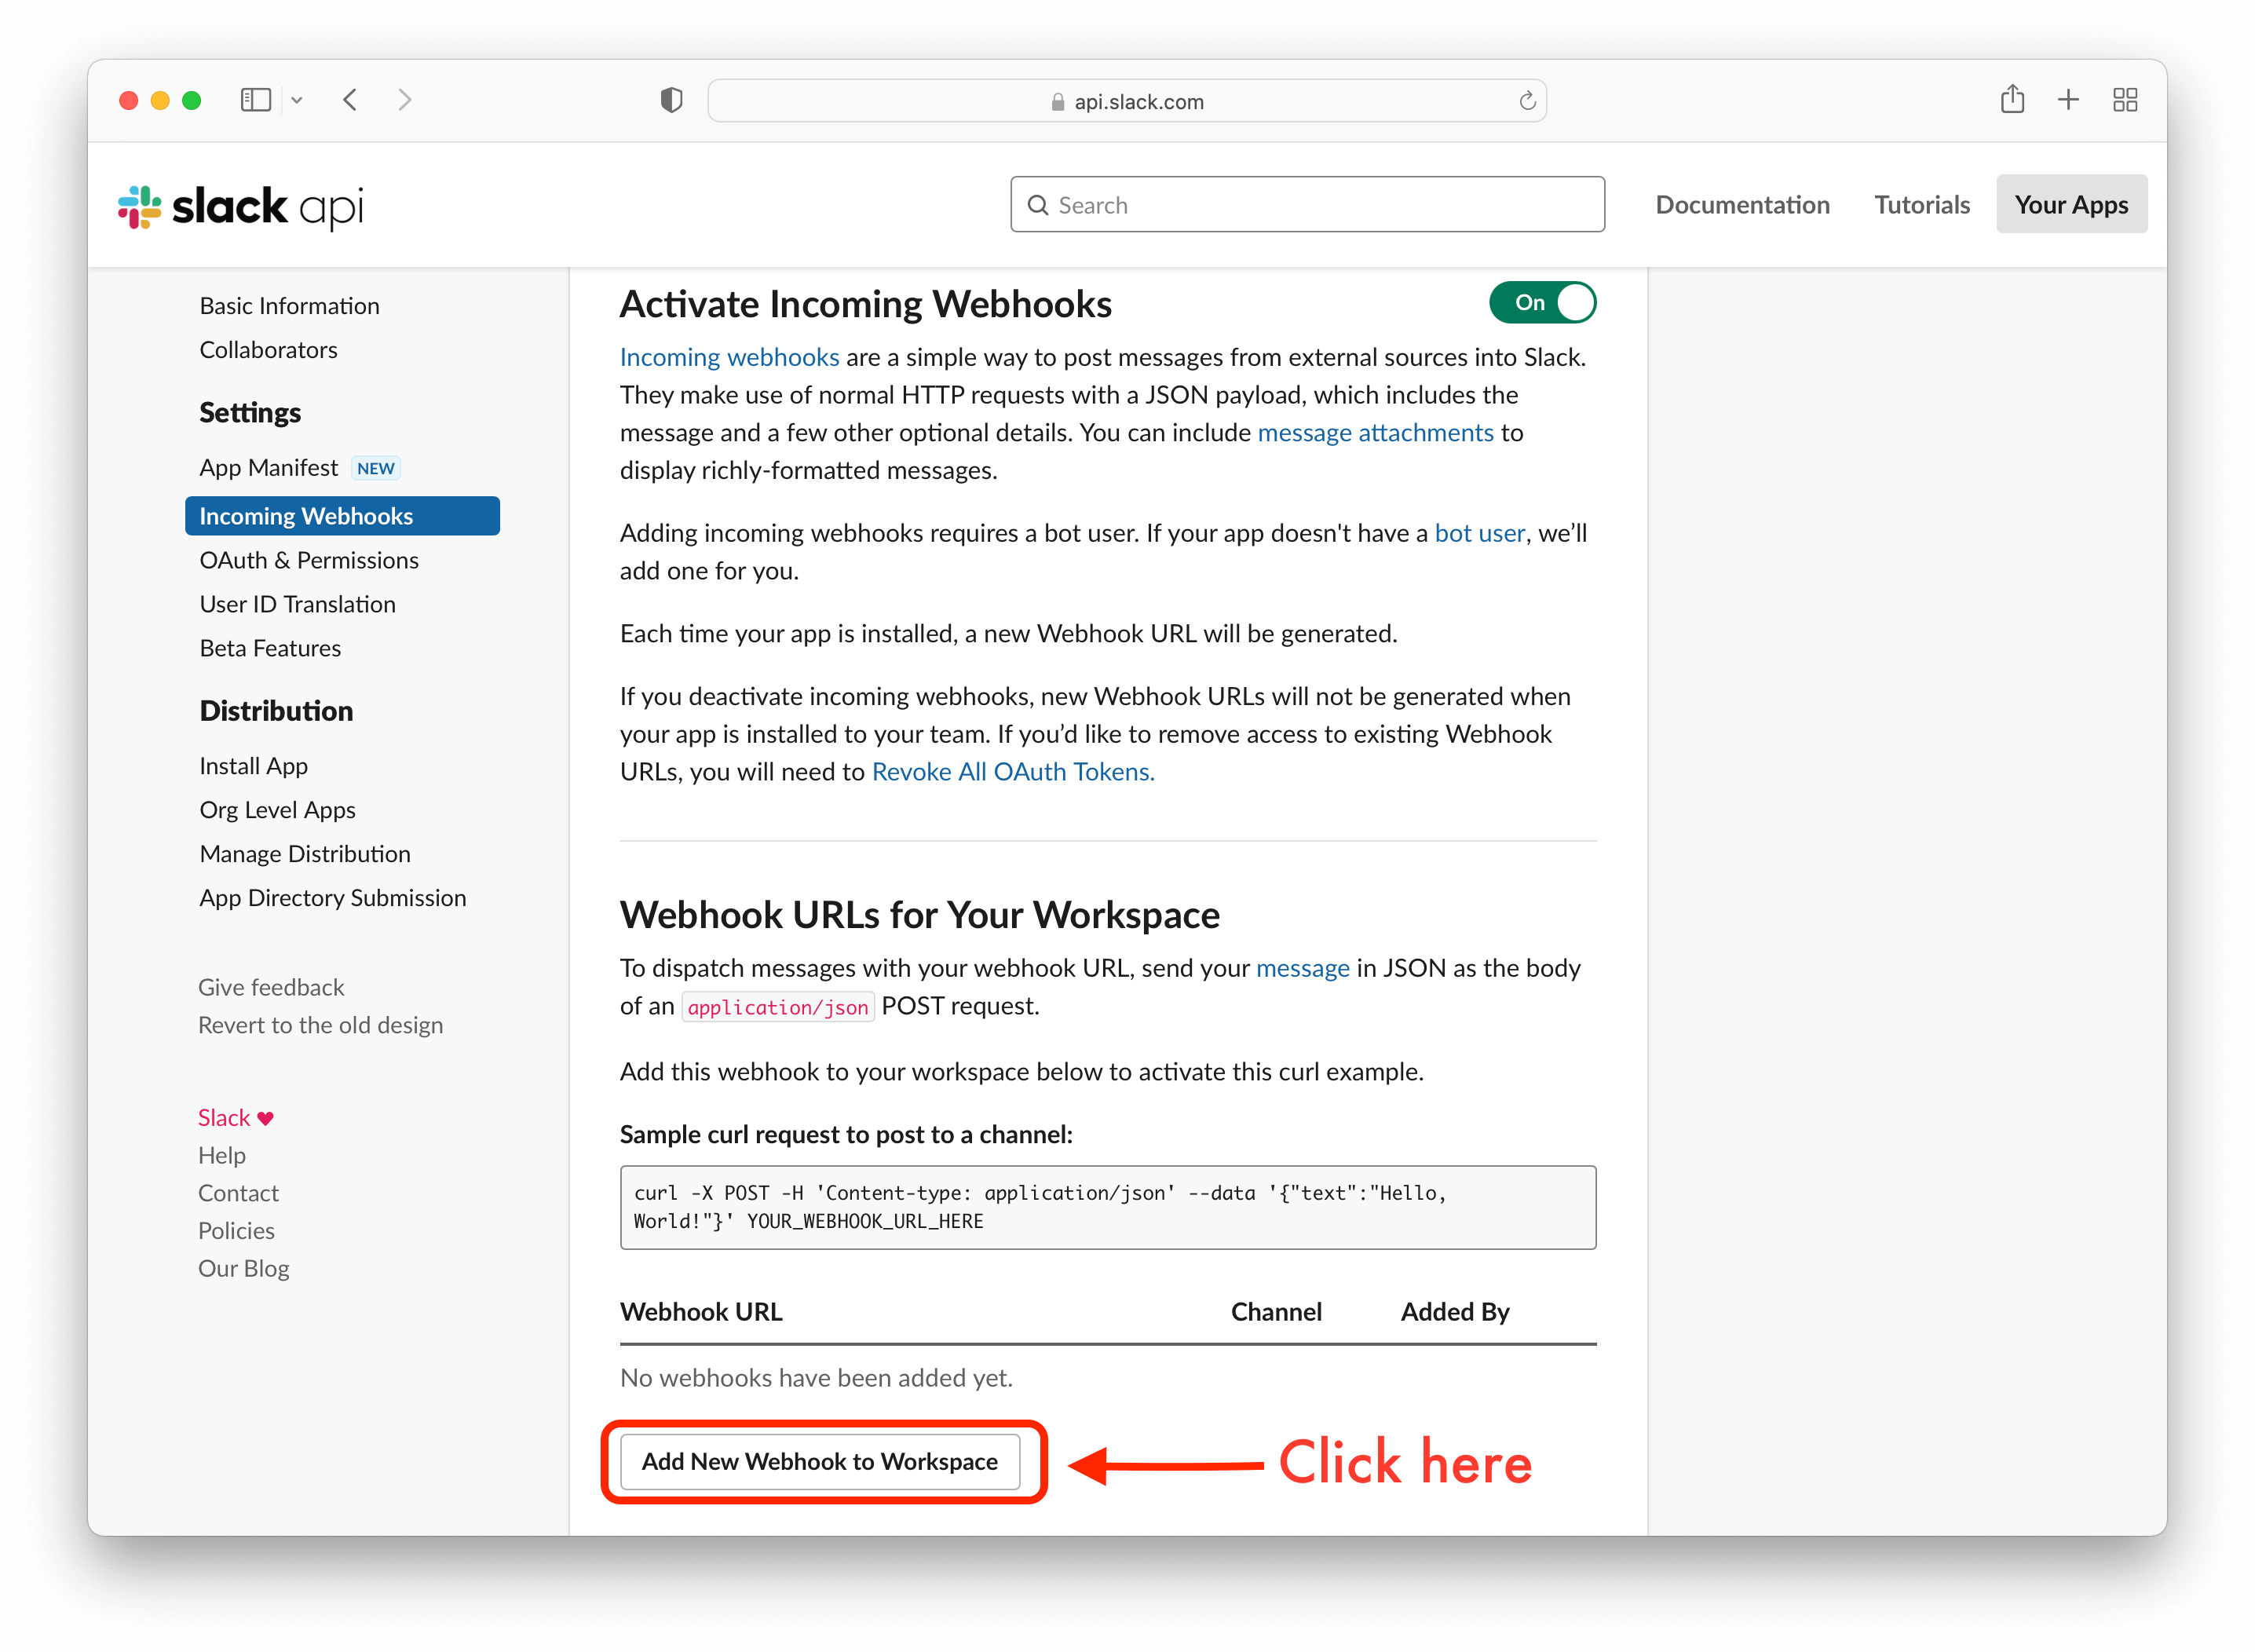
You'll be taken to the Basic Information page. This page is where you turn on the ability to use webhooks and get your webhook URL. On the left side of the page, Click Incoming Webhooks. Click the toggle button on, and Slack will create a bot user if you don't already have one.
The page will refresh, and a shiny new section, Webhook URLs for Your Workspace, will appear. To activate the webhook and create the URL used in your Auth0 Action, scroll to the bottom of the page and click Add New Webhook to Workspace. This button makes a shortcut to install Slack apps, and using it means you don't have to write any code to generate a webhook URL.
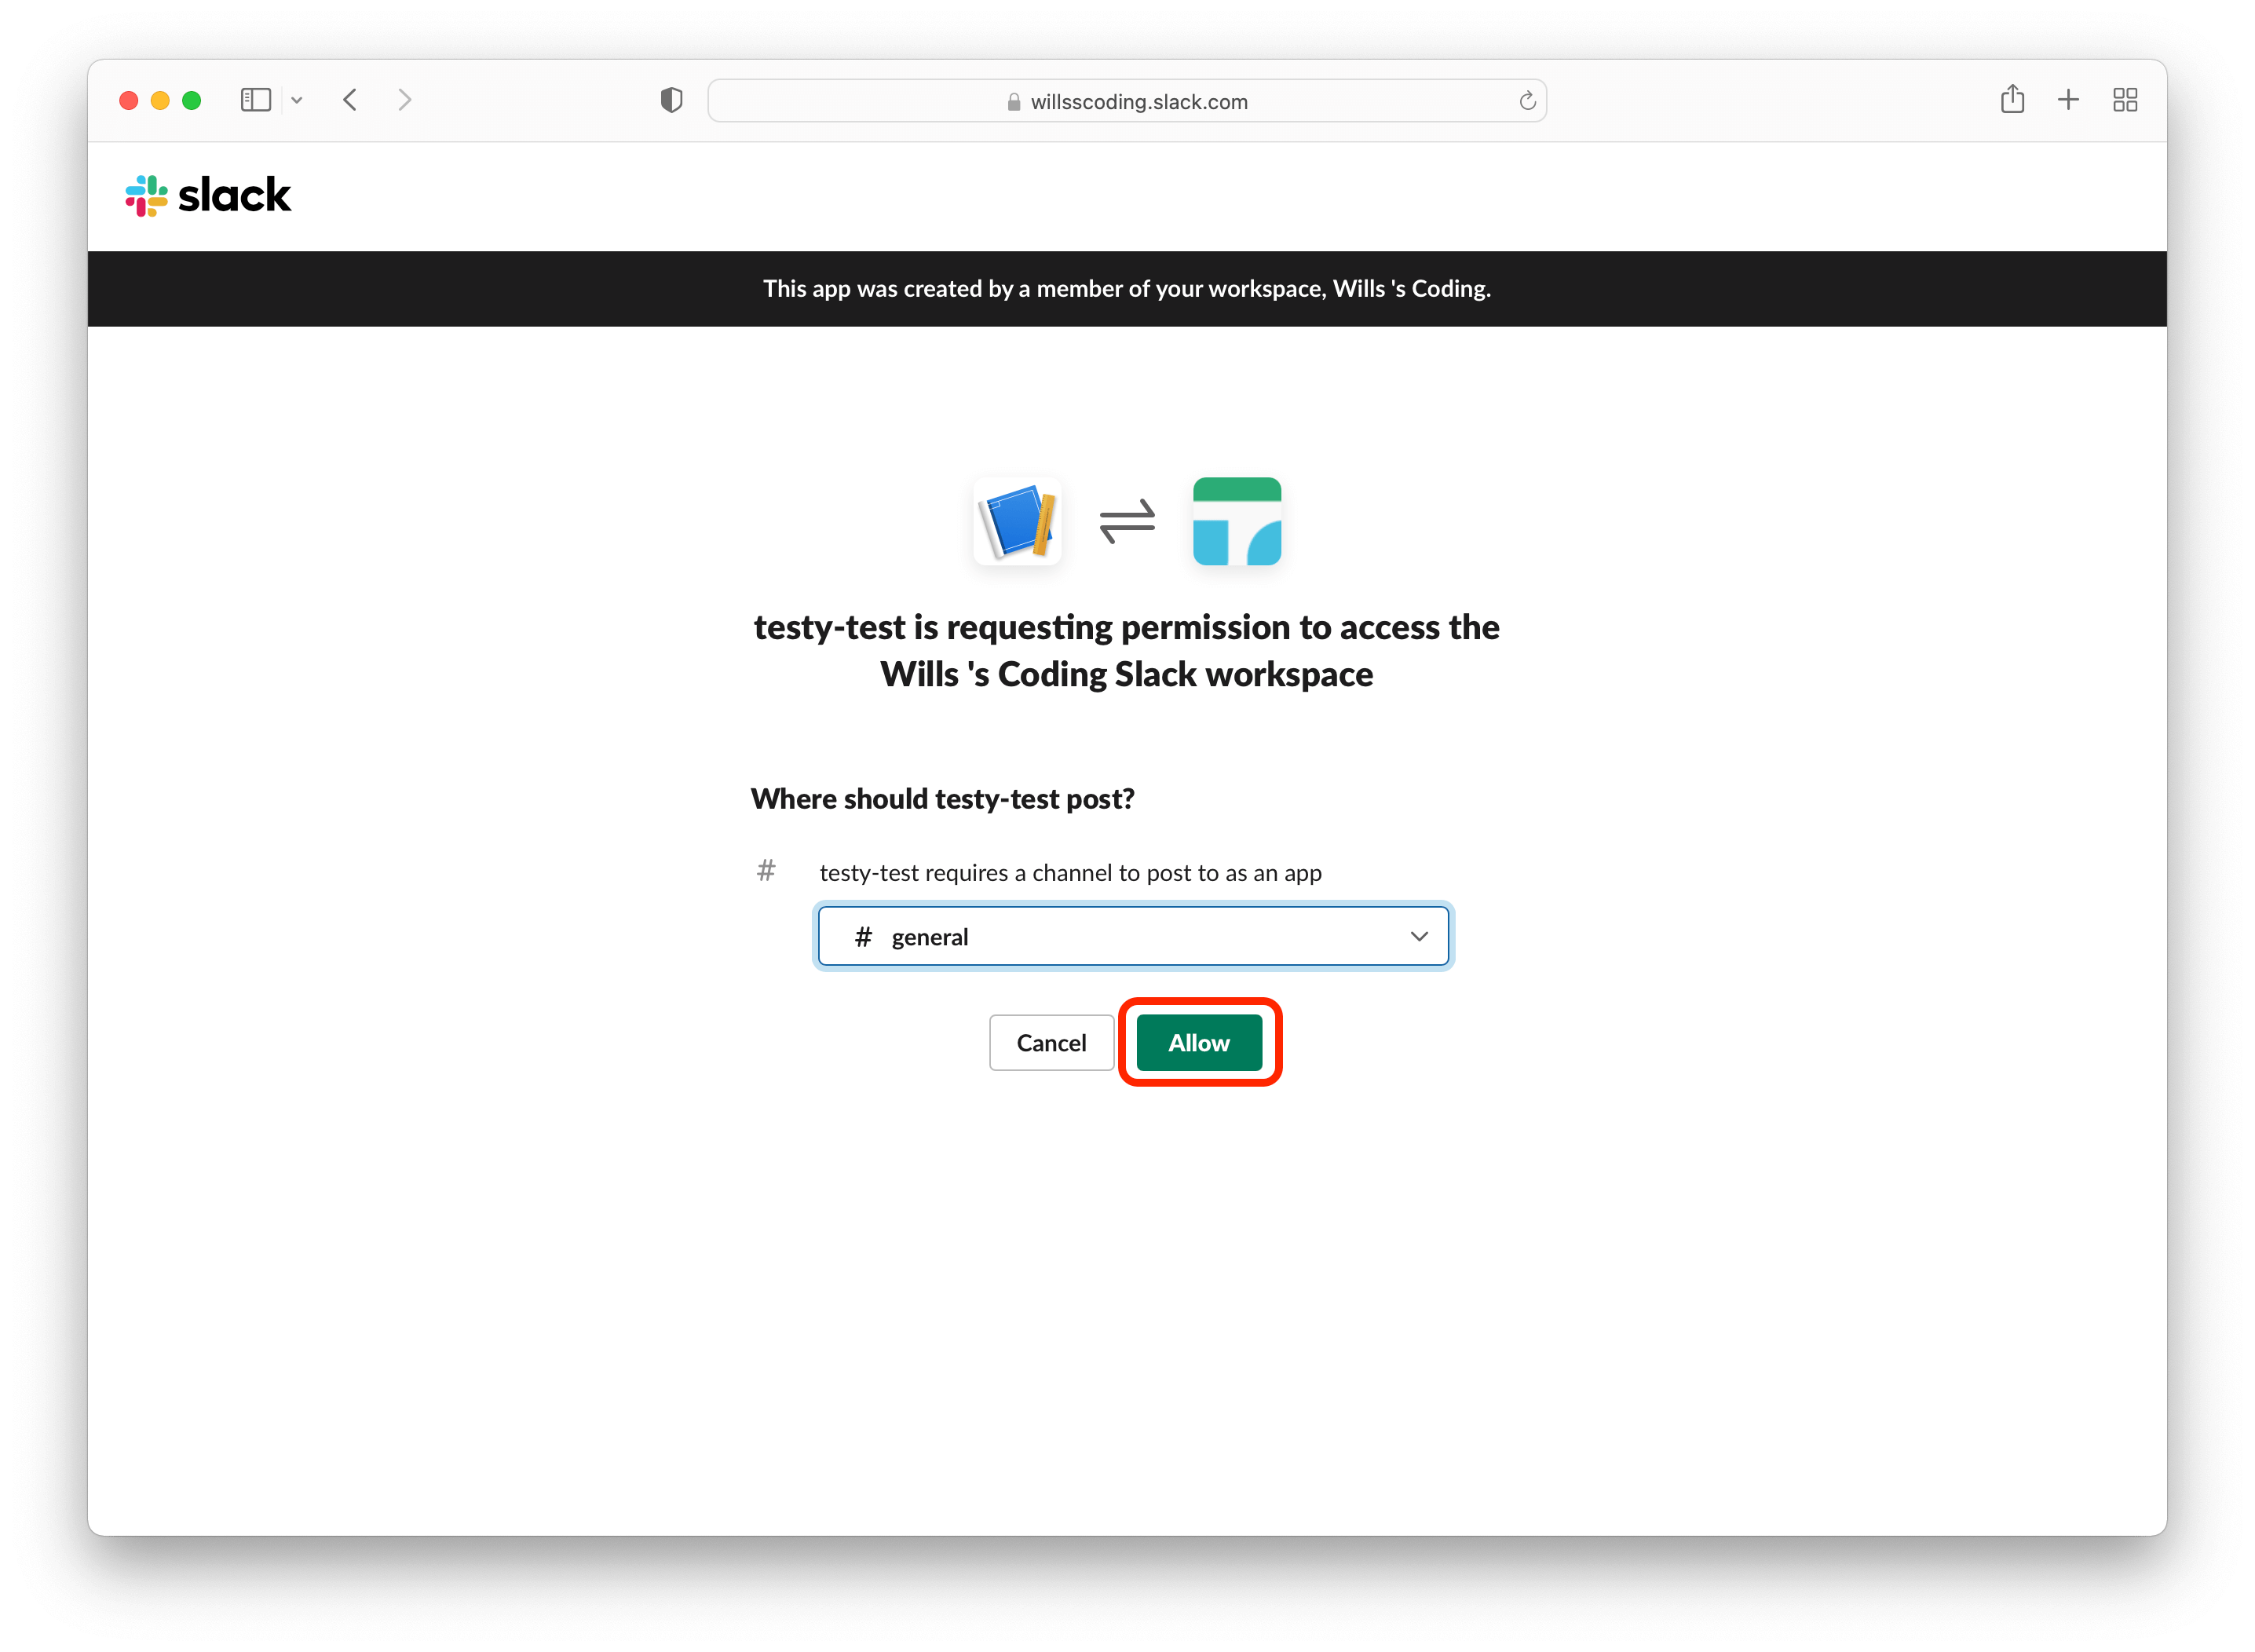
This next screen lets you know that your app wants to access the workspace. It will ask you what channel you want the app to post and give you a drop-down to choose what channel in your workspace you want the app to post in. Once you have selected the channel, click Allow.
You're taken back to the Incoming Webhooks page. You'll now see the webhook URL has been filled in with a value, with the channel you selected for it and the date it was added. Copy and save the webhook URL somewhere safe; you'll need that later when you create a new Auth0 Action.
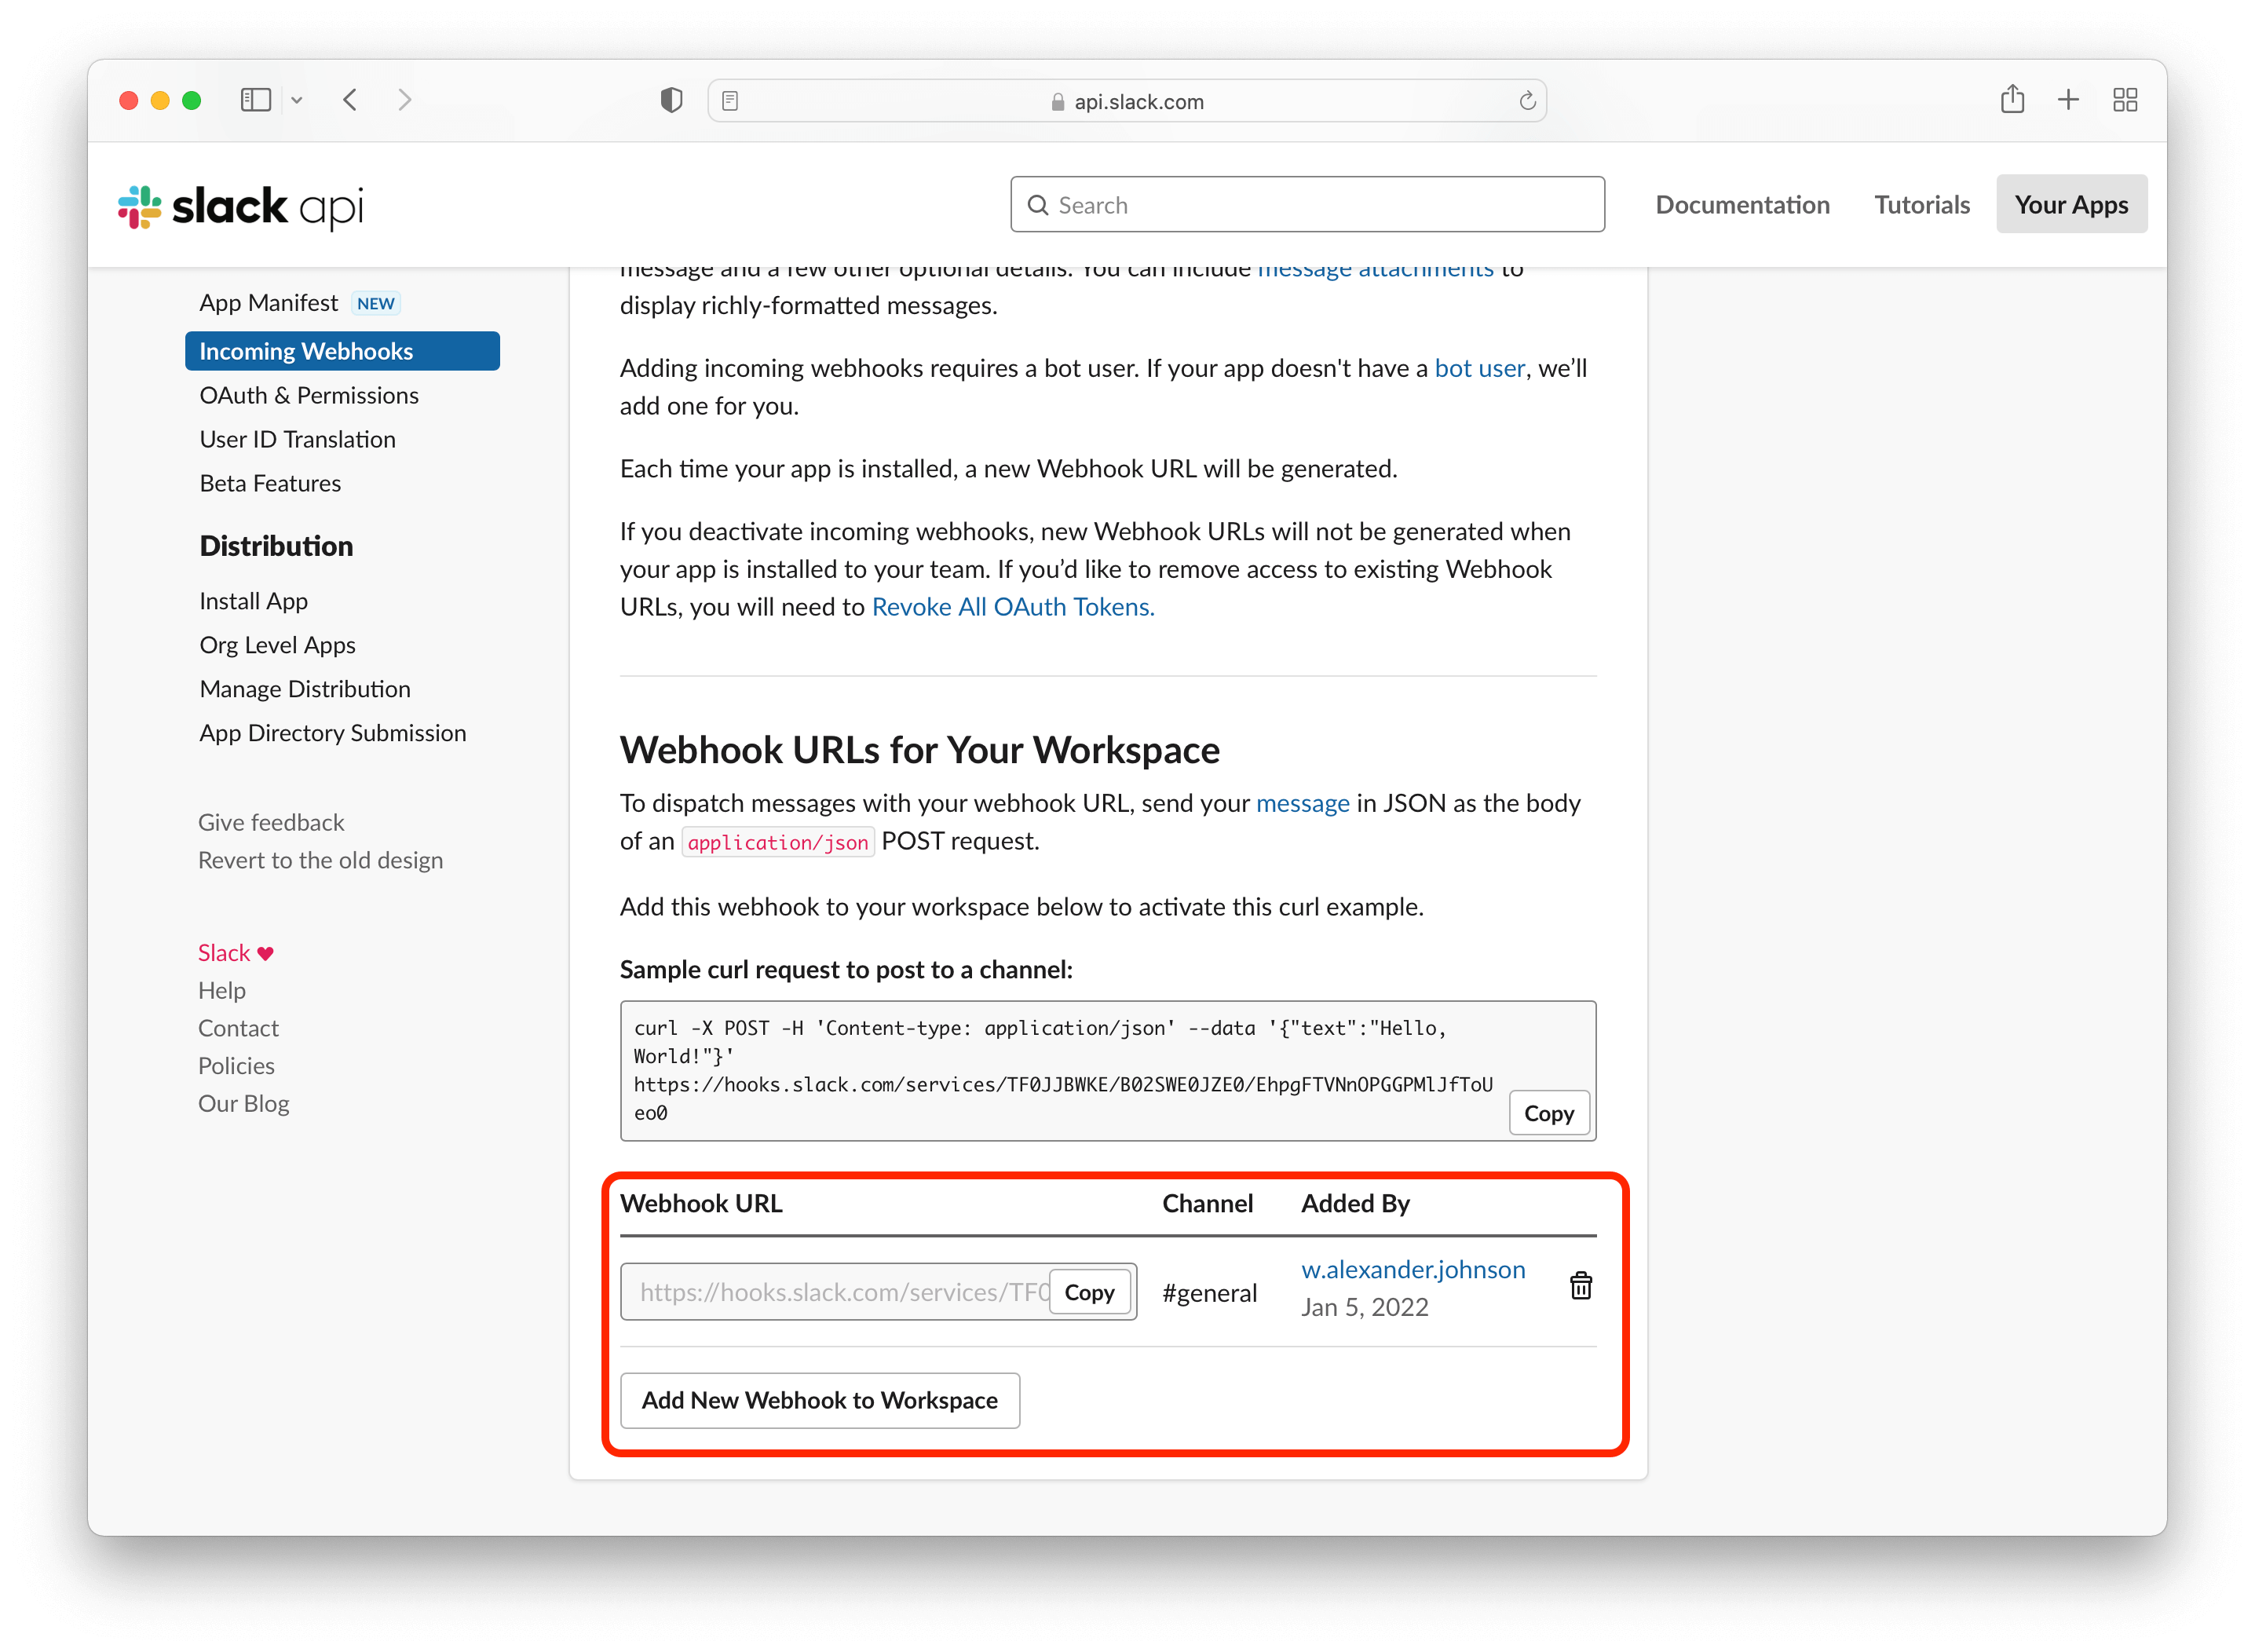
Your webhook URL contains a secret. Don't share it online, including public Git repositories.
Now that you have your webhook URL created for Slack, you need to head to Auth0.com, sign in, and create an Auth0 Action that will send Slack messages.
Create Post User Registration Action
Auth0 Actions allow you to customize events like login and registration to add behaviors that go beyond the default Auth0 features. Actions have an in-browser code editor where you can write Node.js code that is stored and runs on infrastructure owned and maintained by Auth0.
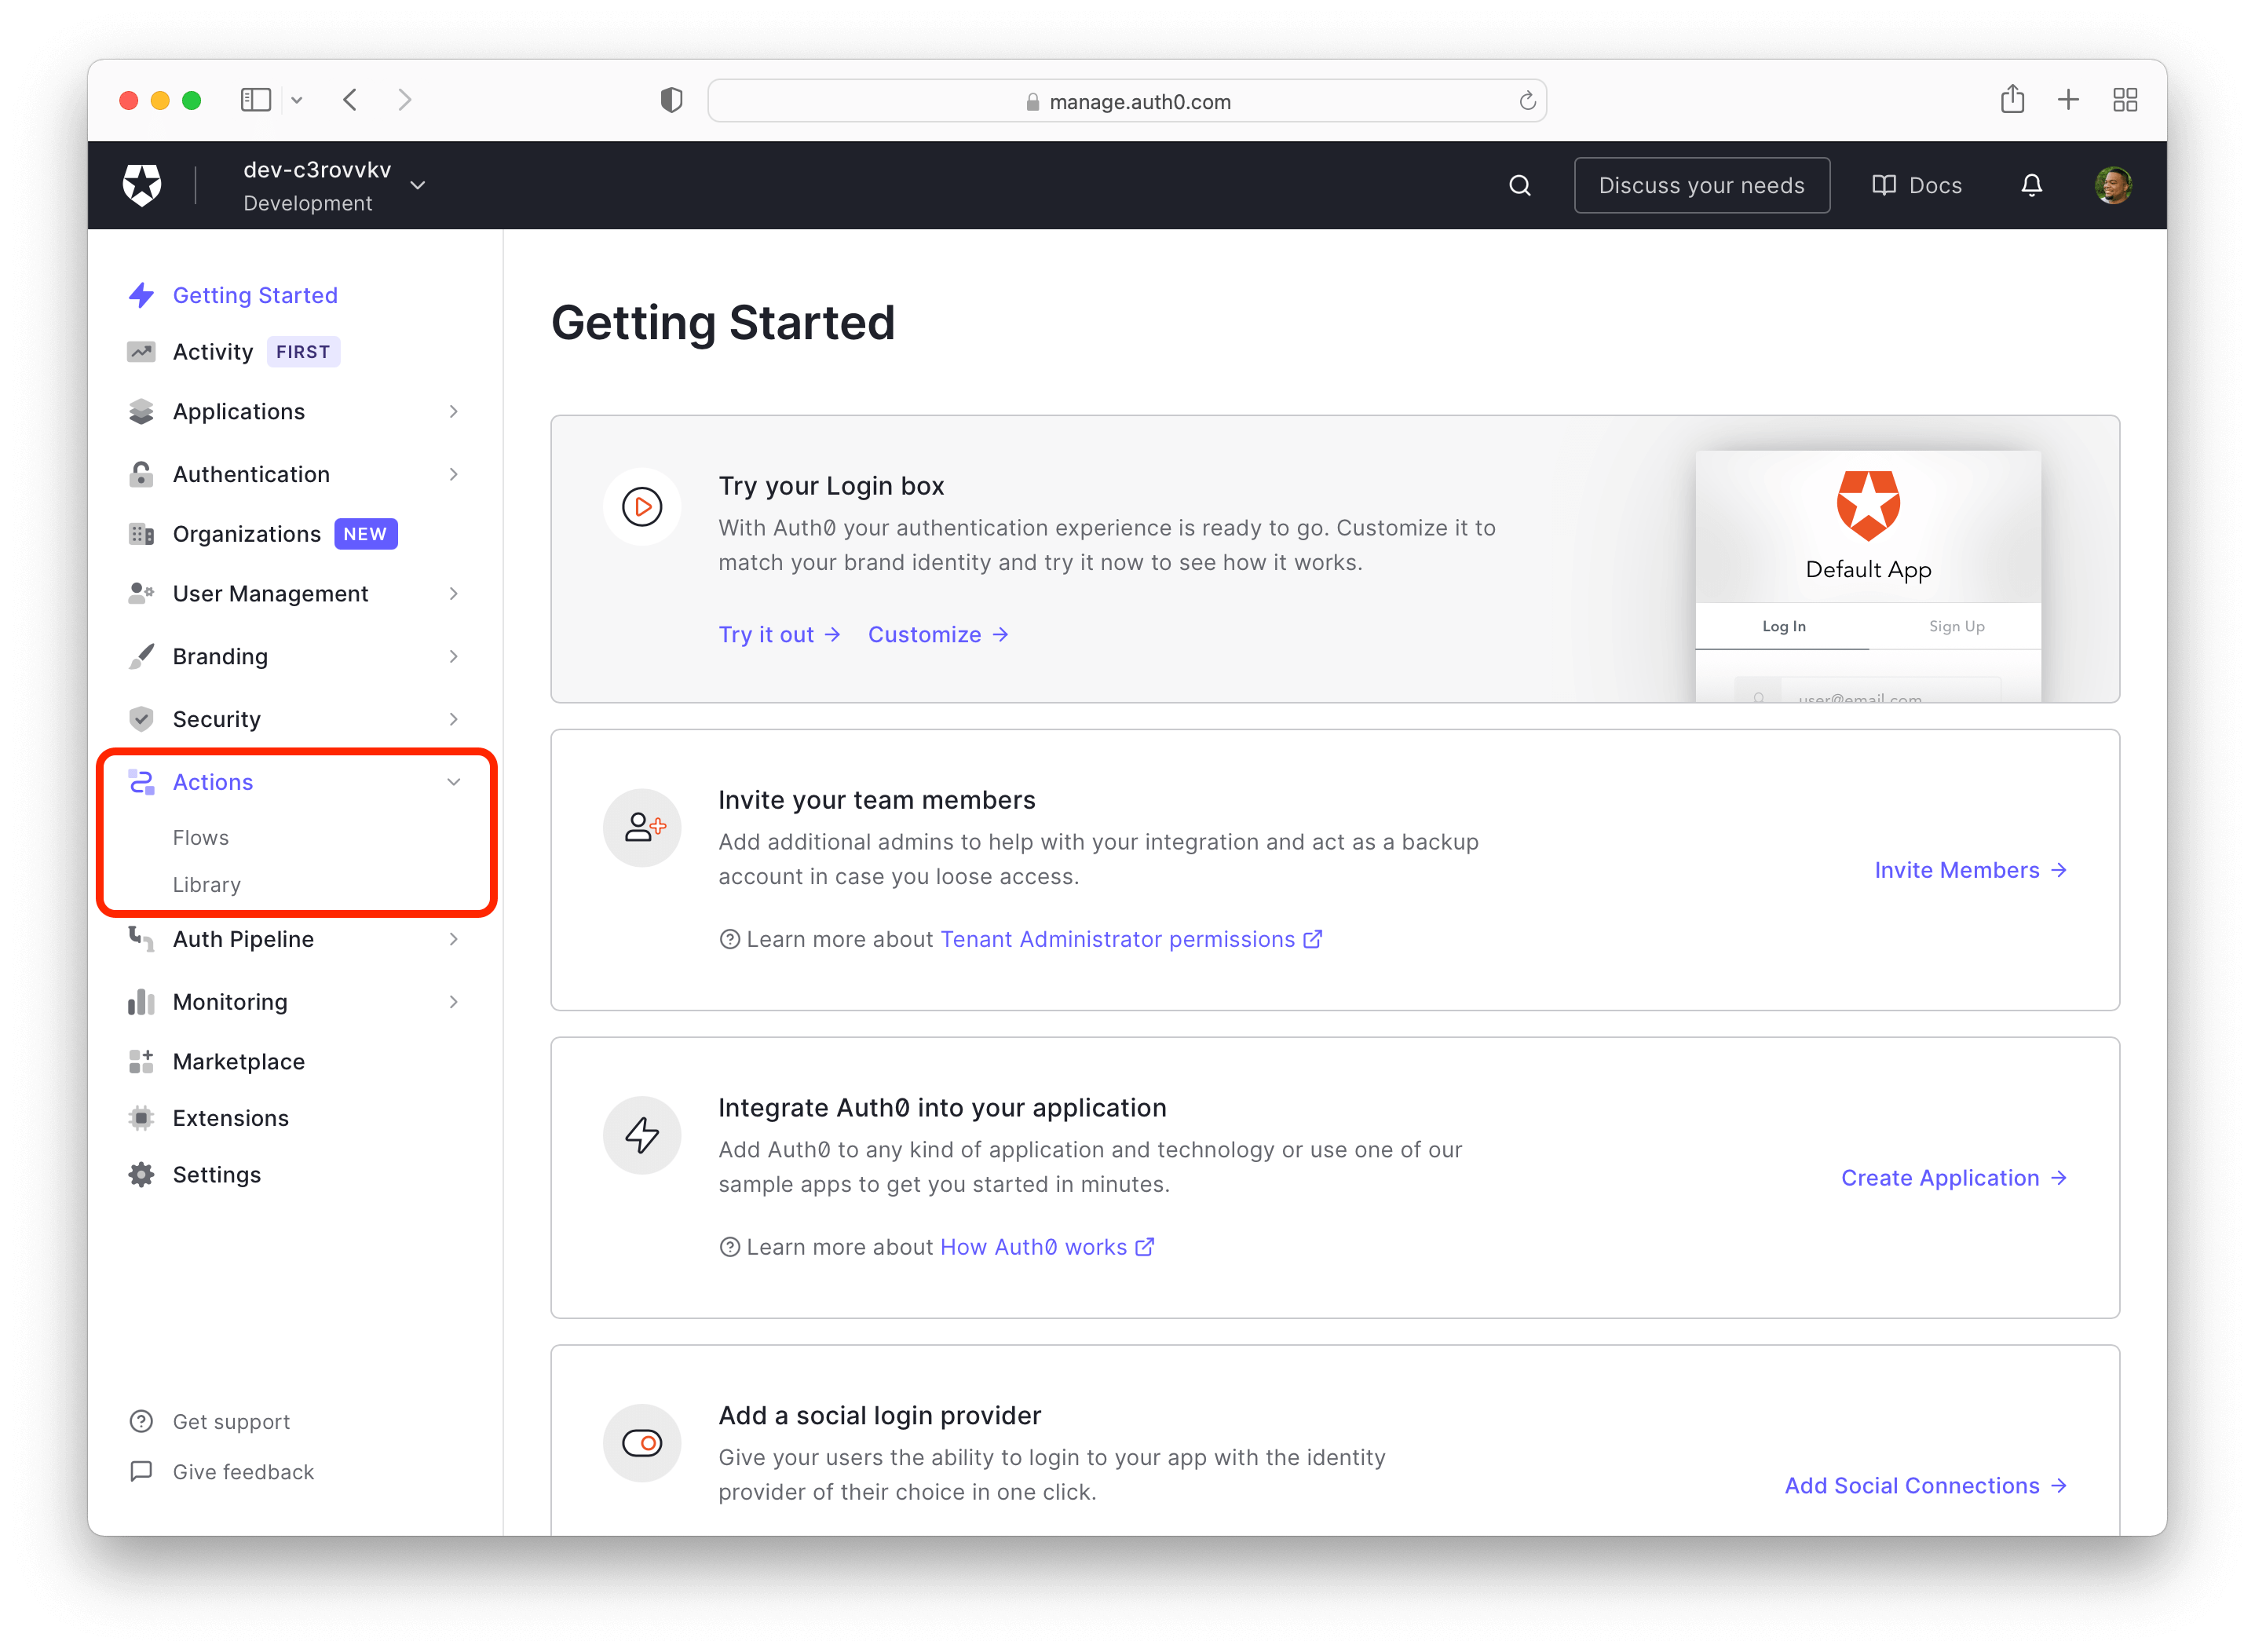
Create your Action by clicking Actions > Library on the left side of the Auth0 Dashboard.
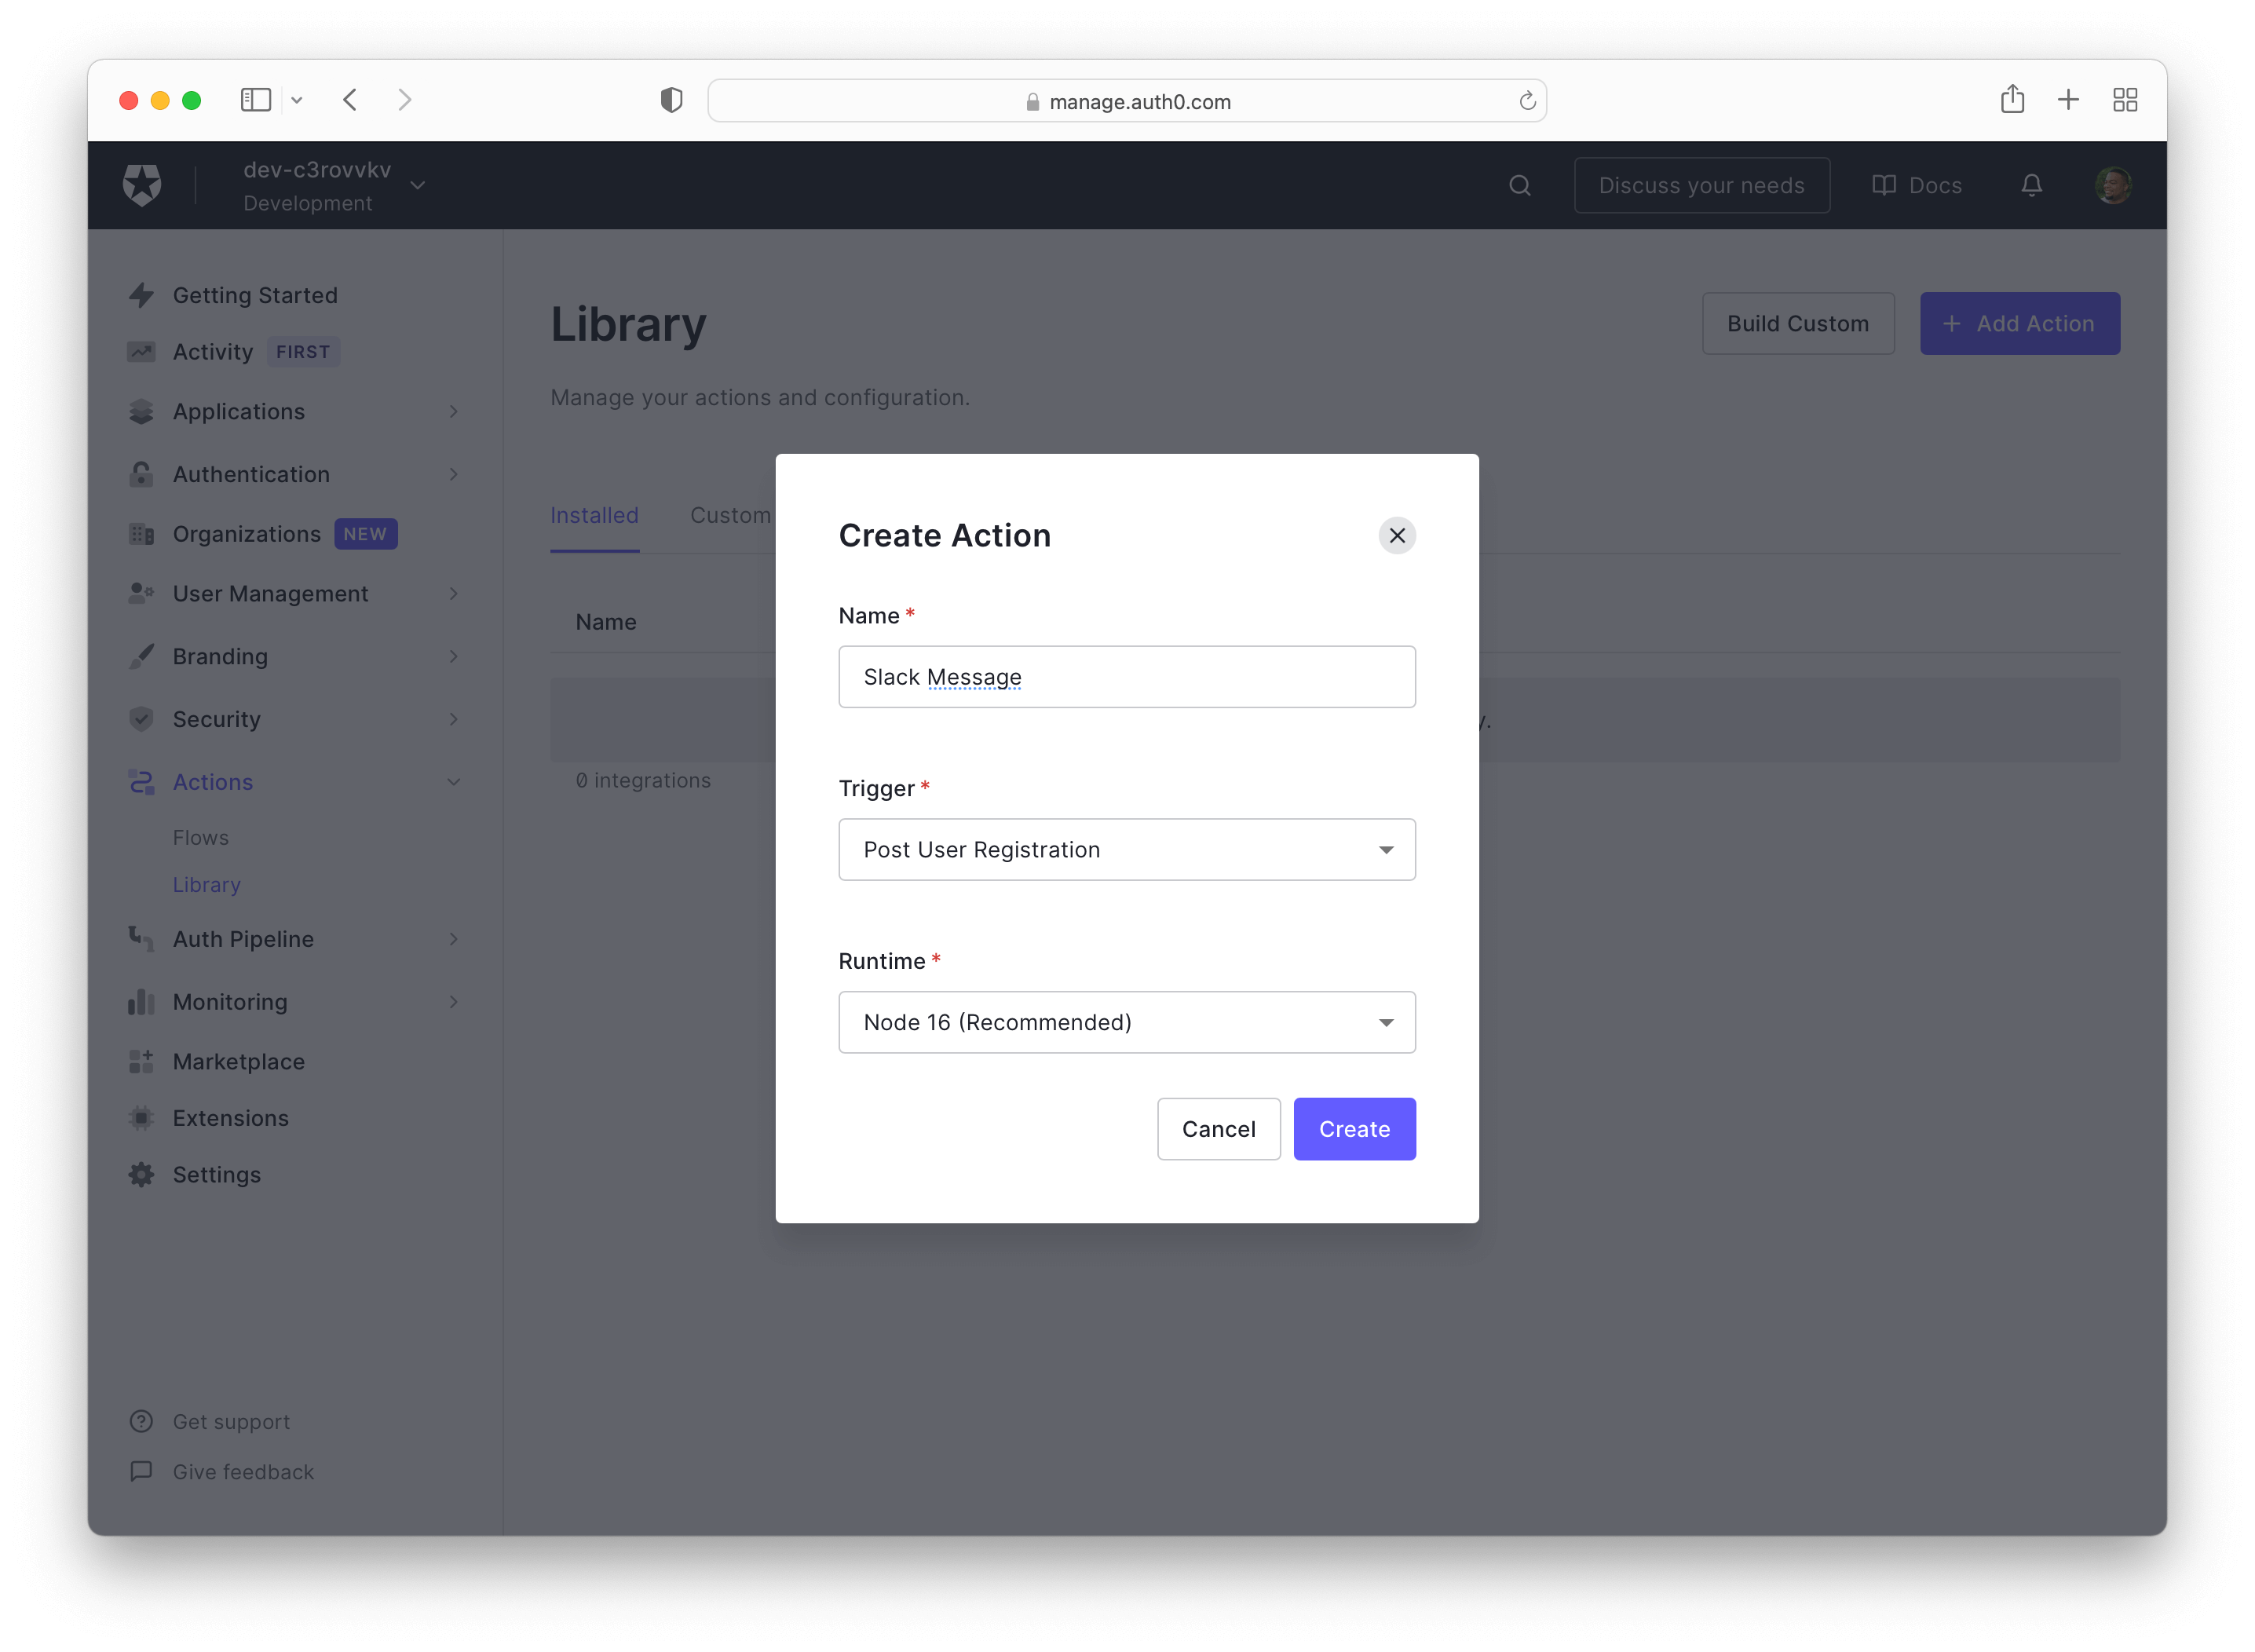
This page lists the Actions that have already been installed, and there's a Custom tab for actions you created. On the upper right side, click Build Custom. You'll see the Create Action modal, which asks to name your Action, assign when you want it to run, and which Node.js version you wish to use.
First, give your Action a name like "Slack Message." Next, select the event that will cause the Action to run from the Trigger drop-down. For this example, select Post User Registration. Leave the Runtime selection set to the recommended version (Node 16 at the time of writing). Finally, with all those details filled in, click Create.
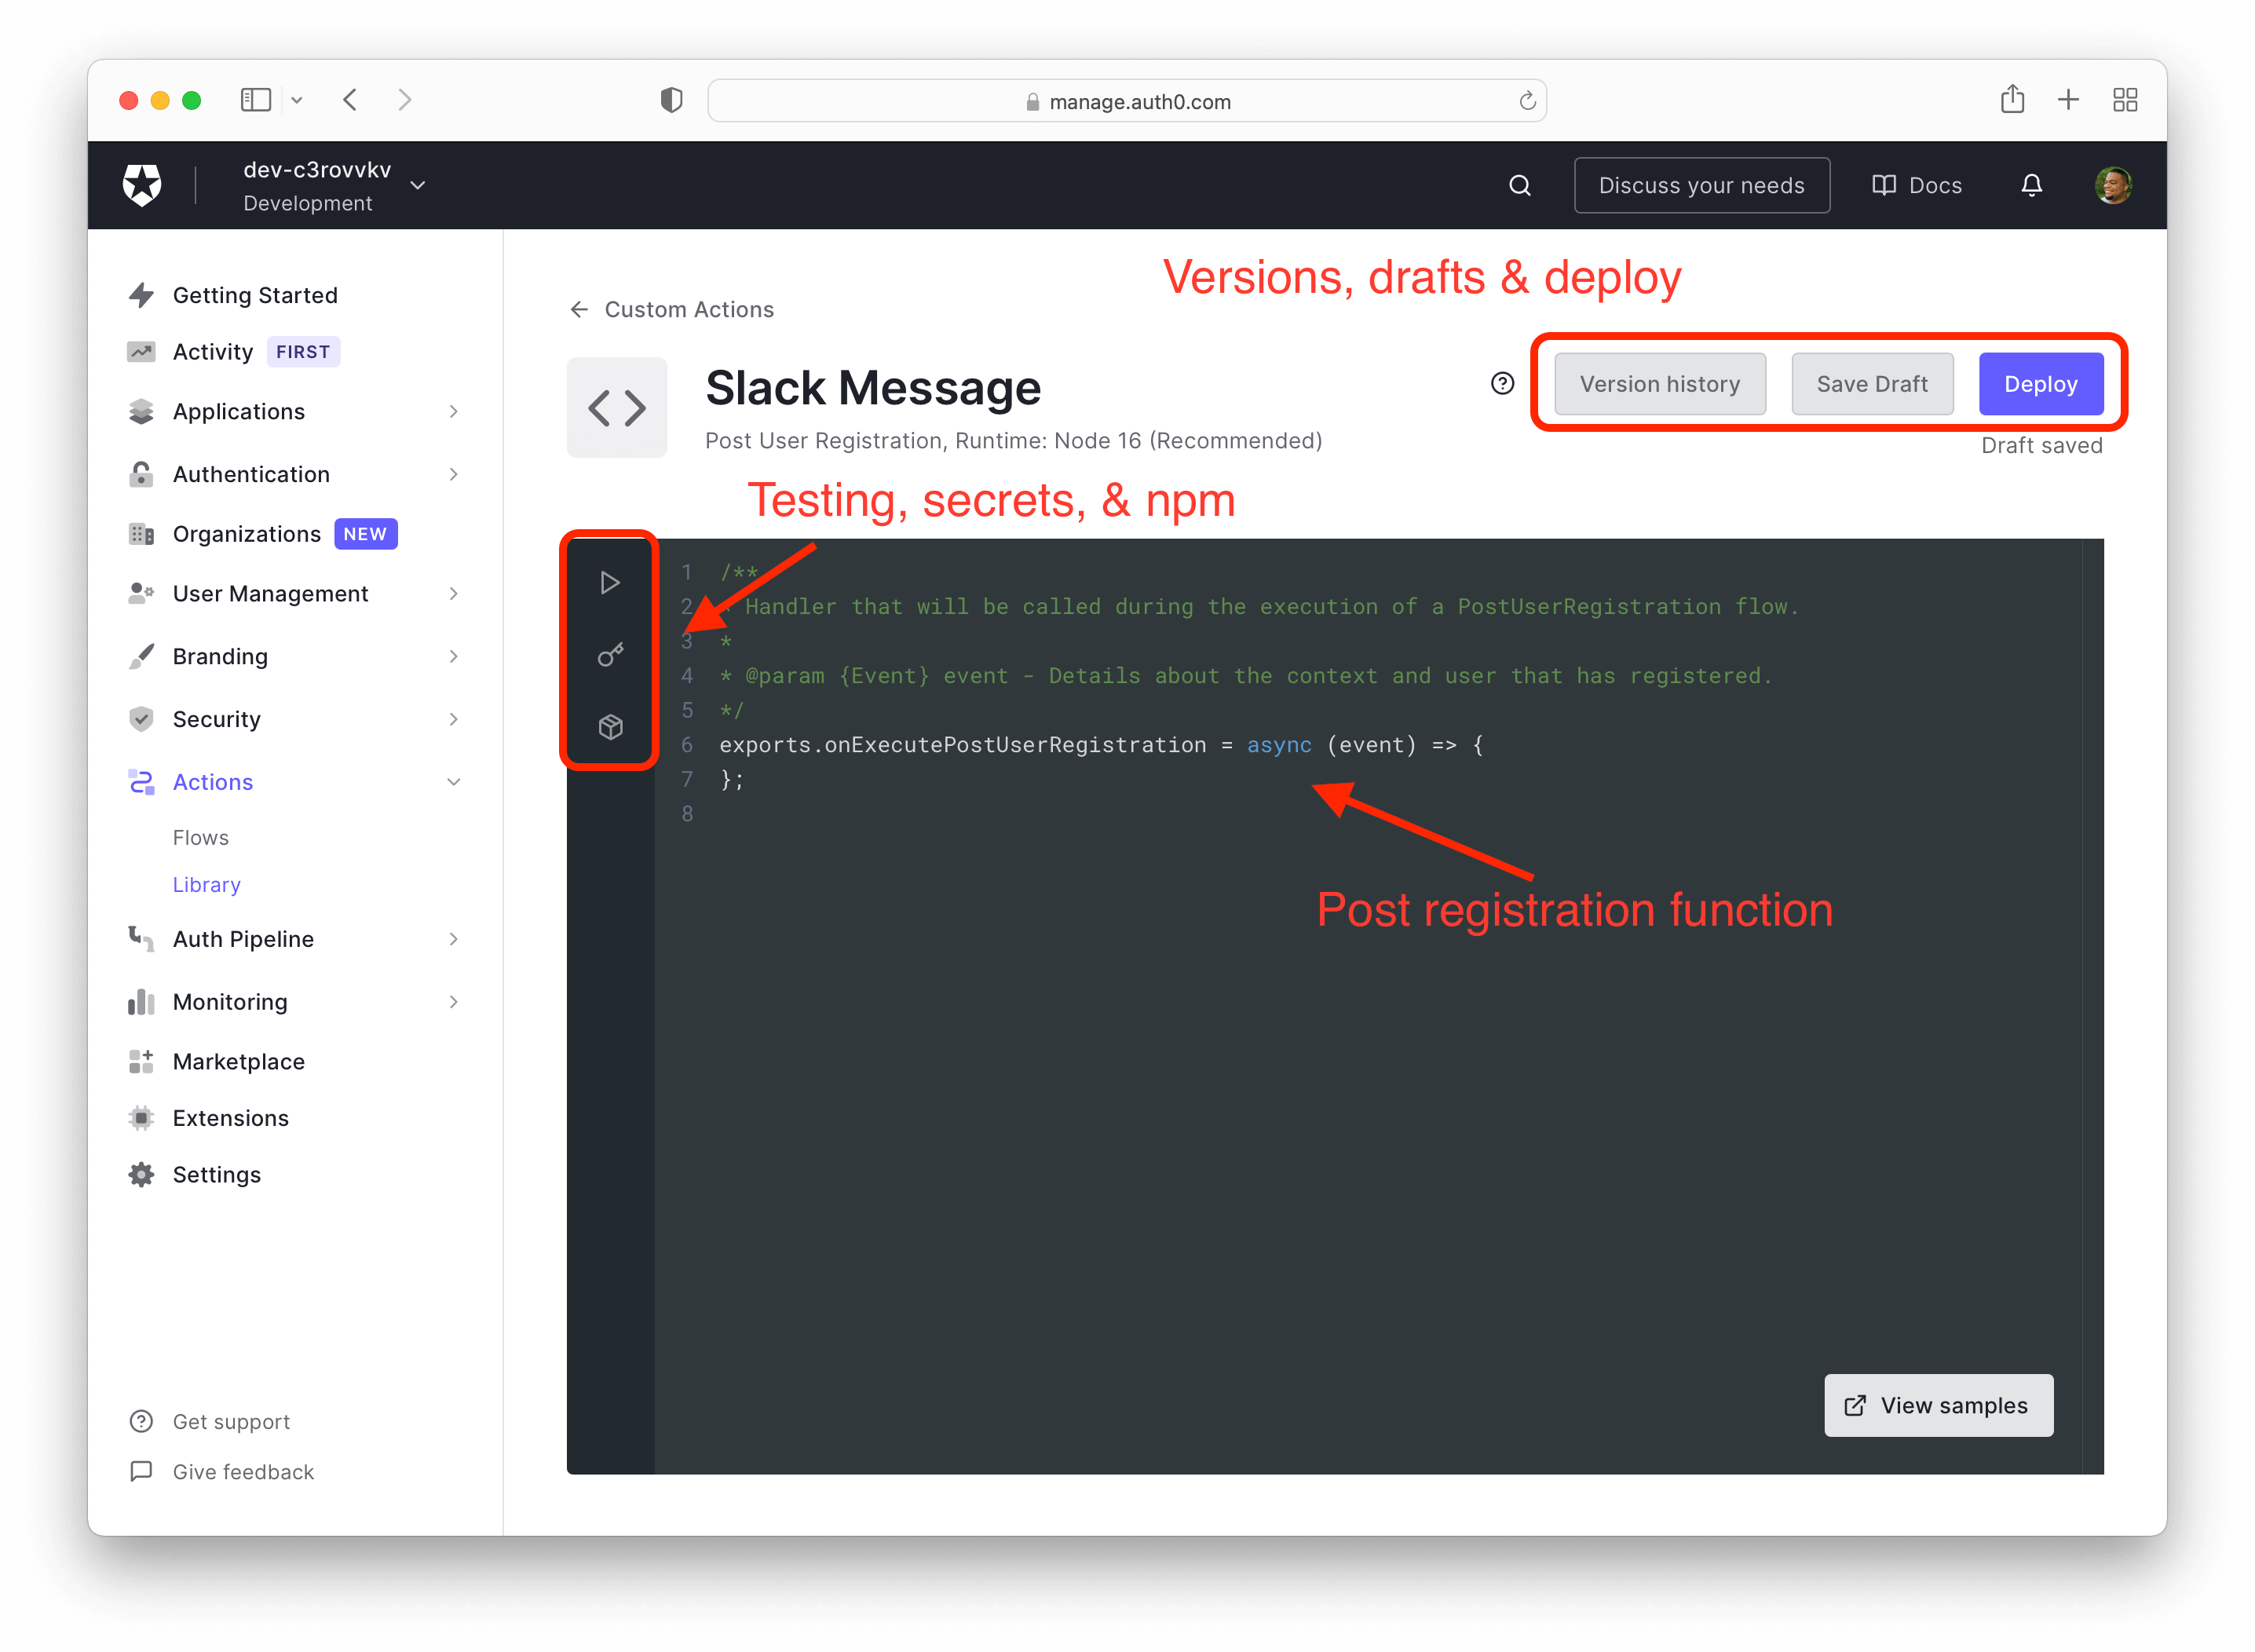
You'll now see the in-browser code editor where you write the code that will run when your Action is triggered. Take a look around the code editor first. You'll see a "play button" icon for testing your Action before deploying it on the left. Under that, you'll see a key icon to enter secrets (such as webhook URLs). The box icon is where you click to add modules from NPM.
Above the code editor and to the right, there are three buttons. Version history lets you see and revert back to previous versions of the Action. Next is Save Draft; if you're not ready to finalize everything in your Action, you can save it as a draft to work on later. Lastly, there's Deploy, which you use when you've tested your Action and it's ready for prime time!
The code editor is pre-populated with the appropriate code for the kind of Action you're writing. In this case, it contains the onExecutePostUserRegistration function. Inside this function, you'll write the code to run after the user registers a new account.
Add webhook URL as a Secret
Time to use that webhook URL you've been keeping safe! Click the key icon on the left side of the code editor. This will open the side menu; click the blue Add Secret button. This opens up the Define Secret modal, which has fields for the name of the secret and the value it will hold.
Name the secret SLACK_WEBHOOK_URL in the key field, then paste your Slack webhook URL into the value field. Now click Create.
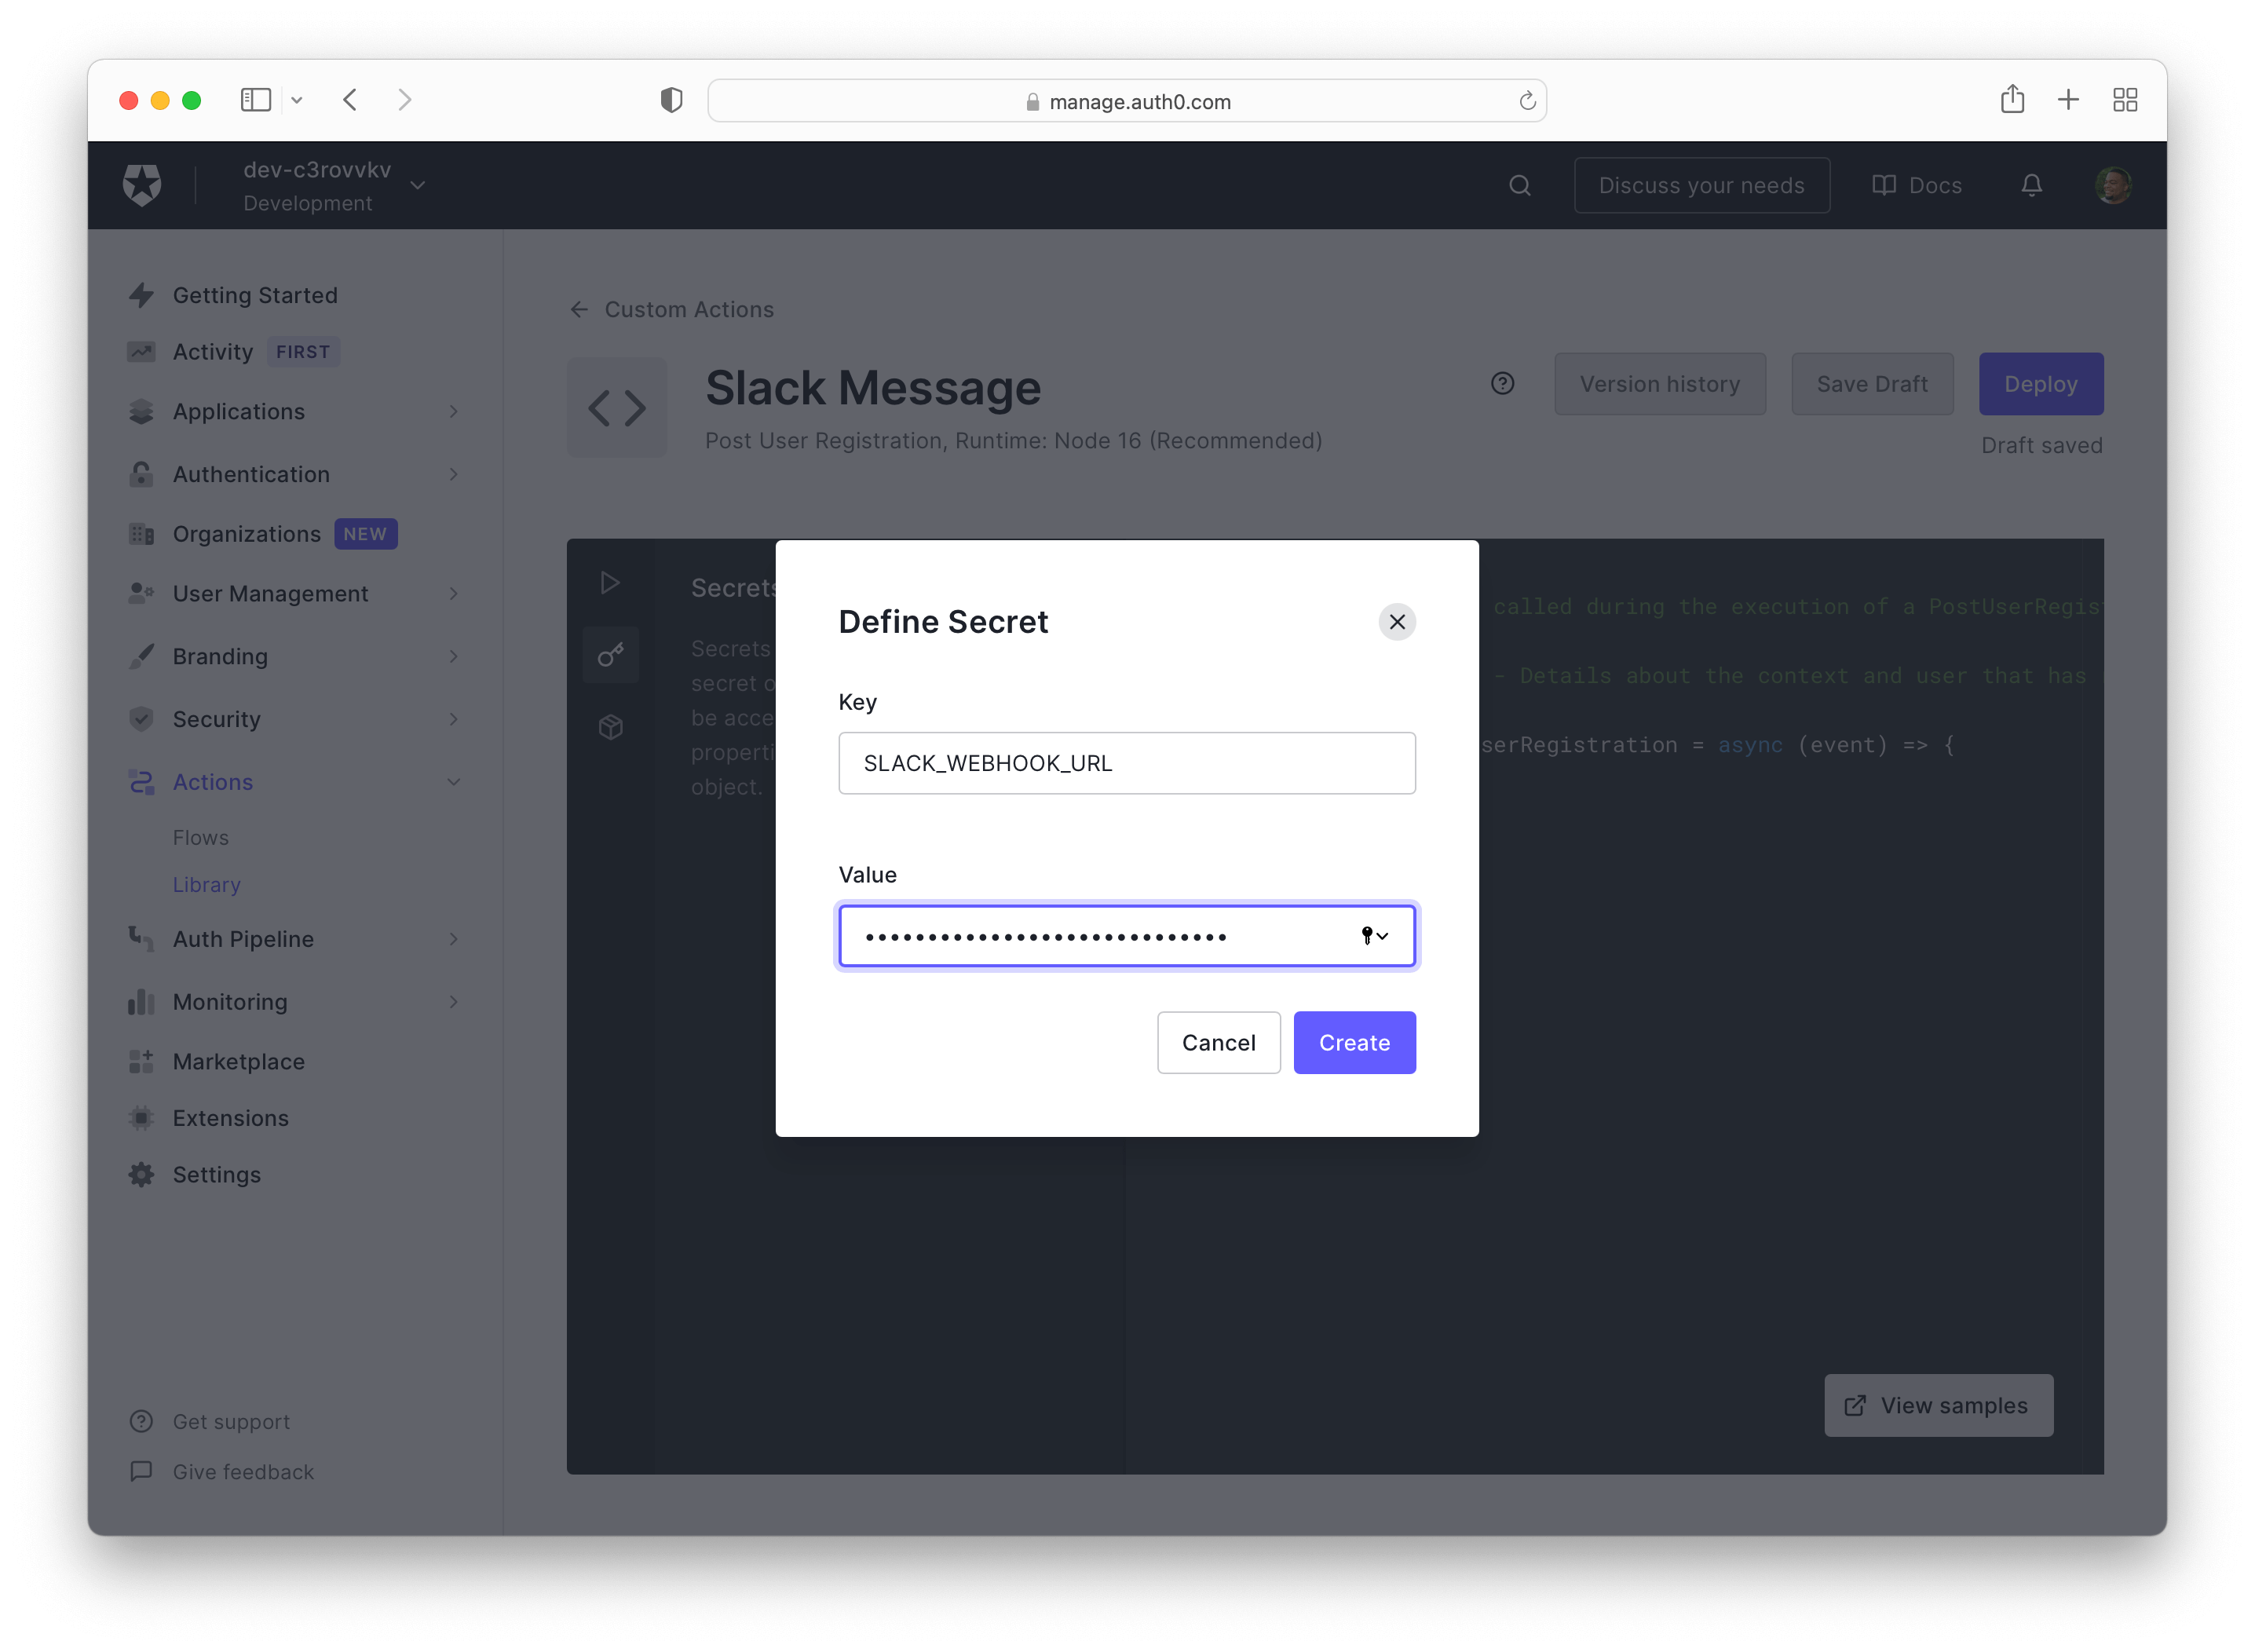
The page will refresh, and you'll see your secret has been added to the Secrets menu.
When secrets are created, their values are never revealed. Auth0 encrypts and stores all secrets securely.
Add npm package
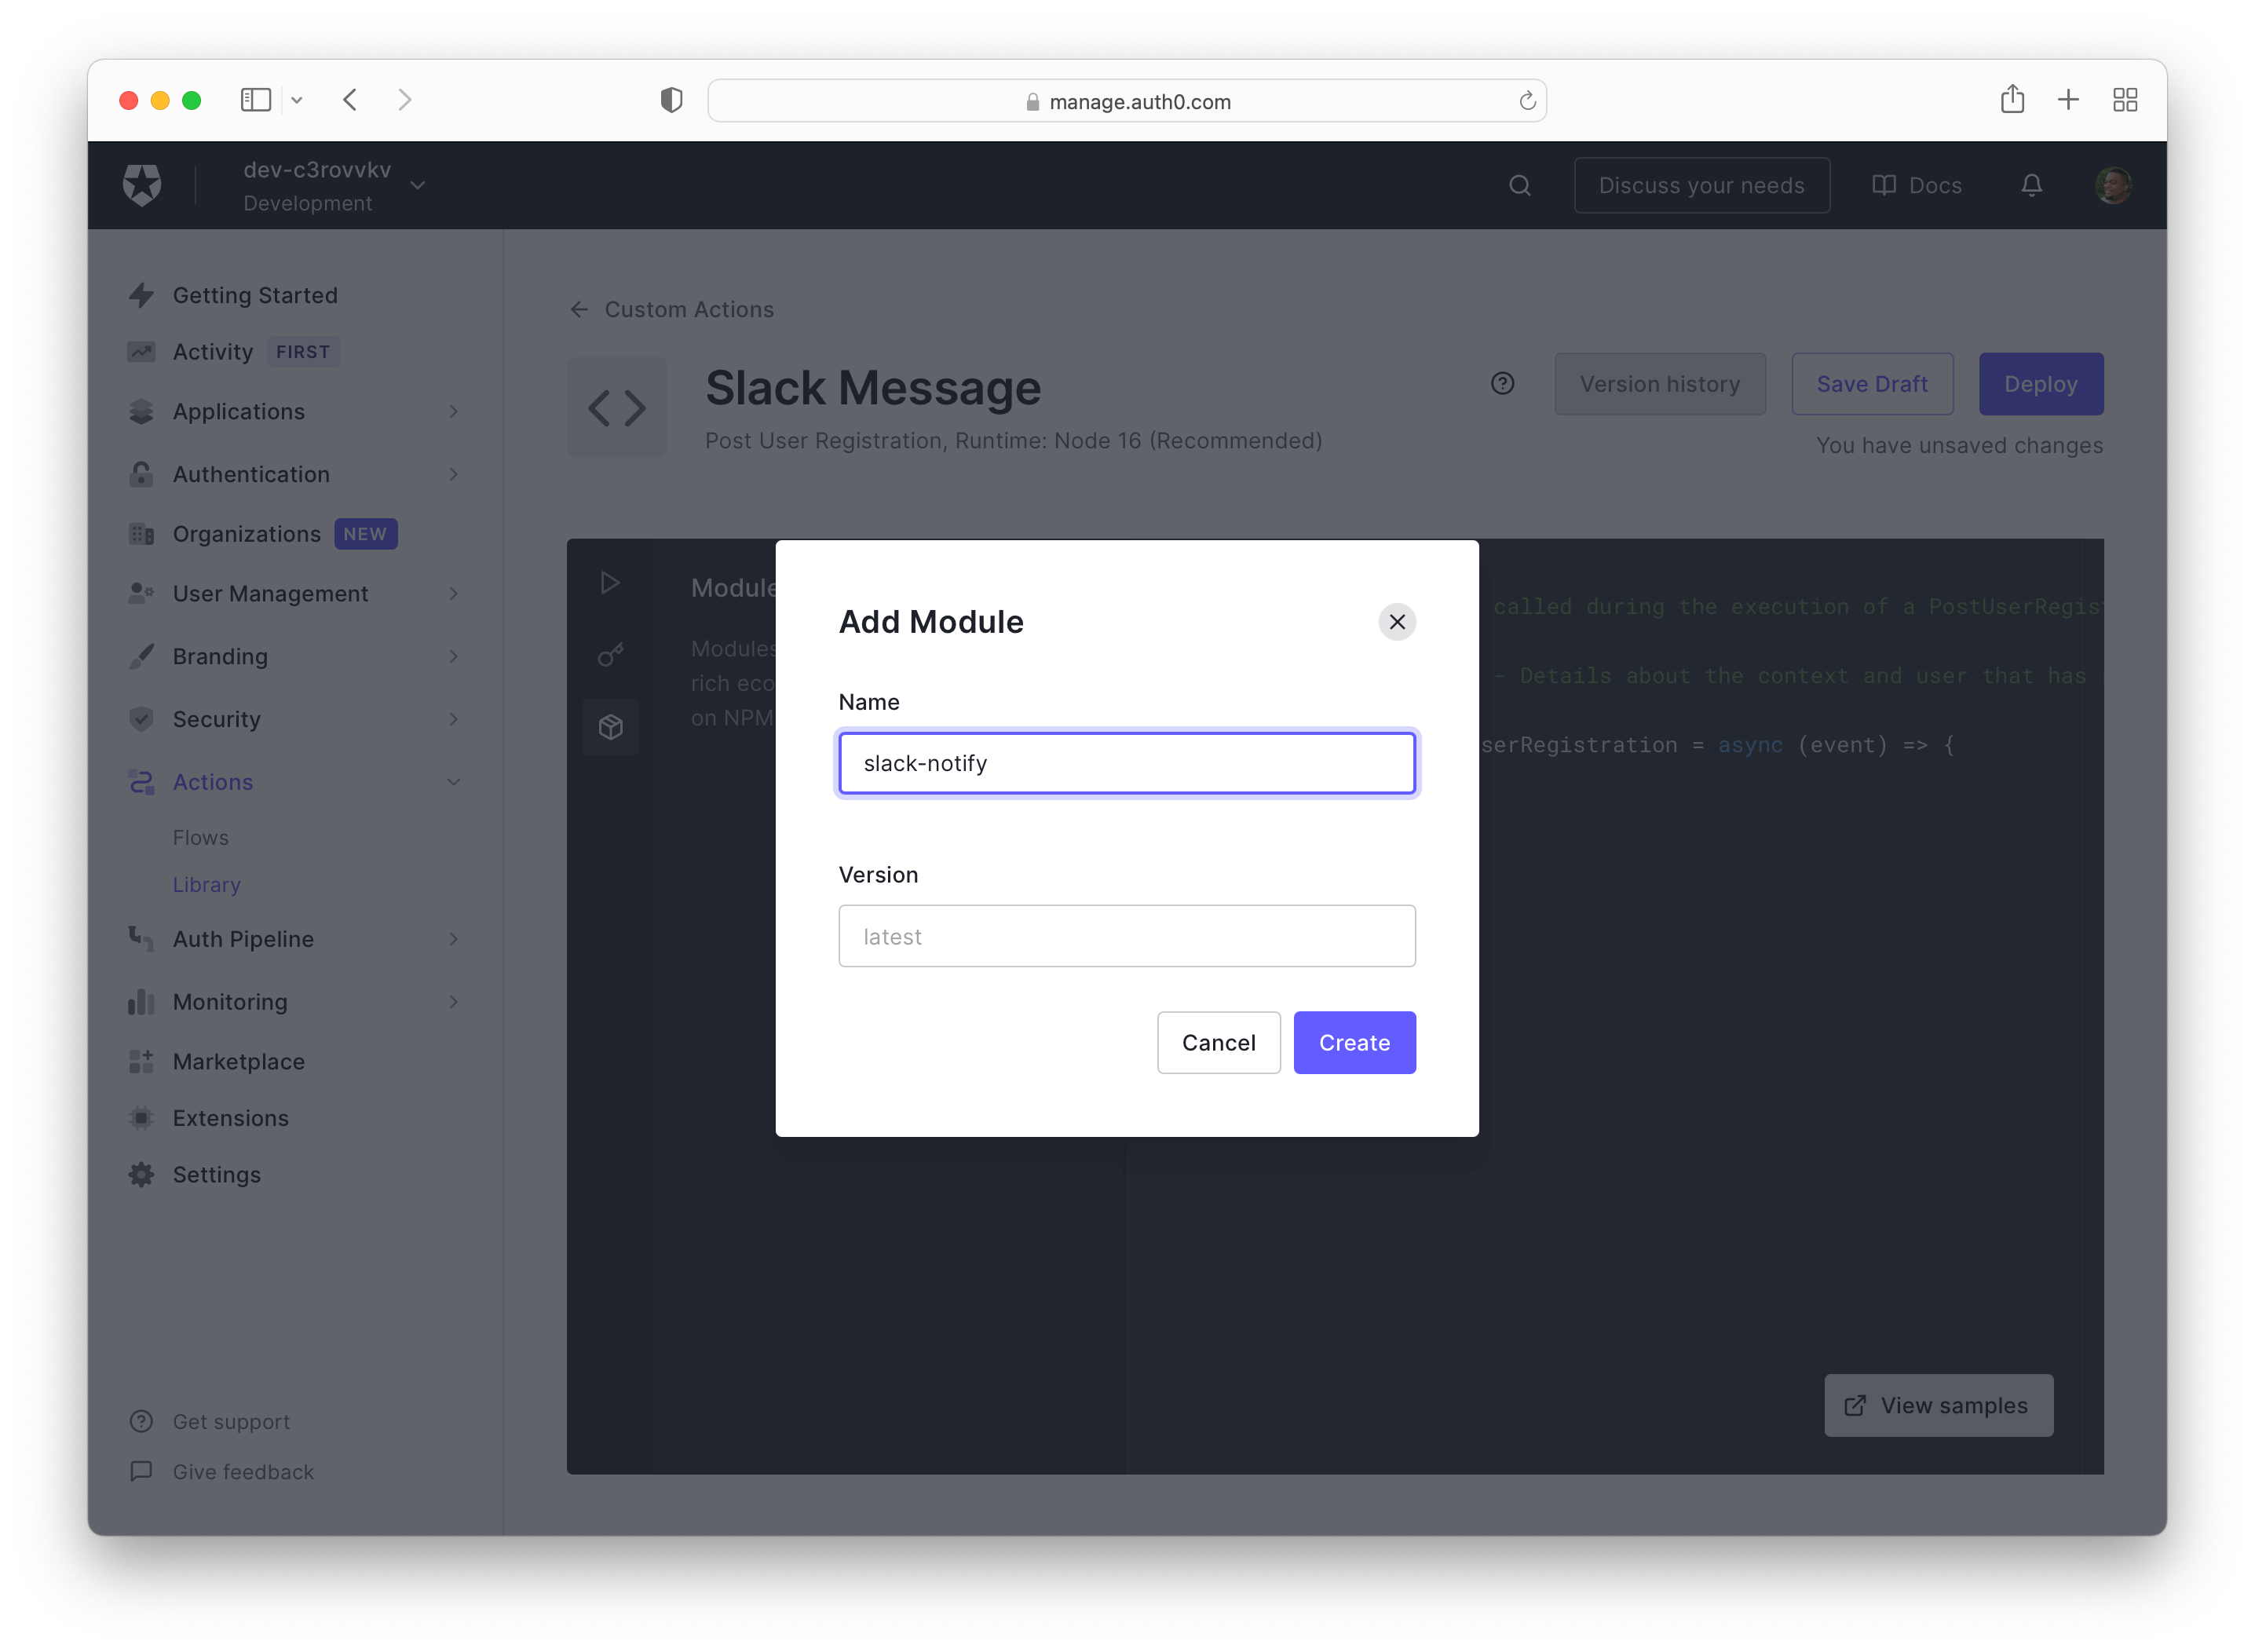
With Actions, you can choose from over 1,000,000 public npm packages and add their functionality to your Action. This action will use the 'slack-notify' npm package. It's a Node.js wrapper around the Slack webhook API that makes it easy to send notifications to Slack from external applications.
Click the box icon to bring up the Modules side menu and click the blue Add Module button. In this modal, you add the name and version of the npm package. Enter slack-notify for the name. The name has to match the package's name as listed in npm, so make sure you check its name to be sure you're providing the correct one. The version is set to the latest by default. Now click Create, and all the pieces to write the code that will send a message to Slack will be in place.
Write custom logic
The in-dashboard code editor works like your own editor that you know and love. The code that you enter into it is hosted and maintained by Auth0. Whenever you want to make changes to your Action in the future, you can do so without touching your codebase.
First, you'll add the slack-notify npm package at the top of the code editor by typing const initSlackNotify = require(slack-notify).
Next, you'll see the onExecutePostUserRegistration function. This async JavaScript function will run after a user is registered and saved to the database. Create a slack variable and pass the slack-notify module with your secret webhook URL inside this function.
Every Action has an event object that has information related to the trigger. You'll use it to get access to the webhook URL you stored as a secret earlier. The code will look like this:
const slack = initSlackNotify(event.secrets.SLACK_WEBHOOK_URL)
Then, below the slack variable, create a message variable that will include the text to be sent to the Slack channel. Set it to a template string with the text "New User" and the user's email address. The event object has the newly registered user's email address. You can display it by passing event.user.email to the template.
const message = `New User: ${event.user.email}`
Lastly, write the code to actually send the message. The slack-notify npm package has 3 different notification methods bundled already: bug, success, and alert.
bug- used for errors.alert- used for when something important happens.success- used for when messages go through with no errors.
You'll use the success method in this example. Within the success method, pass in an object with a key of text (which is one of the built-in custom fields of the slack-notify package) set its value to the message variable.
slack.success({
    text: message
  })
};
With this code, when a new user successfully signs up, a message with the user's email will be sent to Slack.
You should make sure it works as intended before deploying it. You can do this inside the Auth0 dashboard without having to leave the site. Click Save Draft in the upper right corner before starting the test.
Here is the complete code for the Action:
const initSlackNotify = require('slack-notify')

exports.onExecutePostUserRegistration = async (event) => {
  const slack = initSlackNotify(event.secrets.SLACK_WEBHOOK_URL);
  const message = `New User: ${event.user.email}`

  slack.success({
    text: message
  })
};
Test the Action, Then Deploy It
With Actions, you can run tests right in the browser without making any changes in your app or "live-testing" with users. Click the "play button" icon on the left side of the code editor. With this section open, you can see the contents of the event object in case you want to use some of the other information. At the bottom of the page, click the Run button at the bottom of the screen. The "Test Results" screen slides up, and the Commands and Error fields should be empty.
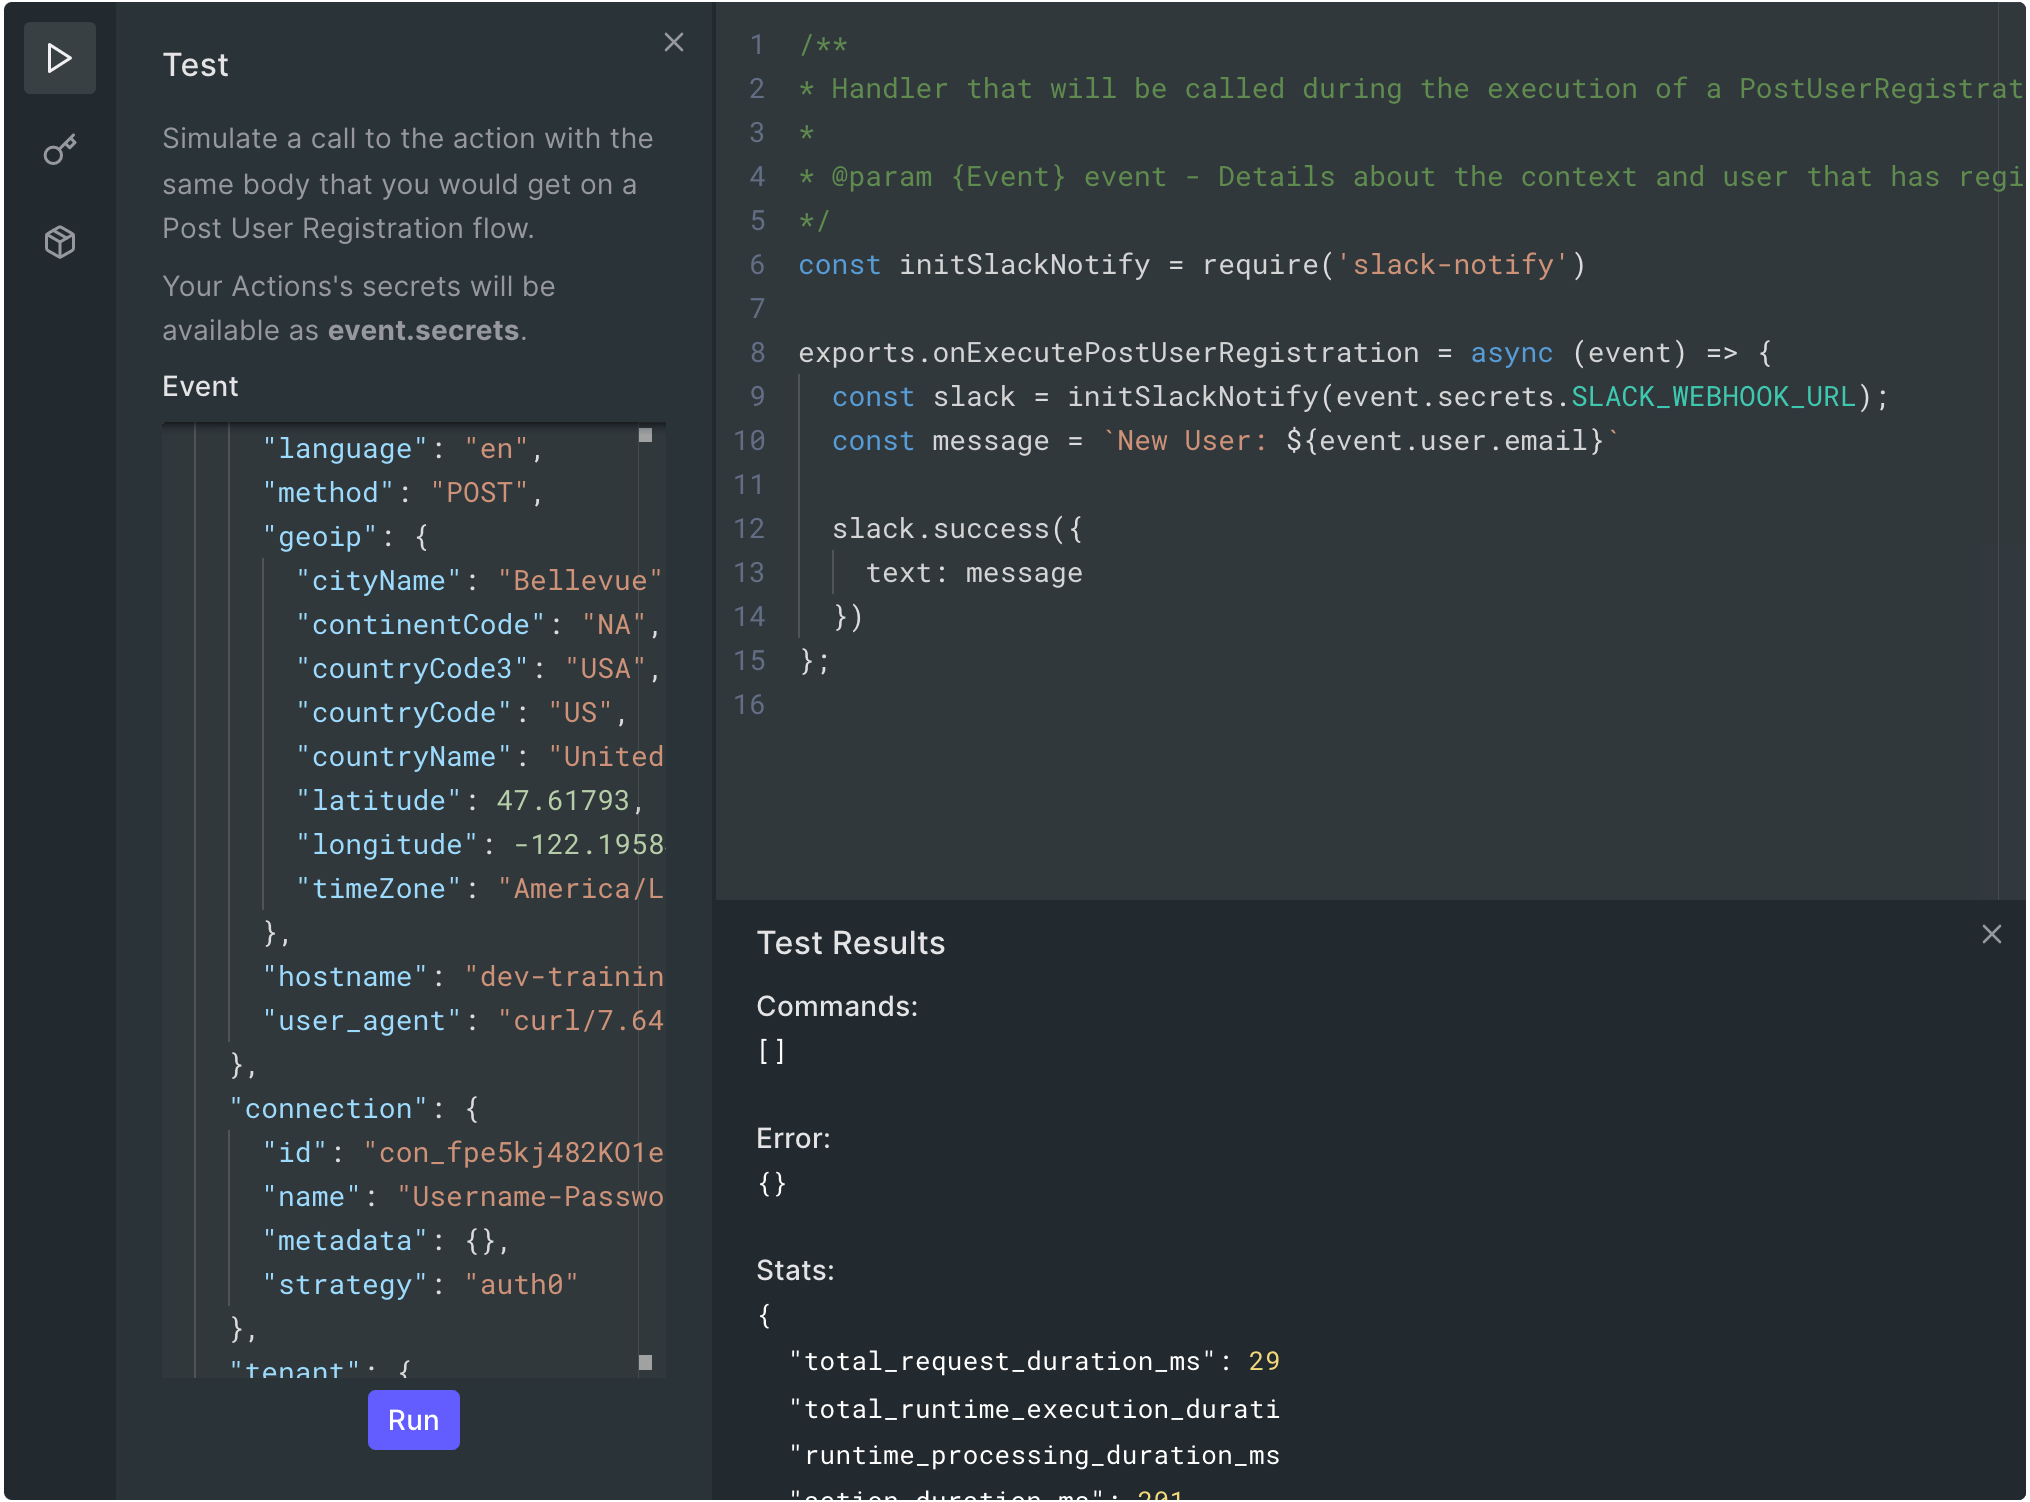
Go to the Slack workspace you created earlier, and see the new message with the sample email address provided by the test event object.

With everything in working order, click Deploy. This will record the Action and give it a version number. This way, you can continue to make changes to the Action without affecting the deployed version.
Now that the Action is deployed, it's time to add it to your Auth0 tenant so you'll get notified when a new user signs up for your site!
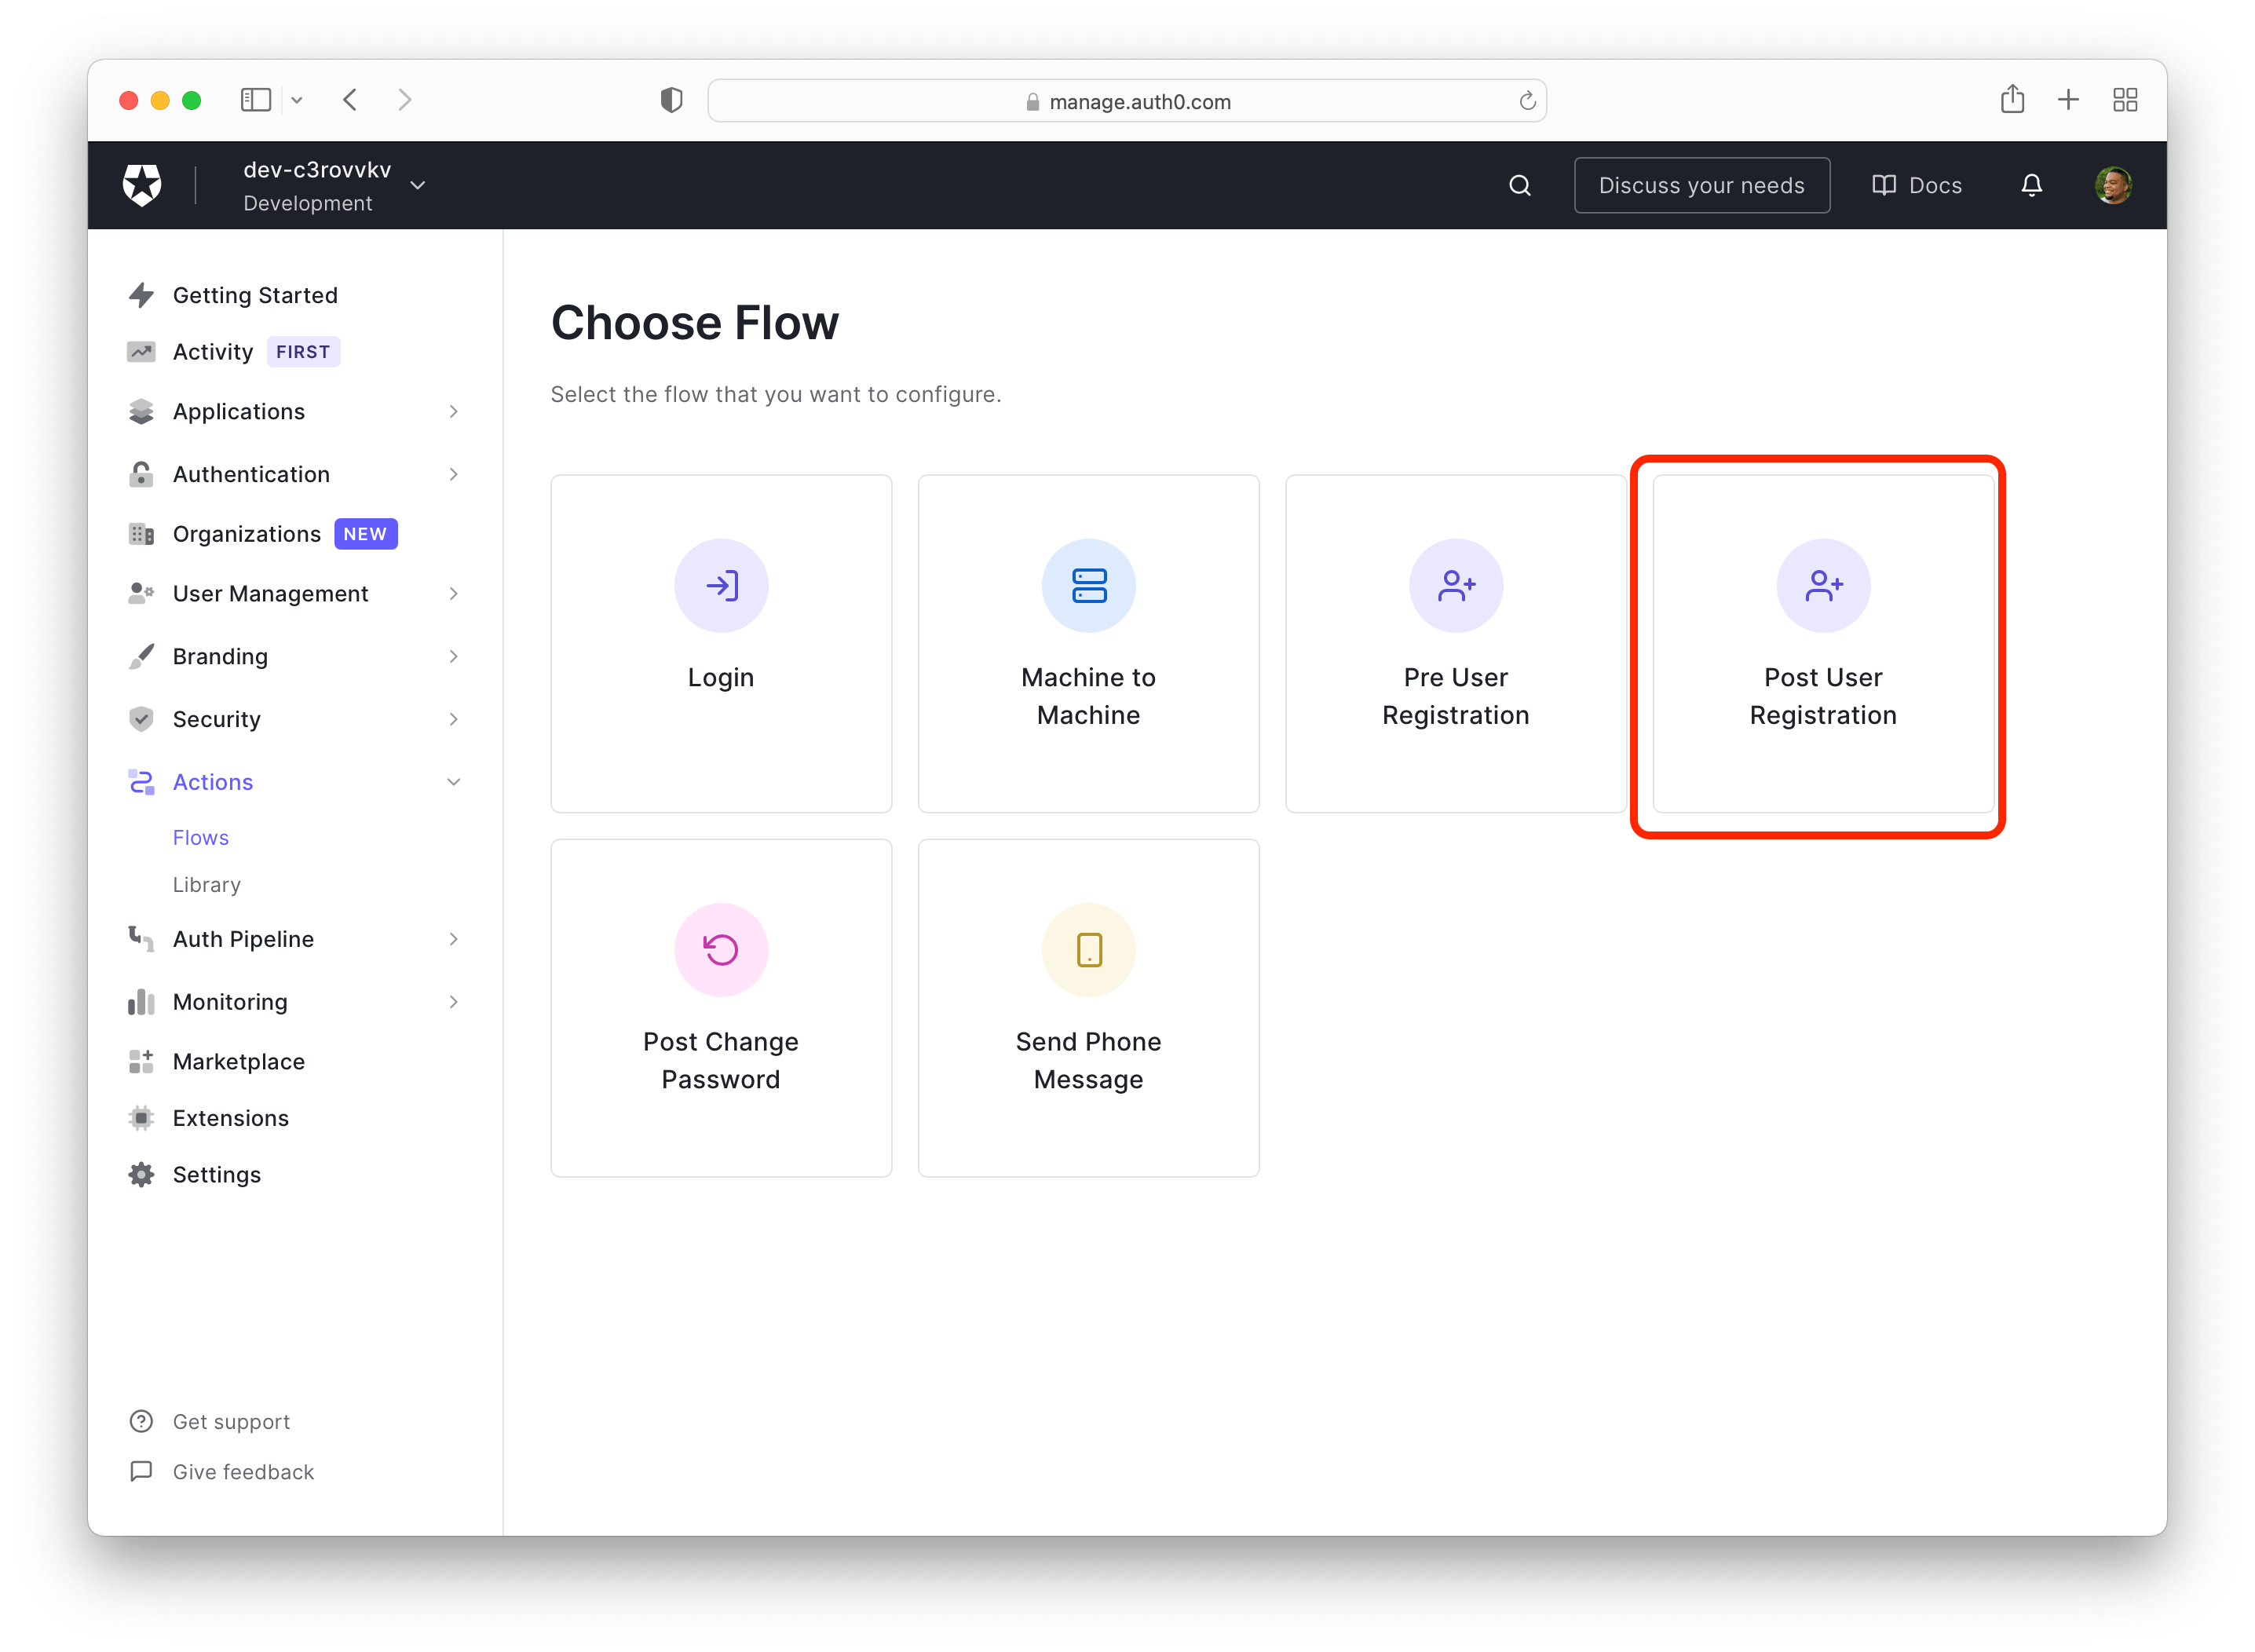
Add the Action to the Post User Registration Flow
The last thing to do is attach your new Action to a flow. Flows are different points in the Auth0 lifecycle, from logging in to saving a new user to the database. When you add an Action to one or more of these points, the Actions will trigger in the order in which they are listed.
You'll use the Post User Registration flow in this tutorial. On the left side of the screen, click Actions > Flows. This will display all the currently available flows. Select Post User Registration, which executes after a user is added to the tenant’s user database.
The following pages show the Actions drag and drop flow visualizer. Here you can add one or more Actions that will run in order after the selected trigger. The Actions are on the right; this section has a tab for installed Actions from the Auth0 marketplace and a custom tab for Actions you created. Click Custom, then drag and drop your Slack action between the Start and Complete points.
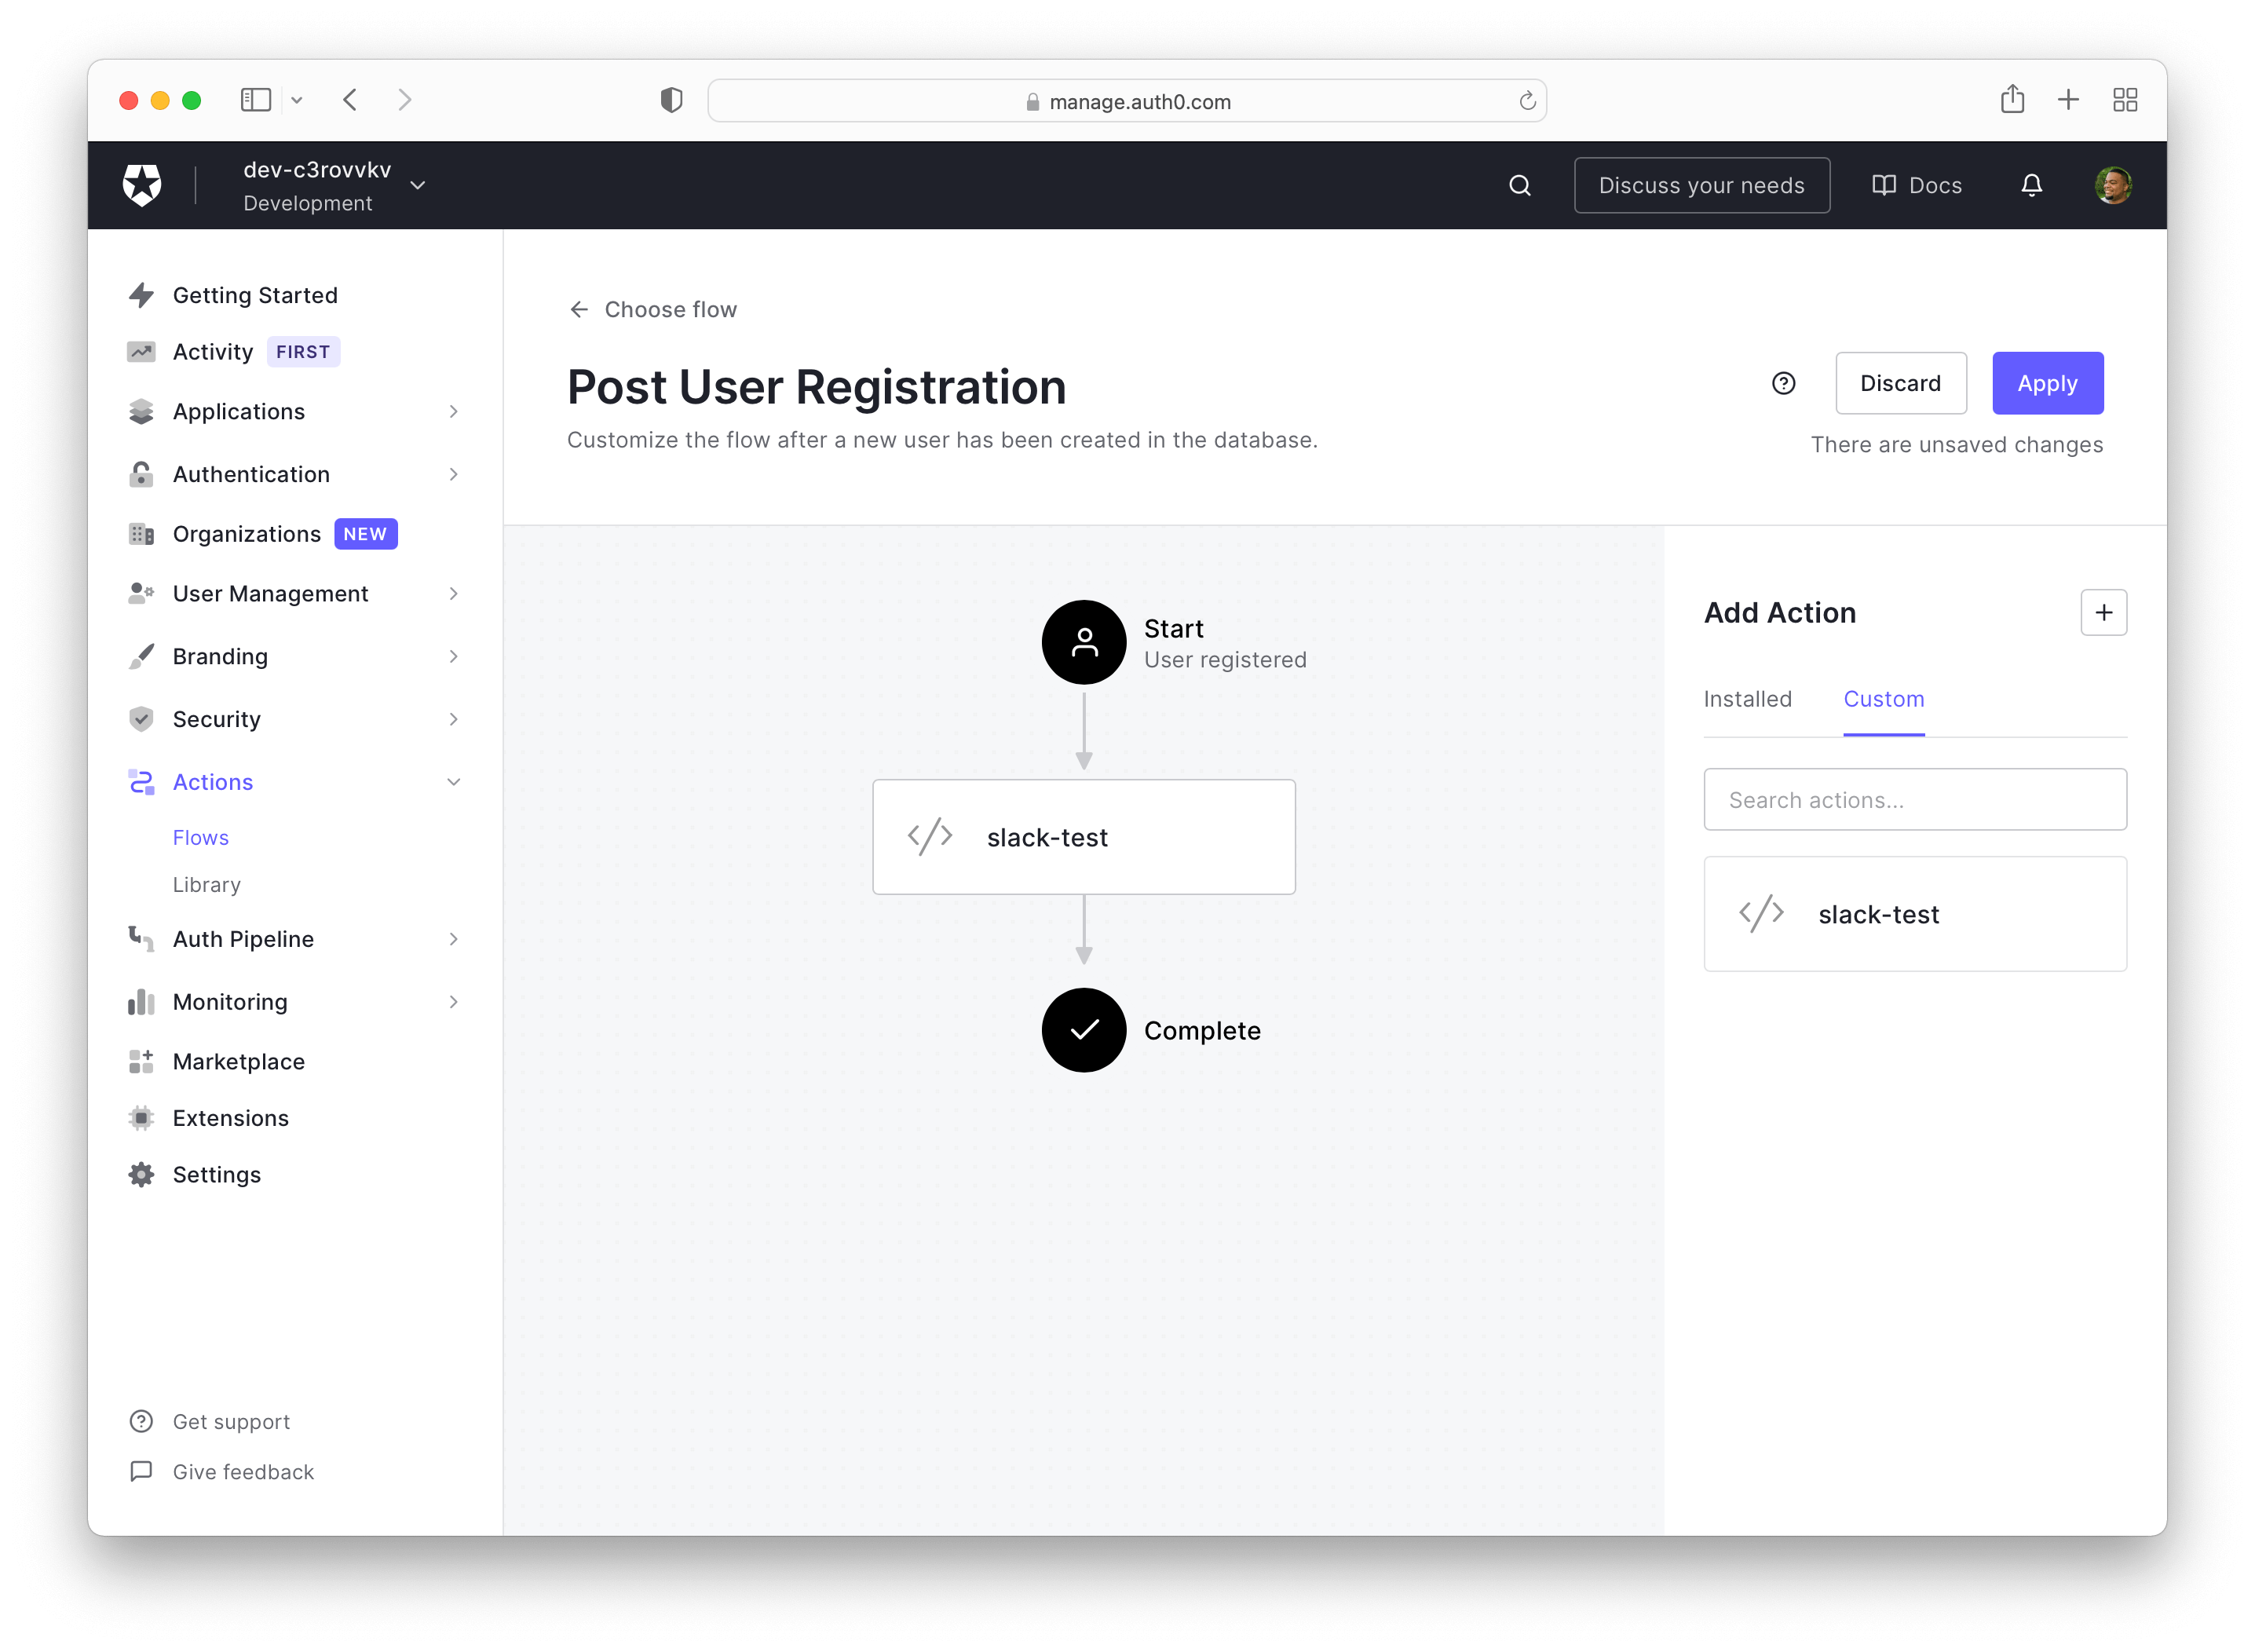
Once that is done, click Apply. Now the Action is ready for prime time and real users!
Sign up a new user on any of the sites in your Auth0 tenant, and you should see that user’s email address appears in Slack.
You could also use the Try your Login box option in the Auth0 dashboard's Getting Started page.
Conclusion
Actions offer you new opportunities to build authentication experiences that are truly unique to you and your application. The access to npm packages lets you add custom code and reduce maintenance for you. Testing your code in the browser without running a local build saves you time. The drag-and-drop editor lets you add a new feature without touching your own codebase, because the Actions code is hosted by Auth0!
Now that you know to create a custom Action, check out the Actions Triggers page in the Auth0 docs to see what other kinds of Actions you could develop.
About the author

Will Johnson
Developer Advocate
Will Johnson is a Developer Advocate at Auth0. He loves teaching topics in a digestible way to empower more developers. He writes blog posts, records screencasts, and writes eBooks to help developers. He's also an instructor on egghead.io.
View profile