
In this article we introduce the concept of stateless sessions for developers used to stateful sessions. We point out the benefits and highlight how a team could go. We will also show a sample setup using JWTs obtained through Auth0.
“If you want to migrate to stateless sessions, this is your guide!”
Tweet This
The Benefits of Going Stateless
Authentication has been a stateful affair for a long time. Let users input their credentials, generate a unique session id, store it server-side and hand it back to the user. All user details are to be stored server-side. Every service that requires some sort of information about the user must consult the data store. In a sense, this is expected. If user data is centralized, there are no ways user data can be fudged. Furthermore, no out-of-date problems are possible. Everything is stored in a central place. For complex architectures this can be limiting: getting data from the central store for every other operation can be troublesome. If authentication and authorization were stateless each operation would carry all necessary data contained in them. So how could we go about doing this?
One of the cool things about session ids is that they are opaque. “Opaque” means no data can be extracted from it by third parties (other than the issuer). The association between session id and data is entirely done server-side. Are there any other ways of achieving something of the sort without relying on state? Enter cryptography.
One way of achieving such a feat is by encrypting data. Consider this: what if we created a special “session id” that was the result of encrypting data with a secret key (stored server-side). We could send that data to a client without worrying about him or her ever reading what was contained in it. In other words, we could keep the opaque feature of our session ids intact but at the same time embed arbitrary data in it. That means that getting to that data server-side needs no additional communication between a server and the datastore: the server only needs to decrypt the data contained in that special “session id”. Of course, calling that a “session id” is no longer accurate. From now on, we will know these elements as tokens.
So how is this useful? What type of data could we store in a token such that it proved beneficial in comparison to classic session ids? For starters: the actual server-side user id and name. Now, whenever a service needs to access additional data from a user, it doesn’t have to first map a session id to a user, it can take the user id directly from the token, after decrypting it.
Let’s take this a step further. What if we included an additional field in the token, one that carried information about the types of operations available for the user? Say we call that field “scope” and we define two scopes: “user” and “admin”. Admin users have access to additional administrative operations. Now, whenever a user uses the token to perform an operation, say by making a call to an API endpoint, the service handling that endpoint can simply validate and decrypt the token, look for the right “scopes” in it and authorize (or deny) the user to perform that operation.
As you can see, having a token carry a certain payload reduces chattiness in the backend. Certain operations, and the roundtrips and transactions associated with them, can be completely eliminated. In other words, certain state, usually handled in the backend, can now be passed to the client in a safe way. That state is then carried by the client and updated accordingly each time the client performs an operation against the server. The client cannot manipulate that state. The integrity of that state is crucial to the security and integrity of the backend. This is why validation and encryption are requirements.
“Having a token carry a certain payload reduces chattiness in the backend”
Tweet This
There are drawbacks, though. While session IDs are usually small, tokens carrying a payload can be expected to be bigger. As these tokens are part of every call, there exists a point at which the overhead of the additional data becomes problematic. We will explore this and other issues in later sections of this article.
We will now focus on an actual implementation for what we have described so far: JSON Web Tokens.
The Technical Magic: JWTs, Digital Signatures and Encryption
Although it certainly is possible to encrypt any data, encode it in a text representation and then pass that to the client as a token on your own, there already exist convenient alternatives for doing just that. A popular one is the JSON Web Token (JWT) spec, along with the JSON Web Signature (JWS) and JSON Web Encryption (JWE) specs, which complement the actual data format with signatures and encryption.
Interested in getting up-to-speed with JWTs as soon as possible?
Download the free ebook
Using a common data format allows for easy interoperability with established solutions. It is perfectly fine to develop your own token solution (as long as you don’t roll your own crypto). However, JWTs are the established solution, and you can’t go wrong with them.
Here’s how a JWT typically looks after encoding and signing it:
eyJhbGciOiJIUzI1NiIsInR5cCI6IkpXVCJ9.eyJzdWIiOiJKb2huIERvZSdzIHVzZXIgSUQiLCJuYW1lIjoiSm9obiBEb2UiLCJzY29wZSI6WyJhZG1pbiIsInVzZXIiXX0.uf_oBjC19qj28JR_3z-gu5Lb7Pbk3wWgnyiTZkJeoYc
Head over to jwt.io, paste the JWT and have a look at its contents. The shared secret is “secret” (no quotes). You will notice a typical JWT is composed of three parts:
- Header: a small JSON object describing the algorithm and the type of JWT in question.
- Payload: the actual usable data, a JSON object of arbitrary content (although some fields are defined by the JWT spec).
- Signature: what makes a JWT safe to use: both the header and the data can be validated against tampering using this.
Each part is separated by a dot (.). By making use of a convenient data representation such as JSON, JWTs have ensured ease of use in many different languages and frameworks. JSON is also lightweight when it comes to syntax, which helps in keeping the token as small as possible.
In our sample JWT, the payload is quite small:
{
  "sub": "John Doe's user ID",
  "name": "John Doe",
  "scope": ["admin", "user"]
}
Note, however, crucial information is included in it. We have an actual user ID, which could be used to directly access relevant user information from our database. There is also the actual user name. No need to fetch it from a database if you just want to show it. And last, but not least, there are “scopes”, used in our example to authorize the user to perform certain operations. Again, there is no need to check this user’s authorization level by going to our user database, this data is available right in the JWT.
Of course, none of this could be trusted if the JWT weren’t signed. JWTs allow for different signing and encryption algorithms. These are specified in the JWT header. In this case, our sample JWT uses the rather common HS256 algorithm (as defined by the JWS spec). HS256 is simply an HMAC + SHA256 algorithm with Base64 encoding.
For the most part, JWTs are usually just signed. However, if your JWT contains data that must not be visible to third parties, then encrypting it using JWE is your only choice. A typical encryption scheme uses an already signed JWT as the payload for encryption. This is known as a nested JWT. It is acceptable to use the same key for encryption and validation.
A word of caution: although JWTs aim to reduce the complexities involved in developing your own solution, care is still needed. A rather common attack against signed JWTs involves stripping the signature and then changing the header to reflect a lack of signature. If you are not enforcing a check for the presence of a signature in your server, a forged JWT could pass as a valid one. Arguably, proper API design on the part of JWT library developers could help in this case.
Going Stateless: Updating a Stateful Architecture for Stateless Operation
First things first: before going stateless, make sure this is appropriate for your architecture. Although we have talked about the benefits of keeping state client-side in the form of signed tokens, there are use cases where this is not the best option. Item 10 in 10 Things You Should Know About Tokens and Cookies makes a good point: if you find yourself requiring ever bigger tokens to accomplish something, then the disadvantages probably outweigh the advantages.
A typical (simplified) stateful architecture will look like this:
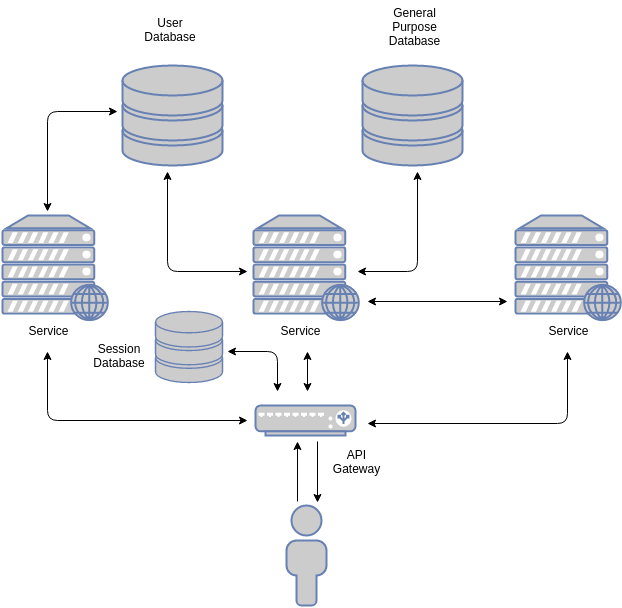
Requests arrive at the public gateway. The public gateway may handle, among other things, load balancing and authentication. Once the request is deemed valid, it usually is passed to internal services. The gateway may embed additional data in the request: the data associated to a session. If the gateway does not do this, each service may in turn query the relevant databases themselves. In essence, whatever data cannot be extracted from the session id must be retrieved from a datastore.
In contrast, a simplified stateless architecture may look a bit like this:
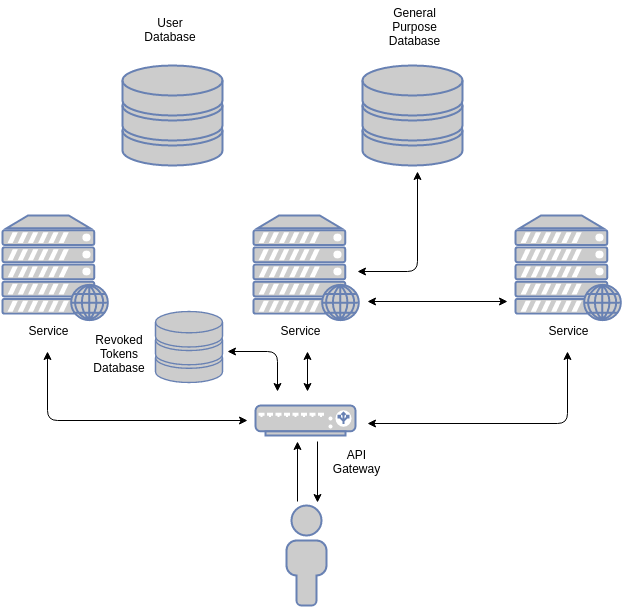
The obvious difference lies in the way the gateway authenticates the incoming request. By using a JWT, the gateway validates the token through its digital signature. Most token-based systems rely on a “revoked tokens” database. This is a security feature of certain systems: since tokens are validated cryptographically, if a token is leaked, it will still be valid. If there is any reason to believe a token was leaked, it should be blacklisted to prevent further access. The only way to do this is by checking each token against a revoked tokens database in the backend.
An alternative way of dealing with leaked tokens is by setting a short expiration date in them. Every time the token is used this date is validated. If the token has expired, the user must reauthenticate. If the date is valid at the time the token is used for a request, a new, different token, with a new expiration date may be issued. In this way, a single leaked token is only valid for a short window of time. In practice, timed-tokens and blacklists are used in combination. Blacklists are used for long-lived tokens.
For very sensitive tokens there is yet another option: to change the encryption or signing key. When this is done, all previously issued tokens become invalid. This affects all tokens, so this option is usually reserved for extreme cases.
As you can imagine, checking for blacklisted tokens negates some of the benefits of the token-based approach. However, tokens can have a greater impact: by keeping relevant information for common calls in them, some requests can be handled without hitting the datastore (or by making queries smaller). This is why there are less arrows pointing to the user database in the stateless diagram. A subtle but important difference.
Note that although the user database is not used by any of the services in the image, it is still necessary (other services may require it). There is only so much information a token can carry.
Going Stateless
The good thing about going stateless is that you can use both approaches at the same time. If you currently have a session-id based architecture, you can add JWTs to certain calls. Or you can embed session-ids in the token and have the API gateway unpack them and then pass them on to internal services.
Another alternative, explained in detail in 5 Steps to Add Modern Authentication to Legacy Apps, involves making the JWT a cookie. In other words, using the JWT as a unique session id. If your architecture allows for flexibility when it comes to session id formats, this might be the best option.
A per-service based approach is usually a good starting point. This allows you to isolate and test changes in selected non-critical parts of your architecture. The gateway will need to be updated though, and that is a critical part of any service-based architecture. Keep this in mind.
A combined approach: cookies and session ids
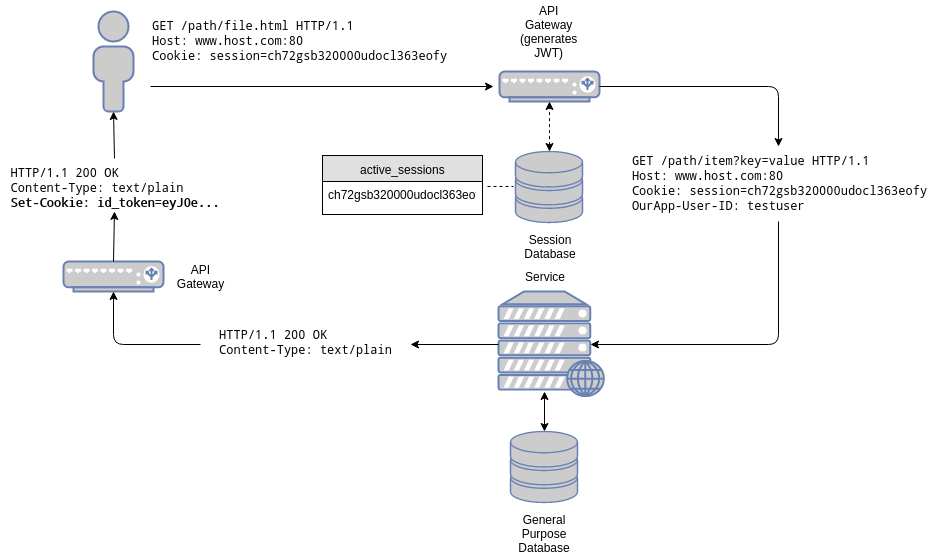
So, let’s suppose you currently have a session based architecture:
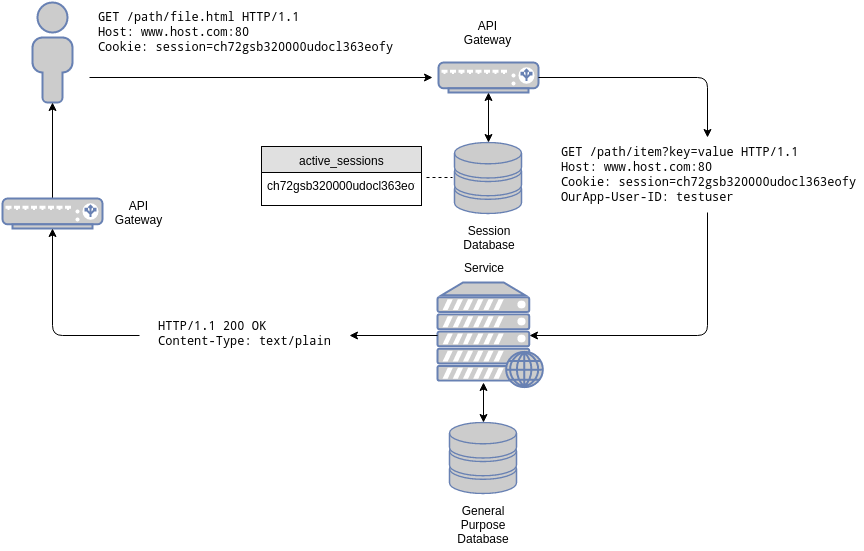
The gateway, as usual, validates session ids. In other words, it checks for its presence in the “active_sessions” table. A key-value database is used for this, as single-key queries are optimally handled by it. Data associated to that session is also stored in that database. In our case only one field is associated to a session id: the user id. Since the associated data is small, and a request is necessary to check the validity of the session, the data is retrieved and added as a special header to the original request: OurApp-User-ID.
The user id is a unique identifier (a primary key) that can be used to access user data in the users’ database, a separate, relational database.
When a request is received, the API gateway looks for the Cookie header, extracts the session id from it, and queries the session database for its presence. If the session is present, the request is passed on to the right service.
The service may, in turn, perform additional queries based on the user id to accomplish its task.
Now let’s take a look at how a mixed approach would work.
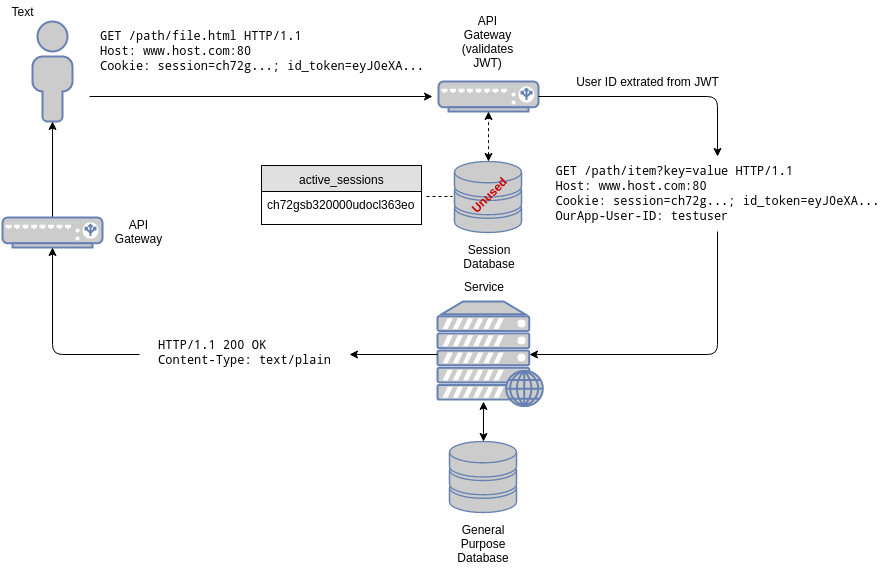
For our mixed approach we will embed the JWT in the cookie. This assumes our cookie already supports multiple key/value pairs internally (most HTTP frameworks support this). In other words, our cookie will now carry the session id and the JWT.
When a request arrives at our gateway, now we check for the presence of the JWT. If the JWT is present in the cookie, we validate it (this includes checking for its presence in our list of blacklisted tokens). Additionally, since we don’t know whether the target service supports JWTs or not, we compare the embedded session in the JWT with the cookie session. If they match, the cookie can also be considered valid. If this is the case, the gateway extracts the user id from the JWT, adds it as a OurApp-User-ID header and then forwards the request to the target service. The gateway may also add a session id extracted from the JWT if it is missing from the original request. This way, what the target service “sees” is perfectly compatible with what would be present in the stateful version of our architecture.
On the other hand, if the JWT is not present, the traditional path is followed: the session is validated against a database, the user id is added as a header and the request is then passed to the target service. Additionally, the gateway may generate a new JWT and embed it in the response, as a new cookie. In other words, this upgrades the cookie to the mixed session + JWT cookie. From then on, if the JWT is present it is used instead.
As services are updated to use the JWT, the session-id and OurApp-User-ID header may be dropped from our API. When this is the case, we have fully switched to the stateless approach.
Negative aspects
If you have read this far, you might we wondering what are the negative aspects of switching to a stateless architecture. In fact, if your sessions are already big enough, it may even be counterproductive.
There is a point at which the size of the token becomes big enough to play against its use. This point depends on several things: request payload size, latency, cost of performing additional queries at the backend, etc. However, you should always strive to keep tokens as small as possible but not smaller than necessary. In general, tokens can be kept in manageable sizes.
If that is not the case, aggregating requests might be an option. If a request is big enough to justify the size of a big token (in other words its overhead is not that big), big tokens might still be a reasonable choice. Although not very common in modern web applications, the Data Transfer Object (DTO) pattern might be worth exploring.
Since tokens in general remain the same for all requests (although possible, endpoint specific tokens are not the norm), the DTO pattern may not easily apply to your architecture. In that case, session ids (or a mixed approach) might be worth keeping.
In general, a typical session id is 21+ bytes long in string form. On the other hand, a JWT with a user id, authorization data and the actual user name (to easily display it in the frontend) is 170+ bytes long in string form.
It will depend on your specific use case whether this difference is negligible or not, or whether the speed difference between a database lookup and JWT validation favors one case or the other.
Other factors such as API call frequency must be considered as well. For instance: are our request queues too big due to many concurrent users? How does the use of bigger tokens impact on our server’s memory in this case? Will using a database increase latency or will JWT validation do so due to hardware limitations? What is the breaking point? As usual, only data from your specific use case can tell. Benchmark and test to your heart’s content.
Example: Using Auth0 and JWTs for Authentication and Client Side Sessions
For our example we will make a simple shopping application. The user's shopping cart will be stored client-side. In this example, there are multiple JWTs present. Our shopping cart will be one of them.
- One JWT for the ID token, a token that carries the user's profile information, useful for the UI.
- One JWT for interacting with the API backend (the access token).
- One JWT for our client-side state: the shopping cart.
Here's how the shopping cart looks when decoded:
{
  "items": [
    0,
    2,
    4
  ],
  "iat": 1493139659,
  "exp": 1493143259
}
Each item is identified by a numeric ID. The encoded and signed JWT looks like:
eyJhbGciOiJIUzI1NiIsInR5cCI6IkpXVCJ9.
eyJpdGVtcyI6WzAsMiw0XSwiaWF0IjoxNDkzMTM5NjU5LCJleHAiOjE0OTMxNDMyNTl9.
932ZxtZzy1qhLXs932hd04J58Ihbg5_g_rIrj-Z16Js
To render the items in the cart, the frontend only needs to retrieve and decode the JWT from its cookie":
function populateCart() {
    const cartElem = $('#cart');
    cartElem.empty();

    const cartToken = Cookies.get('cart');
    if(!cartToken) {
        return;
    }

    const cart = jwt_decode(cartToken).items;

    cart.forEach(itemId => {
        const name = items.find(item => item.id == itemId).name;
        cartElem.append(`<li>${name}</li>`);
    });
}
Note that the frontend does not check the signature, it simply decodes the JWT so it can display its contents. The actual checks are performed by the backend. All JWTs are verified.
Here is the backend check for the validity of the cart JWT implemented as an Express middleware:
function cartValidator(req, res, next) {
    if(!req.cookies.cart) {
        req.cart = { items: [] };
    } else {
        try {
            req.cart = {
                items: jwt.verify(req.cookies.cart,
                                  process.env.AUTH0_CART_SECRET,
                                  cartVerifyJwtOptions).items
            };
        } catch(e) {
            req.cart = { items: [] };
        }
    }

    next();
}
When items are added, the backend constructs a new JWT with the new item in it and a new signature:
app.get('/protected/add_item', idValidator, cartValidator, (req, res) => {
    req.cart.items.push(parseInt(req.query.id));

    const newCart = jwt.sign(req.cart,
                             process.env.AUTH0_CART_SECRET,
                             cartSignJwtOptions);

    res.cookie('cart', newCart, {
        maxAge: 1000 * 60 * 60
    });

    res.end();

    console.log(`Item ID ${req.query.id} added to cart.`);
});
Note that locations prefixed by /protected are also protected by the API access token. This is set up using express-jwt:
app.use('/protected', expressJwt({
    secret: jwksClient.expressJwtSecret(jwksOpts),
    issuer: process.env.AUTH0_API_ISSUER,
    audience: process.env.AUTH0_API_AUDIENCE,
    requestProperty: 'accessToken',
    getToken: req => {
        return req.cookies['access_token'];
    }
}));
In other words, the /protected/add_item endpoint must first pass the access token validation step before validating the cart. One token validates access (authorization) to the API and the other token validates the integrity of the client side data (the cart).
The access token and the ID token are assigned by Auth0 to our application. This requires setting up a client and an API endpoint using the Auth0 dashboard. These are then retrieved using the Auth0 JavaScript library, called by our frontend:
//Auth0 Client ID
const clientId = "t42WY87weXzepAdUlwMiHYRBQj9qWVAT";
//Auth0 Domain
const domain = "speyrott.auth0.com";

const auth0 = new window.auth0.WebAuth({
    domain: domain,
    clientID: clientId,
    audience: '/protected',
    scope: 'openid profile purchase',
    responseType: 'id_token token',
    redirectUri: 'http://localhost:3000/auth/',
    responseMode: 'form_post'
});

//(...)

$('#login-button').on('click', function(event) {
    auth0.authorize();
});
The audience claim must match the one set up for your API endpoint using the Auth0 dashboard.
The Auth0 authentication and authorization server displays a login screen with our settings and then redirects back to our application at a specific path with the tokens we requested. These are handled by our backend which simply sets them as cookies:
app.post('/auth', (req, res) => {
    res.cookie('access_token', req.body.access_token, {
        httpOnly: true,
        maxAge: req.body.expires_in * 1000
    });
    res.cookie('id_token', req.body.id_token, {
        maxAge: req.body.expires_in * 1000
    });
    res.redirect('/');
});
Implementing CSRF mitigation techniques is left as an exercise for the reader.
Get the full example and check how it works! If you want to run your own version, you will need to sign up for a free Auth0 account.
Conclusion
Tokens, by virtue of being able to be validated on their own, require less queries in the backend. Additionally, custom data may be embedded in them, simplifying the flow of certain common operations such as authorization. The size of tokens may be a problem as the information contained in them gets bigger. Chatty architectures may worsen the symptoms in that case. For most scenarios, tokens are a great choice. Switching from a session based architecture to a token based architecture may be done incrementally. This makes it a great choice for old or new architectures.
About the author

Sebastian Peyrott
Senior Engineer