
TL;DR: The concept of coding for IoT devices, CLIs and WebAssembly is not a new concept. However, what if I told you that it is possible to use Golang for all three. TinyGo is a specialized project specifically designed and used for development in small places. This article explains the benefits of TinyGo, what it is, and how you can use it. It also provides you with a Golang IoT code example for you to see TinyGo in action.
What Is TinyGo?
TinyGo is Golang's baby brother. It is a compiler that allows a user to write the Golang code they are familiar with and run it in places people wouldn't have thought were possible. What this means is that the barriers to entry into some tech spaces are being gradually lowered. I say this because I am writing through experience.
How Is TinyGo Different from Golang?
Out of the box, Golang is a feature-rich, highly-performant, compiled language, which means that Golang is compiled to machine-readable code (those funky 1 's and 0 's everyone talks about).
In turn, being compiled to machine code allows it to run directly on the hardware — all that CPU/RAM power! Another really cool feature of Golang is that when building a binary of the written program, it includes extensive cross-compatibility for a wide from of different system architectures.
Once a binary has been built, it can be run on any compatible distribution/architecture, providing it has been specified during the build process. To find the list of supported architectures (after installing Go on your machine), run this command into your terminal: go tool dist list.
The output will look something like this:
aix/ppc64
android/386
android/amd64
android/arm
android/arm64
darwin/amd64
darwin/arm64
dragonfly/amd64
freebsd/386
...
So, how is TinyGo different? Well, it's the same Golang you know and love, but TinyGo is a smaller compiler based on LLVM technologies. It has essentially cherry-picked a number of important and available libraries and trimmed a lot of the fat from the core language.
By doing that, TinyGo becomes an even more powerful and efficient language that you can run in unexpected places. As an example of fat that's been trimmed, the library html/template cannot be imported by TinyGo as it relies upon other dependencies, which in turn are not able to be imported.
To read up on the packages supported by TinyGo, visit the documentation pages.
Where Can You Use TinyGo?
Use TinyGo with WebAssembly
What is WebAssembly?
Web development might usually be associated with JavaScript, but this isn't always the case. WebAssembly is an official W3C standard and allows people to develop applications for the web without using JavaScript.
I first must stress, WebAssembly is not a replacement for JavaScript but can be an excellent complement. The two technologies can work well together to deliver web content. In one small sentence, WebAssembly is a format for writing code for the web. WebAssembly is designed to be highly performant, which is why a language with a small overhead is preferable.
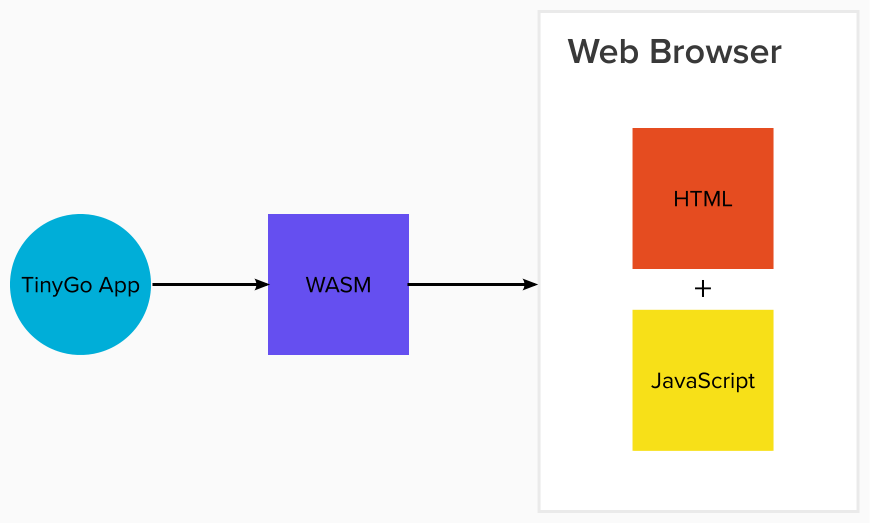
WebAssembly allows developers to write code in a familiar language and run it through a web browser for end-users. Through this method, near-native performance is achieved, and the required support is already in your modern browser.
In essence, you can write your code in TinyGo and pass it through the WASM compiler, which turns that Golang code into machine-readable code. Then, you can run the application through a web browser easily.
Use TinyGo to build a CLI
What is a CLI?
A Command Line Interface (CLI) is a standardized way for a user to interact textually with a system or application. The first primary use cases of CLIs were back in the 1960's where users could use a terminal to interact with the operating system. This was a continuous trend throughout the following decades which enabled systems to become more complex and give users more freedom on the computer they are using.
Why does a CLI need to be small?
Some CLIs interact with the operating system directly, which in turn means they will need some low-level permissions and a secure library set. Initially, people might think of a C language or Python to accomplish that task. They are established, low-level languages that have been used in some high-profile CLIs in the past.
Golang enters the room.
However, for those that don't know, Go is derived from C. In fact, it's so close that you can call C code from within a Go program — it's called Cgo.
In recent years, Go has been the go-to language to create CLIs. Some of the most popular and most used CLIs are written in Go: Docker CLI, Kubernetes CLI (kubectl), GitHub CLI, just to name a few. This has been made possible by the creation of third-party libraries and imports that take care of the complex tasks developers would otherwise have to take care of themselves.
Second to this is the power hidden under the hood of the language. Go has concurrency in the form of go-routines making asynchronous programming simplistic and a garbage collector helping with memory management. All of these features (and more) help reduce the size and space taken up by an integral program, all working towards keeping programs as performant as possible.
However, if a small project needs a CLI to be written for it or the CLI is only performing some basic tasks, sometimes these large libraries and imports can be overkill. Unless the end goal is to write a complex, multi-functional CLI like the ones mentioned before, a great number of the available libraries may not even be used, resulting in overhead the project could do without. To keep a CLI small and precise, reducing waste is a top priority. This makes TinyGo a great choice for small CLIs.
TinyGo can power microcontrollers
What is a microcontroller?
A microcontroller is usually a single chip on a small circuit board that allows input and output (I/O). A common and well-known example is an Arduino, which is fantastic for home automation and other smaller projects around the house.
With the IoT boom in recent years, Arduinos have also seen a rise in popularity. The trouble with this is that Arduinos are usually coded in C++. To some, this can be seen as a barrier to entry as it is a complex language, and not everyone wants to learn or use it when alternatives are available.
When I began to play with IoT, I purchased a bunch of Arduinos, thinking I could do some cool projects. Then I was personally struck with the C++ barrier. Most of my work is either in Node.js or Golang. With this being the case, I took a seat and thought about how I could write the code I know and love to create these cool projects I had in mind. This is where I came across TinyGo.
How many boards does TinyGo support?
TinyGo is a growing project. At the time of writing, TinyGo supports over 60 microcontroller boards. These range from Espressif boards (ESP's) to Adafruits and as previously mentioned, Arduinos, opening so many doors for people to begin their journey into IoT whilst coding in a familiar language.
Check the documentation for each microcontroller board supported by TinyGo for more details.
Why Is TinyGo a Great Alternative to C++ and MicroPython?
I am not going to the language bash. C, Python, and Go are all great languages in their own way. With that being said, there is plenty of room for this project to grow and come to fruition with the right support.
Golang has significantly grown in popularity over the past few years. It is quickly becoming the de facto choice of language for cloud-native development due to its "first-class" support. In the Stack Overflow Developer Survey 2017 for Most popular technologies, Go entered the list for the first time and only scored 4.4%. In contrast to 2020, only 3 years later, it scored 8.8%. Let's the couple that with Golang being associated with some of the most sought-after skills and top paying salaries worldwide. It is only right to assume this growth will continue.
In addition, looking at the IoT market, we can see yet another upwards trend. In 2017, Garner forecasted 8.4 billion IoT devices to be connected. Fast-track to 2025, and there is a prediction of up to 30 billion devices being connected. This is a huge leap! The growth of Golang and its baby sibling, TinyGo, can help fuel the IoT fire.
TinyGo in Action
Let's look at how Golang IoT shapes up with some code!
For this blog post, I have created a small program for you to create that turns 4 LEDs on when a phototransistor detects no light. This is essentially how outdoor night lights work.
To do this, I have used:
- Visual Studio Code + TinyGo plugin
- TinyGo version
0.18.0 darwin/amd64(using Golang version1.16and LLVM version11.0.0) - 1 x Arduino Uno R3
- 1 x Breadboard
- 8 x Male-Male wires
- 5 x Resistors (1 x 10kΩ / 4 x 220Ω)
- 1 x Phototransistor
- 4 LEDs
Step 1:
If you haven't already, install Go and then download and install TinyGo on your machine.
To check if Go is installed, run the following command:
go version
To check if TinyGo is installed, run the following command:
tinygo version
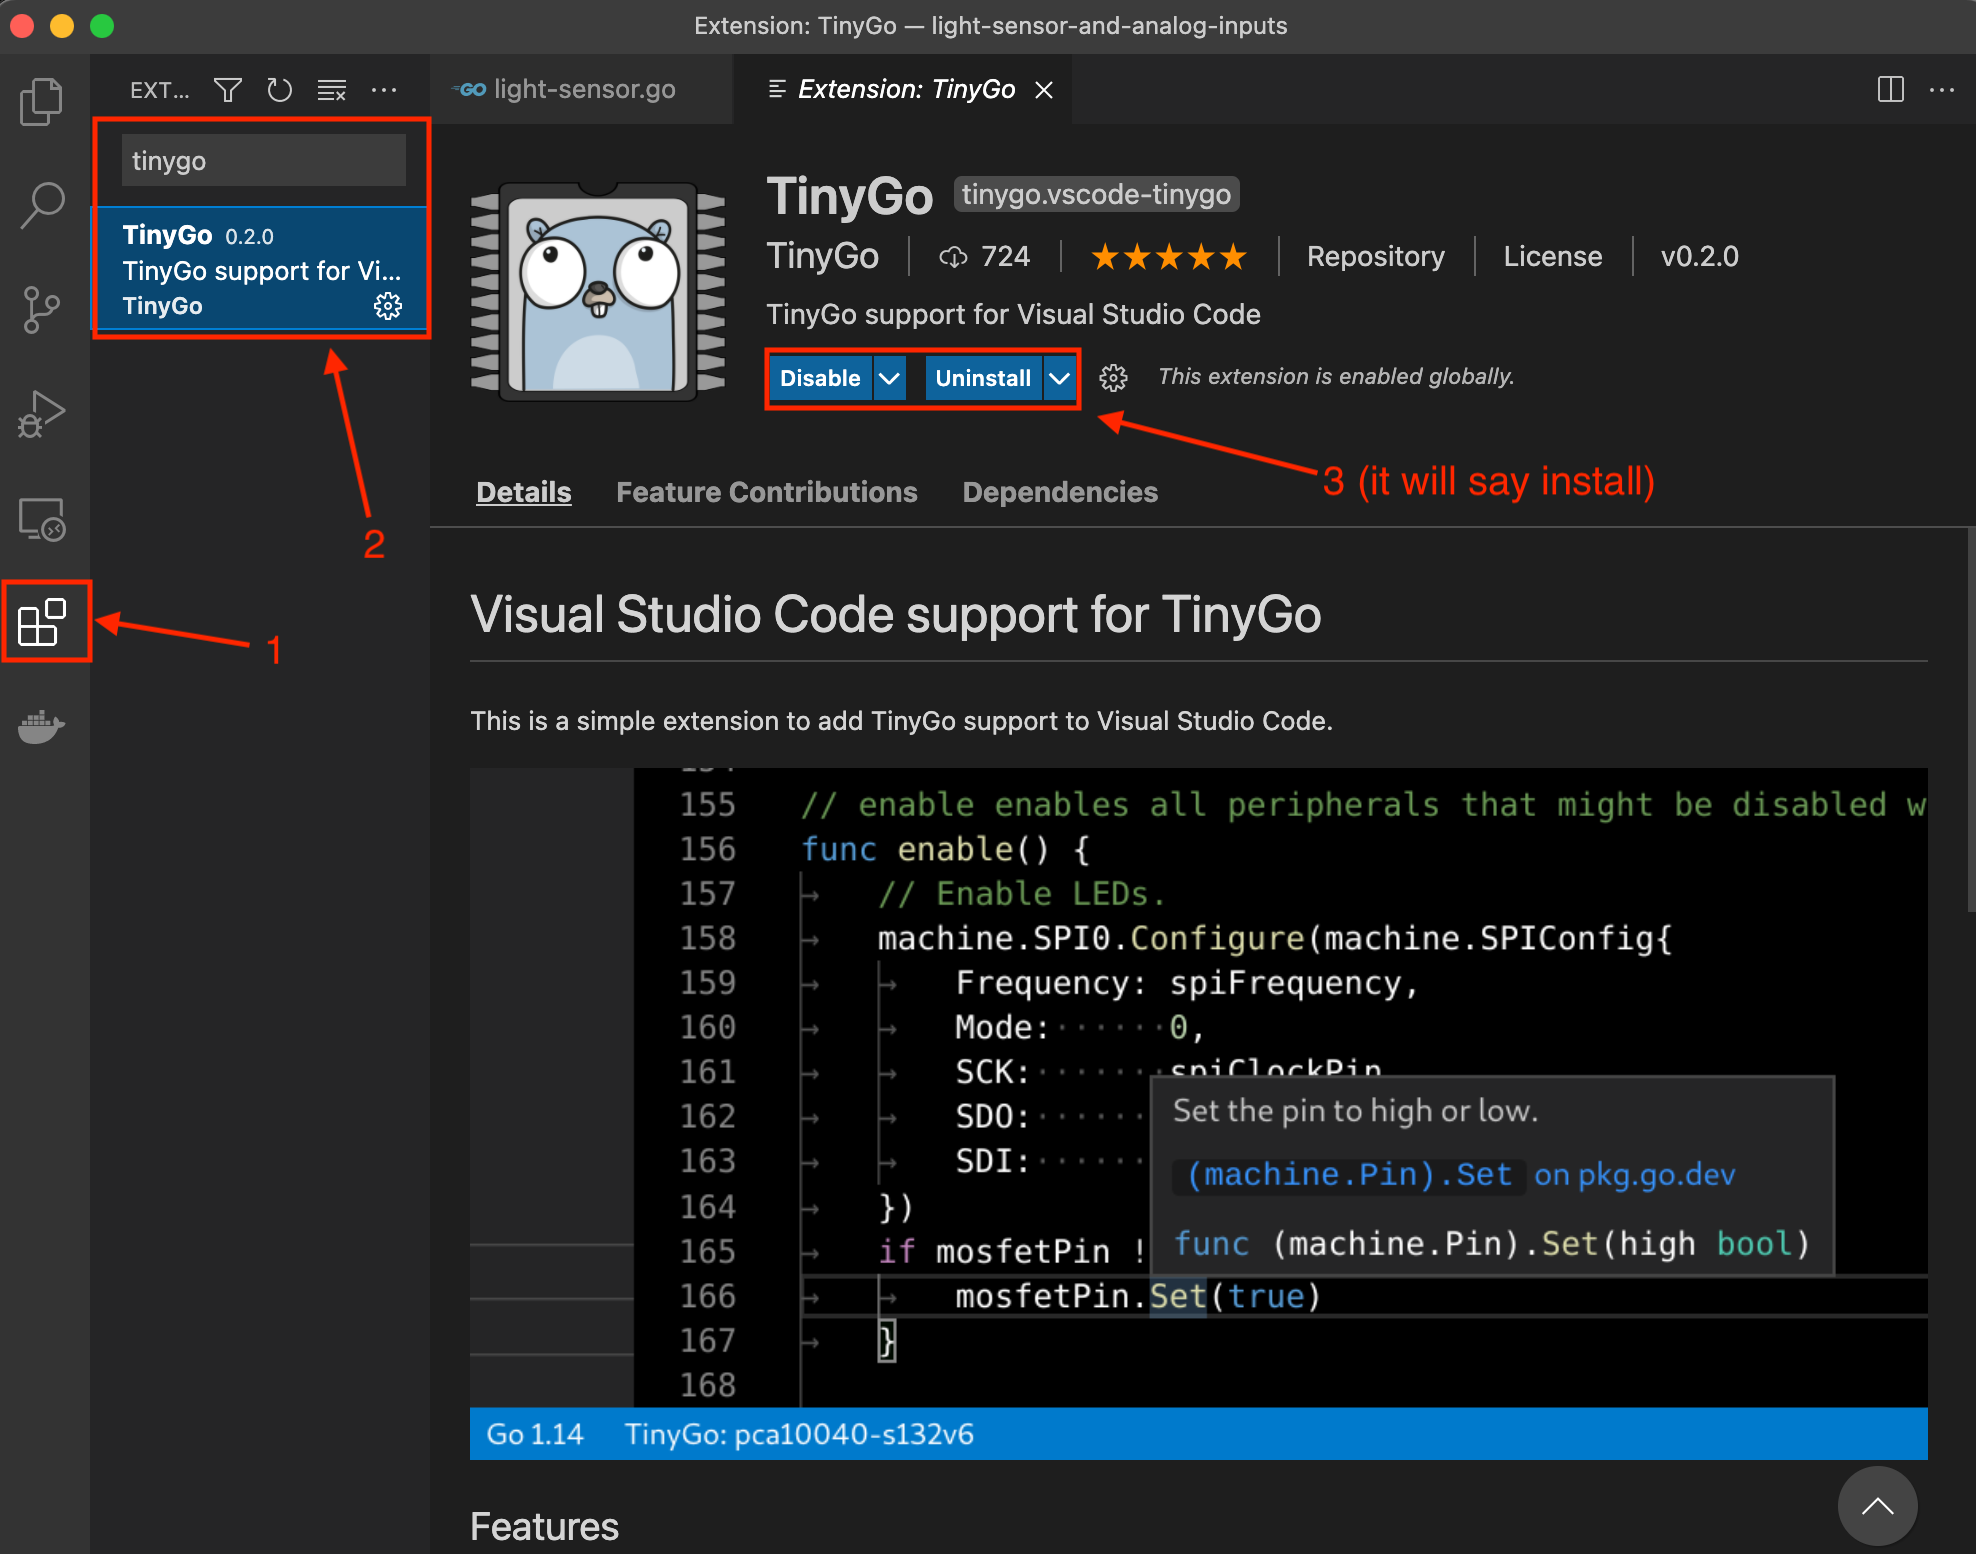
Next, install the TinyGo Visual Studio Code Plugin.
Step 2:
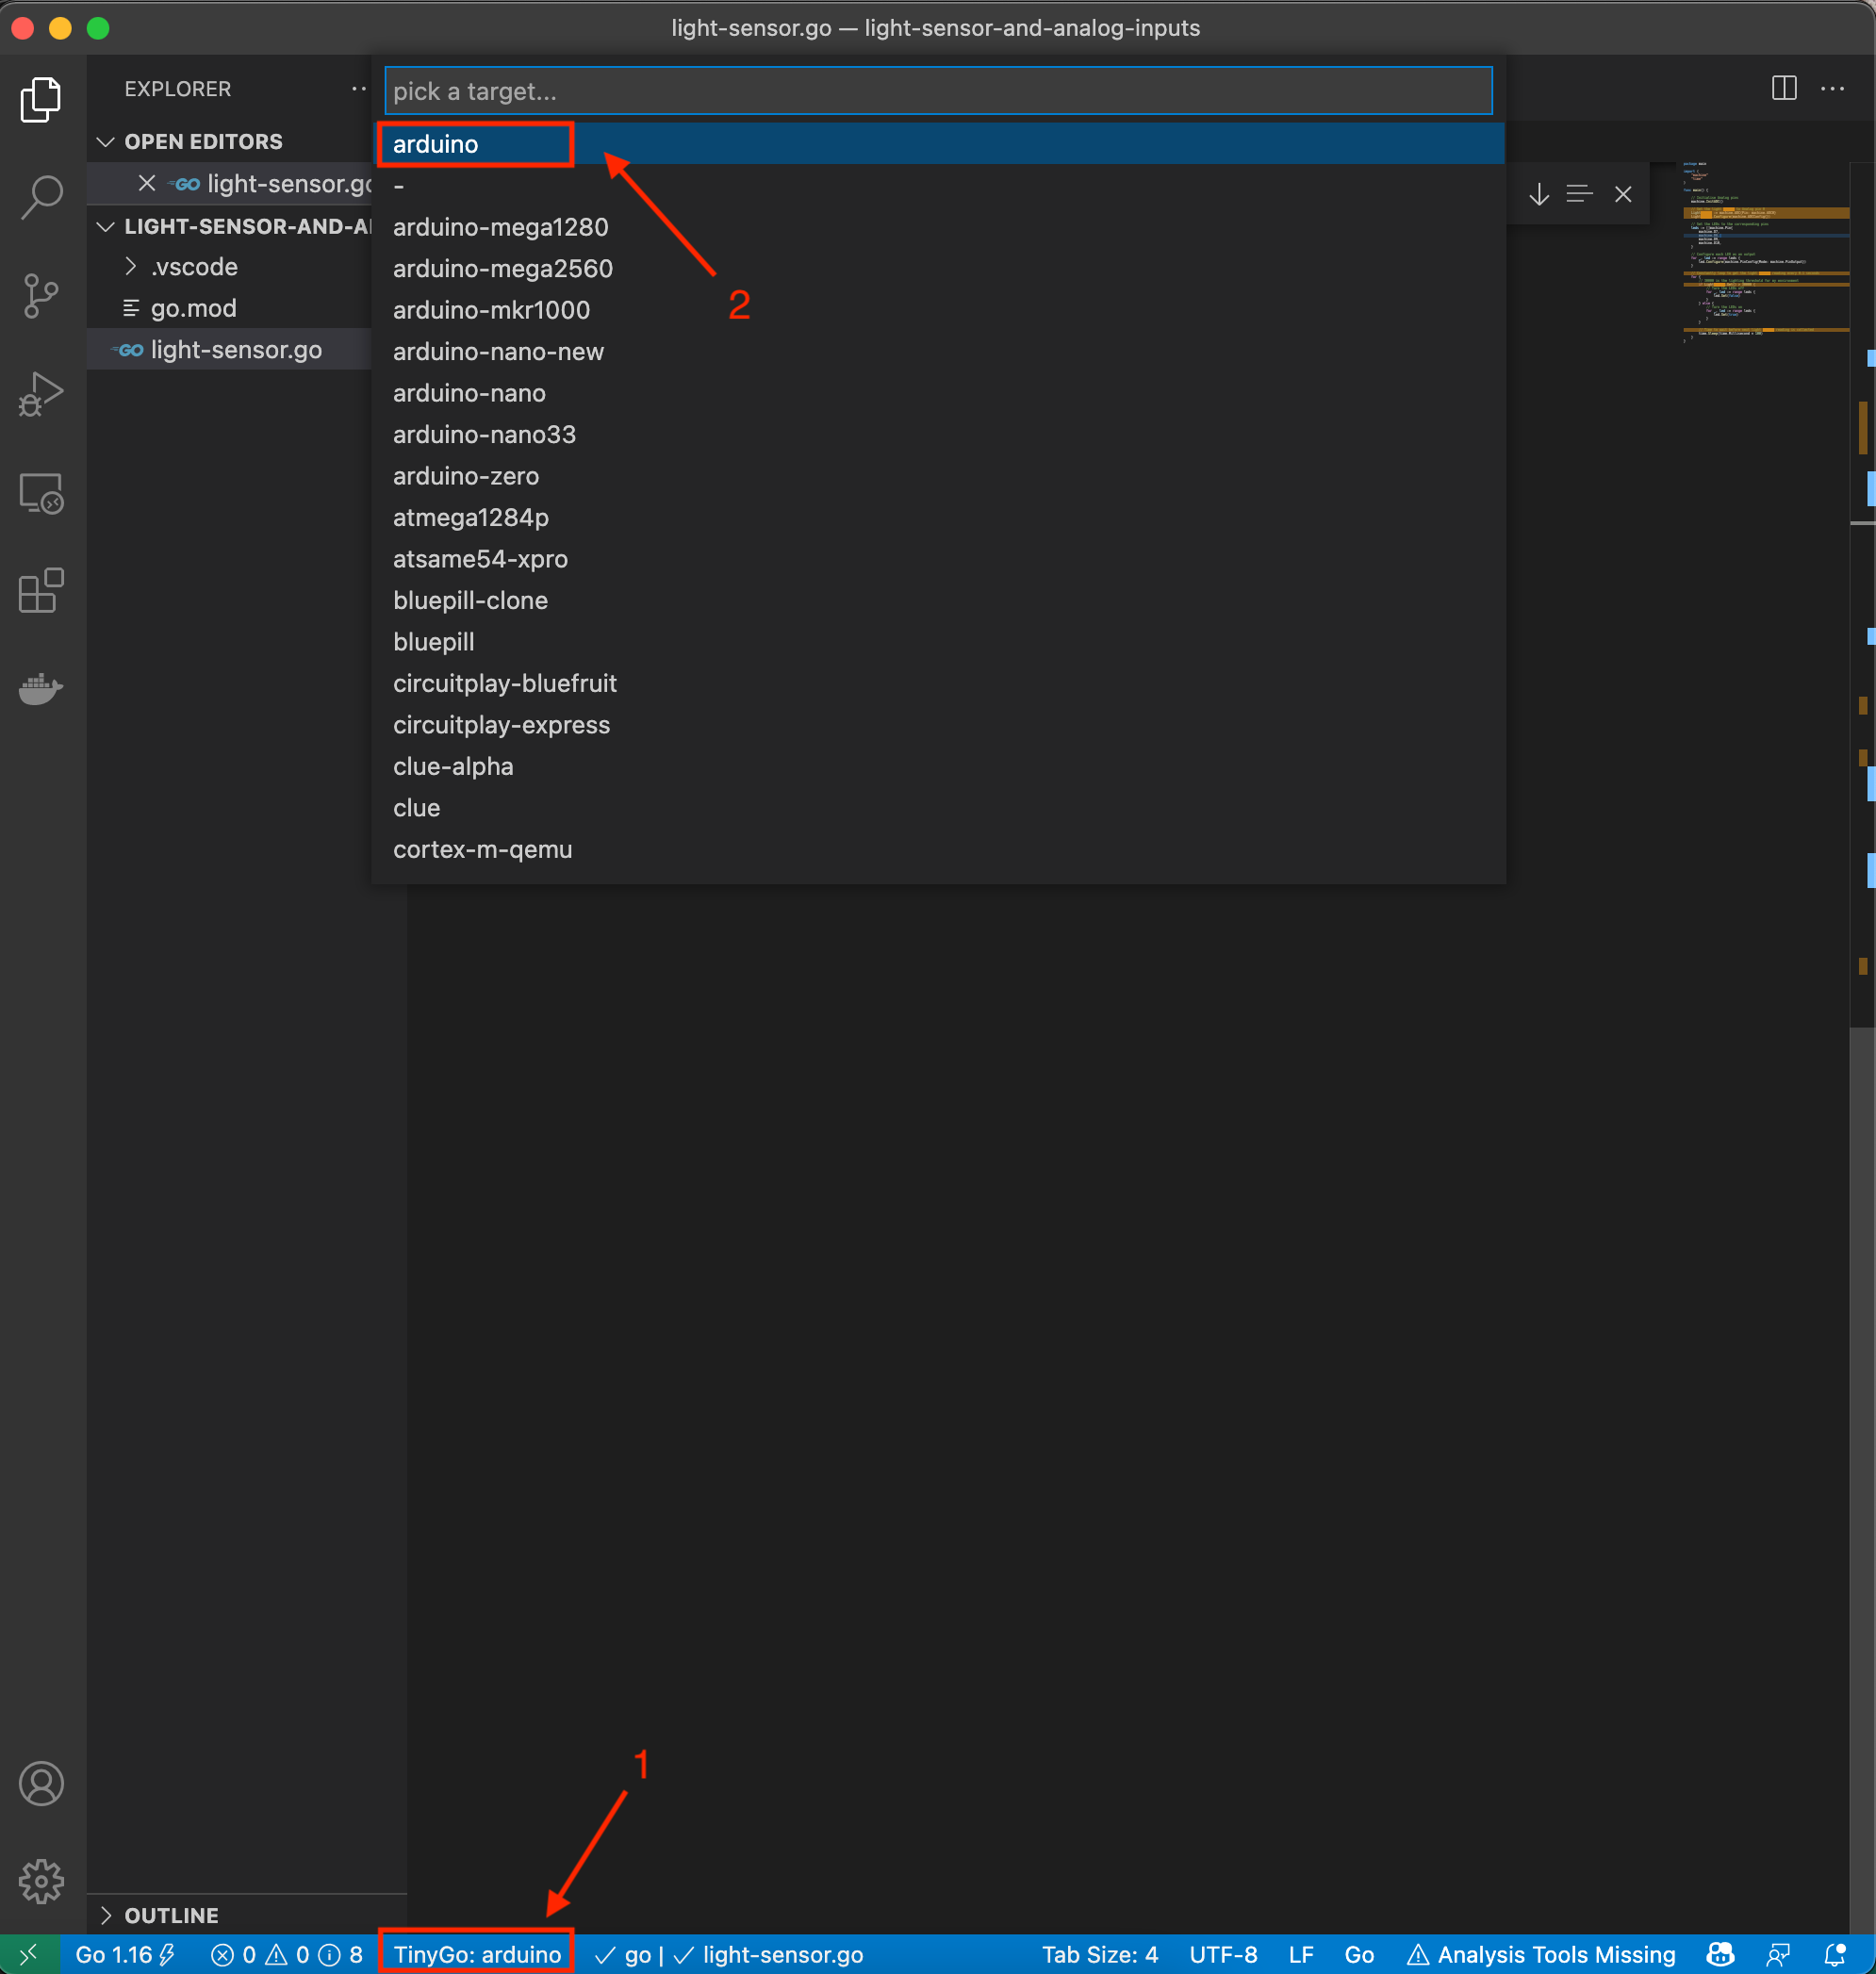
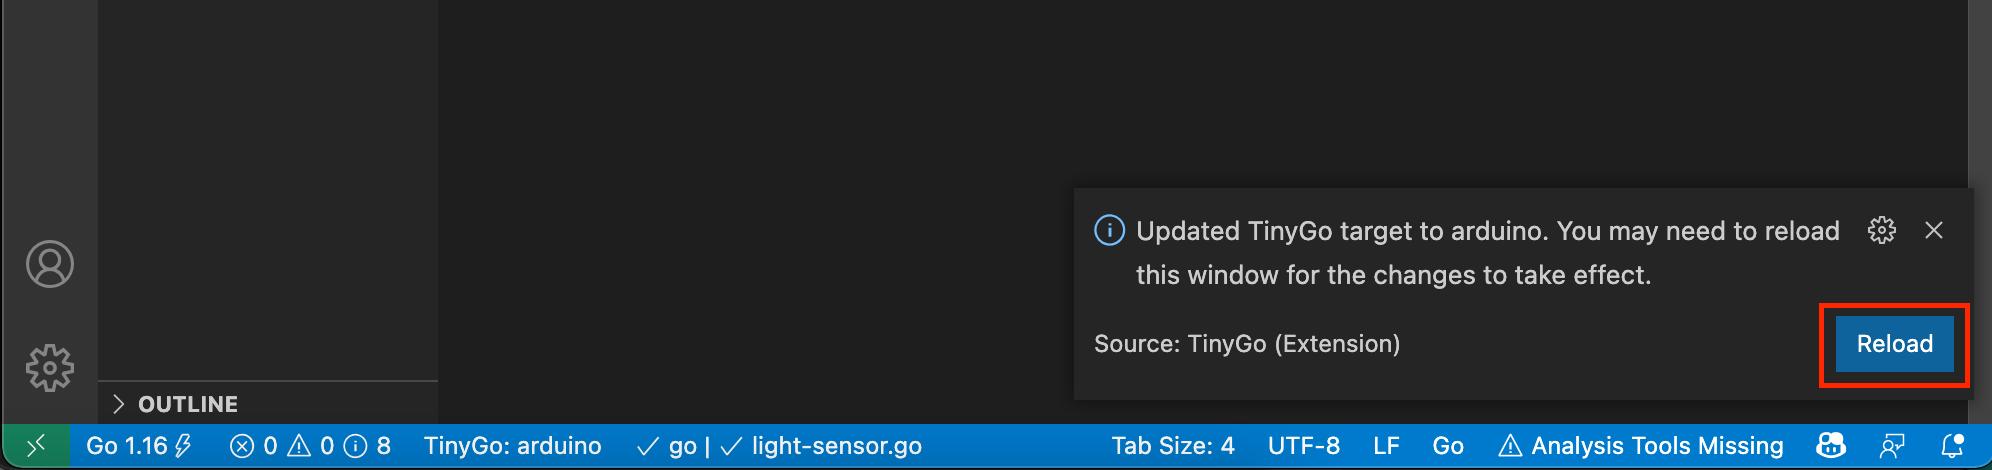
Plugin the board with a USB cable (in this example, I am using an Arduino R3) and target it with the editor. Once targeted, the editor will prompt a reload of the window.
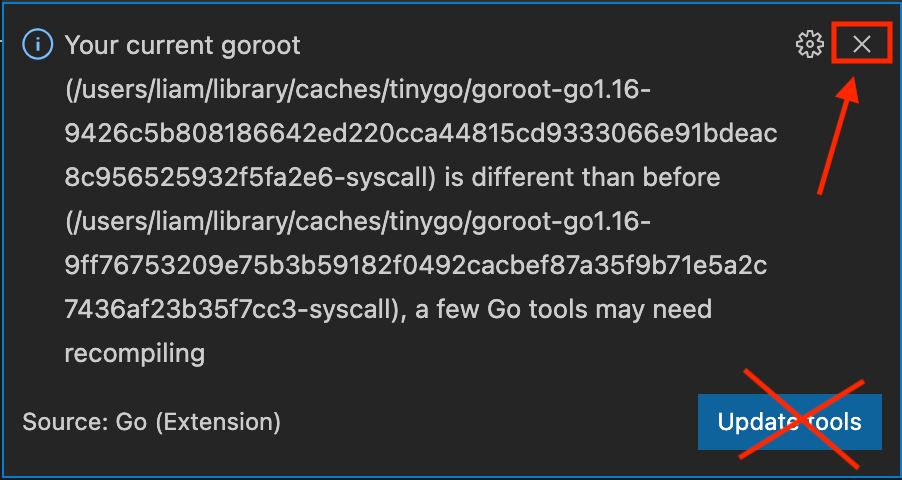
🚨 Warning 🚨: The editor might prompt you to update the
go devtools within the editor. If you execute the update, you may get an error due to a known bug. Until this is fixed, it is advised to not update the tools.
Step 3:
- Create a project in the directory
$HOME/go/src/github.com/tinygo
$ mkdir light-sensor
- Change into the newly created project directory
$ cd light-sensor
- Create a new
.gofile for the application within the project directory
$ touch light-sensor.go
- Create a go mod file if you are using go modules
$ go mod init
- Finally, open the project in Visual Studio Code
Step 4:
First, read the code and comments below, and then secondly, write it out. Don't copy and paste!
package main

import (
    "machine"
    "time"
)

func main() {

    // Initialise Analog pins
    machine.InitADC()

    // Set the light sensor to Analog pin 0
    lightSensor := machine.ADC{Pin: machine.ADC0}
    lightSensor.Configure(machine.ADCConfig{})
    // Set the LEDs to the corresponding pins
    leds := []machine.Pin{
        machine.D7,
        machine.D8,
        machine.D9,
        machine.D10,
    }

    // Configure each LED as an output
    for _, led := range leds {
        led.Configure(machine.PinConfig{Mode: machine.PinOutput})
    }

    // Constantly loop to get the light sensor reading every 0.1 seconds
    for {
        // 30000 is the lighting threshold for my environment
        if lightSensor.Get() > 30000 {
            // Turn the LEDs off
            for _, led := range leds {
                led.Set(false)
            }
        } else {
            // Turn the LEDs on
            for _, led := range leds {
                led.Set(true)
            }
        }

        // Time to wait before next light sensor reading is collected
        time.Sleep(time.Millisecond * 100)
    }
}
Step 5:
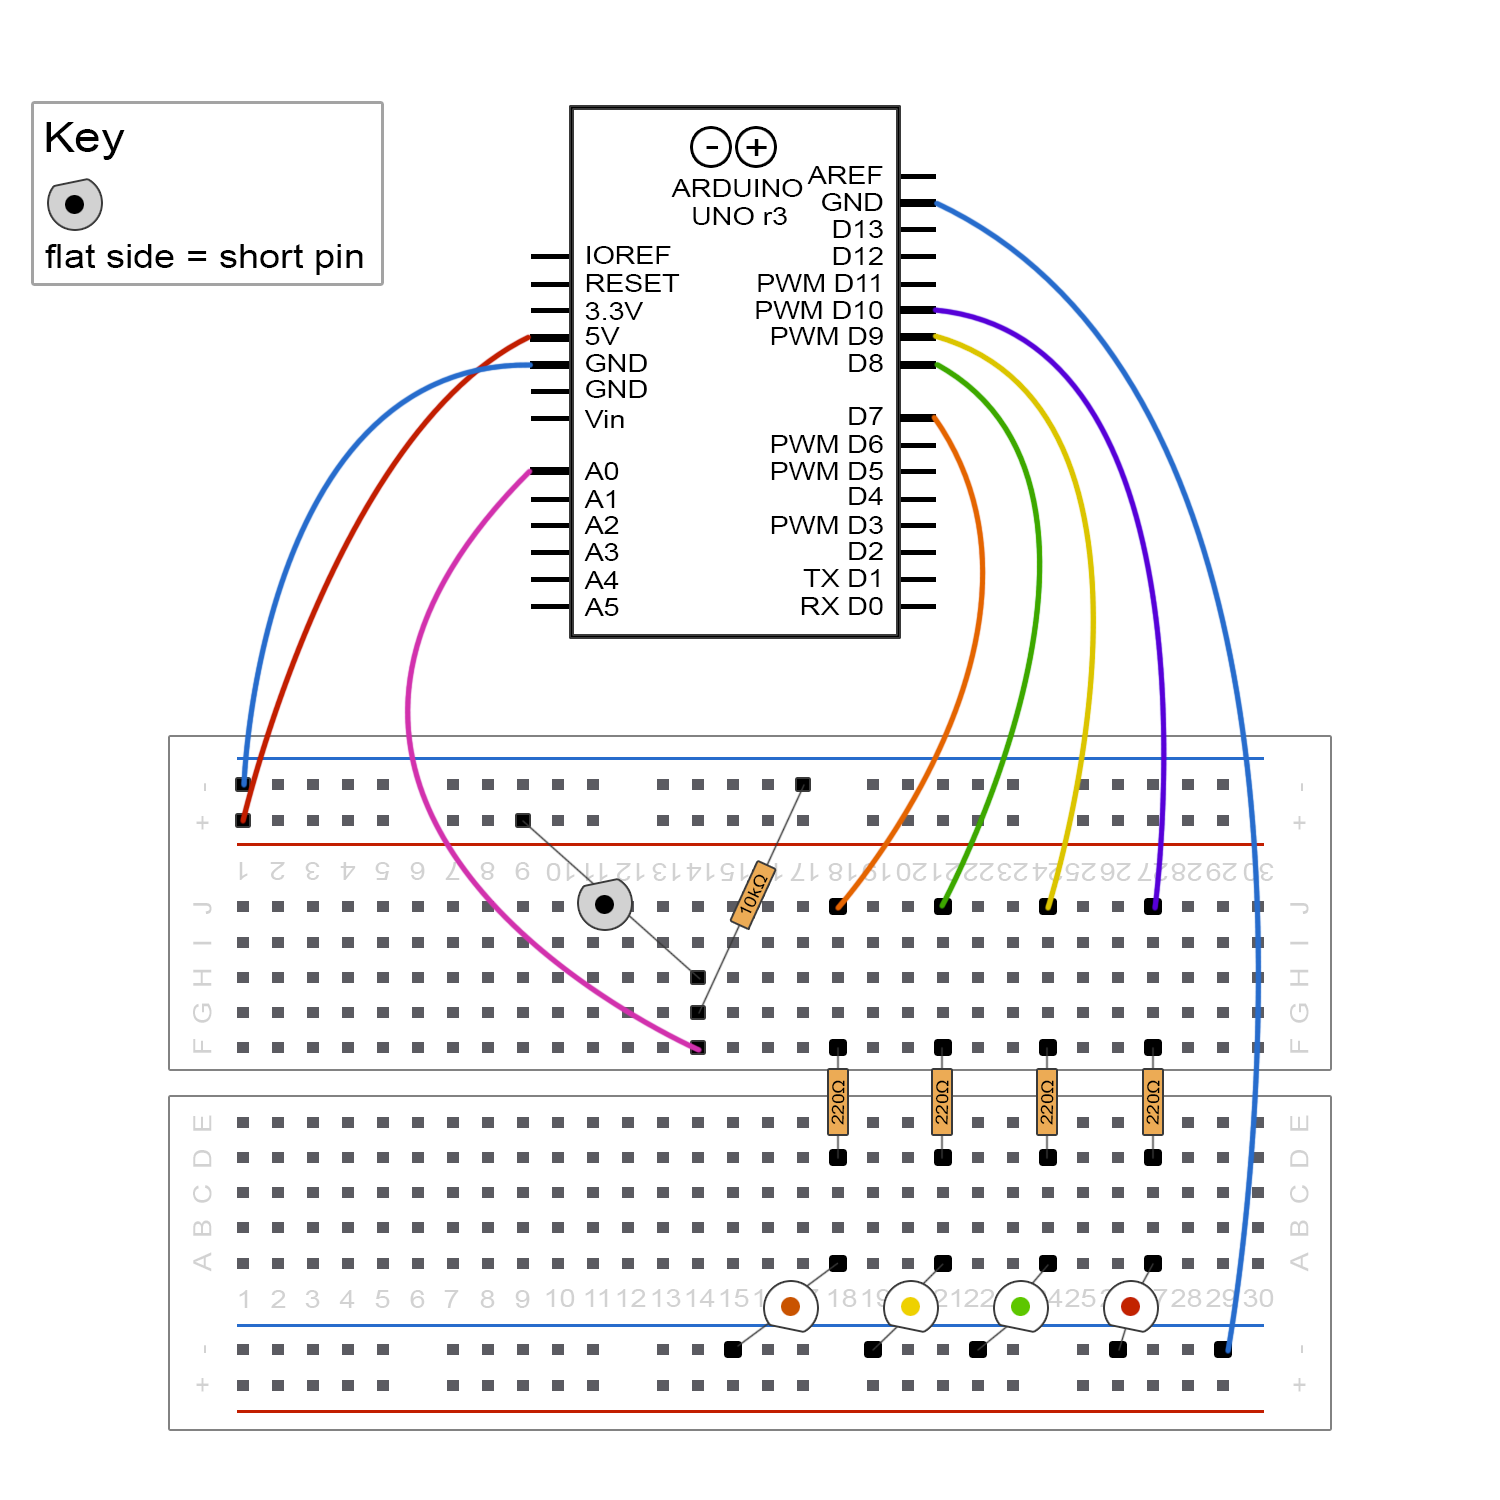
Connect the components, so they resemble the circuit board shown below.
Step 6:
Next, find what port the connected device is running on. To do that, enter the following command into a terminal or navigate to the device manager.
Mac:
$ ls /dev/cu*
Linux:
$ ls /dev/tty*
Windows:
Open Device Manager and expand the Ports (COM & LPT) list. Find your connected device and make a note of the port number. You will need this to flash the device in the next step.
Alternatively, visit MathWorks website for more information on how to find the port number of your connected device.
Step 7:
Now you have the port number, the device is connected and targeted through the editor, and you have written the code. The next step is to flash the board. To do this, enter the command below into a terminal.
tinygo flash -target=<board-you-are-targeting> -port=<device-port-from-step-6> <name-of-file>
Example command:
tinygo flash -target=Arduino -port=/dev/cu.usbmodem143201 light-sensor.go
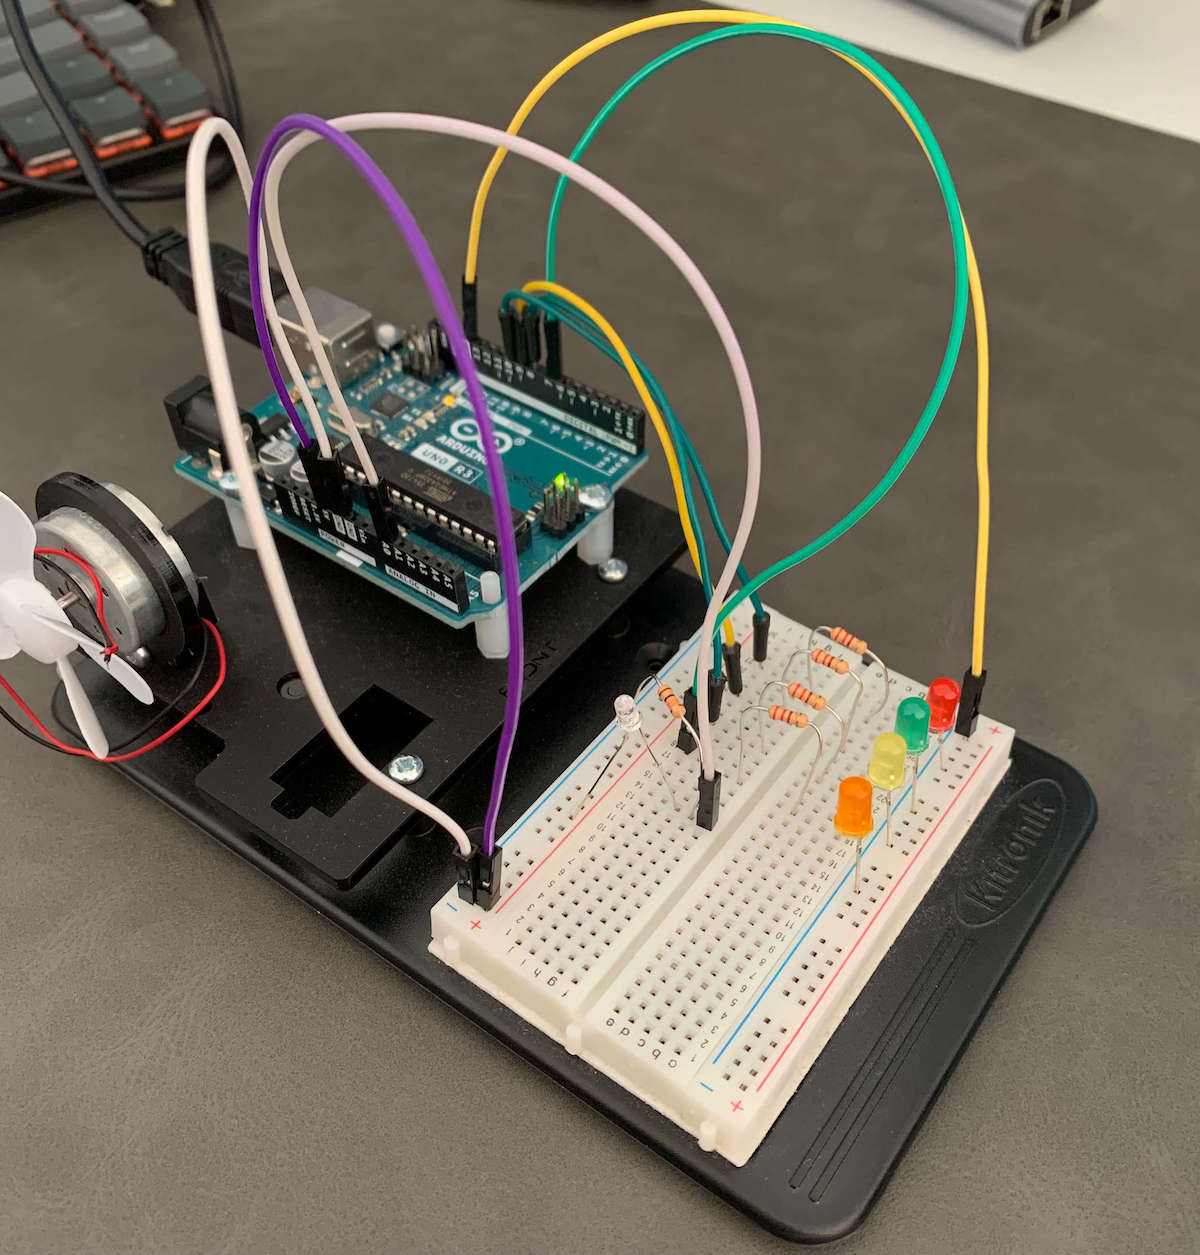
Once you have completed the device flash, it should look like this:

Takeaways
- TinyGo is an excellent alternative for embedded systems and WebAssembly development.
- Being a smaller compiler for the Go language, existing Go developers can enter the IoT space with their current skills.
- Adoption is continuously growing, and TinyGo is supported by the most common microcontroller boards already, reducing the barriers to entry for newcomers and hobbyists.
TinyGo is still a very experimental project which has come on leaps and bounds over a short period of time. With Go's impact in the software world continuing to grow, TinyGo could be a project to keep an eye on. Having multiple lightweight alternatives to the main language is needed for IoT and edge computing since there is often limited compute power available and overall needs exploding. TinyGo is just another example of a great slimmed-down alternative to the dominant languages for microcontrollers. I, for one, will certainly be keeping an eye out for a linear adoption pattern and continue to monitor and research exciting projects like this.
About the author

Liam Hampton
IBM Lead Developer Advocate UKI