
📌 Note: Auth0 doesn't yet support Vue 3. This tutorial is just a look at using the Composition API in a simple application without authentication.
A common issue that new developers run into is figuring out where to begin. You do tutorial after tutorial to learn a new concept, but once you complete a tutorial, you're left wondering, "...now what"?
In this tutorial, you'll build a project idea generator (inspired by this tweet). You'll be able to use the final application to select the skills you want to work on and be given project idea suggestions based on those selections.
The primary purpose of this tutorial is to learn how to use the Vue 3 Composition API, but the project generator will be a fun side effect.
The tutorial will cover:
- Calling an Express API with Vue 3
- Using the Composition API in Vue 3
- Advanced JavaScript array filtering
- Using filters in Vue 3
I'll assume you have some basic Vue 2 knowledge but are new to Vue 3. If this is your first time using Vue and you feel you need some background, check out my Beginner's Vue.js Tutorial.
You can find the final project in this GitHub repository.
🚀 Let's get started!
Vue 3 Setup
First, you need to create your Vue project. I like to use the Vue CLI to get up and running quickly.
You can create a new project with the CLI by running:
npx @vue/cli create project-generator
If you already have the CLI, make sure your running at least v4.5 so that you can use Vue 3.
Choose the options shown below.
? Please pick a preset:
  Default ([Vue 2] babel, eslint)
  Default (Vue 3 Preview) ([Vue 3] babel, eslint)
❯ Manually select features
👩💻 Tip: Press
spacebarto select an option andenterto submit once you're done selecting
? Check the features needed for your project:
❯ ◉ Choose Vue version
  ◉ Babel
  ◯ TypeScript
  ◯ Progressive Web App (PWA) Support
  ◯ Router
  ◯ Vuex
  ◉ CSS Pre-processors
  ◉ Linter / Formatter
  ◯ Unit Testing
  ◯ E2E Testing
For features, select "Choose Vue version", "Babel", "CSS Pre-processors", and "Linter / Formatter".
? Choose a version of Vue.js that you want to start the project with
  2.x
❯ 3.x (Preview)
? Pick a CSS pre-processor (PostCSS, Autoprefixer and CSS Modules are supported by default): (Use arrow keys)
❯ Sass/SCSS (with dart-sass)
  Sass/SCSS (with node-sass)
  Less
  Stylus
? Pick a linter / formatter config: (Use arrow keys)
❯ ESLint with error prevention only
  ESLint + Airbnb config
  ESLint + Standard config
  ESLint + Prettier
? Pick additional lint features: (Press <space> to select, <a> to toggle all, <i> to invert selection)
❯ ◉ Lint on save
  ◯ Lint and fix on commit
? Where do you prefer placing config for Babel, ESLint, etc.? (Use arrow keys)
❯ In dedicated config files
  In package.json
? Save this as a preset for future projects? (y/N) N
Now you'll wait a minute for the CLI to generate your project. Once it's done, switch into the project folder and run it with:
cd project-generator
npm run serve
And your starter application is now running on http://localhost:8080!
Modify the Starter App
Open up the project in your code editor.
👩💻 Tip: If you're using VS Code, install the Vetur extension to get syntax highlighting, Emmet shortcuts, formatting, auto-completion, and more.
For simplicity, you're going to just keep everything in one main component called Generator.vue. You'll notice at the end that some of this can be refactored out into separate components, but to keep this tutorial focused on the Composition API, you can save refactoring for later.
Rename the src/components/HelloWorld.vue component to src/components/Generator.vue and replace its content with a barebones Vue component:
// src/components/Generator.vue

<template>
  <div>
  </div>
</template>

<script>
export default {
  name: 'Generator'
}
</script>

<style>
</style>
Next, open up src/App.vue and replace it with:
<template>
  <Generator />
</template>

<script>
import Generator from './components/Generator.vue'

export default {
  name: 'App',
  components: {
    Generator
  }
}
</script>

<style lang="scss">
html, body {
  margin: 0;
  height: 100%;
  background: #F9F9F9;
}
.container {
  padding-top: 20px;
}
</style>
Here, you're just pulling in the Generator component. There's nothing in here yet, but once you start adding to the component, the base App component is already set up to display it.
Finally, in src/assets, delete Logo.png.
Add styles with Bulma
For basic styling, you're going to use Bulma, which is an open-source CSS framework.
Run the following in your terminal to install it:
npm install bulma
Next, you need to import it into your Vue project. Create a new file under src/assets called main.scss. Here, you just need to import Bulma.
// src/main.scss
@import '~bulma';
Now, bring that main.scss file into your Vue templates by opening src/main.js and updating it with:
import { createApp } from 'vue'
import App from './App.vue'
import '@/assets/main.scss';  // 👈 new code

createApp(App).mount('#app')
This should leave you with a simple base Vue application. And this is where the real fun begins!
Composition API vs Options API
One of the big features that the Vue 3 release brings is the Composition API. In Vue 2, components were built using the Options API. The CodeSandbox below shows a very simple component using the Options API.
Component with Options API
In Vue 3, in addition to the Options API, you now have the option to use the Composition API. Below is an example of the exact same component, but using the Composition API instead.
Component with Composition API
You'll notice the big difference here is the setup function. This is a new component option that holds all of the logic for the component. Instead of defining data, methods, and lifecycle hooks as separate component options, all of these now lie in the setup function.
Another important difference is that you no longer have to use this to access your data in methods. This change has allowed for much better Typescript support in Vue 3.
Create a Component using Composition API
Let's see the Composition API in action by adding to the Generator component that you created earlier.
Here's what this component should do:
- Call the Express API (will be provided) to grab the list of skills that can be used in the generator
- Display the list of skills
- Allow the user to select the skills they want to work on
- Call the Express API to get the list of application ideas
- Display the application idea options based on the skills selected
- Create a filter to select a random option from the app list
First, clone the Application Generator API repository to get the Express API.
git clone git@github.com:auth0-blog/app-generator-api.git
cd app-generator-api
Run it with:
npm install
node server.js
- List of skills: http://localhost:3000/skills
- List of applications: http://localhost:3000/apps
You'll be working with the data shown here soon, so you can leave these tabs open if you'd like to reference the data structure throughout the article.
Get the list of skills
Next, open up src/components/Generator.vue. The first item on the agenda is to call the Express API to get the list of skills. Let's do that now. Replace the <script></script> section with the following:
// src/components/Generator.vue

// ...

<script>
import { ref } from 'vue';

export default {
  name: 'Generator',
  setup() {
    const GENERATOR_BASE = 'http://localhost:3000';
    const skillList = ref([]);

    async function getSkillList() {
      const response = await fetch(`${GENERATOR_BASE}/skills`);
      skillList.value = await response.json();
    }

    getSkillList();

    return {
      skillList
    }
  }
}
</script>

// ...
So what's happening here? First, you're importing ref. This allows your data to be reactive. In other words, you can use this data in your template, and if it changes, the template value will change as well.
Inside the setup function, you'll see that skillList is declared as an empty array wrapped in ref(). This returns a reactive ref object with just one property: value. The .value property points to the inner value of the ref object, which in this case, is the empty array.
Next, in the getSkillList function, you're making a request to the /skills endpoint of the Application Generator API. skillList is set to the response that comes back. You should notice here the use of the .value property mentioned above. This is how you access and set the value of a ref.
Finally, you need to return any data you want to expose to the template. So far, that's just skillList.
Display the list of skills
The next item on the agenda is to display the list of skills. Let's do this now so that you can see how skillList can be used in the template.
Update the <template></template> and <style></style> sections as follows:
<template>
<div class="generator">
  <section class="hero is-primary is-bold has-text-centered py-6">
    <div class="hero-body">
      <div class="container">
        <h1 class="title">
          What skills do you want to work on?
        </h1>
        <div v-for="skill in skillList" :key="skill.id">
          <div class="field">
            <label class="checkbox">
              <input type="checkbox" :value="skill.id">
              {{ skill.skill }}
            </label>
          </div>
        </div>
      </div>
    </div>
  </section>
</div>
</template>

<script>
// ...
</script>

<style scoped>
  label {
    font-size: 20px;
  }
</style>
Here, you're looping over the skillList array and setting up a checkbox input next to each skill. There is also some simple Bulma styling here.
Allow the user to select skills
Next up, you need to allow the user to select the skills they want to work on. You've already laid the foundation for this by setting up the checkboxes and setting the value to the id of the selected skill. However, the checkboxes currently aren't bound to anything, so nothing is really happening.
To fix this, add a new ref in the setup function called selectedSkills, and set it to an empty array. Make sure you also return it so that it can be used in the template. Then, update the template to bind the checked boxes to selectedSkills using v-model.
<template>
  <div class="generator">
    <!-- ... -->
    <div v-for="skill in skillList" :key="skill.id">
      <div class="field">
        <label class="checkbox">
          // 👇 new code
          <input type="checkbox" v-model="selectedSkills" :value="skill.id">
          {{ skill.skill }}
        </label>
      </div>
    </div>
    <!-- ... -->
  </div>
</template>
<script>
  import { ref } from 'vue';

  export default {
    name: 'Generator',
    setup() {
      const GENERATOR_BASE = 'http://localhost:3000';
      const skillList = ref([]);
      const selectedSkills = ref([]);  // 👈 new code

      async function getSkillList() {
        const response = await fetch(`${GENERATOR_BASE}/skills`);
        skillList.value = await response.json();
      }

      getSkillList();

      return {
        skillList,
        selectedSkills  // 👈 new code
      }
    }
  }
</script>
<style scoped>
  label {
    font-size: 20px;
  }
</style>
To confirm that it's working, you can temporarily add the following to the template:
<template>
  <div class="generator">
    <!-- ... -->
    <div v-for="skill in skillList" :key="skill.id">
      <div class="field">
        <label class="checkbox">
          <input type="checkbox" v-model="selectedSkills" :value="skill.id">
          {{ skill.skill }}
        </label>
      </div>
    </div>
    {{ selectedSkills }}   <!-- 👈 new temp code -->
    <!-- ... -->
  </div>
</template>
Select some skills, and you should see an array displayed that holds the ids of the skills that you select. Once you confirm that's working, go ahead and remove the last line.
Get the list of application ideas
Next up, you need to grab the list of application ideas from the Express API. This will look similar to the API call that was made earlier to get the skills list.
Add the following to your setup function:
setup() {
  const GENERATOR_BASE = 'http://localhost:3000';
  const skillList = ref([]);
  const selectedSkills = ref([]);
  const filteredAppList = ref([]);    // 👈 new code
  let appList = [];   // 👈 new code

  async function getSkillList() {
    const response = await fetch(`${GENERATOR_BASE}/skills`);
    skillList.value = await response.json();
  }

  // 👇 new code
  async function getAppList() {
    const response = await fetch(`${GENERATOR_BASE}/apps`);
    appList = await response.json();
    filteredAppList.value = appList;
  }

  getSkillList();
  getAppList();   // 👈 new code

  return {
    skillList,
    selectedSkills,
    filteredAppList   // 👈 new code
  }
}
Do you notice anything different here? Take a look at how appList is declared. It isn't using ref()! Because this value isn't being exposed in the template, you don't need it to be reactive. The purpose of this list is to be the main source of possible applications that the user can build.
Because the user is going to be filtering the list based on what skills they want to work on, you're also setting up the filteredAppList array. This array needs to be reactive because it's going to be displayed in the template. As soon as the user clicks on a skill, this list will need to be updated to show which applications include that skill. You're setting it to include all applications before the user selects anything.
Display the options based on the skills selected
This leads to the next action item: displaying the application options based on the skills that the user selects.
The filtering required to get the final application list is going to get a little complicated, so let's walk through the logic first. The goal of this function is to generate the filteredAppList array. This will hold all the possible application suggestions that contain the skills that the user selected.
You're going to create a function called generateFilteredAppList() that will do the following:
- Loop through the main application list
- For every application, check if the selected skills array is a subset of the application list's skills array
- If that application contains all of the selected skills, then add it to the new
filteredAppListarray
To envision this better, remember what the data looks like:
// example of 2 applications in appSkills
appSkills = [
  {
    id: 4,
    app: 'a blog',
    skills: [1, 3, 5]
  },
  {
    id: 5,
    app: 'a shopping cart',
    skills: [1, 3, 4]
  },
]

// example of selectedSkills
selectedSkills = [1, 5]

// result after filtering
filteredAppList = [
  {
    id: 4,
    app: 'a blog',
    skills: [1, 3, 5]
  }
];
In this case, filteredAppList should be { id: 4, app: 'a blog', skills: [1, 3, 5]} because that is the only application that contains all of the selected skills.
Update setup as follows:
setup() {
  const GENERATOR_BASE = 'http://localhost:3000';
  const skillList = ref([]);
  const selectedSkills = ref([]);
  const filteredAppList = ref([]);
  let appList = [];

  // 👇 new code
  function generateFilteredAppList() {
    filteredAppList.value = [];

    for (const app of appList) {
      const appSkillsArray = app.skills;
      const selectedSkillsArray = selectedSkills.value;

      if (hasAllSkills(appSkillsArray, selectedSkillsArray)) {
        filteredAppList.value.push(app);
      }
    }
  }

  // 👇 new code
  function hasAllSkills(appSkills, selectedSkills) {
    return selectedSkills.every(f => appSkills.includes(f));
  }

  async function getSkillList() {
    const response = await fetch(`${GENERATOR_BASE}/skills`);
    skillList.value = await response.json();
  }

  async function getAppList() {
    const response = await fetch(`${GENERATOR_BASE}/apps`);
    appList = await response.json();
    filteredAppList.value = appList;
  }

  getSkillList();
  getAppList();

  return {
    skillList,
    selectedSkills,
    filteredAppList,
    generateFilteredAppList   // 👈 new code
  }
}
First, you're looping through every item in the appList array. For each item, you're checking if the all the selected skills are contained in that application's skills array. This is done by combining Javascript's .include() and .every().
.every() — The every() method tests whether all elements in the array pass the test implemented by the provided function. It returns a Boolean value.
.includes() — The includes() method determines whether an array includes a certain value among its entries. It returns true or false.
For every application option, you're running it through the checker function, hasAllSkills(), which returns true or false. If the value is true, then you push it onto the filteredAppList array.
Make sure you also create the filteredAppList ref and include filteredAppList and generateFilteredAppList in the return object.
Now that you've gotten through that fun filtering function (😅), it's time to display it in the template!
Update your template as follows:
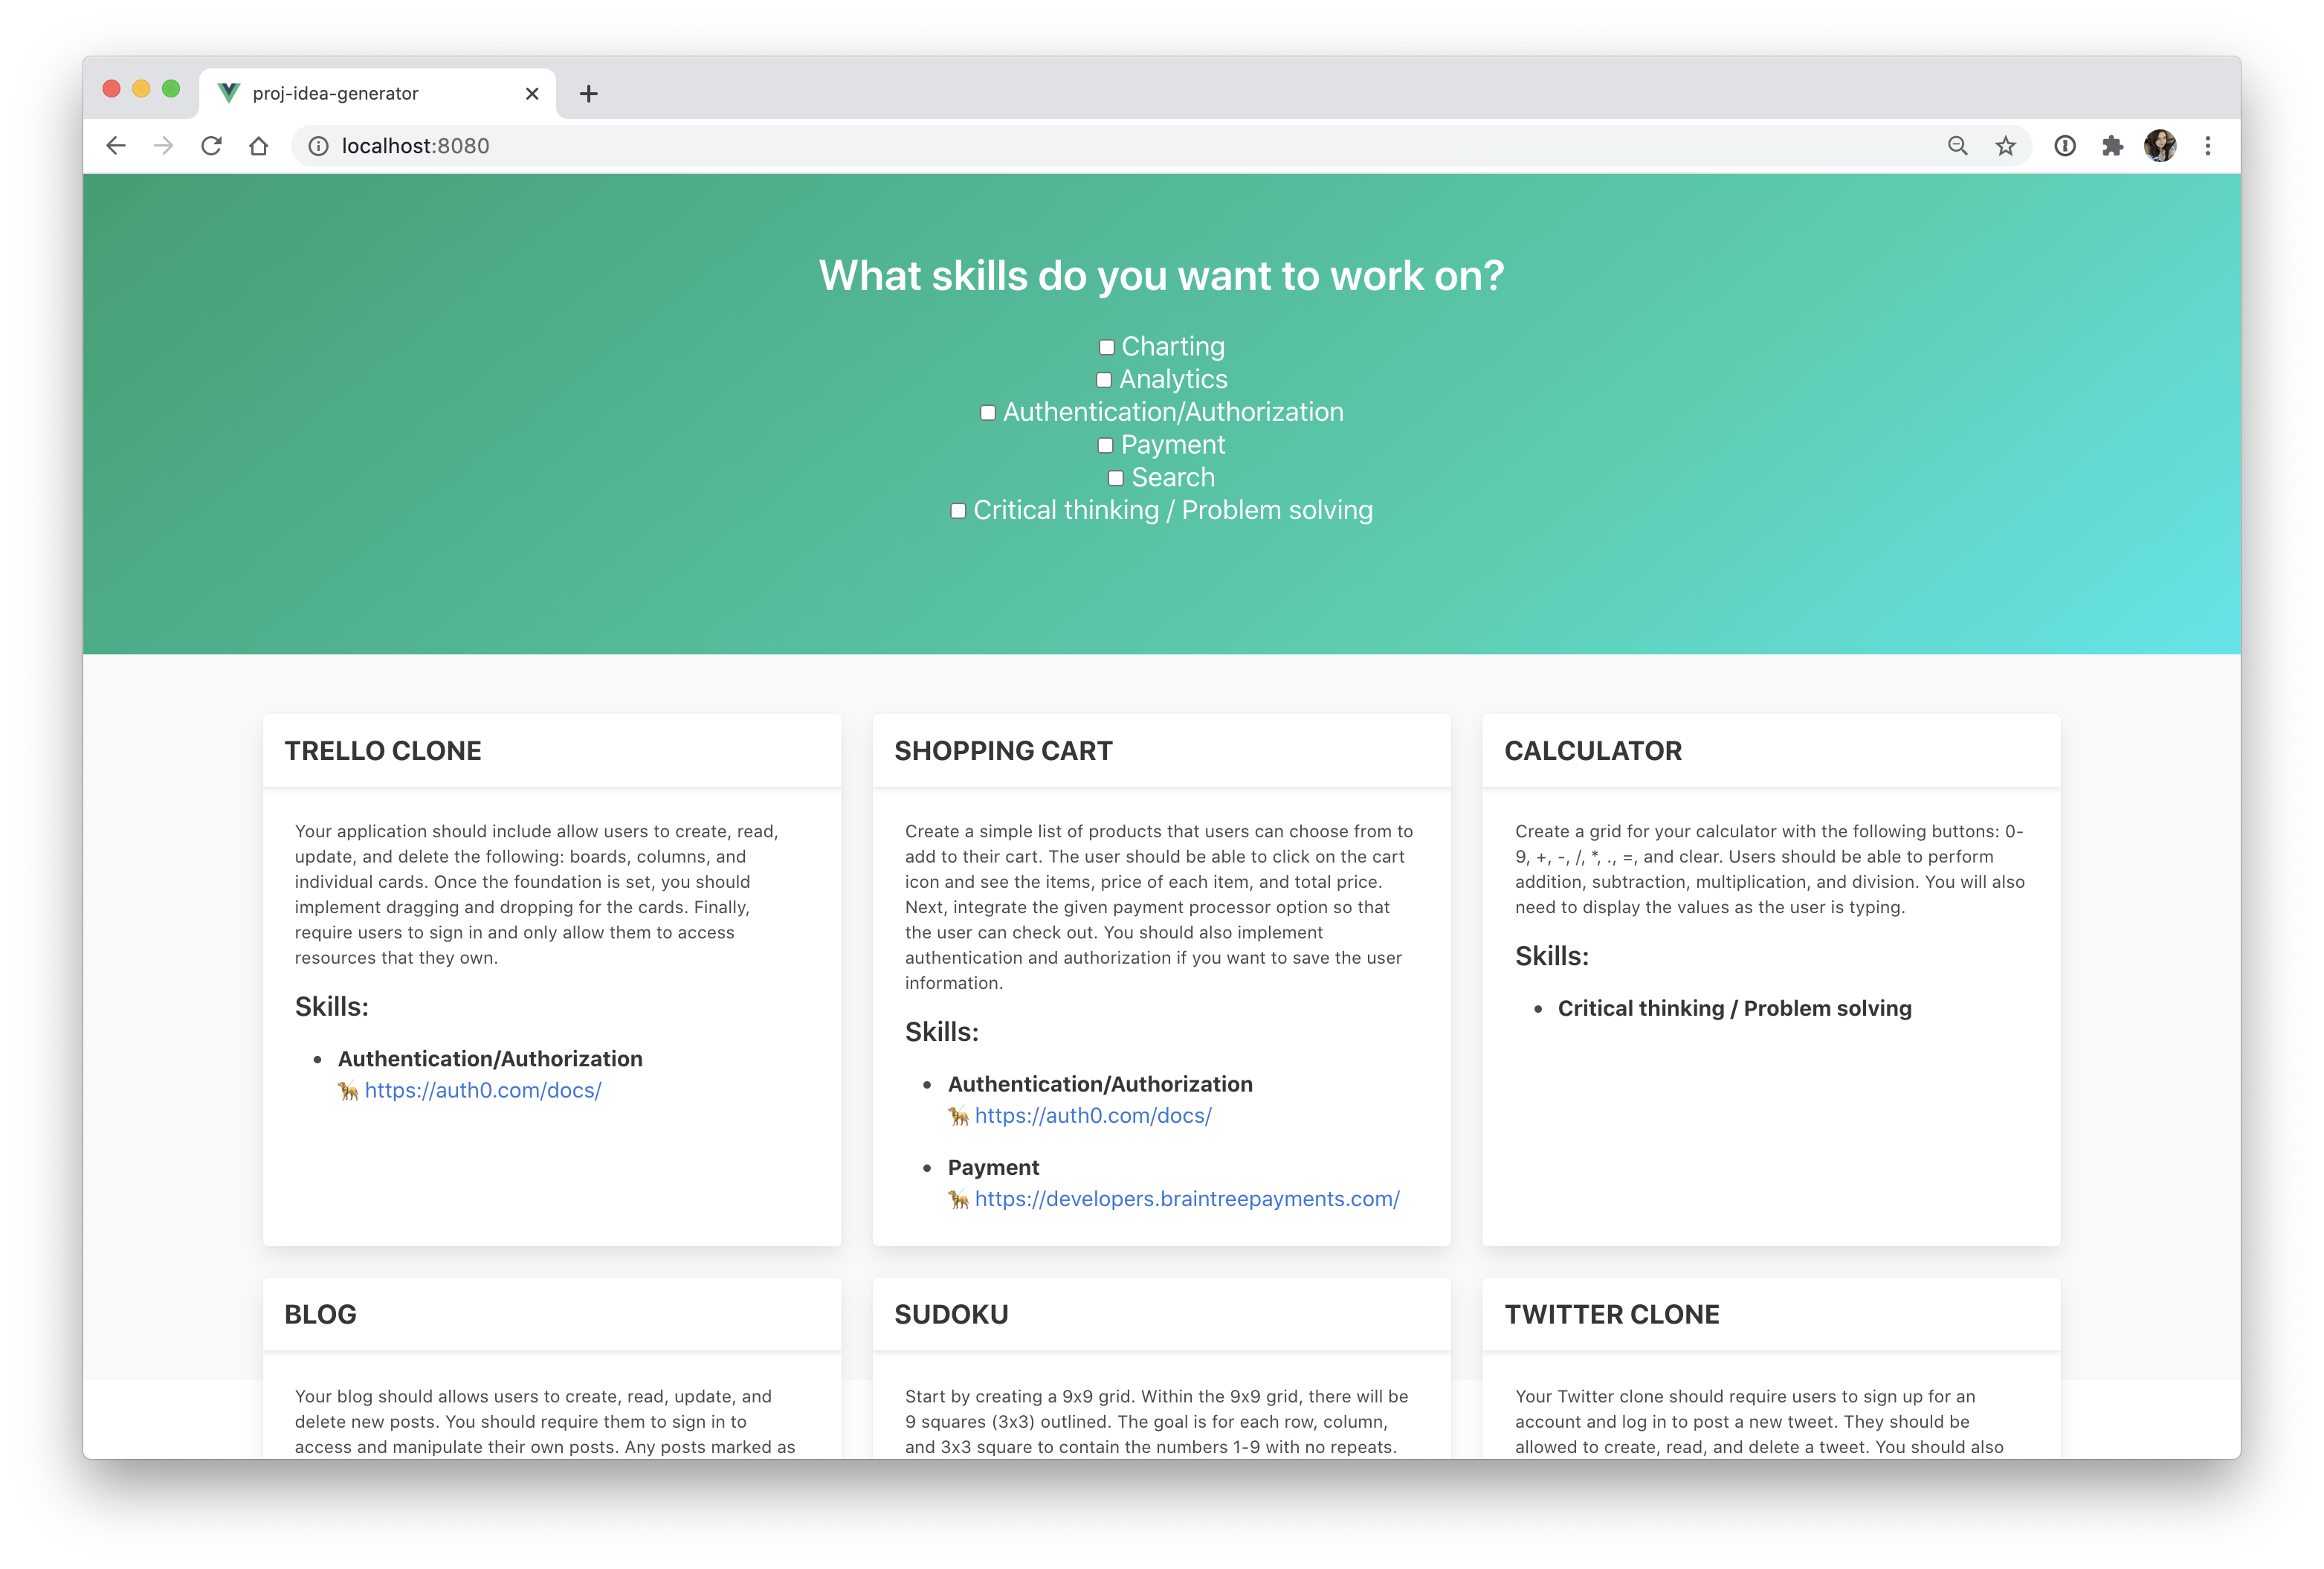
<template>
<div class="generator">
  <section class="hero is-primary is-bold has-text-centered py-6">
    <div class="hero-body">
      <div class="container">
        <h1 class="title">
        What skills do you want to work on?
        </h1>
        <div v-for="skill in skillList" :key="skill.id">
          <div class="field">
            <label class="checkbox">
              <input type="checkbox" :value="skill.id">
              {{ skill.skill }}
            </label>
          </div>
        </div>
      </div>
    </div>
  </section>

  <!-- 👇 new code -->
  <div class="container">
    <div class="columns is-multiline mt-3">
      <div v-for="app in filteredAppList" :key="app.id" class="column is-one-third">
        <div class="card">
          <header class="card-header">
            <p class="card-header-title is-uppercase is-size-5">
              {{ app.app }}
            </p>
          </header>
          <div class="card-content">
            <div class="content has-text-left mb-4">
              <p class="is-size-7">{{ app.instructions }}</p>
              <h4>Skills:</h4>
              <ul v-for="skill in app.skills" :key="skill.id">
                <li>
                  <strong>{{ skillList[skill-1].skill }}</strong>
                </li>
              </ul>
            </div>
          </div>
        </div>
      </div>
    </div>
  </div>
  <!-- ☝️ end new code -->
</div>
</template>
Here, you're looping through the filteredAppList to display each skill that the application utilizes. You're also showing the resource link that is included for that skill. You'll notice though, when you click on some checkboxes, nothing happens. That's because you're never calling the generateFilteredAppList function.
Update the input to call generateFilteredAppList whenever any checkbox is clicked:
<input
  type="checkbox"
  v-model="selectedSkills"
  :value="skill.id"
  @change="generateFilteredAppList"
>
Now, if you click on some checkboxes, you should see the application options updating immediately!
You can fix the card styling by adding the following to the component styles:
<style scoped>
  label {
    font-size: 20px;
  }
  /* 👇 new code */
  .card {
    height: 100%;
  }
</style>
Create a filter to display a random option
This brings us to the final item on the agenda: create a Vue filter to display a random option from the skill list for each application option.
You want to give the user as much direction as possible, so instead of just listing the skill, you're going to include what service or resource they should use to accomplish it. So, you need to pseudo-randomly grab one of the skill options and display it.
So how do you do that? Well, it's a bit of a trick question.
Here's the problem: filters were removed in Vue 3!
In Vue 2, you could create a filter and add the pipe symbol to use it in your template, like this:
<p><strong>{{ skillList[skill-1].skill | random }}</strong></p>
Since this functionality was removed in Vue 3, it's recommended to just create a method instead and call that in the template.
This is what the data for the skillList looks like:
// structure of skillList array
skillList = [
  {
    id: 1,
    skill: 'Charting',
    options: [
      'https://www.chartjs.org/',
      'https://d3js.org/',
      'https://www.highcharts.com/'
    ]
  },
  {
    id: 2,
    skill: 'Analytics',
    options: [
      'https://developers.google.com/analytics',
      'https://matomo.org/docs/'
    ]
  }
];
For the selected skill, you need to look into the options array and randomly pick one of the items. Update setup as follows:
setup() {
  const GENERATOR_BASE = 'http://localhost:3000';
  const skillList = ref([]);
  const selectedSkills = ref([]);
  const filteredAppList = ref([]);
  let appList = [];

  function generateFilteredAppList() {
    filteredAppList.value = [];

    for (const app of appList) {
      const appSkillsArray = app.skills;
      const selectedSkillsArray = selectedSkills.value;

      if (hasAllSkills(appSkillsArray, selectedSkillsArray)) {
        filteredAppList.value.push(app);
      }
    }
  }

  function hasAllSkills(appSkills, selectedSkills) {
    return selectedSkills.every(f => appSkills.includes(f));
  }

  // 👇 new code
  function getRand(value) {
    let keys = Object.keys(value);
    return value[keys[ keys.length * Math.random() << 0]];
  }

  async function getSkillList() {
    const response = await fetch(`${GENERATOR_BASE}/skills`);
    skillList.value = await response.json();
  }

  async function getAppList() {
    const response = await fetch(`${GENERATOR_BASE}/apps`);
    appList = await response.json();
    filteredAppList.value = appList;
  }

  getSkillList();
  getAppList();

  return {
    skillList,
    selectedSkills,
    filteredAppList,
    generateFilteredAppList,
    getRand   // 👈 new code
  }
}
Next, back in the template, update the skill list as follows:
<li>
  <strong>{{ skillList[skill-1].skill }}</strong>
  <p v-if="skillList[skill-1].options" :set="randSkill = getRand(skillList[skill-1].options)">
    🦮 <a :href="randSkill">{{ randSkill }}</a>
  </p>
</li>
And then add the last of the styles:
<style scoped>
  label {
    font-size: 20px;
  }
  .card {
    height: 100%;
  }
  /* 👇 new code */
  a {
    word-break: break-word;
  }
</style>
Because you need to use the random value twice (for the link and to display the skill), you're going to have to use a little "trick" here. You're creating a temporary local value that holds the current return value of getRand() for this spot in the for loop.
And that should do it!
Take a look at your final application, and you should now be able to filter through to find the perfect app to test your skills.
Wrap Up
Phew, that was... a lot. Let's recap everything that you just learned.
- How to use the Vue 3 Composition API
- How to call an API using Vue
- Advanced list filtering in JavaScript
- How to use filters in Vue 3
- How to use Bulma with Vue
Feel free to modify the Express API to add some more skills and sample application options that interest you. If you end up building any of the practice applications, tweet me and let me know! And if you have any questions, be sure to leave them down below. Thanks for reading!
About the author

Holly Guevara
Former Developer Content Manager (Auth0 Alumni)