Documentation Index Fetch the complete documentation index at: https://auth0.com/llms.txt
Use this file to discover all available pages before exploring further.
Auth0は、SharePointの認証プロセスを大幅に簡素化するのに役立ちます。このチュートリアルでは、Auth0を使用してSharePointにシングルサインオン(SSO ソーシャルアイデンティティプロバイダー (Facebook、X、GitHubなど)、エンタープライズプロバイダー (LDAP、Active Directory、ADFSなど)、またはユーザー名とパスワードを使用してログインできるようになります。
Auth0は、Auth0 Claims Provider for SharePoint 2010/2013のサポートを終了しました。既存のテナントに対しては、このパッケージの使用を停止することが奨励されます。新規テナントはこのパッケージを使用できません。
セットアップ 1.アカウント統合を追加する 最初に、Dashboardの[SSO Integrations(SSO統合)] セクションに移動し、アプリのリストから [SharePoint] を選択します。
2.ライブマニュアルに従う
SharePointサーバーがインターネットに接続していない場合は、インストールファイルを手動でダウンロードします(オフラインでのインストール方法 を確認してください)。 [Settings(設定)] タブで、SharePoint WebアプリケーションのURLと外部URL(通常、代替アクセスマッピングのインターネットエンドポイント)を入力する必要があります。ライブマニュアルは、SharePoint用Auth0 CmdLetsのインストールから始まります。
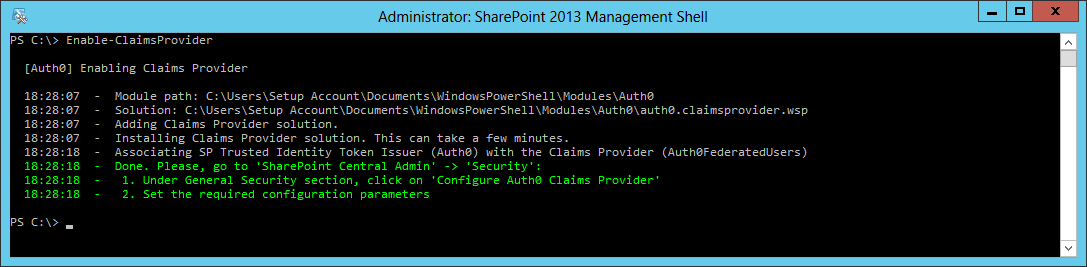
これらがインストールされると、さまざまなWebアプリケーションに対してAuth0とクレームプロバイダーを有効または無効にできるようになりますAuth0での認証を有効にする必要があります。
その後、クレームプロバイダーをインストールして、ユーザー選択機能と権限が正しく機能するようにします。
これらのスクリプトが実行されたら、中央管理で設定を完了します。
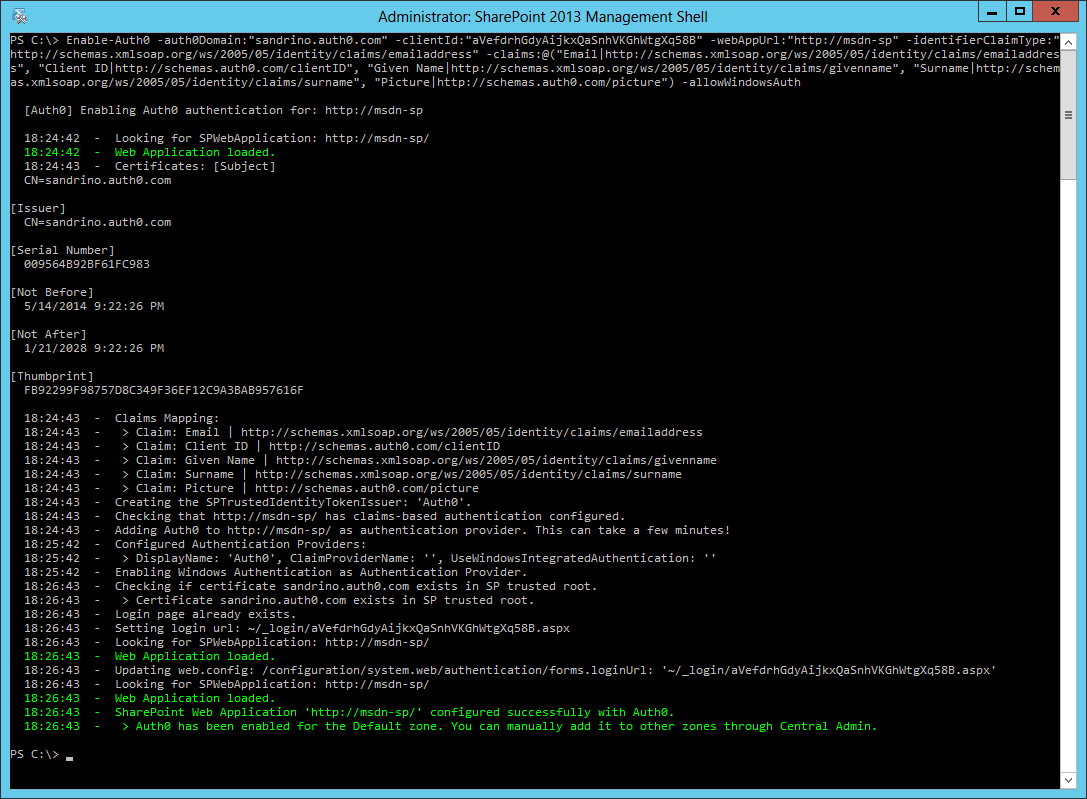
Enable-Auth0の呼び出しは、次のように設定できることに注意してください。
ユーザーの一意の識別子を変更する(メールアドレスやユーザーIDなど)
追加のクレームをSharePointに渡すことを許可する
デフォルトのWindows認証を有効または無効にする
以下の例では、ロールクレームをクレームマッピングに追加し、Windows認証を許可しています。
Enable-Auth0 - auth0Domain: "fabrikam.auth0.com" - clientId: "bOFty3tWgpijnwMcltysNFqHgO1ziz1I" - webAppUrl: "http://fabrikam-sp/" - identifierClaimType: "http://schemas.xmlsoap.org/ws/2005/05/identity/claims/emailaddress" - claims: @ ( "Email|http://schemas.xmlsoap.org/ws/2005/05/identity/claims/emailaddress" , "Role|http://schemas.microsoft.com/ws/2008/06/identity/claims/role" , "Client ID|http://schemas.auth0.com/clientID" , "Given Name|http://schemas.xmlsoap.org/ws/2005/05/identity/claims/givenname" , "Surname|http://schemas.xmlsoap.org/ws/2005/05/identity/claims/surname" , "Picture|http://schemas.auth0.com/picture" ) - allowWindowsAuth
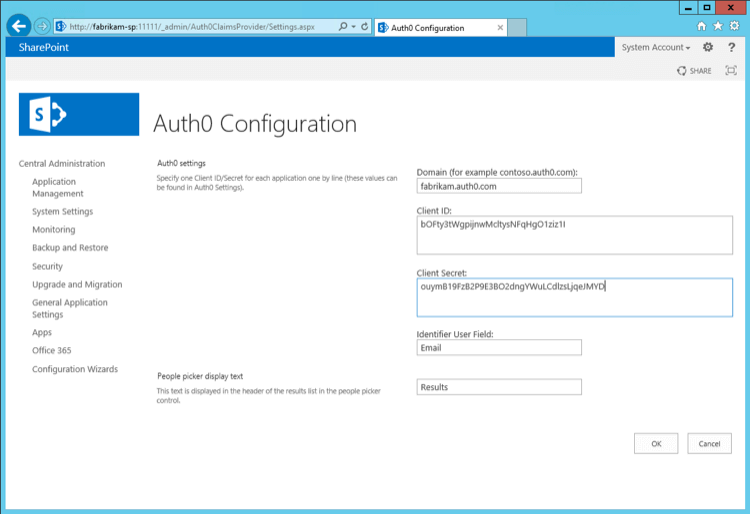
3.これでSharePointの設定が完了しました Auth0をSSOブローカーとして使用するようにSharePointを設定しました。ユーザーがあなたのサイトを訪問すると、ログインページが開き、そのアプリケーションに対して有効になっているすべての接続が表示されます。
クレームプロバイダーのインストール時にどのクレームがマッピングされているかに応じて、この追加情報はユーザーの個人設定ページにも表示されます。
Enable-Auth0の呼び出しは、次のように設定できることに注意してください。
ユーザーの一意の識別子を変更する(メールアドレスやユーザーIDなど)
追加のクレームをSharePointに渡すことを許可する
デフォルトのWindows認証を有効または無効にする
以下の例では、ロールクレームをクレームマッピングに追加し、Windows認証を許可しています。
Enable-Auth0 - auth0Domain: "fabrikam.auth0.com" - clientId: "bOFty3tWgpijnwMcltysNFqHgO1ziz1I" - webAppUrl: "http://fabrikam-sp/" - identifierClaimType: "http://schemas.xmlsoap.org/ws/2005/05/identity/claims/emailaddress" - claims: @ ( "Email|http://schemas.xmlsoap.org/ws/2005/05/identity/claims/emailaddress" , "Role|http://schemas.microsoft.com/ws/2008/06/identity/claims/role" , "Client ID|http://schemas.auth0.com/clientID" , "Given Name|http://schemas.xmlsoap.org/ws/2005/05/identity/claims/givenname" , "Surname|http://schemas.xmlsoap.org/ws/2005/05/identity/claims/surname" , "Picture|http://schemas.auth0.com/picture" ) - allowWindowsAuth
これでSharePointがAuth0をSSOブローカーとして使用するようになります。
ログインページをカスタマイズする ログインページは、「Auth0ユニバーサルログイン 」の指示に従ってカスタマイズできます。
ユーザーがAuth0を通さずにWindows認証を使用してSharePointに対して認証できるようにする手段を提供したい場合もあるかもしれません。それは、ログインページをカスタマイズし、Windows認証エンドポイントへのリンクを追加することで実現できます(通常、https://yoursharepointserver/_windows/default.aspx?ReturnUrl=/_layouts/15/Authenticate.aspxのようなリンク)。
これを実行する1つの方法は、jQueryを使用してLockウィジェットを修正し、Windows認証エンドポイントへのリンクを追加することです。
カスタマイズしたログインページの<body>セクションの先頭に、jQueryへの参照を追加する必要があります。
< script src = "https://code.jquery.com/jquery-3.3.1.slim.min.js" ></ script >
lock.show()を呼び出す前に、リンクを追加するHTML DOMに修正を加えるためのコードを追加します。// construct Lock // var lock = ... [ ... ] // One or more SharePoint client IDs here for which you want // a Windows Auth button var sharepointClientIDs = [ 'your_sharepoint_client_id' ]; if ( sharepointClientIDs . indexOf ( config . clientID ) >= 0 ) { lock . on ( 'signin ready' , function () { var getParameterByName = function ( name ) { name = name . replace ( / [ \[ ] / , " \\\[ " ). replace ( / [ \] ] / , " \\\] " ); var regexS = "[ \\ ?&]" + name + "=([^&#]*)" ; var regex = new RegExp ( regexS ); var results = regex . exec ( window . location . search ); if ( results == null ) return null ; else return results [ 1 ]; }; // get the host from the callback URL var parser = document . createElement ( 'a' ); parser . href = config . callbackURL ; var host = parser . host ; var windowsAuthURL = "https://" + host + "/_windows/default.aspx?ReturnUrl=/_layouts/15/Authenticate.aspx" ; var wctx = getParameterByName ( "wctx" ); if ( wctx ) { windowsAuthURL += "&Source=" + wctx ; } $ ( '.auth0-lock-tabs-container' ) . after ( '<div><p class="auth0-lock-alternative" style="padding:5px 0;">' + '<a class="auth0-lock-alternative-link" ' + 'href="' + windowsAuthURL + '">' + 'Login with Windows Authentication!!!</a>' + '</p><p><span>or</span></p></div>' ). attr ( 'href' , 'https://nowhere' ); }); } lock . show ();
トラブルシューティング 追加のクレームや認可を扱う際には、現在のユーザーのクレームを確認できると便利です。Microsoft の専門家であるリアム・クリーリー 氏の記事「Claims Viewer Web Part 」は、ユーザーのクレームに関する問題のトラブルシューティングに役立ちます。
SP2010のログ エラーや警告はSharePointの統合ログサービスに記録され、ULS Viewerのようなツールを使用して、クレームプロバイダーを使用する際に発生した問題をトラブルシューティングできます。
ULS Viewとその仕様の詳細については、Microsoftの「ULS Viewer 」マニュアルをご覧ください。
SP2013のログ SharePoint 2013では、ログに統合ログサービスを使用せず、代わりにWindowsのイベントトレースを利用するようになりました。これにより、パフォーマンスが向上し、記録されたすべてのイベントを複数の方法で取得できます。
ログをリアルタイムで表示するには、GitHubからAuth0 Logs Processor をダウンロードしてください。このツールをSharePointサーバー上で実行すると、SharePointがクレームプロバイダーに対して行っているすべての呼び出しを確認できます。
次の手順 Auth0から渡されるクレームは、SharePointの認可にも利用できます。たとえば、ロールクレームに Fabrikam HR が含まれるユーザーは、特定のサイトへのアクセス権を持つか、あるいはそのサイトで共同作業者としての権限を持つべきです。
例として Azure ADを取り上げてみましょう。このクラウドディレクトリでは、ユーザーはグループの一員になることができ、田中さんは Fabrikam HRに所属しています。
田中さんがAzure ADアカウントを使用してログインすると(その接続でSecurity Groups属性が有効になっている場合)、グループメンバーシップ情報がユーザープロファイルのgroups属性に保存されます。
これらのグループをSharePointのロールとして利用できるようにするためには、SAML ルール を作成する必要があります。このルールは、 Fabrikam Intranet (SharePoint) という名前のアプリケーションに対してのみ実行されます。
function ( user , context , callback ) { if ( context . clientName === 'Fabrikam Intranet (SharePoint)' ) { context . samlConfiguration . mappings = { 'http://schemas.xmlsoap.org/ws/2005/05/identity/claims/nameidentifier' : 'user_id' , 'http://schemas.xmlsoap.org/ws/2005/05/identity/claims/emailaddress' : 'email' , 'http://schemas.xmlsoap.org/ws/2005/05/identity/claims/name' : 'name' , 'http://schemas.xmlsoap.org/ws/2005/05/identity/claims/givenname' : 'given_name' , 'http://schemas.xmlsoap.org/ws/2005/05/identity/claims/surname' : 'family_name' , 'http://schemas.xmlsoap.org/ws/2005/05/identity/claims/upn' : 'upn' , 'http://schemas.microsoft.com/ws/2008/06/identity/claims/role' : 'groups' }; } callback ( null , user , context ); }
これにより、groupsを含む追加の送信クレームhttp://schemas.microsoft.com/ws/2008/06/identity/claims/roleが追加され、SharePointで認可に使用されます。
クレームプロバイダーをインストールする際には、ロールクレームをクレームマッピングリストに追加することで、そのクレームがSharePointに渡されるようにする必要があります。
Enable-Auth0 - auth0Domain: "fabrikam.auth0.com" ... - claims: @ ( "Email|http://schemas.xmlsoap.org/ws/2005/05/identity/claims/emailaddress" , "Role|http://schemas.microsoft.com/ws/2008/06/identity/claims/role" , ...) ... - Verbose
デフォルトでは、ユーザーはサイトへのアクセス権を持っていません。
現在は、特定のユーザーをSharePointグループ(例:Contributors)に追加する代わりに、 ロール をSharePointグループに追加できるようになりました。以下は、「Fabrikam HR」のメンバーをContributorsグループに追加する方法を示すPowerShellスクリプトのサンプルです。
$webName = "http://fabrikam-sp" $groupName = "Contributors" $roleClaim = "Fabrikam HR" $sts = Get-SPTrustedIdentityTokenIssuer "Auth0" $claimPrincipal = New-SPClaimsPrincipal - ClaimValue $roleClaim - ClaimType "http://schemas.microsoft.com/ws/2008/06/identity/claims/role" - TrustedIdentityTokenIssuer $sts $web = Get-SPWeb $webName $user = New-SPUser - UserAlias $claimPrincipal .ToEncodedString () - Web $web $group = $web .SiteGroups [ $groupName ] $group .AddUser ( $user )
このクレーム値をContributorsグループに追加した後、田中さんはサイトにアクセスしてその内容を編集できるようになります。
ユーザープロファイルの同期 SharePointはデフォルトでActive Directoryから発信されたユーザープロファイル情報を同期できます。現在、Auth0を使用することで、ユーザーはソーシャルからエンタープライズまでさまざまな種類の接続元から来ることができるため、ユーザープロファイルの同期にはそれらに応じた異なるアプローチが必要になります。
最初のアプローチとして、数時間ごとに実行されるタイマージョブを作成して、Auth0のユーザーエンドポイントをクエリし、それらのユーザーのプロファイル情報を同期する方法があります。
using System ; using Microsoft . SharePoint ; using Microsoft . SharePoint . Administration ; using Microsoft . Office . Server ; using Microsoft . Office . Server . UserProfiles ; namespace UserProfileSync { class Program { static void Main ( string [] args ) { // Call the Auth0 Management API - https://docs.auth0.com/api/v2 using ( var site = new SPSite ( "http://servername" )) { var context = SPServiceContext . GetContext ( site ); var profileManager = new UserProfileManager ( context ); var accountName = "i:05.t|auth0|john@example.org" ; var userProfile = profileManager . GetUserProfile ( accountName ); userProfile [ PropertyConstants . HomePhone ]. Value = "+1 594 9392" ; userProfile . Commit (); } } } }
別の方法として、このロジックをHttpModuleとして実装し、ユーザーがログインするたびに実行されるようにすることもできます。
public class PersistUserClaimsHttpModule : IHttpModule { private SPFederationAuthenticationModule FederationModule { get { return HttpContext . Current . ApplicationInstance . Modules [ "FederatedAuthentication" ] as SPFederationAuthenticationModule ; } } public void Init ( HttpApplication context ) { FederationModule . SecurityTokenValidated += OnFederationSecurityTokenValidated ; } private void OnFederationSecurityTokenValidated ( object sender , SecurityTokenValidatedEventArgs e ) { // Use e.ClaimsPrincipal } }