Device Authorization Flow
By Rachel Khoriander
This tutorial demonstrates how to call your API from an input-constrained device using the Device Authorization flow. We recommend that you log in to follow this quickstart with examples configured for your account.
Auth0 makes it easy for your app to implement the Device Authorization flow using:
- Authentication API: Keep reading to learn how to call our API directly. For an interactive experience, see our Device Flow Playground.
Prerequisites
Before beginning this tutorial:
-
Check limitations to be sure the Device Authorization flow is suitable for your implementation.
-
Register the Application with Auth0.
- Select an Application Type of Native.
- If necessary, set Allowed Web Origins. You can use this to allow localhost as an origin for local development, or to set an allowed origin for specific TV software with architecture subject to CORS (eg: HTML5 + JS). Most applications will not use this setting.
- Ensure that the OIDC Conformant toggle is enabled. This setting is in the Dashboard under Application Settings > Advanced > OAuth.
- Make sure the Application's Grant Types include Device Code. This is also in the Dashboard, under Application Settings > Advanced > Grant Types.
- If you want your Application to be able to use Refresh Tokens, make sure the Application's Grant Types include Refresh Token.
-
Set up and enable at least one connection for the Application: Database connections, Social connections
-
- If you want your API to receive Refresh Tokens to allow it to obtain new tokens when the previous ones expire, enable Allow Offline Access.
-
Configure Device User Code Settings to define the character set, format, and length of your randomly-generated user code.
Steps
- Request device code (Device Flow): Request a device code that the user can use to authorize the device.
- Request device activation (Device Flow): Request that the user authorize the device using their laptop or smartphone.
- Request Tokens (Device Flow): Poll the token endpoint to request a token.
- User authorization (Browser Flow): The user authorizes the device, so the device can receive tokens.
- Receive Tokens (Device Flow): After the user successfully authorizes the device, receive tokens.
- Call your API (Device Flow): Use the retrieved Access Token to call your API.
- Refresh Tokens (Device Flow): Use a Refresh Token to request new tokens when the existing ones expire.
Optional: Explore Sample Use Cases
Optional: Troubleshooting
Request Device Code
Once the user has started their device app and wants to authorize the device, you'll need to get a device code. When the user begins their session in their browser-based device, this code will be bound to that session.
To get the device code, your app must request a code from the device code URL, including the Client ID.
Example POST to device code URL
curl --request POST \
--url 'https://{yourDomain}/oauth/device/code' \
--header 'content-type: application/x-www-form-urlencoded' \
--data 'client_id={yourClientId}' \
--data scope=SCOPE \
--data audience=AUDIENCEWas this helpful?
var client = new RestClient("https://{yourDomain}/oauth/device/code");
var request = new RestRequest(Method.POST);
request.AddHeader("content-type", "application/x-www-form-urlencoded");
request.AddParameter("application/x-www-form-urlencoded", "client_id=%24%7Baccount.clientId%7D&scope=SCOPE&audience=AUDIENCE", ParameterType.RequestBody);
IRestResponse response = client.Execute(request);Was this helpful?
package main
import (
"fmt"
"strings"
"net/http"
"io/ioutil"
)
func main() {
url := "https://{yourDomain}/oauth/device/code"
payload := strings.NewReader("client_id=%24%7Baccount.clientId%7D&scope=SCOPE&audience=AUDIENCE")
req, _ := http.NewRequest("POST", url, payload)
req.Header.Add("content-type", "application/x-www-form-urlencoded")
res, _ := http.DefaultClient.Do(req)
defer res.Body.Close()
body, _ := ioutil.ReadAll(res.Body)
fmt.Println(res)
fmt.Println(string(body))
}Was this helpful?
HttpResponse<String> response = Unirest.post("https://{yourDomain}/oauth/device/code")
.header("content-type", "application/x-www-form-urlencoded")
.body("client_id=%24%7Baccount.clientId%7D&scope=SCOPE&audience=AUDIENCE")
.asString();Was this helpful?
var axios = require("axios").default;
var options = {
method: 'POST',
url: 'https://{yourDomain}/oauth/device/code',
headers: {'content-type': 'application/x-www-form-urlencoded'},
data: {client_id: '{yourClientId}', scope: 'SCOPE', audience: 'AUDIENCE'}
};
axios.request(options).then(function (response) {
console.log(response.data);
}).catch(function (error) {
console.error(error);
});Was this helpful?
#import <Foundation/Foundation.h>
NSDictionary *headers = @{ @"content-type": @"application/x-www-form-urlencoded" };
NSMutableData *postData = [[NSMutableData alloc] initWithData:[@"client_id={yourClientId}" dataUsingEncoding:NSUTF8StringEncoding]];
[postData appendData:[@"&scope=SCOPE" dataUsingEncoding:NSUTF8StringEncoding]];
[postData appendData:[@"&audience=AUDIENCE" dataUsingEncoding:NSUTF8StringEncoding]];
NSMutableURLRequest *request = [NSMutableURLRequest requestWithURL:[NSURL URLWithString:@"https://{yourDomain}/oauth/device/code"]
cachePolicy:NSURLRequestUseProtocolCachePolicy
timeoutInterval:10.0];
[request setHTTPMethod:@"POST"];
[request setAllHTTPHeaderFields:headers];
[request setHTTPBody:postData];
NSURLSession *session = [NSURLSession sharedSession];
NSURLSessionDataTask *dataTask = [session dataTaskWithRequest:request
completionHandler:^(NSData *data, NSURLResponse *response, NSError *error) {
if (error) {
NSLog(@"%@", error);
} else {
NSHTTPURLResponse *httpResponse = (NSHTTPURLResponse *) response;
NSLog(@"%@", httpResponse);
}
}];
[dataTask resume];Was this helpful?
$curl = curl_init();
curl_setopt_array($curl, [
CURLOPT_URL => "https://{yourDomain}/oauth/device/code",
CURLOPT_RETURNTRANSFER => true,
CURLOPT_ENCODING => "",
CURLOPT_MAXREDIRS => 10,
CURLOPT_TIMEOUT => 30,
CURLOPT_HTTP_VERSION => CURL_HTTP_VERSION_1_1,
CURLOPT_CUSTOMREQUEST => "POST",
CURLOPT_POSTFIELDS => "client_id=%24%7Baccount.clientId%7D&scope=SCOPE&audience=AUDIENCE",
CURLOPT_HTTPHEADER => [
"content-type: application/x-www-form-urlencoded"
],
]);
$response = curl_exec($curl);
$err = curl_error($curl);
curl_close($curl);
if ($err) {
echo "cURL Error #:" . $err;
} else {
echo $response;
}Was this helpful?
import http.client
conn = http.client.HTTPSConnection("")
payload = "client_id=%24%7Baccount.clientId%7D&scope=SCOPE&audience=AUDIENCE"
headers = { 'content-type': "application/x-www-form-urlencoded" }
conn.request("POST", "/{yourDomain}/oauth/device/code", payload, headers)
res = conn.getresponse()
data = res.read()
print(data.decode("utf-8"))Was this helpful?
require 'uri'
require 'net/http'
require 'openssl'
url = URI("https://{yourDomain}/oauth/device/code")
http = Net::HTTP.new(url.host, url.port)
http.use_ssl = true
http.verify_mode = OpenSSL::SSL::VERIFY_NONE
request = Net::HTTP::Post.new(url)
request["content-type"] = 'application/x-www-form-urlencoded'
request.body = "client_id=%24%7Baccount.clientId%7D&scope=SCOPE&audience=AUDIENCE"
response = http.request(request)
puts response.read_bodyWas this helpful?
import Foundation
let headers = ["content-type": "application/x-www-form-urlencoded"]
let postData = NSMutableData(data: "client_id={yourClientId}".data(using: String.Encoding.utf8)!)
postData.append("&scope=SCOPE".data(using: String.Encoding.utf8)!)
postData.append("&audience=AUDIENCE".data(using: String.Encoding.utf8)!)
let request = NSMutableURLRequest(url: NSURL(string: "https://{yourDomain}/oauth/device/code")! as URL,
cachePolicy: .useProtocolCachePolicy,
timeoutInterval: 10.0)
request.httpMethod = "POST"
request.allHTTPHeaderFields = headers
request.httpBody = postData as Data
let session = URLSession.shared
let dataTask = session.dataTask(with: request as URLRequest, completionHandler: { (data, response, error) -> Void in
if (error != nil) {
print(error)
} else {
let httpResponse = response as? HTTPURLResponse
print(httpResponse)
}
})
dataTask.resume()Was this helpful?
Device Code Parameters
Note that when requesting a device code to call a custom API, you:
- must include an audience parameter
- can include additional scopes supported by the target API
| Parameter Name | Description |
|---|---|
client_id |
Your application's Client ID. You can find this value in your Application Settings. |
scope |
The scopes for which you want to request authorization. These must be separated by a space. You can request any of the standard OIDC scopes about users, such as profile and email, custom claims conforming to a namespaced format, or any scopes supported by the target API (e.g., read:contacts). Include openid to get an ID Token or to be able to use the /userinfo endpoint to retrieve profile information for the user. Include offline_access to get a Refresh Token (make sure that the Allow Offline Access field is enabled in the API Settings). Note that this must be URL encoded. |
audience |
The unique identifier of the API your app wants to access. Use the Identifier value on the Settings tab for the API you created as part of the prerequisites for this tutorial. Note that this must be URL encoded. |
Device Code Response
If all goes well, you'll receive an HTTP 200 response with a payload containing device_code, user_code, verification_uri, and expires_in, interval, and verification_uri_complete values:
{
"device_code": "Ag_EE...ko1p",
"user_code": "QTZL-MCBW",
"verification_uri": "https://accounts.acmetest.org/activate",
"verification_uri_complete": "https://accounts.acmetest.org/activate?user_code=QTZL-MCBW",
"expires_in": 900,
"interval": 5
}Was this helpful?
device_codeis the unique code for the device. When the user goes to theverification_uriin their browser-based device, this code will be bound to their session.user_codecontains the code that should be input at theverification_urito authorize the device.verification_uricontains the URL the user should visit to authorize the device.verification_uri_completecontains the complete URL the user should visit to authorize the device. This allows your app to embed theuser_codein the URL, if you so choose.expires_inindicates the lifetime (in seconds) of thedevice_codeanduser_code.intervalindicates the interval (in seconds) at which the app should poll the token URL to request a token.
Request Device Activation
Once you have received a device_code and user_code, you must ask the user to go to the verification_uri on their laptop or smartphone and enter the user_code:
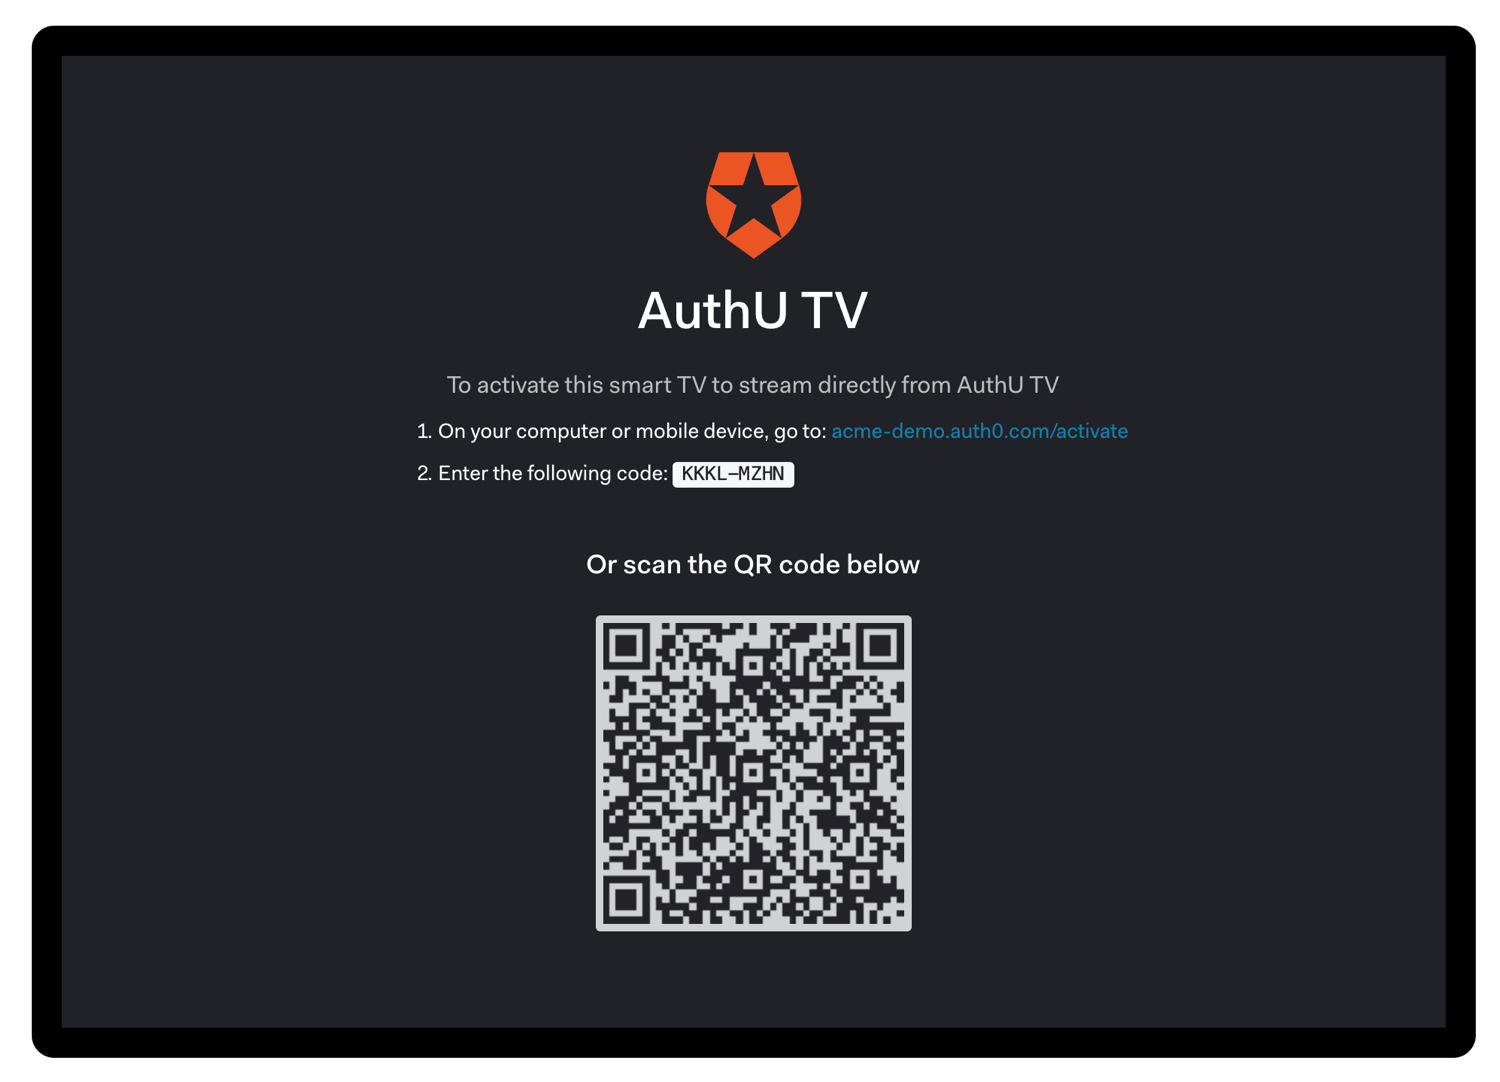
The device_code is not intended for the user directly and should not be displayed during the interaction to avoid confusing the user.
Request Tokens
While you are waiting for the user to activate the device, begin polling the token URL to request an Access Token. Using the extracted polling interval (interval) from the previous step, you will need to POST to the token URL sending along the device_code.
To avoid errors due to network latency, you should start counting each interval after receipt of the last polling request's response.
Example request token POST to token URL
curl --request POST \
--url 'https://{yourDomain}/oauth/token' \
--header 'content-type: application/x-www-form-urlencoded' \
--data grant_type=urn:ietf:params:oauth:grant-type:device_code \
--data device_code=YOUR_DEVICE_CODE \
--data 'client_id={yourClientId}'Was this helpful?
var client = new RestClient("https://{yourDomain}/oauth/token");
var request = new RestRequest(Method.POST);
request.AddHeader("content-type", "application/x-www-form-urlencoded");
request.AddParameter("application/x-www-form-urlencoded", "grant_type=urn%3Aietf%3Aparams%3Aoauth%3Agrant-type%3Adevice_code&device_code=YOUR_DEVICE_CODE&client_id=%24%7Baccount.clientId%7D", ParameterType.RequestBody);
IRestResponse response = client.Execute(request);Was this helpful?
package main
import (
"fmt"
"strings"
"net/http"
"io/ioutil"
)
func main() {
url := "https://{yourDomain}/oauth/token"
payload := strings.NewReader("grant_type=urn%3Aietf%3Aparams%3Aoauth%3Agrant-type%3Adevice_code&device_code=YOUR_DEVICE_CODE&client_id=%24%7Baccount.clientId%7D")
req, _ := http.NewRequest("POST", url, payload)
req.Header.Add("content-type", "application/x-www-form-urlencoded")
res, _ := http.DefaultClient.Do(req)
defer res.Body.Close()
body, _ := ioutil.ReadAll(res.Body)
fmt.Println(res)
fmt.Println(string(body))
}Was this helpful?
HttpResponse<String> response = Unirest.post("https://{yourDomain}/oauth/token")
.header("content-type", "application/x-www-form-urlencoded")
.body("grant_type=urn%3Aietf%3Aparams%3Aoauth%3Agrant-type%3Adevice_code&device_code=YOUR_DEVICE_CODE&client_id=%24%7Baccount.clientId%7D")
.asString();Was this helpful?
var axios = require("axios").default;
var options = {
method: 'POST',
url: 'https://{yourDomain}/oauth/token',
headers: {'content-type': 'application/x-www-form-urlencoded'},
data: new URLSearchParams({
grant_type: 'urn:ietf:params:oauth:grant-type:device_code',
device_code: 'YOUR_DEVICE_CODE',
client_id: '{yourClientId}'
})
};
axios.request(options).then(function (response) {
console.log(response.data);
}).catch(function (error) {
console.error(error);
});Was this helpful?
#import <Foundation/Foundation.h>
NSDictionary *headers = @{ @"content-type": @"application/x-www-form-urlencoded" };
NSMutableData *postData = [[NSMutableData alloc] initWithData:[@"grant_type=urn:ietf:params:oauth:grant-type:device_code" dataUsingEncoding:NSUTF8StringEncoding]];
[postData appendData:[@"&device_code=YOUR_DEVICE_CODE" dataUsingEncoding:NSUTF8StringEncoding]];
[postData appendData:[@"&client_id={yourClientId}" dataUsingEncoding:NSUTF8StringEncoding]];
NSMutableURLRequest *request = [NSMutableURLRequest requestWithURL:[NSURL URLWithString:@"https://{yourDomain}/oauth/token"]
cachePolicy:NSURLRequestUseProtocolCachePolicy
timeoutInterval:10.0];
[request setHTTPMethod:@"POST"];
[request setAllHTTPHeaderFields:headers];
[request setHTTPBody:postData];
NSURLSession *session = [NSURLSession sharedSession];
NSURLSessionDataTask *dataTask = [session dataTaskWithRequest:request
completionHandler:^(NSData *data, NSURLResponse *response, NSError *error) {
if (error) {
NSLog(@"%@", error);
} else {
NSHTTPURLResponse *httpResponse = (NSHTTPURLResponse *) response;
NSLog(@"%@", httpResponse);
}
}];
[dataTask resume];Was this helpful?
$curl = curl_init();
curl_setopt_array($curl, [
CURLOPT_URL => "https://{yourDomain}/oauth/token",
CURLOPT_RETURNTRANSFER => true,
CURLOPT_ENCODING => "",
CURLOPT_MAXREDIRS => 10,
CURLOPT_TIMEOUT => 30,
CURLOPT_HTTP_VERSION => CURL_HTTP_VERSION_1_1,
CURLOPT_CUSTOMREQUEST => "POST",
CURLOPT_POSTFIELDS => "grant_type=urn%3Aietf%3Aparams%3Aoauth%3Agrant-type%3Adevice_code&device_code=YOUR_DEVICE_CODE&client_id=%24%7Baccount.clientId%7D",
CURLOPT_HTTPHEADER => [
"content-type: application/x-www-form-urlencoded"
],
]);
$response = curl_exec($curl);
$err = curl_error($curl);
curl_close($curl);
if ($err) {
echo "cURL Error #:" . $err;
} else {
echo $response;
}Was this helpful?
import http.client
conn = http.client.HTTPSConnection("")
payload = "grant_type=urn%3Aietf%3Aparams%3Aoauth%3Agrant-type%3Adevice_code&device_code=YOUR_DEVICE_CODE&client_id=%24%7Baccount.clientId%7D"
headers = { 'content-type': "application/x-www-form-urlencoded" }
conn.request("POST", "/{yourDomain}/oauth/token", payload, headers)
res = conn.getresponse()
data = res.read()
print(data.decode("utf-8"))Was this helpful?
require 'uri'
require 'net/http'
require 'openssl'
url = URI("https://{yourDomain}/oauth/token")
http = Net::HTTP.new(url.host, url.port)
http.use_ssl = true
http.verify_mode = OpenSSL::SSL::VERIFY_NONE
request = Net::HTTP::Post.new(url)
request["content-type"] = 'application/x-www-form-urlencoded'
request.body = "grant_type=urn%3Aietf%3Aparams%3Aoauth%3Agrant-type%3Adevice_code&device_code=YOUR_DEVICE_CODE&client_id=%24%7Baccount.clientId%7D"
response = http.request(request)
puts response.read_bodyWas this helpful?
import Foundation
let headers = ["content-type": "application/x-www-form-urlencoded"]
let postData = NSMutableData(data: "grant_type=urn:ietf:params:oauth:grant-type:device_code".data(using: String.Encoding.utf8)!)
postData.append("&device_code=YOUR_DEVICE_CODE".data(using: String.Encoding.utf8)!)
postData.append("&client_id={yourClientId}".data(using: String.Encoding.utf8)!)
let request = NSMutableURLRequest(url: NSURL(string: "https://{yourDomain}/oauth/token")! as URL,
cachePolicy: .useProtocolCachePolicy,
timeoutInterval: 10.0)
request.httpMethod = "POST"
request.allHTTPHeaderFields = headers
request.httpBody = postData as Data
let session = URLSession.shared
let dataTask = session.dataTask(with: request as URLRequest, completionHandler: { (data, response, error) -> Void in
if (error != nil) {
print(error)
} else {
let httpResponse = response as? HTTPURLResponse
print(httpResponse)
}
})
dataTask.resume()Was this helpful?
Token Request Parameters
| Parameter Name | Description |
|---|---|
grant_type |
Set this to "urn:ietf:params:oauth:grant-type:device_code". This is an extension grant type (as defined by Section 4.5 of RFC6749). Note that this must be URL encoded. |
device_code |
The device_code retrieved in the previous step of this tutorial. |
client_id |
Your application's Client ID. You can find this value in your Application Settings. |
Token Responses
While you wait for the user to authorize the device, you may receive a few different HTTP 4xx responses:
Authorization pending
You will see this error while waiting for the user to take action. Continue polling using the suggested interval retrieved in the previous step of this tutorial.
`HTTP 403`
{
"error": "authorization_pending",
"error_description": "..."
}Was this helpful?
Slow down
You are polling too fast. Slow down and use the suggested interval retrieved in the previous step of this tutorial. To avoid receiving this error due to network latency, you should start counting each interval after receipt of the last polling request's response.
`HTTP 429`
{
"error": "slow_down",
"error_description": "..."
}Was this helpful?
Expired Token
The user has not authorized the device quickly enough, so the device_code has expired. Your application should notify the user that the flow has expired and prompt them to reinitiate the flow.
`HTTP 403`
{
"error": "expired_token",
"error_description": "..."
}Was this helpful?
Access Denied
Finally, if access is denied, you will receive:
`HTTP 403`
{
"error": "access_denied",
"error_description": "..."
}Was this helpful?
This can occur for a variety of reasons, including:
- the user refused to authorize the device
- the authorization server denied the transaction
- a configured Rule denied access
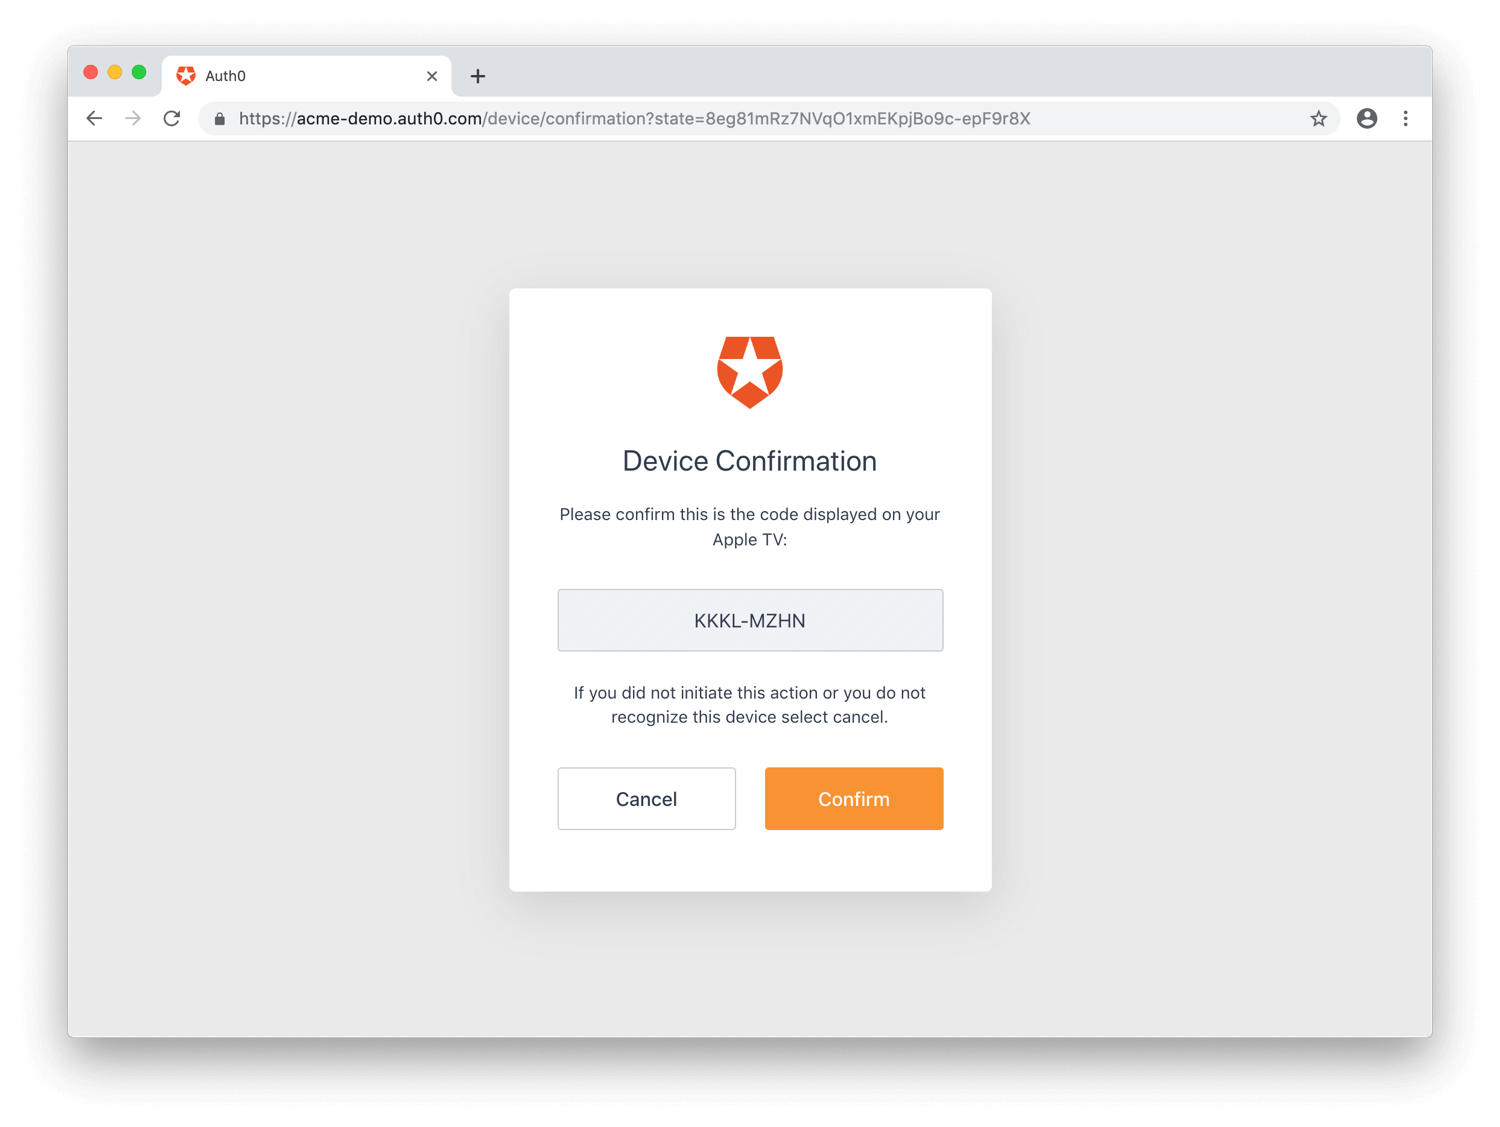
User Authorization
The user will either scan the QR code, or else will open the activation page and enter the user code:

A confirmation page will be shown to have the user confirm that this is the right device:
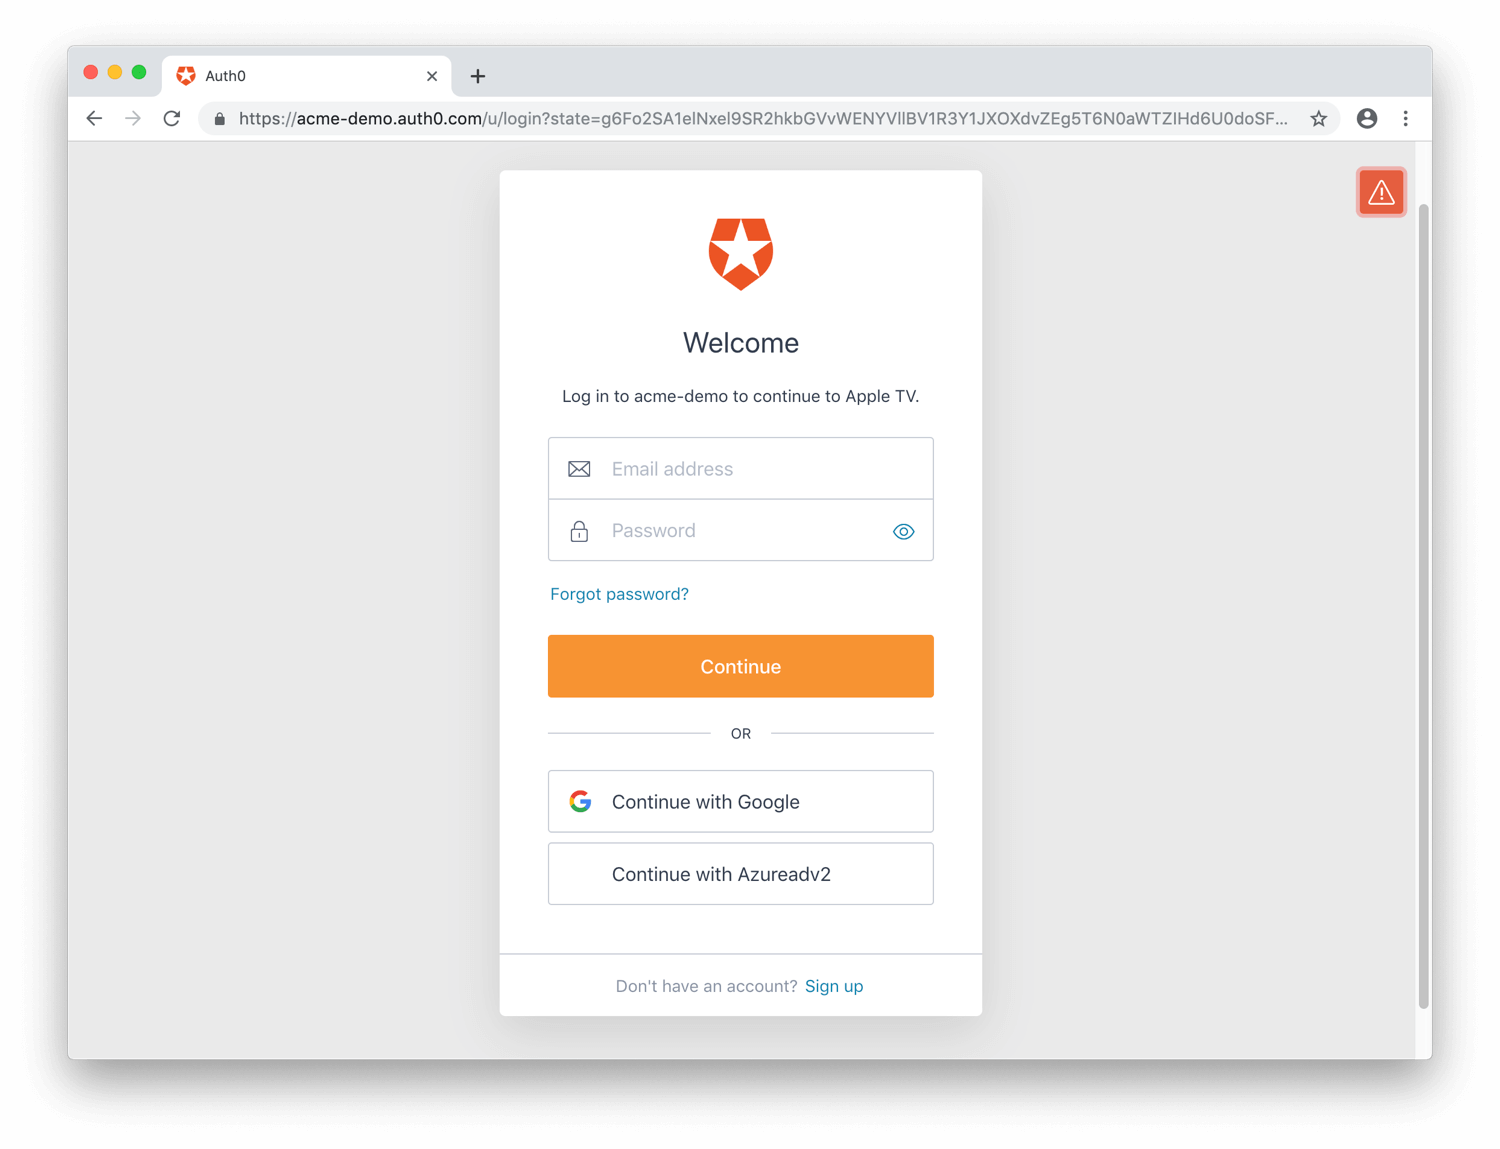
The user will complete the transaction by signing in. This step may include one or more of the following processes:
- Authenticating the user;
- Redirecting the user to an Identity Provider to handle authentication;
- Checking for active SSO sessions;
- Obtaining user consent for the device, unless consent has been previously given.
Upon successful authentication and consent, the confirmation prompt will be shown:
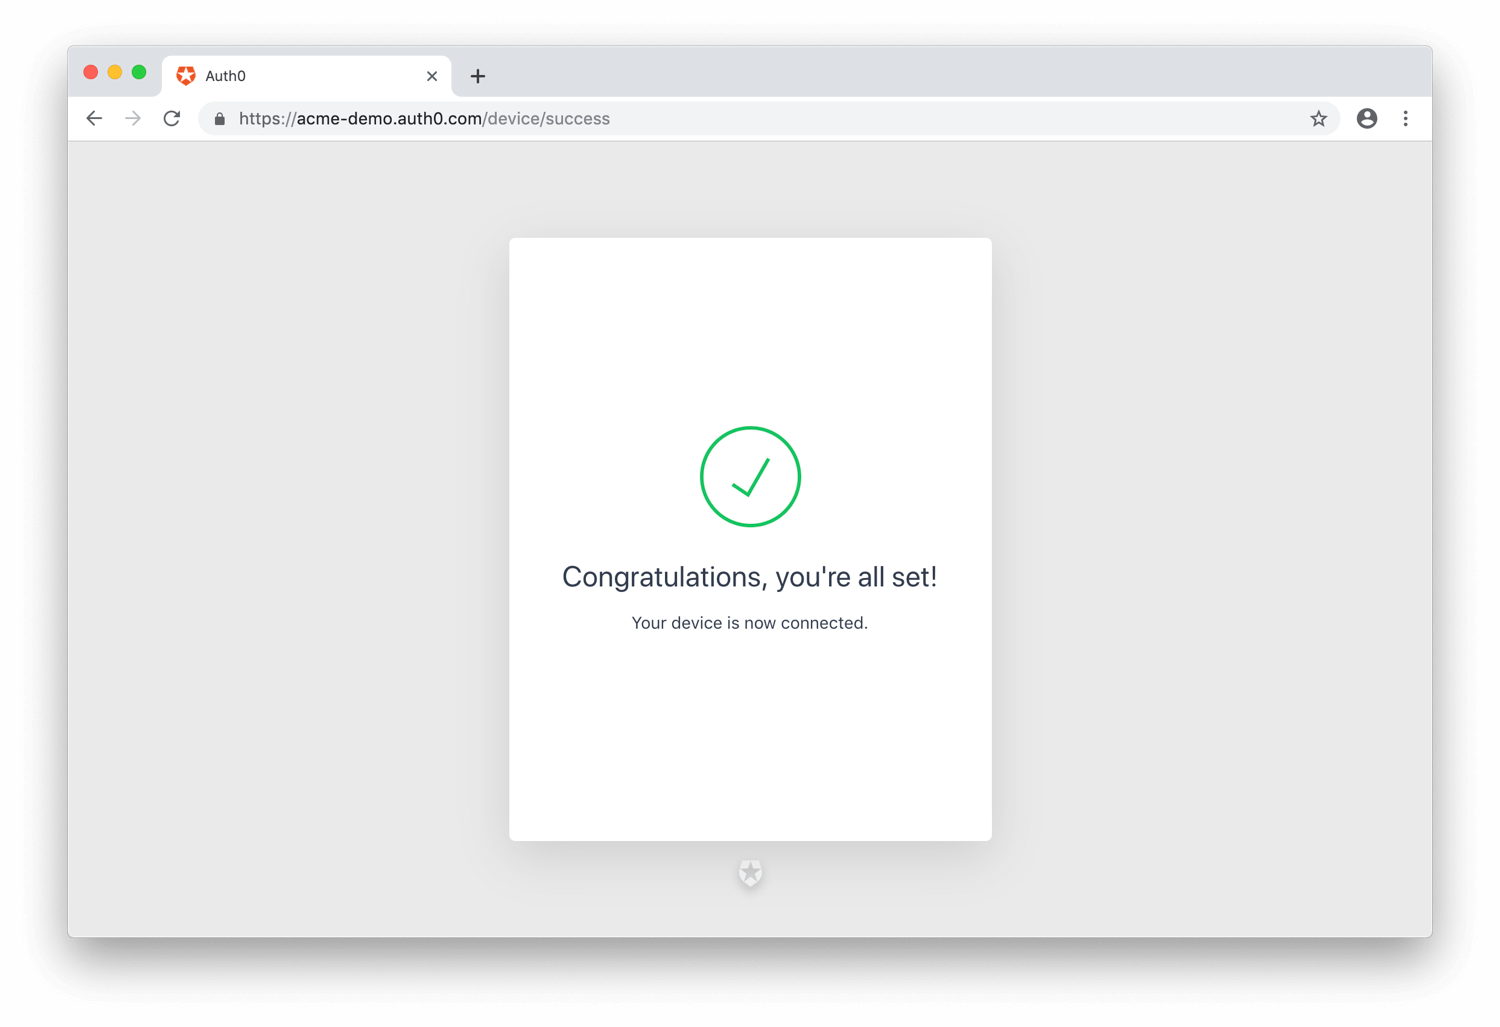
At this point, the user has authenticated, and the device has been authorized.
Receive Tokens
While the user has been authenticating and authorizing the device, the device app has continued to poll the token URL to request an Access Token.
Once the user has successfully authorized the device, you'll receive an HTTP 200 response with a payload containing access_token, refresh_token (optionally), id_token (optionally), token_type, and expires_in values:
{
"access_token":"eyJz93a...k4laUWw",
"refresh_token":"GEbRxBN...edjnXbL",
"id_token": "eyJ0XAi...4faeEoQ",
"token_type":"Bearer",
"expires_in":86400
}Was this helpful?
Access Tokens are used to call the Auth0 Authentication API's /userinfo endpoint or another API. You will be able to use the Access Token to call /userinfo only if you included the openid scope. If you are calling your own API, the first thing your API will need to do is verify the Access Token.
ID Tokens contain user information that must be decoded and extracted. The id_token will only be present in the response if you included the openid scope.
Refresh Tokens are used to obtain a new Access Token or ID Token after the previous one has expired. The refresh_token will only be present in the response if you included the offline_access scope and enabled Allow Offline Access for your API in the Dashboard.
Call your API
To call your API, the application must pass the retrieved Access Token as a Bearer token in the Authorization header of your HTTP request.
curl --request GET \
--url https://myapi.com/api \
--header 'authorization: Bearer ACCESS_TOKEN' \
--header 'content-type: application/json'Was this helpful?
var client = new RestClient("https://myapi.com/api");
var request = new RestRequest(Method.GET);
request.AddHeader("content-type", "application/json");
request.AddHeader("authorization", "Bearer ACCESS_TOKEN");
IRestResponse response = client.Execute(request);Was this helpful?
package main
import (
"fmt"
"net/http"
"io/ioutil"
)
func main() {
url := "https://myapi.com/api"
req, _ := http.NewRequest("GET", url, nil)
req.Header.Add("content-type", "application/json")
req.Header.Add("authorization", "Bearer ACCESS_TOKEN")
res, _ := http.DefaultClient.Do(req)
defer res.Body.Close()
body, _ := ioutil.ReadAll(res.Body)
fmt.Println(res)
fmt.Println(string(body))
}Was this helpful?
HttpResponse<String> response = Unirest.get("https://myapi.com/api")
.header("content-type", "application/json")
.header("authorization", "Bearer ACCESS_TOKEN")
.asString();Was this helpful?
var axios = require("axios").default;
var options = {
method: 'GET',
url: 'https://myapi.com/api',
headers: {'content-type': 'application/json', authorization: 'Bearer ACCESS_TOKEN'}
};
axios.request(options).then(function (response) {
console.log(response.data);
}).catch(function (error) {
console.error(error);
});Was this helpful?
#import <Foundation/Foundation.h>
NSDictionary *headers = @{ @"content-type": @"application/json",
@"authorization": @"Bearer ACCESS_TOKEN" };
NSMutableURLRequest *request = [NSMutableURLRequest requestWithURL:[NSURL URLWithString:@"https://myapi.com/api"]
cachePolicy:NSURLRequestUseProtocolCachePolicy
timeoutInterval:10.0];
[request setHTTPMethod:@"GET"];
[request setAllHTTPHeaderFields:headers];
NSURLSession *session = [NSURLSession sharedSession];
NSURLSessionDataTask *dataTask = [session dataTaskWithRequest:request
completionHandler:^(NSData *data, NSURLResponse *response, NSError *error) {
if (error) {
NSLog(@"%@", error);
} else {
NSHTTPURLResponse *httpResponse = (NSHTTPURLResponse *) response;
NSLog(@"%@", httpResponse);
}
}];
[dataTask resume];Was this helpful?
$curl = curl_init();
curl_setopt_array($curl, [
CURLOPT_URL => "https://myapi.com/api",
CURLOPT_RETURNTRANSFER => true,
CURLOPT_ENCODING => "",
CURLOPT_MAXREDIRS => 10,
CURLOPT_TIMEOUT => 30,
CURLOPT_HTTP_VERSION => CURL_HTTP_VERSION_1_1,
CURLOPT_CUSTOMREQUEST => "GET",
CURLOPT_HTTPHEADER => [
"authorization: Bearer ACCESS_TOKEN",
"content-type: application/json"
],
]);
$response = curl_exec($curl);
$err = curl_error($curl);
curl_close($curl);
if ($err) {
echo "cURL Error #:" . $err;
} else {
echo $response;
}Was this helpful?
import http.client
conn = http.client.HTTPSConnection("myapi.com")
headers = {
'content-type': "application/json",
'authorization': "Bearer ACCESS_TOKEN"
}
conn.request("GET", "/api", headers=headers)
res = conn.getresponse()
data = res.read()
print(data.decode("utf-8"))Was this helpful?
require 'uri'
require 'net/http'
require 'openssl'
url = URI("https://myapi.com/api")
http = Net::HTTP.new(url.host, url.port)
http.use_ssl = true
http.verify_mode = OpenSSL::SSL::VERIFY_NONE
request = Net::HTTP::Get.new(url)
request["content-type"] = 'application/json'
request["authorization"] = 'Bearer ACCESS_TOKEN'
response = http.request(request)
puts response.read_bodyWas this helpful?
import Foundation
let headers = [
"content-type": "application/json",
"authorization": "Bearer ACCESS_TOKEN"
]
let request = NSMutableURLRequest(url: NSURL(string: "https://myapi.com/api")! as URL,
cachePolicy: .useProtocolCachePolicy,
timeoutInterval: 10.0)
request.httpMethod = "GET"
request.allHTTPHeaderFields = headers
let session = URLSession.shared
let dataTask = session.dataTask(with: request as URLRequest, completionHandler: { (data, response, error) -> Void in
if (error != nil) {
print(error)
} else {
let httpResponse = response as? HTTPURLResponse
print(httpResponse)
}
})
dataTask.resume()Was this helpful?
Refresh Tokens
You have already received a Refresh Token if you've been following this tutorial and completed the following:
- configured your API to allow offline access
- included the
offline_accessscope when you initiated the authentication request through the authorize endpoint
You can use the Refresh Token to get a new Access Token. Usually, a user will need a new Access Token only after the previous one expires or when gaining access to a new resource for the first time. It's bad practice to call the endpoint to get a new Access Token every time you call an API, and Auth0 maintains rate limits that will throttle the amount of requests to the endpoint that can be executed using the same token from the same IP.
To refresh your token, make a POST request to the /oauth/token endpoint in the Authentication API, using grant_type=refresh_token.
Example refresh token POST to token URL
curl --request POST \
--url 'https://{yourDomain}/oauth/token' \
--header 'content-type: application/x-www-form-urlencoded' \
--data grant_type=refresh_token \
--data 'client_id={yourClientId}' \
--data 'client_secret={yourClientSecret}' \
--data refresh_token=YOUR_REFRESH_TOKENWas this helpful?
var client = new RestClient("https://{yourDomain}/oauth/token");
var request = new RestRequest(Method.POST);
request.AddHeader("content-type", "application/x-www-form-urlencoded");
request.AddParameter("application/x-www-form-urlencoded", "grant_type=refresh_token&client_id=%24%7Baccount.clientId%7D&client_secret=%24%7Baccount.clientSecret%7D&refresh_token=YOUR_REFRESH_TOKEN", ParameterType.RequestBody);
IRestResponse response = client.Execute(request);Was this helpful?
package main
import (
"fmt"
"strings"
"net/http"
"io/ioutil"
)
func main() {
url := "https://{yourDomain}/oauth/token"
payload := strings.NewReader("grant_type=refresh_token&client_id=%24%7Baccount.clientId%7D&client_secret=%24%7Baccount.clientSecret%7D&refresh_token=YOUR_REFRESH_TOKEN")
req, _ := http.NewRequest("POST", url, payload)
req.Header.Add("content-type", "application/x-www-form-urlencoded")
res, _ := http.DefaultClient.Do(req)
defer res.Body.Close()
body, _ := ioutil.ReadAll(res.Body)
fmt.Println(res)
fmt.Println(string(body))
}Was this helpful?
HttpResponse<String> response = Unirest.post("https://{yourDomain}/oauth/token")
.header("content-type", "application/x-www-form-urlencoded")
.body("grant_type=refresh_token&client_id=%24%7Baccount.clientId%7D&client_secret=%24%7Baccount.clientSecret%7D&refresh_token=YOUR_REFRESH_TOKEN")
.asString();Was this helpful?
var axios = require("axios").default;
var options = {
method: 'POST',
url: 'https://{yourDomain}/oauth/token',
headers: {'content-type': 'application/x-www-form-urlencoded'},
data: new URLSearchParams({
grant_type: 'refresh_token',
client_id: '{yourClientId}',
client_secret: '{yourClientSecret}',
refresh_token: 'YOUR_REFRESH_TOKEN'
})
};
axios.request(options).then(function (response) {
console.log(response.data);
}).catch(function (error) {
console.error(error);
});Was this helpful?
#import <Foundation/Foundation.h>
NSDictionary *headers = @{ @"content-type": @"application/x-www-form-urlencoded" };
NSMutableData *postData = [[NSMutableData alloc] initWithData:[@"grant_type=refresh_token" dataUsingEncoding:NSUTF8StringEncoding]];
[postData appendData:[@"&client_id={yourClientId}" dataUsingEncoding:NSUTF8StringEncoding]];
[postData appendData:[@"&client_secret={yourClientSecret}" dataUsingEncoding:NSUTF8StringEncoding]];
[postData appendData:[@"&refresh_token=YOUR_REFRESH_TOKEN" dataUsingEncoding:NSUTF8StringEncoding]];
NSMutableURLRequest *request = [NSMutableURLRequest requestWithURL:[NSURL URLWithString:@"https://{yourDomain}/oauth/token"]
cachePolicy:NSURLRequestUseProtocolCachePolicy
timeoutInterval:10.0];
[request setHTTPMethod:@"POST"];
[request setAllHTTPHeaderFields:headers];
[request setHTTPBody:postData];
NSURLSession *session = [NSURLSession sharedSession];
NSURLSessionDataTask *dataTask = [session dataTaskWithRequest:request
completionHandler:^(NSData *data, NSURLResponse *response, NSError *error) {
if (error) {
NSLog(@"%@", error);
} else {
NSHTTPURLResponse *httpResponse = (NSHTTPURLResponse *) response;
NSLog(@"%@", httpResponse);
}
}];
[dataTask resume];Was this helpful?
$curl = curl_init();
curl_setopt_array($curl, [
CURLOPT_URL => "https://{yourDomain}/oauth/token",
CURLOPT_RETURNTRANSFER => true,
CURLOPT_ENCODING => "",
CURLOPT_MAXREDIRS => 10,
CURLOPT_TIMEOUT => 30,
CURLOPT_HTTP_VERSION => CURL_HTTP_VERSION_1_1,
CURLOPT_CUSTOMREQUEST => "POST",
CURLOPT_POSTFIELDS => "grant_type=refresh_token&client_id=%24%7Baccount.clientId%7D&client_secret=%24%7Baccount.clientSecret%7D&refresh_token=YOUR_REFRESH_TOKEN",
CURLOPT_HTTPHEADER => [
"content-type: application/x-www-form-urlencoded"
],
]);
$response = curl_exec($curl);
$err = curl_error($curl);
curl_close($curl);
if ($err) {
echo "cURL Error #:" . $err;
} else {
echo $response;
}Was this helpful?
import http.client
conn = http.client.HTTPSConnection("")
payload = "grant_type=refresh_token&client_id=%24%7Baccount.clientId%7D&client_secret=%24%7Baccount.clientSecret%7D&refresh_token=YOUR_REFRESH_TOKEN"
headers = { 'content-type': "application/x-www-form-urlencoded" }
conn.request("POST", "/{yourDomain}/oauth/token", payload, headers)
res = conn.getresponse()
data = res.read()
print(data.decode("utf-8"))Was this helpful?
require 'uri'
require 'net/http'
require 'openssl'
url = URI("https://{yourDomain}/oauth/token")
http = Net::HTTP.new(url.host, url.port)
http.use_ssl = true
http.verify_mode = OpenSSL::SSL::VERIFY_NONE
request = Net::HTTP::Post.new(url)
request["content-type"] = 'application/x-www-form-urlencoded'
request.body = "grant_type=refresh_token&client_id=%24%7Baccount.clientId%7D&client_secret=%24%7Baccount.clientSecret%7D&refresh_token=YOUR_REFRESH_TOKEN"
response = http.request(request)
puts response.read_bodyWas this helpful?
import Foundation
let headers = ["content-type": "application/x-www-form-urlencoded"]
let postData = NSMutableData(data: "grant_type=refresh_token".data(using: String.Encoding.utf8)!)
postData.append("&client_id={yourClientId}".data(using: String.Encoding.utf8)!)
postData.append("&client_secret={yourClientSecret}".data(using: String.Encoding.utf8)!)
postData.append("&refresh_token=YOUR_REFRESH_TOKEN".data(using: String.Encoding.utf8)!)
let request = NSMutableURLRequest(url: NSURL(string: "https://{yourDomain}/oauth/token")! as URL,
cachePolicy: .useProtocolCachePolicy,
timeoutInterval: 10.0)
request.httpMethod = "POST"
request.allHTTPHeaderFields = headers
request.httpBody = postData as Data
let session = URLSession.shared
let dataTask = session.dataTask(with: request as URLRequest, completionHandler: { (data, response, error) -> Void in
if (error != nil) {
print(error)
} else {
let httpResponse = response as? HTTPURLResponse
print(httpResponse)
}
})
dataTask.resume()Was this helpful?
Refresh Token Request Parameters
| Parameter Name | Description |
|---|---|
grant_type |
Set this to "refresh_token". |
client_id |
Your application's Client ID. You can find this value in your Application Settings. |
client_secret |
Your application's Client Secret. You can find this value in your Application Settings. |
refresh_token |
The Refresh Token to use. |
scope |
(Optional) A space-delimited list of requested scope permissions. If not sent, the original scopes will be used; otherwise you can request a reduced set of scopes. Note that this must be URL encoded. |
Refresh Token Response
If all goes well, you'll receive an HTTP 200 response with a payload containing a new access_token, id_token (optionally), token lifetime in seconds (expires_in), granted scope values, and token_type:
{
"access_token": "eyJ...MoQ",
"expires_in": 86400,
"scope": "openid offline_access",
"id_token": "eyJ...0NE",
"token_type": "Bearer"
}Was this helpful?
Sample Use Cases
Detect Device Authorization Flow Use
You can use Rules to detect whether the current transaction is using the Device Authorization Flow. To do so, check the context object's protocol property:
function (user, context, callback) {
if (context.protocol === 'oauth2-device-code') {
...
}
callback(null, user, context);
}Was this helpful?
Sample Implementations
- Device Authorization Playground
- AppleTV (Swift): Simple application that shows how Auth0 can be used with the Device Authorization Flow from an AppleTV.
- CLI (Node.js): Sample implementation of a CLI that uses the Device Authorization Flow instead of the Authorization Code Flow. The major difference is that your CLI does not need to host a webserver and listen on a port.
Troubleshooting
Tenant logs are created for any interaction that takes place and can be used to troubleshoot issues.
Error codes
| Code | Name | Description |
|---|---|---|
fdeaz |
Failed device authorization request | |
fdeac |
Failed device activation | |
fdecc |
User canceled the device confirmation | |
fede |
Failed Exchange | Device Code for Access Token |
sede |
Success Exchange | Device Code for Access Token |
Limitations
To use the Device Authorization Flow, devices must:
- Support Server Name Indication (SNI)
- Have an Auth0 application type of Native
- Have the Token Endpoint Authentication Method set to None
- Be OIDC-conformant
- Not be created through Dynamic Client Registration
In addition, the Device Authorization Flow does not allow:
- Social Connections using Auth0 developer keys unless you are using new New Universal Login Experience.
- Query string parameters to be accessed from hosted login page or rules
We support the full Draft 15, except for confidential Clients.