
TL;DR: Ionic 2 Beta, which is built on Angular, has been released, and brings with it some excellent features. In this article we explore how to add JWT authentication to an Ionic 2 app. Check out the repo to go straight to the code.
Ionic 2 Beta has been released and, just as Angular is vastly different from Angular 1.x, the brand new Ionic is completely revamped as well. Ionic 2 brings all the power of Angular, and provides several of its own decorators for crafting cross-platform mobile applications easily. We still get a lot of the great features from Ionic 1, plus a lot more.
“Ionic 2 brings to the table all the power of Angular”
Tweet This
Authentication is a critical component of non-trivial mobile apps, and with Ionic 2, we can add JWT authentication easily by following the same process we would for an Angular app.
In this tutorial we'll build a simple Ionic 2 application that can authenticate users and provide access to protected resources that are secured with JWT authentication from a NodeJS server. We'll use our NodeJS JWT Authentication Sample to allow users to create accounts, log in, and retrieve public and private Chuck Norris quotes.

Getting Started with Ionic Authentication
To get started, let's first install Ionic and Cordova so we can create our new project.
Note: Cordova is a project that provides web access to native plugins. It is not specifically related to Ionic, and can be used with any other framework. But Ionic can take advantage of Cordova's extensive set of plugins to implement features such as scan barcodes, receive push notifications, access smartphone image gallery, and so on.
# Install Ionic and Cordova globally
npm install -g ionic cordova

# Then use Ionic CLI to create a template project
ionic start chuck-norris-quotes --v2
Next we can clone the backend repo into a directory called server. Even though we won't need it until a little later, we can also start the server now to have it ready to go.
git clone git@github.com:auth0/nodejs-jwt-authentication-sample.git server
cd server && npm install
node server.js
Now we can serve the Ionic application to make sure it's coming through ok. From a new terminal tab, go to the directory created by Ionic, and issue ionic serve.
Note: We'll develop in the browser in this tutorial, but you can also emulate a device as you develop if you like. Take a look at the Ionic docs for steps on how to emulate iOS and Android.
By default we are given a "tabs" style layout that has three pages linked in a tab strip along the bottom of the app view. We can also choose from other starter templates such as "complex-list" or "sidemenu" if we like.
Bootstrapping the Application
All of the action starts with the root component which is found in app/app.module.ts. Ionic apps are bootstrapped a bit differently than regular Angular applications. With Ionic, we have to instruct our Angular application to bootstrap with IonicApp class. Fortunately, this is automatically configured to us by the ionic start command that we've issued before.
We'll use the angular2-jwt library to decode idTokens. Install it by through the following command:
npm install --save angular2-jwt
Creating the Profile Page for Authentication
We'll really just need two pages for our app: one that retrieves quotes and another that acts as a profile area where the user can log in and out. Let's set up the profile page first.
You'll notice that the template that comes with Ionic 2 has three generic pages and a TabsPage component in the pages directory. The TabsPage is used to provide navigation to the other pages and gives us the tab strip at the bottom of the app.
The other ones are just generic placeholder pages and, as such, we can delete them. To do so, let's remove the following directories: pages/about, pages/contact, and pages/home. We'll also remove their utilization from the app/app.module.ts file. This last step is achieved by removing these components:
importstatementsfrom the
declarationsandentryComponentsproperties of@NgModuleWe'll generate the two pages that our app will have, through the Ionic's CLI:
ionic g page profile
ionic g page quotes
We'll need to change up the SCSS files we import in
app/app.scss:@import "../pages/profile/profile"; @import "../pages/quotes/quotes";
We'll also need to adjust the TabsPage component so that it knows about our new pages. To do that, let's update two files: pages/tabs/tabs.html and page/tabs/tabs.ts.
<!-- pages/tabs/tabs.html -->
<ion-tabs>
  <ion-tab [root]="quotesPage" tabTitle="Quotes" tabIcon="quote"></ion-tab>
  <ion-tab [root]="profilePage" tabTitle="Profile" tabIcon="person"></ion-tab>
</ion-tabs>
// pages/tabs/tabs.ts

import {Component} from '@angular/core';
import {Profile} from '../profile/profile';
import {Quotes} from '../quotes/quotes';

@Component({
  templateUrl: 'tabs.html'
})
export class TabsPage {
  profilePage = Profile;
  quotesPage = Quotes;

  constructor() {
  }
}
With both files in place, let's set up the the profile page. We can start with the Profile component.
// pages/profile/profile.ts
import {Component} from "@angular/core";
import {IonicPage} from "ionic-angular";
import {Headers, Http} from "@angular/http";
import {JwtHelper} from "angular2-jwt";
import {Storage} from "@ionic/storage";
import {AuthService} from "../../app/services/auth/auth";
import 'rxjs/add/operator/map';

@IonicPage()
@Component({
  selector: 'page-profile',
  templateUrl: 'profile.html',
})
export class Profile {

  private LOGIN_URL = "http://localhost:3001/sessions/create";
  private SIGNUP_URL = "http://localhost:3001/users";

  auth: AuthService;

  // When the page loads, we want the Login segment to be selected
  authType: string = "login";

  // We need to set the content type for the server
  contentHeader = new Headers({"Content-Type": "application/json"});
  error: string;
  jwtHelper = new JwtHelper();
  user: string;

  constructor(private http: Http, private storage: Storage) {
    this.auth = AuthService;

    storage.ready().then(() => {
      storage.get('profile').then(profile => {
        this.user = JSON.parse(profile);
      }).catch(console.log);
    });
  }

  authenticate(credentials) {
    this.authType == 'login' ? this.login(credentials) : this.signup(credentials);
  }

  login(credentials) {
    this.http.post(this.LOGIN_URL, JSON.stringify(credentials), { headers: this.contentHeader })
      .map(res => res.json())
      .subscribe(
        data => this.authSuccess(data.id_token),
        err => this.error = err
      );
  }

  signup(credentials) {
    this.http.post(this.SIGNUP_URL, JSON.stringify(credentials), { headers: this.contentHeader })
      .map(res => res.json())
      .subscribe(
        data => this.authSuccess(data.id_token),
        err => this.error = err
      );
  }

  logout() {
    this.storage.remove('token');
    this.user = null;
  }

  authSuccess(token) {
    this.error = null;
    this.storage.set('token', token);
    this.user = this.jwtHelper.decodeToken(token).username;
    this.storage.set('profile', this.user);
  }
}
The login and signup methods send the user's credentials to the server. If the user successfully authenticates, a JWT is sent back in the response. To save the returned token, we're using the Storage class that comes from Ionic, which provides a local storage engine for us. The standard localStorage browser API would still work, but it's recommended that we use this class. Note that to properly setup Storage, we need to configure it in the pages/profile/profile.module.ts file. Add IonicStorageModule.forRoot() in the imports property of the @NgModule decoration of the class in this file, and import IonicStorageModule from the @ionic/storage module.
The authSuccess method saves the token and also sets the user object with the user details contained in the token. The tokens returned from our server have a username claim, which we can use to greet the user. The JwtHelper class that comes with angular2-jwt can decode the token and give us access to the claims on it, which is how we access the username here.
Logging out is a simple matter of removing the user's JWT from local storage and setting the user property to null.
We've set a property called authType to the value "login". We'll be needing this for our view (which we'll set up next) to control the "segment" UI element. You'll also notice that we're using an AuthService class that we've yet to create. This service will be used to give us an indication of whether or not the user has a valid JWT in local storage, which is helpful for conditionally showing or hiding certain parts of the UI.
Let's now create the view.
<!-- pages/profile/profile.html -->
<ion-navbar *navbar>
  <ion-title>Profile</ion-title>
</ion-navbar>
<ion-content class="login" *ngIf="!auth.authenticated()">
  <ion-segment [(ngModel)]="authType" color="primary">
    <ion-segment-button value="login">
      Log In
    </ion-segment-button>
    <ion-segment-button value="signup">
      Sign Up
    </ion-segment-button>
  </ion-segment>
  <form #signForm="ngForm" (ngSubmit)="authenticate(signForm.value)">
    <ion-item>
      <ion-label>Username</ion-label>
      <ion-input type="text" name="username" ngModel></ion-input>
    </ion-item>
    <ion-item>
      <ion-label>Password</ion-label>
      <ion-input type="password" name="password" ngModel></ion-input>
    </ion-item>
    <div padding>
      <button block type="submit">Log In</button>
    </div>
  </form>
</ion-content>
<ion-content *ngIf="auth.authenticated()">
  <h1>Welcome, {{ user }}</h1>
  <div padding>
    <button block (click)="logout()">Log Out</button>
  </div>
</ion-content>
The segment UI component gives us controls to switch between various views or "segments", and this is a useful component to use for login and signup. The ion-segment selector has the authType property that we saw in the ProfilePage component bound to it, and we use this property to conditionally decide which method to execute, login or signup. Angular's form directives allow us to pass the input from each form directly to the authenticate method through the ngSubmit event handler.
We don't want to show the login/signup form when the user is already authenticated. To hide it, we're checking if auth.authenticated()—which comes from the AuthService we'll create next—is false. Likewise, we check if it is true to conditionally show the user's welcome message.
Creating the Authentication Service
The AuthService just needs a single method called authenticated which will check if the user has an unexpired JWT in local storage.
// app/services/auth/auth.ts
import {tokenNotExpired} from 'angular2-jwt';

export class AuthService {
  constructor() {}

  public static authenticated() {
    return tokenNotExpired('/_ionickv/token');
  }
}
The angular2-jwt library provides a function called tokenNotExpired which checks the user's JWT for us and will return true if it is unexpired or false if it is expired.
Now that the profile page is in place, we are able to sign up for an account and log in.
Creating the Quotes Page
Now that we have an authenticated user, let's build out the Quotes component to access our secured API route.
// pages/quotes/quotes.ts
import { Component } from '@angular/core';
import { IonicPage} from 'ionic-angular';
import {AuthService} from "../../app/services/auth/auth";
import {Http, Headers} from "@angular/http";
import 'rxjs/add/operator/map';
import {Storage} from "@ionic/storage";

@IonicPage()
@Component({
  selector: 'page-quotes',
  templateUrl: 'quotes.html',
})
export class Quotes {
  API: string = "http://localhost:3001/api";
  quote: string;
  error: string;
  auth: AuthService;

  constructor(private http: Http, private storage: Storage) {
    this.auth = AuthService;
  }

  getQuote() {
    // Use a regular Http call to access unsecured routes
    this.http.get(`${this.API}/random-quote`)
      .map(res => res.text())
      .subscribe(
        data => this.quote = data,
        err => this.error = err
      );
  }

  getSecretQuote() {
    // Use authHttp to access secured routes
    this.storage.get('token').then((token) => {
      let headers = new Headers();
      headers.append('Authorization', 'Bearer ' + token);

      this.http.get(`${this.API}/protected/random-quote`, {
        headers: headers
      }).map(res => res.text())
        .subscribe(
          data => this.quote = data,
          err => this.error = err
        );
    })
  }
}
In this component we have two methods, getQuote and getSecretQuote which will send HTTP requests to the server for the quotes. The difference between them is that getSecretQuote adds an Authorization header with a bearer token on it, so that the backend can identify the requester.
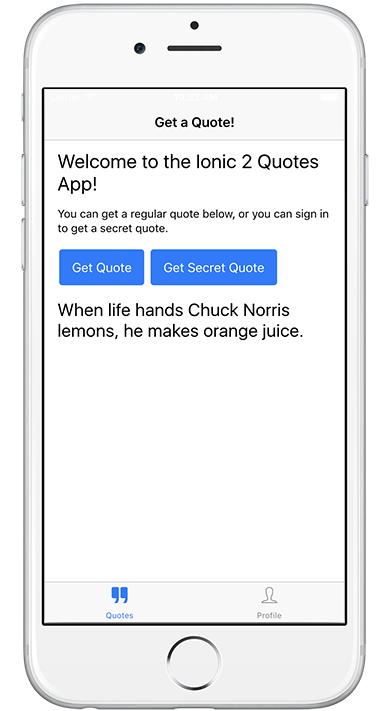
<!-- pages/quotes/quotes.html -->
<ion-navbar *navbar>
  <ion-title>Get a Quote!</ion-title>
</ion-navbar>
<ion-content padding class="quotes">
  <h2>Welcome to the Ionic 2 Quotes App!</h2>
  <p>You can get a regular quote below, or you can sign in to get a secret quote.</p>
  <button (click)="getQuote()">Get Quote</button>
  <button *ngIf="auth.authenticated()" (click)="getSecretQuote()">Get Secret Quote</button>
  <h3>{{ quote }}</h3>
  <p class="error" *ngIf="error">{{ error }}</p>
</ion-content>
We only want to show the button for retrieving a secret quote if the user has an unexpired JWT, and once again we use the AuthService to perform this check.
We should now be able to get quotes from the Quotes page.
Aside: Adding Authentication with Auth0
Setting up username and password authentication with a Node server is simple enough, but things can get tricky when we want to add social auth with providers like Facebook, Twitter, Google, and others. With Auth0, we can use any social provider and get other authentication features like single sign-on, multi-factor login, and passwordless auth, all at the flip of a switch. It's easy to add Ionic Authentication with Auth0--let's take a look at how in these steps.
Step 0: Sign Up for Auth0 and Configure the Callback URL
If you don't already have any Auth0 account, sign up for one now to follow along with the other steps.
In your dashboard, you need to specify an Allowed Callback URL for mobile:
https://{YOUR_DOMAIN}.auth0.com/mobile
For local development, you also need to specify a the local file protocol as an Allowed Origin:
file://*
Step 1: Add Auth0Lock to Your App
Lock is the beautiful (and totally customizable) login box widget that comes with Auth0. The script for it can be brought in from a CDN link or with NPM.
Note: If you use NPM to get Auth0Lock, you will need to include it in your build step.
  <!-- www/index.html -->

  ...

  <!-- Auth0 Lock script -->
  <script src="//cdn.auth0.com/js/lock/10.0/lock.min.js"></script>
  ...
Step 2: Add Lock to Your Profile Page
The app we built above has the authentication action happening on the profile page. This is where we can initialize Lock.
// app/profile/profile.ts
import {Component} from "@angular/core";
import {IonicPage} from "ionic-angular";
import {Headers, Http} from "@angular/http";
import {JwtHelper} from "angular2-jwt";
import {Storage} from "@ionic/storage";
import {AuthService} from "../../app/services/auth/auth";
import 'rxjs/add/operator/map';

declare var Auth0Lock: any;

@IonicPage()
@Component({
  selector: 'page-profile',
  templateUrl: 'profile.html',
})
export class Profile {
  auth: AuthService;
  lock = new Auth0Lock('YOUR_AUTH0_CLIENT_ID', 'YOUR_AUTH0_DOMAIN');

  user: Object;
  self = this;

  constructor() {
    this.auth = AuthService;
    this.local.get('profile').then(profile => {
      this.user = JSON.parse(profile);
    }).catch(error => {
      console.log(error);
    });

    this.lock.on("authenticated", authResult => {
      self.lock.getProfile(authResult.idToken, (error, profile) => {
        if (error) {
          alert(error);
          return;
        }

        self.local.set('id_token', authResult.idToken);
        self.local.set('profile', JSON.stringify(profile));
        self.user = profile;
      });
    });
  }

  login() {
    this.lock.show();
  }

  logout() {
    this.local.remove('profile');
    this.local.remove('id_token');
    this.user = null;
  }
}
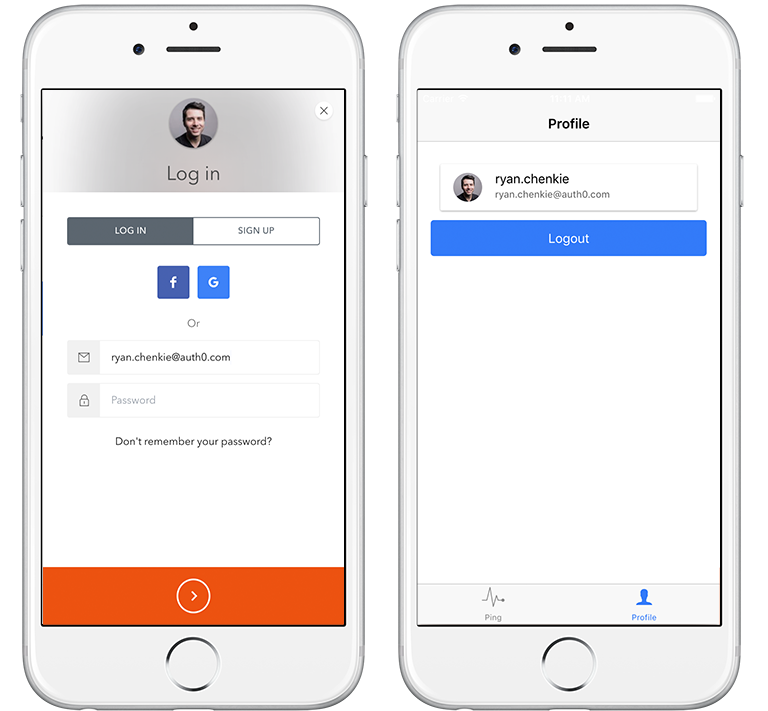
Now in our login method, we just need to call this.lock.show to open the Login box. If we get a good result from the login, we save the profile and token in local storage and set the user object to the profile. Now we can display the user details in a nicely formatted card on the profile page.
<!-- src/pages/profile/profile.html -->
<ion-navbar *navbar>
  <ion-title>Profile</ion-title>
</ion-navbar>
<ion-content padding *ngIf="!auth.authenticated()">
  <button block (click)="login()">Log In</button>
</ion-content>
<ion-content padding *ngIf="auth.authenticated()">
  <ion-card>
    <ion-item>
      <ion-avatar item-left>
        <img src="{{ user.picture }}"/>
      </ion-avatar>
      <h2>{{  user.nickname }}</h2>
      <p>{{ user.email }}</p>
    </ion-item>
  </ion-card>
  <button block (click)="logout()">Logout</button>
</ion-content>
Step 3: Add Your Auth0 Secret to Your Server
Now that we are using tokens issued by Auth0, we need to change up the backend so that the express-jwt middleware uses our Auth0 secret key.
// server/protected-routes.js

...

var jwtCheck = jwt({
  secret: new Buffer('YOUR_AUTH0_SECRET_KEY', 'base64'),
  audience: 'YOUR_AUTH0_CLIENT_ID'
});

...
Important API Security Note: If you want to use Auth0 authentication to authorize API requests, note that you'll need to use a different flow depending on your use case. Auth0 idToken should only be used on the client-side. Access tokens should be used to authorize APIs. You can read more about making API calls with Auth0 here.
Step 4: Add Token Refreshing
As it stands, users will need to re-authenticate once their token becomes expired. To keep users logged in, we can set up token refreshing. Have a look at the Auth0 + Ionic 2 docs for instructions on how to set it up.
Done!
That's it! You've now got authentication with Auth0 set up for your Ionic 2 app.
Wrapping Up
Developing Ionic authentication is very similar to how it's done in an Angular application. This is really beneficial because we can reuse a lot of the same libraries and logic between the two of them. We're likely to see many more great features from Ionic 2 as it continues to develop.
About the author

Ryan Chenkie
Developer
Ryan is a Google Developer Expert, the host of the Entrepreneurial Coder Podcast, the author of Securing Angular Applications, and an all-around fanatic about application security.View profile