
Bitcoin took the world by suprise in the year 2009 and popularized the idea of decentralized secure monetary transactions. The concepts behind it, however, can be extended to much more than just digital currencies. Ethereum attempts to do that, marrying the power of decentralized transactions with a Turing-complete contract system. In this post we teamed up with Ivo Zieliński, Konrad Kozioł, David Belinchon, and Nicolás González from GFT's Innovation Team to develop a practical application of an Ethereum-based login system for Ethereum users. This system will allow Ethereum users to prove ownership of an Ethereum account without using their private-key each time such proof is required, which is ideal for login systems. Think of "Login with Facebook" for Ethereum users. Read on!
This is the third post from a three-post series about Ethereum. Read part 1 and part 2 if you haven't done so.
“Discover the power of decentralized apps with Ethereum”
Tweet This
Introduction
In our previous post we took a closer look at Ethereum, a decentralized, Turing-complete platform for developing applications using a blockchain. In Ethereum, applications run on each node in the network. The results of those computations are then encoded in blocks, which, through the proof-of-work system, are validated by each node in the network. Furthermore, these operations (transactions) are carried on out on behalf of users. Users must sign each transaction with their private-key, thus making it possible to track whether a certain user can perform certain operations or not. In particular, transactions have a cost, and users must be able to pay that cost by spending Ethereum's cryptocoin: Ether.
In our previous post we also had a look at practical applications of Ethereum. The Decentralized Autonomous Organization (DAO), a central bank, a crowdfunding system, a proof of existence system, and even our own simple authentication system. All of these examples run without a central authority holding any control over them. All operations are carried out by each node on the network, and these are only effective after all nodes agree on the results. This makes Ethereum particularly powerful for applications were no single entity must be able to validate or approve operations.
Our simple login system on Ethereum did work as expected, but it was less than ideal. Let's take a look at how it worked:
The objective of the system is to make it possible for any third-party to allow users to log into the their website using an Ethereum address as an identifier. No username or password is required. We assume a user attempting to login with an Ethereum address is a user who currently holds an Ethereum address with some Ether (that is, a user that holds an Ethereum account for other uses). Based on these assumptions, this is how our sample system worked:
- A user browses to a third-party website that requires login. An input text area for the user's Ethereum address is displayed.
- Users input their Ethereum address and clicks "login".
- The third-party backend produces a challenge string and signs a JWT with the challenge embedded in it.
- The user sends the challenge string to the
loginmethod of theLogincontract already available on Ethereum. - The backend watches the Ethereum network for the challenge string. It must be sent by the owner of the Ethereum address that was input in step 2.
- If the challenge is seen by the backend within a reasonable timeframe, the user is then marked as logged in using the Ethereum address from step 2 as the identifier. A new JWT with full access to the third-party website is issued.
There are a series of problems with this approach. Namely:
- Users must manually make a call to the
loginmethod of theLogincontract using an Ethereum wallet of their choice. - The user must know the address and the interface of the
Logincontract beforehand. - The user must spend some Ether to login because the contract relies on
eventsthat are logged to the blockchain (that is, they perform writes). This makes the contract requiregasto run. - The backend must wait for a new block to be mined and propagated through the network before the login is completed (minimum latency in the order of 12 seconds or more).
As you can imagine, these limitations make our simple authentication example impractical. So what can we do about them?
Towards a Practical Authentication Solution for Ethereum Users
Authentication is what we do at Auth0, so we teamed up with the folks from GFT's Innovation Team to think of a better way of using Ethereum for this purpose. We came up with a proof of concept which we will share with you in this post. First, let's describe the design goals for our system:
- It should allow users with an Ethereum address to use that address to login to a third party website (that supports this login method).
- It should be easy to use and reasonably easy to setup.
- It should not compromise the security of the user's Ethereum account.
- It should allow users to recover their credentials in case of loss or theft.
- It should not require knowledge of contracts or manually calling contract methods.
- It should have reasonable latency for a login system (no more than a couple of seconds).
- It should not cost users gas (or money) to login.
- It should be reasonably easy for developers to implement in their apps.
One of the biggest problems with our initial approach was that writes were necessary. This forced users who wanted to log in to spend Ether to do so. Worse, they had to wait for confirmation of the transaction before the login was successful. On the other hand, this made the login process truly decentralized.
Writes were a requirement for our previous system due to the way Ethereum events work. Events are special operations in the Ethereum network that can be watched by nodes. Internally, events are Ethereum Virtual Machine ops that create data that is added to the transaction when it is mined. Events do not work on read-only (constant) Solidity functions, since they are added to a transaction when it is mined, this forces users of our first system to pay to generate a LoginAttempt event.
This limitation forced us to make a compromise: rather than remain entirely decentralized, we added a server to handle authentication requests. In turn, this server relies on data stored in the Ethereum blockchain. However, our system does retain the ability to allow for serverless logins. We will see how that works later on.
Another big limitation of our first system was that the user needed access to his Ethereum wallet to login. This is impractical for several reasons:
- Users usually keep a single wallet. In other words, they do not carry around their private keys to easily use them on different devices.
- If users lose their Ethereum private key, they may never be able to authenticate again with that address to a third party service, not even to switch their main address or recover their information. This poses a problem for long term use of the system.
- Requiring users to use their private key for each login can be a security issue for accounts holding big amounts of value. For those accounts, private keys may be stored safely and used only when necessary. Requiring their use for each login is less than ideal.
So some way of using an Ethereum address to login without requiring the private key for that address must be implemented for our new system.
A Login System for Ethereum Users
So, here is what we implemented. Our system relies on three key elements: an authentication server, a mobile application, and the Ethereum network. Here's how they play together.
To keep the user's Ethereum address separate from the authentication process, a different, authentication only, Ethereum address is generated by the system. This address is associated to the user's Ethereum address using an Ethereum contract. In other words, a mapping between the user's Ethereum address and the system's login-only address is established. This mapping is stored in Ethereum's blockchain with the help of a contract.
pragma solidity ^0.4.2;

contract Mapper {

    event AddressMapped(address primary, address secondary);
    event Error(uint code, address sender);

    mapping (address => address) public primaryToSecondary;
    mapping (address => bool) public secondaryInUse;

    modifier secondaryAddressMustBeUnique(address secondary) {
        if(secondaryInUse[secondary]) {
            Error(1, msg.sender);
            throw;
        }
        _;
    }

    function mapAddress(address secondary)
        secondaryAddressMustBeUnique(secondary) {
        // If there is no mapping, this does nothing
        secondaryInUse[primaryToSecondary[msg.sender]] = false;

        primaryToSecondary[msg.sender] = secondary;
        secondaryInUse[secondary] = true;

        AddressMapped(msg.sender, secondary);
    }
}
Although this contract is a bit more complex than we have seen so far, it remains fairly accessible. Let's break it down:
- There are two events:
AddressMappedandError. TheAddressMappedevent is generated any time a user's primary Ethereum address is mapped to a secondary, login-only, address. TheErrorevent is only generated in case of errors, such as when a mapping using an existing secondary address already exists. - Then two variables are declared:
primaryToSecondaryandsecondaryInUse.primaryToSecondaryis a map of addresses: given the primary address, it can tell the secondary address mapped to it.secondaryInUseis a map of addresses to booleans, used to check whether a secondary address is already in use. - Next comes
secondaryAddressMustBeUnique. This special function is a modifier. Modifiers in Solidity are special functions that can be attached to contract methods. These run before the method code and can be used to modify their behavior. In this case,secondaryAddressMustBeUniqueuses thesecondaryInUsevariable to confirm whether the secondary address passed as parameter is in use. If it is, this is flagged as an error and theErrorevent is emitted. If it is not in use, then execution continues. The_placeholder is where the code from the modified function is logically inserted. - And lastly there is the
mapAddressmethod. This method takes a secondary address and maps it to the address of the sender or caller of this method. The semantics of Ethereum make sure that the sender is who he says he is. In other words, only the owner of the private key for an address can make calls as the sender to a Solidity method. This makes sure, without any special check, that only the rightful owner of the primary address can establish a mapping between it and a secondary address used for logins. This is the crux of our system.
In summary, our contract does four things:
- It establishes a mapping between two Ethereum addresses: one high value address (the primary address) and a low value, login-only, secondary address.
- It certifies only the owner of the primary address can establish this mapping.
- It records this information publicly in the blockchain.
- It emits events to monitor and react to changes in the data stored in it.
This is all we need to make our system work. Let's go over the full registration and authentication flow to see how it all works together. We assume the user is the rightful owner of an Ethereum account with a certain amount of Ether.
Registration
This is a one time only step to be performed the first time users try to use the system. Once registered, users can use their Ethereum address with any third-party website. In other words, this is a system-wide, one time only step.
To simplify the authentication experience, our implementation uses a mobile application to authorize or deny authentication requests. A user who wants to enable his Ethereum account for use as an authentication factor first registers through the mobile application.
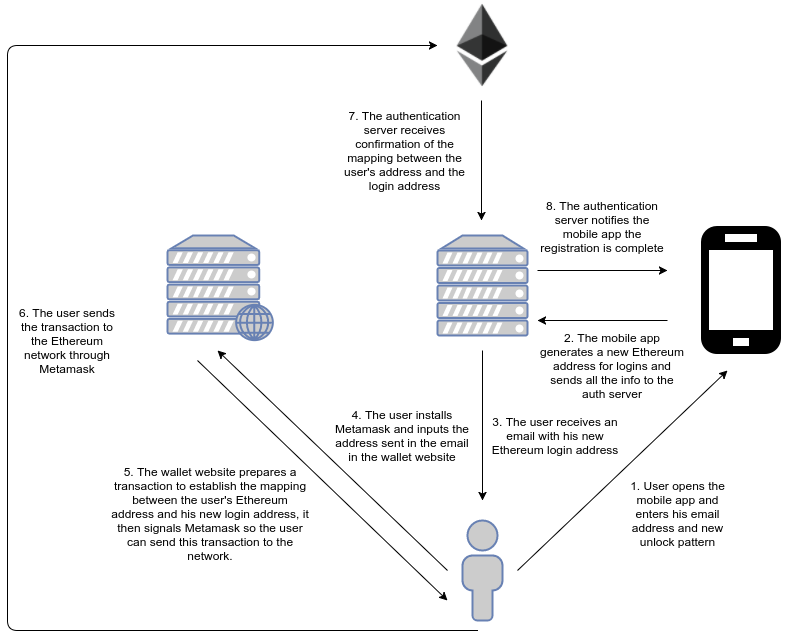
Registration is performed by following these steps:
- The user opens the mobile application.
- Users enter their email address and an unlock pattern.
- A new Ethereum address is generated behind the scenes by the mobile application. This is the secondary address. This address is sent to users to their email for convenience.
- Users establish a link between their primary Ethereum address and this secondary address. To do so the user can manually call the
mapAddressmethod of theMappercontract or use a special wallet app developed for this purpose. This step requires the user to spend a minimum amount of gas from his primary account. - Once the link between addresses is established, the mobile application will show a confirmation dialog. If the user confirms, the mapping is established and the process is complete.
One of the added benefits of this approach is that it makes throwaway accounts harder to use. Point 4 forces the user to spend Ether to establish the mapping between his personal Ethereum address and the login-only address. This way, third-parties can be sure that the Ethereum account used by the user is not a throwaway account (i.e. a spam account).
Authentication
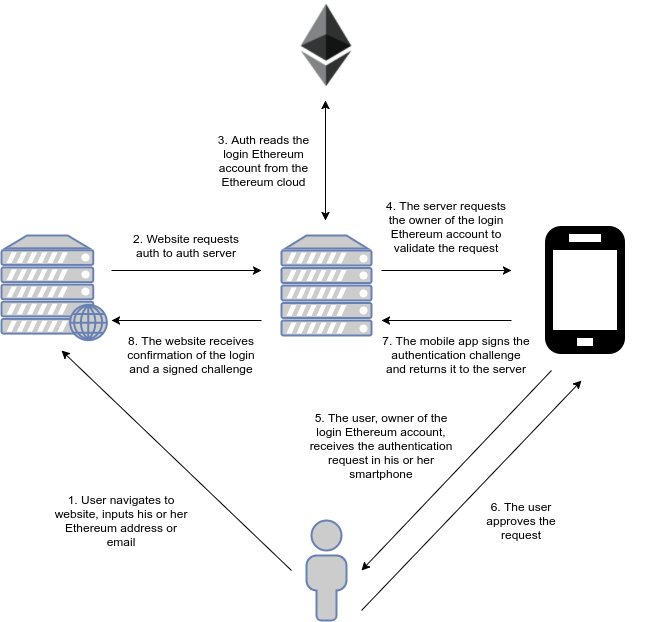
Whenever users who have already registered want to use their Ethereum account to login to a third party website, they need to follow this process:
- Users input their primary Ethereum address or their email in an input field and click "Login".
- The third-party website contacts the authentication server requesting authentication for that address. To do so the third-party website generates a challenge string with a specific format and passes it to the authentication server.
- The authentication server checks the Ethereum network for the current secondary address of the user. It then checks the internal database for the necessary data to contact the mobile device associated to that address.
- The user receives a mobile push notification to confirm or deny the login request.
- If the user accepts, the private key of the secondary address is used to sign the challenge. The signed challenge is then sent back to the authentication server.
- The authentication server verifies the signature and if it is valid and the challenge matches, it considers the login successful. It then sends back the signed challenge to the third-party website for optional independent confirmation.
That is all there is to it, really! This scheme separates the signature process from a sensitive primary address, preventing the exposure of a potentially important private key while still giving the third party site confirmation that the user is the rightful owner of that address. Furthermore, although it relies on the authentication server for convenience, it can still work without it and does not require trust to be placed in it (the third party website can check the signature itself). Thus it remains decentralized in worst-case scenarios (authentication server down) and convenient for the common case.
As an added benefit, this system can easily be adapted to work like "Login with Facebook" or "Login with Google" do. In fact, a future version could be included in Auth0!
Cons
As we have seen so far, our system appears to be more convenient than our initial, simple approach from part two of this series. However, it does come with a few limitations of its own. Let's take a brief look at them.
Our initial approach sported a key element from blockchain based systems: it was entirely decentralized. Our newer approach relies on an authentication server for convenience. Although it is possible for the system to work without the authentication server, it is not convenient to use it this way. This is by design and must be considered if convenient decentralized operation is mandatory in all cases. In every case, however, no trust is placed in the server.
Try it out!
Since this is just a proof-of-concept and getting your feet wet with Ethereum can be a bit hard at first, here is a step by step guide for new users to test the system. Please note that this is just a test system so it uses Ethereum's testnet. In other words, no hard guarantees are provided with regard to the integrity of the data stored in the Ethereum testnet, do not put important stuff in the accounts created in this guide, they won't be protected by the same guarantees as the Ethereum mainnet.
Get an Ethereum Wallet
To perform operations in Ethereum you need a wallet. A wallet is an application that allows you to interact with the rest of the network. Wallets store the private-keys for your Ethereum addresses. For simplicity we will be using Metamask. Metamask is a browser-based wallet that runs locally as a Chrome extension. Keys are stored locally and transactions are signed with them. These are then sent to the rest of the network through a Metamask operated public node.
1. Get Metamask
Go to the Chrome Webstore and install Metamask.
2. Create a New Account
Click on the Metamask icon on the top right corner of your Chrome windows and follow the wizard to create an account. Make sure it is created in the Rinkeby testnet. To check this, after creating the account, click on the icon next to the Metamask fox, on the top left corner of the Metamask window. If you are using another network, just switch to Rinkeby and then follow the wizard again.
3. Get Some Ether
To register you will need a minimum amount of Ether. Fortunately, this is easy to get in the testnet (in the mainnet you must either buy it or be lucky enough to be able to mine it). For the testnet it is possible to use "faucets". Faucets are places to get free Ether. The most popular Rinkeby faucet requires users to create a GitHub gist. This is a simple way to limit misuse of the faucet. Creating gists is easy, you only require a GitHub account. Crate a public GitHub gist and paste your Metamask Rinkeby address in it. Then go back to the faucet and place the link to the gist in the required field, then click on "Give Me Ether" (the faucet is located in the crypto faucet section on the left bar).
After a bit, you should see your newly acquired Ether in Metamask.
To get your Rinkeby Ethereum address, go to Metamask and then click on the "copy" icon next to your account name. This will be your primary Ethereum address. In an actual production system, this would be the address of an account with lots of Ether in it. One that you would not want to expose every time you want to login to some third party site using your Ethereum address.
Get the Mobile Authenticator App
Now it's time to set up your secondary address and login helper app. This application will be the authentication factor used to confirm your login request. Any time you want to login to some site, you will receive a notification through this app. This notification will allow you to either confirm or deny the authentication request.
1. Get the App
Go to the Android Play Store and download our Auth0 PoC app.
2. Register
Open the app and input your email address. Now choose an unlock pattern. You will be asked to input this same pattern any time you want to login to a site. Then click Register. You will be asked to confirm the registration through the mobile app. Click Sign to confirm it.
The mobile app is now set, let's enable your Ethereum account for logins.
Enable Your Ethereum Address for Logins
This step, like the previous ones, is only performed once. This sets up the mapping between your primary address and the login address. In other words, it connects your Metamask account to the mobile app in your smartphone.
1. Get Your Mobile App (Secondary) Address
If you now look at your emails (please check spam, promotions, etc.) you will find your Ethereum secondary address. This is the address of the account managed through your smartphone. Just copy it to the clipboard.

2. Call the Contract!
If you are an Ethereum user and you have your own wallet, you can perform this step manually. For simplicity, however, we have set up a site that will do the hard work for you. Using the same Chrome instance where you installed Metamask, navigate to our PoC wallet. This site is a simple local-only wallet-like app that creates the Ethereum transaction necessary to call the contract. This site communicated with Metamask so that you don't have to input your account details manually.
Once you are in the site, paste the Ethereum address you copied from the email in the previous step and click Register. A Metamask window will pop-up. This is a confirmation that you are about to make a transaction from your primary account that will spend Ether. Click Sign. After a while your primary and secondary accounts will be connected! The time for this to happen depends on the Ethereum network. In general it is just a few seconds.
In case you are already experienced with Ethereum you may want to perform this step manually. Call the mapAddress method of the Mapper contract located at 0x5e24bf433aee99227737663c0a387f02a9ed4b8a. You can get the JSON API here. The only parameter is the address you got in your email.
After this is done everything is set!
Login to Our Test Site
You may now login to any third party site that supports this authentication method using either your email address or your primary Ethereum address as a credential. Go to our sample website, put your email address and click Login. Watch your smartphone for notifications to approve your login.
You will notice there is a checkbox labeled Trustless Authentication. As explained before, third parties may opt for different levels of security. They can opt to trust the authentication server when it says the login is valid (trustful authentication) or they may opt to not trust the authentication server and validate the signature internally. In this case, the third party website must validate the signature of the secondary address itself, first be querying the secondary address using the Mapper contract (which is publicly available) and then by verifying the signature of the returned data using the secondary address to find the public key of the secondary address. This provides the highest level of security and uses the authentication server as simply a messenger.
Explore the Code
If you are interested in taking a closer look at how our PoC works, here are all the repositories:
- The authentication server
- The mobile app
- The sample third party web app
- The registration wallet using Metamask
- Docker scripts for easy testing
There are also a couple of helper libraries that were developed for this PoC, these are used by the repositories above:
- Ethereum crypto helper lib
- JavaScript library for doing auth as used by this PoC
- A simple database abstraction helper
- Preconfigured Ethereum client node for this PoC
Aside: Easy Authentication with Auth0
What we have seen in this post seems complicated, and indeed authentication can be a complex matter. Fortunately, with our help it needn't be so. Check our quickstarts and implement authentication and authorization in your apps in a breeze.
Sign upfor a free account and get started!
Auth0 provides the simplest and easiest to use user interface tools to help administrators manage user identities including password resets, creating and provisioning, blocking and deleting users. A generous free tier is offered so you can get started with modern authentication.
Note: authentication for Ethereum accounts as discussed in this post is not available through Auth0. If you are interested in having this option using Auth0, let us know in the comments.
Aside: GFT
GFT Technologies SE (GFT) is a business change and technology consultancy trusted by the world's leading financial services institutions to solve their most critical challenges. Specifically defining answers to the current constant of regulatory change – whilst innovating to meet the demands of the digital revolution. GFT brings together advisory, creative and technology capabilities with innovation culture and specialist knowledge of the finance sector, to transform the clients' businesses.
Utilising the CODE_n innovation platform, GFT is able to provide international start-ups, technology pioneers and established companies access to a global network, which enables them to tap into the disruptive trends in financial services markets and harness them for their out of the box thinking.
Founded in 1987, GFT is represented in twelve countries with a global team of around 5,000 employees. The GFT share is listed on the Frankfurt Stock Exchange in the TecDAX (ISIN: DE0005800601). For more information visit www.gft.com.
Conclusion
We have taken our simple authentication for Ethereum accounts concept from our previous post and expanded it to make it more convenient. Let's review our design goals from the beginning of this post:
It should allow users with an Ethereum address to use that address to login to a third party website (that supports this login method). After registration, users can login to any site implementing this protocol using their Ethereum address or email address.
It should be easy to use and reasonably easy to setup. It is simpler than our previous example and simple enough for typical Ethereum users: one mobile app to install, one transaction to execute once.
It should not compromise the security of the user's Ethereum account. Logins are now handled using a separate Ethereum account so the user does not need to expose his valuable Ethereum account.
It should allow users to recover their credentials in case of loss or theft. In case of theft of the mobile device, the user can create a mapping to a new account for logins using his primary Ethereum address.
It should not require knowledge of contracts or manually calling contract methods. The mobile wallet app and Metamask combined isolate users from interacting with contracts directly.
It should have reasonable latency for a login system (no more than a couple of seconds). Logins are only affected by network latency between the authentication server and the mobile device. In other words, they are as fast as any login system.
It should not cost users gas (or money) to login. Users only spend Ether once when first setting up their account. After that, logins to any third party websites do not use gas or Ether.
It should be reasonably easy for developers to implement in their apps. Developers can implement this by calling two endpoints of a RESTful API. Really simple.
Not bad for our initial research into integrating Ethereum with classic technologies. This shows Ethereum can be integrated into traditional applications today. The platform works, and the concept of decentralized applications is picking up steam.
Another interesting approach to Ethereum authentication is currently under development by uPort. The landscape of blockchain based applications is still being explored and we are eager to find out what people can do with it. Let us know what you think in the comments!
Would you be interested in having Ethereum authentication as an option in Auth0? Don't forget to tell us in the comments!
Many thanks to GFT's Innovation Team (Ivo Zieliński, Konrad Kozioł, David Belinchon and Nicolás González) for doing an amazing job developing this proof-of-concept, and to Manu Aráoz for reviewing and providing insight for this article.
About the author

Sebastian Peyrott
Senior Engineer