The modern web relies on cloud-based authentication. When a user authenticates, identity providers like Auth0 issue cryptographically signed tokens that allow applications to verify identity locally without needing to query a central server for every single request. While Auth0 maintains the session state on its end, the 'stateless' nature of the tokens issued to your applications creates a specific challenge: How do you track and propagate information that is unique to a single login instance without permanently altering the user’s global profile?
Metadata for sessions and refresh tokens bridges this gap, allowing you to store instance-specific context directly within the identity provider's session layer.
The Challenge of Contextual Identity
In a standard OAuth 2.0 or OpenID Connect flow, authentication artifacts serve distinct purposes. A session represents an active, stateful period of engagement within a browser, while a refresh token acts as a long-term grant of authority. The fundamental challenge, however, is that these artifacts are often "forgetful."
Once a session is established or a refresh token is granted, the specific circumstances of that initial handshake — like the device's security posture, the network's risk level, or the user's specific intent — are lost to time. When a user returns three months later to rotate a refresh token or jump to a new application via SSO, the identity provider knows who the user is, but it has no inherent way to remember the situation under which they were originally granted access, and whether things have changed since then.
By attaching metadata to the underlying session or refresh token, you create a persistent context layer. You can treat the authentication artifact as a ledger of its own history. You are not just verifying a user. You are referencing the specific situational data that granted them access in the first place, allowing you to influence security logic and token issuance throughout the entire lifecycle of that connection.
User metadata is not always the answer
To maintain consistency while the user returns to get more tokens, most Auth0 developers gravitate toward user_metadata and app_metadata to store extra information. While powerful, these are persistent and global stores applying to the user as a whole. If you store a "temporary security flag" or a "current login region" in the user profile, that data follows the user across every device they own.
Using global metadata for session-specific data leads to several issues:
- Profile Bloat: Storing transient data (like a one-time IP address) in a permanent database record.
- Race Conditions: If a user is logged in on both a laptop and a phone, a
current_session_idstored in user_metadata will be constantly overwritten by whichever device polled the server last. - Privacy Concerns: Keeping historical data in a user profile that should have been discarded the moment the user logged out.
Introducing ephemeral state via Auth0 metadata layers
To solve these issues, Auth0 introduced metadata layers specifically for sessions and refresh tokens. These features allow you to attach key-value pairs directly to the lifecycle of the specific authentication artifact in use. Because this data is ephemeral (it will not create a record in the user profile) and instance-specific, it provides a necessary middle ground: you maintain a clean, stateless architecture for your applications while preserving granular, real-time context.
Crucially, creating or including these key-value pairs in a specific session or refresh token metadata allows a single user to maintain different states across different devices simultaneously. A user might have a 'High Trust' session metadata flag on their hardware-secured work laptop while simultaneously carrying a 'Restricted' flag on a session initiated from a public mobile network. By shifting state from the User Profile to the session or refresh token layer, you ensure that the context for one device never leaks into or overwrites the context of another.
Implementing Session Metadata for Web Applications
Session metadata allows for the storage of customizable keys and values (up to 255 characters each) within an Auth0 user session. This metadata is specifically available for browser-based flows where an Auth0 session cookie is created. Because an Auth0 session can span multiple applications with Single Sign-On (SSO), this metadata can be shared across your entire application ecosystem for that specific user's browser instance for as long as the session is kept alive. Once the session is terminated or the session expires, this data is automatically discarded, ensuring that your application context remains as fresh as the user's current authenticated state.
Setting and accessing session metadata
There are two primary ways to manage session metadata: through Auth0 Actions or the Management API.
For most use cases, Auth0 Actions is the preferred method. The login flow is the moment you have the most context about the user's request (such as their IP, User-Agent, or specific login parameters). So setting metadata via a Post-Login Action is highly efficient and happens while authorization decisions are being made.
However, the Management API is also useful for out-of-band updates. If an administrative tool or a secondary security service needs to flag a session as "verified" or "high-risk" after the user has already logged in, the Management API provides the necessary programmatic access.
Use case: strengthening security with device fingerprinting
Device fingerprinting is a technique used to create a distinct identifier for the client, so you can tell different clients apart, ensuring that a session cookie has not been stolen and moved to a different machine. By storing a fingerprint — a hash of the client environment — in the session metadata, you can verify the environment on every subsequent interaction.
There are options in the Auth0 marketplace for a very detailed fingerprinting process that provides a higher assurance level. Auth0 Enterprise Plans also provide JA3/JA4 fingerprints generated at our edge, which we will use for our example.
The following Post-Login Action captures the JA3/JA4 TLS fingerprints from the security context during the initial credential exchange and verifies them on every subsequent interaction (such as SSO jumps or silent authentication).
exports.onExecutePostLogin = async (event, api) => {
  // 1. Capture the TLS fingerprint provided by Auth0
  const {ja3, ja4} = event.security_context ?? {};
  const currentFingerprint = `${ja3}-${ja4}`;
  // 2. Make sure this is a session flow by checking on the session
  if (event.session) {
    const storedFingerprint = event.session.metadata?.device_fingerprint;

    // 3. Comparison: If a fingerprint was already locked, verify it matches
    if (storedFingerprint) {
      if (storedFingerprint !== currentFingerprint) {
        // SECURITY VIOLATION: The TLS context has changed significantly.
        // This suggests the session is being used in a different environment.
        return api.access.deny("Security context mismatch. Access denied.");
      }
    }
    // 4. Initial Capture: If the session has no metadata yet, lock it in
    else if (currentFingerprint) {
      // THIS IS THE LINE ADDING THE METADATA TO THE SESSION:
      api.session.setMetadata("device_fingerprint", currentFingerprint);
    }
  }
};
With this simple Action, we protect the session relying on:
- Network-Level Identity: By using JA3/JA4, we identify the browser/OS combination based on how it negotiates SSL/TLS. This is much harder to spoof than a simple User-Agent string.
- The Handshake Lock: The logic ensures that the very first time the user logs in, their client’s "signature" is burned into the session metadata.
- Continuous Session Protection: Because this runs in the Post-Login flow, it is triggered every time the session is used to access a new application in your SSO dashboard. If the fingerprint does not match the original, the access is instantly denied.
Use case: marking a session as high risk
Not all security threats are apparent the moment a user enters their password. Often, a third-party threat intelligence tool might flag a user's behavior as suspicious minutes after they have logged in. By using the Management API, you can update an active session's metadata to flag it as high risk. Here is how you would do it:
curl --request PATCH
--url "https://{YOUR_DOMAIN}/api/v2/sessions/{SESSION_ID}"
--header "Authorization: Bearer MGMT_API_TOKEN"
--header "Content-Type: application/json"
--data '{"session_metadata": {"risk_level": "high", "risk_reason": "erratic_portal_behavior"}}'
Once the metadata is updated, the change is immediate. The next time the user attempts a silent authentication call, an SSO jump to another application, or even a session heartbeat check, this Post-Login Action will intercept the request and deny access (or perform other actions such as requesting an additional factor of authentication if the user has one) based on the metadata flag.
exports.onExecutePostLogin = async (event, api) => {
  // 1. Check if the current session has been flagged as high risk
  if (event.session?.metadata?.risk_level === 'high') {
    // 2. Retrieve the reason for the flag
    const message = `Access denied for session ${event.session.id}. Reason: ${event.session.metadata.risk_reason || "Unspecified security concern"}. Please log in again`

    // 3. Block access and force the user to re-authenticate
    return api.access.deny(message);
  }
};
Integrating with the Management API for security dashboards
One of the most powerful aspects of session metadata is that it is queryable. If you are building a security dashboard within your app, you can show users exactly which devices are currently logged in by querying the Management API.
An example Management API request:
curl --request GET
--url "https://{YOUR_DOMAIN}/api/v2/users/{USER_ID}/sessions"
--header "Authorization: Bearer MGMT_API_TOKEN"
The response returns a JSON object containing the metadata field, allowing your front-end to display details like "Logged in via Winter Campaign" or "Fingerprint Verified."
{
  "sessions": [
    {
      "id": "Fka...",
      "user_id": "auth0|697c...",
      "created_at": "2026-02-20T10:49:18.986Z",
      "updated_at": "2026-02-20T11:21:38.554Z",
      "authenticated_at": "2026-02-20T10:49:18.986Z",
      (...),
      "session_metadata": {
        "origin": "winter_campaign",
        "device_fingerprint": "5GmSnU7Y..."
      }
    },
    {...}
  ],
  "next": "Fe26..."
}
Leveraging Refresh Token Metadata for Native and Mobile Apps
Unlike sessions, which are often tied to a browser cookie in a device, refresh tokens are designed to provide long-term, offline access to applications on behalf of users and used to obtain access tokens without the need for a user to reauthenticate. This makes it the choice for mobile or native applications where resorting to a browser-based redirect flow for silent authentication is a subpar user experience.
Similar to session metadata, refresh token metadata allows for the storage of persistent, customizable data (up to 255 characters per key/value) tied to a specific refresh token. This metadata will be available whenever a refresh token has been issued, can evolve alongside the user’s activity, and will be cleaned up when the refresh token is revoked.
Managing the refresh token lifecycle
Just like session metadata, you have two primary mechanisms for interacting with refresh token data: Auth0 Actions for real-time logic and the Management API for administrative oversight.
Probably the most interesting moment to use this metadata is during the refresh token exchange flow. Because Auth0 Actions can read the metadata from the token being exchanged and write to the one being issued, you can create a "chain of custody." This allows you to track the evolution of a grant over its entire lifespan.
While Auth0 Actions handle the live rotation, the Management API allows you to query or update the state of these tokens out-of-band. This is essential for building security dashboards or administrative tools. For example, if a user reports a lost device, your backend can use the Management API to find the specific refresh token associated with that device, inspect its metadata (like friendly_device_name), and revoke it immediately.
Use case: maintaining custom claims through token refreshes
In many architectures, developers inject custom claims into an access token during the initial login like for instance, a user's subscription tier, a language, or other tags. However, if that value was determined by a temporary context (like a query parameter or a specific landing page), it will not be available during a background refresh token exchange some time later. Subsequent access tokens issued within this lifecycle will not have access to that information.
Refresh token metadata allows you to "remember" that context. By storing the critical data during the initial login, you can retrieve it and re-apply it to every new access token issued during the rotation process, ensuring the user's permissions and context remain consistent.
Imagine a scenario, where we are capturing two distinct types of data, which we want to persist for as long as the user keeps coming back to our app:
- An external referral ID (
ext-referral) passed in the initial authorization call through a custom query parameter. - A session-specific language choice (
ulp-lang) captured via a custom prompt in Universal Login.
Action code for capturing and persisting context:
exports.onExecutePostLogin = async (event, api) => {
  const isRefresh = event.transaction?.protocol === "oauth2-refresh-token";
  let referral;
  let sessionLang;

  if (!isRefresh) {
    // 1. INITIAL LOGIN: Capture context from the request
    // 'ext-referral' comes from the authorization exchange
    // 'ulp-lang' comes from our custom Universal Login prompt
    referral = event.request.query?.['ext-referral'] || "direct";
    sessionLang = event.request.body?.['ulp-lang'] || "en";

    // 2. Pin to refresh token metadata for long-term memory
    api.refreshToken.setMetadata("referral_source", referral);
    api.refreshToken.setMetadata("session_language", sessionLang);
  } else {
    // 4. REFRESH EXCHANGE: Retrieve from metadata "memory"
    referral = event.refresh_token?.metadata?.referral_source;
    sessionLang = event.refresh_token?.metadata?.session_language;
  }

  // 5. Apply the claims to the new ID Token
  api.idToken.setCustomClaim("referral", referral);
  api.idToken.setCustomClaim("lang", sessionLang);
};
With this Action, we achieved:
- Attribution: If the user makes a purchase some weeks after their first login, the access token will still carry that ext-referral claim. Your backend can attribute the revenue correctly without needing to join complex tracking tables. If the purchase happens somewhere else where the user did not use a referral link, we will not have that claim and therefore the revenue is still correctly attributed.
- UI Consistency: Since the ulp-lang was a "for this session" choice, you do not want to overwrite the user's global profile language (which might be their native tongue). Using metadata ensures that if they chose "French" for this specific session on their mobile phone, the app stays in French throughout every background refresh.
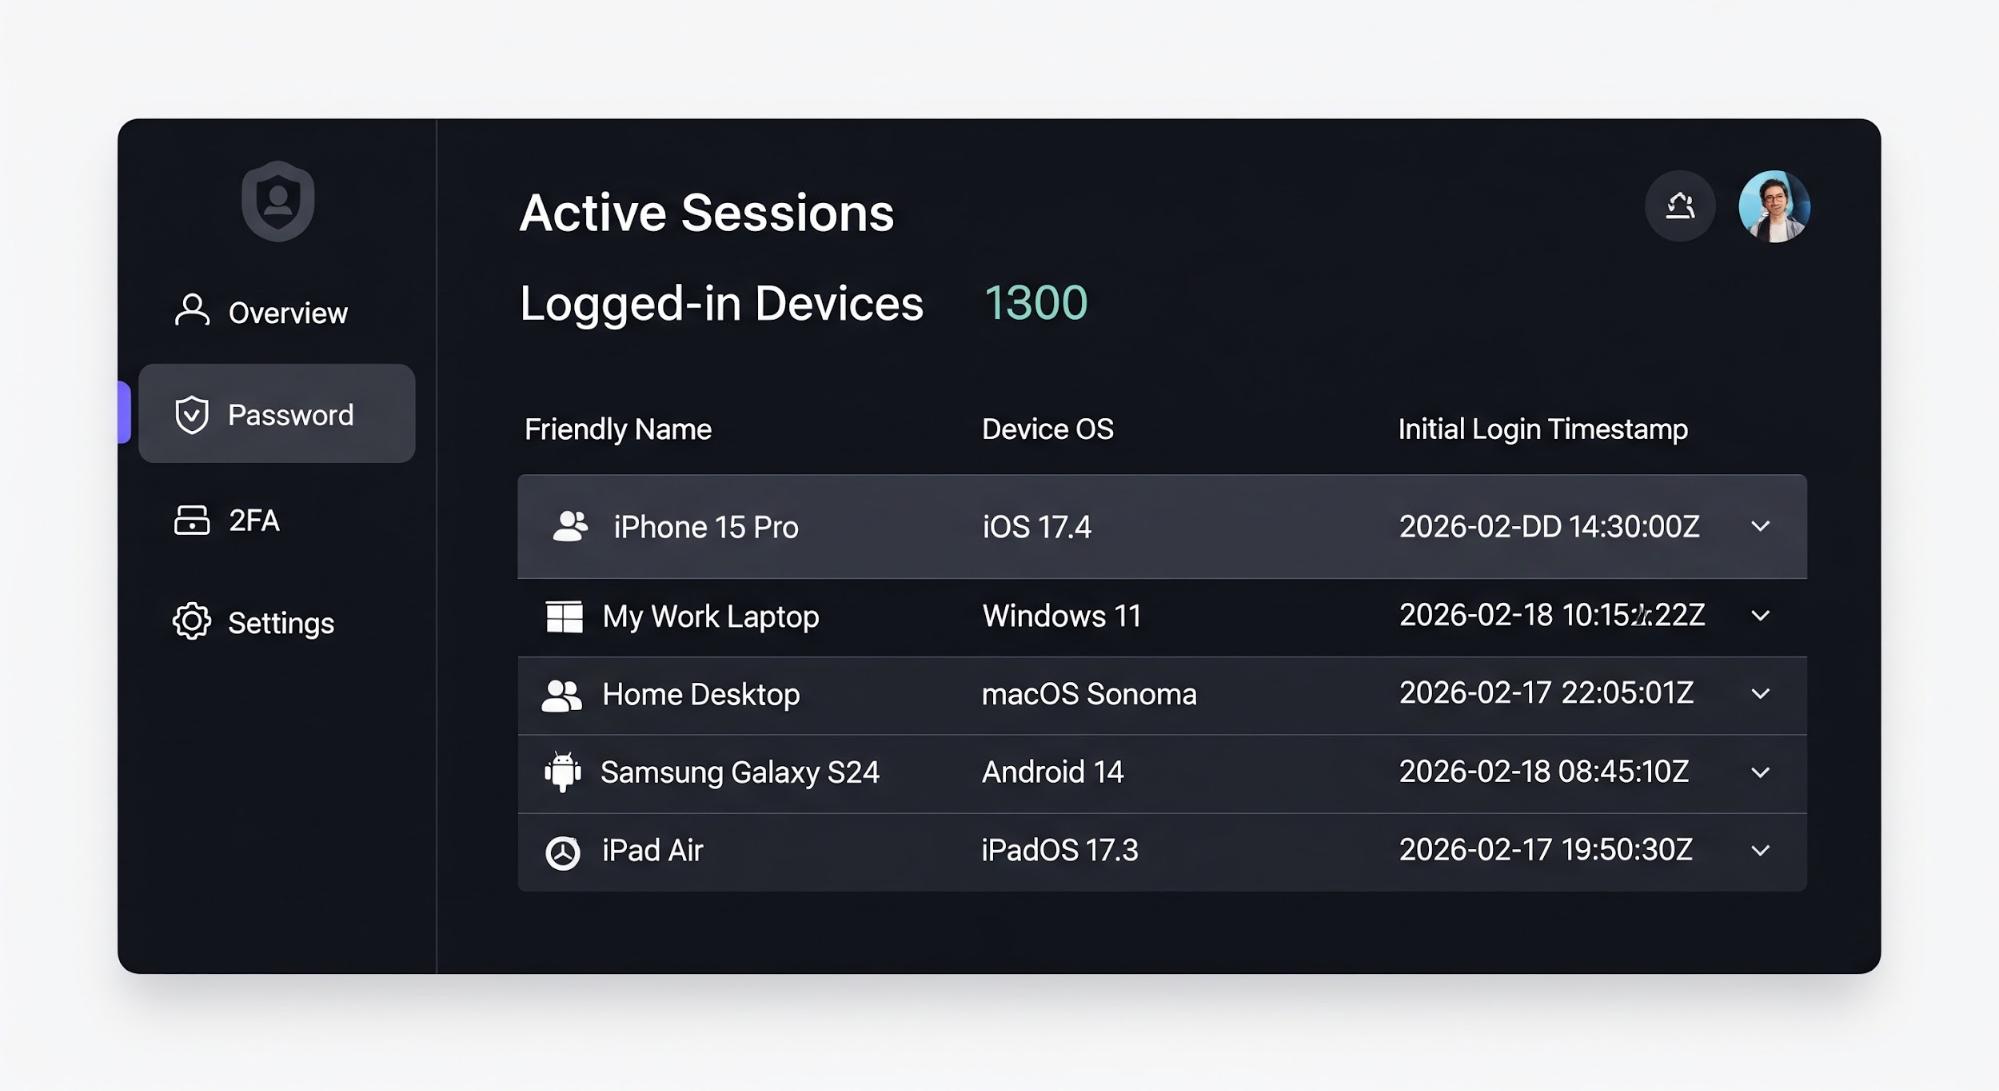
Use case: enhancing user transparency with device details
When building a secure application, it is best practice to allow users to audit their own active sessions. However, refresh tokens are cryptographically generated strings that carry no inherent meaning to an end-user.
To bridge this gap, you can capture device-specific details during the initial login, such as a "Friendly Name" provided by your mobile app or the specific OS/Browser version, and store them in the refresh token metadata. You can later query the Management API to build a clear, transparent security dashboard for your users.
Action code for capturing friendly device names:
exports.onExecutePostLogin = async (event, api) => {
  // We only capture this on the initial login, not on every refresh
  if (event.transaction?.protocol !== "oauth2-refresh-token") {
    // 1. Extract device info passed by your app or the request context
    const friendlyName = event.request.query?.['ext-name'] || "Unknown Device";
    const os = event.request.user_agent || "Unknown OS";

    // 2. Store these details in the refresh token metadata
    api.refreshToken.setMetadata("friendly_name", friendlyName);
    api.refreshToken.setMetadata("device_os", os);
    api.refreshToken.setMetadata("initial_login_at", new Date().toISOString());
  }
};
Integrating with the Management API for user-friendly dashboards
Once you've stored this data, your backend can fetch all active refresh tokens for a user. The metadata we stored in the Action is returned in the API response, allowing you to display a human-readable list.
The Management API call:
curl --request GET
--url "https://{YOUR_DOMAIN}/api/v2/users/{USER_ID}/refresh-tokens"
--header "Authorization: Bearer MGMT_API_TOKEN"
An example API response snippet:
{
  "tokens": [
    {
      "id": "dcr...",
      "user_id": "auth0|697c9...",
      "created_at": "2026-02-20T16:15:02.260Z",
      "expires_at": "2027-02-20T22:15:02.259Z",
      (...),
      "refresh_token_metadata": {
        "device_os": "Mozilla/5.0 (Macintosh; Intel Mac OS X 10_15_7)",
        "friendly_name": "my iPhone 15 Pro",
        "initial_login_at": "2026-02-20T16:15:01.783Z"
      }
    },    {...}  ]
}
Then the user profile page could look like this:
And if the user renames any of their devices, you can make the Management API Call like this:
curl --request PATCH
--url "https://{YOUR_DOMAIN}/api/v2/refresh-tokens/{RT_ID}"
--header "Authorization: Bearer MGMT_API_TOKEN"
--header "Content-Type: application/json"
--data '{"metadata": {"friendly_name": "My Old iPhone"}}'
This is a UX and privacy win because we gain:
- Self-Service Revocation: If a user sees a device they do not recognize, they can click "Revoke" on that specific refresh token. Since the metadata clearly identifies the device, they will not accidentally log themselves out of the device they are currently using.
- Contextual Audit Logs: Your internal security team can see exactly which device initiated a specific series of actions by correlating the refresh token ID with the metadata tags.
- Reduced Support Load: Users are less likely to contact support about unrecognized logins when the login notification or dashboard says "Login from: Sarah's MacBook Air" instead of "Login from: 192.168.1.1".
What Never to Store in Metadata
While session and refresh token metadata provide a powerful way to manage state, they are not designed to be a secure database for sensitive information. Here are a few things to take into account when storing your session and refresh token metadata:
- No Secrets: Metadata values are not encrypted at the application layer in a way that prevents administrative access via the Management API. Never store API keys, client secrets, or private signing keys.
- No High-Risk personally identifiable information (PII): Avoid storing Social Security numbers, health records, credit card numbers or other financial data. Metadata should be used for operational context (tags, IDs, and flags), not as a primary data store for identity attributes.
- Size Limits: Auth0 enforces a limit of 255 characters for both keys and values. If you find yourself trying to stringify large JSON objects into metadata, you likely need a dedicated external database.
Choose the Right Tool for the Job
Always bear in mind the purpose of the metadata and how it will be used.
- Is the data you want to store relevant only for this login transaction? Then you are better off with transaction metadata.
- Will this information be useful for every transaction in this particular session? Then session or refresh token metadata should be your choice.
- Is this information always true and accurate for this particular user regardless of where and when they log in? That would definitely be better stored in the user’s profile metadata.
By thoughtfully applying metadata to sessions and refresh tokens, you can create a more secure, personalized, and transparent experience for your users while keeping your identity architecture clean and stateless.
Ready to Build? Here Is Your Get-Started Checklist
If you are ready to move from concept to code, follow these steps to implement metadata-driven context in your own Auth0 tenant:
1. Verify Your Plan: Metadata for sessions and refresh tokens is available on Enterprise Plans.
2. Dive Into the Documentation: Auth0 provides detailed technical references for each of the objects we've discussed:
- Session Metadata – Learn how to read and write to the session metadata.
- Refresh Token Metadata – Learn how to read and write to the refresh token metadata.
- Management API Reference – Explore the /api/v2/sessions and /api/v2/refresh-tokens endpoints for out-of-band updates.
3. Start with a Sandbox Action Do not deploy to production immediately! Navigate to Actions > Library in your Auth0 Dashboard and create a "Test Action" using the examples we wrote earlier. Use the Test tab in the editor to simulate a login and watch your metadata populate in real-time.
4. Join the Conversation If you run into a specific edge case—like complex claim mapping or high-volume API constraints—the Auth0 Community is the best place to find peer-to-peer support and architectural advice from Auth0 Engineers.
Frequently Asked Questions
About the author

Antonio Ortells
Senior Product Manager