
As we've shown in a previous post, you can add authentication to a Shiny Server instance, allowing your server to be online without being available to everyone in the internet. If you've been working with this and your organization has grown, you'll be more likely to find scenarios where you'd prefer or need to restrict access to a report to specific users or groups.
Shiny Server Pro is a paid edition which allows for this, and has a built-in authentication scheme with some options included, but these options, for one of many reasons may not be appropiate for you, if so, this is the blog post you've been waiting for! We'll explain how to use the shiny-auth0-plus proxy to pass along credentials and permissions.
Note: If you are working in a small company and are scared away by Shiny Pro's pricing, take into account they have special pricing for small companies.
But why?
First of all, why would you need to get authorization for your shiny apps? Well, suppose you have a report with customer PII (personally identifiable information) which employees should only access in a "need to know basis", a way to control this would be requiring a certain permission or list of users to access the report.
Also, to consider a slightly more complex scenario, suppose you want sales representatives to be able to access customer data, but only of accounts they manage, you can also do this with Shiny.
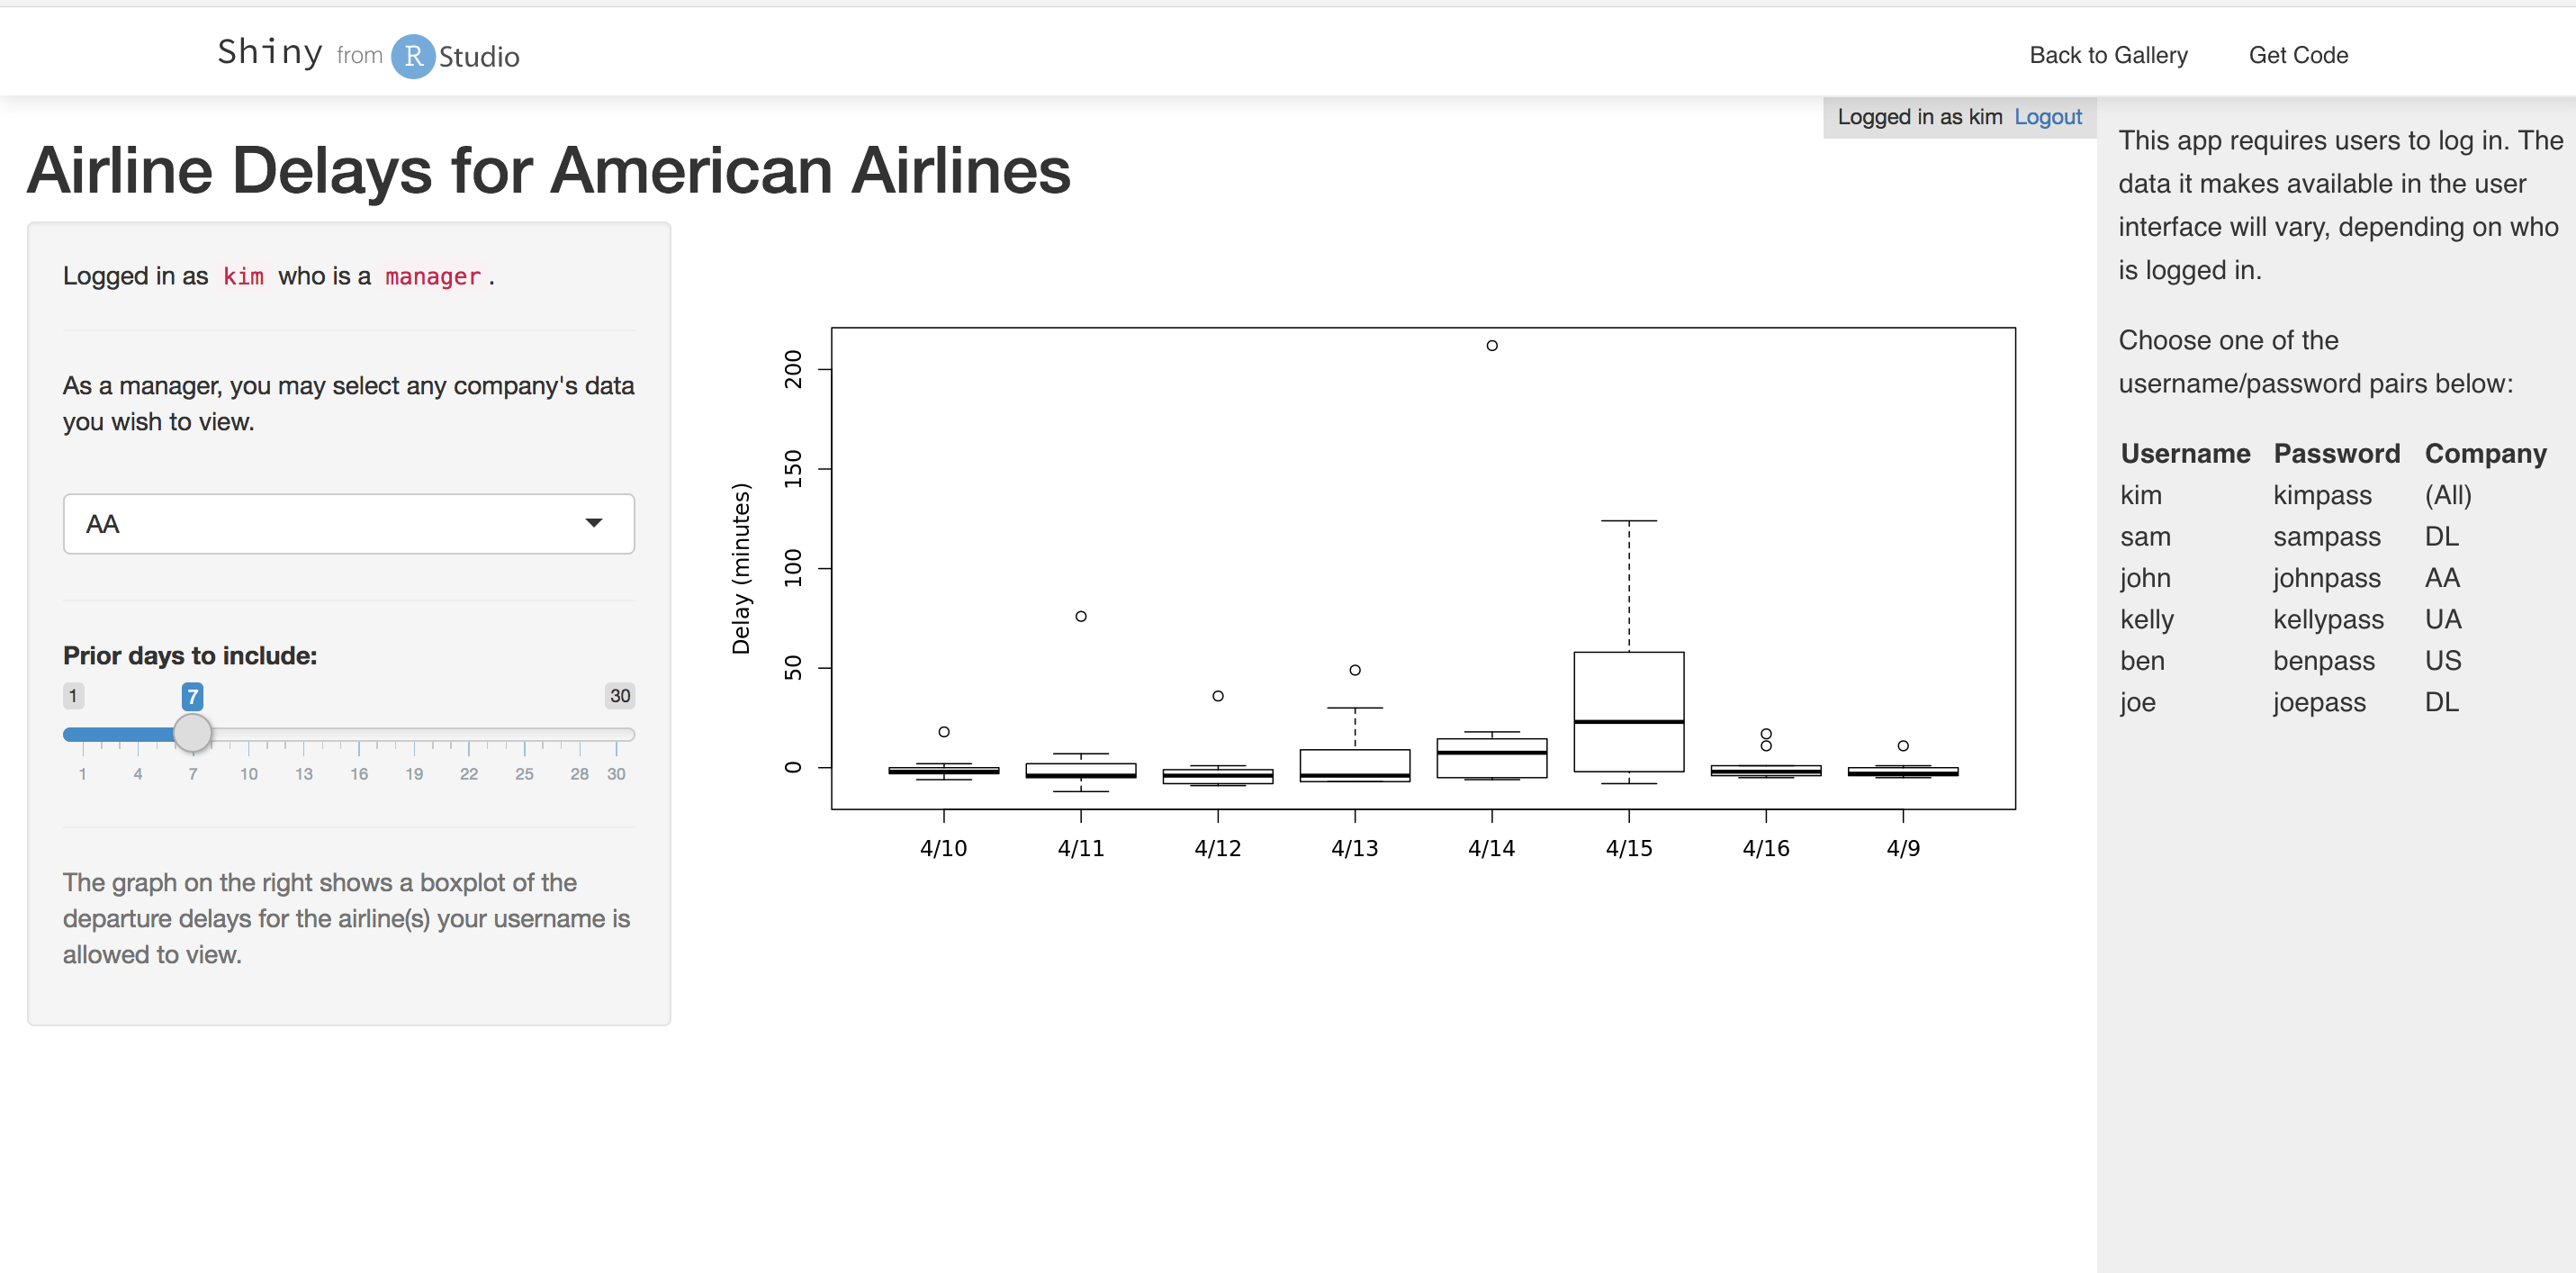
For example, consider this Demo available in the Shiny reports gallery, you can login as an administrator (kim) and see all companies:
Or, you can login with sam, that only has access to data from DL, and you'll see this:
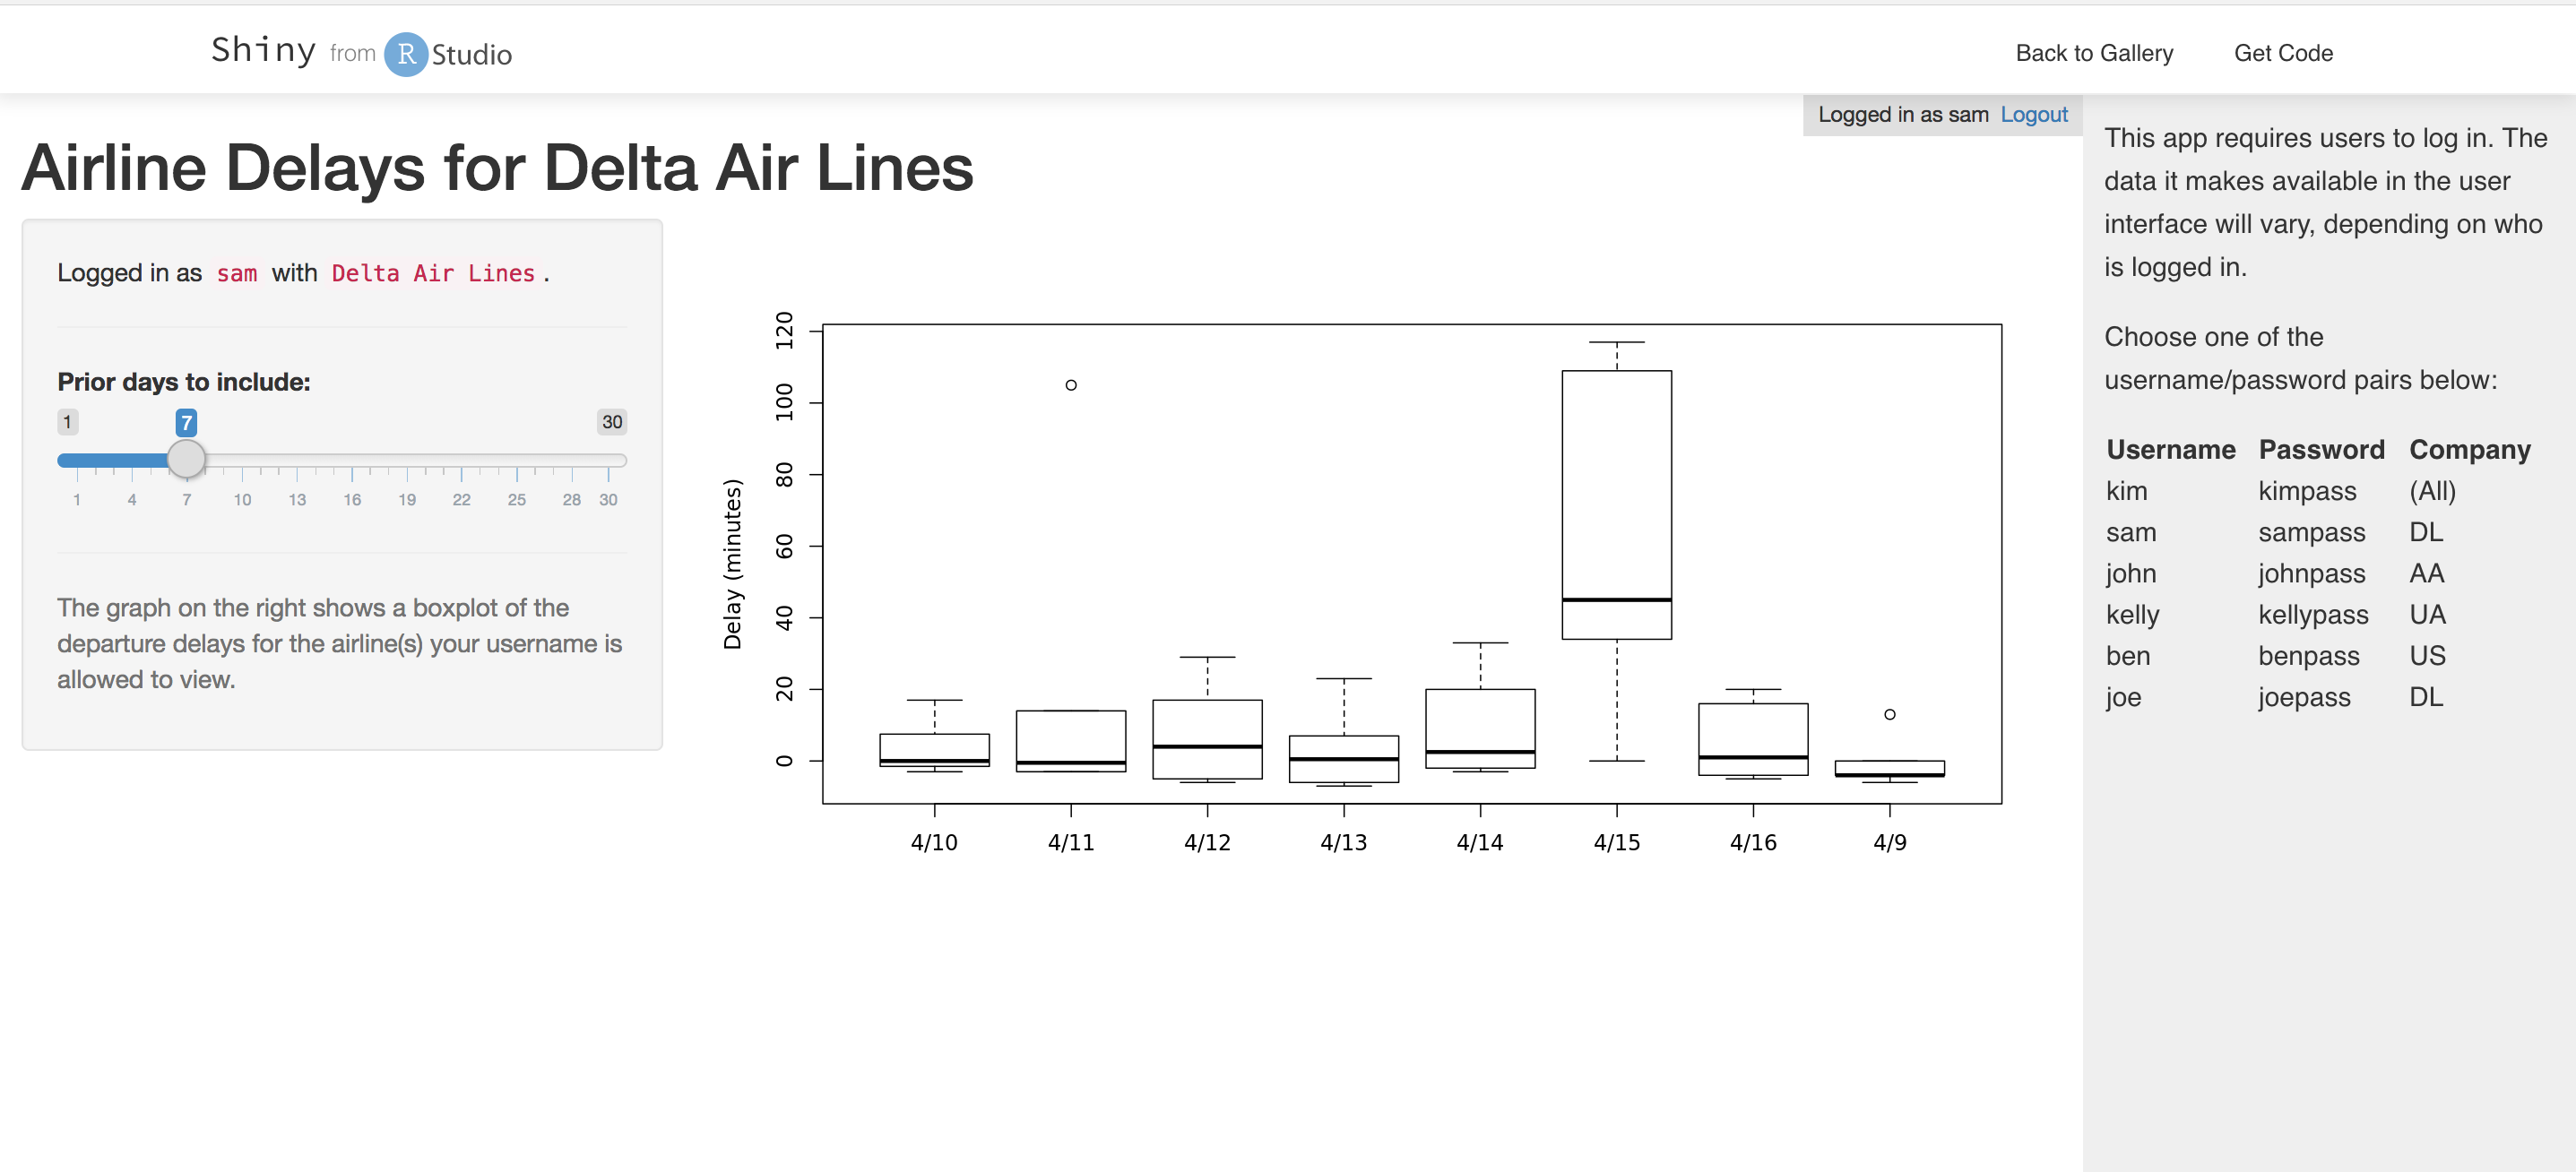
The code for this example is here, and in this case the report has been coded in such a way that the users membership to a company or complete admins has been hardcoded into a membership_db table. We'll recreate a similar example but using Auth0 as a proxied authentication.
Apart from these, the Pro version allows for usage monitoring with a sweet admin panel, spanning multiple processes per each report to handle a bigger number of users without hanging, and allows to use different R versions per Shiny app.
Step 1: Installation and configuration
- First of all Download Shiny Server Pro
- If you don't see anything in the download box, you may have to disable your ad-blocker software, since it's a third party form. The setup is almost the same as the one described in our previous blog post, in step 1, but using the Shiny Server Pro download.
- Follow the basic setup instructions for it
- Make sure it works before trying to add any authentication.
Once you know Shiny Server is up and running in its Pro version, we can start to plan out how to make it work with Auth0.

Step 2: Get Nginx Up and Running
Nginx is a powerful and popular HTTP server. It supports a ton of features and is very fast. We will use Nginx to perform SSL/TLS termination. In other words, Nginx will act as the public facing server, with full TLS support (a must for secure connections). It will then forward all requests to our internal shiny-auth0-plus proxy server, which will run without TLS in our internal network (considered safe). This step is the same as the guide for the open source Shiny server.
Our sample Nginx configuration file looks as follows:
http {
    map $http_upgrade $connection_upgrade {
        default upgrade;
        ''      close;
    }

    # Listen on port 80 and redirect all requests to the
    # TLS enabled server (https, port 443)
    server {
        listen       *:80;

        # Your hostname should go here
        server_name  shiny.yourhost.com;

        access_log   off;
        location / {
            rewrite ^ https://$host$request_uri? permanent;
        }
    }

    # TLS enabled server
    server {
        listen       443 ssl;

        # Your hostname should go here
        server_name shiny.yourhost.com;

        # TLS/SSL certificates for your secure server should go here.
        # If you don't have a TLS certificate, you can get a free one by
        # following the free PDF available in this link:
        # https://auth0.com/blog/using-https/
        ssl_certificate      localtestserver-dot-com.pem;
        ssl_certificate_key  localtestserver-dot-com-key.pem;

        # To enhance security, as long as you don't need to support older browsers
        # (and you probably don't), you should only enable the most secure
        # ciphers and algorithms. This is a reasonable selection.
        ssl_ciphers 'ECDHE-RSA-AES128-GCM-SHA256:ECDHE-ECDSA-AES128-GCM-SHA256:ECDHE-RSA-AES256-GCM-SHA384:ECDHE-ECDSA-AES256-GCM-SHA384:DHE-RSA-AES128-GCM-SHA256:DHE-DSS-AES128-GCM-SHA256:kEDH+AESGCM:ECDHE-RSA-AES128-SHA256:ECDHE-ECDSA-AES128-SHA256:ECDHE-RSA-AES128-SHA:ECDHE-ECDSA-AES128-SHA:ECDHE-RSA-AES256-SHA384:ECDHE-ECDSA-AES256-SHA384:ECDHE-RSA-AES256-SHA:ECDHE-ECDSA-AES256-SHA:DHE-RSA-AES128-SHA256:DHE-RSA-AES128-SHA:DHE-DSS-AES128-SHA256:DHE-RSA-AES256-SHA256:DHE-DSS-AES256-SHA:DHE-RSA-AES256-SHA:AES128-GCM-SHA256:AES256-GCM-SHA384:AES128:AES256:AES:DES-CBC3-SHA:HIGH:!aNULL:!eNULL:!EXPORT:!DES:!RC4:!MD5:!PSK';
        ssl_protocols TLSv1 TLSv1.1 TLSv1.2;
        ssl_prefer_server_ciphers on;
        ssl_session_cache  builtin:1000  shared:SSL:10m;
        ssl_stapling on; # Requires nginx >= 1.3.7
        ssl_stapling_verify on; # Requires nginx => 1.3.7

        # This proxies requests to our shiny-auth0-plus authentication proxy.
        # Requests are passed in plain HTTP, so TLS termination
        # is applied at this point.
        location / {
            proxy_set_header    Host $host;

            # This points to our shiny-auth0-plus authentication proxy,
            # change localhost:3000 to suit the configuration of
            # your shiny-auth0-plus config
            proxy_pass          http://localhost:3000;
            proxy_redirect      http://localhost:3000/ $scheme://$host/;

            proxy_http_version  1.1;

            # The following lines enable WebSockets proxying, do not remove them
            # as they are used by Shiny Server to improve user experience
            proxy_set_header    Upgrade $http_upgrade;
            proxy_set_header    Connection $connection_upgrade;

            proxy_connect_timeout 3h;
            proxy_send_timeout 3h;
            proxy_read_timeout 3h;
        }
    }
}
The important part is near the bottom. Take a look at the last location / block. This block tells Nginx to handle all requests. Inside this block you will find two directives: proxy_pass and proxy_redirect. These directives tell Nginx to proxy requests to the host passed as parameter to them. This is were you should edit the configuration file to point it to your shiny-auth0-plus authentication server, which we will setup later on in this guide.
Other important directives in this configuration file are ssl_certificate and ssl_certificate_key. These directives point Nginx to your TLS/SSL certificates. These certificates are used to secure the connection to the server. You must set a valid certificate and a private key here, as TLS must be enabled to properly secure your Shiny Server installation.
If you want to learn more about TLS/SSL, or find out how to get your own free TLS certificate, head over to our Using HTTPS article. You may want to consider that Let's Encrypt provides free TLS certificates with automatic updates after expiration. You can also ask your system administrator to perform these steps for you. It is also possible to use a self-signed certificate, if only certain clients need access to the server (and can install your certificate in their browsers).
Last but not least, you should change both server_name directives to use the right name for your host. This is of particular importance if several hosts are being served by the same Nginx configuration. If in doubt about what this means, consult with your system administrator.
In most installations, the system-wide Nginx configuration file is located at /etc/nginx/nginx.conf.
Step 3: Setting up an Auth0 Account for shiny-auth0-plus
Since authentication will be handled by Auth0, a free Auth0 account is required to work with shiny-auth0-plus. Don't panic, it's as simple as signing-up and setting a few knobs here and there. Let's take a look.
First, head over to Auth0's signup page. Follow the steps to fill in your details. For simple use cases, a free account is more than enough. With a free account you get up to 7000 regular users. If you need more than that, check our pricing page.
Signup to Auth0</a>
After you have completed the signup process, access the Auth0 Dashboard and create a new application for our shiny-auth0-plus app. This application will let you setup how your users will log-in through the proxy. You have several options you must consider: will you use a standard username/password database? Or will you allow social logins (through Facebook or Google, for example)? It is up to you to decide what fits best your use case.
To create an application go to Applications on the sidebar and then Create Application on the top right of the screen. Pick a name and then select the type of client. Select Regular Web Applications. Ignore the quickstart that is presented after that and go straight to Settings.
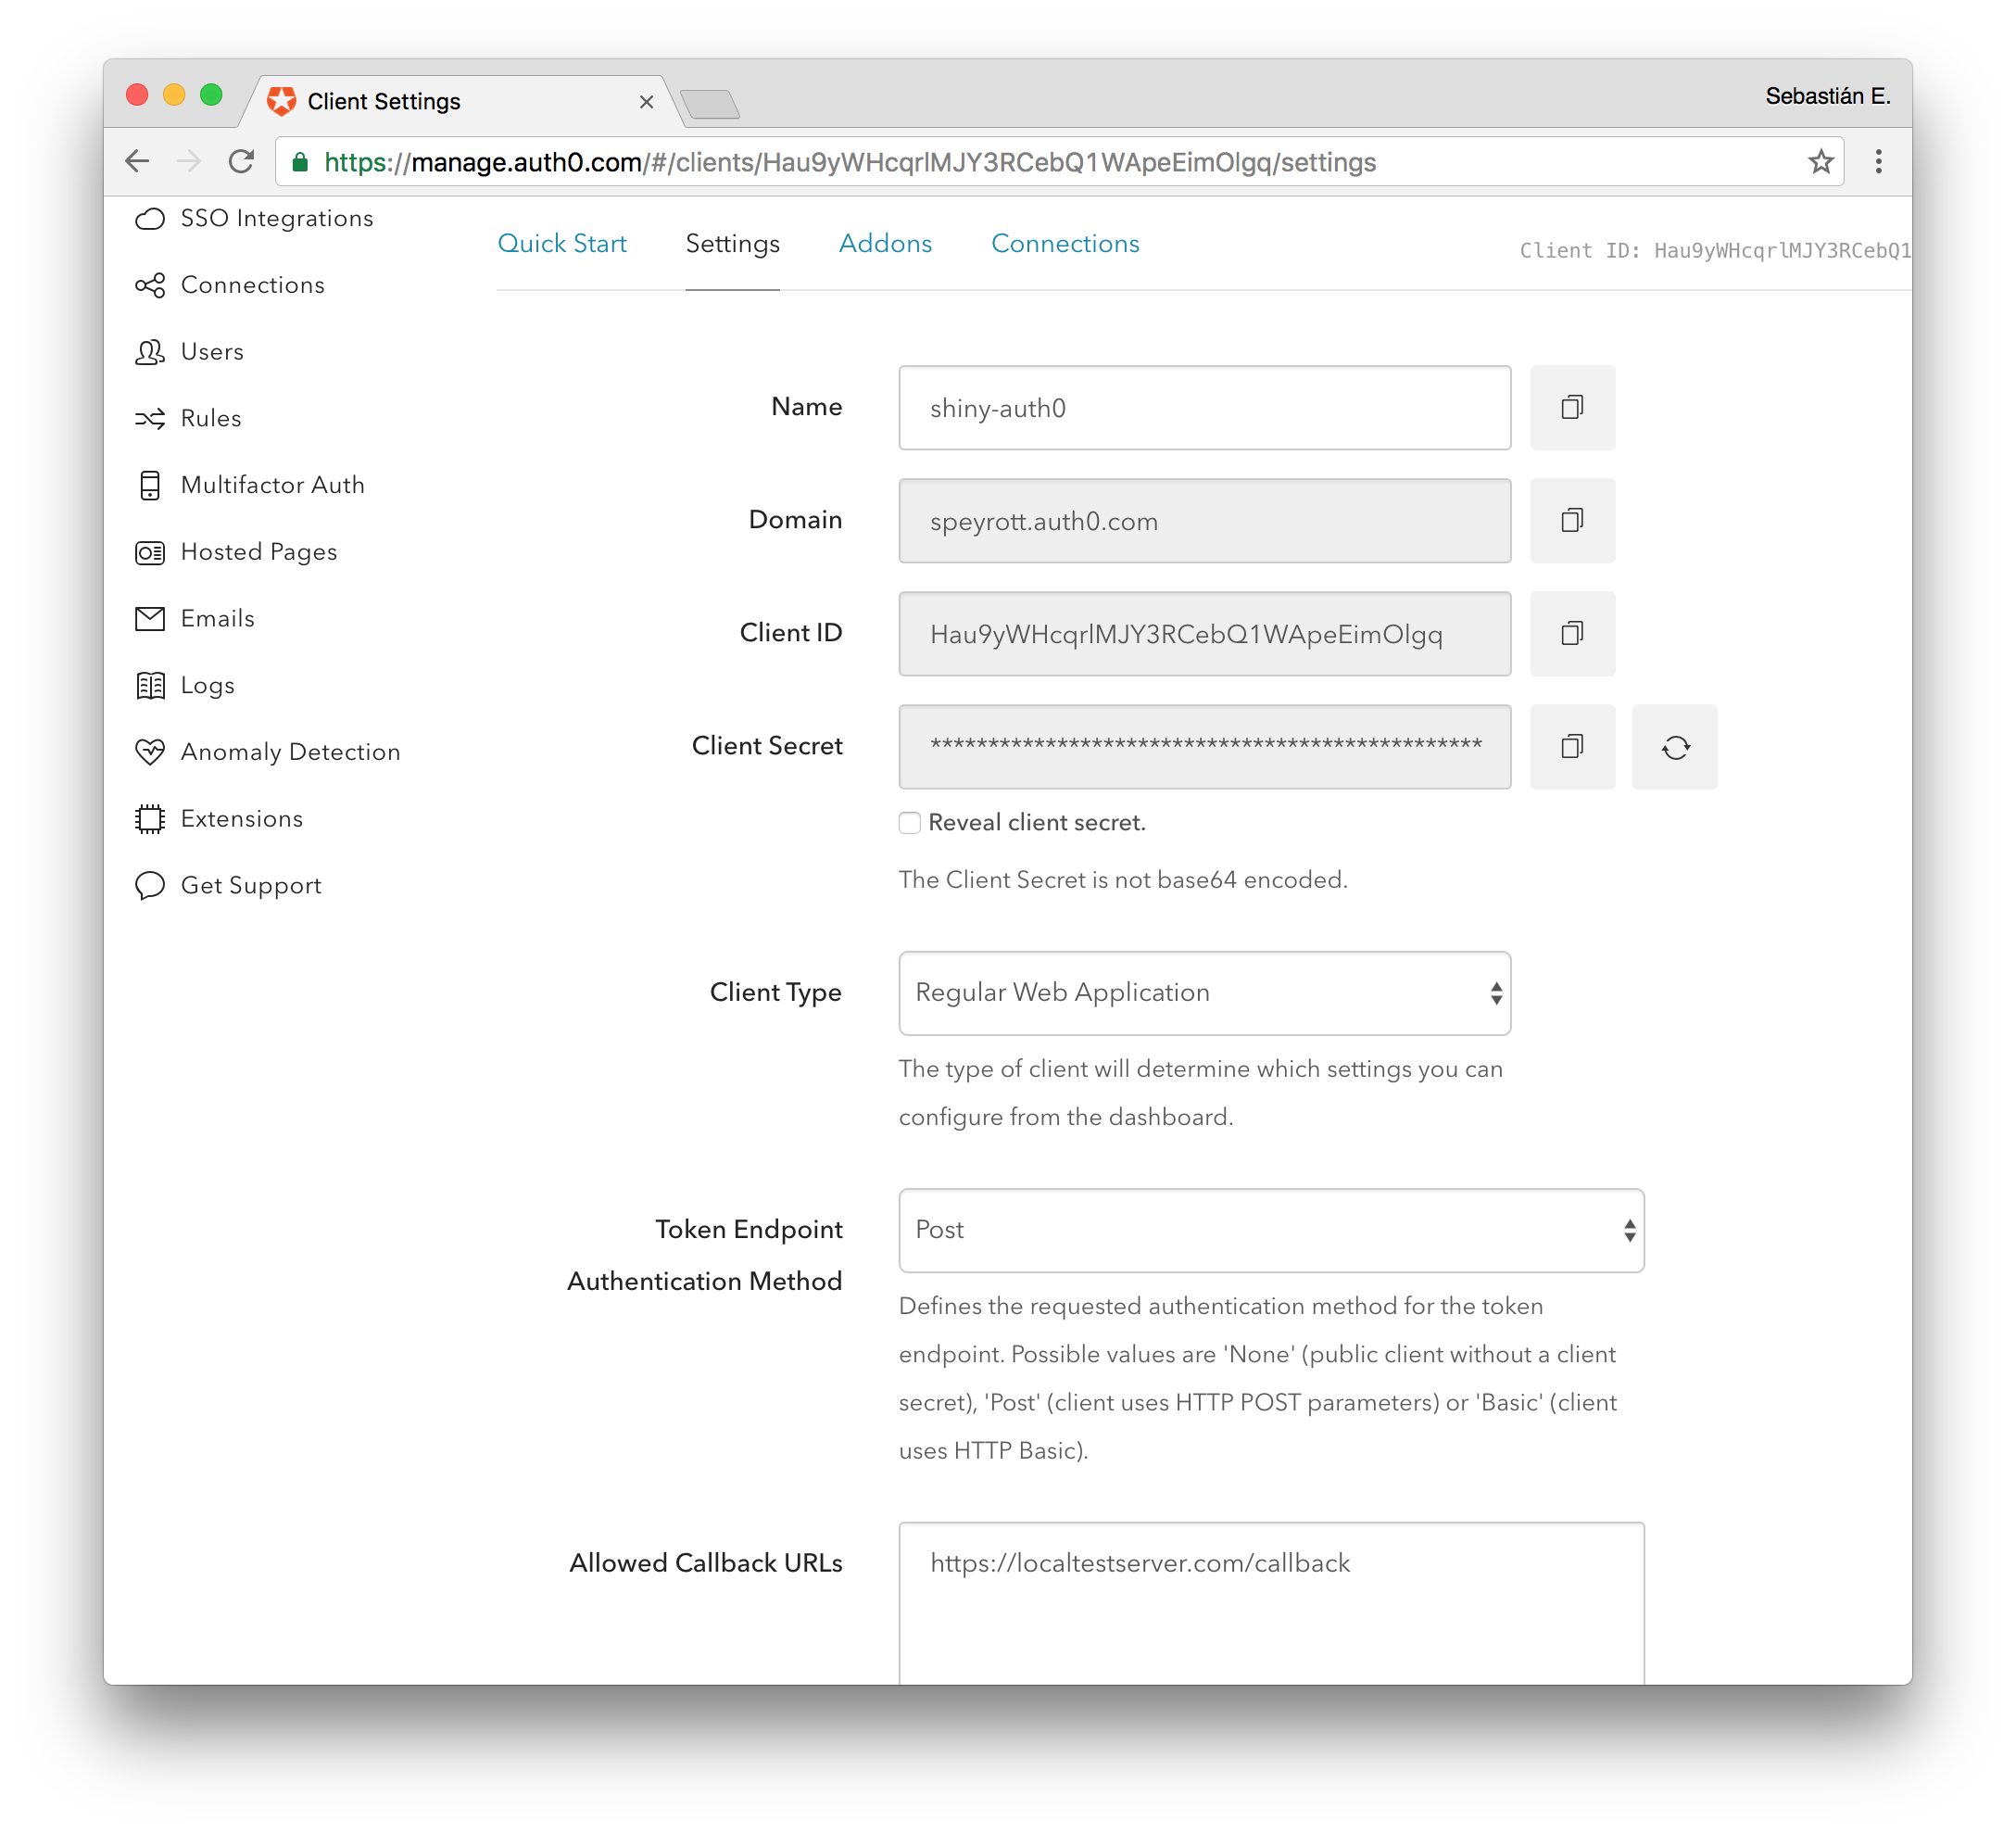
Take note of the Client ID, Domain and the Client Secret. You will need these later to setup shiny-auth0-plus. Another important setting is the Allowed Callback URLs setting visible below. This is the URL the user will be redirected to after a successful authentication attempt. It is formed by the domain of your public server plus the callback path. For instance: https://shiny.yourhost.com/callback.
Step 4: Setting up shiny-auth0-plus for Shiny Server Authentication
In this step we'll configure a proxy that sits between nginx and the Shiny Server, which will authenticate with Auth0.
First, clone the latest version of shiny-auth0-plus to the system that will run the authentication proxy.
git clone https://github.com/auth0/shiny-auth0-plus.git
Make sure you have an up-to-date Node.js installation. If in doubt, consult with your system administrator. Now install all required dependencies for shiny-auth0-plus:
cd shiny-auth0-plus
npm install
If everything went well, all dependencies for running shiny-auth0-plus are now locally installed. Now, we will setup shiny-auth0-plus. Create a new file named .env inside the shiny-auth0-plus directory with the following content, adjusted with the variables you wrote down.
AUTH0_CLIENT_SECRET=myCoolSecret
AUTH0_CLIENT_ID=myCoolClientId
AUTH0_DOMAIN=myCoolDomain
AUTH0_CALLBACK_URL=https://shiny.yourhost.com/callback
AUTH0_GROUPS_CLAIM=https://shiny.yourhost.com/claims/groups
COOKIE_SECRET=somethingRandomAndLongHerePlease
SHINY_HOST=localhost
SHINY_PORT=3838
SHINY_ADMIN_PORT=4151
PORT=3000
You will see several common names here. As you can imagine, AUTH0CLIENTSECRET, AUTH0CLIENTID and AUTH0_DOMAIN are the client settings we took note in step 3. Proceed to fill these in here.
AUTH0CALLBACKURL depends on the actual URL you will use to access your Shiny Server from outside. In other words, it is the URL the user will be redirected to after authentication. This should be one of the Allowed Callback URLs from step 3. It is very important to leave the trailing /callback part of the URL in place, whatever the name of your host is.
AUTH0GROUPSCLAIM is an URL we'll use to define custom claims to add to the token, just use your shiny domain slash claims and you'll be fine. Remember to use the same when configuring your Auth0 tenant for the groups.
COOKIE_SECRET should be a fairly long random string that should be kept secret. This secret is used to validate the cookie stored client side. Put a long, random string here. For example, you can generate this string with the pwgen package:
pwgen 50 1
SHINYHOST, SHINYPORT and SHINYADMINPORT are the actual host and ports for your running Shiny Server installation from step 1. If everything is running on the same server, the defaults should be OK (localhost and ports 3838 and 4151).
Lastly, PORT is the port where the shiny-auth0-plus authentication proxy will run. This port is the port that should be set in the proxypass and proxyredirect directives from step 2. If shiny-auth0-plus will run on a different host from Nginx, don't forget to update the localhost part of these directives in nginx.conf as well. If in doubt, consult with your system administrator.
If you are just testing locally, you can use localhost instead of the IP of any machine. After setting up all of this, start the proxy with this command:
npm start
And check if you can access the server, if you get error 502, check in the logs (/var/log/nginx/error.log) If you see an error like this:
[...]*1 connect() to [::1]:3000 failed (13: permission denied) while connecting to upstream[...]
It can be solved by configuring SELinux to allow the connection, using this command as root:
setsebool -P httpd_can_network_connect 1
Step 5: Authorization in Shiny
If you got everything right up to this step, you should get an Auth0 login screen when accessing the server (The one we mentioned as https://shiny.yourhost.com/). If something fails in this stage make sure to recheck all steps before continuing.
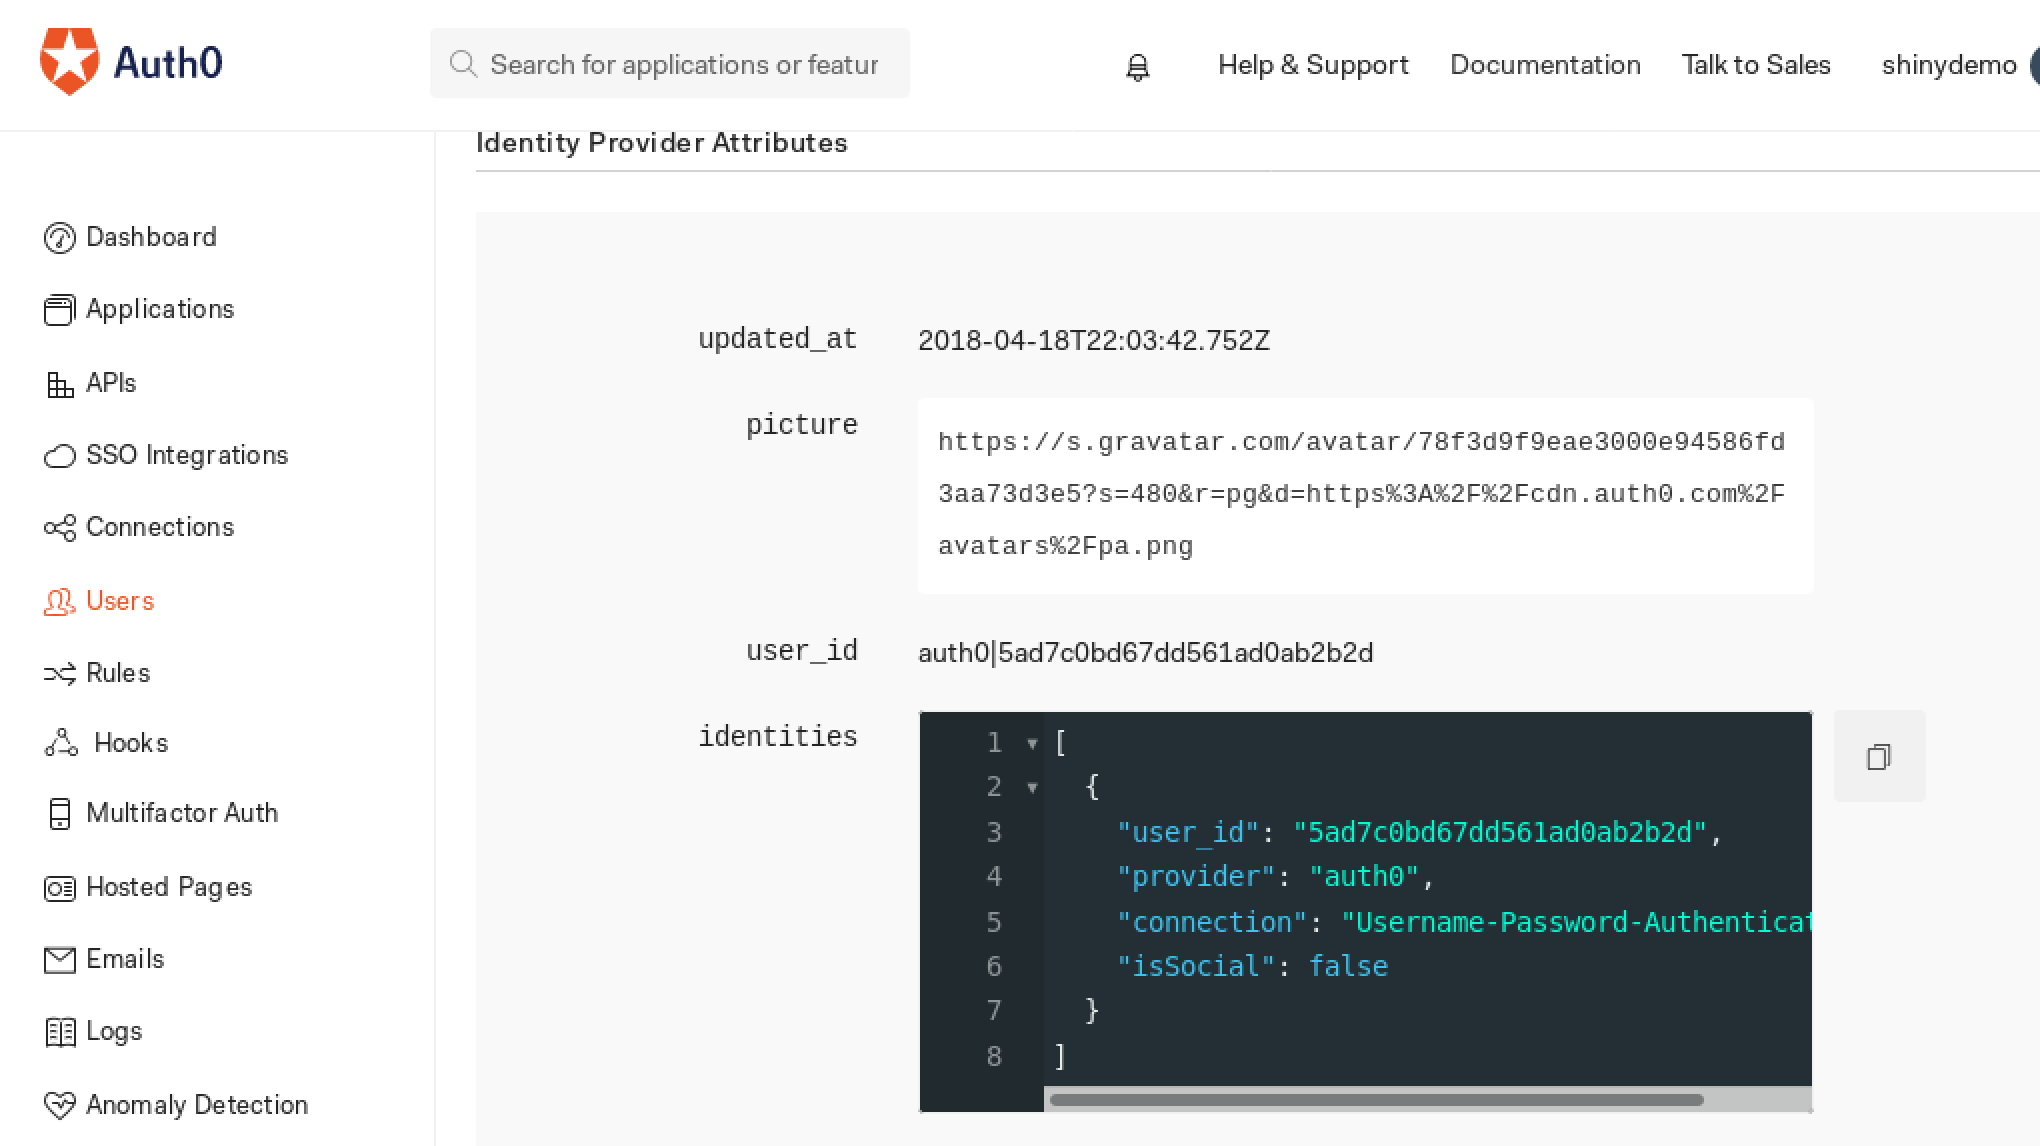
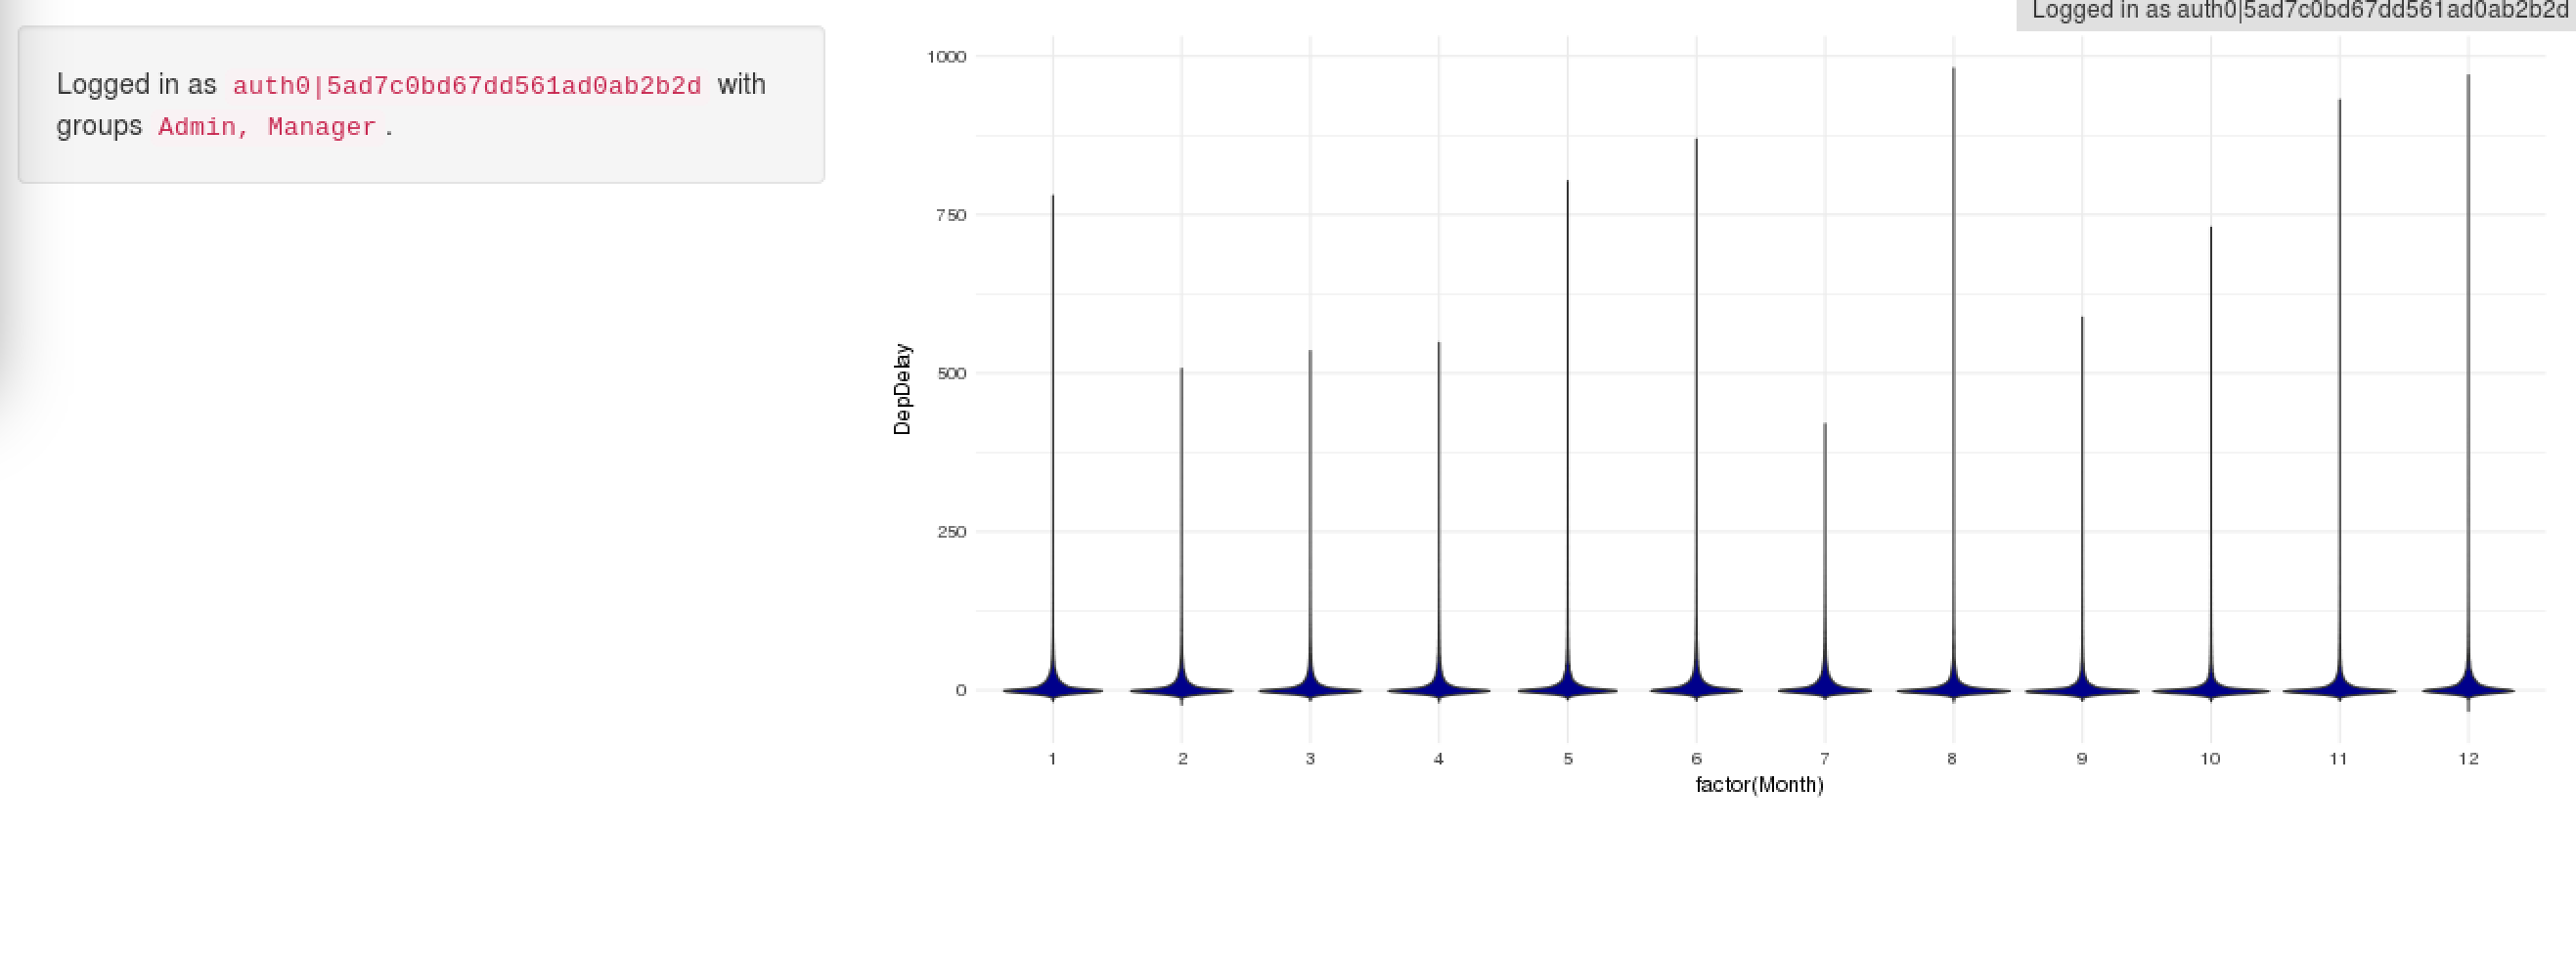
Having logged in, go into https://manage.auth0.com/#/users and click on the user you accessed with, if you scroll down to Identity Provider Attributes you'll see the user_id, write this value down in some text file since we'll use it afterwards.
Assuming everything works, you can now make some adjustments to the /etc/shiny-server/shiny-server.conf file, so the user/groups will arrive to the shiny app.
If there are any Authentication strategies defined (authproxy, authpass), please delete that line, and also modify the admin panel so it looks like this, where auth0|5ad7c0bd67dd561ad0ab2b2 should be your user_id:
# Send user id and group to shiny
auth_proxy X-AUTH0-USER-ID X-AUTH0-GROUPS;
# Define a default admin interface to be run on port 4151. {.pro}
admin 4151 {
    required_user auth0|5ad7c0bd67dd561ad0ab2b2d;
}
With any change in this configuration file, make sure to restart the shiny-server to take the change.
When this has been configured, the admin panel should be accesible at https://shiny.yourhost.com/admin/, only to the user specified up there, and https://shiny.yourhost.com/reports/ will have the reports you made available with shiny server. If instead of using user_ids you wish to allow access using the email of the user (which may not be available for all connection types, like SMS) you can use X-AUTH0-EMAIL instead of X-AUTH0-USER-ID.
Step 6: Authorization by group
We'll implement authorization by groups to allow for specifying groups for each user, and adjust the reports using this data.
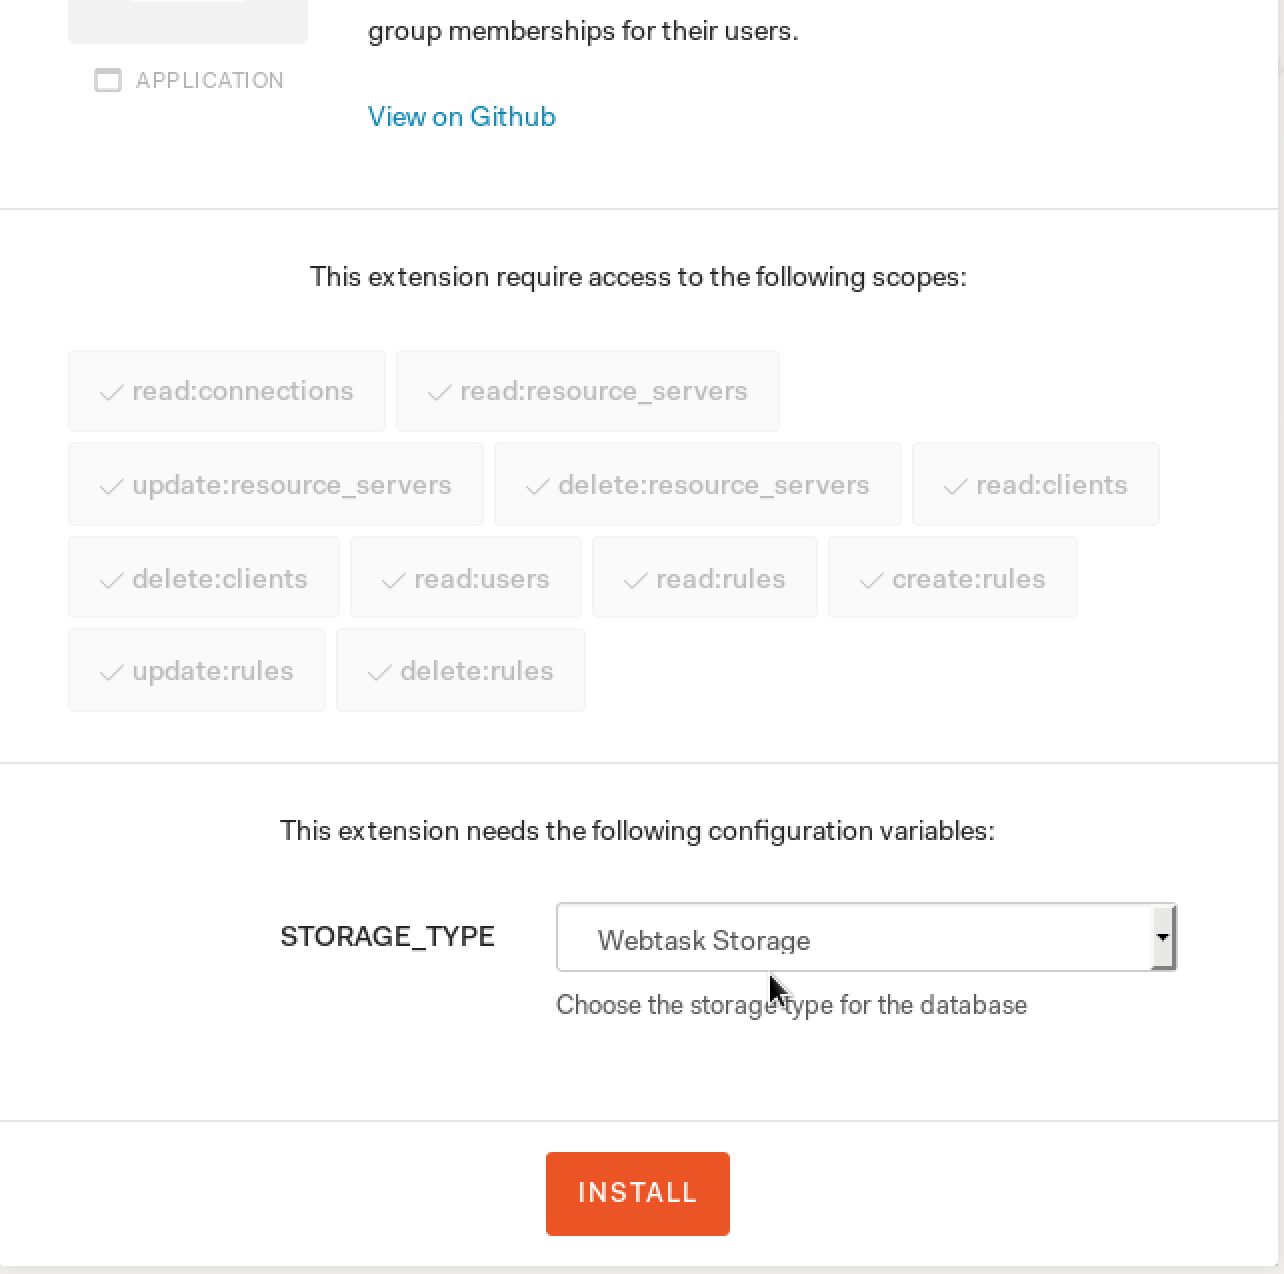
Let's assume a simple example, where a user can have groups "Admin", "Manager", or none of those. For this, we can use (Among a lot of other approaches) the authorization extension, first of all, install it:
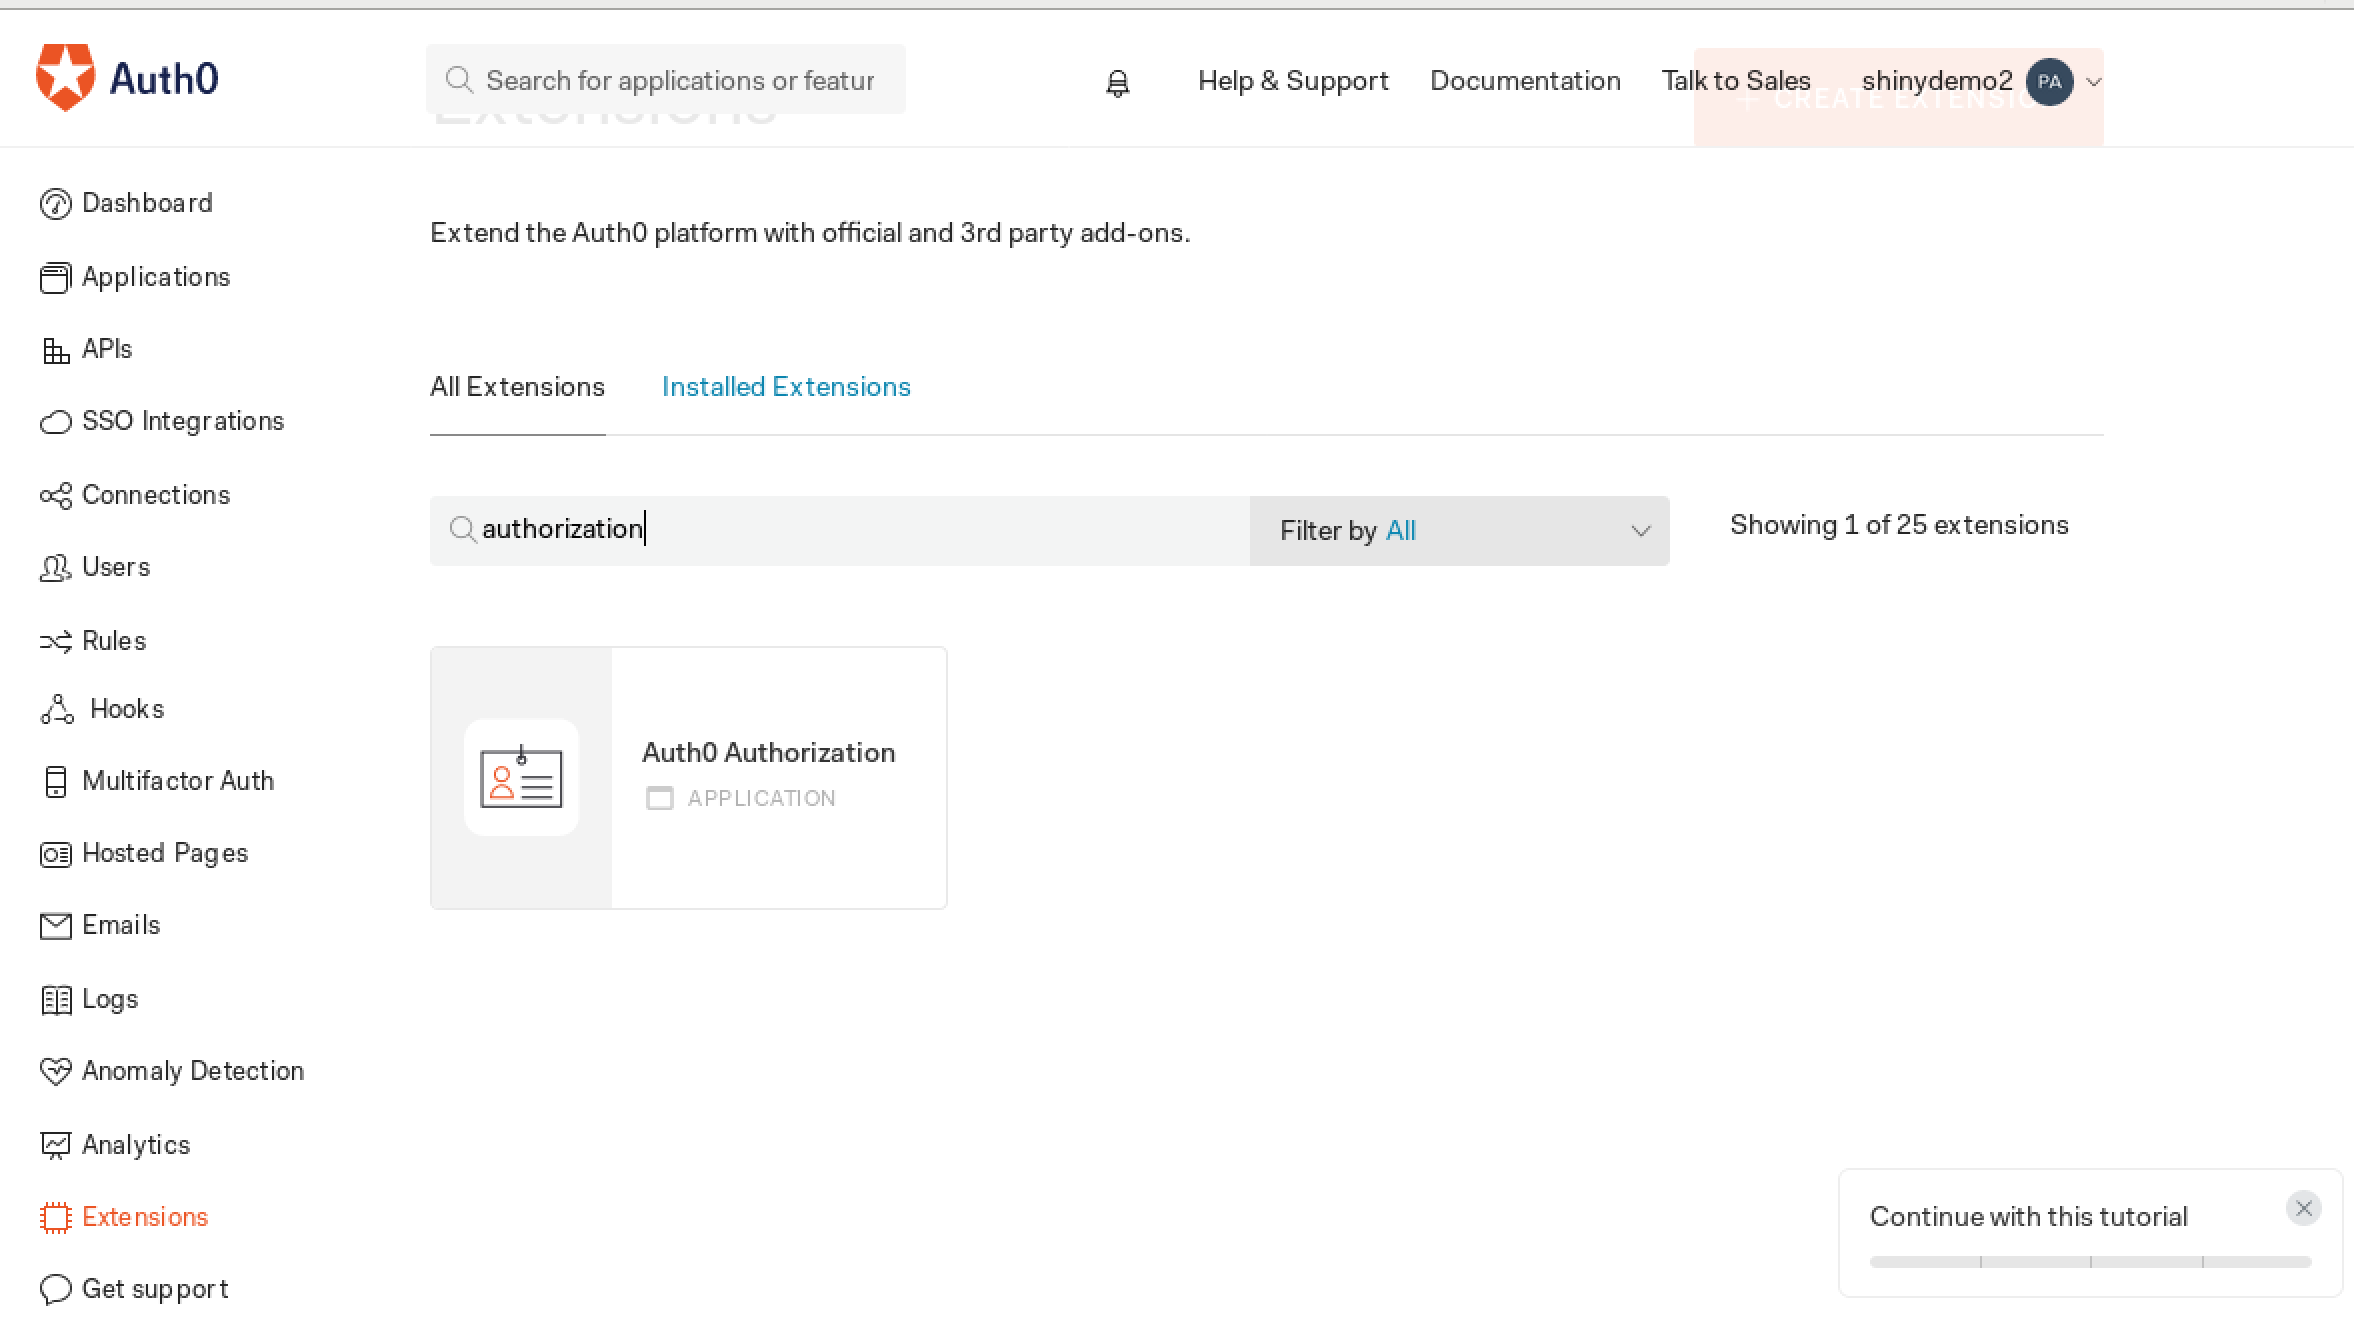
To keep it simple, install it using Webtask storage for now:
Open the Authorization extension:
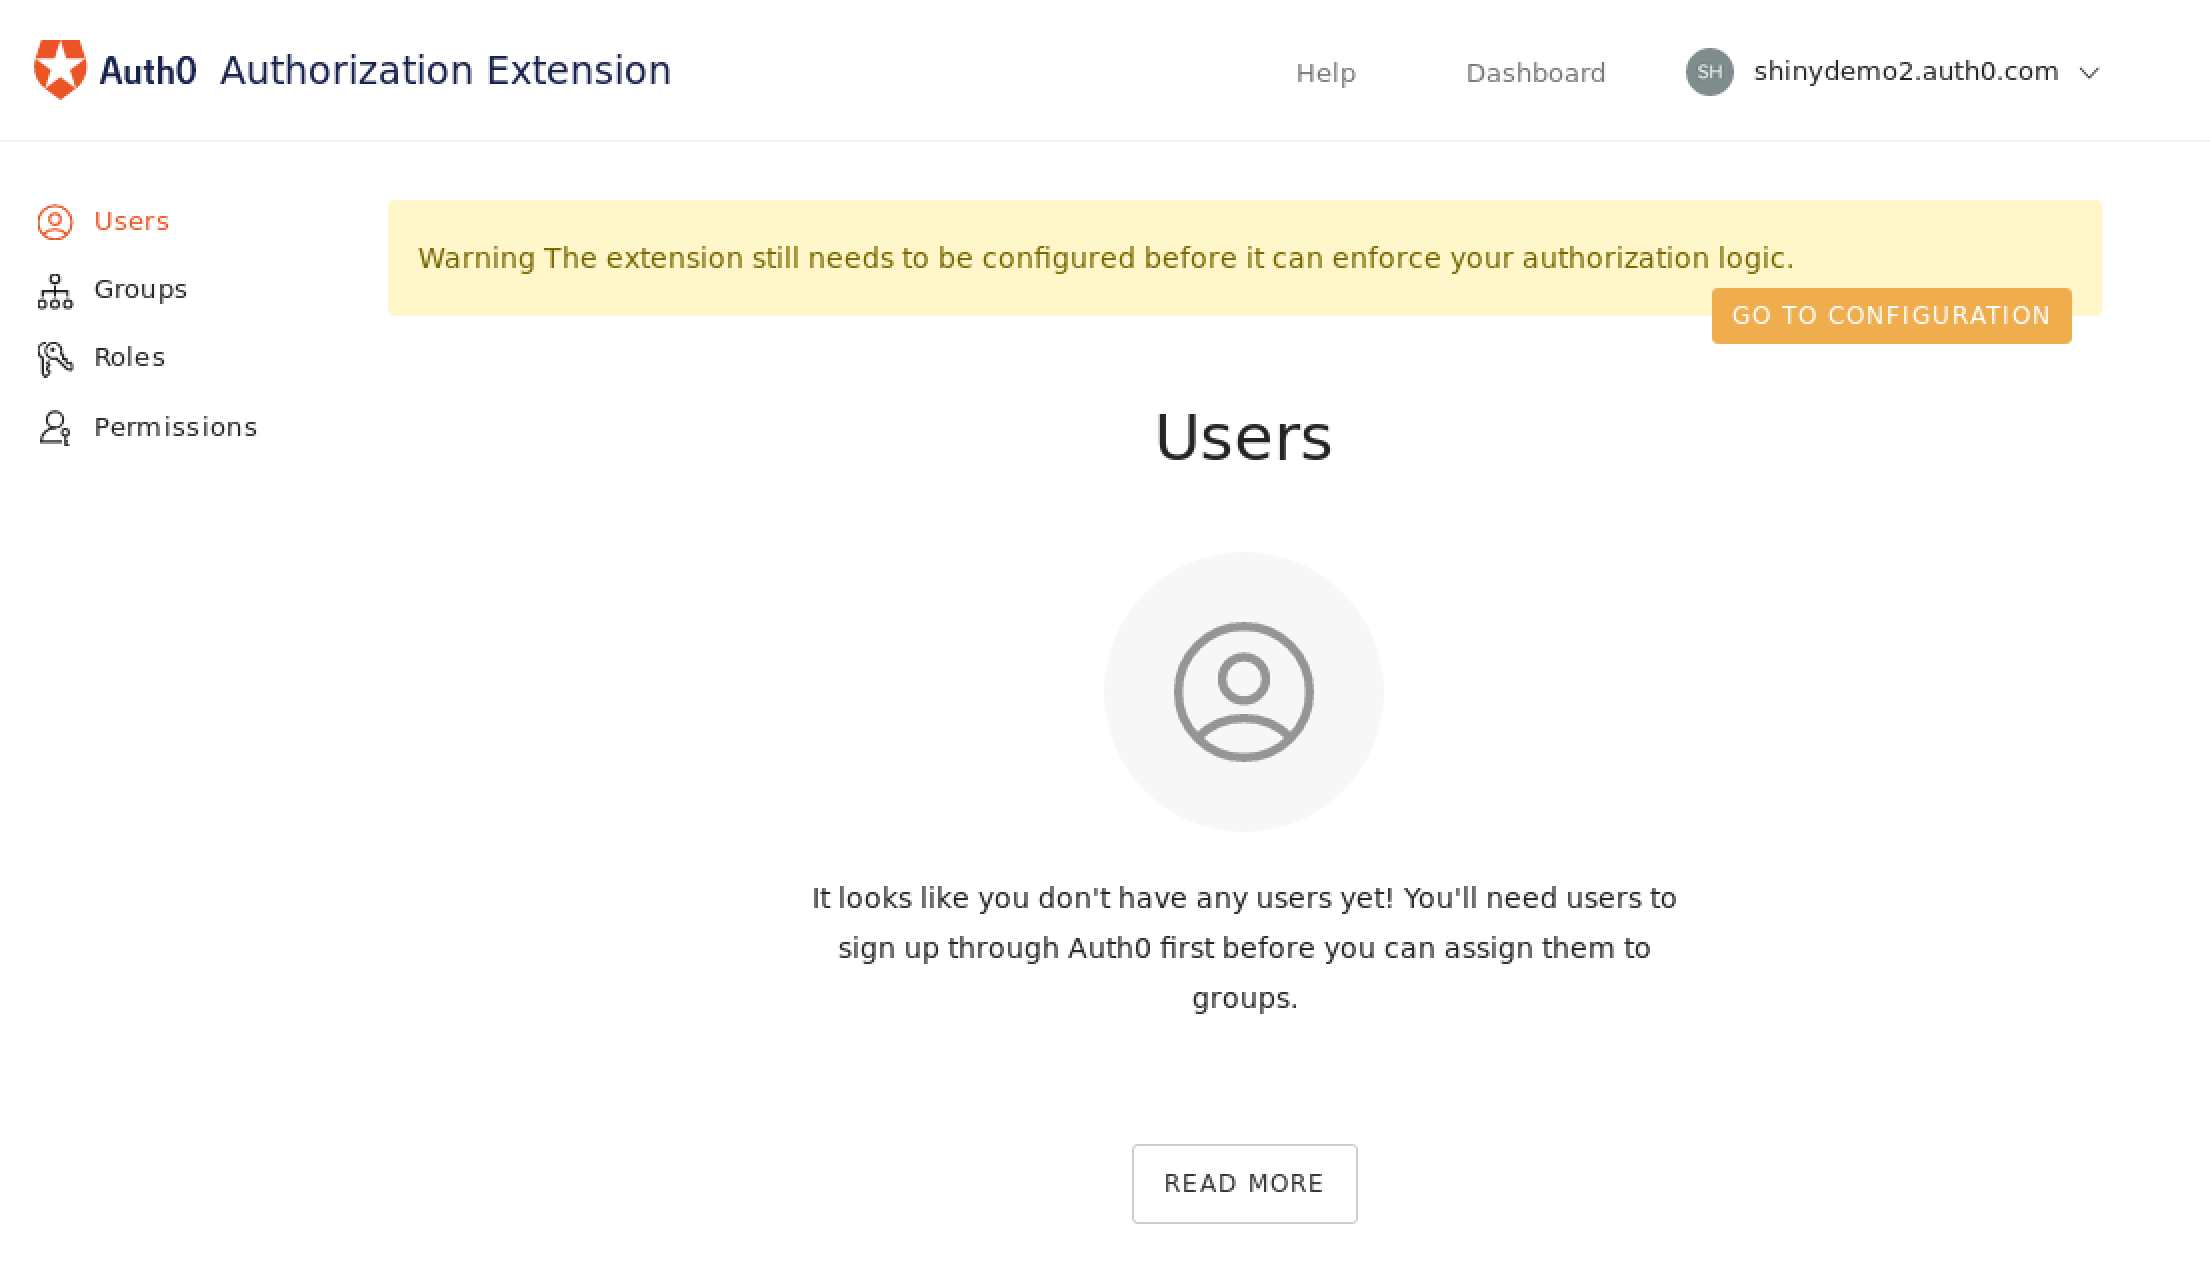
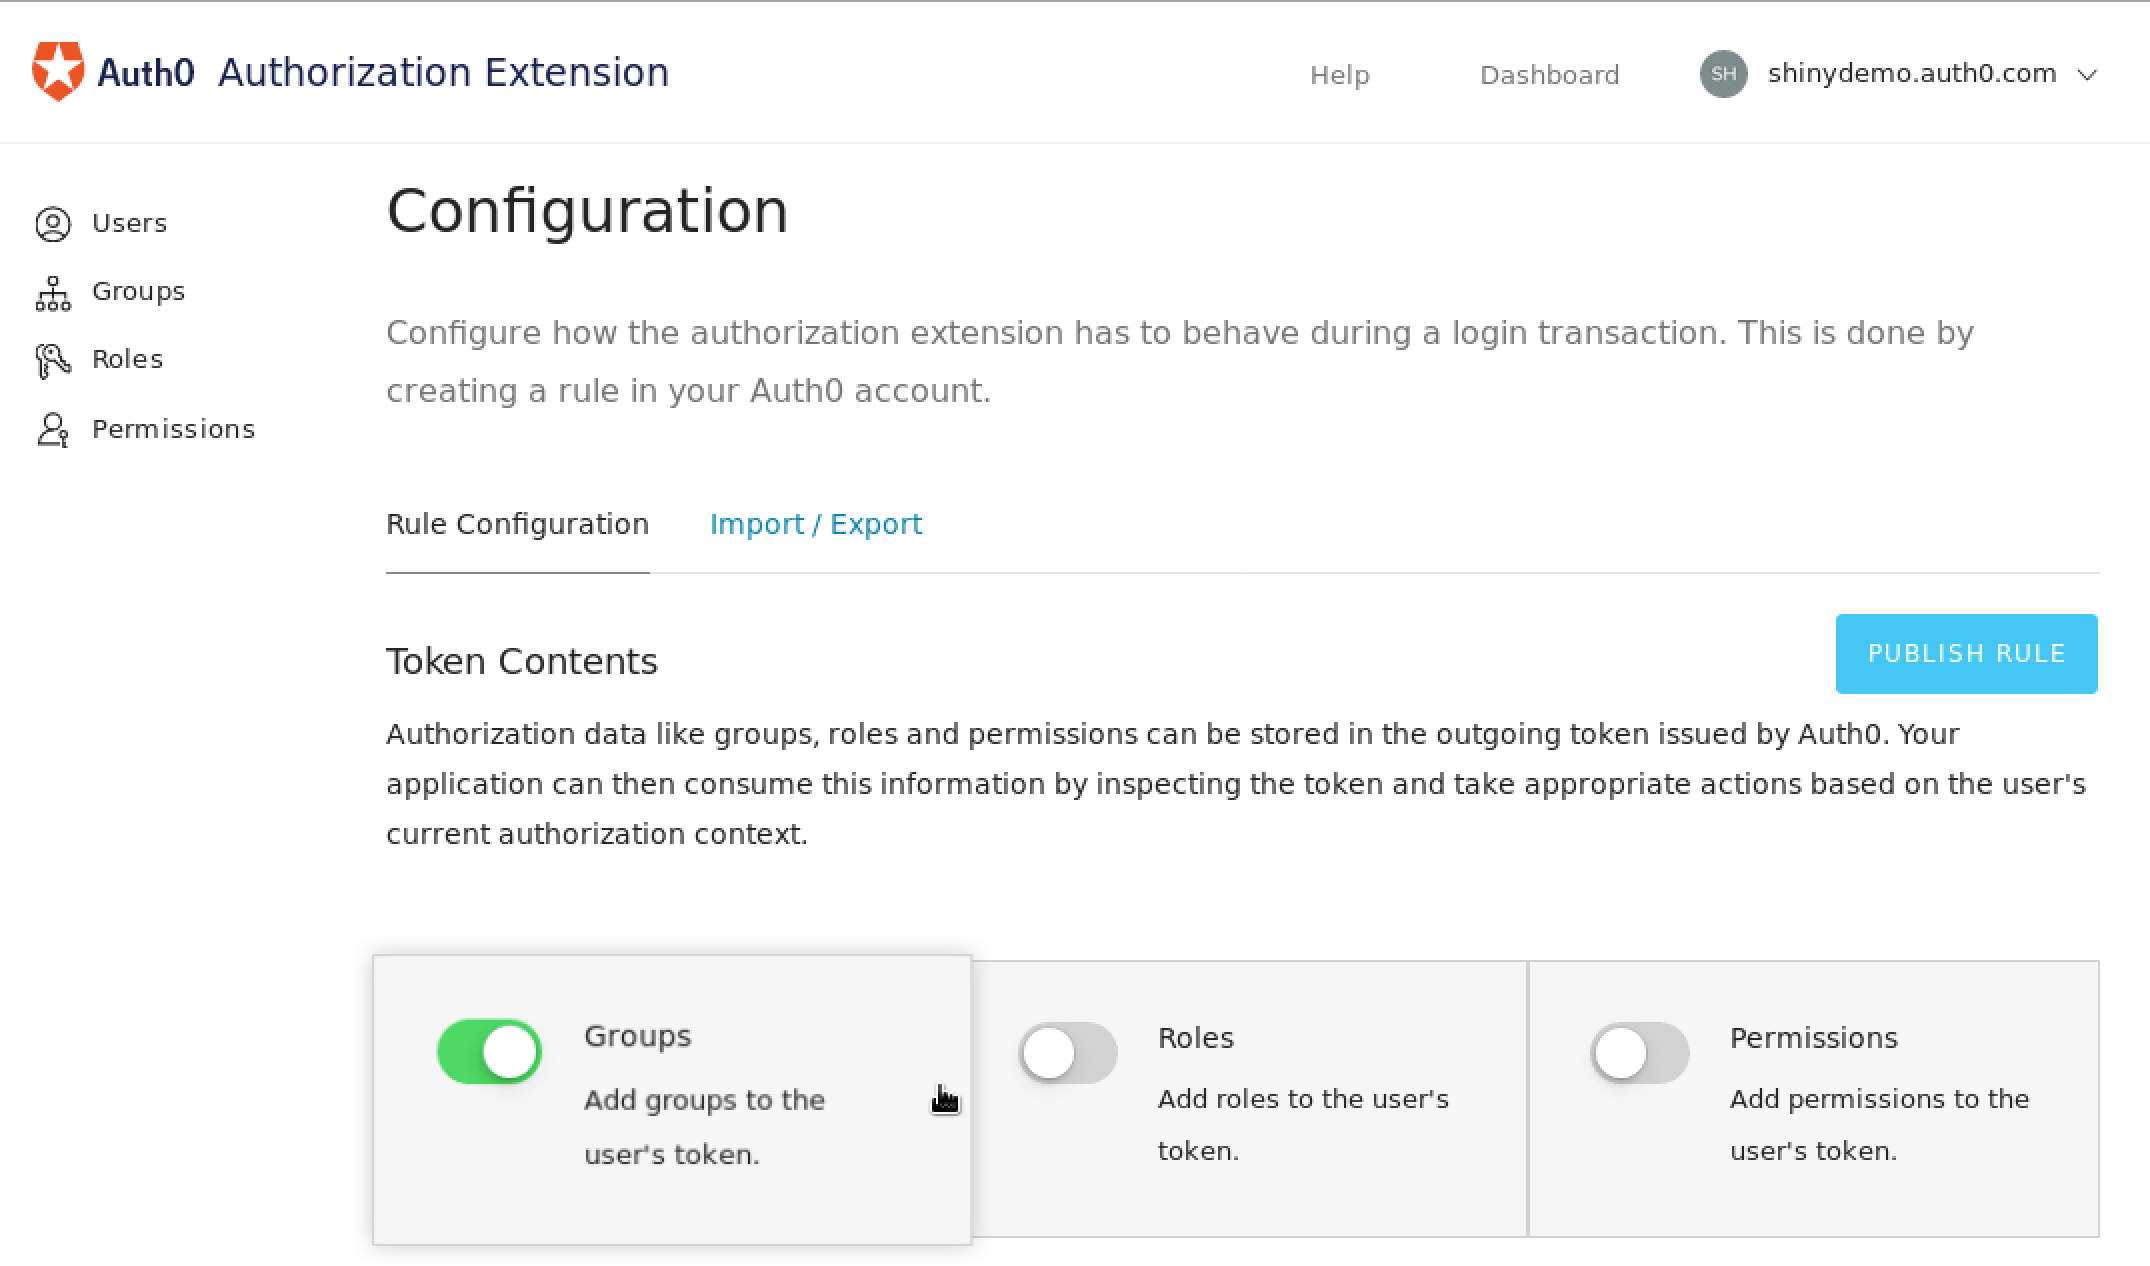
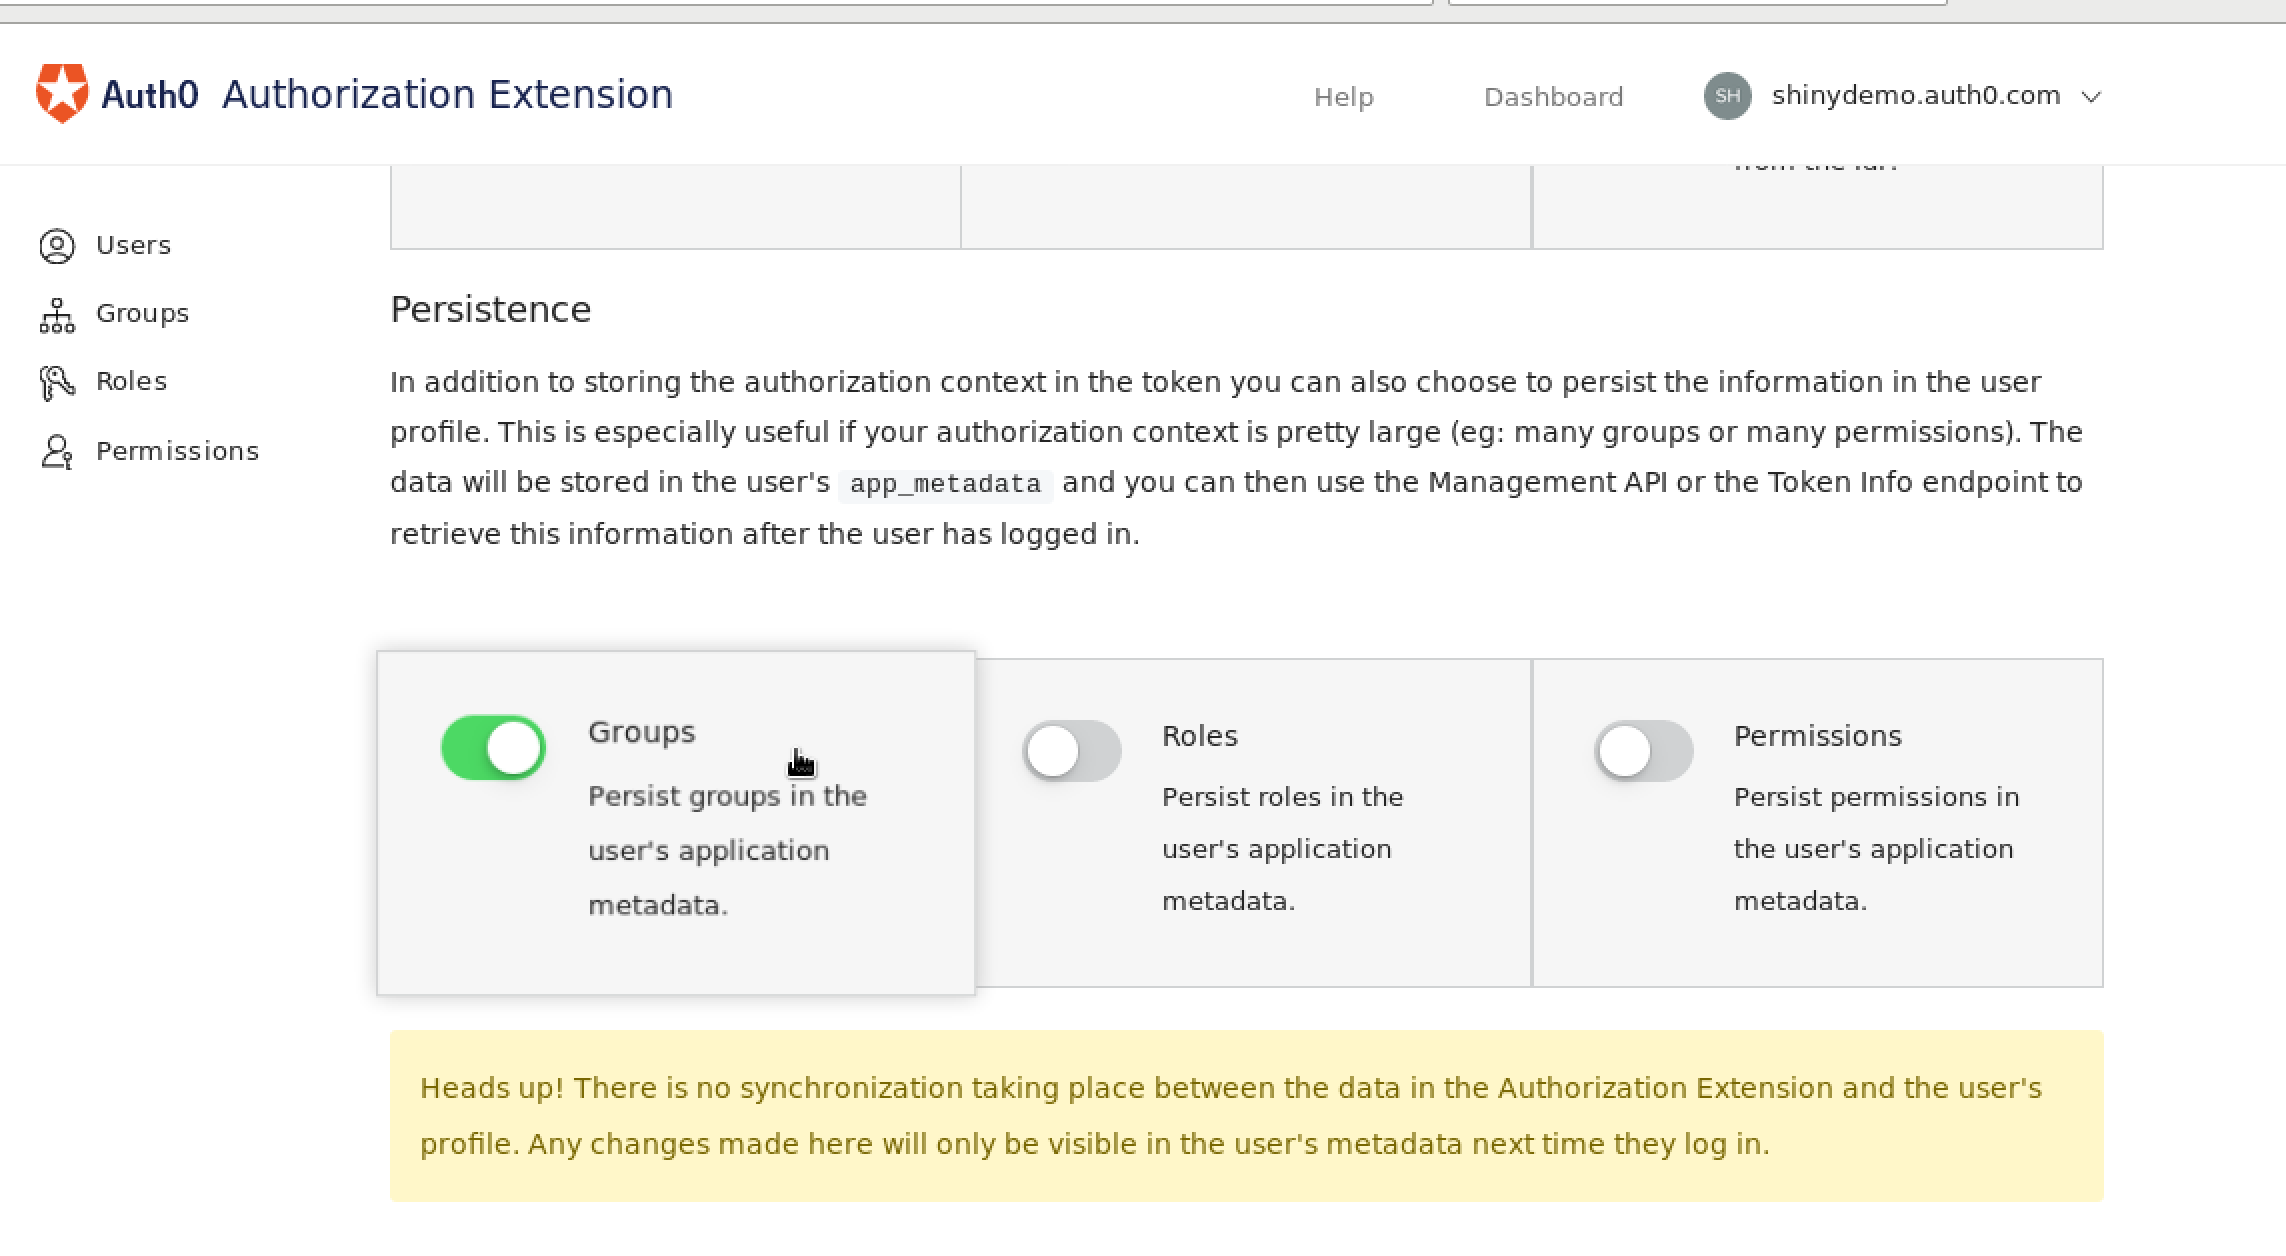
And go to the configuration section, there choose to include the groups in the token and persistence, and then click on "Publish Rule", this will generate a Rule which will load the groups that you define in the extension.
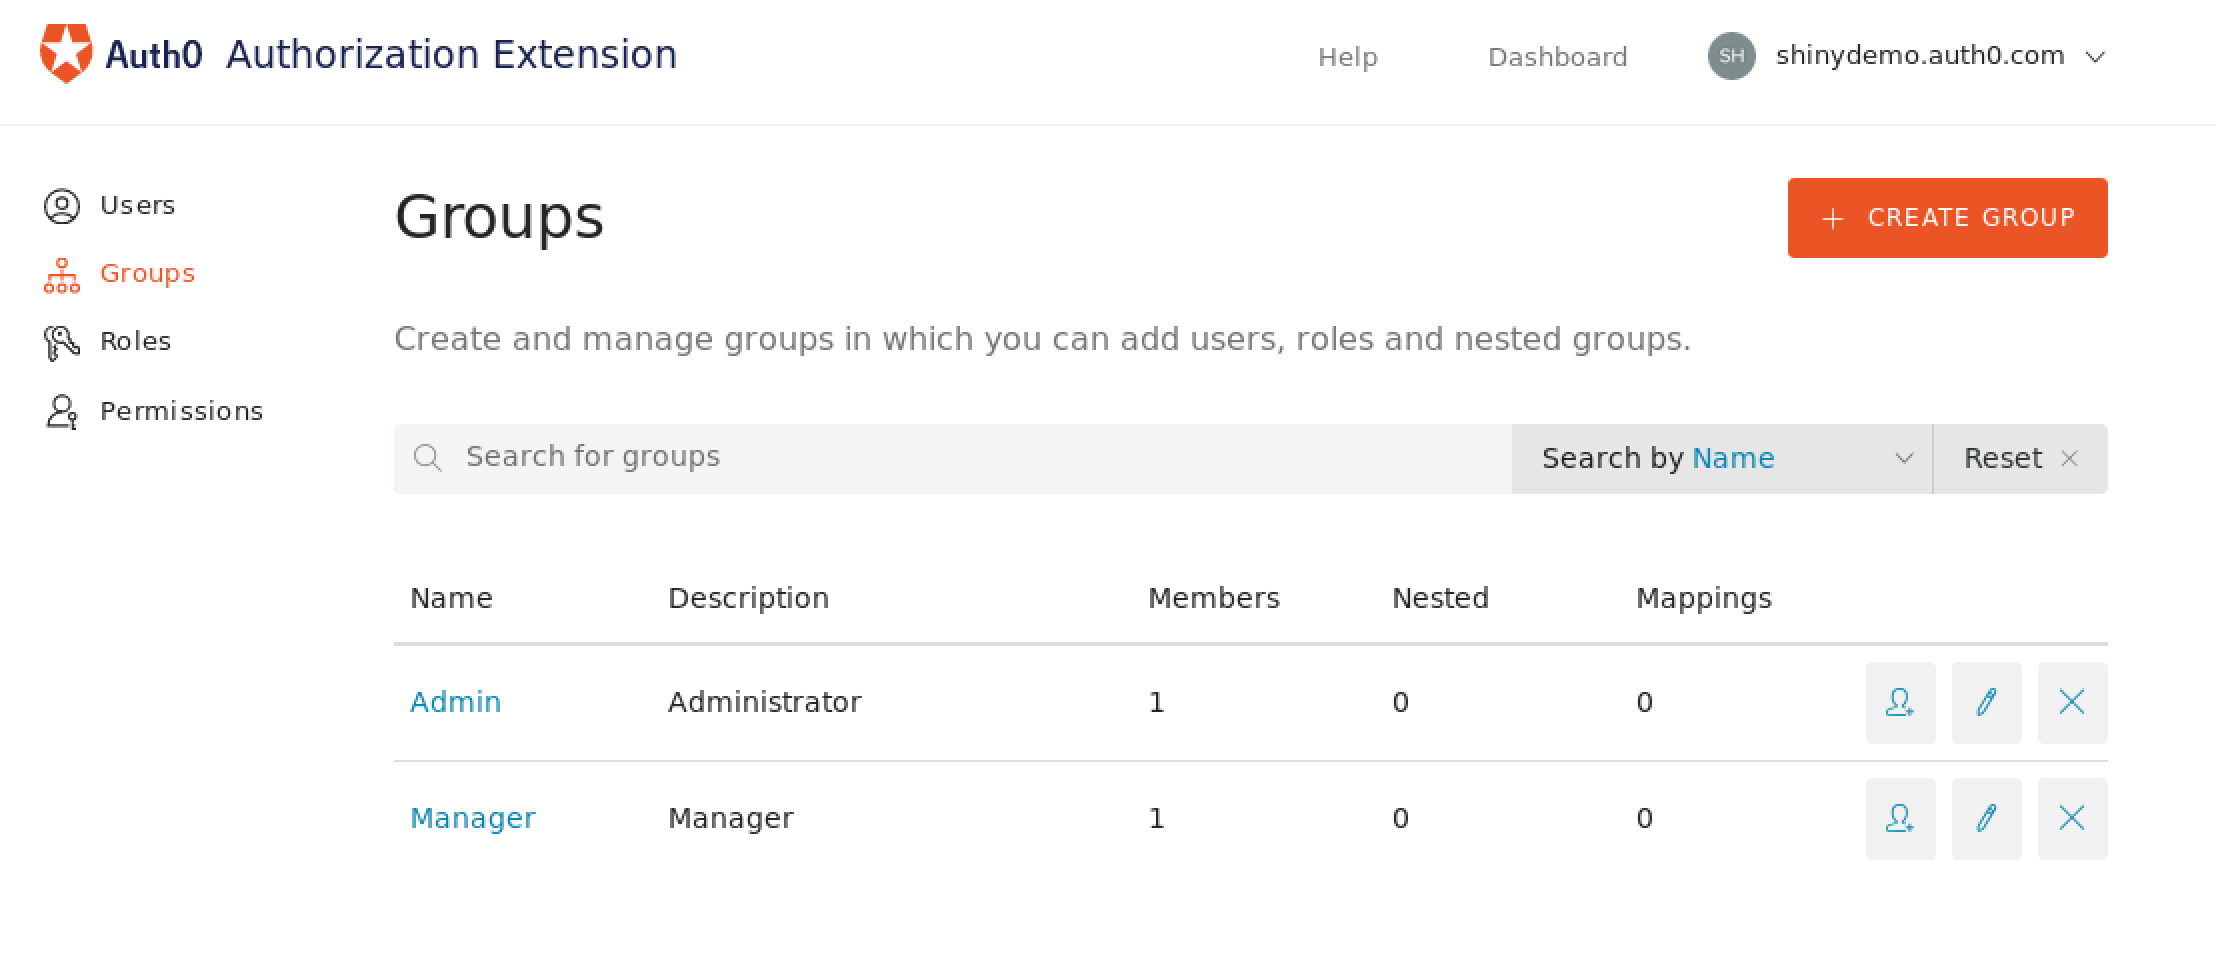
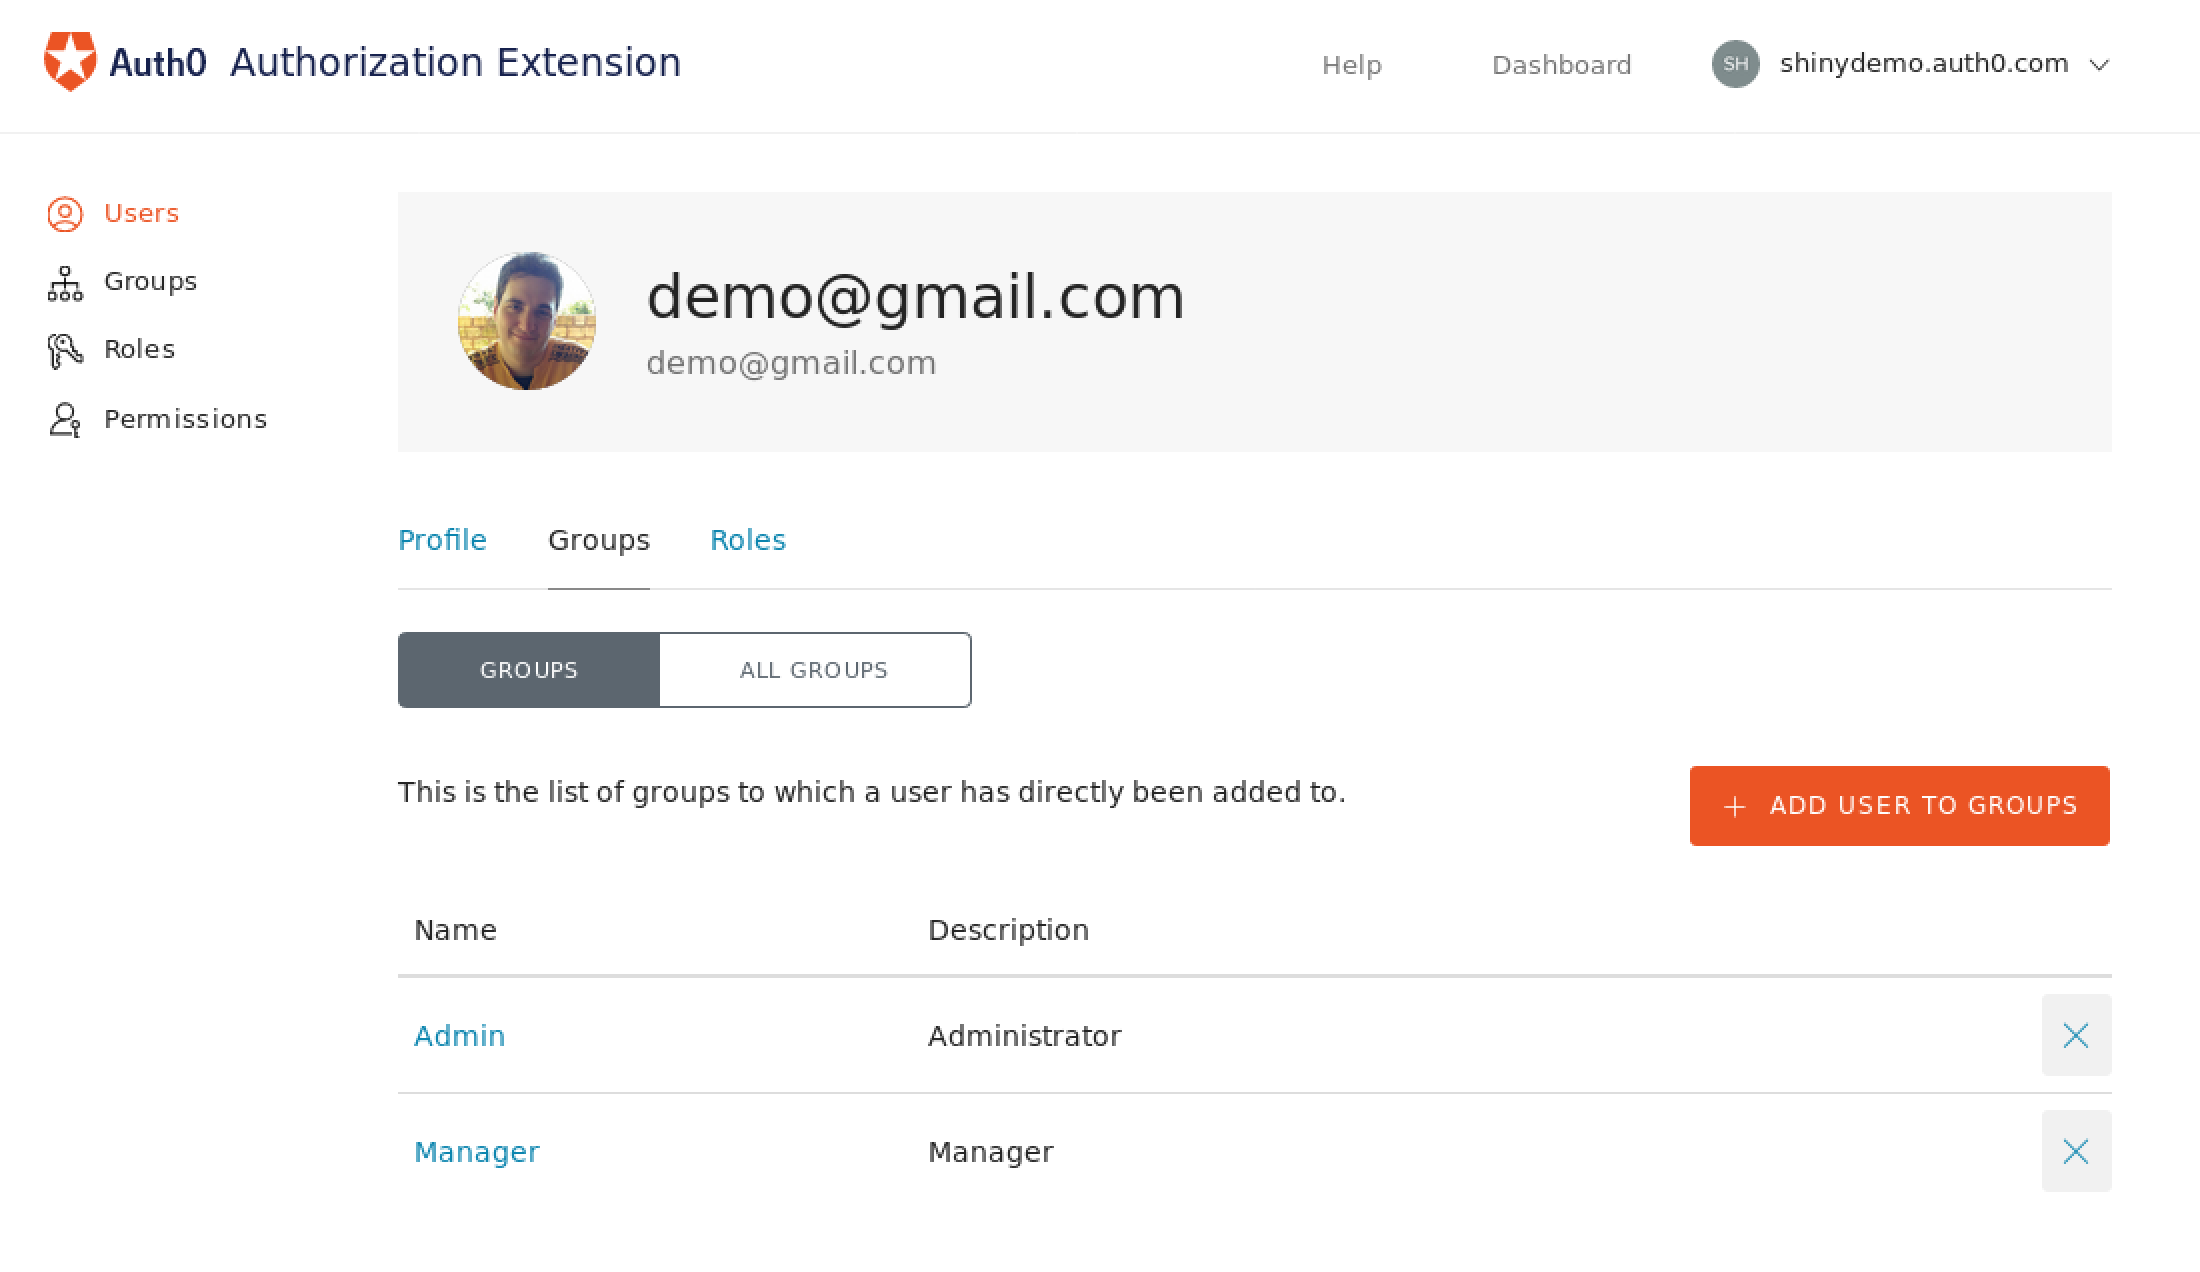
You can then create groups and assign them to users in this interface:
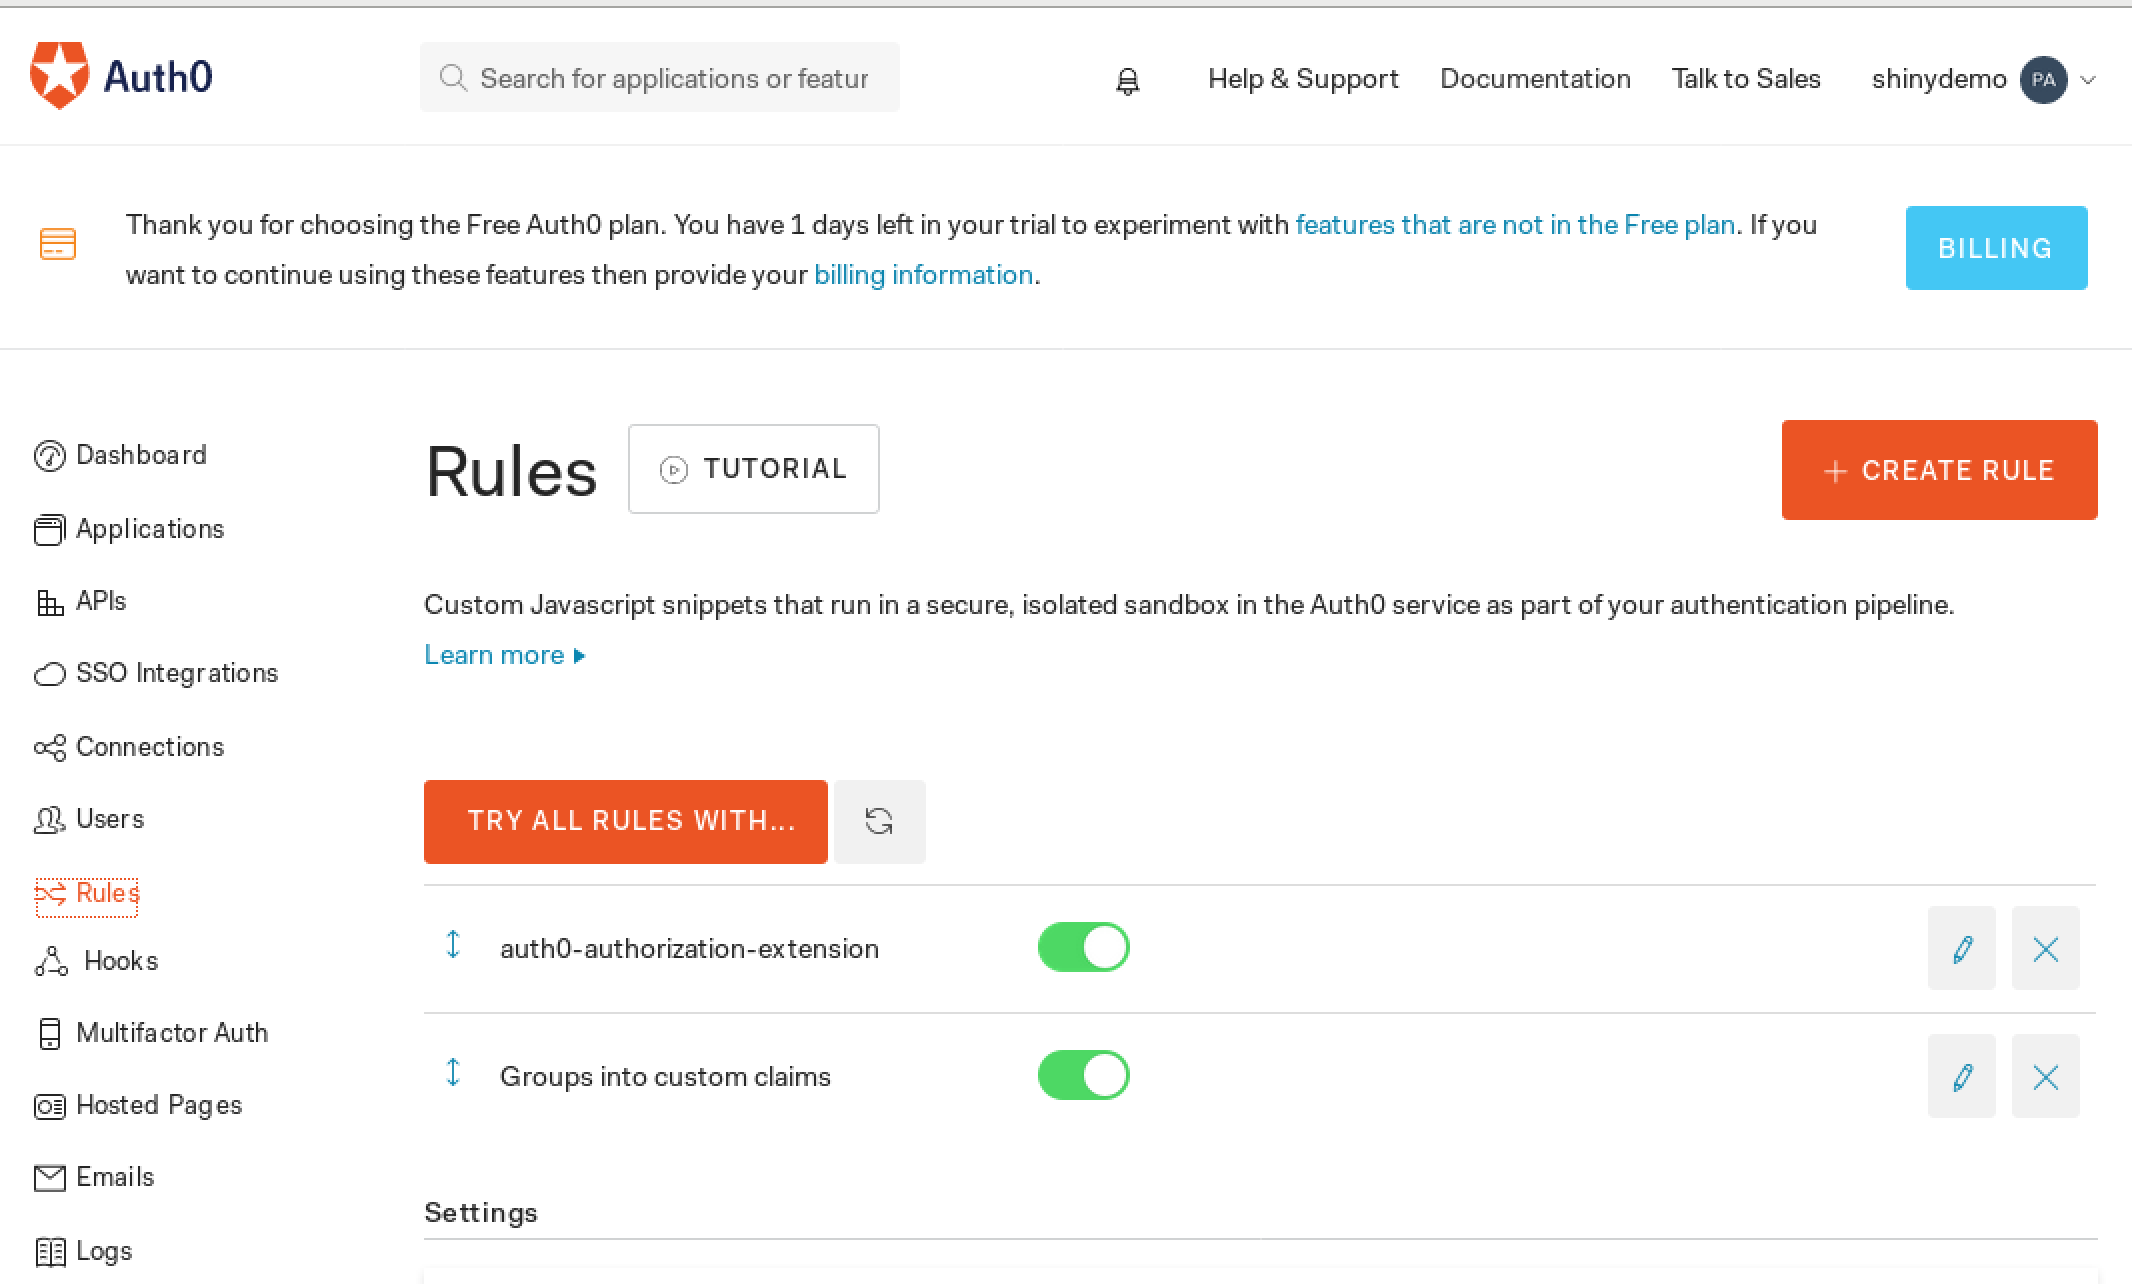
Almost done! The users/groups are created and being passed along in the authentication steps, but the groups still don't reach Shiny at this point, to include the group in the token Auth0 generates, we can add a rule which adds it as a custom claim:
function(user, context, callback){

  // The namespace configured here, combined with '/groups',
  // has to match the `AUTH0_GROUPS_CLAIM` setting in shiny-auth0-plus
  // e.g. if namespace is 'https://shiny.yourhost.com/claims' then
  // AUTH0_GROUPS_CLAIM should be https://shiny.yourhost.com/claims/groups

  var namespace = 'https://shiny.yourhost.com/claims';

  context.idToken[namespace + '/groups'] = user.groups;

  callback(null, user, context);
}
Make sure this rule runs after the rule autogenerated by the Authorization Extension!
After all of this, you can head over to clone this report: https://github.com/auth0/shiny-auth0-integration-example - This example report can show you different results if it's an admin or not, and shows you the reported values at the left, you can use the code as a basis to do something more complex and allow for specific roles to access specific pieces of the data, or directly deny access to it.
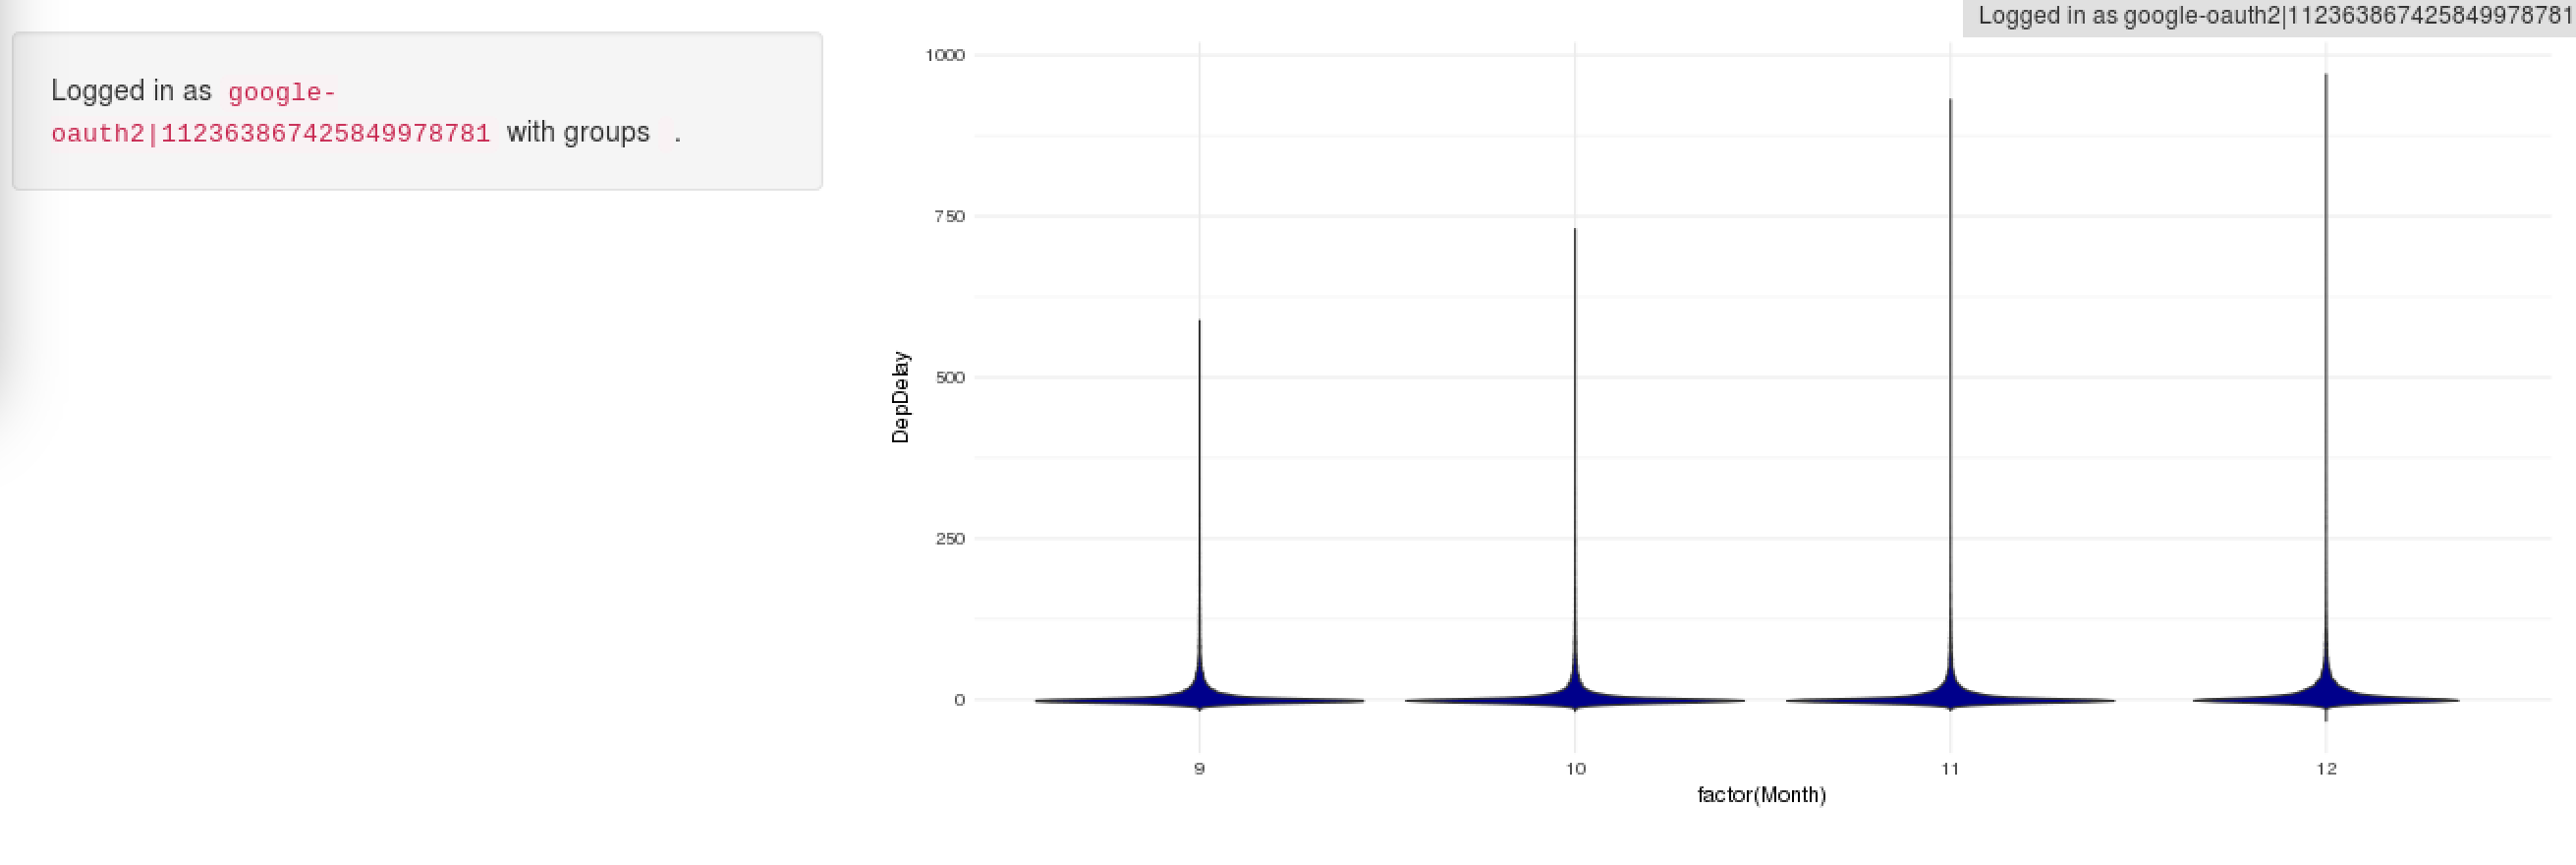
If you've followed all the steps, you'll now be able to control Authorization in your Shiny server!
About the author

Pablo Seibelt
Head of Data (Auth0 Alumni)