
Managing session state across a distributed system with multiple relying parties presents a unique set of challenges, particularly when it comes to terminating those sessions reliably. This is where Back-Channel Logout becomes essential.
Unlike traditional front-channel logout, which relies on browser redirects or iframes to clear local cookies, Back-Channel Logout operates entirely server to server. When a user logs out from a central Auth0 tenant, Auth0 transmits a secure logout token directly to the backend of your applications. This approach removes the dependency on the user's browser, providing a significantly more robust and secure mechanism to ensure that a user's session is definitively terminated across all connected services.
In this post, we will explore how to implement Auth0 Back-Channel Logout within a TanStack Start application. As a modern, type-safe full-stack framework built on TanStack Router, TanStack Start provides an excellent architecture for handling both the frontend experience and the necessary server-side logic.
We will walk through the process of configuring the required server-side API route to receive Auth0 Logout Tokens, securely validate those tokens, and effectively destroy the local user session. We will use TanStack Start Server Routes for the implementation. Read on as we detail the steps required to enhance the security and reliability of your application's authentication flow.
Auth0 Back-Channel Logout Flow
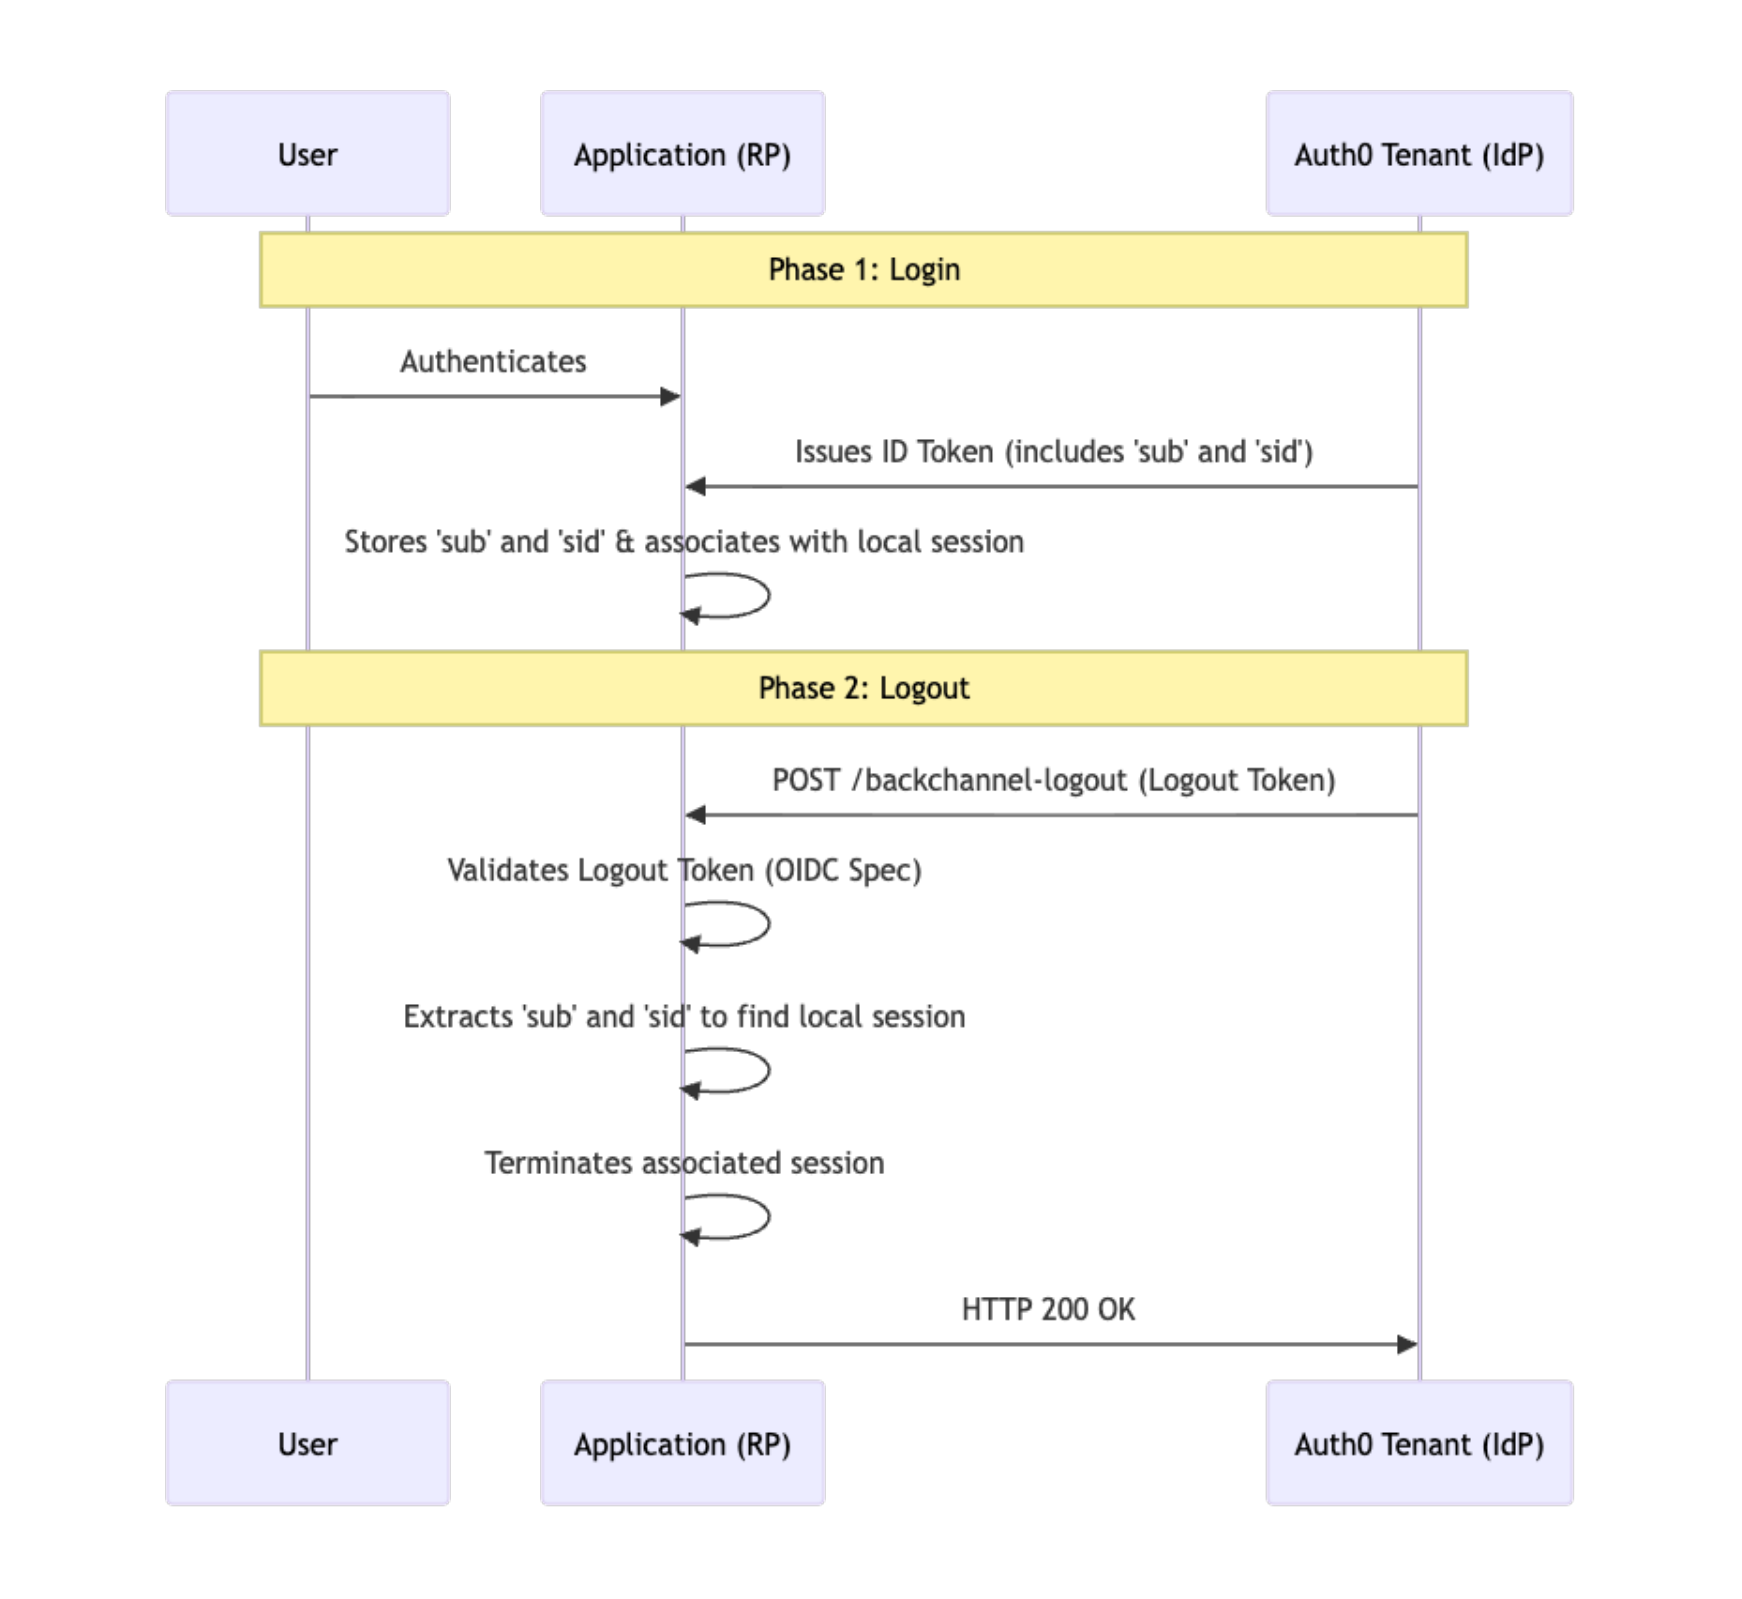
To understand how this works in practice, let's outline the core Auth0 Back-Channel Logout flow. The process begins when a logout event occurs at the authorization server—whether initiated by the user or via an administrative action. Auth0 then identifies all active applications associated with that user's session. For every application configured to support this feature, Auth0 generates a specialized, signed JSON Web Token (JWT) known as a Logout Token. This token is dispatched via an HTTP POST request directly to the application's designated Back-Channel Logout URI. The receiving application must then validate the token's cryptographic signature and specific claims (such as the subject, sub or session ID, sid) before definitively destroying the local session.
Configuring Your Auth0 Application
Before diving into the code, we first need to ensure your Auth0 application is properly configured to support this feature. Here are the essential steps to get your application ready for the Back-Channel Logout flow:
Navigate to Applications: Go to the Auth0 Dashboard and navigate to the Applications section.
Select Your App: Choose the specific application you want to register for Back-Channel Logout.
Open Settings: Select the Settings tab for your chosen application.
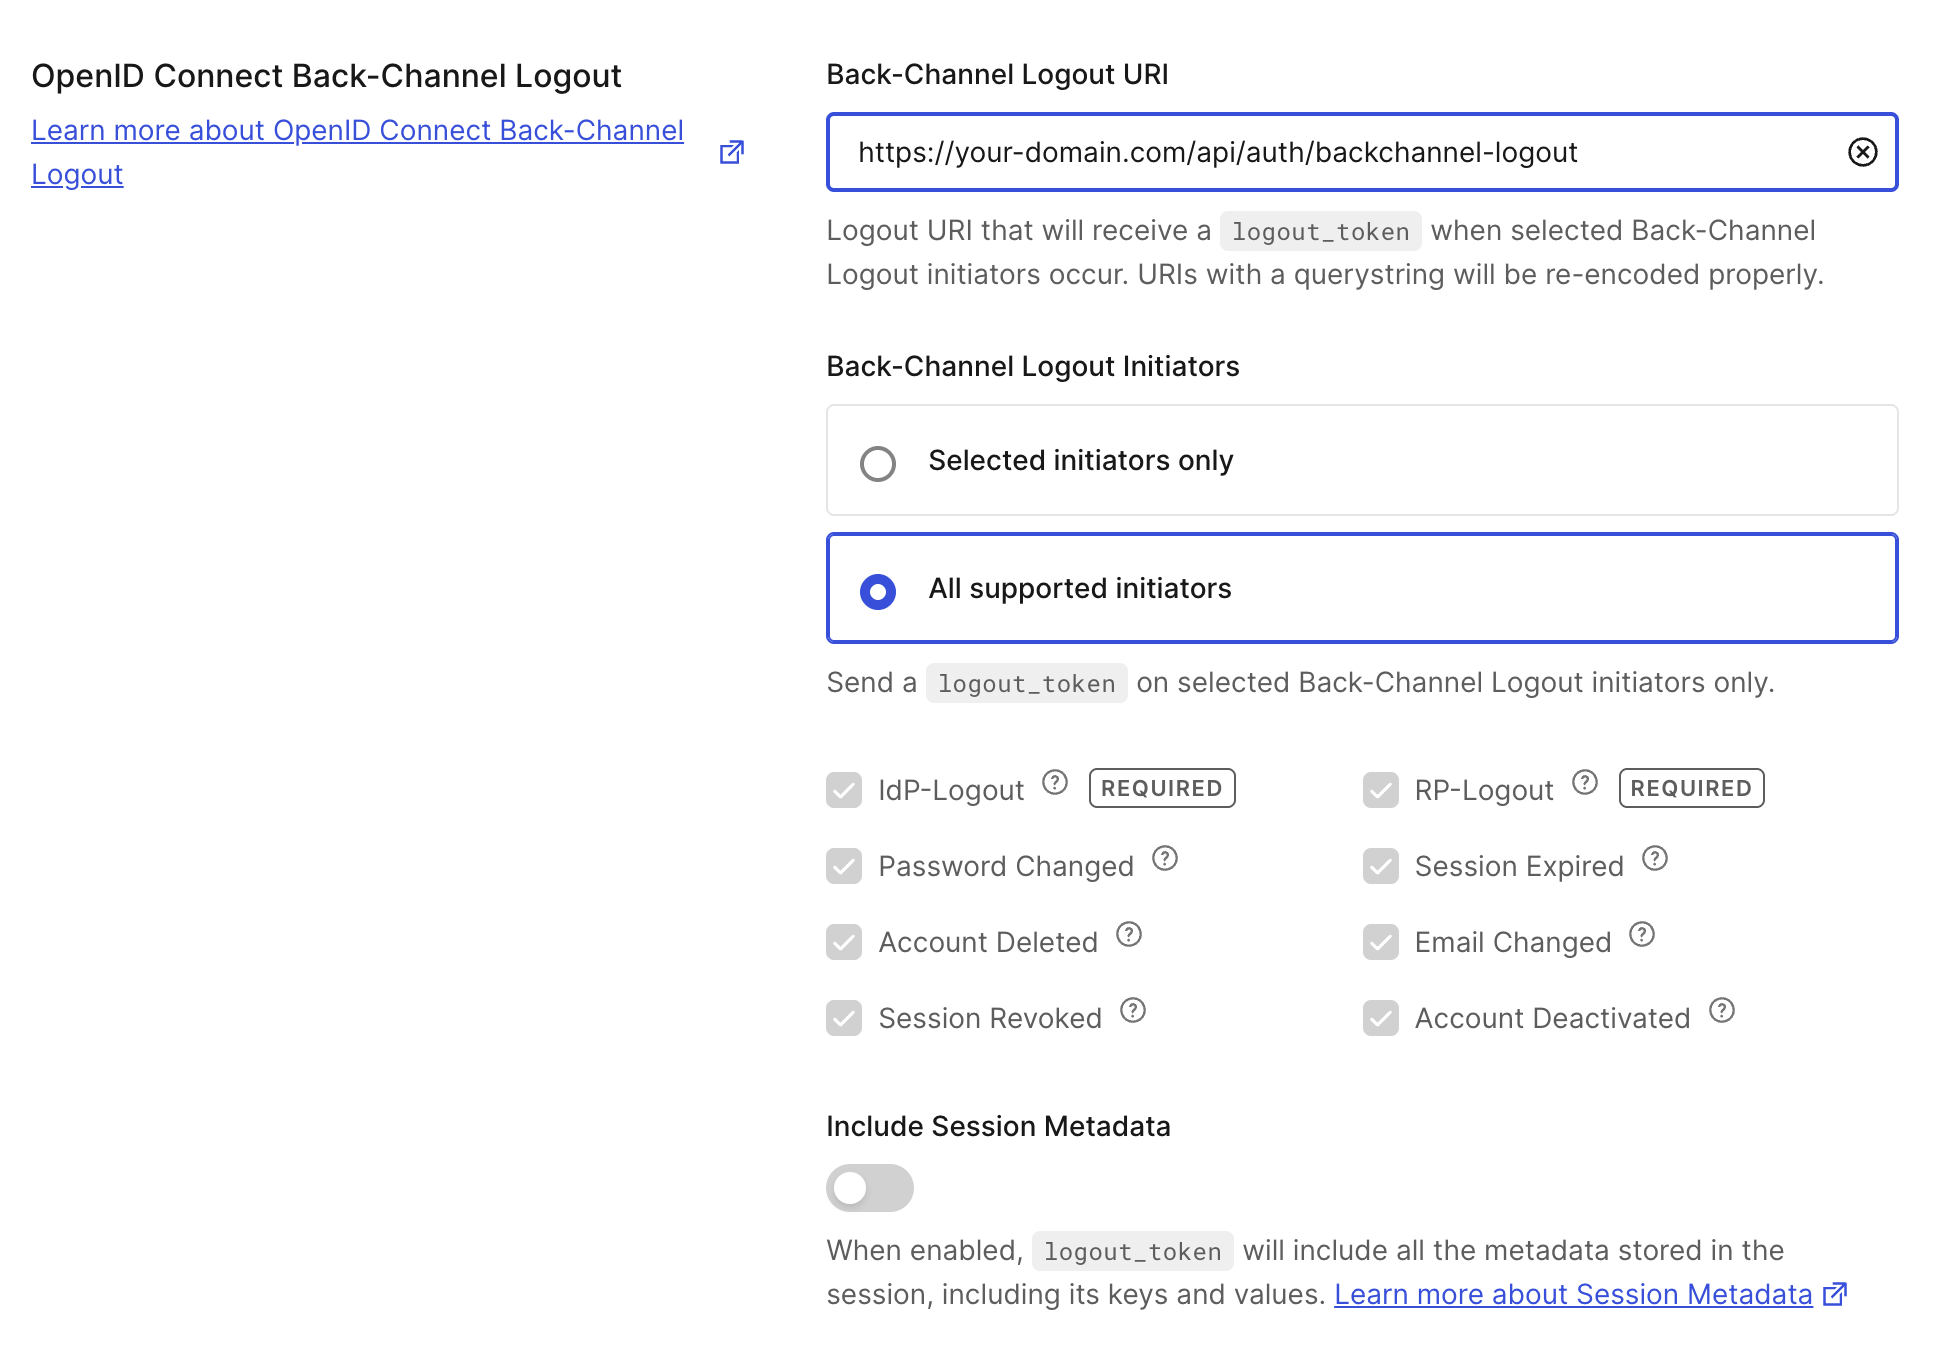
Configure the URI: Scroll to find OpenID Connect Back-Channel Logout, and in the Back-Channel Logout URI field, add the application logout URI that will receive the
logout_tokens (for example, https://your-domain.com/api/auth/backchannel-logout).Select Logout Initiators: Logout initiators are the specific events that trigger the Back-Channel Logout process. These can include a user initiating a logout from another application, an administrator manually revoking a session from the dashboard, or a password change event. It is important to select the specific initiators that make the most sense for your application's security requirements. For the purposes of this tutorial, we will simply choose them all to ensure our application responds to every possible logout event.
Save: Once complete, click Save Changes to apply the configuration.
Endpoint Validation Requirements
Before we look at the code for the TanStack Start endpoint, let's review what this endpoint actually needs to do. When Auth0 sends a request to your Back-Channel Logout URI, it includes a logout_token that you must rigorously validate to ensure the request is legitimate.
According to the OpenID Connect Back-Channel Logout specification, your application must perform the following checks:
Accept HTTP POST: The endpoint must strictly process incoming HTTP POST requests.
JWT Signature Validation: Extract the
logout_tokenparameter and validate its cryptographic signature as a standard JWT using your Auth0 tenant's public keys.Verify the Events Claim: Check that the token contains an
eventsclaim (a JSON object) that includes a specific member named http://schemas.openid.net/event/backchannel-logout.Check for Session Identifiers: Ensure the token contains a
sid(Session ID) and/orsub(Subject/User ID) claim. You will use these claims to identify which local session to terminate.Reject Nonce Claims: Verify that the token does not contain a
nonceclaim. This is a crucial security measure required to distinguish a logout token from a standard ID token and prevent potential abuse.
Once these validation steps are successfully completed, your backend can safely destroy the local session and return a standard 200 OK response.
Implementing the TanStack Start Endpoint
Now that our Auth0 application is configured to fire off logout tokens and we know exactly what we need to validate, let's shift focus to the application side. We will not dive into the nuts and bolts of TanStack Start itself; instead, we're going to look at configuring an endpoint via a TanStack Start server route. This ensures that when a POST request is received from Auth0, our application can securely destroy the requisite session.
To make this work, we'll create a route equipped with a POST handler. Keep in mind that the code below references a few small helper functions (buildSessionId, and destroySession). We will not show the implementation for these as they are standard boilerplate tailored to your specific session store.
In TanStack Start, server route handlers receive a request object that provides the necessary context to parse and process the incoming data. This is a standard Web API Request object, meaning you can leverage familiar methods—as extensively documented in the MDN Web Docs—to access headers, form data, and other critical request properties.
import { createFileRoute } from '@tanstack/react-router';

import * as jose from 'jose';

import * as z from 'zod';

import { clientEnv } from '~/lib/env';
import {
  buildSessionId,
  destroySession,
} from '~/lib/session/session.functions';

type BackchannelLogoutEvents = {
  'http://schemas.openid.net/event/backchannel-logout': Record<string, unknown>;
};

type LogoutTokenClaims = jose.JWTPayload & {
  events?: BackchannelLogoutEvents;
  sid?: string;
  nonce?: string;
};

const JwksCacheMaxAgeMs = 10 * 60 * 1000;

const issuerJwks = new URL(
  `https://${clientEnv.VITE_APP_AUTH0_DOMAIN}/.well-known/jwks.json`,
);

const getJwksKey = jose.createRemoteJWKSet(issuerJwks, {
  cacheMaxAge: JwksCacheMaxAgeMs,
});

const BodySchema = z.object({
  logout_token: z.string().min(1),
});

async function verifyLogoutToken(token: string) {
  const { payload } = await jose.jwtVerify(token, getJwksKey, {
    issuer: `https://${clientEnv.VITE_APP_AUTH0_DOMAIN}/`,
    audience: clientEnv.VITE_APP_AUTH0_CLIENT_ID,
  });
  return payload as LogoutTokenClaims;
}

export const Route = createFileRoute('/_public/api/auth/backchannel')({
  server: {
    handlers: {
      ANY: () => {
        return new Response(null, {
          status: 405,
          headers: { Allow: 'POST' },
        });
      },
      POST: async ({ request }) => {
        const contentType = request.headers.get('content-type') ?? '';

        if (!contentType.includes('application/x-www-form-urlencoded')) {
          console.warn('Backchannel logout: unsupported content type');
          return Response.json({ error: 'Bad Request' }, { status: 400 });
        }

        const parsed = BodySchema.safeParse(
          Object.fromEntries(await request.formData()),
        );

        if (!parsed.success) {
          console.warn('Backchannel logout: logout_token missing or invalid');
          return Response.json({ error: 'Bad Request' }, { status: 400 });
        }

        let claims: LogoutTokenClaims;

        try {
          claims = await verifyLogoutToken(parsed.data.logout_token);
        } catch {
          console.warn('Backchannel logout: token verification failed');
          return Response.json({ error: 'Bad Request' }, { status: 400 });
        }

        const backchannelEvent =
          claims.events?.['http://schemas.openid.net/event/backchannel-logout'];

        if (!backchannelEvent) {
          console.warn('Backchannel logout: missing backchannel-logout event');
          return Response.json({ error: 'Bad Request' }, { status: 400 });
        }

        if (!claims.sid || !claims.sub) {
          console.warn('Backchannel logout: missing sid or sub claim');
          return Response.json({ error: 'Bad Request' }, { status: 400 });
        }

        if (claims.nonce) {
          console.warn('Backchannel logout: nonce claim present');
          return Response.json({ error: 'Bad Request' }, { status: 400 });
        }

        const sessionId = buildSessionId(claims.sid, claims.sub);
        await destroySession(sessionId);

        return new Response(null, {
          status: 200,
        });
      },
    },
  },
});
Notice the strict validation checks occurring within the POST handler. Per the OIDC Back-Channel Logout specification, we ensure the token contains the specific Back-Channel Logout event claim, verifies the presence of both sid and sub claims to identify the session, and explicitly rejects any token that contains a nonce. Once validated, our boilerplate session helpers take over to purge the user's session from the system, returning a standard 200 OK response to let Auth0 know the logout was successful.
Testing Your Implementation
With your endpoint in place and your Auth0 application properly configured, it is time to test the flow. A straightforward way to verify everything is working as expected is to start by logging a user into your TanStack application to establish an active session. Once the user is logged in, head over to the User Management section of your Auth0 Dashboard. Find the user you just logged in with and change their password.
Because we selected all logout initiators earlier (which includes password changes), Auth0 will immediately dispatch a logout_token to your configured Back-Channel Logout URI. You can monitor your application's server logs to watch the payload come in, verify the token passes all validation steps, and confirm that the local session is successfully destroyed behind the scenes.
Wrapping Up
Implementing Back-Channel Logout provides significant advantages over traditional front-channel methods. By shifting the logout process entirely server-side, you eliminate the reliance on fragile browser-based redirects and third-party cookies. This guarantees a much more robust and secure architecture, ensuring that when a user logs out, their sessions are definitively terminated across all connected relying parties. For a deeper dive into the specific mechanics and advanced configurations of this feature, be sure to check out the official Auth0 Back-Channel Logout documentation.
Resources
To continue your deep dive into the underlying specifications and the frameworks used for this solution, please consult the official documentation below.
- Auth0 Documentation
- OpenID Connect Back-Channel Logout: For a complete understanding of the protocol specifications and requirements.
- TanStack Documentation
- TanStack Start Documentation: The official entry point for the full-stack framework used in this implementation.
- TanStack Start Server Routes Guide: Detailed information on configuring the server-side endpoints.
About the author

Rudy Dahbura
Senior Solutions Engineer