TL;DR: This article discusses the Backend For Frontend authentication pattern and how it can be used in practice in SPAs implemented with React that use ASP.NET Core 5 as backend. Basic knowledge of the OAuth 2.0 and OpenID Connect is desirable but not required.
What Is the Backend For Frontend Authentication Pattern?
As you start looking into the different OAuth flows and the scenarios they cover, client type is one of those relevant aspects mentioned everywhere. The OAuth 2.0 specification defines two different client types, public and confidential clients, under section #2.1.
Public clients are those that run in places where secrets could be exposed as part of the source code or if the binaries are decompiled. These usually are single-page apps running in a browser or native apps running in user devices such as mobile phones or smart TVs.
On the other hand, confidential clients are the ones that can keep secrets in a private store, like, for example, a web application running in a web server, which can store secrets on the backend.
The client type will determine one or more OAuth flows suitable for the application implementation. By sticking to one of those flows, you can also lower the risks of getting the application compromised from an authentication and authorization standpoint.
The Backend For Frontend (a.k.a BFF) pattern for authentication emerged to mitigate any risk that may occur from negotiating and handling access tokens from public clients running in a browser. The name also implies that a dedicated backend must be available for performing all the authorization code exchange and handling of the access and refresh tokens. This pattern relies on OpenID Connect, which is an authentication layer that runs on top of OAuth to request and receive identity information about authenticated users.
This pattern does not work for a pure SPA that relies on calling external APIs directly from javascript or a serverless backend (e.g., AWS Lamba or Azure Functions).
The following diagram illustrates how this pattern works in detail:
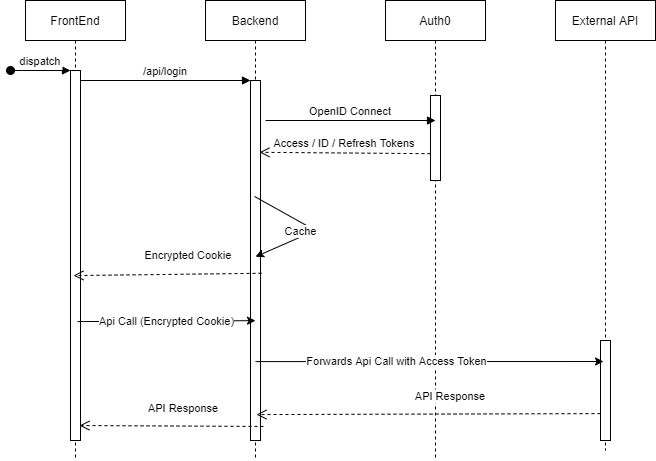
- When the frontend needs to authenticate the user, it calls an API endpoint (
/api/login) on the backend to start the login handshake. - The backend uses OpenID connect with Auth0 to authenticate the user and getting the id, access, and refresh tokens.
- The backend stores the user's tokens in a cache.
- An encrypted cookie is issued for the frontend representing the user authentication session.
- When the frontend needs to call an external API, it passes the encrypted cookie to the backend together with the URL and data to invoke the API.
- The backend retrieves the access token from the cache and makes a call to the external API including that token on the authorization header.
- When the external API returns a response to the backend, this one forwards that response back to the frontend.
Backend For FrontEnd in ASP.NET Core
Visual Studio ships with three templates for SPAs with an ASP.NET Core backend. As shown in the following picture, those templates are ASP.NET Core with Angular, ASP.NET Core with React.js, and ASP.NET Core with React.js and Redux, which includes all the necessary plumbing for using Redux.
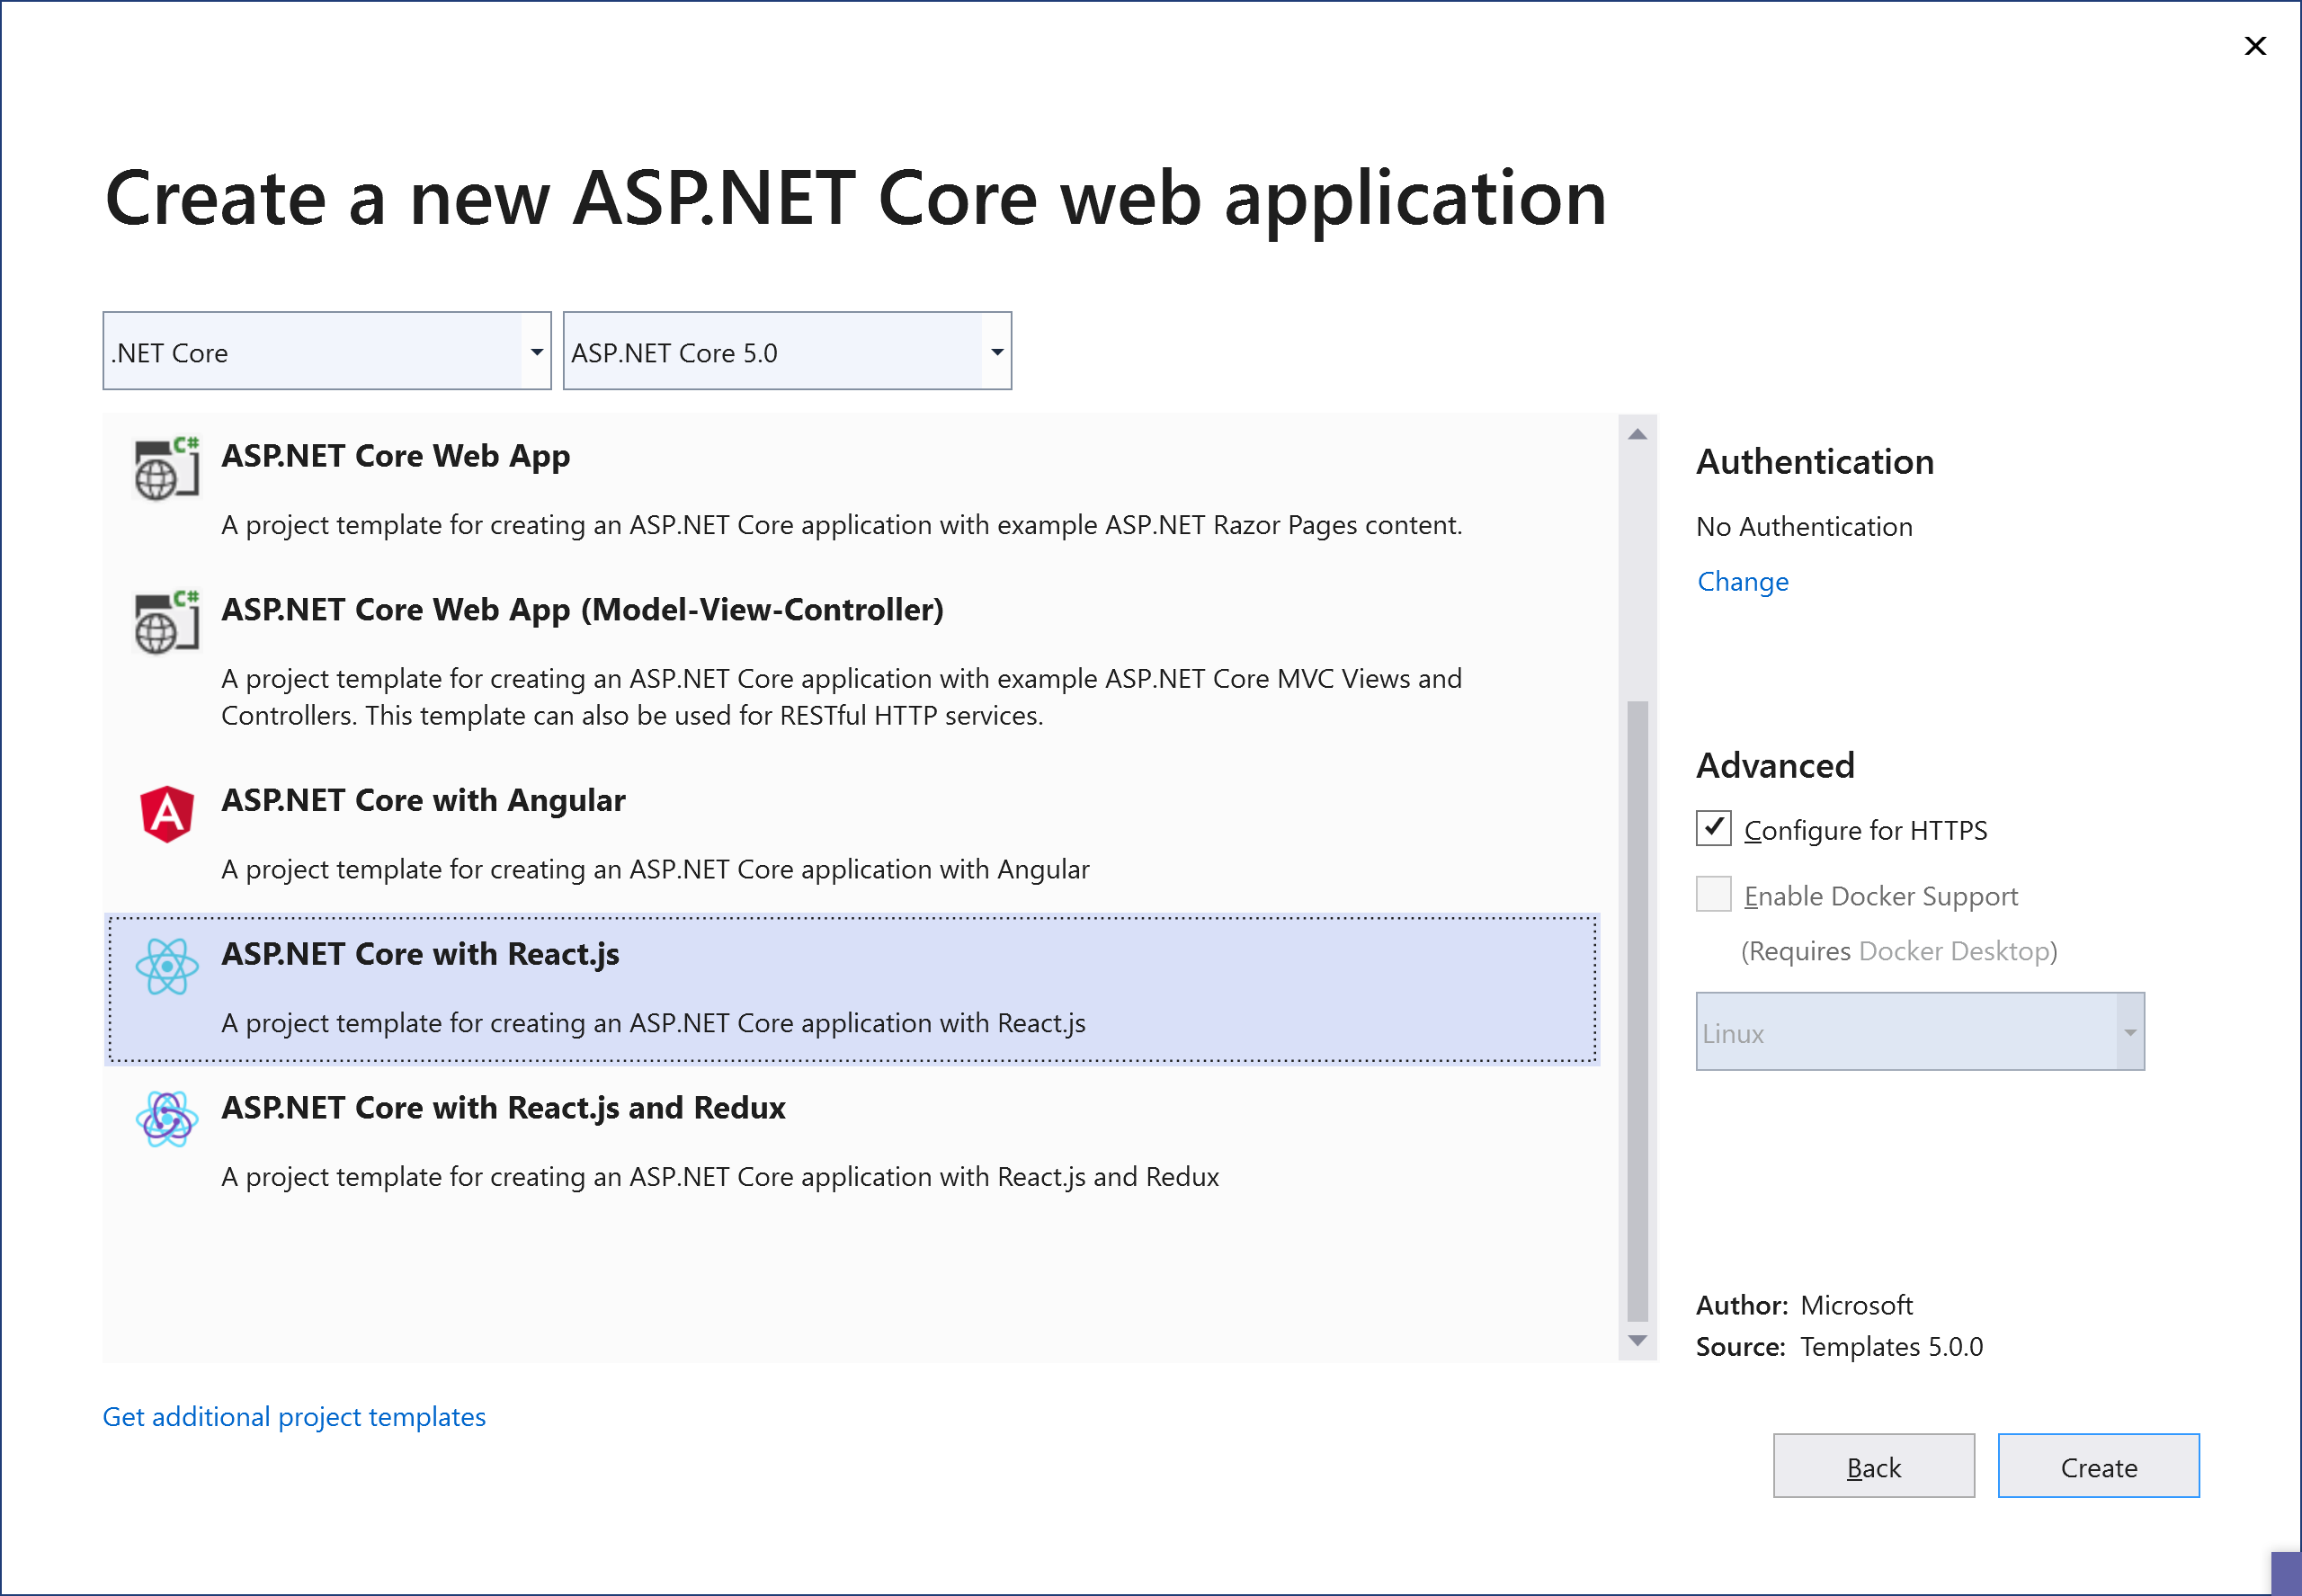
As part of this article, we will be discussing how to implement this pattern with the ASP.NET Core with React.js template.
You can use this GitHub repository as a reference for the project you are about to build.
The structure of the project
Projects created with that template from Visual Studio will have the following folder structure.
ClientApp, this folder contains a sample SPA implemented with React.js. This is the app that we will modify to support the BFF pattern.Controllers, this folder contains the controllers implemented with ASP.NET Core for the API consumed from the SPA. In other words, it's the backend.Pages, this folder contains server-side pages, which are mostly used for rendering errors on the backend.Startups.cs, this is the file containing the main class where the ASP.NET Core middleware classes are configured as well as the dependency injection container.
Before modifying any code, we will proceed to configure first our application in Auth0. That configuration will give us access to the keys and authentication endpoints for the OpenID middleware in .NET Core.
Auth0 Configuration
To start, you need to access your Auth0 Dashboard. If you don't have an Auth0 account, you can sign up for a free one right now!
Create an application in the Auth0 Dashboard
The first thing we will do is to create a new brand application in the Auth0 Dashboard. An Auth0 application is an entry point for getting the keys and endpoints we will need in our web application. Go to your dashboard, click on the Applications menu on the left, and then Create Application.
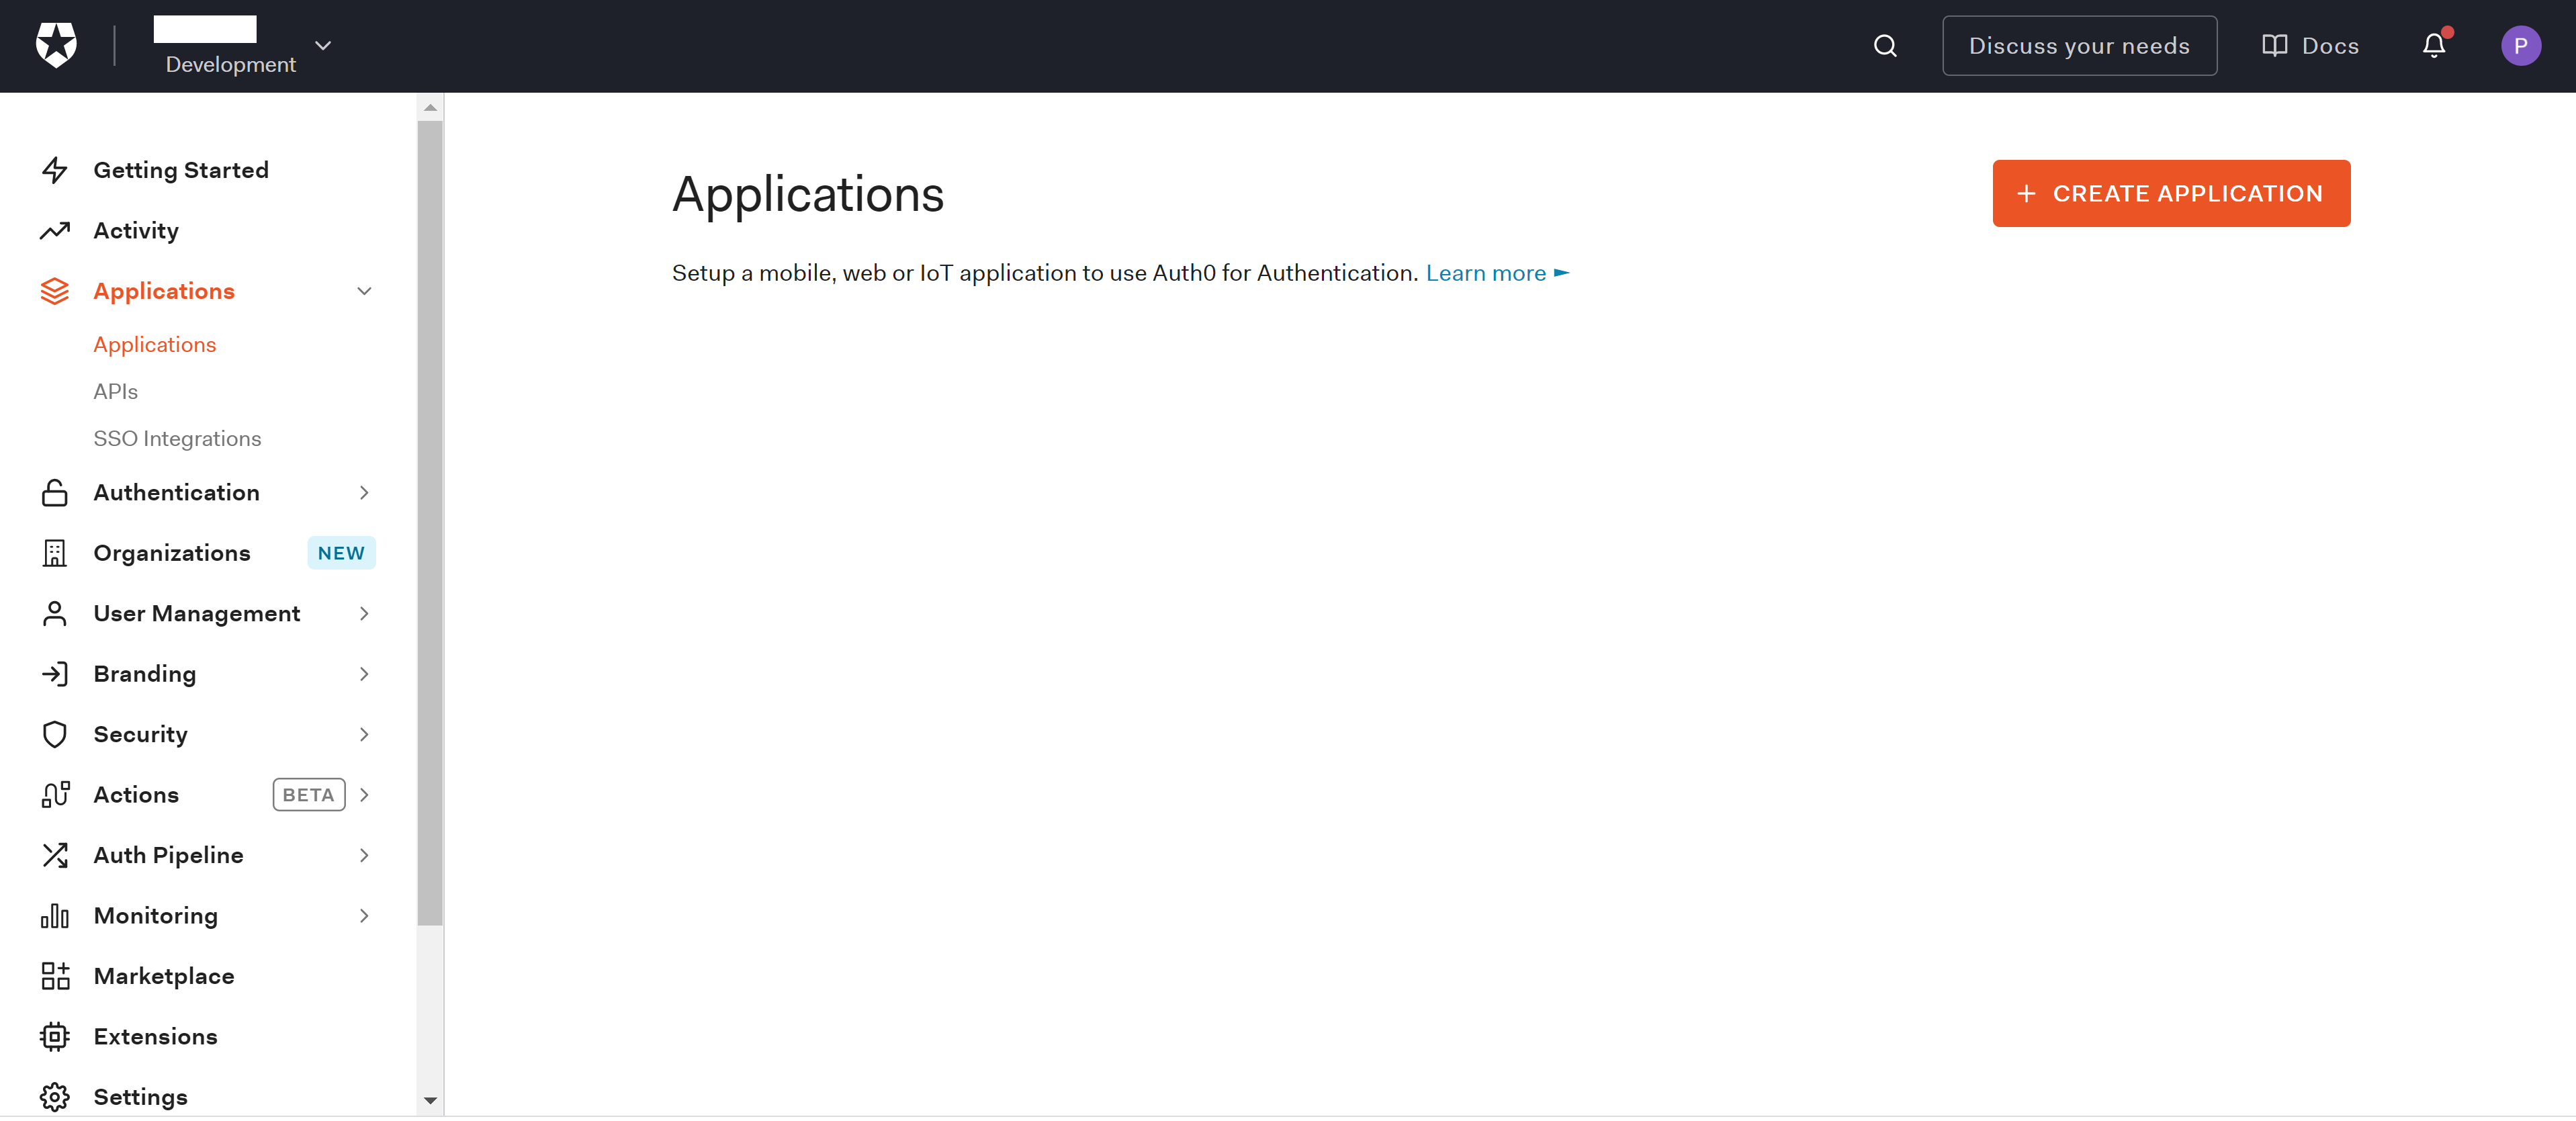
The Create Application button will start a wizard to define the configuration of our application. Pick a name for your web application, and select the option Regular Web Applications. Do not confuse your application with a Single Page Web Application. Even if we are going to implement a SPA with React, we will rely on the .NET Core backend to negotiate the ID tokens. When choosing Regular Web Applications, we are telling Auth0 that our application will use the Authorization Code Flow, which requires a backend channel to receive the ID token for OpenID Connect, and that is exactly what we need to get that magic happening in our ASP.NET Core backend.
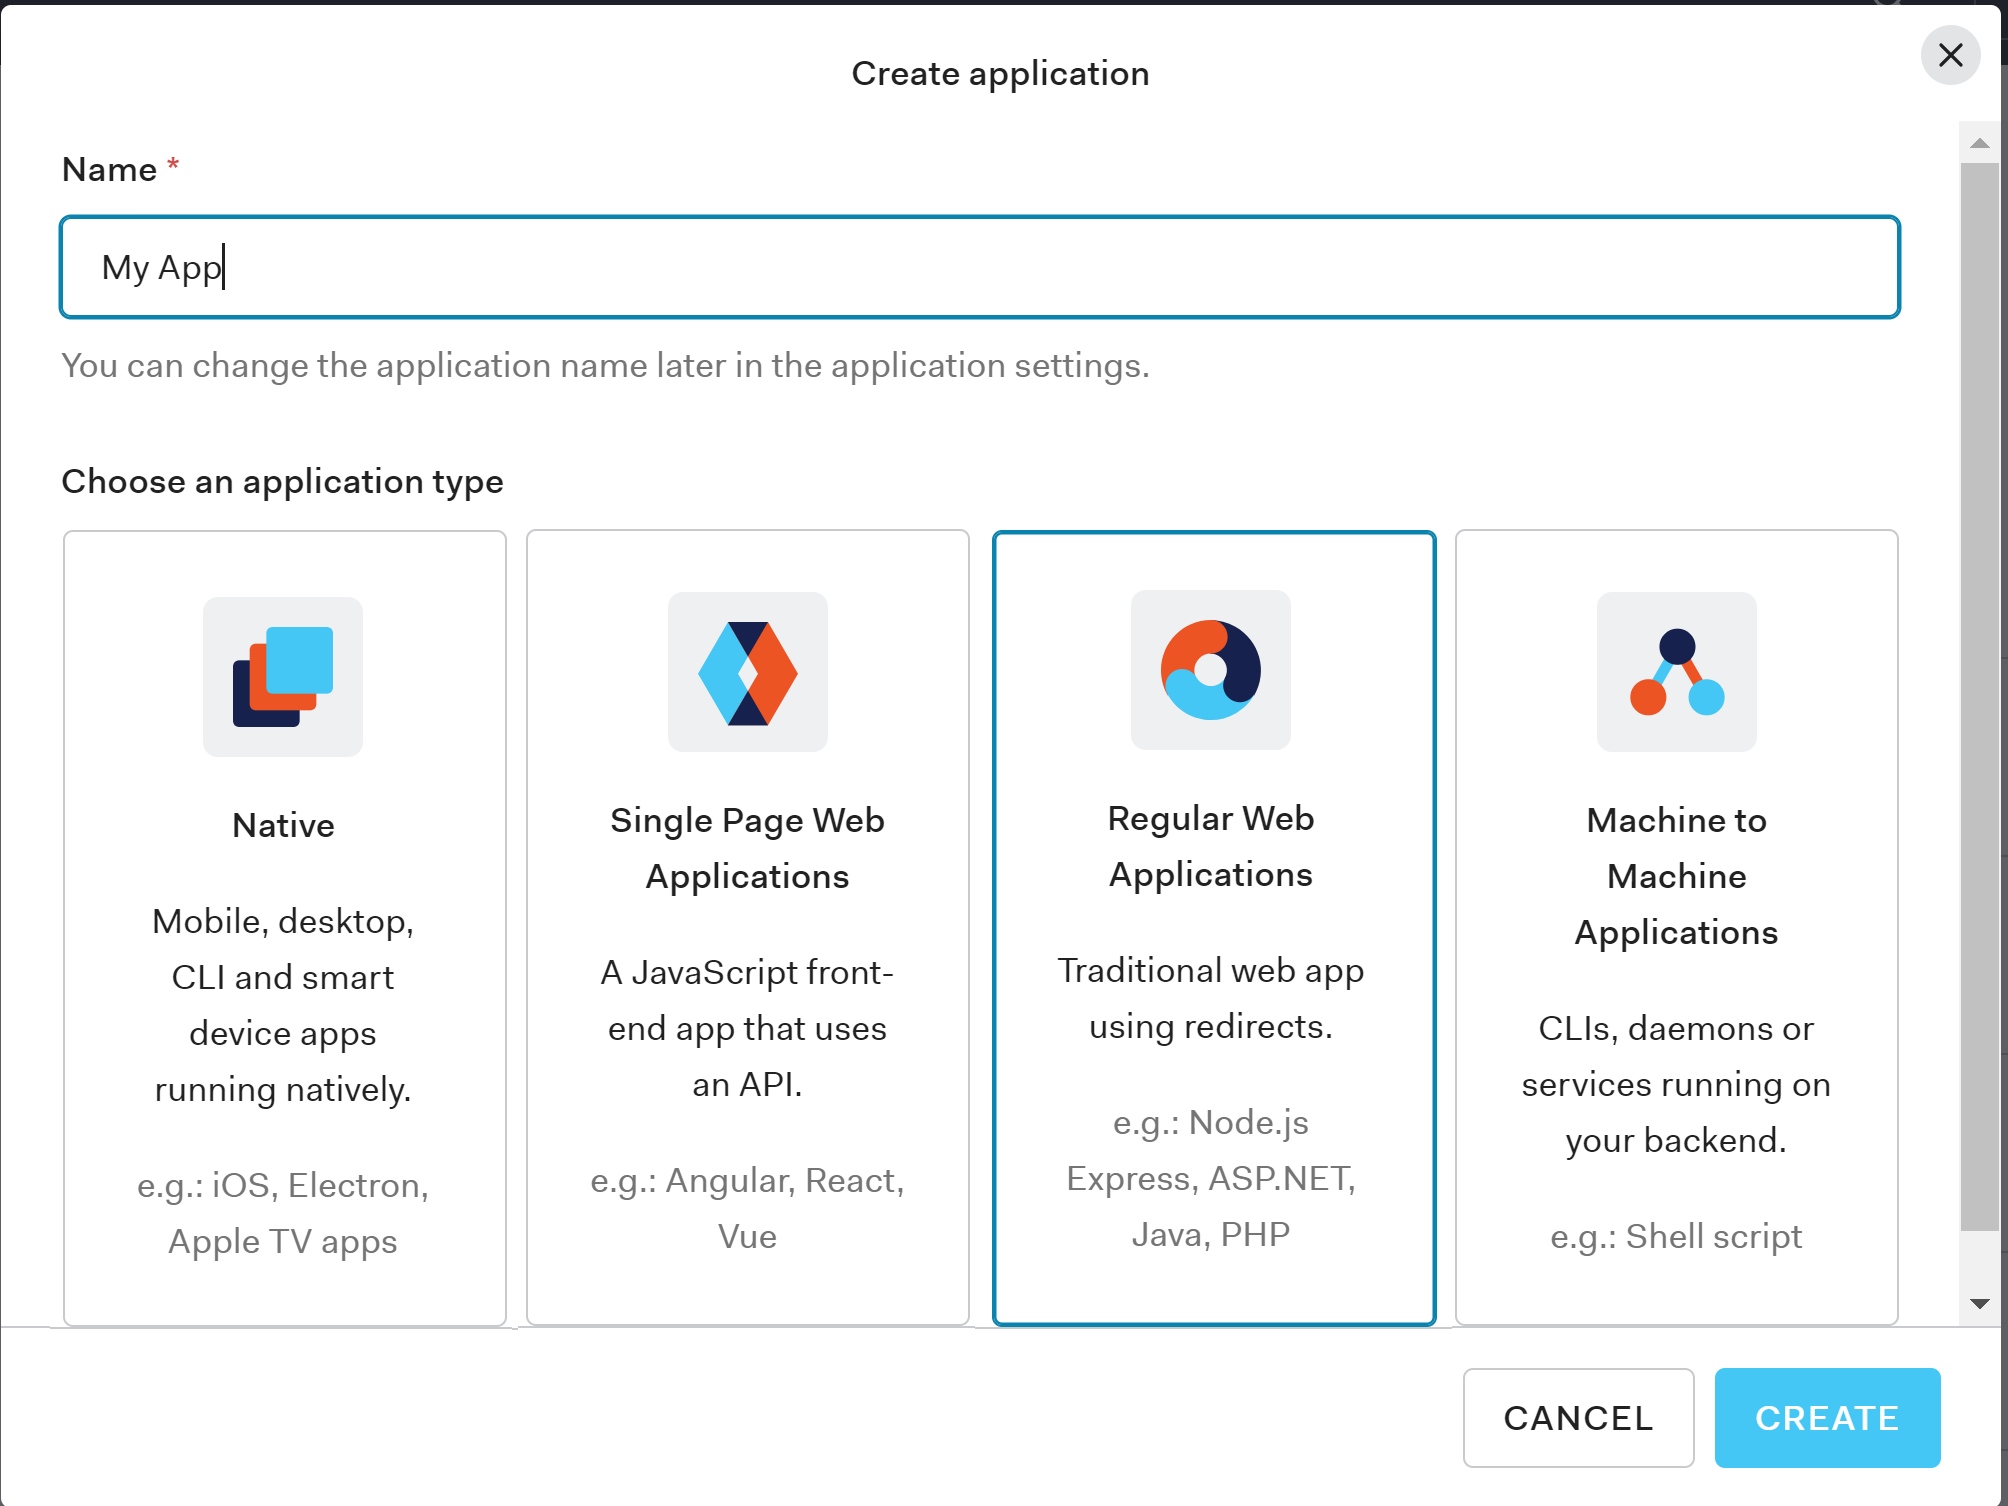
Once the application is created, go to the Settings tab and take note of the following settings:
- Domain
- Client ID
- Client Secret
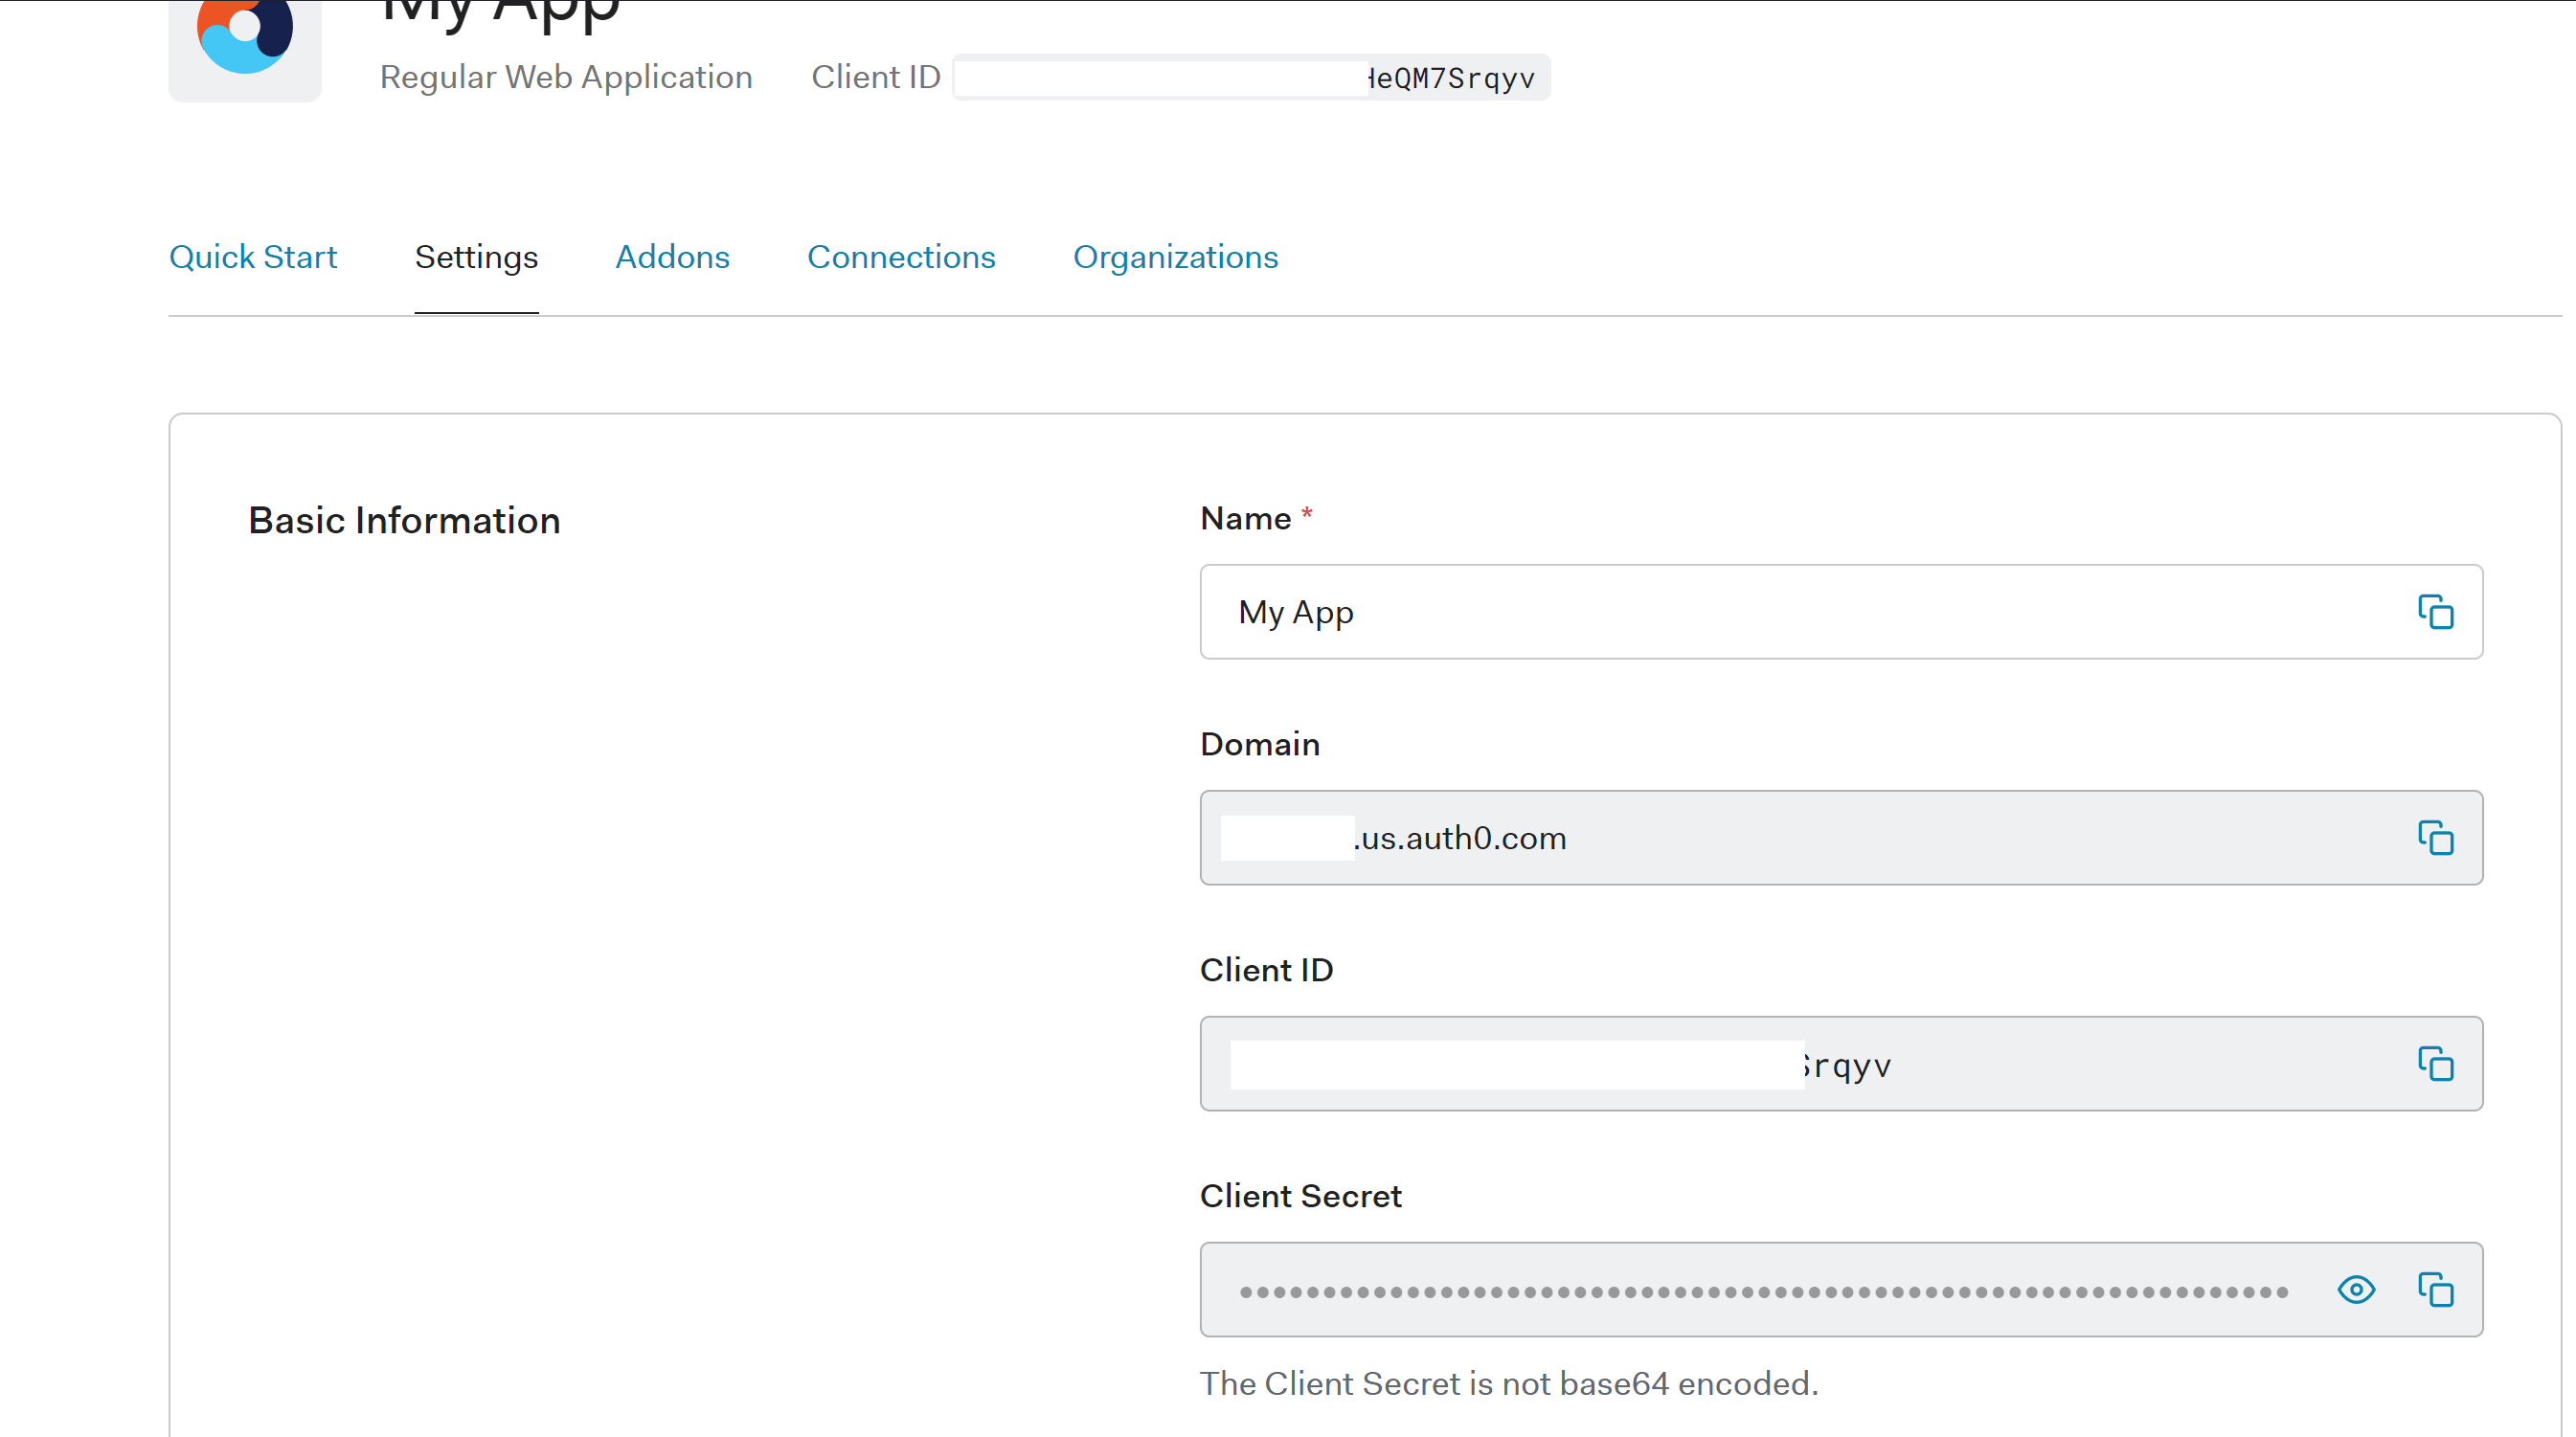
Those are the ones you will need to configure the OpenID middleware in the web application.
Configure the Callback URL
The next thing is to configure the Callback URL for our web application. This is the URL where Auth0 will post the authorization code and ID token for OpenID Connect. This URL can be added in the Allowed URLs field for our application. For our sample, we will use https://localhost:5001/callback. If you are planning to deploy the application to a different URL, you will also need to ensure it is listed here.
Configure the Logout URL
The logout URL is where Auth0 will redirect the user after the logout process has been completed. Our web application will pass this URL to Auth0 as part of the returnTo query string parameter. The logout URL for your app must be added to the Allowed Logout URLs field under the application settings, or Auth0 will return an error otherwise when the user tries to do a logout. For our sample, we will use https://localhost:5001.
Create an API in the Auth0 Dashboard
We also need to create an Auth0 API in the Auth0 Dashboard. So, go to the APIs section and click on Create API, as shown in the following picture:

This will open a new window for configuring the API. Configure the following fields under the settings tab in that window.
- Name, a friendly name or description for the API. Enter Weather Forecast API for this sample.
- Identifier or Audience, which is an identifier that the client application uses to request access tokens for the API. Enter the string
https://weatherforecast.
Under the permissions tab, add a new permission read:weather with the description It allows getting the weather forecast. This is the scope that Auth0 will inject in the access token if the user approves it in the consent screen.
Finally, click on the Save button to save the changes. At this point, our API is ready to be used from .NET Core.
Configuring the ASP.NET Core Application
Our application will use two middleware:
- The OpenID Connect middleware for handling all the authentication handshake with Auth0.
- The Authentication Cookie middleware for persisting the authentication session in a cookie also sharing it with the frontend running React.
Open the Package Manager Console for NuGet in Visual Studio and run the following command:
Install-Package Microsoft.AspNetCore.Authentication.Cookies
Install-Package Microsoft.AspNetCore.Authentication.OpenIdConnect
Once the Nuget packages are installed in our project, we can go ahead and configure the middleware in the Startup.cs class under the root folder of the ASP.NET Core project.
Modify the ConfigureServices method in that class to include the following code.
// BFF/Startup.cs

// ...existing code...

public void ConfigureServices(IServiceCollection services)
{
  services.AddAuthentication(options =>
    {
        options.DefaultAuthenticateScheme = CookieAuthenticationDefaults.AuthenticationScheme;
        options.DefaultSignInScheme = CookieAuthenticationDefaults.AuthenticationScheme;
        options.DefaultChallengeScheme = CookieAuthenticationDefaults.AuthenticationScheme;
    })
    .AddCookie(o =>
    {
        o.Cookie.SecurePolicy = CookieSecurePolicy.Always;
        o.Cookie.SameSite = SameSiteMode.Strict;
        o.Cookie.HttpOnly = true;
    })
    .AddOpenIdConnect("Auth0", options => ConfigureOpenIdConnect(options));

    services.AddHttpClient();

   // ...existing code...
 }

private void ConfigureOpenIdConnect(OpenIdConnectOptions options)
{
    // Set the authority to your Auth0 domain
    options.Authority = $"https://{Configuration["Auth0:Domain"]}";

    // Configure the Auth0 Client ID and Client Secret
    options.ClientId = Configuration["Auth0:ClientId"];
    options.ClientSecret = Configuration["Auth0:ClientSecret"];

    // Set response type to code
    options.ResponseType = OpenIdConnectResponseType.CodeIdToken;

    options.ResponseMode = OpenIdConnectResponseMode.FormPost;

    // Configure the scope
    options.Scope.Clear();
    options.Scope.Add("openid");
    options.Scope.Add("offline_access");
    options.Scope.Add("read:weather");

    // Set the callback path, so Auth0 will call back to http://localhost:3000/callback
    // Also ensure that you have added the URL as an Allowed Callback URL in your Auth0 dashboard
    options.CallbackPath = new PathString("/callback");

    // Configure the Claims Issuer to be Auth0
    options.ClaimsIssuer = "Auth0";

    // This saves the tokens in the session cookie
    options.SaveTokens = true;

    options.Events = new OpenIdConnectEvents
    {
        // handle the logout redirection
        OnRedirectToIdentityProviderForSignOut = (context) =>
        {
            var logoutUri = $"https://{Configuration["Auth0:Domain"]}/v2/logout?client_id={Configuration["Auth0:ClientId"]}";

            var postLogoutUri = context.Properties.RedirectUri;
            if (!string.IsNullOrEmpty(postLogoutUri))
            {
                if (postLogoutUri.StartsWith("/"))
                {
                    // transform to absolute
                    var request = context.Request;
                    postLogoutUri = request.Scheme + "://" + request.Host + request.PathBase + postLogoutUri;
                }
                logoutUri += $"&returnTo={ Uri.EscapeDataString(postLogoutUri)}";
            }
            context.Response.Redirect(logoutUri);
            context.HandleResponse();

            return Task.CompletedTask;
        },
        OnRedirectToIdentityProvider = context => {
            context.ProtocolMessage.SetParameter("audience", Configuration["Auth0:ApiAudience"]);
            return Task.CompletedTask;
        }
    };
}

// ...existing code...
This code configures the OpenID Connect middleware to point to Auth0 for authentication and the Cookie middleware for persisting the authentication session in cookies. Let's discuss different parts of this code more in detail so you can understand what it does.
services.AddAuthentication(options =>
    {
        options.DefaultAuthenticateScheme = CookieAuthenticationDefaults.AuthenticationScheme;
        options.DefaultSignInScheme = CookieAuthenticationDefaults.AuthenticationScheme;
        options.DefaultChallengeScheme = CookieAuthenticationDefaults.AuthenticationScheme;
    })
    .AddCookie(o =>
    {
        o.Cookie.SecurePolicy = CookieSecurePolicy.Always;
        o.Cookie.SameSite = SameSiteMode.Strict;
        o.Cookie.HttpOnly = true;
    })
It configures authentication to rely on the session cookie as the primary authentication mechanism if no other is specified in one of the web application's controllers. It also injects the cookie middleware with a few settings that restrict how the cookie can be used on the browsers. In our case, the cookie can only be used under HTTPS (CookieSecurePolicy.Always), it's not available on the client side (HttpOnly = true), and uses a site policy equals to strict (SameSiteMode.Strict). This last one implies the cookie will only be sent if the domain for the cookie matches exactly the domain in the browser's URL. All these settings help to prevent potential attacks with scripting on the client side.
options.ResponseType = OpenIdConnectResponseType.CodeIdToken;
options.ResponseMode = OpenIdConnectResponseMode.FormPost;
The OpenID Connect middleware is configured to use ResponseType equals to CodeIdToken (Hybrid flow), which means our web application will receive an authorization code and ID token directly from the authorization endpoint right after the user is authenticated. We will use the authorization code in exchange for an access token for calling a backend API hosted on a different site.
// Configure the scope
options.Scope.Clear();
options.Scope.Add("openid");
options.Scope.Add("offline_access");
options.Scope.Add("read:weather");
The openid scope is required as part of the OpenID Connect authentication flow. The offline_access is for requesting a refresh token and read:weather is specific to the API we will call later as part of this sample.
options.SaveTokens = true;
The SaveTokens option tells the OpenID Connect middleware that all the tokens (id token, refresh token, and access token) received from the authorization endpoint during the initial handshake must be persisted for later use. By default, the middleware persists those tokens in the encrypted session cookie, and we will use that for our sample.
OnRedirectToIdentityProvider = context => {
    context.ProtocolMessage.SetParameter("audience", Configuration["Auth0:ApiAudience"]);
    return Task.CompletedTask;
},
The OpenID Connect middleware does not have any property to configure the audience parameter that Auth0 requires for returning an authorization code for an API. We are attaching some code to the OnRedirectToIdentityProvider event for setting that parameter before the user is redirected to Auth0 for authentication.
services.AddHttpClient();
The extension method AddHttpClient injects an IHttpClientFactory with default settings to create instances of the class HttpClient. We will use it to make calls to the external API.
The next step is to modify the Configure method to tell ASP.NET Core that we want to use the authentication and authorization middleware. Those middleware will integrate automatically with the authentication session cookies.
Insert the following code as it is shown below:
// Startup.cs

// ...existing code...

public void Configure(IApplicationBuilder app, IWebHostEnvironment env)
{
    // ...existing code...
    app.UseRouting();

    // Code goes here
    app.UseAuthentication();
    app.UseAuthorization();

    app.UseEndpoints(endpoints =>
    {
      endpoints.MapControllerRoute(
        name: "default",
        pattern: "{controller}/{action=Index}/{id?}");
     });

    // ...existing code...
}
Update the existing appSettings.json file and include the settings we got from the Auth0 Dashboard before. Those are Domain, Client ID, Client Secret, and ApiAudience.
{
  "Logging": {
      "LogLevel": {
      "Default": "Information",
      "Microsoft": "Warning",
      "Microsoft.Hosting.Lifetime": "Information"
      }
    },
  "AllowedHosts": "*",
  "Auth0": {
    "Domain": "<domain>",
    "ClientId": "<client id>",
    "ClientSecret": "<client secret>",
    "ApiAudience": "https://weatherforecast"
  }
}
Add the ASP.NET Core Controllers for handling authentication
Create a new ASP.NET controller in the Controllers folder and call it AuthController. This controller has three actions.
Loginfor initiating the OpenID Connect login handshake with Auth0.Logoutfor logging out from the web application and also from Auth0.GetUserfor getting data about the authenticated user in the current session. This is an API that the React application will invoke to get the authentication context for the user.
This is the code for the Login action:
// BFF/Controllers/AuthController.cs

// ...existing code...

public ActionResult Login(string returnUrl = "/")
{
  return new ChallengeResult("Auth0", new AuthenticationProperties()
    {
      RedirectUri = returnUrl
    }
  );
}

// ...existing code...
It is an action that returns a ChallengeResult with the authentication schema to be used. In this case, it is Auth0, which is the schema we associated with our OpenID Connect middleware in the Startup class. This result is a built-in class shipped with ASP.NET Core to initiate an authentication handshake from the authentication middleware.
The logout action looks as follows:
// BFF/Controllers/AuthController.cs

// ...existing code...

[Authorize]
public async Task<ActionResult> Logout()
{
    await HttpContext.SignOutAsync();

    return new SignOutResult("Auth0", new AuthenticationProperties
    {
        RedirectUri = Url.Action("Index", "Home")
    });
}

// ...existing code...
It returns a SignOutResult that will log the user out of the application and also initiate the sign-out process with Auth0. As it happened with the ChallengeResult, this SignOutResult is also a built-in result that the authentication middleware will process. We also decorated the action with the [Authorize] attribute as it should only be invoked if the user is authenticated.
Finally, the GetUser API code is the following:
// BFF/Controllers/AuthController.cs

// ...existing code...

public ActionResult GetUser()
{
  if (User.Identity.IsAuthenticated)
  {
    var claims = ((ClaimsIdentity)this.User.Identity).Claims.Select(c =>
                    new { type = c.Type, value = c.Value })
                    .ToArray();

    return Json(new { isAuthenticated = true, claims = claims });
 }

 return Json(new { isAuthenticated = false });
}

// ...existing code...
If the user is authenticated, it returns the user identity as a set of claims serialized as JSON. Otherwise, it just returns a flag indicating the user is not authenticated.
Require authentication in other controllers
The WeatherForecast controller included in the template allows anonymous calls. To make it more interesting in our sample, we will convert it to require authenticated calls. Fortunately, that is as simple as adding a top-level Authorize attribute in the class definition.
// BFF/Controllers/WeatherForecastController.cs

// ...existing code...

[ApiController]
[Authorize]
[Route("[controller]")]
public class WeatherForecastController : ControllerBase
{

// ...existing code...
Negotiate an Access Token and call a remote API
We will convert the WeatherForecast controller in our web application to act as a reverse proxy and call the equivalent API hosted remotely on a different site. This API will require an access token, so the controller will have to negotiate first the authorization code that is persisted in the session cookie.
 public WeatherForecastController(
            IHttpClientFactory httpClientFactory,
            IConfiguration configuration)
{
    _httpClientFactory = httpClientFactory;

    if (configuration["WeatherApiEndpoint"] == null)
        throw new ArgumentNullException("The Weather Api Endpoint is missing from the configuration");

    _apiEndpoint = new Uri(configuration["WeatherApiEndpoint"], UriKind.Absolute);
}
The constructor on this controller receives an instance of an IHttpClientFactory that we previously registered in the Startup.cs file for creating HttpClient instances and an instance of IConfiguration to retrieve settings from the configuration file. The endpoint for the Weather API is retrieved from the configuration using the WeatherApiEndpoint key. That key in the appSettings.json only references the URL for the remote API as it is shown below:
// appSettings.json
{
  // ... other settings ...
  "WeatherApiEndpoint": "https://localhost:44385/"
}
The following code shows the implementation of the Get method. This is the actual remote API invoked by passing the expected authorization headers:
// BFF/Controllers/WeatherForecastController.cs

// ...existing code...

[HttpGet]
public async Task Get()
{
    var accessToken = await HttpContext.GetTokenAsync("Auth0", "access_token");

    var httpClient = _httpClientFactory.CreateClient();

    var request = new HttpRequestMessage(HttpMethod.Get, new Uri(_apiEndpoint, "WeatherForecast"));
    request.Headers.Authorization = new AuthenticationHeaderValue("Bearer", accessToken);

    var response = await httpClient.SendAsync(request);

    response.EnsureSuccessStatusCode();

    await response.Content.CopyToAsync(HttpContext.Response.Body);
}

// ...existing code...
The trick for getting the access token is in the following line,
var accessToken = await HttpContext.GetTokenAsync("Auth0", "access_token");
GetTokenAsync is an extension method available as part of the authentication middleware in ASP.NET Core. The first argument specifies the authentication schema to be used to get the token, which is our OpenID Connect middleware configured with the name "Auth0". The second argument is the token to be used. In the case of OpenID Connect, the possible values are "access_token" or "id_token". If the access token is not available or already expired, the middleware will use the refresh token and authorization code to get one. Since our middleware was pointing to the WeatherForecast API with the audience attribute and the scope we previously configured, Auth0 will return an access token for that API.
var httpClient = _httpClientFactory.CreateClient();

var request = new HttpRequestMessage(HttpMethod.Get, new Uri(_apiEndpoint, "WeatherForecast"));
request.Headers.Authorization = new AuthenticationHeaderValue("Bearer", accessToken);

var response = await httpClient.SendAsync(request);

response.EnsureSuccessStatusCode();

await response.Content.CopyToAsync(HttpContext.Response.Body);
The code above forwards the request to the remote API using a new instance of HttpClient created with the IHttpClientFactory injected in the constructor. The access token is passed as a Bearer token in the authorization header.
Configuring the Remote API
As the remote API, we will use the one provided with Visual Studio's ASP.NET Web API template that returns the weather forecast data.
Create the ASP.NET Core API in Visual Studio
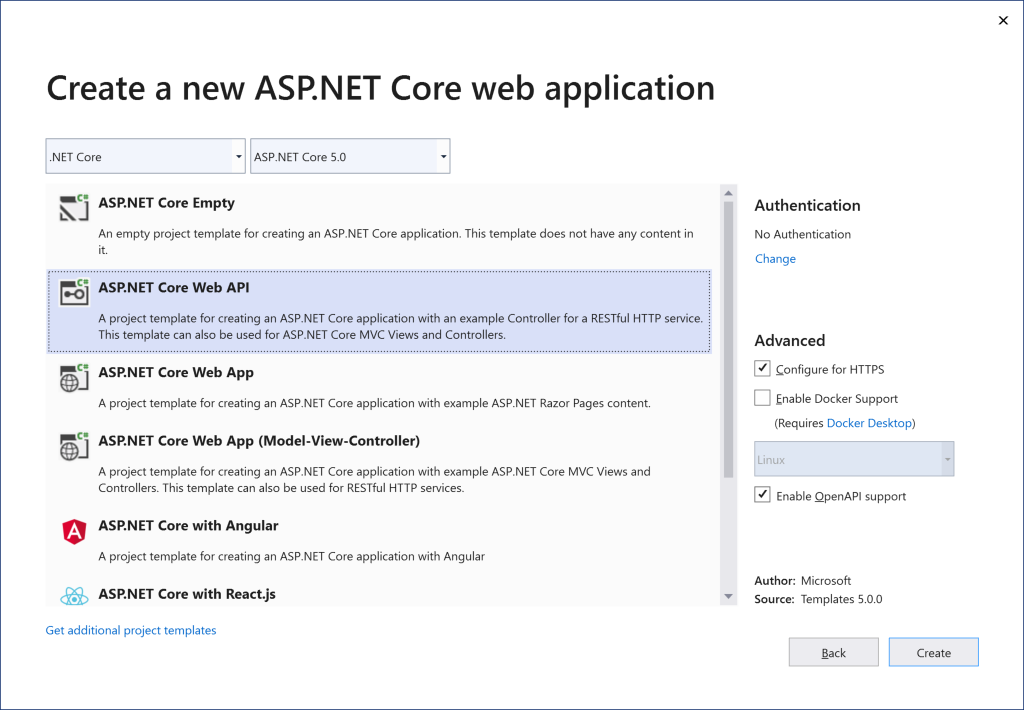
Visual Studio ships with a single template for .NET Core APIs. That is ASP.NET Core Web API, as it is shown in the image below.
The structure of the project
Projects created with that template from Visual Studio will have the following structure:
Controllers, this folder contains the controllers for the API implementation.Startup.cs, this is the main class where the ASP.NET Core middleware classes and the dependency injection container are configured.
Configuring the project
Our application will only use the middleware for supporting authentication with JWT as bearer tokens.
Open the Package Manager Console for NuGet in Visual Studio and run the following command:
Install-Package Microsoft.AspNetCore.Authentication.JwtBearer
Once the NuGet packages are installed in our project, we can go ahead and configure them in the Startup.cs class file.
Modify the ConfigureServices method in that class to include the following code:
// Api/Startup.cs

// ...existing code...

public void ConfigureServices(IServiceCollection services)
{
    var authentication = services
        .AddAuthentication(JwtBearerDefaults.AuthenticationScheme)
        .AddJwtBearer("Bearer", c =>
        {
        c.Authority = $"https://{Configuration["Auth0:Domain"]}";
        c.TokenValidationParameters = new TokenValidationParameters
        {
            ValidateAudience = true,
            ValidAudiences = Configuration["Auth0:Audience"].Split(";"),
            ValidateIssuer = true,
            ValidIssuer = $"https://{Configuration["Auth0:Domain"]}";
        };
    });

    services.AddControllers();

    services.AddSwaggerGen(c =>
    {
        c.SwaggerDoc("v1", new OpenApiInfo { Title = "Api", Version = "v1" });
    });

    services.AddAuthorization(o =>
    {
        o.AddPolicy("read:weather", p => p.
            RequireAuthenticatedUser().
            RequireScope("read:weather"));
    });
}

// ...existing code...
This code performs two things. It configures the JWT middleware to accept access tokens issued by Auth0 and defines an authorization policy for checking the scope set on the token.
The policy checks for a claim or attribute called scope with a value read:weather, which is the scope we previously configured for our API in the Auth0 dashboard.
RequireScope is a custom extension we will write as part of this sample to check for the scope present in the JWT access token.
The next step is to modify the Configure method to tell ASP.NET Core that we want to use the authentication and authorization middleware. That middleware will integrate automatically with the authentication session cookies.
Insert the new code as shown below in the Startup.cs file:
// Api/Startup.cs

// ...existing code...

public void Configure(IApplicationBuilder app, IWebHostEnvironment env)
{
  // ...existing code...

  app.UseRouting();

  app.UseAuthentication();
  app.UseAuthorization();

  app.UseEndpoints(endpoints =>
  {
    endpoints.MapControllers();
  });
}

// ...existing code...
Update the existing appSettings.json file and include the settings we got from the Auth0 dashboard before. Those are Domain and API's Audience.
{
  "Logging": {
      "LogLevel": {
      "Default": "Information",
      "Microsoft": "Warning",
      "Microsoft.Hosting.Lifetime": "Information"
      }
    },
  "AllowedHosts": "*",
  "Auth0": {
    "Domain": "<domain>",
    "Audience": "https://weatherforecast"
  }
}
RequireScope policy
ASP.NET Core does not include any policy out of the box for checking an individual scope in a JWT access token. To overcome this shortcoming, we will create a custom policy. For this purpose, create a new Authorization folder. Then add three new files on it, ScopeHandler.cs, ScopeRequirement.cs, and AuthorizationPolicyBuilderExtensions.cs. We will discuss the purpose of each one next.
Add a new file ScopeHandler.cs to the Authorization folder with the following content:
// Api/Authorization/ScopeHandler.cs

using Microsoft.AspNetCore.Authorization;
using System;
using System.Collections.Generic;
using System.Linq;
using System.Threading.Tasks;

namespace Api.Authorization
{
    public class ScopeHandler :
             AuthorizationHandler<ScopeRequirement>
    {
        protected override Task HandleRequirementAsync(
          AuthorizationHandlerContext context,
          ScopeRequirement requirement)
        {
            if (context is null)
            {
                throw new ArgumentNullException(nameof(context));
            }

            var success = context.User.Claims.Any(c => c.Type == "scope" &&
                c.Value.Contains(requirement.Scope));

            if (success)
                context.Succeed(requirement);

            return Task.CompletedTask;
        }
    }
}
The authentication middleware parses the JWT access token and converts each attribute in the token as a claim attached to the current user in context. Our policy handler uses the claim associated with the scope for checking that the expected scope is there (read:weather).
Every implementation of AuthorizationHandler must be associated with an implementation of IAuthorizationRequirement that describes the authorization requirements for the handler. In our case, the implementation looks as it is described in the following.
Add the following content in the ScopeRequirement.cs file,
// Api/Authorization/ScopeRequirement.cs

using Microsoft.AspNetCore.Authorization;
using System;
using System.Collections.Generic;
using System.Linq;
using System.Threading.Tasks;

namespace Api.Authorization
{
    public class ScopeRequirement : IAuthorizationRequirement
    {
        public string Scope { get; private set; }

        public ScopeRequirement(string scope)
        {
            Scope = scope;
        }
    }
}
It's a very simple implementation that describes a requirement in terms of a scope. That's the expected scope in the JWT Access Token.
Finally, the class AuthorizationPolicyBuilderExtensions.cs includes the RequireScope extension method for injecting the ScopeHandler instance in the Startup.cs class when the policy is configured.
// Api/Authorization/AuthorizationPolicyBuilderExtensions.cs

using Microsoft.AspNetCore.Authorization;
using System;
using System.Collections.Generic;
using System.Linq;
using System.Threading.Tasks;

namespace Api.Authorization
{
    public static class AuthorizationPolicyBuilderExtensions
    {
        public static AuthorizationPolicyBuilder RequireScope(this AuthorizationPolicyBuilder builder, string scope)
        {
            return builder.AddRequirements(new ScopeRequirement(scope));
        }
    }
}
Require authentication in the API controller
The WeatherForecast controller included in the template allows anonymous calls. We will convert it to require authenticated calls using the Authorize attribute. That attribute will also reference the policy we previously defined in the Startup.cs file.
// Api/Controllers/WeatherForecastController.cs

// ...existing code...

[ApiController]
[Route("[controller]")]
public class WeatherForecastController : ControllerBase
{
  [HttpGet]
  [Authorize("read:weather")]
  public IEnumerable<WeatherForecast> Get()
  {

// ...existing code...
This attribute will do two things,
- It will activate the authorization middleware that will check if the call was authenticated and there is one user identity set in the current execution context.
- It will run the
read:weatherpolicy to make sure the user identity contains the required permissions. In our case, it will check the access token includes a scope calledread:weather.
Once we run this project in Visual Studio, the API will only accept authenticated calls with access tokens coming from Auth0.
Securing the React Application
So far, we have added all the plumbing code on the backend to enable authentication with Auth0 using OpenID Connect. The backend handles user authentication and configures a cookie that we can share with the React app. We also added a GetUser API that can be used to determine whether the user is authenticated and get basic identity information about them. Let's now see the needed changes for the React client application.
React Context for Authentication
As authentication is a core concern that we will use across all the components in the React application, it makes sense to make it available as a global context using the context pattern.
Move into BFF/ClientApp/src folder and create a context folder. Then add a file AuthContext.js to the newly created folder. Paste the following code on the file:
// BFF/ClientApp/src/context/AuthContext.js

import React, { useState, useEffect, useContext } from "react";

export const AuthContext = React.createContext();
export const useAuth = () => useContext(AuthContext);
export const AuthProvider = ({
    children
}) => {
    const [isAuthenticated, setIsAuthenticated] = useState();
    const [user, setUser] = useState();
    const [isLoading, setIsLoading] = useState(false);

    const getUser = async () => {
        const response = await fetch('/auth/getUser');
        const json = await response.json();

        setIsAuthenticated(json.isAuthenticated);
        setIsLoading(false);
        if (json.isAuthenticated) setUser(json.claims);
    }

    useEffect(() => {
        getUser();
    }, []);

    const login = () => {
        window.location.href = '/auth/login';
    }

    const logout = () => {
        window.location.href = '/auth/logout';
    }

    return (
        <AuthContext.Provider
            value={{
                isAuthenticated,
                user,
                isLoading,
                login,
                logout
            }}
        >
            {children}
        </AuthContext.Provider>
    );
};
This context object provides methods for starting the login and logout handshake with the backend and getting the authenticated user.
Modify the index.js file to reference this context provider.
// BFF/ClientApp/src/index.js

// ...existing code...

ReactDOM.render(
    <AuthProvider>
        <BrowserRouter basename={baseUrl}>
            <App />
        </BrowserRouter>
    </AuthProvider>,
    rootElement);

// ...existing code...
Add the login and logout routes
The React Router configuration uses the authentication context to redirect the user to login and logout URLs on the backend. It also forces the user authentication for routes that are protected, such as the one for fetching the weather data.
To add these protected routes, modify the App.js file to include this code:
// BFF/ClientApp/src/App.js

import { Redirect, Route } from 'react-router';
import { Layout } from './components/Layout';
import { Home } from './components/Home';
import { FetchData } from './components/FetchData';
import { useAuth } from './context/AuthContext';

import './custom.css'

const App = () => {

    const { isAuthenticated, login, logout } = useAuth();

    return (
        <Layout>
            <Route exact path='/' component={Home} />
            <Route path='/fetch-data' component={isAuthenticated ? () => { return <FetchData /> } : () => { login(); return null; }}/>
            <Route path='/login' component={() => { login(); return null }} />
            <Route path='/logout' component={() => { logout(); return null }}></Route>
        </Layout>
    );
}

export default App;
The fetch-data route, for example, checks if the user is authenticated before returning the FetchData component. If the user is not authenticated, it calls the login function in the authentication context, which ultimately redirects the user to the Login endpoint in the backend.
Modify the application menu
Another very common feature in web applications is to make menu options visible or not, depending on the user authentication status.
As we did in the React Router, the same thing can be accomplished for the menu options using the isAuthenticated function from the authentication context.
So, move to the ClientApp/src/components folder. Then modify the NavMenu.js file to check the authentication status as it is shown below.
// BFF/ClientApp/src/components/NavMenu.js

// ...existing code...

return (
        <header>
            <Navbar className="navbar-expand-sm navbar-toggleable-sm ng-white border-bottom box-shadow mb-3" light>
                <Container>
                    <NavbarBrand tag={Link} to="/">Auth0 Backend For FrontEnd Authentication</NavbarBrand>
                    <NavbarToggler onClick={toggleNavbar} className="mr-2" />
                    <Collapse className="d-sm-inline-flex flex-sm-row-reverse" isOpen={!collapsed} navbar>
                        <ul className="navbar-nav flex-grow">
                            <NavItem>
                                <NavLink tag={Link} className="text-dark" to="/">Home</NavLink>
                            </NavItem>
                            <NavItem>
                                <NavLink tag={Link} className="text-dark" to="/fetch-data">Fetch data</NavLink>
                            </NavItem>
                            <NavItem>
                            {!isAuthenticated && <NavItem>
                                <NavLink tag={Link} className="text-dark" to="/login">Login</NavLink>
                            </NavItem>}
                            {isAuthenticated && <NavItem>
                                <NavLink tag={Link} className="text-dark" to="/logout">Logout</NavLink>
                            </NavItem>}
                        </ul>
                    </Collapse>
                </Container>
            </Navbar>
        </header>
 );

// ...existing code...
Add a component to show user data
The authentication context provides a getUser function in case you want to show the user's basic data coming from Auth0 on the React application. That function returns a collection of claims about the user's identity coming from the backend API GetUser.
The following code shows a component that enumerates those claims.
// BFF/ClientApp/src/components/User.js

import React, { useEffect, useState } from 'react';
import { useAuth } from '../context/AuthContext';

export const User = () => {

    const { user } = useAuth();

    const renderClaimsTable = function (claims) {
        return (
            <table className='table table-striped' aria-labelledby="tabelLabel">
                <thead>
                    <tr>
                        <th>Type</th>
                        <th>Value</th>
                    </tr>
                </thead>
                <tbody>
                    {claims.map(claim =>
                        <tr key={claim.type}>
                            <td>{claim.type}</td>
                            <td>{claim.value}</td>
                        </tr>
                    )}
                </tbody>
            </table>
        );
    }

    return (
        <div>
            <h1 id="tabelLabel" >User claims</h1>
            <p>This component demonstrates fetching user identity claims from the server.</p>
            {renderClaimsTable(user)}
        </div>
    );

}
Run the Web Application
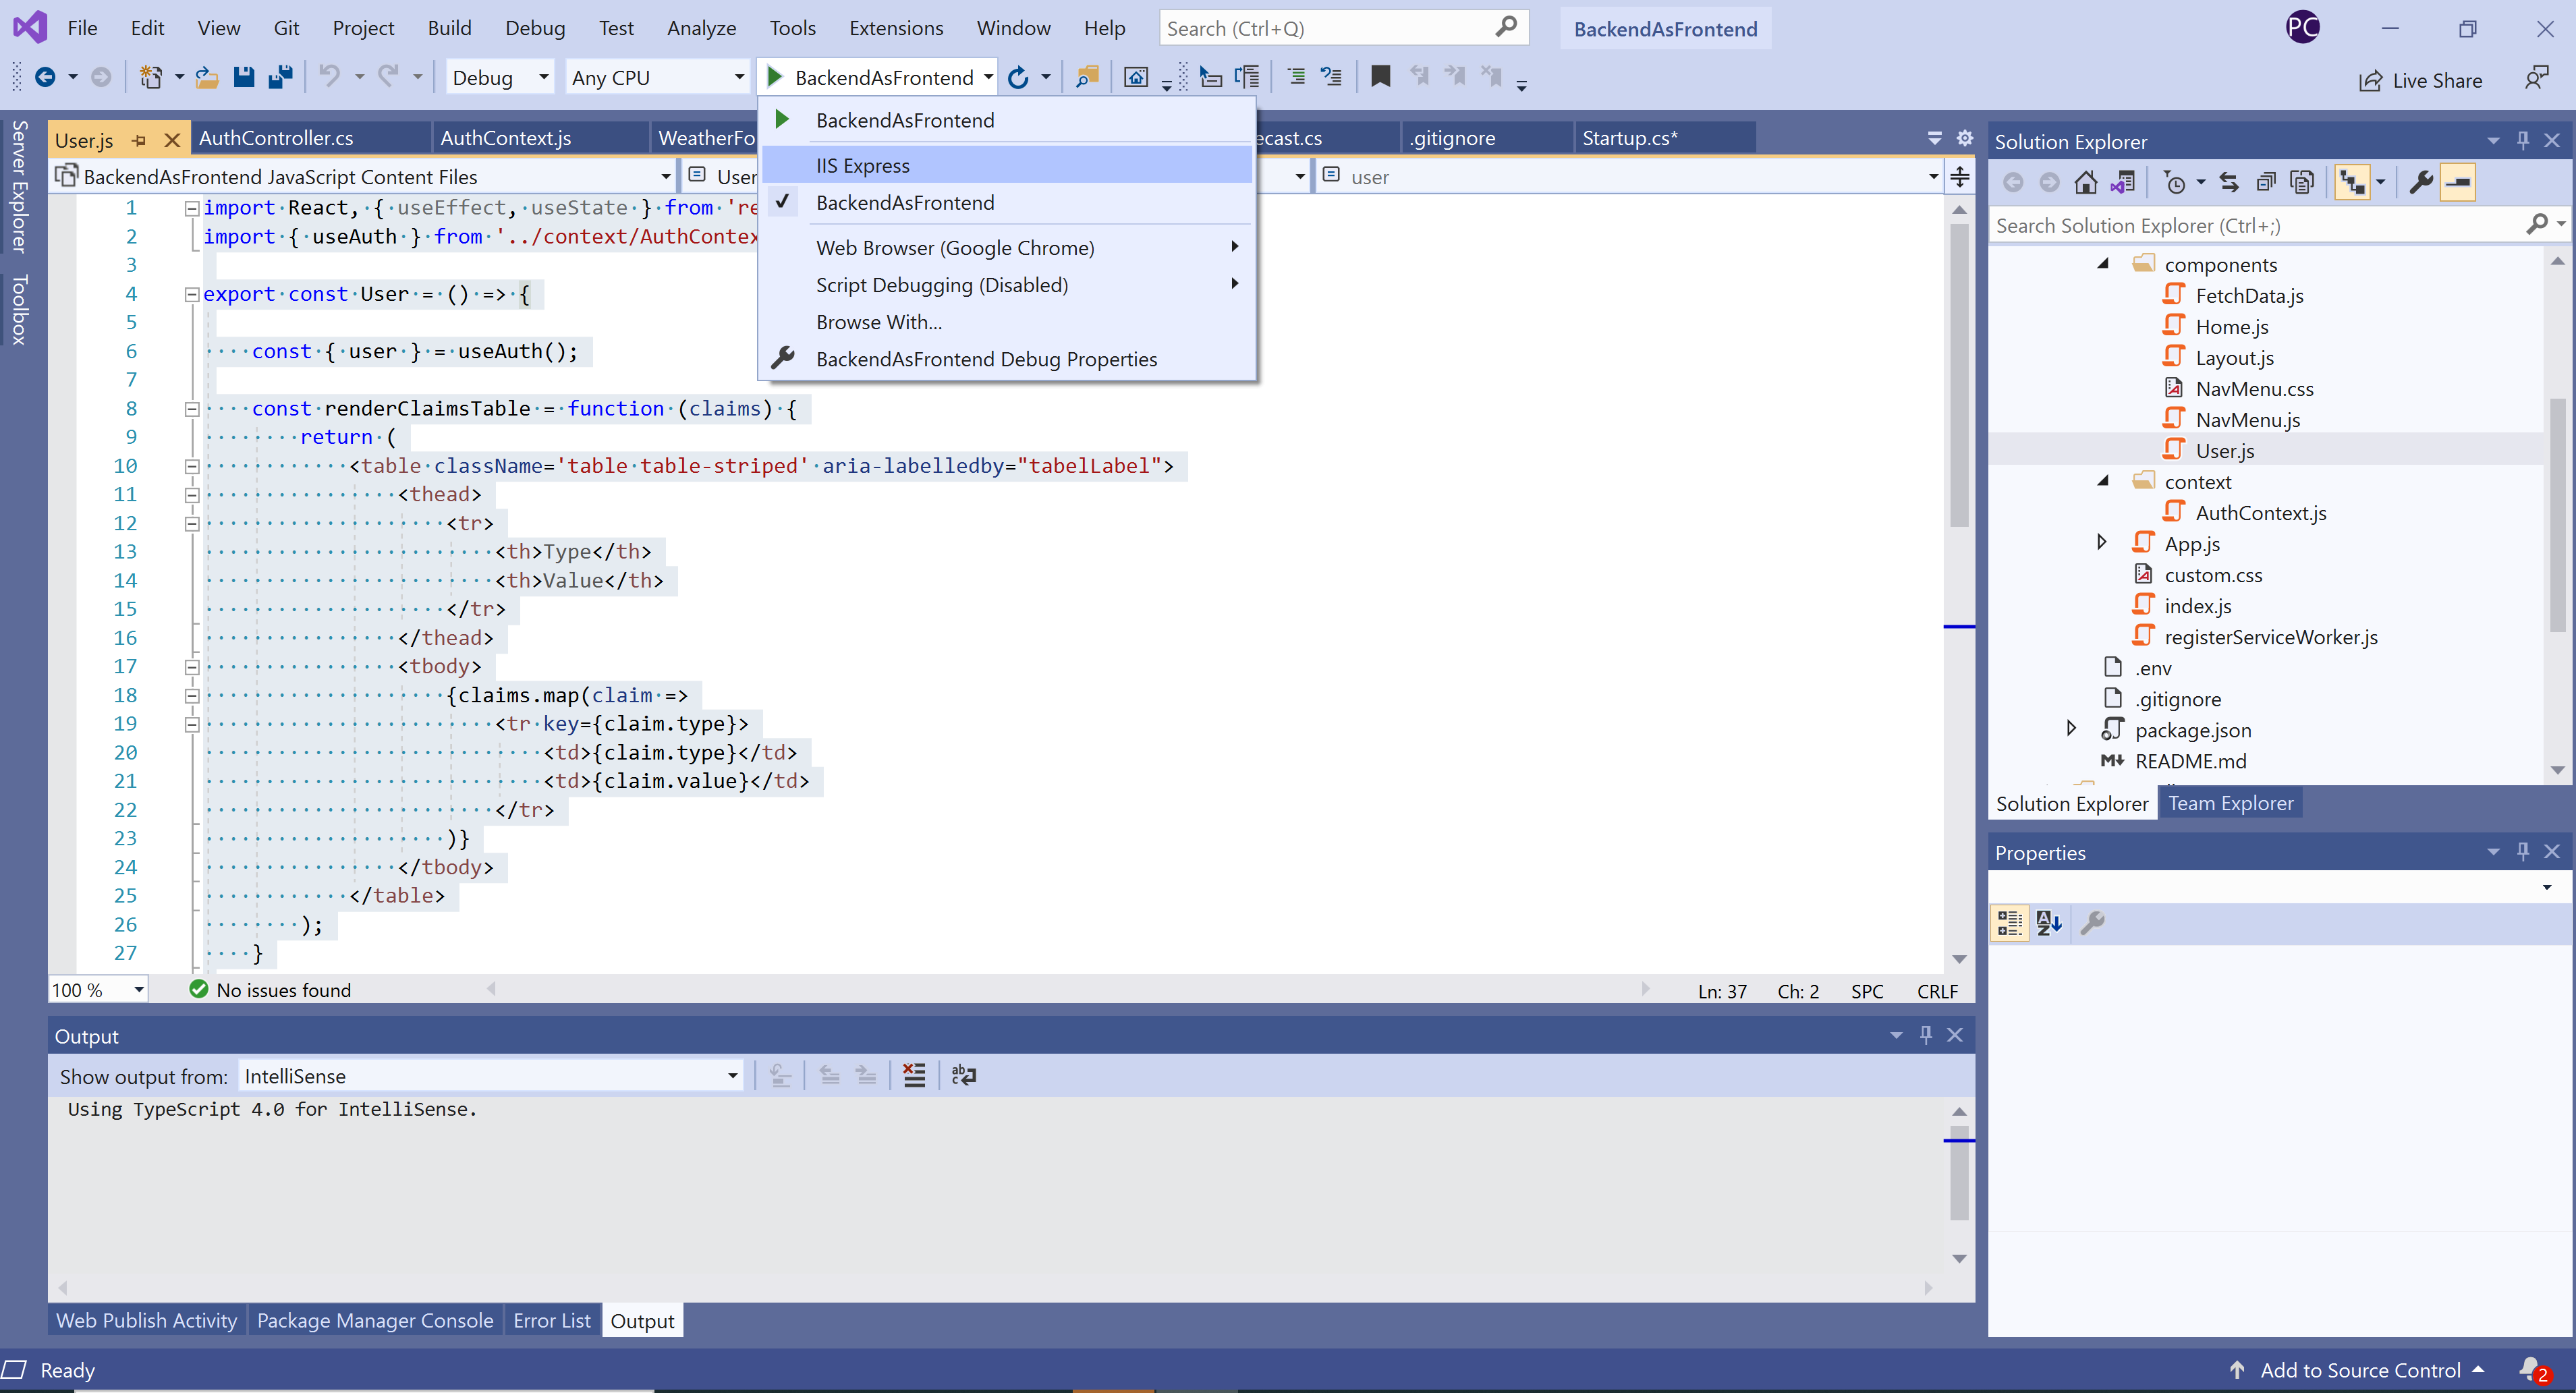
From Visual Studio, click on the Run button but select your project name from the dropdown option instead of "IIS Express". That will run the application using the Kestrel, the built-in web server included in .NET Core. Kestrel runs on "https://localhost:5001", which is the URL we previously configured in Auth0.
About the Login Flow
Here is what happens when the user authenticates with the application we have built:
- The user clicks on the Log In button and is directed to the
Loginroute. - The
ChallengeResultresponse tells the ASP.NET authentication middleware to issue a challenge to the authentication handler registered with the Auth0 authentication scheme parameter. The parameter uses the "Auth0" value you passed in the call toAddOpenIdConnectin theStartupclass. - The OIDC handler redirects the user to the Auth0's
/authorizeendpoint, which displays the Universal Login page. The user can log in with their username and password, social provider, or any other identity provider. - Once the user has logged in, Auth0 calls back to the
/callbackendpoint in your application and passes along an authorization code. - The OIDC handler intercepts requests made to the
/callbackpath. - The handler looks for the authorization code, which Auth0 sent in the query string.
- The OIDC handler calls the Auth0's
/oauth/tokenendpoint to exchange the authorization code for the user's ID and access token. - The OIDC middleware extracts the user information from the claims in the ID token.
- The OIDC middleware returns a successful authentication response and sets a cookie that indicates that the user is authenticated. The cookie contains the claims with the user's information. The cookie is stored so that the cookie middleware will automatically authenticate the user on any future requests. The OIDC middleware receives no more requests unless it is explicitly challenged.
- The React application uses the authentication context to issue an API call to the
GetUserAPI. This API returns the user claims from the authentication cookie. - The React application renders the UI Component using the authenticated user's identity.
Conclusion
The BFF pattern is an ideal solution for authentication if you can afford to pay extra money for a dedicated backend. It will help you avoid headaches when dealing with access tokens and how to keep them safe on your client-side application. The backend will do all the heavy lifting, so that you can focus only on UI/UX concerns in the frontend.
You can download from this GitHub repository the full source code of the sample project built in this article.
About the author

Pablo Cibraro
Agilesight Cofounder
Pablo is an internationally recognized expert and entrepreneur with more than 22 years of experience in designing and implementing large distributed systems with Microsoft technologies and a Connected System MVP.
For the last few years, Pablo has helped numerous Microsoft teams develop tools and frameworks for building service-oriented and web applications with .NET.
Pablo now focuses on technologies that enable developers to build large-scale systems and web applications on the cloud, such as HTML5, Node.js, ASP.NET, Windows Azure and Amazon AWS.
