Every time an AI agent queries your internal systems, it makes an access decision on behalf of a real user. If that decision is not backed up by a proper identity layer, you are not only exposing an API but also giving a language model unrestricted access to data it was never meant to see.
The Model Context Protocol (MCP) is the standard interface for connecting Large Language Models (LLMs) to external data sources. It gives AI agents a structured way to discover, read, and modify resources from servers that you control. This flexibility is powerful, but it also comes with significant security risks. An MCP server without an identity layer is like an open door into your systems.
The risk becomes obvious in real-world scenarios. An AI assistant that queries your internal knowledge base needs to respect per-user data permissions: an HR document should not be accessible to an engineering agent. A multi-tenant SaaS product needs to ensure that one tenant's AI agent cannot see another tenant's data. An enterprise copilot calling internal APIs needs to enforce role-based access the same way any other API client would. In all these cases, the MCP server is the data access layer, and it needs to know who is asking before it answers.
In this guide, you will build an MCP server in Go and secure it with Auth0. By the end, you will have a working server that validates bearer tokens and enforces department-scoped access to an internal knowledge base.
Prerequisites
To follow along with this guide, you will need:
- Go 1.25 or later and Git CLI installed on your machine
- A free Auth0 account
- curl for testing the endpoints
- A code editor and a web browser
Understanding the Architecture
Before you start building, it is important to understand what you will build and how all the pieces fit together. The system will have three moving parts.
- The MCP client is the LLM or AI Agent making requests. It acts on behalf of a user and needs to access data from your server.
- The MCP server is the data access layer that you control. It receives requests from the client, validates identity, and returns only what the caller is authorized to see.
- Auth0 is the identity provider (IdP). It issues tokens, enforces role-based permissions, and gives your server a reliable way to answer the question "Who is this, and what are they allowed to do".
This is how they connect:
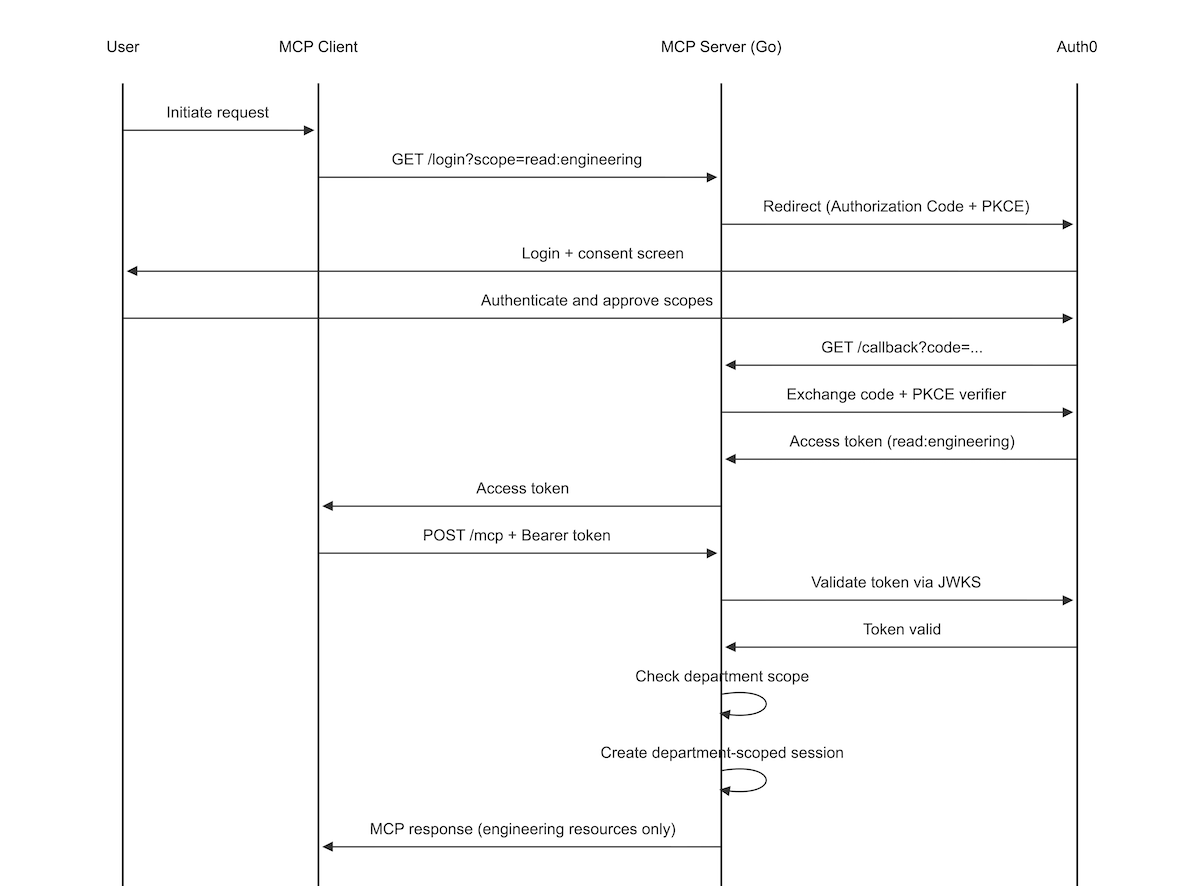
This shows the three actors in the system: the MCP client, the MCP server, and Auth0, and how they interact during authentication and resource access.
OAuth 2.1 is the protocol connecting these pieces. It defines how a client proves who it is acting on behalf of and what it is allowed to access. There are two flows relevant to MCP: Authorization Code and Client Credentials. Client Credentials is appropriate for fully automated agent pipelines with no human in the loop (machine-to-machine or M2M), but most MCP deployments involve a real user's identity governing what data the client can access. This tutorial opts for Authorization Code because it is safer and more broadly applicable by default.
The Authorization Code flow ties every token to a real user identity. When your Go server validates a token issued through this flow, the sub claim is a traceable and auditable reference to a specific person.
A protected MCP resource follows a strict request lifecycle. The client sends a JSON-RPC 2.0 request to the exposed MCP endpoint with a bearer token in the Authorization header. Your server extracts and validates that token against Auth0's JWKS endpoint, which verifies the signature, issuer, audience, and expiry. If the token is missing or invalid, the server returns a 401 with a WWW-Authenticate header pointing to your OAuth metadata endpoint. If the token is valid but lacks the required scope, the server returns a 403. Only when both checks pass does the server return context to the model. This two-layer check is what separates a secure MCP server from an insecure one.
Set Up Auth0
Before writing any server code, you need to have your identity infrastructure in place. Your Go server will validate tokens against Auth0's JWKS endpoints, which means that it will not start cleanly without valid credentials. Getting Auth0 configured first also means you can test the full auth flow as soon as the server is running, rather than retrofitting security onto working code.
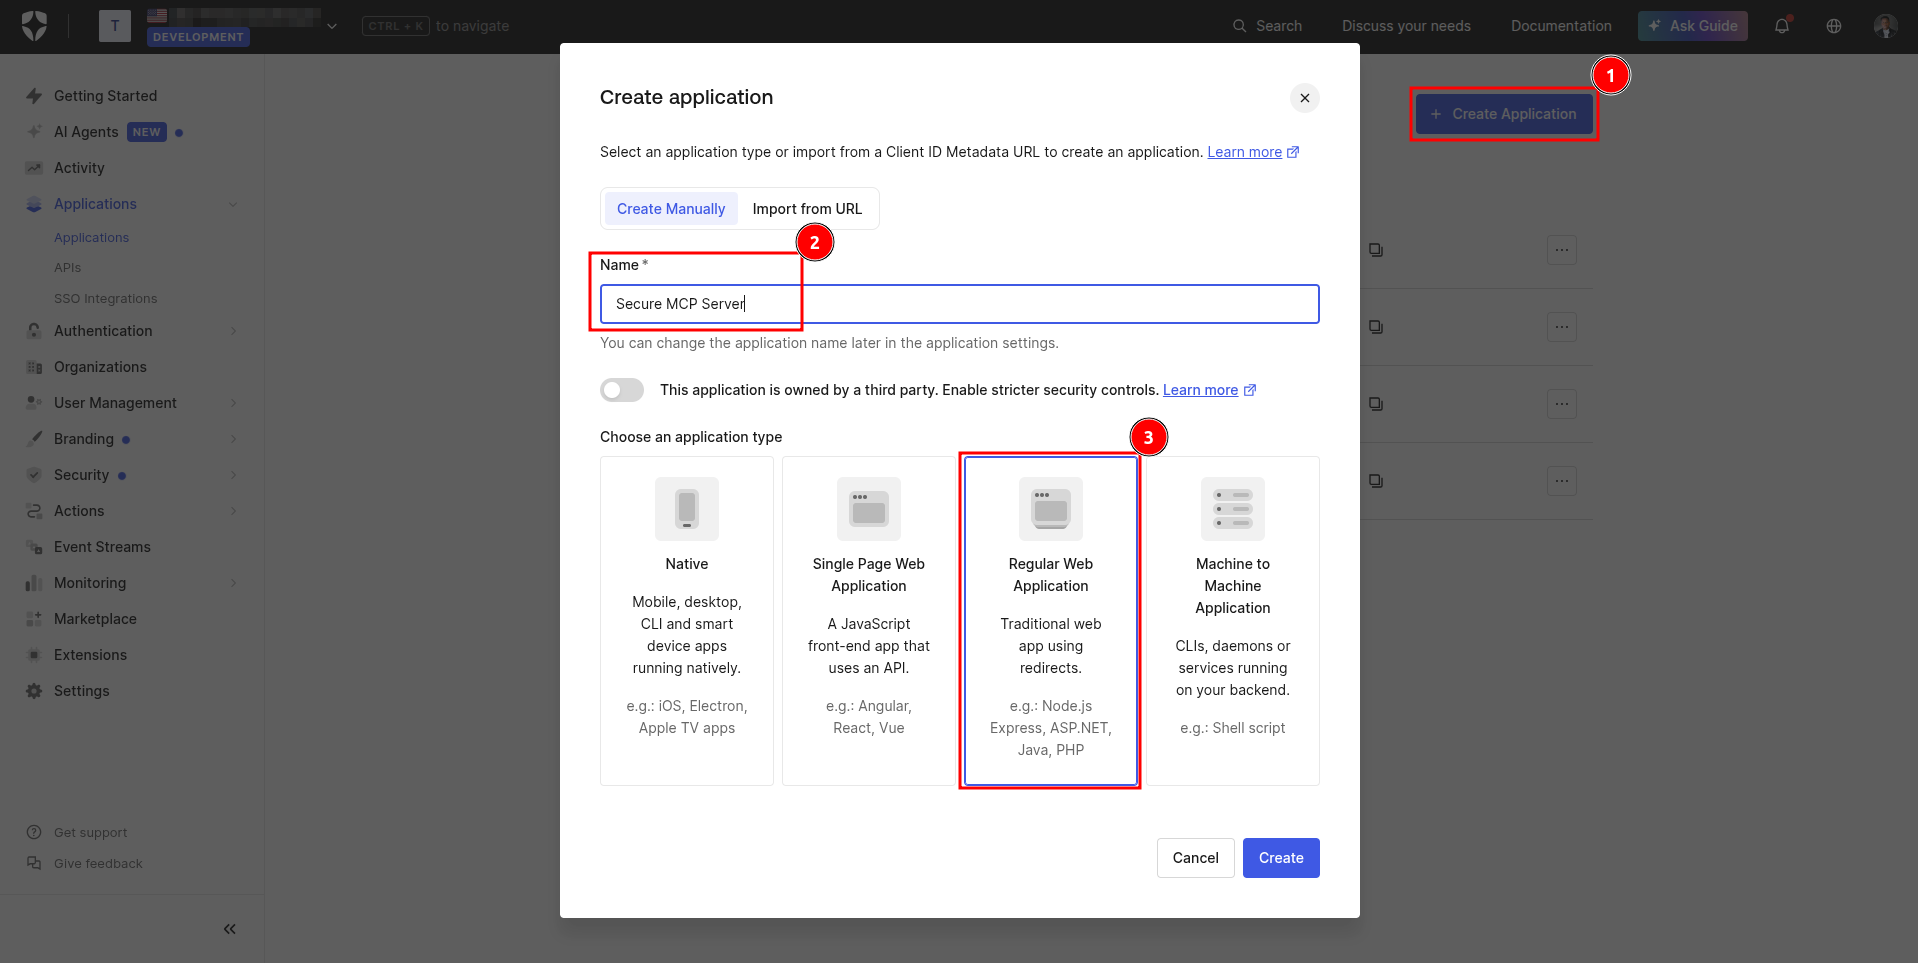
Start by navigating to your Auth0 dashboard and selecting Applications > Applications. On the Applications page, select + Create Application, provide Secure MCP Client as the name of the application and select Regular Web Application as the application type, and create the application by selecting Create:
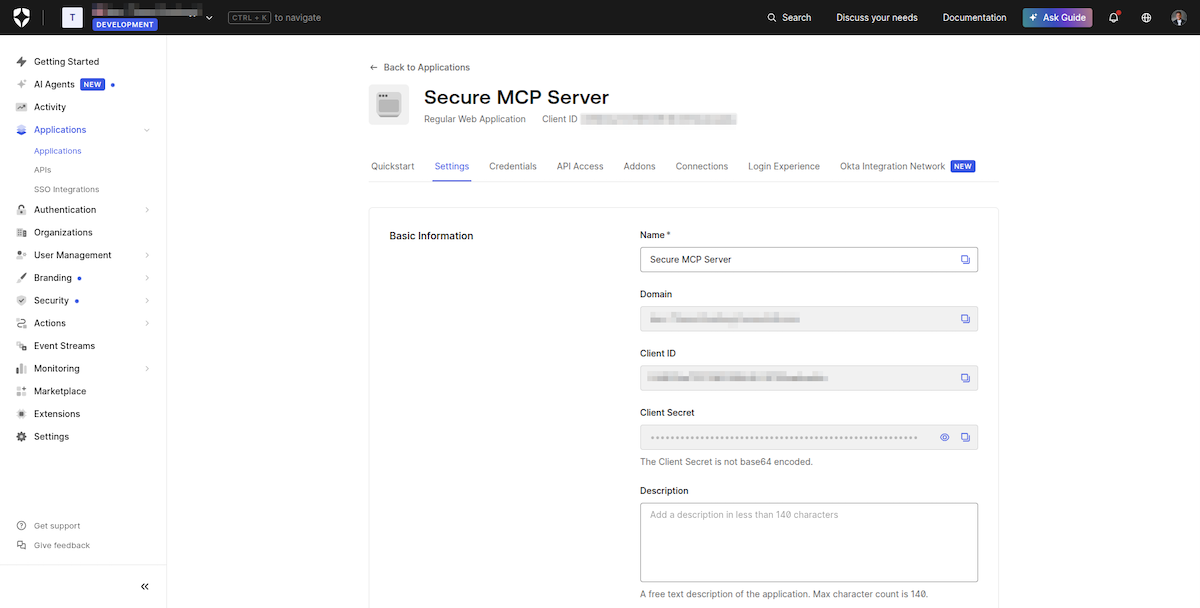
On the application details page, select the Settings tab and take note of your domain, client ID, and client secret. You will need them in the next section:
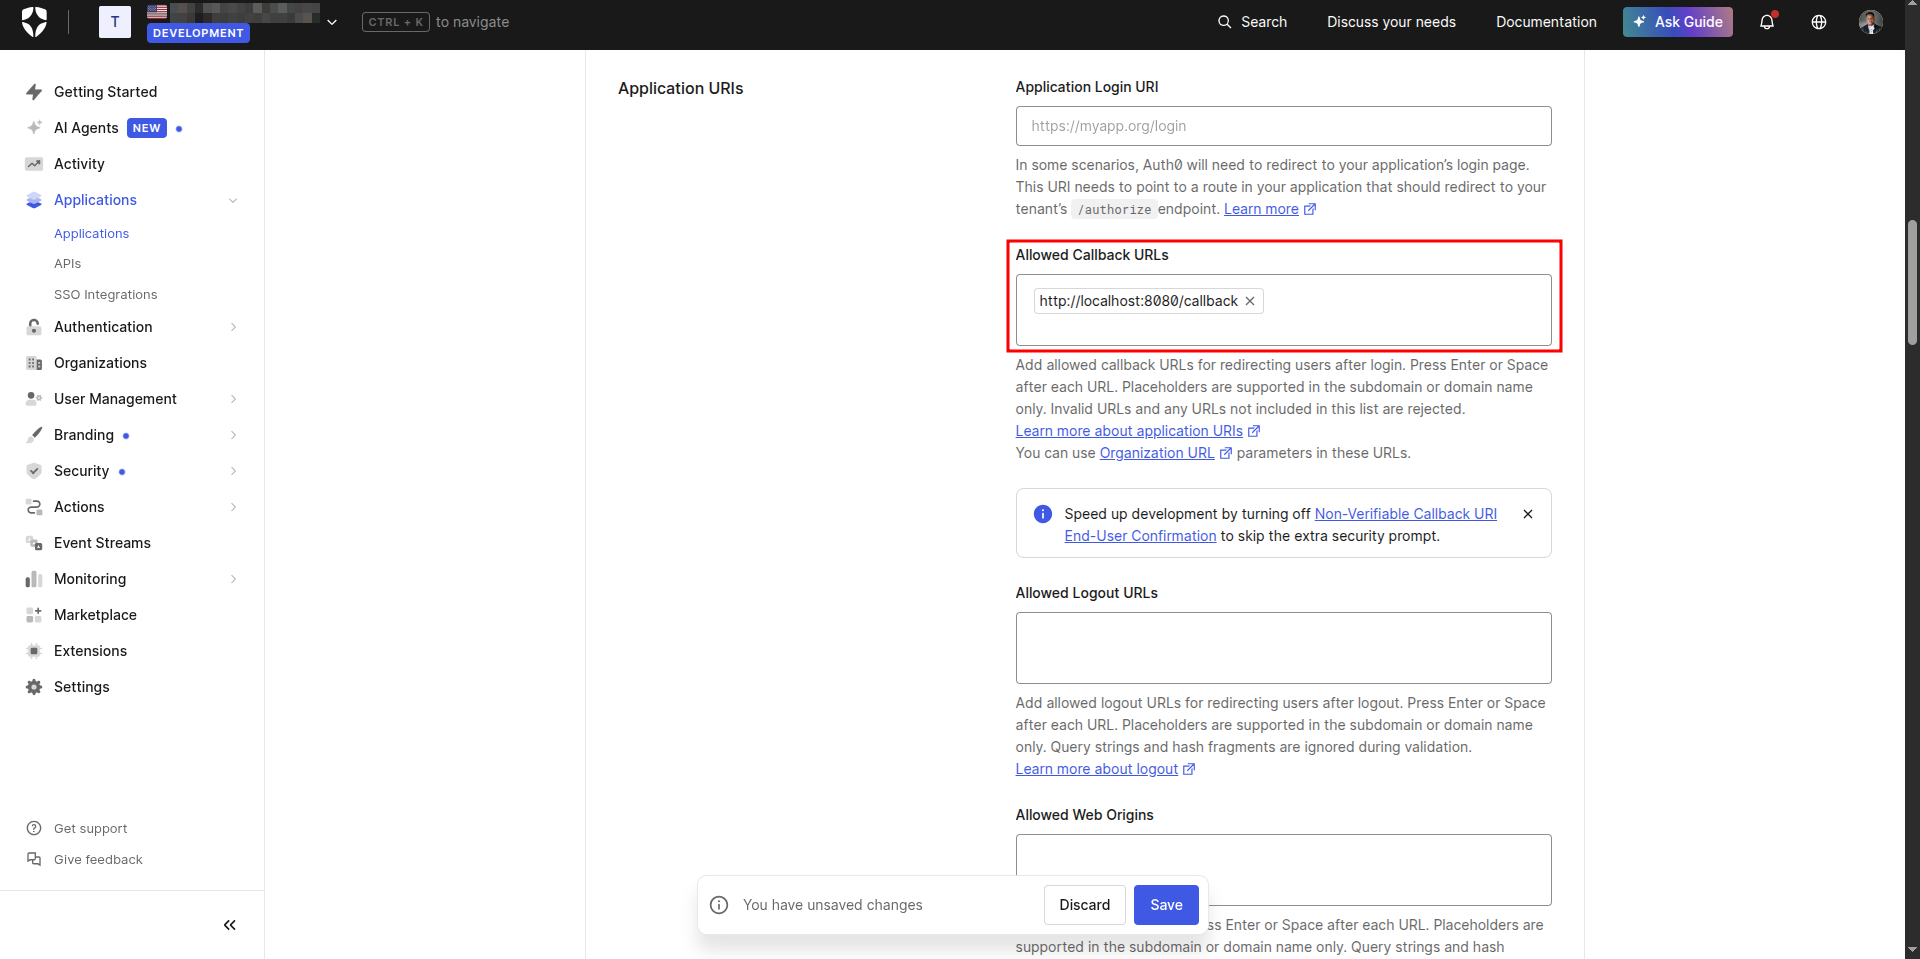
You now need to configure the URL where users should be redirected after they authenticate. Still on the Settings tab, scroll down to the Application URIs section and add http://localhost:8080/callback to the Allowed Callback URLs field, then save your changes.
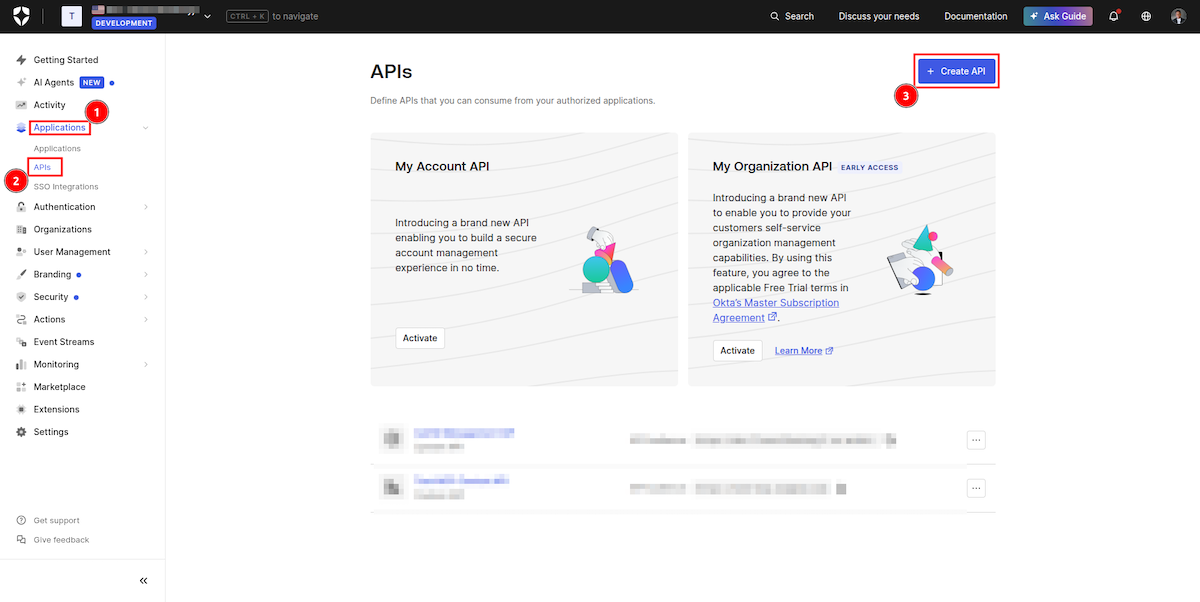
Next navigate to Applications > APIs on the sidebar and select + Create API:
You need to register an API separately from the application because the API represents the protected resource, your MCP server, while the application represents the MCP client interacting with the server. On the Create Custom API form, provide Secure MCP Server as the name and https://securemcp.example.com as the identifier. The identifier does not need to resolve because it is simply a unique URI that identifies your API. Leave everything else as is and select Create:
![Providing API details]](https://images.ctfassets.net/23aumh6u8s0i/3DkQfFDUzWNHutrnhYfssz/7dbef3342ad20c4686bed946f4b90570/CreateCustomAPI.png)
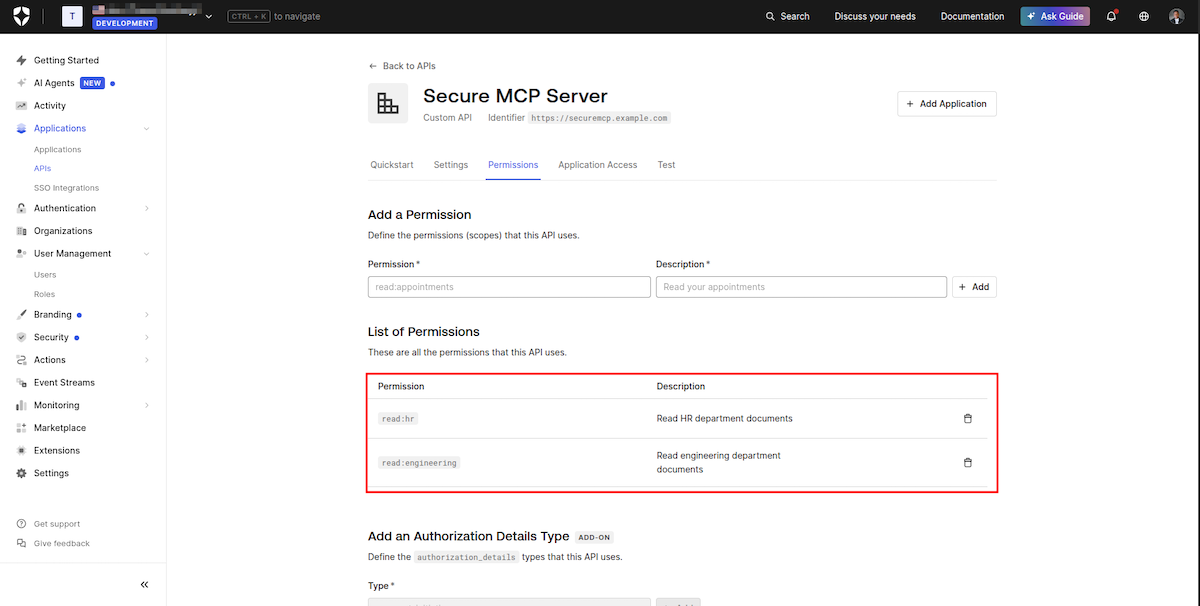
On the API details page, select the Permissions tab and create two permissions: read:engineering with description "Read engineering department documents" and read:hr with description "Read HR department documents". These scopes enforce least-privilege access, which means that your MCP server will only grant access to documents matching the scope in the returned token:
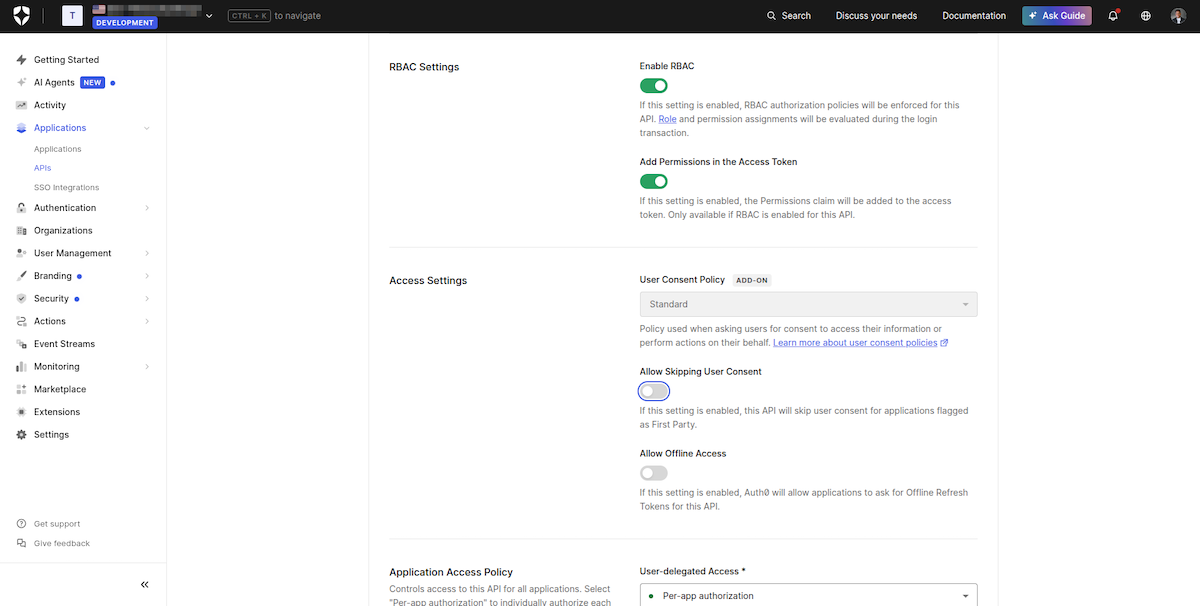
The next step is to ensure that your API enforces the permissions you just created. Select the Settings tab and scroll down to the RBAC Settings section. Here, toggle Enable RBAC and Add Permissions in the Access Token to both options. These settings enforce role-based access control (RBAC) for the API, which ensures that a scope only appears in a token if the user's role explicitly grants it. While here, scroll down to the Access Settings section and disable Allow Skipping User Consent. For MCP deployments, this is important as users should always see and explicitly approve what an AI agent is being authorized to access on their behalf. Make sure to save the changes.
Now you need to authorize your Secure MCP Client application to request permissions from this API. Select the Application Access tab on the API details page. Locate your regular web application named Secure MCP Client and select Edit. On the User-Delegated Access tab, select the two permissions you created and click Grant Access. Your regular web application should now be able to request both permissions for the API:
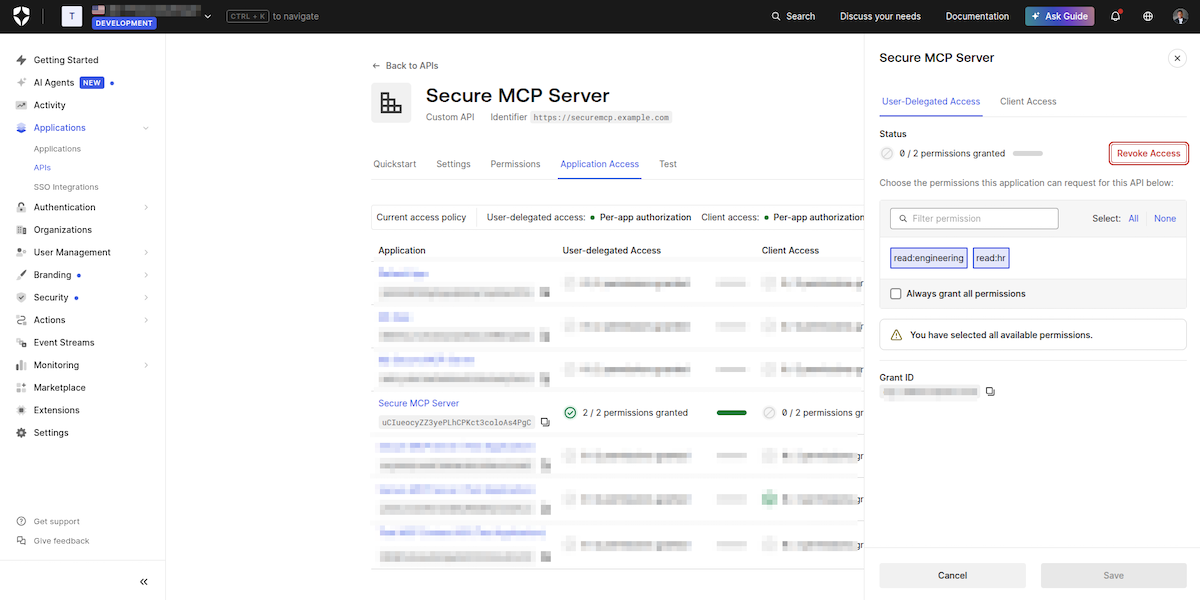
With permissions set up and RBAC enabled, you can now create roles. Roles are how you group permissions and assign them to users. On the sidebar, select User Management > Roles to open the Roles page:
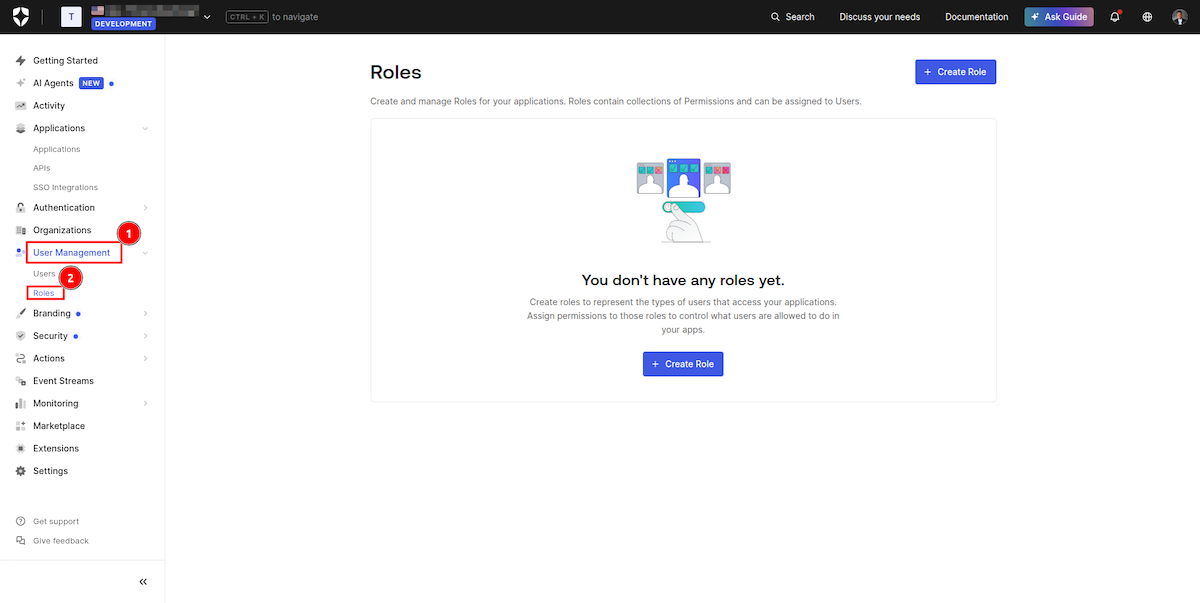
Select + Create Role and provide engineering as the name and "Access engineering documents" as the description. Make sure to select Create to save the role:
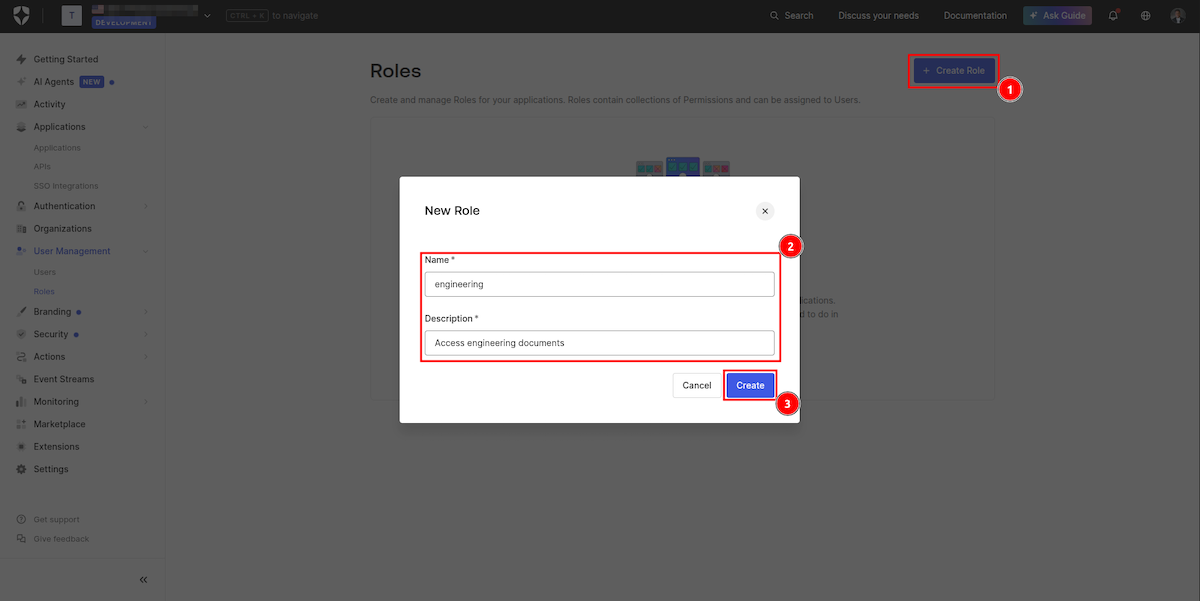
Once the role is created, select its Permissions tab and click Add Permissions. On the Add Permissions form, select the API you created and the read:engineering permission. Make sure to save the changes by selecting Add Permissions:
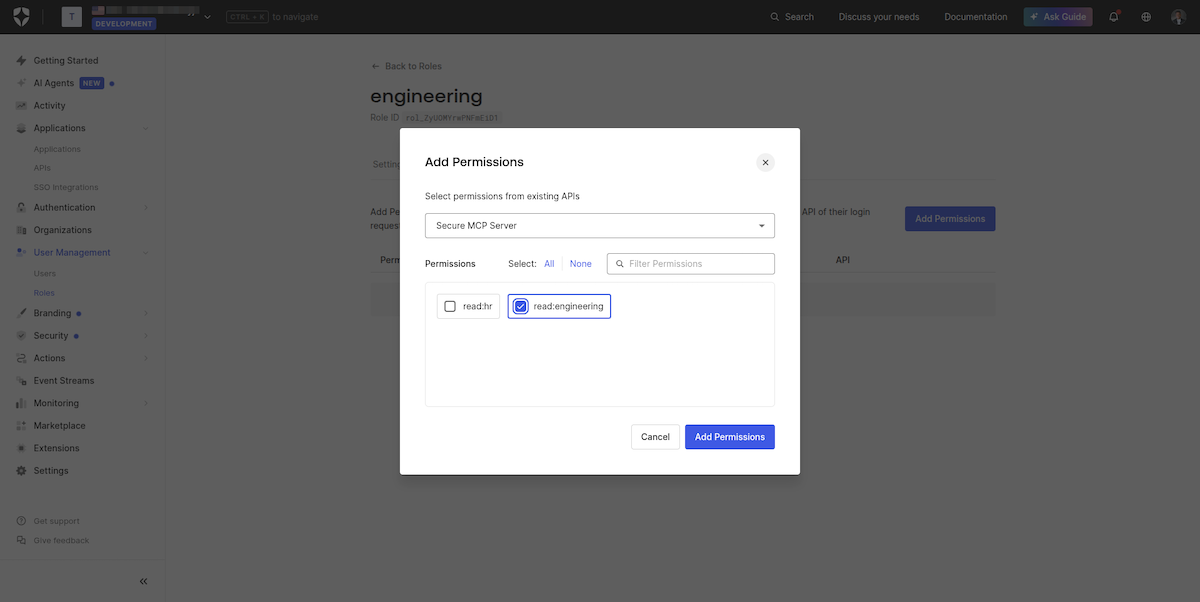
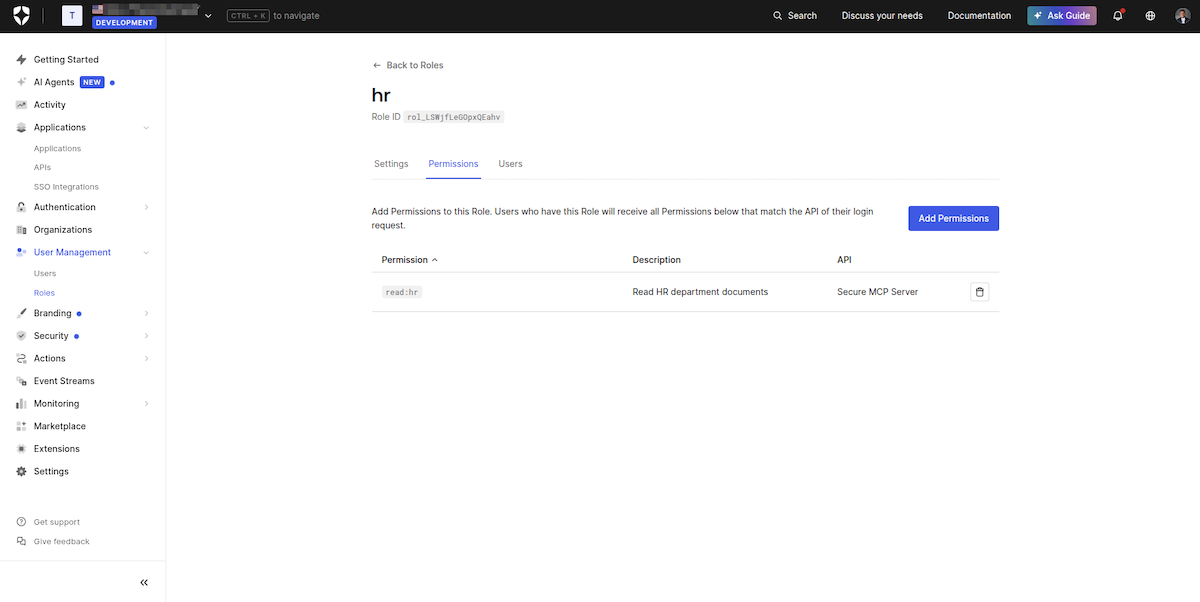
Repeat the process above to create a role named hr with description "Access HR documents" and assign read:hr permission to it:
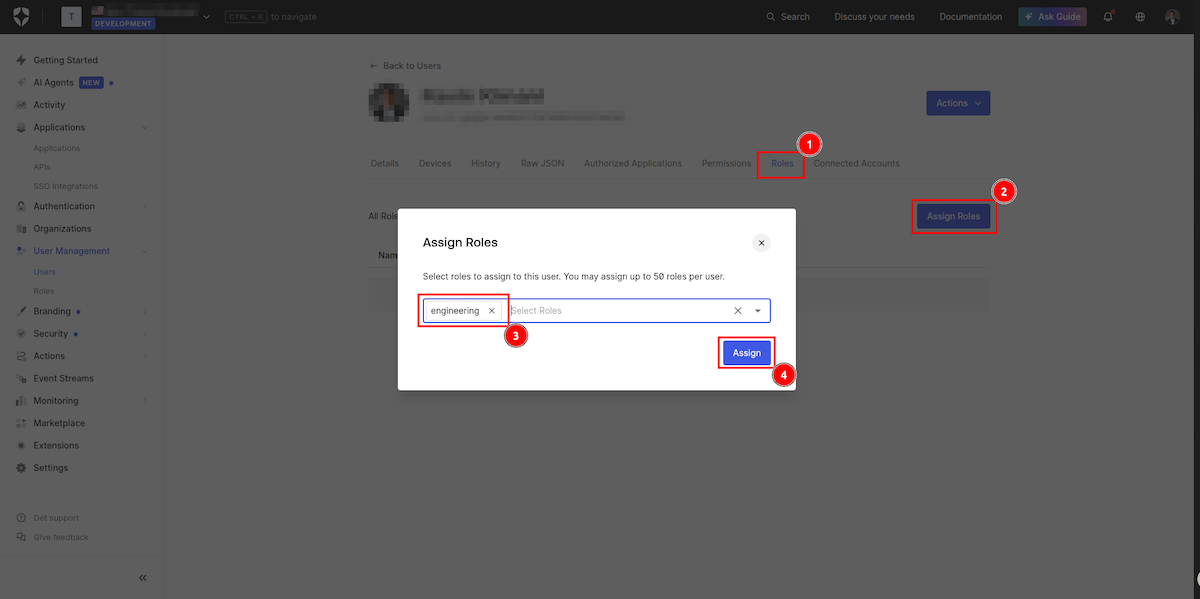
Finally, you need to assign roles to users. At this point, your Auth0 tenant will have at least one user. Navigate to User Management > Users and open the user details page. On the Roles tab, select Assign Roles and assign the engineering role to the user:
In production, role assignment is typically automated via Auth0 Actions or handled programmatically via the Management API during user provisioning.
Build the MCP Server with Go
With the identity infrastructure set up, you can now start working on the MCP server. To keep the focus on the MCP server and auth, we have prepared a starter template. Clone it to your local machine:
git clone --single-branch -b starter-template https://github.com/kimanikevin254/auth0-secure-mcp-server.git
The starter template has three important files:
cmd/server/main.go: Configures a minimal web server that exposes a/healthendpointinternal/kb/kb.go: Defines an in-memory knowledge base with six documents split across engineering and HR departmentsconfig/config.go: Loads and validates environment variables at startup
Rename the .env.example to .env and replace the placeholders with the appropriate values from your Auth0 dashboard.
Set Up the MCP Endpoint
Your MCP server needs to speak JSON-RPC 2.0 over Streamable HTTP as required for HTTP-based servers. To avoid reinventing the wheel, you will use the MCP Go SDK. Install it together with the other dependencies you will need:
go get github.com/modelcontextprotocol/go-sdk
go get github.com/lestrrat-go/jwx/v2
go get golang.org/x/oauth2
Here is what each package does:
go-sdk: the official Go MCP SDKjwx/v2: JWT validation against Auth0's JWKS endpointsgolang.org/x/oauth2: client implementation for the OAuth 2.0 spec
You now need to register your knowledge base documents as MCP resources. Create a new file named internal/mcpserver/handler.go and add the following code:
package mcpserver

import (
   "context"
   "fmt"
   "strings"

   "github.com/kimanikevin254/secure-mcp-server/internal/auth"
   "github.com/kimanikevin254/secure-mcp-server/internal/kb"
   "github.com/modelcontextprotocol/go-sdk/mcp"
)

// Creates a department-scoped MCP server
// Only articles belonging to the user's department are registered,
// so resources/list only returns what the user is permitted to see.
func NewServer(store *kb.Store, department string) *mcp.Server {
   server := mcp.NewServer(&mcp.Implementation{
       Name:    "secure-mcp-server",
       Version: "1.0.0",
   }, nil)

   server.AddResourceTemplate(
       &mcp.ResourceTemplate{
           URITemplate: "kb://{department}/{id}",
           Name:        "Knowledge Base Article",
           Description: "Internal company knowledge base articles scoped by department",
           MIMEType:    "text/plain",
       },
       func(ctx context.Context, req *mcp.ReadResourceRequest) (*mcp.ReadResourceResult, error) {
           dept, id, err := parseURI(req.Params.URI)
           if err != nil {
               return nil, fmt.Errorf("invalid resource URI: %w", err)
           }

           if dept != department {
               return nil, mcp.ResourceNotFoundError(req.Params.URI)
           }

           for _, a := range store.GetByDepartment(dept) {
               if a.ID == id {
                   return &mcp.ReadResourceResult{
                       Contents: []*mcp.ResourceContents{
                           {
                               URI:      req.Params.URI,
                               MIMEType: "text/plain",
                               Text:     fmt.Sprintf("Title: %snDepartment: %snn%s", a.Title, a.Department, a.Content),
                           },
                       },
                   }, nil
               }
           }
           return nil, mcp.ResourceNotFoundError(req.Params.URI)
       },
   )

   for _, a := range store.GetByDepartment(department) {
       article := a
       server.AddResource(
           &mcp.Resource{
               URI:         fmt.Sprintf("kb://%s/%s", article.Department, article.ID),
               Name:        article.Title,
               Description: fmt.Sprintf("Department: %s", article.Department),
               MIMEType:    "text/plain",
           },
           func(ctx context.Context, req *mcp.ReadResourceRequest) (*mcp.ReadResourceResult, error) {
               return &mcp.ReadResourceResult{
                   Contents: []*mcp.ResourceContents{
                       {
                           URI:      req.Params.URI,
                           MIMEType: "text/plain",
                           Text:     fmt.Sprintf("Title: %snDepartment: %snn%s", article.Title, article.Department, article.Content),
                       },
                   },
               }, nil
           },
       )
   }

   return server
}

func parseURI(uri string) (department, id string, err error) {
   path := strings.TrimPrefix(uri, "kb://")
   parts := strings.SplitN(path, "/", 2)
   if len(parts) != 2 || parts[0] == "" || parts[1] == "" {
       return "", "", fmt.Errorf("expected kb://{department}/{id}, got %s", uri)
   }
   return parts[0], parts[1], nil
}

// Retrieve the user's department from the request context
func DepartmentFromContext(ctx context.Context) string {
   dept, _ := ctx.Value(auth.DepartmentContextKey).(string)
   return dept
}
This code creates a department-scoped MCP server that exposes knowledge base articles as MCP resources. When a user connects, the server is initialized for a specific department by passing the authenticated user’s department as an argument to NewServer(). This means only articles belonging to that department are registered, scoping the list before any access request is made. The resource template handles requests for article URIs such as kb://engineering/1, validates the URI, ensures the requested department matches the user's department, and returns the article content if authorized.
Returning mcp.ResourceNotFoundError for cross-department requests is intentional as it prevents information leakage by making unauthorized resources indistinguishable from non-existent ones. The parseURI helper extracts department and article ID from the URI, while DepartmentFromContext retrieves the authenticated user's department from the request context.
Validate JWTs Server-Side
To avoid any client from claiming to have a valid auth token, send a forged header, or replay an expired token. Your server needs to validate received tokens using the public keys Auth0 publishes at JWKs endpoint for your tenant.
To do this, create a new file named internal/auth/validator.go and add the code below:
package auth

import (
   "context"
   "fmt"
   "net/http"
   "strings"

   "github.com/lestrrat-go/jwx/v2/jwk"
   "github.com/lestrrat-go/jwx/v2/jwt"
)

type Validator struct {
   jwksCache *jwk.Cache
   audience  string
   issuer    string
}

func NewValidator(ctx context.Context, domain, audience string) (*Validator, error) {
   jwksURL := fmt.Sprintf("https://%s/.well-known/jwks.json", domain)
   issuer := fmt.Sprintf("https://%s/", domain)

   cache := jwk.NewCache(ctx)
   if err := cache.Register(jwksURL); err != nil {
       return nil, fmt.Errorf("failed to register JWKS URL: %w", err)
   }

   // Eagerly fetch JWKs on startup.
   // Fails fast if unreachable
   if _, err := cache.Refresh(ctx, jwksURL); err != nil {
       return nil, fmt.Errorf("failed to fetch JWKS: %w", err)
   }

   return &Validator{
       jwksCache: cache,
       audience:  audience,
       issuer:    issuer,
   }, nil
}

func (v *Validator) ValidateToken(ctx context.Context, tokenString string) (jwt.Token, error) {
   jwksURL := fmt.Sprintf("%s.well-known/jwks.json", v.issuer)

   keySet, err := v.jwksCache.Get(ctx, jwksURL)
   if err != nil {
       return nil, fmt.Errorf("failed to get JWKS: %w", err)
   }

   token, err := jwt.Parse([]byte(tokenString),
       jwt.WithKeySet(keySet),
       jwt.WithValidate(true),
       jwt.WithIssuer(v.issuer),
       jwt.WithAudience(v.audience),
   )
   if err != nil {
       return nil, fmt.Errorf("invalid token: %w", err)
   }

   return token, nil
}

func ExtractBearerToken(r *http.Request) (string, error) {
   authHeader := r.Header.Get("Authorization")
   if authHeader == "" {
       return "", fmt.Errorf("missing Authorization header")
   }

   parts := strings.SplitN(authHeader, " ", 2)
   if len(parts) != 2 || !strings.EqualFold(parts[0], "bearer") {
       return "", fmt.Errorf("invalid Authorization header format")
   }

   return parts[1], nil
}

// Returns individual scopes from token's scope claim.
// Scope claim represents what was explicitly requested
// and approved for the session
func ExtractScopes(token jwt.Token) []string {
   scopeVal, ok := token.Get("scope")
   if !ok {
       return nil
   }
   return strings.Fields(fmt.Sprintf("%v", scopeVal))
}

// Map a department scope to a department name
func DepartmentFromScopes(scopes []string) string {
   for _, s := range scopes {
       switch s {
       case "read:engineering":
           return "engineering"
       case "read:hr":
           return "hr"
       }
   }
   return ""
}
NewValidator registers Auth0's JWKS URL with a cache and eagerly fetches the public keys on startup. This eager fetch is a deliberate security-first design decision: if Auth0 is unreachable or misconfigured, the server refuses to start rather than serving requests it cannot securely validate. For an MCP server where every response depends on a trusted token, a failed startup is safer than discovering misconfiguration only when the first request arrives.
ValidateToken verifies the token's signature against the cached public keys and validates the issuer, audience, and expiry in one step. The audience check ensures the token was issued specifically for your MCP server and not for some other API in the same Auth0 tenant.
Notice that authorization decisions are based on the scope claim rather than the permissions claim. This distinction is important because both claims are present in the Auth0 access token with RBAC enabled, but they serve different purposes. The permissions claim contains everything the user is authorized to do based on their assigned roles, while the scope claim contains only the permissions explicitly requested by the client and granted by the user for the current session. By enforcing access based on scopes, the MCP server follows the principle of least privilege and only grants access that was explicitly approved.
Protect the Endpoint
With the validation in place, you need a middleware that enforces it on every request. Create a new file named internal/auth/middleware.go and add the following code:
package auth

import (
   "context"
   "fmt"
   "log"
   "net/http"
   "strings"

   sdkauth "github.com/modelcontextprotocol/go-sdk/auth"
)

type contextKey string

// Exported so mcpserver/handler.go can read it from context
const DepartmentContextKey contextKey = "department"

// Validate the JWT, logs the sub claim, and extract department from
// scope for downstream use
func (v *Validator) NewTokenVerifier() sdkauth.TokenVerifier {
   return func(ctx context.Context, token string, req *http.Request) (*sdkauth.TokenInfo, error) {
       parsed, err := v.ValidateToken(ctx, token)
       if err != nil {
           return nil, fmt.Errorf("%w: %v", sdkauth.ErrInvalidToken, err)
       }

       // sub claim is a traceable reference to a real user identity
       // Log the subject (not the token) on every authenticated request for auditablity
       log.Printf("authenticated request: sub=%s path=%s", parsed.Subject(), req.URL.Path)

       scopes := ExtractScopes(parsed)
       department := DepartmentFromScopes(scopes)

       return &sdkauth.TokenInfo{
           UserID:     parsed.Subject(),
           Scopes:     scopes,
           Expiration: parsed.Expiration(),
           Extra:      map[string]any{"department": department},
       }, nil
   }
}

// Middleware that validates bearer tokens and enforces department scopes.
// The SDK's RequireBearerToken handles 401 and WWW-Authenticate headers.
// The inner handler enforces "at least one department scope" requirement
// and stores the department in context for the per-session MCP server factory.
func (v *Validator) Protect(resourceMetadataURL string, scopes []string, next http.Handler) http.Handler {
   verifier := v.NewTokenVerifier()
   sdkMiddleware := sdkauth.RequireBearerToken(verifier, &sdkauth.RequireBearerTokenOptions{
       ResourceMetadataURL: resourceMetadataURL,
   })

   return sdkMiddleware(http.HandlerFunc(func(w http.ResponseWriter, r *http.Request) {
       tokenInfo := sdkauth.TokenInfoFromContext(r.Context())
       if tokenInfo == nil {
           http.Error(w, `{"error": "forbidden", "message": "no token info in context"}`, http.StatusForbidden)
           return
       }

       // Require at least one department scope
       hasScope := false
       for _, required := range scopes {
           for _, granted := range tokenInfo.Scopes {
               if granted == required {
                   hasScope = true
                   break
               }
           }
           if hasScope {
               break
           }
       }

       if !hasScope {
           w.Header().Set("WWW-Authenticate", fmt.Sprintf(
               `Bearer resource_metadata="%s", scope="%s"`,
               resourceMetadataURL,
               strings.Join(scopes, " "),
           ))
           http.Error(w, `{"error": "forbidden", "message": "insufficient scope"}`, http.StatusForbidden)
           return
       }

       // Extract department from TokenInfo and store in context for the MCP handler
       if dept, ok := tokenInfo.Extra["department"].(string); ok {
           r = r.WithContext(context.WithValue(r.Context(), DepartmentContextKey, dept))
       }

       next.ServeHTTP(w, r)
   }))
}
This code defines the authentication layer that integrates JWT validation with the MCP SDK's bearer token middleware.
NewTokenVerifier adapts the custom Validator into the MCP SDK's TokenVerifier interface. It validates the incoming JWT, logs the authenticated user's sub claim for audit purposes, extracts scopes from the token, and maps them to a department. It returns a TokenInfo object that the SDK stores in the request context, with the department attached to Extra for use later in the request lifecycle.
Protect wraps an HTTP handler with the SDK's RequireBearerToken middleware, which handles bearer token extraction and validation and automatically manages 401 responses and WWW-Authenticate headers. After authentication, it enforces authorization by checking that the token contains at least one of the required department scopes, returning 403 if not.
- A
401tells the client to re-authenticate. - A
403tells it that the user needs to be granted the right role in Auth0.
If both checks pass, the department is injected into the request context so the per-session MCP server factory can scope the session to only that department's documents.
Handle the OAuth Flow
The validator and middleware are in place, but there is still no way for a user to actually get a token. The authorization code flow requires a login route that redirects users to Auth0 and a callback route that exchanges the authorization code for a token. To implement this, create a new file named internal/auth/oauth.go and add the code below:
package auth

import (
   "context"
   "crypto/rand"
   "crypto/sha256"
   "encoding/base64"
   "encoding/json"
   "fmt"
   "net/http"
   "strings"

   "golang.org/x/oauth2"
)

type OAuthHandler struct {
   config      *oauth2.Config
   audience    string
   stateCookie string
   pkceCookie  string
}

func NewOAuthHandler(domain, clientID, clientSecret, callbackURL, audience string) *OAuthHandler {
   endpoint := oauth2.Endpoint{
       AuthURL:  fmt.Sprintf("https://%s/authorize", domain),
       TokenURL: fmt.Sprintf("https://%s/oauth/token", domain),
   }

   cfg := &oauth2.Config{
       ClientID:     clientID,
       ClientSecret: clientSecret,
       RedirectURL:  callbackURL,
       Endpoint:     endpoint,
   }

   return &OAuthHandler{
       config:      cfg,
       audience:    audience,
       stateCookie: "oauth_state",
       pkceCookie:  "pkce_cookie",
   }
}

// Redirect the user to Auth0's hosted logi page with PKCE
func (o *OAuthHandler) Login(w http.ResponseWriter, r *http.Request) {
   requestedScope := r.URL.Query().Get("scope")
   scopes := []string{"openid", "profile"}
   if requestedScope != "" {
       scopes = append(scopes, strings.Split(requestedScope, " ")...)
   }

   state, err := generateRandom()
   if err != nil {
       http.Error(w, "failed to generate state", http.StatusInternalServerError)
       return
   }

   verifier, err := generateRandom()
   if err != nil {
       http.Error(w, "failed to generate PKCE verifier", http.StatusInternalServerError)
       return
   }
   challenge := generateS256Challenge(verifier)

   // Store state cookie to validate on callback.
   // Prevents CSRF
   http.SetCookie(w, &http.Cookie{
       Name:     o.stateCookie,
       Value:    state,
       Path:     "/",
       HttpOnly: true,
       SameSite: http.SameSiteLaxMode,
   })

   // Store PKCE verifier in cookie for use during token exchange
   http.SetCookie(w, &http.Cookie{
       Name:     o.pkceCookie,
       Value:    verifier,
       Path:     "/",
       HttpOnly: true,
       SameSite: http.SameSiteLaxMode,
   })

   authURL := o.config.AuthCodeURL(state,
       oauth2.SetAuthURLParam("audience", o.audience),
       oauth2.SetAuthURLParam("scope", strings.Join(scopes, " ")),
       oauth2.SetAuthURLParam("code_challenge", challenge),
       oauth2.SetAuthURLParam("code_challenge_method", "S256"),
       oauth2.SetAuthURLParam("prompt", "consent"),
   )
   http.Redirect(w, r, authURL, http.StatusTemporaryRedirect)
}

// Exchange the authorization code for a token
func (o *OAuthHandler) Callback(w http.ResponseWriter, r *http.Request) {
   stateCookie, err := r.Cookie((o.stateCookie))
   if err != nil {
       http.Error(w, "missing state cookie", http.StatusBadRequest)
       return
   }

   if r.URL.Query().Get("state") != stateCookie.Value {
       http.Error(w, "invalid state parameter", http.StatusBadRequest)
       return
   }

   pkceVerifier, err := r.Cookie(o.pkceCookie)
   if err != nil {
       http.Error(w, "missing PKCE verifier cookie", http.StatusBadRequest)
       return
   }

   code := r.URL.Query().Get("code")
   if code == "" {
       http.Error(w, "missing authorization code", http.StatusBadRequest)
       return
   }

   token, err := o.config.Exchange(context.Background(), code,
       oauth2.SetAuthURLParam("code_verifier", pkceVerifier.Value),
   )
   if err != nil {
       http.Error(w, fmt.Sprintf("failed to exchange code: %v", err), http.StatusInternalServerError)
       return
   }

   w.Header().Set("Content-Type", "application/json")
   json.NewEncoder(w).Encode(map[string]string{
       "access_token": token.AccessToken,
       "token_type":   token.TokenType,
   })
}

func generateRandom() (string, error) {
   b := make([]byte, 32)
   if _, err := rand.Read(b); err != nil {
       return "", err
   }
   return base64.RawURLEncoding.EncodeToString(b), nil
}

func generateS256Challenge(verifier string) string {
   h := sha256.New()
   h.Write([]byte(verifier))
   return base64.RawURLEncoding.EncodeToString(h.Sum(nil))
}
This code implements an OAuth 2.0 Authorization Code Flow with Proof Key for Code Exchange (PKCE) for authenticating users against an Auth0 domain.
NewOAuthHandler initializes the OAuth configuration using Auth0’s authorization and token endpoints, along with the client credentials, redirect URL, and audience. It also defines cookie names used to store transient security values during the login flow.
Login starts the authentication process by generating a cryptographically secure random state value to protect against Cross-Site Request Forgery (CSRF) and a PKCE code_verifier. It derives a code_challenge from the verifier using SHA-256 and base64 encoding and stores both the state and verifier in secure, HTTP-only cookies. The user is then redirected to the hosted login page with the requested scopes, audience, and PKCE parameters attached. prompt=consent ensures the user always explicitly approves what the MCP client is being authorized to access.
Callback validates the state parameter against the stored cookie to prevent CSRF, retrieves the PKCE verifier, and exchanges the authorization code for an access token. The verifier is sent alongside the code to complete the PKCE flow. Without it, an intercepted authorization code is useless. If successful, the access token is returned as JSON for use in subsequent MCP requests.
Wire it All Together
You now have a department-scoped MCP server with registered resources, a validator, a middleware, and an OAuth handler, but they are not connected yet. To wire everything together, open the cmd/server/main.go file and replace the existing code with the following:
package main

import (
   "context"
   "fmt"
   "log"
   "net/http"

   "github.com/kimanikevin254/secure-mcp-server/config"
   "github.com/kimanikevin254/secure-mcp-server/internal/auth"
   "github.com/kimanikevin254/secure-mcp-server/internal/kb"
   "github.com/kimanikevin254/secure-mcp-server/internal/mcpserver"
   sdkauth "github.com/modelcontextprotocol/go-sdk/auth"
   sdkmcp "github.com/modelcontextprotocol/go-sdk/mcp"
   "github.com/modelcontextprotocol/go-sdk/oauthex"
)

func main() {
   ctx := context.Background()

   // Load config
   cfg, err := config.Load()
   if err != nil {
       log.Fatalf("failed to load config: %v", err)
   }

   // Initialize JWT validator
   validator, err := auth.NewValidator(ctx, cfg.Auth0Domain, cfg.Auth0Audience)
   if err != nil {
       log.Fatalf("failed to create auth validator: %v", err)
   }

   // Initialize OAuth handler
   oauthHandler := auth.NewOAuthHandler(
       cfg.Auth0Domain,
       cfg.Auth0ClientID,
       cfg.Auth0ClientSecret,
       cfg.Auth0CallbackURL,
       cfg.Auth0Audience,
   )

   // Initialize knowledge base
   store := kb.NewStore()

   resourceMetadataURL := cfg.ServerURL + "/.well-known/oauth-protected-resource"

   // Per-session MCP Server scoped to user's department.
   // The factory is called once per session during initialize.
   // Department is captured from the validated token in context
   mcpHandler := sdkmcp.NewStreamableHTTPHandler(func(r *http.Request) *sdkmcp.Server {
       department := mcpserver.DepartmentFromContext(r.Context())
       return mcpserver.NewServer(store, department)
   }, nil)

   mux := http.NewServeMux()

   // Auth routes
   mux.HandleFunc("/login", oauthHandler.Login)
   mux.HandleFunc("/callback", oauthHandler.Callback)

   // Protected MCP endpoint
   mux.Handle("/mcp", validator.Protect(
       resourceMetadataURL,
       cfg.MCPScopes,
       mcpHandler,
   ))

   // OAuth 2.0 Protected Resource Metadata
   // Required by the MCP auth spec so clients can discover the authorization server
   mux.Handle("/.well-known/oauth-protected-resource", sdkauth.ProtectedResourceMetadataHandler(
       &oauthex.ProtectedResourceMetadata{
           Resource:               cfg.ServerURL + "/mcp",
           AuthorizationServers:   []string{fmt.Sprintf("https://%s/", cfg.Auth0Domain)},
           ScopesSupported:        cfg.MCPScopes,
           BearerMethodsSupported: []string{"header"},
       },
   ))

   // Health check
   mux.HandleFunc("/health", func(w http.ResponseWriter, r *http.Request) {
       w.Header().Set("Content-Type", "application/json")
       fmt.Fprintln(w, `{"status": "ok"}`)
   })

   addr := fmt.Sprintf(":%s", cfg.Port)
   log.Printf("MCP server listening on %s", addr)

   if err := http.ListenAndServe(addr, mux); err != nil {
       log.Fatalf("server error: %v", err)
   }
}
The main function wires together all the components you have been working on. It begins by loading the configuration, initializing the JWT validator used for access token verification, creating the OAuth handler that manages the login flow, and loading the in-memory knowledge base.
Rather than creating a single global MCP server instance, the application uses a factory function that executes once per session during the MCP initialize phase. The factory reads the authenticated user's department from the request context and creates a department-scoped server containing only the resources that the user is authorized to see. This means access control is enforced at the resource registration level: an engineering user's session never has HR documents registered, so there is nothing to filter or leak.
The /mcp endpoint is protected by Protect, which chains the SDK's bearer token validation with the department scope check before requests reach the MCP handler. The /login and /callback routes handle the Authorization Code flow, and /.well-known/oauth-protected-resource publishes the OAuth Protected Resource Metadata required by the MCP auth spec so compliant clients can discover the authorization server and initiate the OAuth flow automatically.
Test the Integration
With everything connected, it is time to test if it works as expected. Start by running the server using the command:
go mod tidy
go run cmd/server/main.go
Your output should be similar to the following:
2026/05/31 10:29:57 MCP server listening on :8080
To obtain an access token, navigate to http://localhost:8080/login?scope=read:engineering on your browser. You should see the Auth0-hosted login page with a consent screen showing you exactly what you are requesting access to:
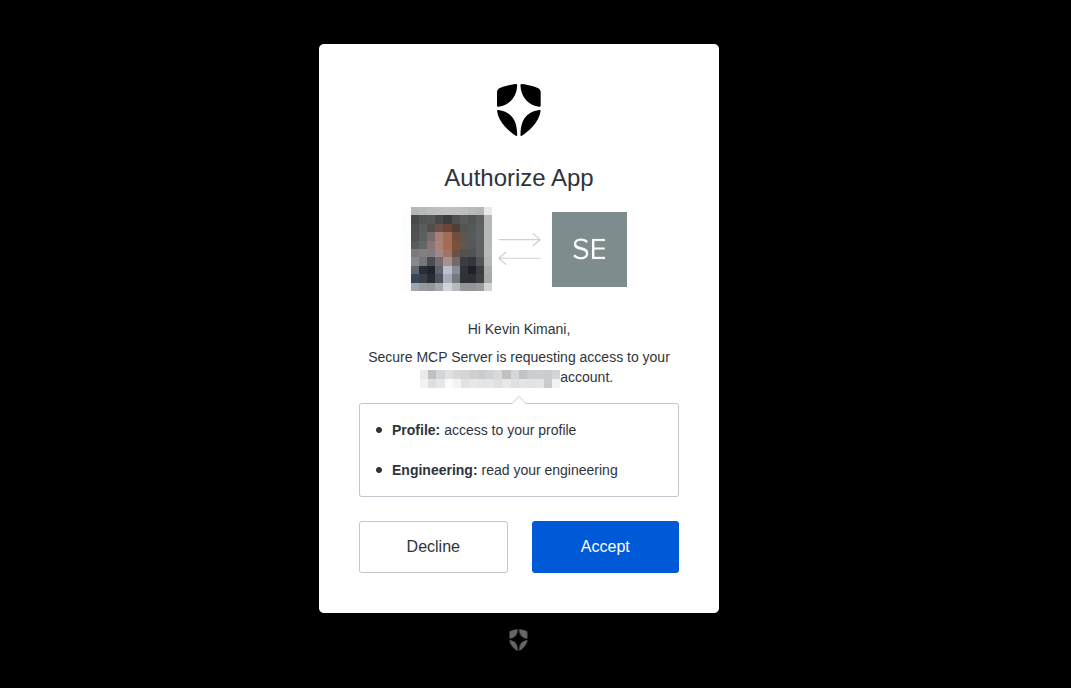
Select Accept and you will be redirected to the /callback route, which displays the access token and the type:
{
   "access_token": "eyJhb...",
   "token_type": "Bearer"
}
Copy the access token and set it as a variable in a different terminal:
TOKEN="<YOUR-ACCESS-TOKEN>"
Test the happy path
In the same terminal where you set the TOKEN variable, complete the MCP initialize handshake:
curl -i -X POST http://localhost:8080/mcp
 -H "Authorization: Bearer $TOKEN"
 -H "Content-Type: application/json"
 -H "MCP-Protocol-Version: 2025-11-25"
 -d '{
   "jsonrpc": "2.0",
   "id": 1,
   "method": "initialize",
   "params": {
     "protocolVersion": "2025-11-25",
     "capabilities": {},
     "clientInfo": {
       "name": "test-client",
       "version": "1.0.0"
     }
   }
 }'
You should get a 200 with the server capabilities and a session ID:
HTTP/1.1 200 OK
Cache-Control: no-cache, no-transform
Connection: keep-alive
Content-Type: text/event-stream
Mcp-Session-Id: <YOUR-MCP-SESSION-ID>
Date: Sun, 31 May 2026 07:39:27 GMT
Transfer-Encoding: chunked

event: message
data: {"jsonrpc":"2.0","id":1,"result":{"capabilities":{"logging":{},"resources":{"listChanged":true}},"protocolVersion":"2025-11-25","serverInfo":{"name":"secure-mcp-server","version":"1.0.0"}}}
Note that the MCP server also includes a Mcp-Session-Id header. You should include the session ID in all subsequent requests to continue with the same session. Now list the available resources and make sure to replace <YOUR-MCP-SESSION-ID> with the appropriate value from here onwards:
curl -i -X POST http://localhost:8080/mcp
 -H "Authorization: Bearer $TOKEN"
 -H "Content-Type: application/json"
 -H "MCP-Protocol-Version: 2025-11-25"
 -H "Mcp-Session-Id: <YOUR-MCP-SESSION-ID>"
 -d '{"jsonrpc":"2.0","id":2,"method":"resources/list","params":{}}'
Because you only requested and consented to the read:engineering scope, the response should only include the engineering documents:
event: message
data: {"jsonrpc":"2.0","id":2,"result":{"resources":[{"description":"Department: engineering","mimeType":"text/plain","name":"Engineering Onboarding Guide","uri":"kb://engineering/1"},{"description":"Department: engineering","mimeType":"text/plain","name":"System Architecture Overview","uri":"kb://engineering/2"},{"description":"Department: engineering","mimeType":"text/plain","name":"Production Runbook","uri":"kb://engineering/3"}]}}
You can also read a specific article/resource:
curl -i -X POST http://localhost:8080/mcp
 -H "Authorization: Bearer $TOKEN"
 -H "Content-Type: application/json"
 -H "MCP-Protocol-Version: 2025-11-25"
 -H "Mcp-Session-Id: <YOUR-MCP-SESSION-ID>"
 -d '{"jsonrpc":"2.0","id":3,"method":"resources/read","params":{"uri":"kb://engineering/1"}}'
Your output should look similar to the following:
event: message
data: {"jsonrpc":"2.0","id":3,"result":{"contents":[{"uri":"kb://engineering/1","mimeType":"text/plain","text":"Title: Engineering Onboarding GuidenDepartment: engineeringnnWelcome to the engineering team. This guide covers your dev environment setup, code review process, and deployment procedures."}]}}
Test the failure paths
Testing the failure paths is as important as testing the happy path. A server that returns the right data is useful, but a server that correctly rejects unauthorized requests is secure.
Start by testing cross-department access. The token you have at the moment is for the engineering department, and it should not be able to access HR department documents. Try to read an HR department document:
curl -i -X POST http://localhost:8080/mcp
 -H "Authorization: Bearer $TOKEN"
 -H "Content-Type: application/json"
 -H "MCP-Protocol-Version: 2025-11-25"
 -H "Mcp-Session-Id: <YOUR-MCP-SESSION-ID>"
 -d '{"jsonrpc":"2.0","id":4,"method":"resources/read","params":{"uri":"kb://hr/4"}}'
You should get a resource not found message, which is exactly how you configured the server to prevent information leakage:
event: message
data: {"jsonrpc":"2.0","id":4,"error":{"code":-32002,"message":"Resource not found","data":{"uri":"kb://hr/4"}}}
Next, try to initialize a new session without providing a token:
curl -i -X POST http://localhost:8080/mcp
 -H "Content-Type: application/json"
 -H "MCP-Protocol-Version: 2025-11-25"
 -d '{"jsonrpc":"2.0","id":1,"method":"initialize","params":{"protocolVersion":"2025-11-25","capabilities":{},"clientInfo":{"name":"test-client","version":"1.0.0"}}}'
You should get a 401 Unauthorized response with a WWW-Authenticate header that points the client to your metadata endpoint so it can discover the authorization server as required by the MCP spec.
Lastly, visit http://localhost:8080/login on your browser to obtain an access token without scopes and try to hit the MCP endpoint with it:
curl -i -X POST http://localhost:8080/mcp
 -H "Authorization: Bearer <YOUR-ACCESS-TOKEN-WITHOUT-SCOPES>"
 -H "Content-Type: application/json"
 -H "MCP-Protocol-Version: 2025-11-25"
 -d '{"jsonrpc":"2.0","id":1,"method":"initialize","params":{"protocolVersion":"2025-11-25","capabilities":{},"clientInfo":{"name":"test-client","version":"1.0.0"}}}'
You should get a 403 Forbidden response with a message that you have insufficient scopes:
HTTP/1.1 403 Forbidden
Content-Type: text/plain; charset=utf-8
Www-Authenticate: Bearer resource_metadata="http://localhost:8080/.well-known/oauth-protected-resource", scope="read:engineering read:hr"
X-Content-Type-Options: nosniff
Date: Sun, 31 May 2026 08:01:02 GMT
Content-Length: 56

{"error": "forbidden", "message": "insufficient scope"}
Through both the happy and failure paths, you have seen the security model in action. A valid token scoped to read:engineering returns only engineering resources, a token with no scopes is rejected with a 403, and a request with no token at all is rejected with a 401 that guides the client to the authorization server. Most importantly, cross-department access returns a "resource not found" error rather than an authorization error, which helps prevent information leakage by making unauthorized resources indistinguishable from non-existent ones.
We used cURL for simplicity but you can use MCP Inspector or any other MCP client to call the server. Read the guide Test your MCP Server with MCP Inspector to learn how to set this up.
You can access the full code on GitHub.
From Open Door to Identity-Aware MCP Server
In this guide, you built an MCP server in Go with production-grade auth patterns and secured it with Auth0. Along the way, you set up OAuth 2.1 with Authorization Code flow and PKCE, validated JWTs server-side against Auth0's JWKS endpoint, enforced department-scoped access using RBAC-backed tokens, and implemented the Protected Resource Metadata endpoint required by the MCP auth spec. The result is a clear identity layer between your AI agent and your protected data.
As AI agents get access to more enterprise systems through MCP, the identity layer stops being optional. An MCP server without auth is not a data access layer but an open door. For teams taking this to production, the next steps are token refresh for expiring sessions, rotating client secrets via a secrets manager, structured audit logging beyond the sub claim, and Auth0's Fine-Grained Authorization for access patterns more complex than department-level scoping.
Auth0 is the natural foundation for all of this: a developer-first identity platform built for exactly these kinds of complex, API-driven, AI-adjacent access patterns. Everything you have built here can grow from department-level scoping to multi-tenant and enterprise-scale authorization without changing the fundamentals. Set up your free Auth0 account in minutes and start building.
About the author

Kevin Kimani
Developer