TL;DR: Auth0's custom OAuth2 integration works alongside built-in Token Vault connections to let you register services as custom social connections. The auth0-tv open-source CLI allows developers or AI agents like Claude Code to execute internal API calls with a single terminal command.
Your AI agent (Claude Code, OpenClaw, etc.) can already call external services like Gmail, GitHub, Slack, Salesforce, and a growing list of other SaaS providers through Auth0 Token Vault. That covers the public side of an enterprise stack. But most of the systems your users actually work with every day (the internal ticketing system, the company wiki, the deployment platform, the expense tool someone built in 2019) are not on that list. They are your own APIs, protected by OAuth2 and running behind your VPN.
You do not want to hardcode service accounts. You do not want to teach an agent framework about a brand-new credential store. You want those internal APIs to show up in the agent the same way Gmail does: as something it calls on the logged-in user's behalf, with tokens the agent never sees. That is exactly what Auth0's custom OAuth2 integration for Token Vault is for. In this post, we will wire one up end-to-end, using a small sample helpdesk API and Claude Code as the agent.
What We Will Learn in This Post
- How Auth0's custom OAuth2 integration fits alongside the built-in Token Vault connections, and when you'd reach for it.
- How to register an OAuth2-compliant service you own as a custom social connection and toggle on Connected Accounts for Token Vault.
- How to use
auth0-tv, a small open-source CLI that drives Token Vault from the terminal or an AI agent, to call your internal API with one line, including calling it directly from Claude Code.
Technology Stack
- Auth0 Token Vault: securely stores and refreshes OAuth tokens for third-party services so your agent never handles credentials.
- Custom OAuth2 integration: Auth0's "bring your own provider" flavor of a social connection, for any OAuth2-compliant service that is not in the built-in list.
auth0-token-vault-cli(auth0-tv): an open-source Node.js CLI + Agent Skill that provides commands to login,connectto services, and to do authenticatedfetchfor the services. Designed for humans and AI agents alike.- An AI agent that supports skills, like Claude Code or OpenClaw.
- Acme Helpdesk sample: a tiny Express + SQLite OAuth2 provider that plays the role of "your internal API" in this tutorial. Clone it, run it, do not worry about how it is built since that is not the point of this post. You can check the project's README.md if you are interested in knowing more.
How It Fits Together
Here is the end-to-end flow we are about to wire up. It shows a user sending a request via Claude Code to the auth0-tv CLI.
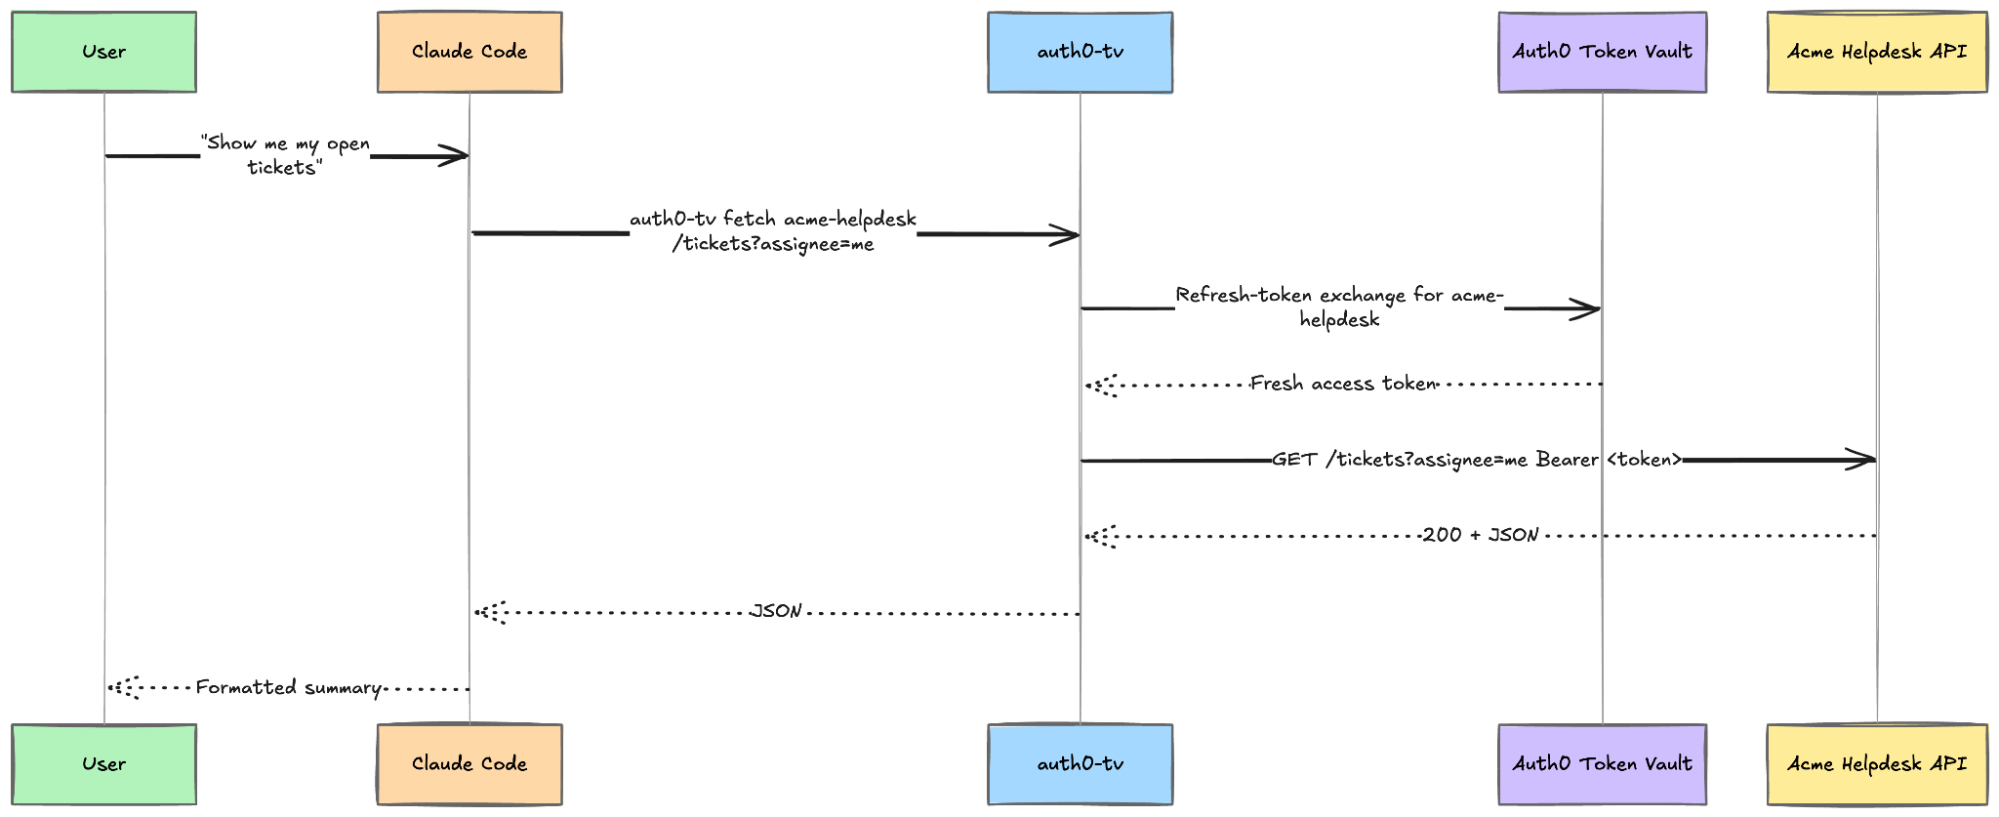
The two pieces doing the heavy lifting are the ones you do not really see:
- Token Vault holds the refresh token for your Acme Helpdesk account, scoped to your Auth0 user. When
auth0-tvrequests an access token, Auth0 exchanges the refresh token with Acme Helpdesk's/tokenendpoint and returns a new one. You (and the agent) never handle either token directly. - The custom OAuth2 connection is the Auth0-side record that tells Token Vault where to go and what to ask for. The same connection can be reused across any number of applications and agents in your tenant.
Prerequisites
You will need the following tools and services to follow along:
- An Auth0 account
- Bun v1.2+ or Node.js v20+
- The latest version of Auth0 CLI installed and logged in
jqfor composing and inspecting JSON payloads on the command line- Claude Code or another AI agent installed and authenticated
- A way to expose
http://localhost:3001publicly. ngrok is what I will use in this post; Cloudflare works just as well if you prefer. Auth0 needs to reach the sample app's/authorize,/token, and/userinfoendpoints.
Getting Started
Clone the sample and start it:
git clone https://github.com/deepu105/acme-helpdesk-oauth2-sample.git
cd acme-helpdesk-oauth2-sample

bun install   # or npm install

cp .env.example .env.local
Open .env.local and update the fields.
First, fill in the three secrets. Use openssl rand -hex 32 command to generate three unique secrets for this.
Next, you need to set OAUTH2_REDIRECT_URI to your Auth0 tenant's callback URL. Auth0 always sends users back to https://<your-tenant>.auth0.com/login/callback after a social login, and the sample app's authorize endpoint strict-compares against this value.
Let’s grab the tenant domain with the Auth0 CLI.
First, make sure you are logged in to the CLI. The default auth0 login token does not include the connection-management and client grant scopes we will need later for using token vault and connected accounts, so log in once with the full set of necessary scopes now:
auth0 login --scopes "create:connections,update:connections,read:connections,delete:connections,create:client_grants"
Then list your tenants:
auth0 tenants list
Look for the row marked → (your currently active tenant) and plug the domain into .env.local:
# .env.local
OAUTH2_REDIRECT_URI=https://<your-tenant>.auth0.com/login/callback
Start the app:
bun dev # or npm run dev
You should see:
Seeded 3 users and 12 tickets.
acme-helpdesk listening on http://localhost:3001
Confirm it is alive:
curl -sSf http://localhost:3001/health
# {"status":"ok","service":"acme-helpdesk",...}
Now make the app publicly accessible so Auth0 can reach it. In a second terminal:
ngrok http 3001
# or: cloudflared tunnel --url http://localhost:3001
ngrok prints a line like https://<slug>.ngrok-free.app; cloudflared prints a https://<slug>.trycloudflare.com equivalent. Copy that URL. We will call it $ACME_HOST for the rest of the post.
Excellent. Our "internal API" is now reachable from the public internet.
Checkpoint
At this point, you should be able to:
- cURL
https://$ACME_HOST/healthand get a JSON response - Open
https://$ACME_HOST/authorize?client_id=auth0-custom-oauth2&redirect_uri=<your-auth0-callback>&response_type=code&scope=openid+profile+read:tickets+write:tickets&state=xin a browser and see the sample app's login form render. (The flow will not complete past login yet. We will register the Auth0 connection in the next section.)
Registering the Custom OAuth2 Connection in Auth0
Now the fun part. We will tell Auth0 about our service and flip the Token Vault switch on the connection. Enabling the service on the auth0-tv application and setting up the rest of the Token Vault plumbing (MRRT, client grants, My Account API) is handled by auth0-tv init in the next section, so we do not need to touch that here.
Create the connection via the Auth0 CLI
Create the variables below so your shell can interpolate them into the payload in the next command. Make sure not to include https:// in the host URL.
export ACME_HOST=<your-ngrok-hostname>          # e.g. c021-165-85-243-52.ngrok-free.app (no https://)
export OAUTH2_CLIENT_SECRET=<from .env.local>   # the 32-byte hex secret you generated earlier
Create the fetchUserProfile script. This is the Node.js function that Auth0 runs server-side to turn the access token into a user profile. Our sample's /userinfo endpoint is OIDC-shaped, so the script is minimal:
cat > /tmp/fetchUserProfile.js <<JS
function fetchUserProfile(accessToken, ctx, cb) {
 request.get(
   {
     url: 'https://$ACME_HOST/userinfo',
     headers: { Authorization: 'Bearer ' + accessToken },
     json: true,
   },
   function (err, _res, body) {
     if (err) return cb(err);
     cb(null, {
       user_id: body.user_id,
       email: body.email,
       name: body.name,
     });
   }
 );
}
JS
The only non-negotiable field in the returned profile is user_id, which Auth0 uses to key the connected account to the user. email and name are optional but helpful. The here-doc delimiter (JS) is unquoted on purpose, so bash expands $ACME_HOST as it writes the file.
Now compose the full connection payload. jq handles JSON-escaping the script and interpolating the host and secret:
jq -n \
 --rawfile script /tmp/fetchUserProfile.js \
 --arg host "$ACME_HOST" \
 --arg secret "$OAUTH2_CLIENT_SECRET" \
 '{
   name: "acme-helpdesk",
   strategy: "oauth2",
   connected_accounts: { active: true },
   options: {
     client_id: "auth0-custom-oauth2",
     client_secret: $secret,
     authorizationURL: "https://($host)/authorize",
     tokenURL: "https://($host)/token",
     scope: "openid profile read:tickets write:tickets",
     scripts: { fetchUserProfile: $script }
   }
 }' > /tmp/acme-connection.json
Then create the connection:
auth0 api post connections --data "$(cat /tmp/acme-connection.json)" \
 | jq '{id, name, strategy, connected_accounts}'
You should see:
{
 "id": "con_xxxxxxxxxxxxxxxx",
 "name": "acme-helpdesk",
 "strategy": "oauth2",
 "connected_accounts": { "active": true }
}
That one call covers both the connection creation and the "Connected Accounts for Token Vault" toggle, thanks to connected_accounts.active: true in the payload.
The connection name (acme-helpdesk) is the slug you will use with auth0-tv connect later. Pick a connection name to match your own service when you do this for real.
Checkpoint
At this point, you should be able to:
- Run
auth0 api get "connections?name=acme-helpdesk" | jq '.[0].connected_accounts'and see{"active": true}
The connection exists on your tenant but is not yet enabled on the auth0-tv application. auth0-tv init takes care of that in the next section.
Alternative: configure via the Auth0 Dashboard
Prefer the UI? The sample repo's README has the full Dashboard walkthrough: three click-throughs in Authentication → Social to create the connection, flip the Connected Accounts for Token Vault toggle, and (optionally) enable the connection on your auth0-tv app.
The Auth0 side is done. Everything from here will be in the terminal.
Wiring auth0-tv to the New Connection
auth0-tv is a small open-source CLI that wraps Auth0's Token Vault flows (login, per-service connect, and authenticated fetch) for use by humans and AI agents. Install it globally:
bun add -g auth0-token-vault-cli # or npm install -g auth0-token-vault-cli
Run the interactive auth0-tv init wizard. It bootstraps the Auth0 side (tenant configuration, Token Vault grant type, MRRT, callback URLs) and registers your connections:
auth0-tv init
Follow the prompts. When init asks how to configure the application, pick Create a new application (or Use an existing application if you already have one set up for Token Vault). When it asks which connections to enable, make sure acme-helpdesk is selected.
This opens a browser, signs you in using the new Auth0 app that was just created, and returns control to the terminal. You can either create a new account with an email and password using the Sign up link when prompted to sign in, or sign in using the Continue with Acme-helpdesk button and its seeded users like carol@acme.test with password demo1234.
Now connect the new custom OAuth2 connection, using the acme-helpdesk slug you chose earlier:
auth0-tv connect acme-helpdesk \
 --scopes "openid,profile,read:tickets,write:tickets" \
 --allowed-domains "$ACME_HOST"
What happens:
auth0-tvredirects you through Auth0's Connected Accounts flow.- Auth0 redirects you to our sample app's
/authorizeendpoint. - You sign in as one of the demo users (for example,
alice@acme.test/demo1234) and click Allow on the consent screen. - Auth0 stores the resulting access + refresh tokens in Token Vault, under your Auth0 user profile.
Back in the terminal, confirm the connection:
auth0-tv connections
You should see acme-helpdesk listed with the scopes you requested.
Now make your first authenticated call:
auth0-tv fetch acme-helpdesk https://$ACME_HOST/tickets
The CLI pulls a fresh access token from Token Vault (exchanging your refresh token under the hood), calls the URL with Authorization: Bearer ... injected, and prints the JSON response. Neither you nor the agent ever saw a token in plaintext.
That is it. You have set up a custom OAuth2 connection for Token Vault.
Checkpoint
At this point, you should be able to:
- See
acme-helpdeskunderauth0-tv connections - List tickets via
auth0-tv fetch acme-helpdesk https://$ACME_HOST/tickets
Using It from Claude Code
This is the part that turns a clever CLI into something an agent can use.
auth0-token-vault-cli ships an Agent Skill that teaches supported agents how to call auth0-tv correctly: which scopes map to which services, how to interpret errors, and how to re-run connect when a scope is missing. The skill is available through the Claude Code plugin marketplace.
Install it:
/plugin marketplace add deepu105/auth0-token-vault-cli
/plugin install auth0-token-vault@auth0-token-vault
/reload-plugins
Now, try asking the assistant:
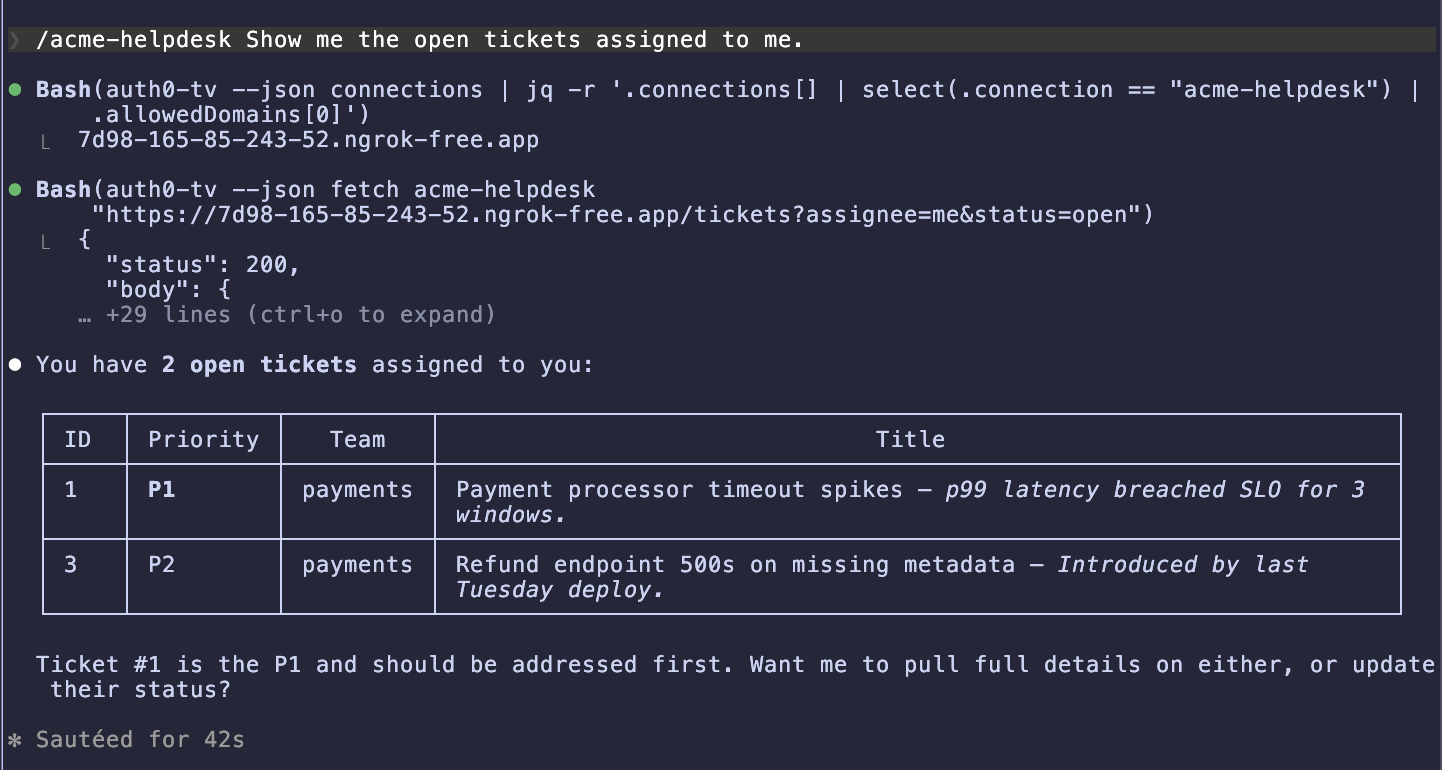
You: "/auth0-token-vault Show me the open tickets assigned to me in acme-helpdesk."
Claude Code picks up the auth0-token-vault skill and resolves that acme-helpdesk is a connected service. You will get the ticket list back, but you might notice the agent spends a few back-and-forth calls figuring out the API shape first: a GET on /tickets/me, then /api/tickets, then /tickets?user=me, before landing on /tickets?assignee=me&status=open. The auth0-token-vault skill knows how to talk to Token Vault but has no idea what endpoints acme-helpdesk exposes.
The fix is a second skill sitting on top: a small acme-helpdesk skill that documents the API so the agent does not have to guess. The sample repo ships one at skills/acme-helpdesk/SKILL.md. It is ~70 lines of markdown: a short API reference (endpoints, filters, value constraints), a couple of example commands, and a note about auth0-tv's --json response envelope. No code.
Drop it into your Claude Code user skills directory:
# Point this at your local clone of the sample repo
export ACME_SAMPLE_DIR=~/path/to/acme-helpdesk-oauth2-sample
mkdir -p ~/.claude/skills/acme-helpdesk
cp "$ACME_SAMPLE_DIR/skills/acme-helpdesk/SKILL.md" \
 ~/.claude/skills/acme-helpdesk/SKILL.md
Reload plugins (/reload-plugins), then try the same prompt again:
You: "/acme-helpdesk Show me the open tickets assigned to me."
This time, Claude goes straight to auth0-tv --json fetch acme-helpdesk "https://$ACME_HOST/tickets?assignee=me&status=open" and returns the list on the first try, no trial and error.
A few more prompts worth trying:
You: "/acme-helpdesk Open a new P1 incident titled 'Checkout 500s spiking' in the payments team."
The agent should call POST /tickets with the right body and report back with the new ticket ID.
You: "/acme-helpdesk List all in-progress tickets on the platform team."
Filters combine cleanly. The agent picks the right query string.
You: "/acme-helpdesk Mark ticket 42 as resolved."
A PATCH /tickets/42 with {"status":"resolved"}. The agent will echo the updated record.
Great! Your coding assistant can now drive an API it has never seen before, using the same credentials flow as a human user, with no agent-level token handling.
Using it from OpenClaw
OpenClaw users get the same skill through ClawHub:
npx clawhub@latest install auth0-token-vault
Restart OpenClaw, and the same prompts work. The skill manifest is shared, so the behavior is identical. You can also add the same acme-helpdesk skill to OpenClaw by dropping it into the user skills directory:
mkdir -p ~/.openclaw/skills/acme-helpdesk
cp ~/path/to/acme-helpdesk-oauth2-sample/skills/acme-helpdesk/SKILL.md \
 ~/.openclaw/skills/acme-helpdesk/SKILL.md
Restart OpenClaw once more, and the agent gets the same one-shot behavior: no endpoint guessing, direct auth0-tv --json fetch on the right URL.
What You Have Accomplished
- Ran a small OAuth2-compliant API locally and made it publicly accessible for Auth0.
- Registered the API as an Auth0 custom OAuth2 social connection with Connected Accounts for Token Vault enabled.
- Connected to it from the terminal via
auth0-tv connect acme-helpdesk, and called it withauth0-tv fetch. - Gave Claude Code (and, optionally, OpenClaw) the same capability via an Agent Skill, without your agent ever handling a token.
Extending further
- Swap the helpdesk for your own service. The steps are identical. Change the authorization/token URLs, point the fetch-user-profile script at your
/userinfoendpoint, pick your own scopes, and you are in. - Add more scopes.
auth0-tv connect <name> --scopes ...accepts any scope string your service understands. Connecting again with a broader scope prompts a re-consent. - Mix with built-in connections. The same Connected Accounts machinery links a user profile to Google, GitHub, Slack, and your internal helpdesk simultaneously. The agent sees them all through one CLI.
Learn More About Auth0 Token Vault
Auth0 Token Vault lets your AI agent call external APIs on a user's behalf without ever seeing the user's credentials, whether those APIs come from a built-in integration like Google or Slack, or a first-party internal service wired in through a custom OAuth2 connection like we did here. That combination, a single agent-visible surface over both the public SaaS world and your own APIs, is what Auth0 for AI Agents is built for.
Sign up for Auth0 for AI Agents.
About the author

Deepu K Sasidharan
Principal Developer Advocate