

Introduction
Jenkins is the "leading open-source automation server", a tool that can be used to automate various parts of a development workflow. With it, you can smooth processes like running test cases, deploying the latest build, or even automating the complete Continuous Integration (CI) pipeline. It can be configured to run these tasks in any environment or even dedicated containers. You can run Jenkins in a distributed fashion allowing you to scale the work and also run them simultaneously on different environments like running test cases for an Angular project in various browsers and versions simultaneously. With many plugins available, you can make Jenkins easily integrate and communicate with external services like Git, Slack, etc.
In this tutorial, you will learn to set up a Jenkins instance. You will also see how to make use of the latest Blue Ocean plugin interface and integrate with GitHub to run automated tests. If you need, you can use this GitHub repository as a reference.
“Learn how to manage Continuous Integration pipelines with Jenkins.”
Tweet This
1. Installing Jenkins
For starters, you will need a server to set up Jenkins so that it can be accessed globally by you and other services that you will integrate with Jenkins. The bare minimum, in this case, is to have a static IP address or a valid DNS name that points to this server. This domain (or IP) will be used by external services like GitHub to notify Jenkins of new events.
If you already have a server available, you can skip to the 1.2. Installing Jenkins section. Otherwise, keep reading.
1.1. Setting up a DigitalOcean Droplet
DigitalOcean is a cloud provider that makes it very easy to set up virtual servers, called droplets. If you do not have a DigitalOcean account, already you can use this link to get $100 in credit over 60 days. It's a great way to try things out.
You can now head over the droplets management console (link) and click on "Create Droplet". Next, choose the image that this droplet will be based on. For this tutorial, select "Ubuntu 18.04", the latest Ubuntu LTS (Long Term Support) version at the time of writing. You want to start low, so select the plan of $5/month. Next, for datacenter, choose the one which is closest to you (e.g., Bangalore). If you have SSH keys, you can add or select the one already in your account. If you do not have keys, you can skip this step; you will later see how to use user passwords to log in. Give a hostname that can be used to identify the purpose of this droplet like jenkins-test. When you have verified all details click on "Create".
Once the droplet is created, you have two options to log into the droplet.
- You can use SSH keys if you used them when creating the droplet.
- You can use username/password.
On successful creation of the droplet, you will receive the IP address of the droplet, username, and password via email. Open a terminal type in the following command to log into the server.
ssh <username>@<public ip address>
Note: You will have to replace
<username>and<public ip address>accordingly.
You may be prompted to add the IP address to the list of known hots, accept it. Enter your password when prompted for it next. You may be asked to reset the password.
In this step, you created a virtual server (a droplet) that you can now use to install Jenkins and let other external services reach out this service.
1.2. Installing Jenkins
After accessing your server, start by making sure that the packages there are up to date. Run the following commands to do so:
sudo apt update
sudo apt upgrade
This may take a few minutes. After this, you will install Java 8 runtime environment that is required to run Jenkins. To do so, run the following command:
# install Java 8
sudo apt install openjdk-8-jdk

# verify installation
java -version
If the last command returned something similar to openjdk version "1.8.0_212", then you are ready to install Jenkins. So, begin by adding the repository key to the system so that Ubuntu knows that the source of this package can be trusted:
wget -q -O - https://pkg.jenkins.io/debian/jenkins.io.key | sudo apt-key add -
Next, add the Debian package repository. This will tell the system where to find the package:
sudo sh -c 'echo deb http://pkg.jenkins.io/debian-stable binary/ > /etc/apt/sources.list.d/jenkins.list'
Now, use the following command to instruct apt to start using the new source:
sudo apt-get update
Finally, install Jenkins:
sudo apt-get install jenkins
Congratulations! You have successfully installed Jenkins. You can now visit your Jenkins setup at <public ip address>:8080. Note that Jenkins, by default, listens on port 8080. In the next step, you will set up a root user and also install various plugins to make things easy for you.
2. Setting Up Root User
When you go to access your Jenkins setup for the first time (<public ip address>:8080), you will be asked to provide a password to "Unlock Jenkins". This is a way to ensure that the person setting things up has access to the server as this password is stored there.
To fetch this password, run the following command:
cat /var/lib/jenkins/secrets/initialAdminPassword
On the next screen, you will be prompted to select the plugin packages. Go ahead by selecting "Install suggested plugins". Then, on the next screen, you will see the progress of the installation.
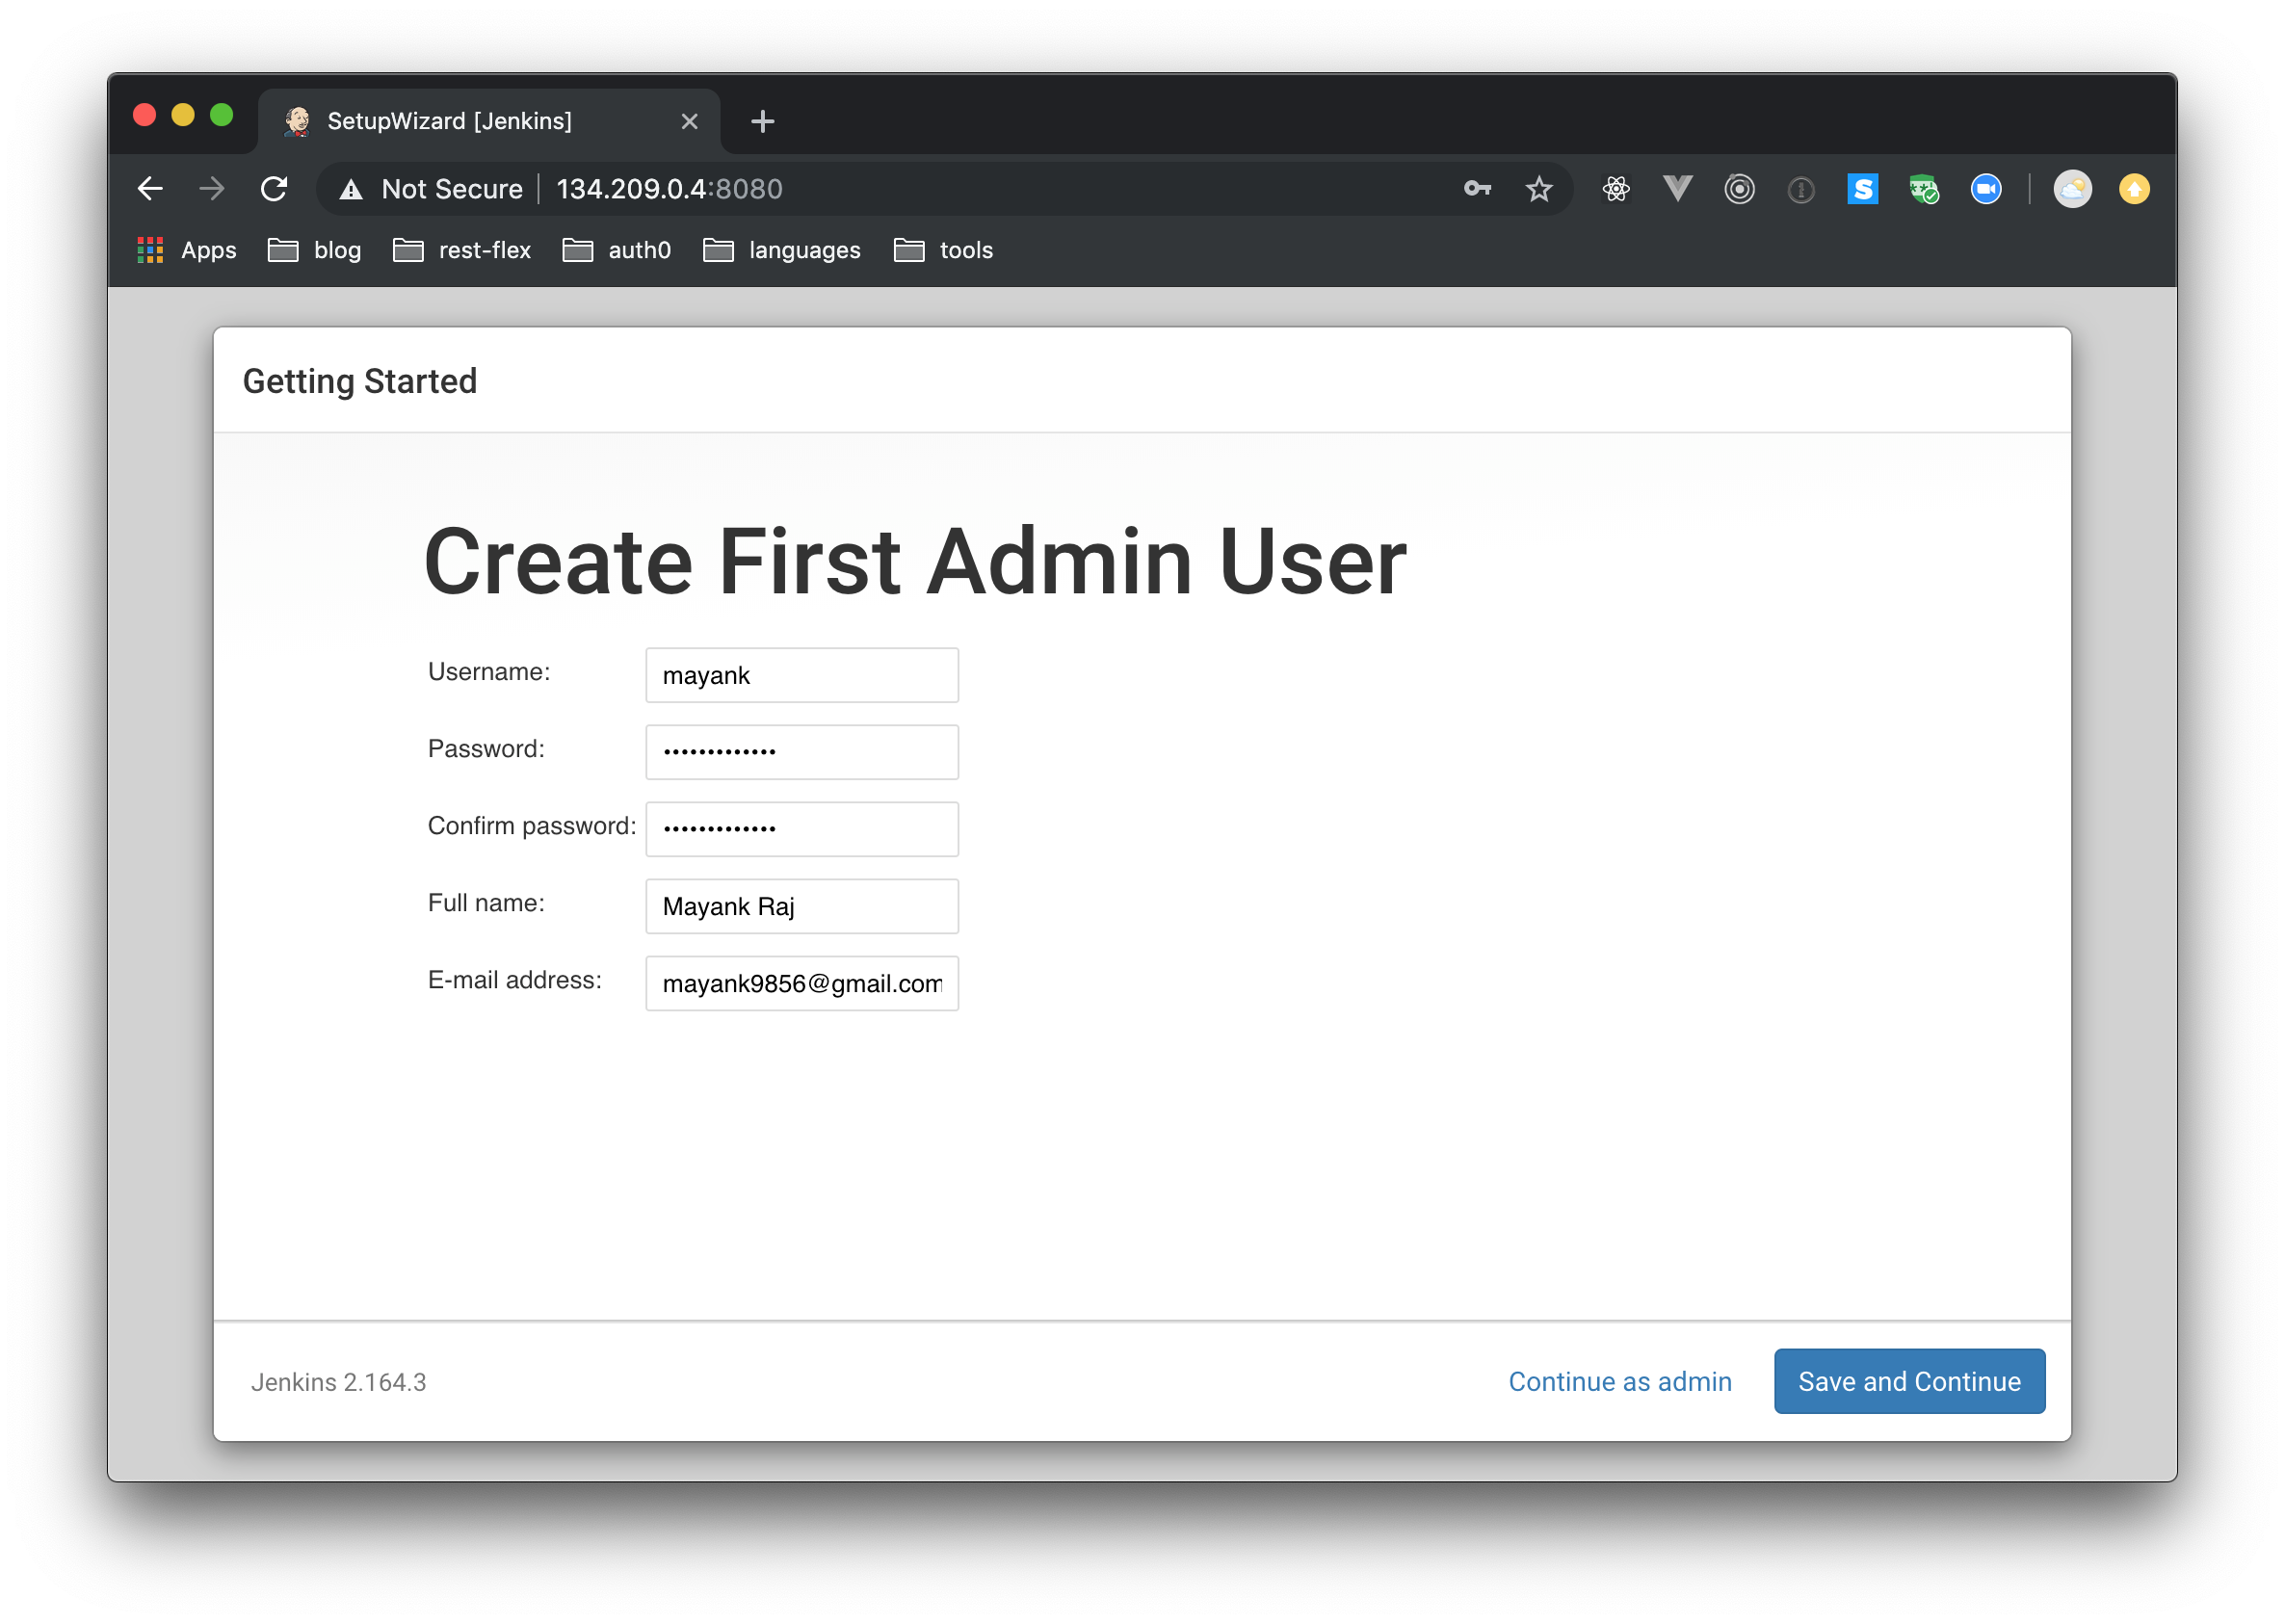
After the installation is completed, you will be asked to create your first admin user. Insert user details as you see fit.
Then, on the next screen, you will be asked to provide the domain name which will be used by Jenkins. This generally is the subdomain of your company like jenkins.example.com or automation.example.com. For this tutorial, you can use the public IP which you used to access this server.
After filling in this form, click "Save and Finish" to complete the setup. You will now be redirected to your dashboard.
In this step, you have successfully installed Jenkins. You are now ready to connect Jenkins with GitHub.
3. Installing Jenkins Blue Ocean
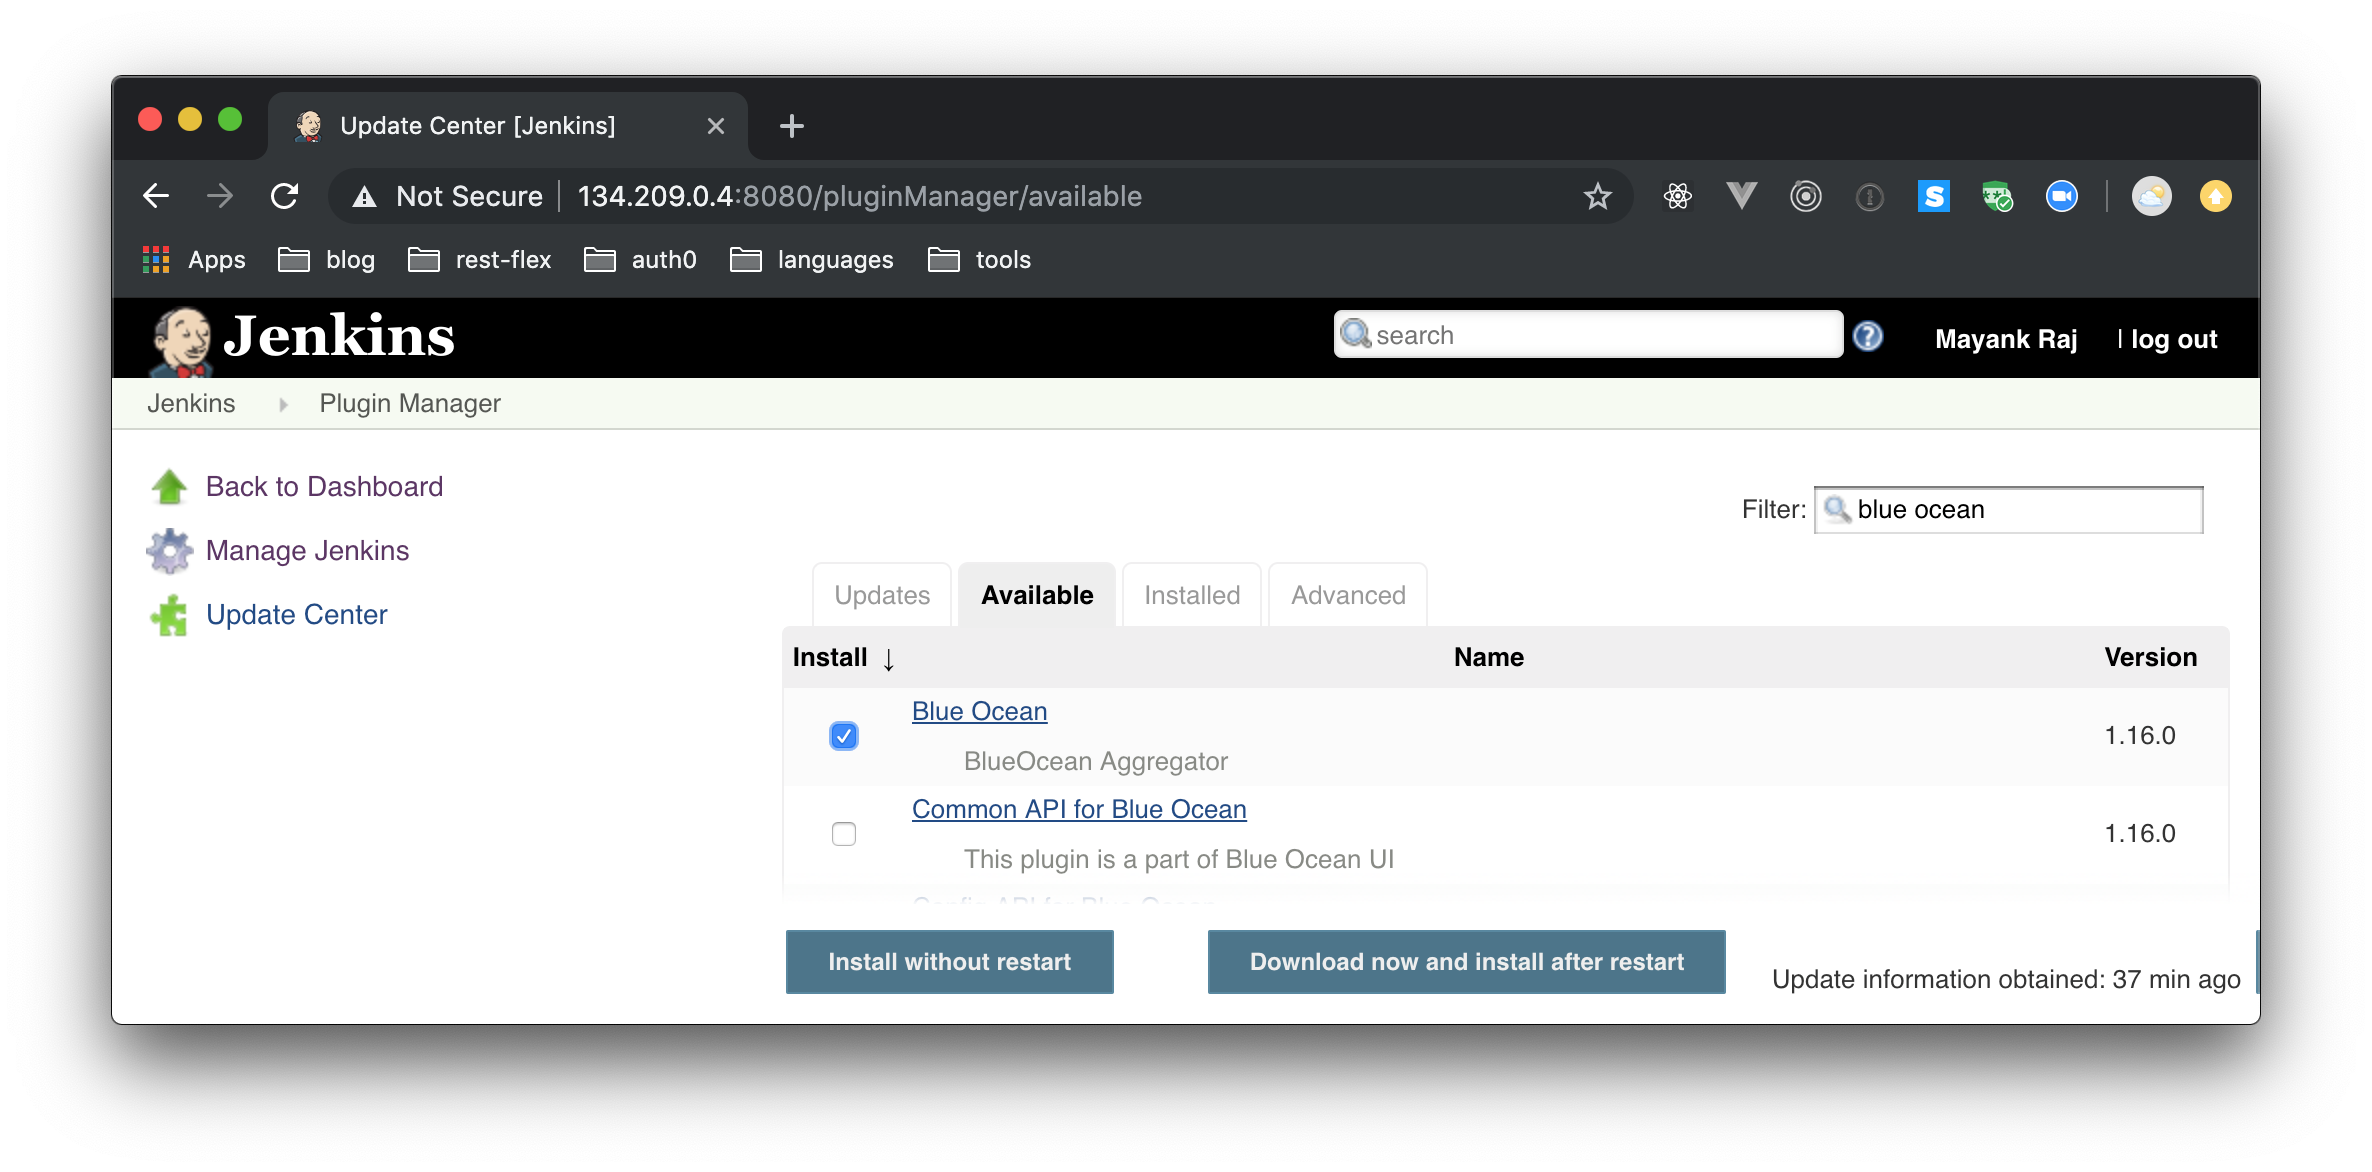
Jenkins Blue Ocean provides a new interface to interact with Jenkins. This plugin is being developed by the very same team behind Jenkins and is available for free. To install it, select the "Manage Jenkins" from the left navigation bar in your dashboard; then select "Manage Plugins". After that, click on the "Available" tab and search for "Blue Ocean". Then, click on the checkbox against it and click on "Install without restart" in the bottom. This will install the Jenkins Blue Ocean Plugin.
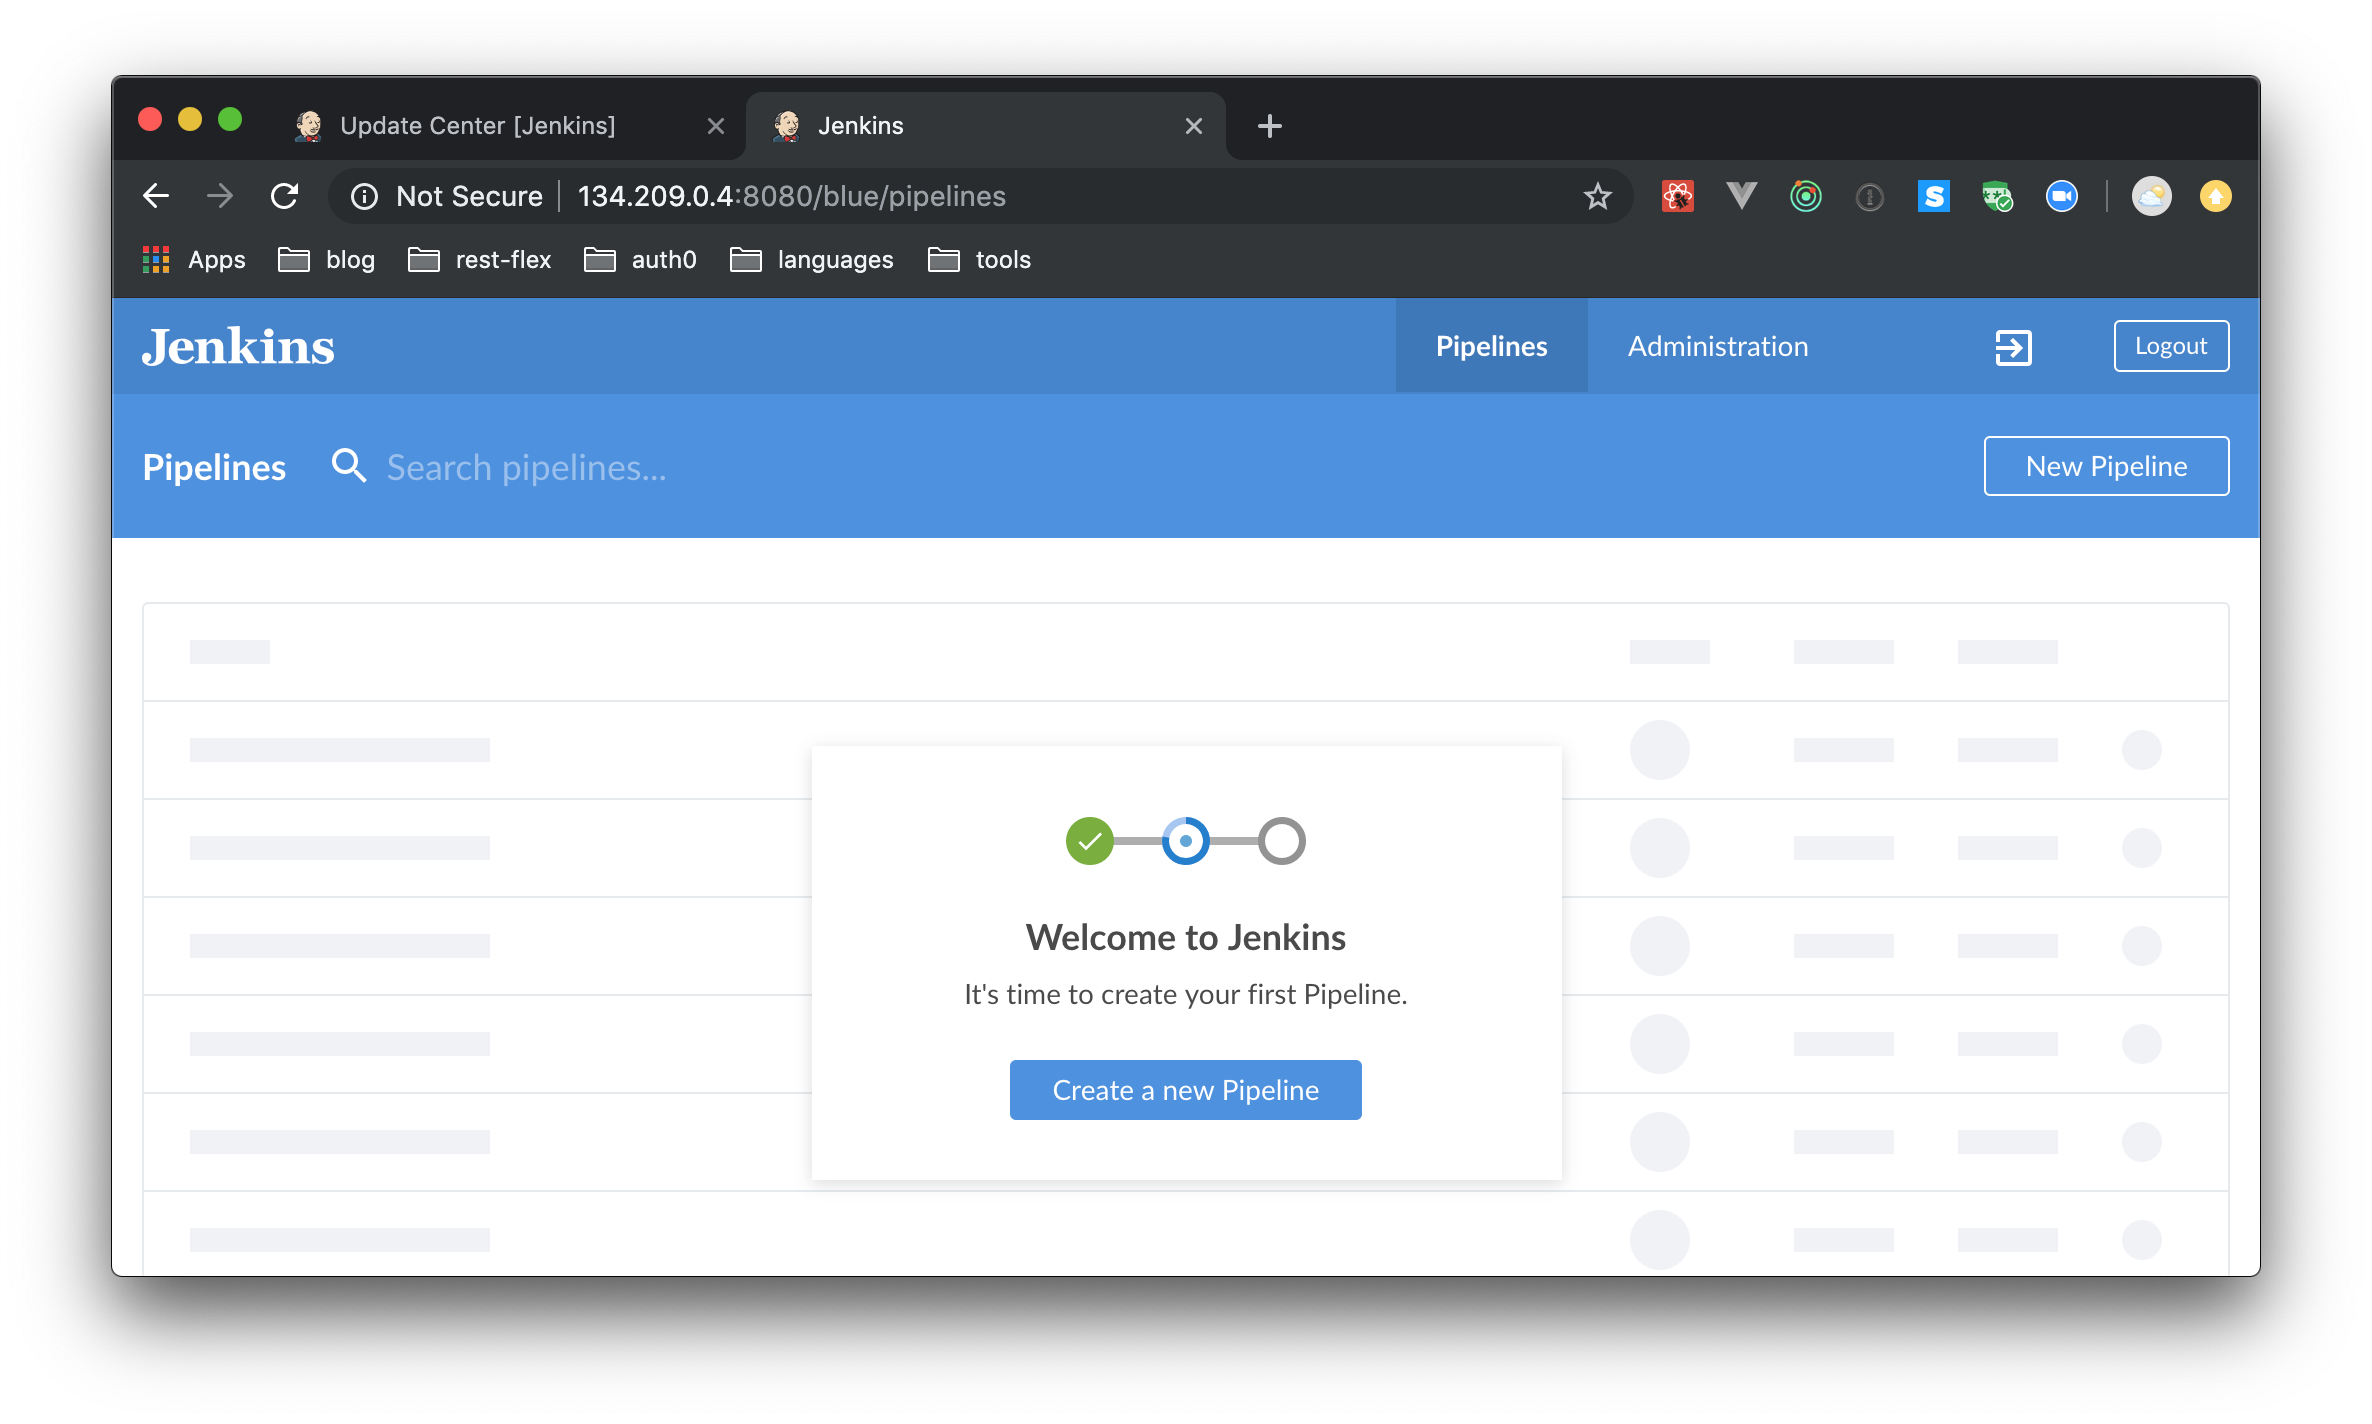
When the installation completes, you will be able to access the new interface at <public ip address>:8080/blue.
4. Setting Up a Pipeline and Connecting to GitHub
When you open the Blue Ocean URL for the first time, the plugin will ask you to create a new pipeline.
Pipeline is a set of procedures that you define having various tasks like running test cases, verifying code sanity, creating deployment packages, and even deploying to the production servers. There are triggers associated with each pipeline that can be used to set the tasks in motion. Each run of the tasks in a pipeline is called a Job.
The idea here is to use GitHub actions as triggers that will start the pipeline. As such, after each commit push to GitHub (or merged into your repo), Jenkins will start jobs. So, click on "Create a new Pipeline" button; then, on the next screen, select GitHub. You will need to create a new access token for this integration. Jenkins will use this token to authenticate itself with GitHub. So, click on the "Create access token here" link then, after inputting your password, fill in the form as follows:
- Note: "Jenkins Integration".
- Select scopes: Leave with the default values.
After that, click on "Generate token". This will generate the access token and show it to you. Copy this token (this is the last time GitHub will show you this specific token); then head back to the Blue Ocean plugin and paste it inside the "Your GitHub access token" field and click on "Connect".
Now, the plugin will ask you to select a repository (and the GitHub organization where it resides). So, before moving on, open GitHub in a new tab and create a repository called jenkins-test. After that, head back to Jenkins and:
- Select on what organization this repo resides (i.e., if you do participate in GitHub organizations);
- Select the new repository (i.e.,
jenkins-test).
When you choose it, click on "Create Pipeline".
In a few seconds, your pipeline will be ready. You will be redirected to the pipeline editor. This is a visual editor that you can use to create stages. You will learn more about this next.
5. Adding Stages to the Pipeline
Stage is a logical block of the pipeline that houses various steps, like build, packaging, deployment, etc. Steps are the individual actions that Jenkins performs.
For this tutorial, you will configure your pipeline to check for the presence of two files: file-1.txt and file-2.txt. This will be your test case. In a real-world scenario, this would be the actual test suite of your application (e.g., manage.py test for a Django app or npm test for an npm project).
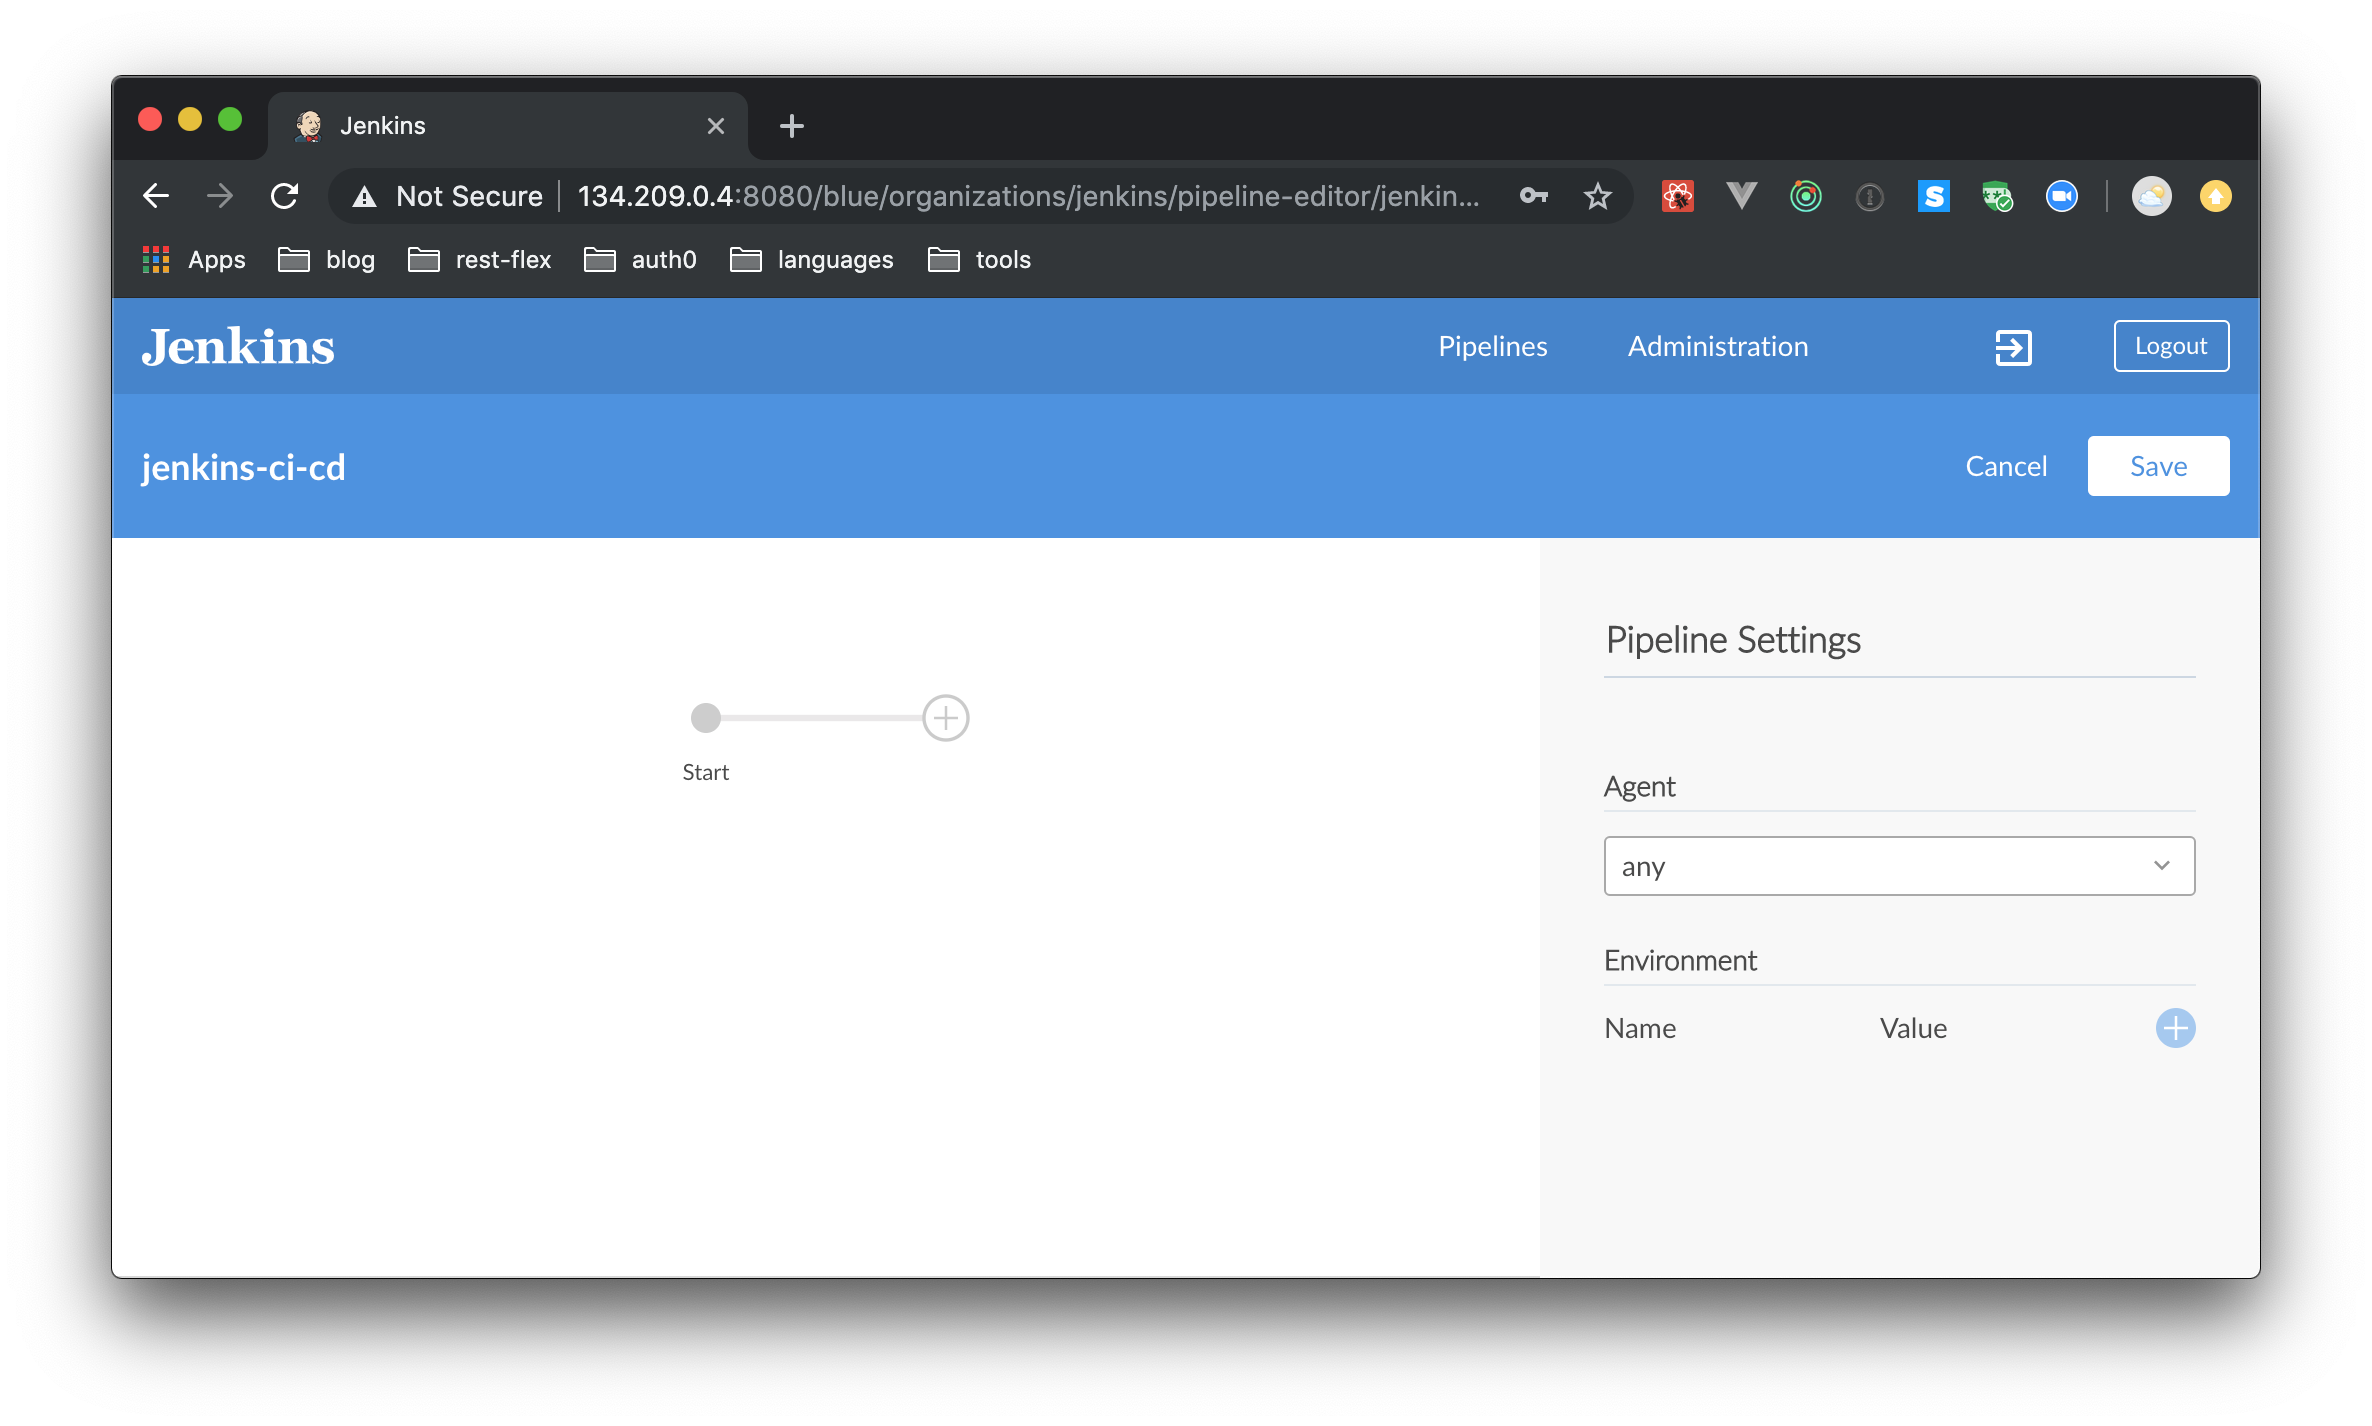
To set up a stage, you first need to define the agent that Jenkins will use to run the stages on.
Agent is the actual host or environment where the stages, events, or the whole pipeline will be executed.
Jenkins is built for a distributed architecture. So you may have one master node and various agent nodes that would actually run the jobs. Or, in a simple scenario, you would run test cases inside a Docker container that has all the dependencies pre-installed in it.
For this tutorial, you will not use any external agents, and instead you will make Jenkins run the pipeline on the host server itself. For this, select "any" in the dropdown under "Agent" on the right-hand side. You may also add any environment variables if your application required it. Leave it blank for now.
To add a stage, click on the plus (+) button next to "Start" in the pipeline editor. Then, on the right-hand side, you can name the stage (something like "Check file 1" will work). To add a step to this stage, click on "Add Step".
The goal in this step (and of the stage as a whole, for demonstration purposes) is to check for the presence of the file file-1.txt. So, on the "Choose step type", select "Shell Script" and use the cat file-1.txt command to check if the file exists.
Similarly, add a stage which checks for file-2.txt. For that, click on the new + icon right next to the stage number one, then add a "Shell Script" step with cat file-2.txt.
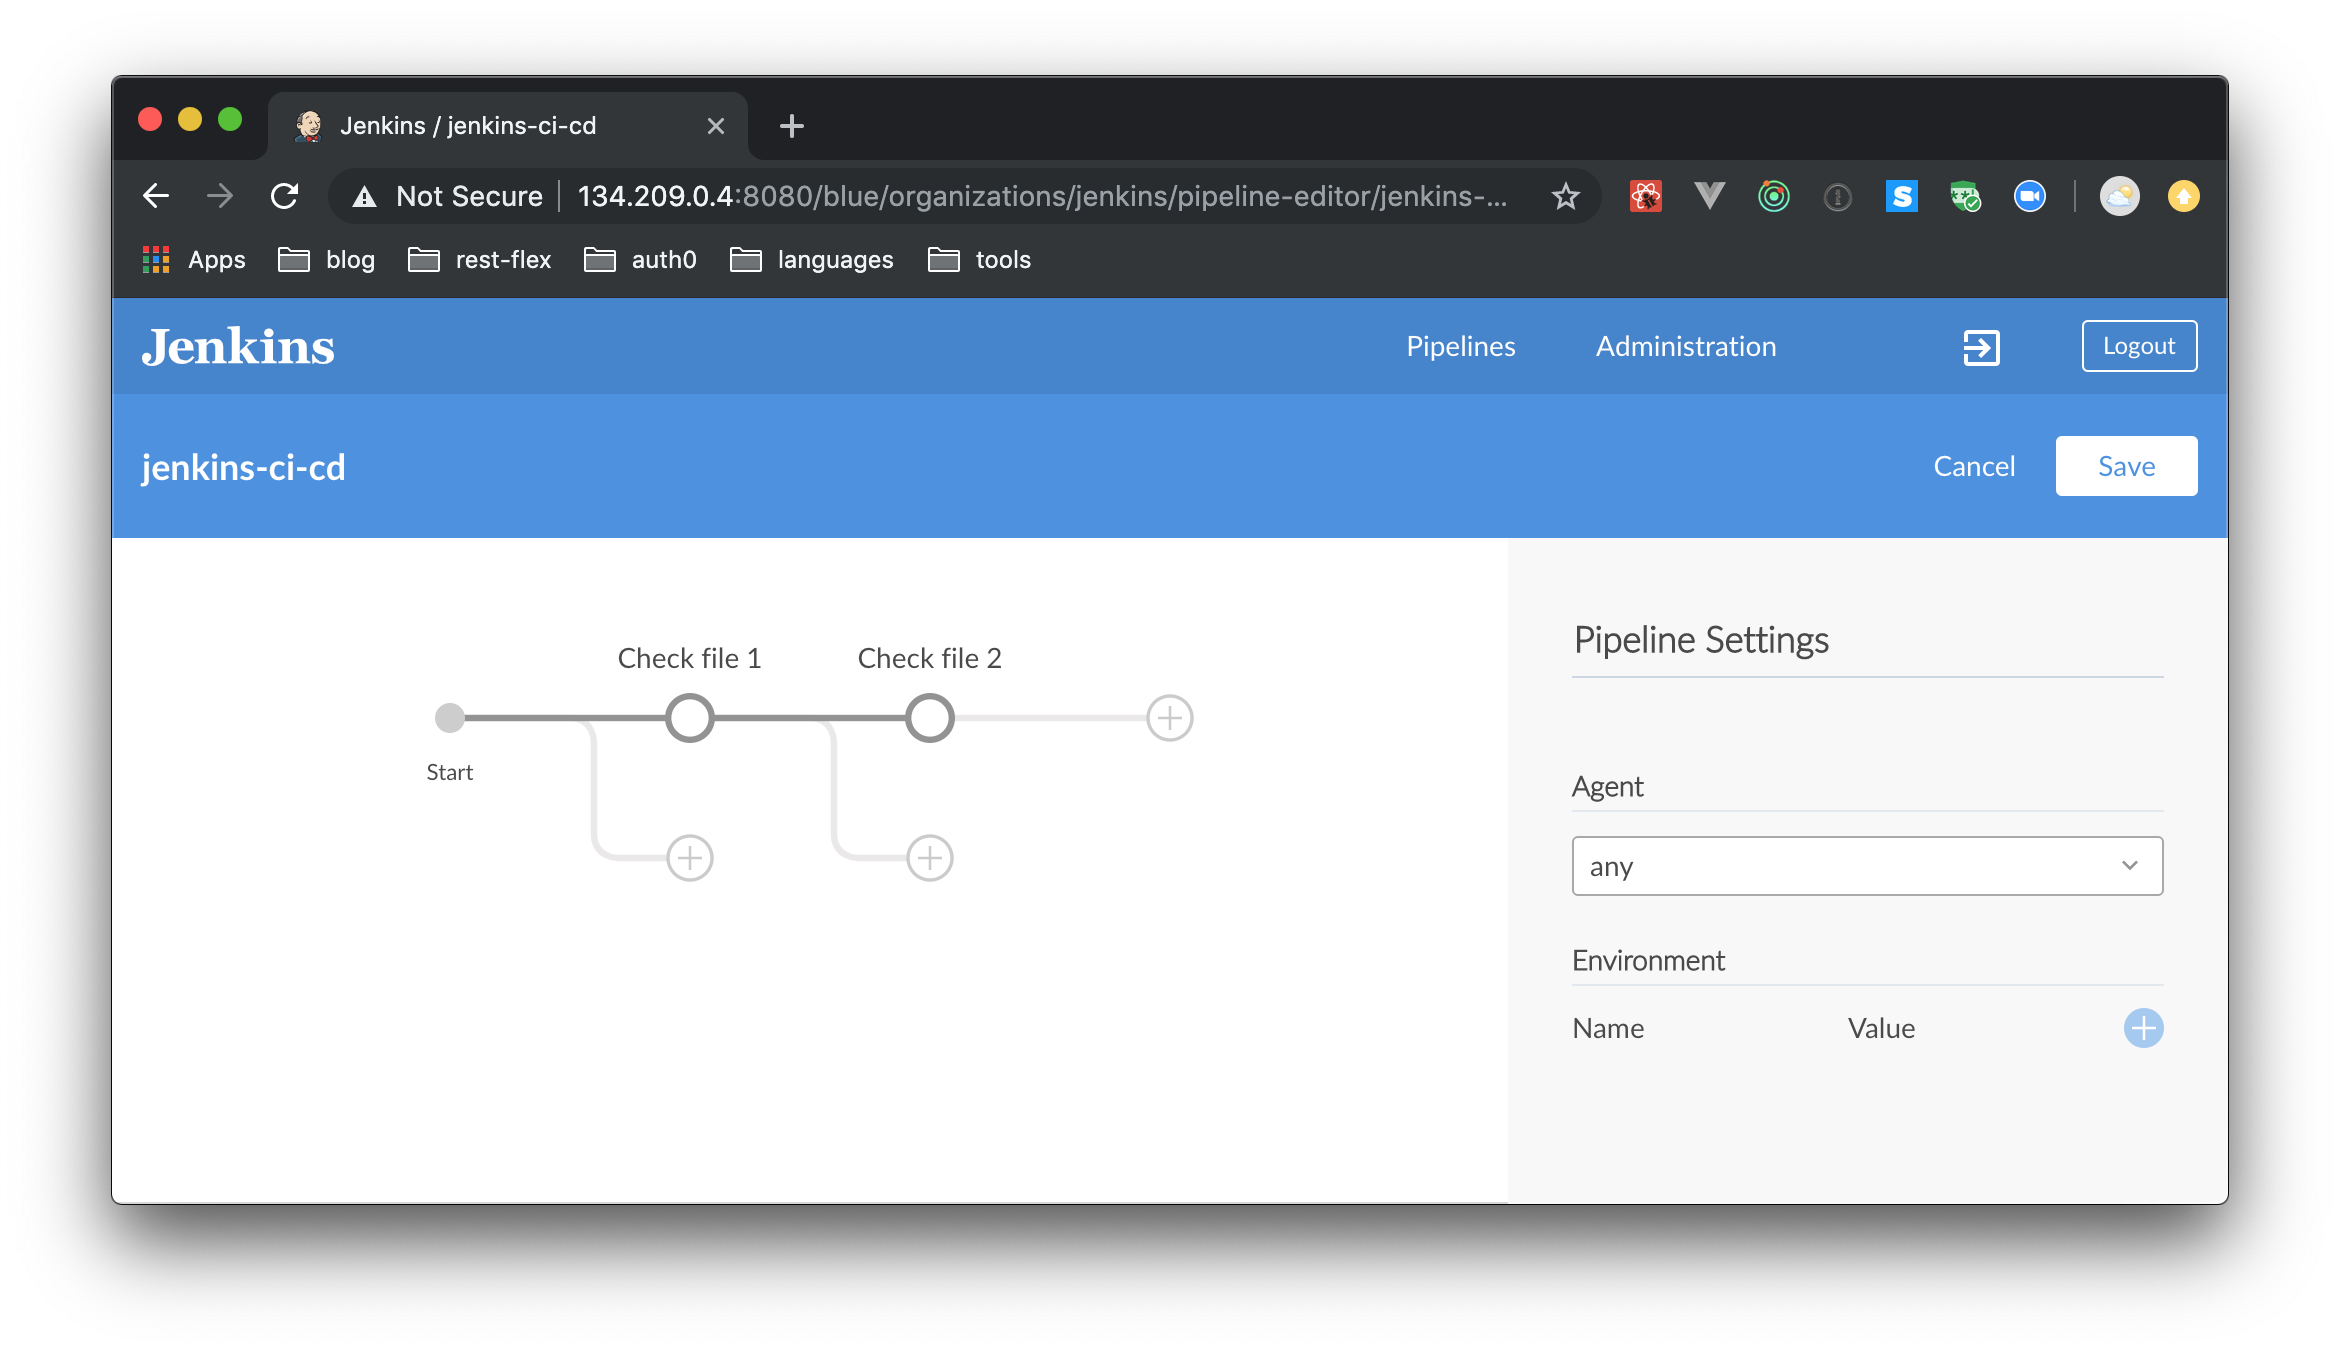
Now, you need to save this pipeline to your repository. Pipelines are nothing but configuration stored in a file called Jenkinsfile in the root of your repository. You can directly write rules in this file without using the visual editor as well. To learn more, follow this link. As you are using the visual editor at the moment, you will save this file from the editor itself. So, click on "Save" on the top right corner. This step will create a new commit into the branch of your choice. Add a commit message (e.g., "configuring Jenkins") and select the master branch.
Finally, click on "Save and Run". This will create a new commit to your branch and include the new Jenkins file in it. It will also trigger the build.
In this step, you defined the stages of your pipeline and also triggered your first build.
6. Setting Up GitHub Webhook.
The next cool thing you can do is to automate when new builds are executed. So far, the only way you can trigger a new build is by going to the "Branches" tab and clicking the play icon next to the branch of your choice. But this is not very efficient. A better way is to make builds to be triggered automatically whenever a new commit is made in any branch.
To notify Jenkins about new builds, you will take advantage of the webhooks GitHub provides. By using them, you will be able to make GitHub notify Jenkins whenever new commit is made, which can then be used by Jenkins to trigger a build automatically.
To do this, head to your GitHub repository and click on the "Settings" tab on the top. In the navigation bar on the left, select the "Webhooks" section and click on "Add Webhook". On the field that asks for payload URL, enter the following URL: http://<public ip address>:8080/github-webhook/ (make sure you replace <public ip address> with the IP address of your server). Leave everything else as default and click on "Add Webhook".
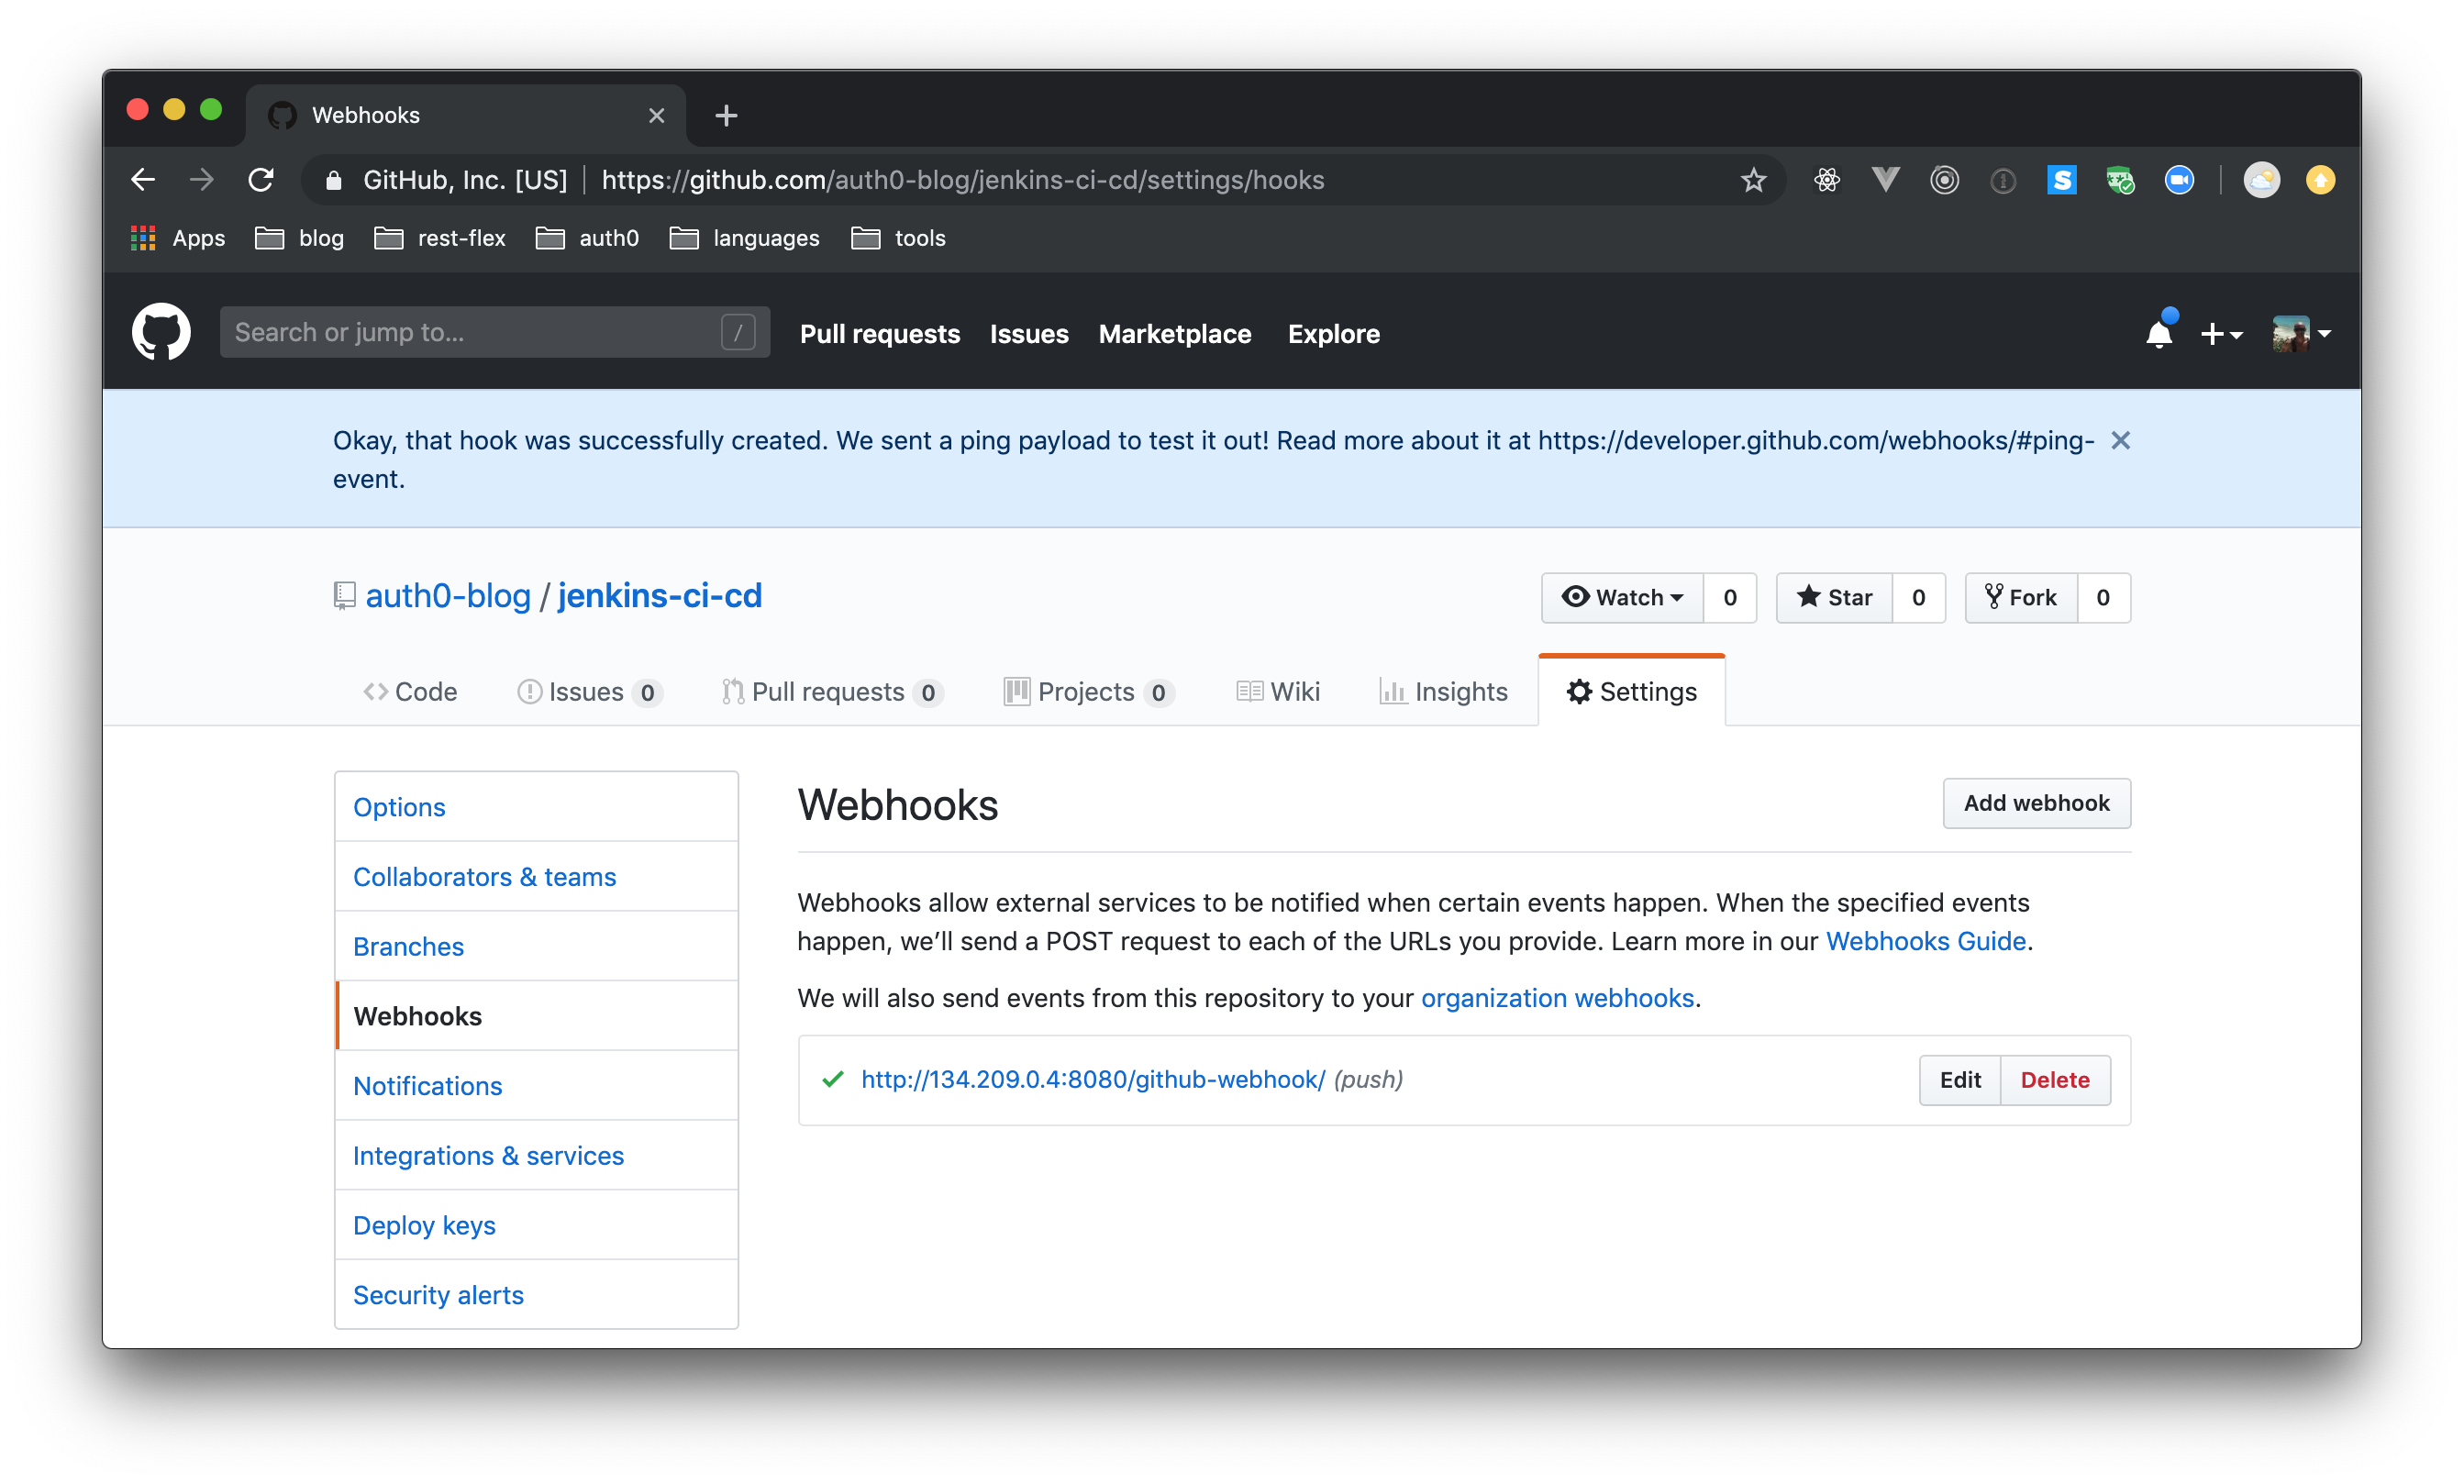
With this you have told GitHub to notify Jenkins whenever any commit is made.
7. Triggering the First Automated Build
After configuring GitHub to notify your Jenkins server about new commits to your repository, then next thing you can do to is to test this integration with a real commit. To do so, you have two choices:
You can clone your repository into your machine and work locally.
You can use GitHub's website to create the files you will need.
No matter what alternative you choose, make sure to add two files to the project root: file-1.txt and file-2.txt.
If you choose to work locally, you will have to commit and push the new files to your repository. When you do so, GitHub will notify Jenkins about the new commit, and Jenkins will trigger a build automatically (which should complete successfully).
If you choose to work on GitHub's website, each file you add will be a commit. As such, the first commit (the file you add) will result in an unsuccessful build. Then, when you add the second file, the build Jenkins triggers shall end successfully.
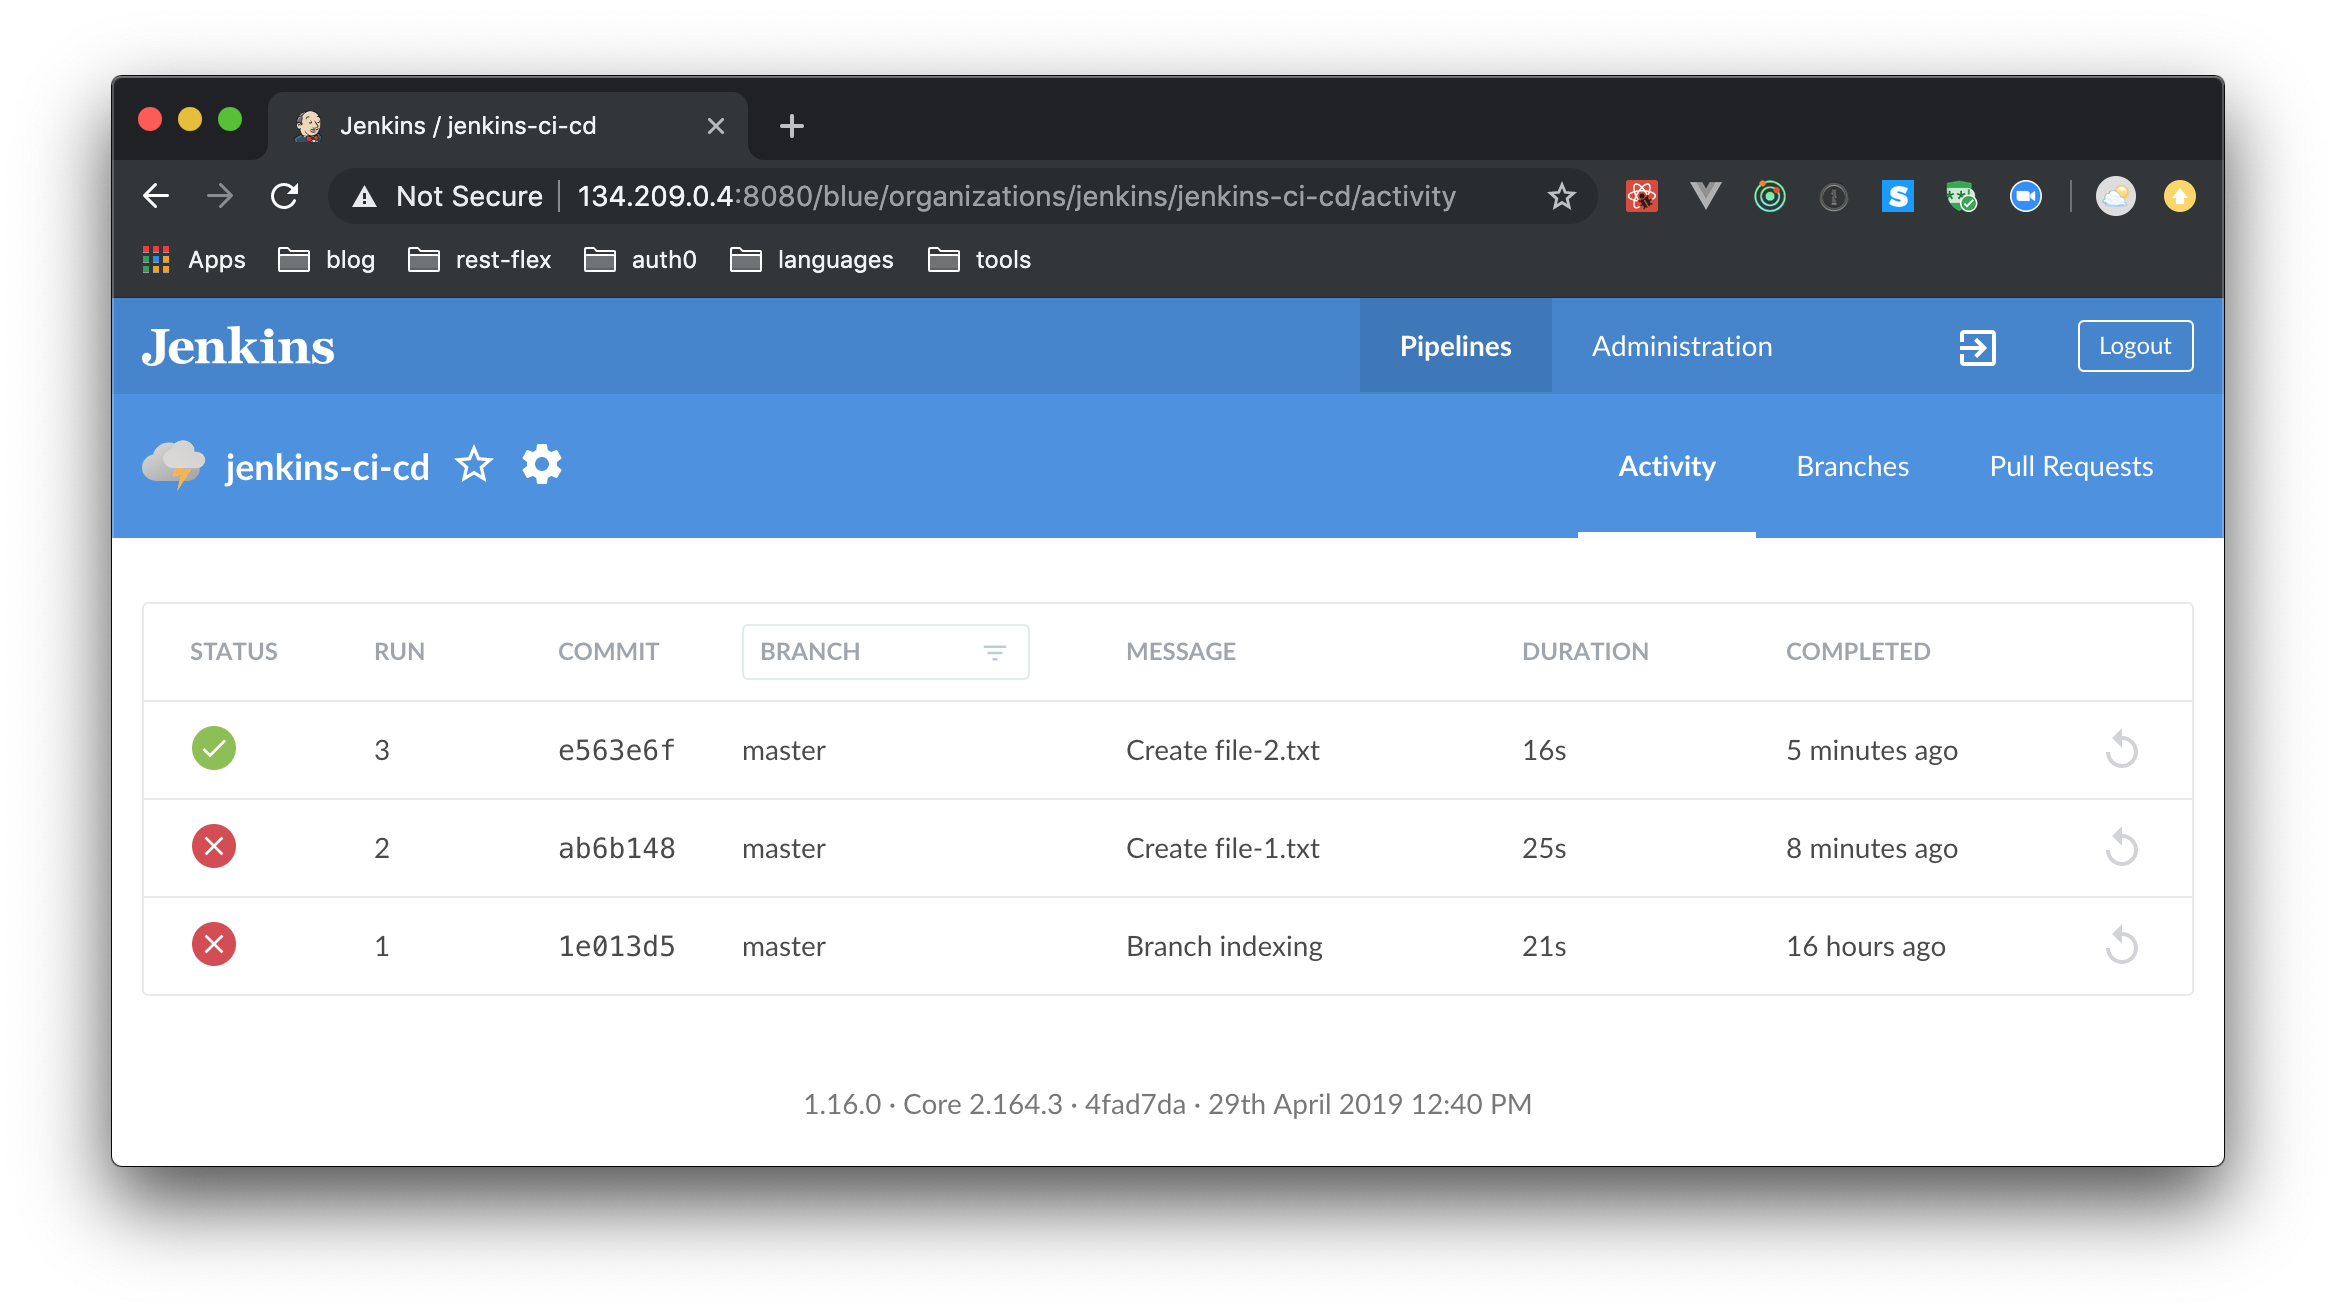
In this step, you triggered jobs by pushing commits to GitHub. Any new commit to this repository will now trigger builds, and the result would be automatically updated on GitHub.
8. Recording Test Results and Artifacts
Whenever a new build is initiated, it is started with a shallow clone of the branch on which the build is triggered. That is, a new folder is created, and the files that belong to the branch on which the action was made are copied into it. This is done to ensure that each build is isolated from the other. This also means that for 10 builds you would have 10 folders somewhere in the server where Jenkins is hosted with clone of your repository. This would not be an ideal situation because you do not want to keep a copy of each and every run.
For this reason, at the end of each build, Jenkins executes a cleanup process to delete the folder. This raises the question: "How do I keep the result of the test cases and build processes?" The answer is: by using build artifacts. Build artifacts are important elements that you want to keep around. For example, the results of a test to be able to check it later; or a runnable file that you create on the pipeline.
Note: If you are curious, you can check the
/var/lib/jenkins/workspace/directory in your Jenkins server to see the build artifacts.
In this section, you will record test results to see how Jenkins handle build artifacts in action. To do so, you will transform your repository into a simple npm project. If you don't know npm (or Node.js for that matter), don't worry. You don't really need to learn how to use these tools to follow the steps described below. However, you do need to have npm and Node.js installed locally to execute the commands that follow.
Note: Jenkins understands JUnit XML format of test results which are considered to be a standard. Every test runner today has some or the other way to give report in JUnit XML. This tutorial will use MochaJS as a testing framework.
To follow along with the steps below, after making sure that npm and Node.js are installed locally, you will need to clone the repository. Then, you will need to use the following command to transform your repo into an npm project:
# from the repository project root
npm init -y
Then, you will need to add the two dependencies that the app needs:
# install the test case runner
npm install --save-dev mocha

# install the JUnit XML reporter
npm install --save-dev mocha-jenkins-reporter
After installing these packages, create a file called test.js and add the following code to it:
const assert = require('assert');

describe('Addition', function() {
  it('2 + 2 should be 4', function() {
    assert.equal((2 + 2), 4);
  });

  it('1 + 5 should be 6', function() {
    assert.equal((1 + 5), 6);
  });
});

describe('Type Comparison', function() {
  it(''5' == 5 should be true', function() {
    assert.equal(('5' == 5), true);
  });

  it(''5' === 5 should be false', function() {
    assert.equal(('5' === 5), false);
  });
});
Then, use the following command to run these test cases:
npx mocha
If everything works, all tests will pass. Now, to generate reports in JUnit XML format use the following command:
# define where you want the test results
export JUNIT_REPORT_PATH=./test-results.xml

# run mocha and tell it to use the JUnit reporter
npx mocha --reporter mocha-jenkins-reporter
This will save the test results into a file called test-results.xml.
With that in place, you will now instruct your Jenkins pipeline to use this file too. But, before that, update your GitHub repository with your new code:
# make git ignore the node_modules directory
echo "node_modules/" > .gitignore

# stage your new code
git add .

# commit it to git
git commit -m "Added Test Cases"

# push it to GitHub
git push origin master
Now that the application has few test cases, the next step is to tell Jenkins how to run these test cases and where to find the XML Report for the same. So, head over to the pipeline editor (the URL would be something like: http://<public ip address>:8080/blue/organizations/jenkins/pipeline-editor/jenkins-ci-cd/master/). There, you will have to:
Use the
+button after the "Check file 2" step to add a stage called "Install dependencies". Then, inside this stage, you will have to add a "Shell Script" step with the following command:npm install -d.Use the
+button after the "Install dependencies" stage to add a new one called "Run test cases". Then, inside this stage, you will have to add a "Shell Script" step with the following commands:# define where you want the test results export JUNIT_REPORT_PATH=./test-results.xml # run mocha and tell it to use the JUnit reporter npx mocha --reporter mocha-jenkins-reporter
With that in place, click on the "Save" button on the top right corner to apply the changes to your pipeline.
Before continuing, though, you will need to install npm and Node.js in your Jenkins server. You need that because these tools are global dependencies, not project dependencies. So, head to your server:
ssh <username>@<public ip address>
Note: You will need to replace
<username>and<pubnlic ip address>accordingly.
Then, issue the following command to install npm and Node.js:
sudo apt install nodejs npm
After installing these tools into your Jenkins server, you will create a step to capture the JUnit-formatted test results. For the moment, you won't be able to use the visual pipeline editor. That's so because you need to perform this step on the Post stage which the editor still doesn't support.
For that, you will need to update the Jenkinsfile directly. So, open this file (it resides on the project root), then update it as follows:
pipeline {
  agent any
  stages {
    // ... all stages remain untouched ...
  }
  post {
    always {
        junit 'test-results.xml'
    }
  }
}
After that, if you commit and push this change to your GitHub repository, you will find tests results on the "Tests" tab of your Jenkins pipeline.
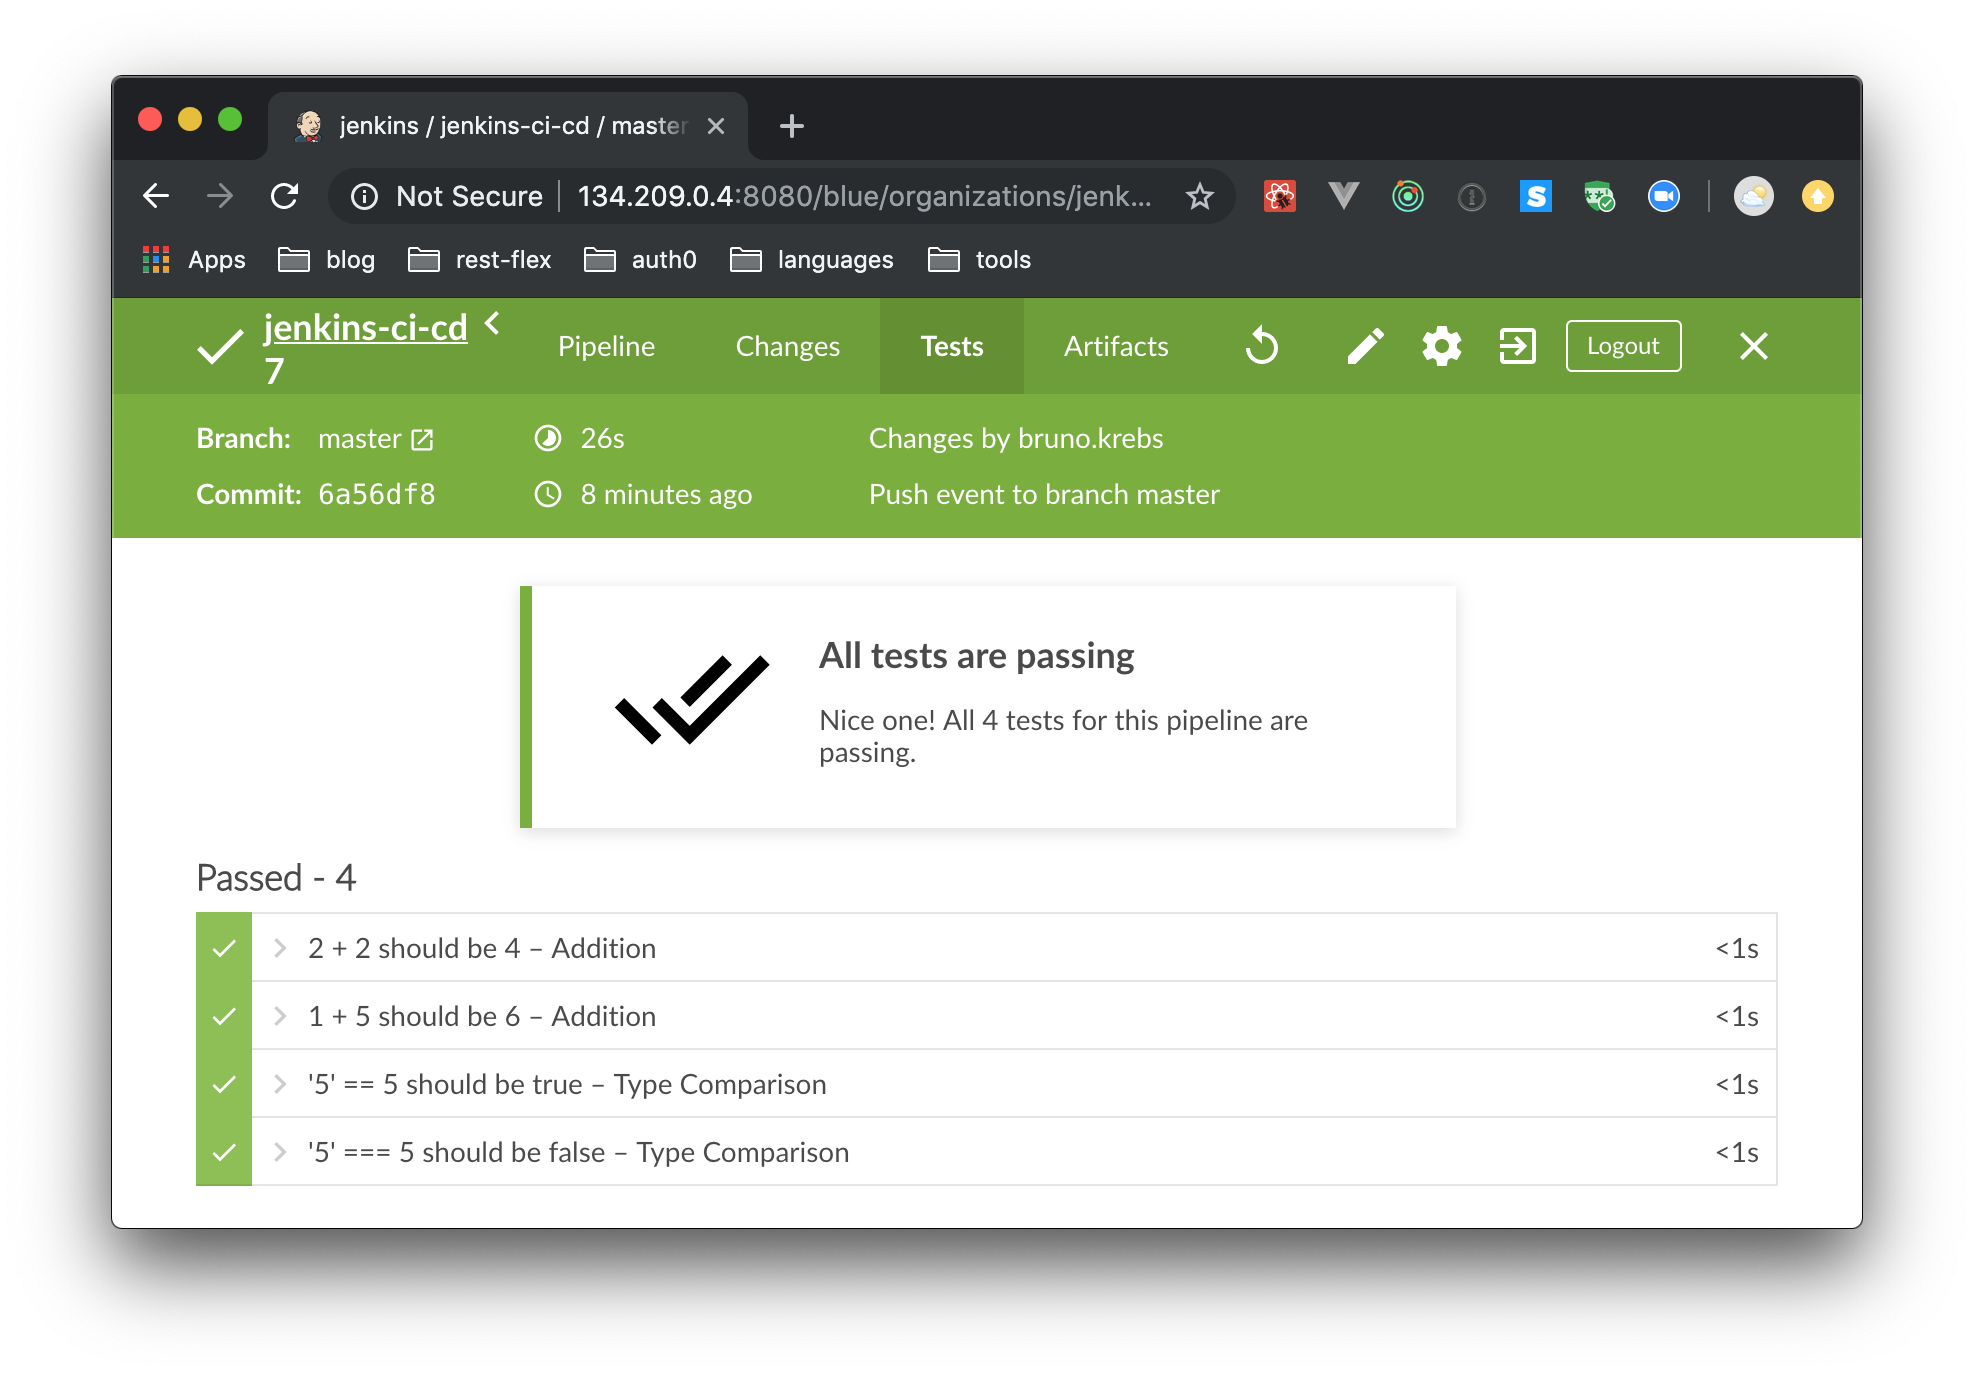
In this step, you learned how to record the results of test cases. You also saw how the status of individual test cases are tracked over builds.
9. Exploring Plugins
Just like any other open sourced projects, plugins are what gives Jenkins the power to do a lot more. You can find various plugins here. You can find plugins that can notify the build status to your slack channel (Slack Notification). If you want to take your Jenkins setup towards the Kubernetes route you have the Kubernetes Plugin, or if you prefer to use cloud container services there are options like Amazon Elastic Container Service and Azure Container Service.
“I just built a Continuous Integration pipeline with Jenkins. So cool!”
Tweet This
Aside: Syncing Authentication in CI using the Auth0 Deploy CLI Tool
One of the trickiest parts of managing applications in different environments is syncing authentication configuration. For example, you may have a testing and production environment that share the same configuration, even if they don't share the same user database.
Luckily, Auth0 can help you manage this part of your Jenkins pipeline using our Deploy CLI tool.
The Deploy CLI tool allows you to:
- Import and export a variety of Auth0 tenant configuration objects such as tenant settings, rules, and connections
- Export the data to a predefined directory structure or a YAML configuration file
- Call the tool programmatically
- Replace environment variables
To try this with your Jenkins pipeline, first sign up for a free Auth0 account. Then, check out our documentation on how to install the CLI tool and how to incorporate it into your build environment.
Note: This tool can be destructive to your Auth0 tenant. Please ensure you have read the documentation and tested the tool on a development tenant before using it in production.
Conclusion
Congratulations. You now have a Jenkins setup that you and your team can use to test the sanity of your codebase automatically at each push. You will also be able to track the history of your builds, see when a certain test case fails, and for how many commits it has been failing. You will also be able to perform integration testing after a pull request is merged.
What are your thoughts? Will you use Jenkins in production any time soon? Let us know on the comment box below.