
Are you starting from this chapter?
Clone the application repo and check out the adding-authorization-auth0 branch:
git clone git@github.com:auth0-blog/wab-menu-api-nestjs.git \
nest-restaurant-api \
--branch adding-authorization-auth0
Make the project folder your current directory:
cd nest-restaurant-api
Then, install the project dependencies:
npm i
If you haven't set up any Auth0 applications, follow the steps from these previous sections:
Set Up API AuthorizationRegister a Client Application with Auth0Connect a Client Application With Auth0Create a .env hidden file:
touch .env
Populate .env with this:
PORT=7000
AUTH0_ISSUER_URL="Your Auth0 domain"
AUTH0_AUDIENCE="Your Auth0 audience"
As it is, any request with a valid access token can use your API to read and write data from the store. But not all users are equal: some are customers or employees that only need to read data, while a few others are employees who need to add, delete, or change the data in the store.
As such, you need to further develop your authorization strategy to check if a client application making a request on behalf of an authenticated user is authorized to perform an operation.
Manage Access with Auth0
An easy way to implement this level of authorization is through role-based access control (RBAC), which refers to the idea of assigning permissions to users based on their role within an organization. For this application, you can create permissions to write data to the store and create a menu-admin role. You can then assign those write permissions to the menu-admin role and assign that role to any user that you want to make an admin.
When users successfully log in, Auth0 issues to the client application an access token that has information on any permissions the users have based on their assigned roles. Since Auth0 issues the access token as a JSON Web Token (JWT), that access information can be added to the token as a claim named permissions. JWT claims are essentially key-value pairs encoded as a JSON object.
Consequently, your server application can inspect the access token to compare the values present in its permissions claim with the permissions required by the API endpoint. If the server can fully match the permissions required by the endpoint, the client request is authorized.
Implementing RBAC is easily done through the Auth0 Dashboard. Here's the plan of what you'll do:
Create permissions for the Menu API you created earlier.
Create a role called
menu-admin.Assign permissions from the Menu API to the
menu-adminrole.Create a new user and assign it the
menu-adminrole.
Let's get started.
Create API Permissions
Head to the APIs page from the Auth0 Dashboard and select the Menu API that you created earlier.
In the Menu API page, click on the Permissions tab. Once there, fill in the fields and use the + Add button to create the following permissions:
read:items: Read menu itemscreate:items: Create menu itemsupdate:items: Update menu itemsdelete:items: Delete menu items
Now that you have permissions in place, you need to tell Auth0 that you want to enforce role-based access control (RBAC) authorization for the Menu API. Click on the Settings tab and scroll down until you see the RBAC Settings section.
Use the toggle button next to Enable RBAC to turn it on. This will enforce RBAC authorization policies during the login transaction of a user. Next, enable Add Permissions in the Access Token to add a permissions attribute (JWT claim) to the access token created by Auth0. The presence of this claim is critical for the implementation of RBAC in your NestJS app.
Make sure you press Save once you're done.
Create Access Roles
Open the Roles page from the Auth0 Dashboard and click on the Create Role button.
Fill out the form in the pop-up as follows:
Name:
menu-adminDescription: Create, update, and delete menu items.
Once done, click the Create button to complete the creation of the role.
Next, you need to associate permissions with that role. Permissions map a role to areas of an API. Click on the Permissions tab of the role page. Once there, click on the Add Permissions button.
In the dialog that comes up, choose the Menu API from the dropdown box to select permissions from an existing API. A Scopes section shows up. A scope is a term used by the OAuth 2.0 protocol to define limitations on the amount of access that is granted to an access token — in essence, permissions define the scope of an access token.
Select all of the scopes by clicking on them one by one or by using the All link. Once that's done, click on the Add permissions button. You are taken back to the menu-admin role page, which now lists all the permissions associated with the role.
You don't really need to add the
read:itemsscope to this role as anyone can read items from the API; however, it's a good practice to add the role in case that your business requirements change and reading data becomes a privileged operation.
Get User Roles
You learned earlier that when you enable role-based access control (RBAC) for your Auth0 API, you can also attach the permissions created for the user as a claim to the access token. But, what about the user roles? For example, your client application may need to easily determine the roles assigned to a user to render certain parts of your user interface conditionally: if the user has the menu-admin role, show a button that lets the user create a new item.
To make the user roles available to your client or server application, you are going to use Auth0 Rules to enhance the tokens that are sent to the client.
When a user logs in to your application, upon success, the Auth0 authorization server sends two tokens to the client:
Access Token
The access token is a credential that can be used by an application to access an API. The client application receives an access token after a user successfully authenticates and authorizes access, then it passes the access token as a credential when it calls the target API — in your case, the Menu API. The passed token informs the API that the bearer of the token has been authorized to access the API and to perform specific actions specified by the permissions that were granted during authorization.
ID Token
The ID Token, usually referred to as id_token in code, is a JSON Web Token (JWT) that contains user profile attributes represented in the form of claims. The ID Token is consumed by the client application to get user information like the user's name, email, and so forth, typically used for UI display.
You'll attach the roles assigned to each authenticated user as a claim to either token using Auth0 Rules.
What are Auth0 Rules?
Auth0 Rules are JavaScript functions that execute when a user authenticates to your application. They run once the authentication process is complete and you can use them to customize and extend Auth0's capabilities. For security reasons, your Rules code executes in a sandbox, isolated from the code of other Auth0 tenants.
You can create Auth0 Rules easily using the Auth0 Dashboard. Follow these steps to create a rule that adds user roles to tokens:
Open the Rules page from the Auth0 Dashboard.
Click on the Create Rule button.
Click on the Empty Rule option.
In the Edit Rule page, provide a Name to your rule, such as Add user roles to tokens.
Next, replace the content of the Script section with the following function:
function(user, context, callback) {
  const namespace = 'https://menu-api.demo.com';

  if (context.authorization && context.authorization.roles) {
    const assignedRoles = context.authorization.roles;

    if (context.idToken) {
      const idTokenClaims = context.idToken;
      idTokenClaims[`${namespace}/roles`] = assignedRoles;
      context.idToken = idTokenClaims;
    }

    if (context.accessToken) {
      const accessTokenClaims = context.accessToken;
      accessTokenClaims[`${namespace}/roles`] = assignedRoles;
      context.accessToken = accessTokenClaims;
    }
  }

  callback(null, user, context);
}
- Click the Save Changes button.
What's this rule doing?
When the user successfully authenticates, this rule function executes and receives three parameters:
useris an object that represents the logged in user, returned by the identity provider — this could be Auth0 or a social provider such as Google.contextis an object that stores contextual information about the current authentication transaction, such as the user's IP address, application, or location.callbackis a function to send potentially modified tokens back to Auth0 or an error. Because of the async nature of Node.js, it is important to always call the callback function or else the script will timeout.
function(user, context, callback) {
  // ...
}
To keep your custom claims from colliding with any reserved claims or claims from other resources, you must give them a globally unique name using a namespaced format.
By default, Auth0 always enforces namespacing; any custom claims with non-namespaced identifiers will be silently excluded from tokens.
Namespaces are arbitrary identifiers, so technically you can call your namespace anything you want. For convenience, the API audience value set in the WAB Dashboard Demo Settings is used as the namespace.
function(user, context, callback) {
  const namespace = 'https://menu-api.demo.com';

  //...
}
You then check if the context object has an authorization property which in turn has a roles property:
function(user, context, callback) {
  const namespace = 'https://menu-api.demo.com';

  if (context.authorization && context.authorization.roles) {
   // ...
  }

  // ...
}
context.authorization is an object containing information related to the authorization transaction, such as roles.
context.authorization.roles is an array of strings containing the names of a user's assigned roles.
Next, you assigned the roles array to the assignedRoles constant and check if there is an ID token or access token present in the context object:
function(user, context, callback) {
  const namespace = 'https://menu-api.demo.com';

  if (context.authorization && context.authorization.roles) {
    const assignedRoles = context.authorization.roles;

    if (context.idToken) {
      // ...
    }

    if (context.accessToken) {
      // ...
    }
  }

  // ...
}
If any of these token objects is present, you add to it a <namespace>/roles property with the roles array, assignedRoles, as its value. This effectively creates a custom claim on the token that represents the user roles.
function(user, context, callback) {
  const namespace = 'https://menu-api.demo.com';

  if (context.authorization && context.authorization.roles) {
    const assignedRoles = context.authorization.roles;

    if (context.idToken) {
      const idTokenClaims = context.idToken;
      idTokenClaims[`${namespace}/roles`] = assignedRoles;
      context.idToken = idTokenClaims;
    }

    if (context.accessToken) {
      const accessTokenClaims = context.accessToken;
      accessTokenClaims[`${namespace}/roles`] = assignedRoles;
      context.accessToken = accessTokenClaims;
    }
  }

  // ...
}
Finally, you invoke the callback function to send potentially modified tokens back to Auth0 which in turn sends them to the client:
function(user, context, callback) {
  // ...

  callback(null, user, context);
}
That's it for creating an Auth0 rule that lets you add user roles to tokens.
What's left to do is for you to create a user that will have the menu-admin role.
Create an Admin User
Open the Users page from the Auth0 Dashboard and click on Create User. Fill the form that pops up with the following:
Email:
admin@example.comPassword and Repeat Password: Any password of your choice
Connection:
Username-Password-Authentication
Click on the Create button. A user page for admin@example.com loads up. On this page, click on the Roles tab and then click on the Assign Roles button.
From the dropdown, select the menu-admin role that was created earlier and click on the Assign button.
Optionally, verify that the user has the right permissions by clicking on the Permissions tab.
Your admin user is all set up and ready to use.
Use the Admin Access
Head back to the WAB Dashboard and sign out. Click on the Sign In button again and enter admin@example.com in the email box and the password you created for that user. Then, click Log In.
Below the Sign Out button you'll now see admin@example.com as the username. When you open the WAB Dashboard Menu tab, you get the three menu items you saw with the non-admin user but, if you look at the upper right corner, you'll also see an Add Item link.
Logged in with a menu-admin role, you can now create, edit, and delete menu items using the WAB Dashboard. However, as of now, the same could be done with a non-admin user if the client-side route protections were to be circumvented or a malicious, yet authenticated, user was able to make requests to the API manually using the access token as your API is not enforcing access control just yet.
Hack Yourself
To see this attack vector in action, follow these steps using Google Chrome (you can use any other browser that offers the same functionality):
Open the Chrome Dev Tools.
Click on the Network tab of the console.
Sign out of the admin account and sign back in with a non-admin account.
In the Network activity panel look for the
tokenentry and click it.
The Chrome Dev Tools will show you an adjacent panel with details on the token network request. In the "Preview" tab you can see that the response to this request is an object with an access_token property.
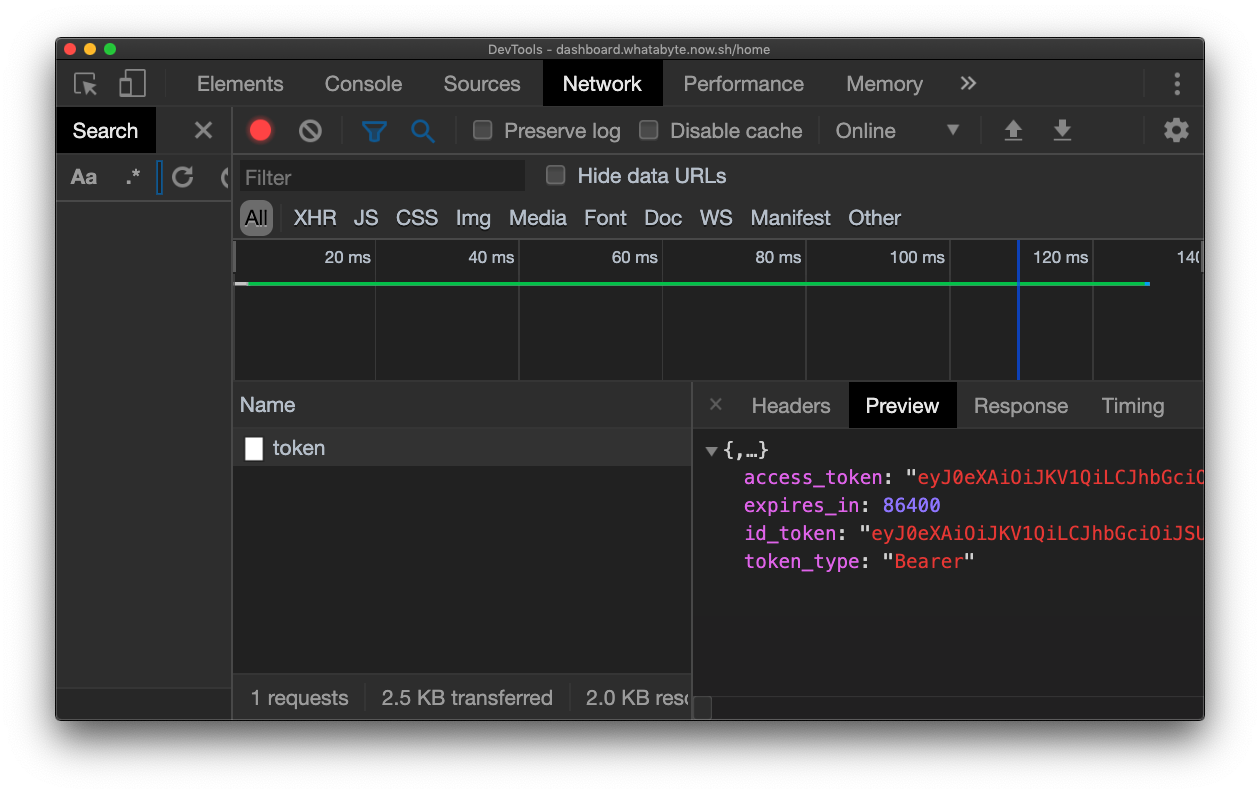
To visualize this response better:
- Click on the Response tab of the network request details.
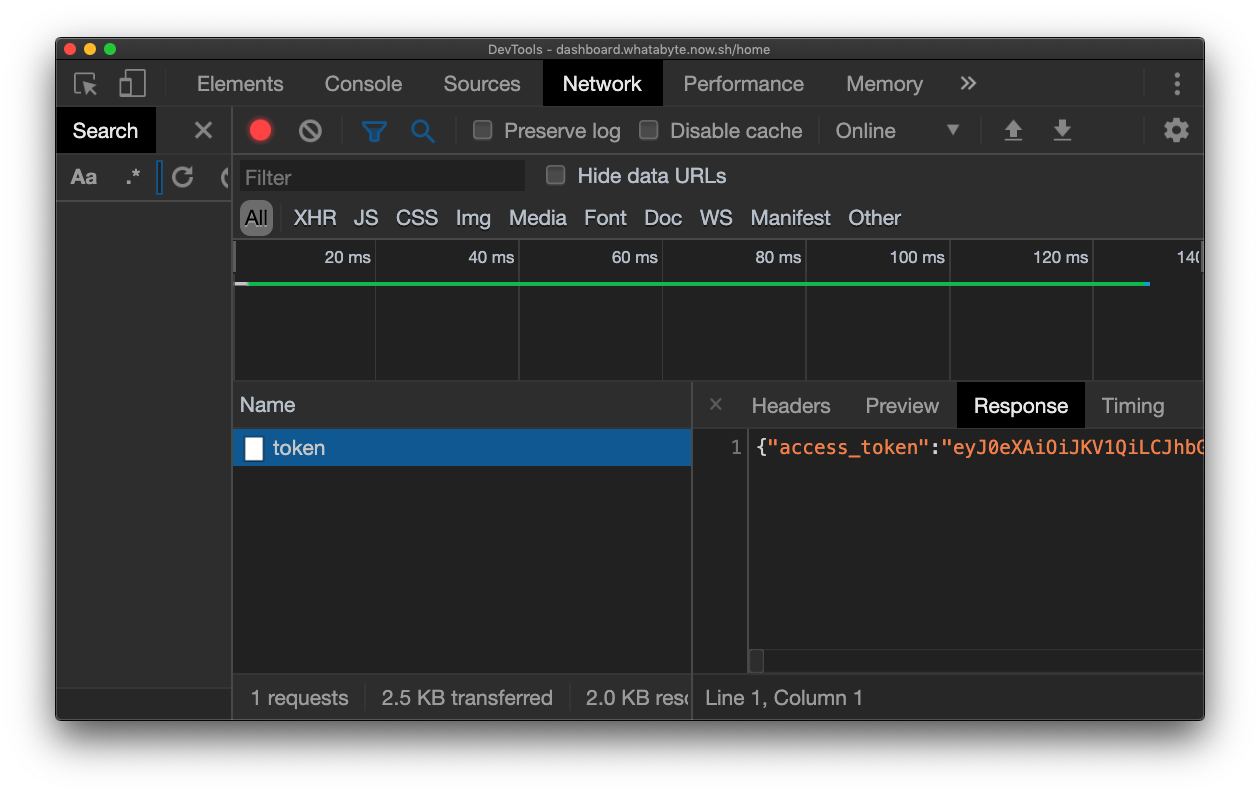
Copy the entire response object.
Using your IDE or text editor, create a
res.jsonfile and paste the response object there.
Some IDEs may format this JSON file nicely for you making it easier to read.
There you have it: the complete access token that proves your identity to the Menu API. Copy the value of the access_token property and use it in the following command to access an "admin" endpoint as a non-admin user:
curl -X POST  -H 'Authorization: Bearer YOUR-ACCESS-TOKEN-HERE' -H 'Content-Type: application/json' -d '{
  "item": {
    "name": "Salad",
    "price": 4.99,
    "description": "Fresh",
    "image": "https://cdn.auth0.com/blog/whatabyte/salad-sm.png"
  }
}' http://localhost:7000/items -i
Replace
YOUR-ACCESS-TOKEN-HEREwith the value of youraccess_tokenand execute the command.
You'll get a successful 201 Created response. Carlos Mostek, Auth0 Senior Solution Architect, explains this attack vector nicely:
"To perform authentication from the client, there will be a call from the browser to the /oauth/token endpoint and you'll be able to inspect the response of that call using the browser developer tools. Thus, there needs to be server-side validation for your authentication and authorization strategy to be effective. The access token that you give to the client must have the right amount of information in it, such as permissions, so that calls can be restricted on the server. The restriction of certain pages in a single-page application is done for user convenience but it doesn’t actually provide any additional security as anything that lives in the client-side can be hacked."
To mitigate this attack vector, you'll implement role-based access control (RBAC) in your NestJS application by building a guard that granularly grants access to protected endpoints based on permissions associated with an user that are defined in an access token.
Implement Role-Based Access Control in NestJS
This is the plan: You are going to attach custom metadata to a route handler through a decorator named @Permissions. The custom metadata will specify the permissions needed to access that route handler, such as create:items, and supply that permission data to a custom guard, PermissionsGuard.
The guard will inspect the access token provided by the client request and verify that it has the permissions required by the endpoint it needs to access. Consequently, if the proper permissions are present in the access token, access to the endpoint is granted; otherwise, an unauthorized error is sent to the client.
To start, head back to your NestJS project and run the following command to create the Permissions decorator:
nest generate decorator permissions --no-spec
The file permissions.decorator.ts is created under the src directory. Populate this file as follows:
// src/permissions.decorator.ts

import { SetMetadata } from '@nestjs/common';

export const Permissions = (...permissions: string[]) =>
  SetMetadata('permissions', permissions);
The SetMetadata() method is used to associate an array of strings representing permissions with a permissions key. This key-value pair will be attached to whatever method @Permissions decorates. For example, the route handler of POST items/ would look like this:
@UseGuards(AuthGuard('jwt'))
@Post()
@Permissions('create:items')
create(@Body('item') item: Item) {
  this.itemsService.create(item);
}
Next, you need to tie the permissions metadata with a guard. Issue the following command to create a PermissionsGuard file:
nest generate guard permissions --no-spec
The file permissions.guard.ts is created under the src directory. Populate this file as follows:
// src/permissions.guard.ts

import { CanActivate, ExecutionContext, Injectable } from '@nestjs/common';
import { Observable } from 'rxjs';
import { Reflector } from '@nestjs/core';

@Injectable()
export class PermissionsGuard implements CanActivate {
  constructor(private readonly reflector: Reflector) {}

  canActivate(
    context: ExecutionContext,
  ): boolean | Promise<boolean> | Observable<boolean> {
    const routePermissions = this.reflector.get<string[]>(
      'permissions',
      context.getHandler(),
    );

    const userPermissions = context.getArgs()[0].user.permissions;

    if (!routePermissions) {
      return true;
    }

    const hasPermission = () =>
      routePermissions.every(routePermission =>
        userPermissions.includes(routePermission),
      );

    return hasPermission();
  }
}
Let's go over what's happening in this guard implementation.
In this guard, you want to return a conditional value based on whether or not the authenticated user has the required permissions to access the endpoint. As you can see, there are a lot of moving parts in this authorization flow. At a high-level:
The
JwtStrategyPassport strategy gets invoked which validates the client request.Then, control is passed to
ItemsController.ItemsControllermatches the route path with one of its route handlers and invokes it if the route guards returntrue.
These three separate high-level stages need to share data: access tokens and permissions metadata. NestJS facilitates this data sharing across the request handling cycle through an ExecutionContext object. This object provides additional details about the current execution process through methods such as getHandler() to get a reference to the route handler function and getArgs() to get an array with arguments passed natively to the application. By default NestJS uses Express under the hood, so this array has the original list of parameters passed to the original Express handler: [req, res, next].
PermissionsGuard uses an instance of the Reflector helper class provided by NestJS to easily access the metadata attached to a router handler by the @Permissions decorator. To get the route permissions, you use the reflector.get() method which takes as arguments the key of the property you want to extract from the metadata, in this case permissions, and a reference to the route handler function where the metadata has been attached, context.getHandler().
These are the local permissions that you'll need to compare with the permissions claim of the access token. You can access the access token of the authenticated user through the user object returned by the context.getArgs() method.
When comparing local and access token permissions, you return true from PermissionsGuard if and only if:
The route handler doesn't have any permissions set.
The route handler has permissions set and each one of them is present in the permissions claim of the access token.
With PermissionsGuard and the @Permission decorator implemented, it's time to integrate them into the route handlers of ItemsController. Open src/items/items.controller.ts and update it like so:
import {
  Body,
  Controller,
  Delete,
  Get,
  Param,
  Post,
  Put,
  UseGuards,
} from '@nestjs/common';
import { ItemsService } from './items.service';
import { Items } from '../items';
import { Item } from '../item';
import { AuthGuard } from '@nestjs/passport';
import { Permissions } from '../permissions.decorator';
import { PermissionsGuard } from '../permissions.guard';

@Controller('items')
export class ItemsController {
  constructor(private readonly itemsService: ItemsService) {}

  @Get()
  async findAll(): Promise<Items> {
    return this.itemsService.findAll();
  }

  @Get(':id')
  async find(@Param('id') id: number): Promise<Item> {
    return this.itemsService.find(id);
  }

  @UseGuards(AuthGuard('jwt'), PermissionsGuard)
  @Post()
  @Permissions('create:items')
  create(@Body('item') item: Item) {
    this.itemsService.create(item);
  }

  @UseGuards(AuthGuard('jwt'), PermissionsGuard)
  @Put()
  @Permissions('update:items')
  update(@Body('item') item: Item) {
    this.itemsService.update(item);
  }

  @UseGuards(AuthGuard('jwt'), PermissionsGuard)
  @Delete(':id')
  @Permissions('delete:items')
  delete(@Param('id') id: number) {
    this.itemsService.delete(id);
  }
}
The protection of the write endpoints (POST items/, PUT items/, DELETE items/:id) is enhanced to include role-based access control (RBAC) by adding the PermissionsGuard as an additional argument to the @UseGuards() decorator. You passed the PermissionsGuard type, instead of an instance like AuthGuard, to delegate the responsibility of instantiating the guard to the framework and enabling dependency injection.
Try to create a new menu item again using the non-admin access token and you'll see how it fails:
curl -X POST  -H 'Authorization: Bearer YOUR-ACCESS-TOKEN-HERE' -H 'Content-Type: application/json' -d '{
  "item": {
    "name": "Coffee",
    "price": 2.99,
    "description": "Woke",
    "image": "https://cdn.auth0.com/blog/whatabyte/coffee-sm.png"
  }
}' http://localhost:7000/items -i
This time, you get a 403 Forbidden response thanks to the RBAC protection you added to your NestJS API:
{"statusCode":403,"error":"Forbidden","message":"Forbidden resource"}
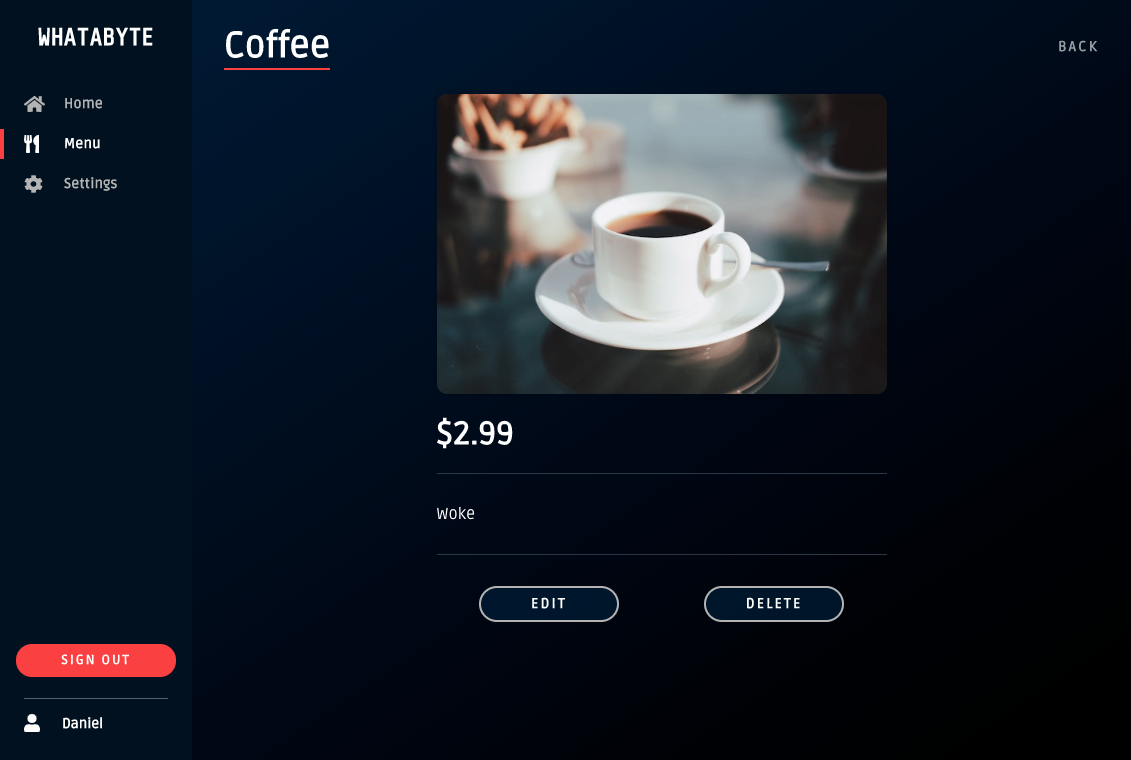
Sign out of the non-admin account and sign back in as the admin user in the WAB Dashboard. Try to add a new item. The Add Item form is pre-loaded with some data to make this process easier for you. If you already created the salad item, try to create a coffee item with this data:
name: Coffee
price: 2.99
description: Woke
image: https://cdn.auth0.com/blog/whatabyte/coffee-sm.png
Click on that newly created item and notice that you can either edit or delete it. Try both operations.
Security Exercise
As an experiment to test the robustness of your API, go back to Roles page from the Auth0 Dashboard and edit the menu-admin role. Remove the create:items permission from it.
Refresh the WAB Dashboard to rotate the access token. Under the hood, the WAB Dashboard is using RxJS and the Auth0 SPA SDK to power an authentication service. Anytime you refresh the Dashboard, a new instance of an Auth0 client is created with a new and updated access token.
Then, try to create an item again. You should get a 403 (Forbidden) error from the server. Open an existing menu item and either delete it or update it. Since those permissions are still associated with the menu-admin role and are present in the permissions claim of the access token, these two operations (update and delete) should be successful.
Let me know if you were able to complete this exercise!
What's Next
This concludes the tutorial for now. What other chapters should be added? This is what I have in mind for the future:
Deploying a NestJS application to Heroku and AWS.
Connecting a NestJS application to a MongoDB or PostgreSQL store.
Using GraphQL or gRPC with NestJS.
Let me know through our feedback section if these are chapters you'd like to read or what other content I should cover. Thank you for reading this far and happy engineering!
I have feedback or ran into an issueAbout the author

Dan Arias
Software Engineer (Auth0 Alumni)