
TL;DR: In this article, we are going to learn the basic features of TypeScript through practical examples. We'll start with a small introduction to TypeScript, then we are going to create a TypeScript project and use its features to learn the language in practice.
What is TypeScript
TypeScript is a programming language, built by Microsoft, that extends JavaScript. The language has been built as an open-source project, licensed under the Apache License 2.0, so the developer community can use it freely. Among its features, a remarkable one is that TypeScript brings type safety to one of the most flexible, dynamic programming languages around: JavaScript. This characteristic enables developers to be very productive even on large codebases by introducing and facilitating tools and practices like static checking and code refactoring.
“TypeScript brings type safety to one of the most flexible, dynamic programming languages around: JavaScript.”
Tweet This
Besides enabling developers to check the correctness of their code before running it, TypeScript also brings to the table the state of the art features of JavaScript. That is, with TypeScript, we can take advantage of the latest features of JavaScript, like those introduced by ECMAScript 2015, and features that are still under consideration (e.g., decorators). As the developers of TypeScript knew that applications written in the language would face a wide variety of environments (i.e., JavaScript engines), they made it easy to compile and transpile TypeScript to different targets, like ECMAScript 3 and above.
Installing TypeScript
To compile and transpile TypeScript into JavaScript, we need to install the command-line compiler. As this compiler is, in fact, a Node.js program, we first need to install Node.js and NPM on our environment. After that, we can install the compiler as a Node.js package:
# installing TypeScript compiler
npm install -g typescript
This will make the tsc (TypeScript Compiler) command available globally on our machine. To test the installation, let's create a simple TypeScript file called index.ts with the following code:
console.log(1);
Then let's use the compiler to transform it to JavaScript:
# compiling index.ts
tsc index
This will generate a new file called index.js with the exact same code of the TypeScript file. To execute this new file, let's use Node.js:
# this will output 1
node index
Although the compiler did nothing else besides creating a JavaScript file and copying the original code to it, these steps helped us to validate that our TypeScript installation is in good shape and ready to handle the next steps.
Creating a TypeScript Project
To create a TypeScript project, everything that we need is a tsconfig.json file. The presence of this file in a directory denotes that this directory is the root of a TypeScript project. This file, among other things, instructs the compiler on which files to compile, which files to ignore, and what environment to target (e.g., ECMAScript 3).
To create our first TypeScript project, let's create a new directory and add the TypeScript configuration file to it:
# create the root directory of our TypeScript project
mkdir project-manager-ts

# move the working directory to it
cd project-manager-ts

# create an empty tsconfig.json file
touch tsconfig.json
TypeScript Configuration
As TypeScript can aim different environments (like ECMAScript 3 or ECMAScript 2015) and can be configured to validate different things (like implicit any), we use the tsconfig.json file to adjust the compiler to our needs. In our practical introduction to TypeScript, we will create a small program that deals with tasks and stories, and that runs on our terminal, through Node.js, to help us understand the concepts.
Node.js is based on Chrome V8, one of the most up-to-date JavaScript engines available. Node.js 6 ships with a Chrome V8 version capable of supporting 95% of the ECMAScript 2015 specification, as shown by Node Green, while Node.js 8 supports 99% of the specification. In respect to ECMAScript 2017, both versions support 23% and 73% of the specification, respectively. Therefore, the best choice is to configure our project to be compiled to ECMAScript 2015, which will enable users with Node.js 6 and 8 to run our program without trouble.
Besides configuring the compiler to target ECMAScript 2015, we will also configure the other four characteristics:
module, to instruct TypeScript to use the CommonJS module format.removeComments, to avoid adding comments in the generated JavaScript files.sourceMap, to help us debugging the code generated.outDir, to define where the compiled code will reside.
We will also tell the compiler to process files under ./src, a directory that we will create to add our TypeScript source code. To perform these configurations, let's open the tsconfig.json file and add the following content to it:
{
  "compilerOptions": {
    "module": "commonjs",
    "target": "es2015",
    "removeComments": true,
    "outDir": "./bin"
  },
  "include": ["src/**/*"]
}
Compiler Options
The options used in the configuration file above are just a small subset of what TypeScript supports. For example, we could instruct the compiler to handle decorators, to support jsx files, or even to transpile pure JavaScript files. The official website contains a list of all options available on TypeScript, but below there is the explanation of a few commonly used options:
allowJs: this option makes TypeScript compiler process JavaScript as well. For example, if we create a JavaScript file that uses a generator (ECMAScript 2015 feature), and use TypeScript to compile JavaScript targeting ECMAScript 5, the compiler would replace the generator function with JavaScript code capable of running on the target.noImplicitAny: this option makes the compiler complain whenever it finds a variable declaration that can accept any type, but that doesn't explicitly define it.experimentalDecorators: this option enables decorators on a TypeScript project. By default, decorators are disabled since they are not part of any official JavaScript version yet.emitDecoratorMetadata: this option, alongside the presence of thereflect-metadatapackage, preserves type information in the object's metadata.watch: this option makes the TypeScript compiler run indefinitely. With it, whenever a source file is changed, the compiling process is triggered automatically to generate the new version.
TypeScript Features
Now that we understand how to bootstrap a TypeScript project and configure the compiler let's start learning about the features provided by TypeScript. Although the features that we are going to cover here (and a few more) are thoroughly explained in the TypeScript handbook, this article will focus on a more practical approach. We will learn the basic concepts of the most important features and put them to work together.
TypeScript Types, Variables, and Functions
Before creating anything that matters, we need to learn about the most important features of TypeScript: types, variables, and functions. TypeScript became popular over the last couple of years because it enables developers to define strongly typed variables, parameters, and return values while still using JavaScript (which on its nature is weakly typed and extremely flexible). For example, developing on JavaScript, the following code is perfectly valid:
function addOne(age) {
    return age + 1;
}

let age = 32;
// ...
age = "thirty two";

console.log(addOne(age));
Running it on Node.js, or on any browser for that matter, would output thirty two1 without generating any warning. Nothing new here, it's just JavaScript behaving as flexible as always. But, what if we want to guarantee that our addOne function accepts only numbers when called? We could change the code to validate the typeof the parameter during runtime, or we could use TypeScript to restrict that during compile time:
// note that we restricted age to accept numbers only
function addOne(age: number): number {
    return age + 1;
}

console.log(addOne(32));
console.log(addOne("thirty two"));
Now, using the TypeScript compiler to generate JavaScript will produce an error saying that the Argument of type '"thirty two"' is not assignable to parameter of type 'number'.. This is the most valuable feature of TypeScript. Based on this feature, amazing tools and IDE integrations can be created to improve tasks like code refactoring. Being able to define types during design time help us avoid mistakes like passing the wrong variable type to functions.
String and number are two of the basic types that TypeScript supports. Besides these types, TypeScript also supports:
Boolean: a flag that contains true or false values.Array: a collection of typed elements.Tuple: similar toarray, but with a fixed number of typed elements.Enum: friendly names to sets of numeric values.Any: to indicate that a variable/parameter can be anything.Void: to indicate that a function won't return anything.Never: to indicate that a function always throws an exception or never finishes its execution.
These types enable us to create solutions to whatever problem we face. With them, we can develop code that guarantees that the correct types are being passed around and, if we need to represent more complex entities, we can define classes that contain any arbitrary number of typed variables (as we will see in the next section). To provide an overview of what TypeScript makes possible, let's take a look in the following code:
// 1 - declaring a type
type RankingTuple = [number, string, boolean];

// 2 - defining typed variables
let position: number;
let playerName: string;
let finishedGame: boolean;
let ranking: RankingTuple;
let hallOfFame: Array<RankingTuple> = [];

// 3 - creating a ranking
position = 1;
playerName = "Bruno Krebs";
finishedGame = true;
ranking = [position, playerName, finishedGame];
hallOfFame.push(ranking);

// 4 - creating another ranking
position = 2;
playerName = "Maria Helena";
finishedGame = true;
ranking = [position, playerName, finishedGame];
hallOfFame.push(ranking);

// 5 - defining a function that logs all rankings
function printRankings(rankings: Array<RankingTuple>): void {
  for (let ranking of rankings) {
    console.log(ranking);
  }
}

// 6 - calling the function
printRankings(hallOfFame);
The first step executed by the code above creates a type (tuple) that accepts three objects: a number, a string, and a boolean. This tuple represents a ranking where the number is the position, the string is the name of the person in that position, and the boolean indicates whether the player has finished the game or not. In the second step, we define five typed variables to hold:
- a player's position,
- a player's name,
- a flag that indicates if the player has finished the game or not,
- a reference to an object that complies to the ranking tuple,
- and an array of rankings.
Steps three and four use these variables to create two rankings and to push them to the array of rankings (hallOfFame). Step five defines a function that iterates over an array of rankings and prints them. The last step simply calls the function defined in the previous step passing the array of rankings (hallOfFame). Note that all these steps were defined in a way that the compiler is able to validate everything before runtime. For example, trying to push something else than a tuple that contains exactly a number, a string, and a boolean to hallOfFame would generate an error. Another example is that trying to capture the return value of a call to printRankings would also generate an error since this function explicitly defines that it returns nothing (: void).
To learn more about the basic types of TypeScript, take a look at the documentation. The official website also contains a section that talks about advanced types, like the type that we declared in the first step of the example above.
TypeScript Modules
Another feature that TypeScript inherits from ECMAScript 2015 is the support of modules. Modules in both languages (JavaScript and TypeScript) are a way to encapsulate code into their own scope. That is, when we create a module and add some code to it, we are not letting anything (like variables, functions, etc.) escape silently. Everything that we want to provide externally needs to be explicitly exported by our module and explicitly imported by other modules/scripts.
For example, if we change the code in the previous section by adding the following line:
// steps 1 to 6 ...

export { printRankings, RankingTuple };
We are then able to import the printRankings function and the RankingTuple type definition on other modules/files to use them. Throughout this article, we are going to define and export multiple classes and import them into other files. As each of these classes will be defined on their own files, they can be considered separate modules. To learn more about modules, check out the official documentation.
TypeScript Classes
In TypeScript, classes are very similar to what other object-oriented programming languages provide. That is, a class is the contract definition of what is supported by the instances of this class (objects). Besides that, a class can also inherit functionality from other classes and even from interfaces (more on that in the next section). One feature that distinguishes classes in TypeScript from most of the other languages is that classes support only a single constructor. Although this might sound limiting, we will see that by supporting optional parameters, TypeScript mitigates this limitation.
To better understand these concepts, let's start creating our project management program by defining the four classes shown in the following diagram.
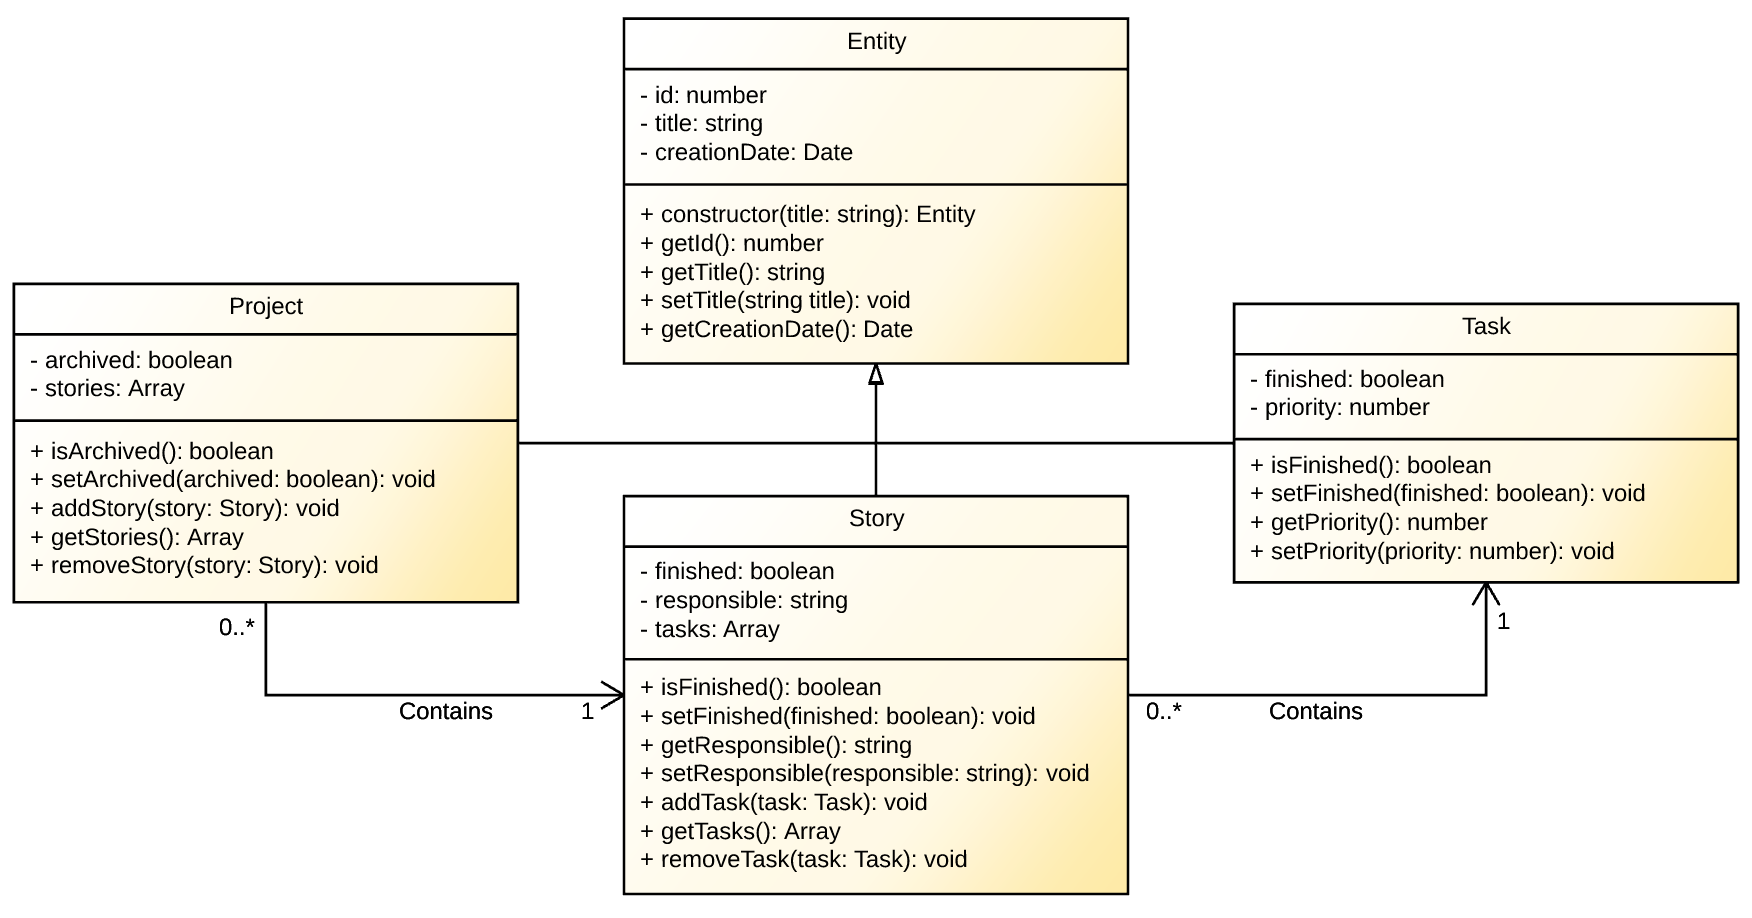
Defining the Entity Class
The first class that we will create is Entity. This is an abstract class that defines common characteristics that will be inherited by the other classes. To define this class, let's create a file called entity.ts in the ./src directory with the following code:
export class Entity {
  private _id: number;
  private _title: string;
  private _creationDate: Date;

  constructor(id: number, title: string) {
    this._id = id;
    this._title = title;
    this._creationDate = new Date();
  }

  get id(): number {
    return this._id;
  }

  get title(): string {
    return this._title;
  }

  set title(title: string) {
    this._title = title;
  }

  get creationDate(): Date {
    return this._creationDate;
  }
}
We start the definition of this class by using the export keyword. Exporting the class is essential so we can import it in other files, as we will see in the definition of the other classes. After that, we define three properties: _id, _title, and _creationDate. Starting properties with an underscore is important to differentiate them from their accessors (getters and setters). With the properties properly defined, we add the constructor of the class. This constructor accepts two parameters: a number to use it as the _id of the project, and a string to set in the _title property. The constructor also automatically defines the _creationDate to the current date. The last thing we do in this class definition is to add the getters and setters of the properties.
Defining the Task Class
Next, we will create Task, a concrete class that represents a task that needs to be executed. Users will be able to order tasks by priority, flag them as completed, and set a title to tasks (which will be inherited from Entity). To define this class, let's create a file called task.ts in the ./src directory with the following code:
import {Entity} from "./entity";

export class Task extends Entity {
  private _completed: boolean;
  private _priority: number;

  get completed(): boolean {
    return this._completed;
  }

  set completed(value: boolean) {
    this._completed = value;
  }

  get priority(): number {
    return this._priority;
  }

  set priority(value: number) {
    this._priority = value;
  }
}
As this class will inherit characteristics from Entity, we start this file by adding the import statement to bring the definition of Entity. After that, we define the Task class and make it extend Entity. Besides that, there is nothing too special about this class. It contains only two properties (_completed and _priority) with its accessors. Note that we don't define a constructor on Task because we will use the one inherited from Entity.
Defining the Story Class
The third class that we will create will be Story, a concrete class that represents a user story. A story can be subdivided into multiple tasks to facilitate its execution, but only one person is responsible for a story and its tasks. Besides that, a story contains a title (inherited from Entity) and a flag that identifies if the story has been completed or not. To define the Story class, let's create a file called story.ts in the ./src directory with the following code:
import {Entity} from "./entity";
import {Task} from "./task";

export class Story extends Entity {
  private _completed: boolean;
  private _responsible: string;
  private _tasks: Array<Task> = [];

  get completed(): boolean {
    return this._completed;
  }

  set completed(value: boolean) {
    this._completed = value;
  }

  get responsible(): string {
    return this._responsible;
  }

  set responsible(value: string) {
    this._responsible = value;
  }

  public addTask(task: Task) {
    this._tasks.push(task);
  }

  get tasks(): Array<Task> {
    return this._tasks;
  }

  public removeTask(task: Task): void {
    let taskPosition = this._tasks.indexOf(task);
    this._tasks.splice(taskPosition, 1);
  }
}
Just like Task, we start Story by making it extend Entity to inherit its characteristics. After that, we define three properties:
_completed: a flag that identifies if theStoryhas been completed or not._responsible: a string that defines who is in charge of executing the story and its tasks._tasks: an array that contains zero or more instances ofTaskto be executed by the person responsible.
For the first two properties, _completed and _responsible, we define both accessors to enable their manipulation. For the _tasks property, we add three methods. The first one, addTask, accepts an instance of Task to add to the array. The second one is the accessor to get all instances of Task. The third one, removeTask, receives a task to remove it from the array of tasks.
Defining the Project Class
The fourth and final class that we will create will be the Project class. A project contains zero or more stories, can be released when finished and can have a title (inherited from Entity). To define this class, let's create a file called project.ts in the ./src directory and add the following code:
import {Entity} from "./entity";
import {Story} from "./story";

export class Project extends Entity {
  private _released: boolean;
  private _stories: Array<Story>;

  get released(): boolean {
    return this._released;
  }

  set released(value: boolean) {
    this._released = value;
  }

  public addStory(story: Story) {
    this._stories.push(story);
  }

  get stories(): Array<Story> {
    return this._stories;
  }

  public removeStory(story: Story) {
    let storyPosition = this._stories.indexOf(story);
    this._stories.splice(storyPosition, 1);
  }
}
We start the definition of Project by importing Entity to inherit its characteristics. After that, we define two properties: _released and _stories. The functionality provided by Project is quite similar to Story. The difference is that instead of dealing with an array of tasks, a Project deals with an array of Stories. These stories are manipulated through three methods: addStory, stories, and removeStory. The resemblance between these three methods and the ones defined on Story to deal with Tasks is big, and therefore, does not require explanation.
TypeScript Interfaces
Interfaces, on TypeScript, exist to perform type checking during compile time. That is, using an interface makes the TypeScript compiler check if variables fill the contract (have the structure) defined by the interface. As occurs in other programming languages, TypeScript does not require an object to have the exact same structure as defined by the interface. To be considered valid, objects can have any shape as long as they define the functions and properties required by the interface that they implement.
For example, let's say that we want to trigger an email whenever a Task or Story is marked as completed. Instead of creating two different functions to deal with each type separately, we can define an interface to represent completable items. To practice, let's create a file called completable.ts in the ./src directory with the following source code:
export interface Completable {
  title: string;
  completed: boolean;
  completedAt?: Date;
}
After defining this interface, we can use it to restrict what objects can be passed to the function that sends emails. Let's create a file called index.ts in the ./src directory to see this in action:
import {Task} from "./task";
import {Completable} from "./completable";

function sendCompletionEmail(completable: Completable) {
  if (!completable.completed) {
    // ignore incompleted entities
    console.error(`Please, complete '${completable.title}' before sending email.`);
    return;
  }
  console.log(`Sending email about '${completable.title}'`);
  // ...
}

let bugFix = new Task(1, 'Weirdo flying bug');
sendCompletionEmail(bugFix);
bugFix.completed = true;
sendCompletionEmail(bugFix);
Note that TypeScript does not force us to implement the Completable interface explicitly. The compiler, when run, simply checks the structure of the object being passed to see if it fits the interface contract. Therefore, if we compile and run our code now, TypeScript won't display any alerts:
tsc
node ./bin/index

# > Please, complete 'Weirdo flying bug' before sending email.
# > Sending email about 'Weirdo flying bug'
Although TypeScript is flexible on that matter, it's a good practice to implement the interface explicitly. Therefore, let's update the Task class definition:
import {Entity} from "./entity";
import {Completable} from "./completable";

export class Task extends Entity implements Completable {
  // ... nothing else changes here
}
And also the definition of Story:
import {Entity} from "./entity";
import {Task} from "./task";
import {Completable} from "./completable";

export class Story extends Entity implements Completable {
  // ... nothing else changes here
}
An avid reader will notice that the Completable interface defines two properties that are not part of Task or Story. The compiler won't complain about the first property, title, because both classes inherit a property with the same name and shape from Entity. For the second property, completedAt, TypeScript won't generate alerts because the property is marked as optional through the question mark (completedAt?: Date) added after the property name.
To learn more about interfaces on TypeScript, take a look at the official documentation.
TypeScript Decorators
Decorators offer a declarative syntax to modify the shape of classes and properties declarations. For the time being, decorators are not supported by vanilla JavaScript, but there is a proposal (currently on stage 2) to add support to them on future versions. Fortunately, as TypeScript already supports this feature, we will be able to develop elegant solutions to cross-cutting concerns like logging and transactions.
“TypeScript decorators enable developers to create elegant solutions to cross-cutting concerns like logging and transactions.”
Tweet This
To understand how this feature works, let's say that we are interested in measuring and logging the time spent by a few functions on our program. Instead of changing the code inside all these functions, we can take advantage of decorators to decouple the performance logging from the code itself. Decorators, in the end, are just function wrappers. That is, to create a decorator, we create a function that wraps the call to the original function and changes its behavior in any way we like.
To see this in action, let's create a file called log.ts in the ./src directory and add the following code:
export function Log() {
  return function (target: Object, propertyKey: string, descriptor: TypedPropertyDescriptor<any>) {
    // 1 - keep a reference to the original function
    let originalFunction = descriptor.value || descriptor.get;

    // 2 - wrap the call to the original function to log when it
    function wrapper() {
      let startedAt = +new Date();
      let returnValue = originalFunction.apply(this);
      let endedAt = +new Date();
      console.log(`${propertyKey} executed in ${(endedAt - startedAt)} milliseconds`);
      return returnValue;
    }

    // 3 - reassigns the original function to reference the wrapper
    if (descriptor.value) descriptor.value = wrapper;
    else if (descriptor.get) descriptor.get = wrapper;
  };
}
The first step in our new Log decorator is to assign a new variable that references the original function. As we want to be able to add this decorator to methods and property accessors, we need to reference descriptor.value or descriptor.get. The latter, descriptor.get, is the reference to accessors and the first reference to normal methods. After that, we define our wrapper to perform the following actions:
- Take note of when the original function is being called.
- Call the original function and keep a reference to whatever is the returning value (if any).
- Take note of when the original function finishes its job.
- Log the difference between the two times so we can see how many milliseconds it took to complete the call.
- Return the value obtained from the original function call.
The last step executed by the Log decorator declaration is to replace the original function with the wrapper. Replacing it makes the wrapper getting called whenever we reference a method/accessor decorated with @Log(), and enables us to see how long it takes the execution of the original method.
Before using the @Log() decorator, we need to instruct TypeScript to support this feature. This is done by adding the following line to tsconfig.json:
{
  "compilerOptions": {
    // ...
    "experimentalDecorators": true
  },
  // ...
}
After that, we can add @Log() to methods and accessors to measure their performance. As all methods that we have created so far are extremely fast, let's simulate a slow method and add the decorator to it. To do that, let's open the entity.ts file and make the following changes:
import {Log} from "./log";

export class Entity {
  // ...

  @Log()
  get title(): string {
    Entity.wait(1572);
    return this._title;
  }

  // ...

  private static wait(ms) {
    let start = Date.now();
    let now = start;
    while (now - start < ms) {
      now = Date.now();
    }
  }
}
As it's possible to see in the code above, the changes needed to use the decorator are simple. We just need to import it in the class that we want to probe and add the decorator to whatever methods/accessors we are interested in. The static method created, called wait, is only used to simulate slow scenarios. This method takes a number of milliseconds as parameters and halts the program execution until this time elapses.
Compiling and running the code now will produce almost the same result as before. The difference is that now we will be able to see how long our code takes to access the title property of an Entity:
tsc
node ./bin/index

# > title executed in 1572 milliseconds
# > Please, complete 'Weirdo flying bug' before sending email.
# > title executed in 1572 milliseconds
# > Sending email about 'Weirdo flying bug'
To learn more about decorators on TypeScript, take a look at the official documentation.
TypeScript Iterators
Whenever we want to loop over objects in a collection (array, map, or set), we take advantage of the iterator feature. Although TypeScript does not add anything special on top of what has been introduced on ECMAScript 2015, we will, for the sake of completeness, take a glimpse of how to use iterators. TypeScript/JavaScript provides two ways to go over objects on a collection: by using the for..of statement, and by referencing objects by its indexes.
The latter (referencing its indexes) is the classical way, probably seen by all seasoned developers:
import {Task} from "./task";

let tasks:Array<Task> = [
  new Task(1, "Buy milk"),
  new Task(2, "Buy cheese"),
  new Task(3, "Pay bills"),
  new Task(4, "Clean the house")
];

for (let i = 0; i < tasks.length; i++) {
  let task = tasks[i];
  console.log(task.title);
}
The other way, using the for..of statement, provides a more elegant way to achieve the same result:
import {Task} from "./task";

let tasks:Array<Task> = [
  new Task(1, "Buy milk"),
  new Task(2, "Buy cheese"),
  new Task(3, "Pay bills"),
  new Task(4, "Clean the house")
];

for (let task of tasks) {
  console.log(task.title);
}
As we can see, using the for..of statement makes much more sense, as we automatically get a reference to the objects in question inside the loop.
Aside: Securing TypeScript with Auth0
Auth0, a global leader in Identity-as-a-Service (IDaaS), provides thousands of customers in every market sector with the only identity solution they need for their web, mobile, IoT, and internal applications. As such, it must come with no surprise that Auth0 provides extremely easy ways to secure applications written in any popular technology, like JavaScript and TypeScript. Auth0 solutions and libraries can be used to secure TypeScript applications developed to run in the front-end and in the backend. For example, the following code snippet creates an Express middleware to secure APIs:
import * as jwt from 'express-jwt';
import {expressJwtSecret} from 'jwks-rsa';

export function securityMiddleware() {
  return jwt({
    secret: expressJwtSecret({
      cache: true,
      rateLimit: true,
      jwksRequestsPerMinute: 5,
      jwksUri: `https://${CLIENT_DOMAIN}/.well-known/jwks.json`
    }),
    audience: 'http://localhost:3000/',
    issuer: 'https://${CLIENT_DOMAIN}/',
    algorithm: 'RS256'
  });
}
To use this middleware, we need to execute six easy steps:
- Install
express-jwt, its type definition (@types/express-jwt), and thejwks-rsalibrary. - Create a free Auth0 account.
- Set up an Auth0 API to represent our backend.
- Replace
${CLIENT_DOMAIN}in the code above with our Auth0 domain (e.g.,bkrebs.auth0.com). - Configure
securityMiddlewareto intercept calls to API endpoints. - Integrate our front-end application with Auth0 to get the tokens that are going to use to talk to the backend.
After that, we get access to state-of-the-art security and identity management features like single sign-on, user management, support for social identity providers (like Facebook, GitHub, Twitter, etc.), enterprise (Active Directory, LDAP, SAML, etc.), and multifactor authentication.
To learn how to use Auth0 to secure front-end applications, or other backend frameworks and programming languages, take a look at the documentation. You will see that it's very easy to secure applications with Auth0.
Conclusion
Although bringing type safety to JavaScript, TypeScript does it without being intrusive. That is, it helps us static checking variable types when we want, but don't force us to do it. Besides that, TypeScript is becoming more and more popular recently. Great frameworks, like Angular in the front-end and Nest in the backend, are being developed with TypeScript, and IDEs are getting better on supporting this technology. Also, the community is investing time to create type definitions for well-established libraries like jQuery and lodash, which enhances their usage in this type-safe version of JavaScript. Considering all these factors, the only possible conclusion is that the future of TypeScript is very promising.
About the author

Bruno Krebs
R&D Content Architect (Auth0 Alumni)