

If your business revenue depends on knowing who your users are before they ever log in, you have an identity-to-revenue pipeline problem. And until recently, solving it meant duct-taping together FTP drops, CSV imports, and brittle cron jobs.
Not anymore. With Auth0 Inbound SCIM and Auth0 Event Streams, you can build a real-time bridge from an upstream corporate directory to any downstream CRM, CDP, or marketing automation platform, entirely within Auth0.
In this post, we'll walk through the architecture end-to-end and build a working example that flows from Okta to Auth0 to HubSpot CRM in real time, using an Event Streams Custom Action to handle the transformation and API call directly inside Auth0.
Why This Matters: Two Stories from the Real World
In the following two use cases, the identity lifecycle (user created, user updated, user deactivated) is a business event. And business events belong in your CRM, your CDP, and your marketing automation platform. They do not belong trapped inside an identity provider.
Story 1: The benefits platform
Imagine you run a B2B employee benefits company (think wellness programs, mental health services, or financial planning tools). Your customer is a large enterprise. They sign a contract covering all 5,000 of their employees.
Here is your problem: none of those 5,000 people know they have access to your product. Your revenue realization depends entirely on reaching them, which means sending enrollment invitations, onboarding emails, and follow-up nudges.
To do any of that, you need their names, emails, and employment status. That data lives in your customer's corporate identity provider. Historically, getting it meant negotiating an SFTP integration, parsing inconsistent CSV formats, and hoping someone remembers to run the export. When an employee leaves the company, you might not find out for weeks.
Story 2: The corporate learning platform
Now imagine you are a company like a learning management system (LMS) that enterprises use to deliver compliance training, professional development, and onboarding courses to their workforce. The moment a new hire joins the company and appears in the corporate directory, they need to be assigned mandatory training modules. When someone transfers departments, their training catalog needs to be updated. When someone leaves, their license should be freed up immediately.
The LMS cannot wait for a nightly batch sync to find out about these changes. Stale directory data results in new hires missing compliance deadlines, departing employees retaining paid seats, and IT teams spending hours manually reconciling mismatches.
The Event-Driven Path
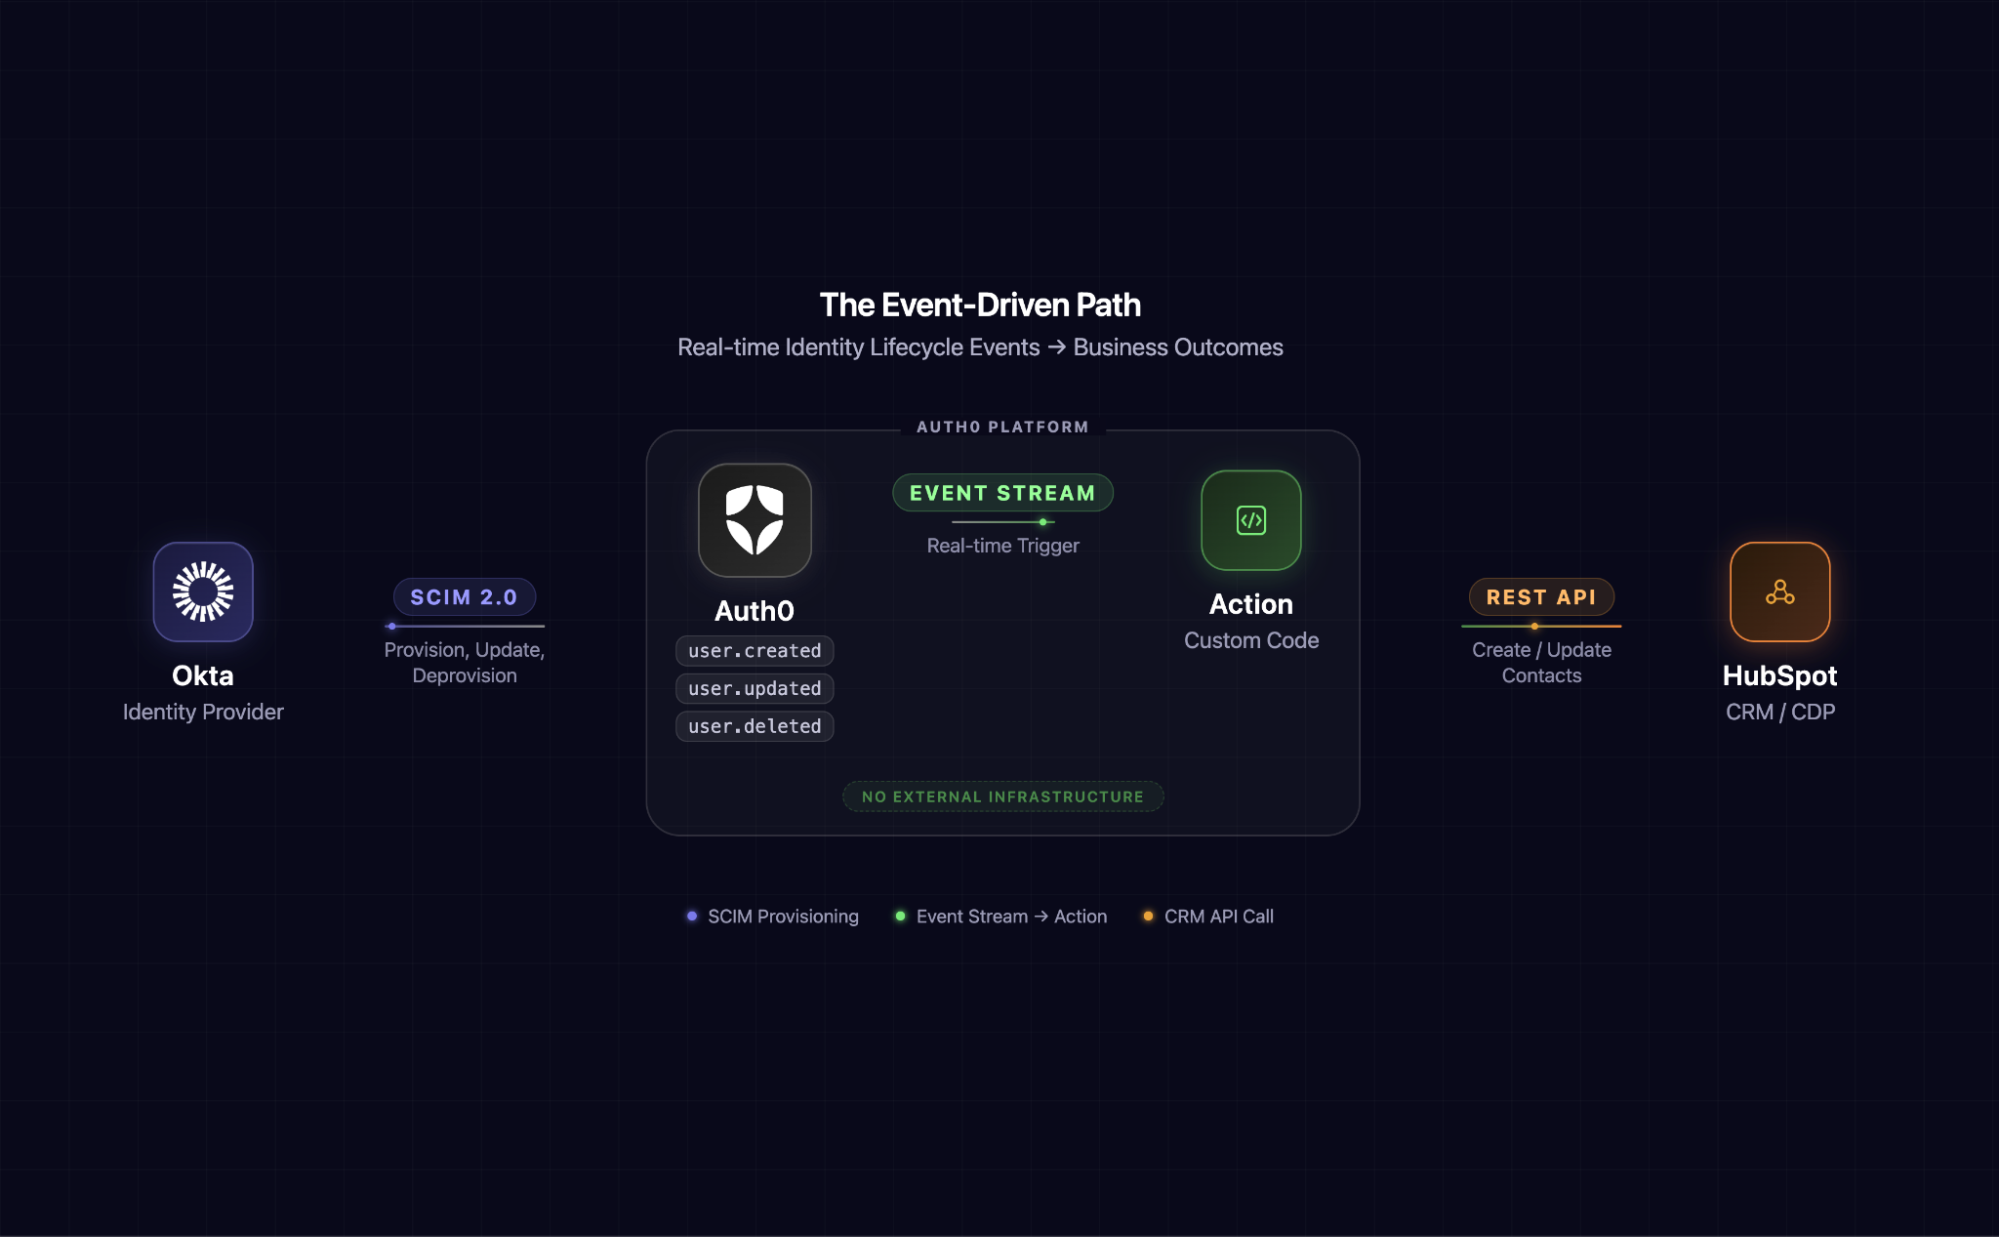
This is a layer by layer description of this architecture:
- Okta (or any SCIM-capable IdP) is the source of truth for the employee directory.
- Auth0 Inbound SCIM receives provisioning events and maintains user records in Auth0.
- Auth0 Event Streams broadcasts lifecycle events (user created, updated, and deleted) to a destination.
- An Event Streams Custom Action is code that runs inside Auth0's extensibility layer, transforms the Auth0 event payload, and calls HubSpot's API directly. No external server. No middleware to deploy, host, or monitor.
- HubSpot CRM is where sales and marketing teams operate. New contacts appear automatically, and lifecycle properties update in real time.
Notice what is missing from this architecture: no external middleware, no Vercel function, no Lambda, and no Cloudflare Worker. The transformation logic lives inside Auth0 as an Event Streams Action, keeping the entire pipeline self-contained.
Before we wire anything together, it is worth understanding what each feature does on its own and why the combination matters.
Inbound SCIM and Event Streams in Auth0
Auth0 includes two features that, when combined, give you full control over the user lifecycle without writing custom middleware. Inbound SCIM automates how external identity providers push user data into your tenant. Event Streams let you react to those changes in real time, routing them to the destinations your architecture requires.
What is SCIM?
System for Cross-domain Identity Management (SCIM) is an open standard (RFC 7644) designed to automate the exchange of user identity information between systems. Instead of batch file transfers, SCIM provides a RESTful API for creating, reading, updating, and deleting user records in real time.
When your customer's IT admin assigns employees to your application in their IdP, SCIM pushes those user profiles to your system automatically. When someone leaves the company, SCIM deactivates them. There is no need for a human to be in the loop, which a significantly reduced risk of stale data.
Why it matters
For B2B SaaS companies, SCIM is the difference between "we signed a contract with Acme Corp" and "we actually know who at Acme Corp should be using our product." It is table stakes for enterprise readiness, and it is increasingly a deal-breaker in procurement conversations.
What are Event Streams?
Auth0 Event Streams let you push tenant events to external destinations in real time. Think of it as a firehose of everything happening in your Auth0 tenant: logins, signups, token exchanges, user lifecycle changes, and more.
Event Streams support several destination types, including Amazon EventBridge, Custom Webhooks, and (critically for our architecture) Auth0 Actions.
Why Custom Actions change the game
With a Custom Webhook destination, you'd need to deploy and maintain an external server to receive events, transform payloads, and call downstream APIs. It works, but it introduces infrastructure you have to host, monitor, and secure.
Event Streams Auth0 Actions let you write that transformation logic directly inside Auth0. Your code runs in Auth0's serverless runtime, has access to a secrets store for API keys, and executes every time a matching event fires. The entire integration collapses into a single platform.
With both pieces in place, the integration path becomes straightforward: SCIM events flow in, Actions react and push data out. Here's how to set it up.
Step 1: Inbound SCIM: Bridging the Directory to Auth0
Setting it up in Auth0
Auth0's Inbound SCIM support works as an extension of enterprise connections. Here is how to configure it:
In the Auth0 Dashboard:
- Navigate to Authentication > Enterprise and create (or select) an enterprise connection. For this scenario, we'll use an Okta Workforce connection pointed at your Okta tenant.
- Once the connection is created, go to its Provisioning tab.
- Toggle on Sync user profiles using SCIM. Auth0 will generate:
- A SCIM Base URL (for example,
https://YOUR_TENANT.us.auth0.com/scim/v2/connections/con_xxxxxxx) - A SCIM Bearer Token for authenticating provisioning requests.
- A SCIM Base URL (for example,
- Copy both values.
In the Okta Admin Console:
- Create a new SWA application.
- Navigate to General > App Settings > Provisioning. Toggle on SCIM.
- Go to the Provisioning tab and select Configure API Integration.
- Paste and select the following values:
- SCIM connector base URL: your copied Auth0 SCIM Base URL
- Unique identifier field for users: userName
- Supported provisioning actions: Push New Users, Push Profile Updates, Push Groups
- Authentication Mode: HTTP Header
- HTTP Header - Authorization: your copied SCIM Bearer Token
- Click Test Connector Configuration to verify connectivity.
- Under Provisioning > To App, enable:
- Create Users
- Update User Attributes
- Deactivate Users
- Save.
Now, when you assign a user or group to this application in Okta, those users will be provisioned into Auth0 in real time via SCIM.
Quick Verification: Assign a test user to the app in Okta, then check User Management > Users in the Auth0 Dashboard. The user should appear within seconds, with their profile attributes populated from the IdP.
Step 2: Event Streams: Broadcasting Lifecycle Events
Setting it up in Auth0
- In the Auth0 Dashboard, navigate to Event Streams.
- Click Create Event Stream and select Auth0 Actions.
- Configure the stream:
- Name:
hubspot-user-lifecycle
- Name:
- Under Event Filters, select the events you care about. For our use case:
user.createduser.updateduser.deleted
- These are the events that will fire when SCIM provisions, updates, or deprovisions a user.
- In the Actions Editor below, copy and paste the following code into the editor. This code automatically syncs your user directory with HubSpot: when someone is provisioned into your app, their contact record is created in your CRM, and when they are removed, their record is archived. It runs entirely within an Auth0 action, so there is no additional infrastructure to deploy or maintain. Save the changes.
exports.onExecuteEventStream = async (event, api) => {
  const HUBSPOT_API_KEY = event.secrets.HUBSPOT_API_KEY;
  const HUBSPOT_BASE = 'https://api.hubapi.com';

  const eventType = event?.payload?.type;
  const user = event?.payload?.data?.user || event?.payload?.data;

  if (!user?.email) {
    console.log('No user email found in event payload. Skipping.');
    return;
  }

  // Helper: make a HubSpot API request
  async function hubspotRequest(method, path, data) {
    const options = {
      method,
      headers: {
        'Authorization': `Bearer ${HUBSPOT_API_KEY}`,
        'Content-Type': 'application/json',
      },
    };
    if (data) {
      options.body = JSON.stringify(data);
    }

    const res = await fetch(`${HUBSPOT_BASE}${path}`, options);

    if (!res.ok) {
      const text = await res.text();
      console.log(`HubSpot API error: ${res.status} — ${text}`);
    }
    return res;
  }

  // Map Auth0 user to HubSpot contact properties
  function mapUserToContact(u) {
    return {
      properties: {
        email: u.email,
        firstname: u.given_name || u.nickname || '',
        lastname: u.family_name || '',
        company: u.app_metadata?.company || '',
        lifecyclestage: 'lead',
      },
    };
  }

  switch (eventType) {
    case 'user.created': {
      const contact = mapUserToContact(user);
      await hubspotRequest('POST', '/crm/v3/objects/contacts', contact);
      console.log(`Created HubSpot contact for ${user.email}`);
      break;
    }

    case 'user.updated': {
      const contact = mapUserToContact(user);
      await hubspotRequest(
        'PATCH',
        `/crm/v3/objects/contacts/${encodeURIComponent(user.email)}?idProperty=email`,
        contact
      );
      console.log(`Updated HubSpot contact for ${user.email}`);
      break;
    }

    case 'user.deleted': {
      // Search for the contact by email, then archive
      const search = await hubspotRequest('POST', '/crm/v3/objects/contacts/search', {
        filterGroups: [{
          filters: [{ propertyName: 'email', operator: 'EQ', value: user.email }],
        }],
      });
      const results = await search.json();
      if (results.results?.length > 0) {
        const contactId = results.results[0].id;
        await hubspotRequest('DELETE', `/crm/v3/objects/contacts/${contactId}`);
        console.log(`Archived HubSpot contact for ${user.email}`);
      } else {
        console.log(`No HubSpot contact found for ${user.email}. Nothing to archive.`);
      }
      break;
    }

    default:
      console.log(`Unhandled event type: ${eventType}`);
  }
};
That is it! There was no need for external infrastructure or any complex deploy pipelines to manage. Auth0 receives the SCIM event, fires the Event Stream, and your Action calls HubSpot, all within the same platform.
Step 3: HubSpot CRM Setup
You are ready to set up HubSpot CRM.
- Create a free account at app.hubspot.com.
- Navigate to Settings > Integrations > Private Apps.
- Create a new Private App with the following scopes:
crm.objects.contacts.writecrm.objects.contacts.read
- Copy the access token and add it as the
HUBSPOT_API_KEYsecret in the Event Stream Actions Editor (if you have not already).
Step 4: See It Work
Now for the satisfying part.
Create a user
In the Okta Admin Console, assign a new user (let's say Jane Doe, jane.doe@acmecorp.com) to the BenefitsCo application.
Within seconds:
- Auth0: Jane appears in User Management, provisioned via SCIM.
- Auth0 Action logs: a
user.createdevent is received and processed (viewable under Monitoring > Logs and in the Action's real-time logs). - HubSpot: a new Contact appears for Jane Doe (jane.doe@acmecorp.com).
Update a user
In Okta, change Jane's last name to "Smith" (maybe she got married). SCIM pushes the update to Auth0, Event Streams fires a user.updated event, and the Action patches the HubSpot contact. Jane Smith now appears in the CRM with no manual data entry required.
Deactivate a user
In Okta, unassign Jane from the application (she left Acme Corp). SCIM deactivates her in Auth0. Now when an admin goes in and deletes Jane’s user, Event Streams fires a user.deleted event. The action archives the contact in HubSpot. Your sales team is not wasting outreach on someone who no longer works there.
Total latency from IdP action to CRM update: typically under 10 seconds.
Debugging
Because the Action runs inside Auth0, you get built-in observability:
- Real-time Logs: Use the Action editor's test runner or watch logs in Monitoring > Logs to see
console.logoutput from your Action. - Event Stream Monitoring: The Event Streams dashboard shows delivery status, event counts, and errors for your stream.
- No need to tail Vercel function logs or set up CloudWatch. It is all in one place.
Step-by-Step Setup Video
The Bigger Picture
What we built here is deliberately simple: a single Action syncing to a single CRM. But the pattern is endlessly extensible:
| Swap This... | For This... | To Do This... |
|---|---|---|
| HubSpot | Segment | Feed user lifecycle events into a CDP for cross-platform audience building |
| HubSpot | Salesforce | Auto-create Leads or update Contacts in your sales CRM |
| HubSpot | Braze or Iterable | Trigger onboarding email sequences the moment a user is provisioned |
| HubSpot | Amplitude or Mixpanel | Track provisioning events as product analytics for adoption metrics |
| Single Action | Multiple Actions on the same stream event | Fan out to multiple downstream systems simultaneously, no EventBridge required |
You can also attach multiple Actions to a single event monitored via an Event Stream, meaning one SCIM provisioning event can simultaneously create a HubSpot contact, fire a Segment identify call, and send a Slack notification to your customer success team, all without leaving Auth0.
The Event Streams Action is the universal adapter. Auth0 handles the identity plumbing and the business logic execution, so you do not have to manage either.
Key Takeaways
- SCIM transforms enterprise directories into real-time data sources. Your identity provider changes are synchronized to Auth0 instantly. User provisioning, updates, and deprovisioning flow through in seconds.
- Event Streams converts Auth0 into an event broker. Identity lifecycle events no longer remain siloed within your identity platform. They stream to any system where they create measurable business value, reducing operational friction and accelerating time-to-revenue across your entire user ecosystem.
- Event Streams Actions eliminate the middleware layer. You do not deploy external servers, manage infrastructure, or maintain security perimeters. Your transformation logic runs within Auth0's serverless runtime with built-in secrets management and audit logging, cutting operational overhead and reducing the attack surface.
- Together, they create an identity-to-revenue pipeline. For businesses where user adoption directly drives revenue (benefits platforms, corporate learning, expense management, corporate wellness), this architecture replaces weeks-old batch data with real-time signals, enabling faster revenue recognition and reducing user onboarding friction by days.
- The implementation is remarkably lightweight. An Auth0 tenant, an enterprise connection with SCIM, an Event Stream, and a single Action with roughly 60 lines of code. That is the entire integration. Zero external infrastructure.
Resources
- Auth0 Inbound SCIM Documentation
- Auth0 Event Streams Documentation
- Auth0 Event Streams Custom Actions
- HubSpot Contacts API Reference
- SCIM 2.0 RFC 7644
Your customer's IdP already knows who should be using your product. Auth0 SCIM and Event Streams make sure the rest of your business does too, without a single line of infrastructure to manage.