
TL;DR Stormpath announced today that it was acquired by Okta. As a result, the Stormpath API will be shutting down this coming August as the team transitions to Okta. Customers have until August 18, 2017 to export their user data to Okta or a different provider. Find out how to easily migrate your users to Auth0 without requiring your users to reset their passwords and some additional benefits you'll gain by making the switch. If you would like to follow along with our demo, download the sample app from GitHub.
Stormpath is an authentication as a service company that allows developers to offload their authentication and authorization needs to a third party. The company offered a RESTful API that customers could use to manage identity in their applications. Today, the company announced that it had been acquired by Okta, another company that provides identity management services.
Acquisitions in the software industry are a norm. What is surprising about this acquisition is that the Stormpath product will be shut down later this year as the team transitions to Okta and many customers will have to find an alternative. Customers have until August 18, 2017 to find a new provider, get it up and running, and export their existing users. This could be a challenging amount of unexpected work in such a short time frame.
“Stormpath customers have until August 18, 2017 to migrate off the platform as it is being shut down!”
Tweet This
At Auth0, our goal is to provide the best authentication and identity management solution that is also simple and easy for developers to work with.
should open user migration to everyone from @goStormpath and gain all those clients that can't move to okta. #wearesorry
— Tom Compagno (@TomCompagno) March 6, 2017
You ask, we deliver :)! We're offering the database migration feature for free for all Stormpath customers 💥!
Custom Database Migration Made Easy with Auth0
The most important thing you are probably concerned with right now is how to migrate your existing users with minimal impact to your applications. At Auth0 we hope to greatly reduce your stress and anxiety with our painless user import functionality.
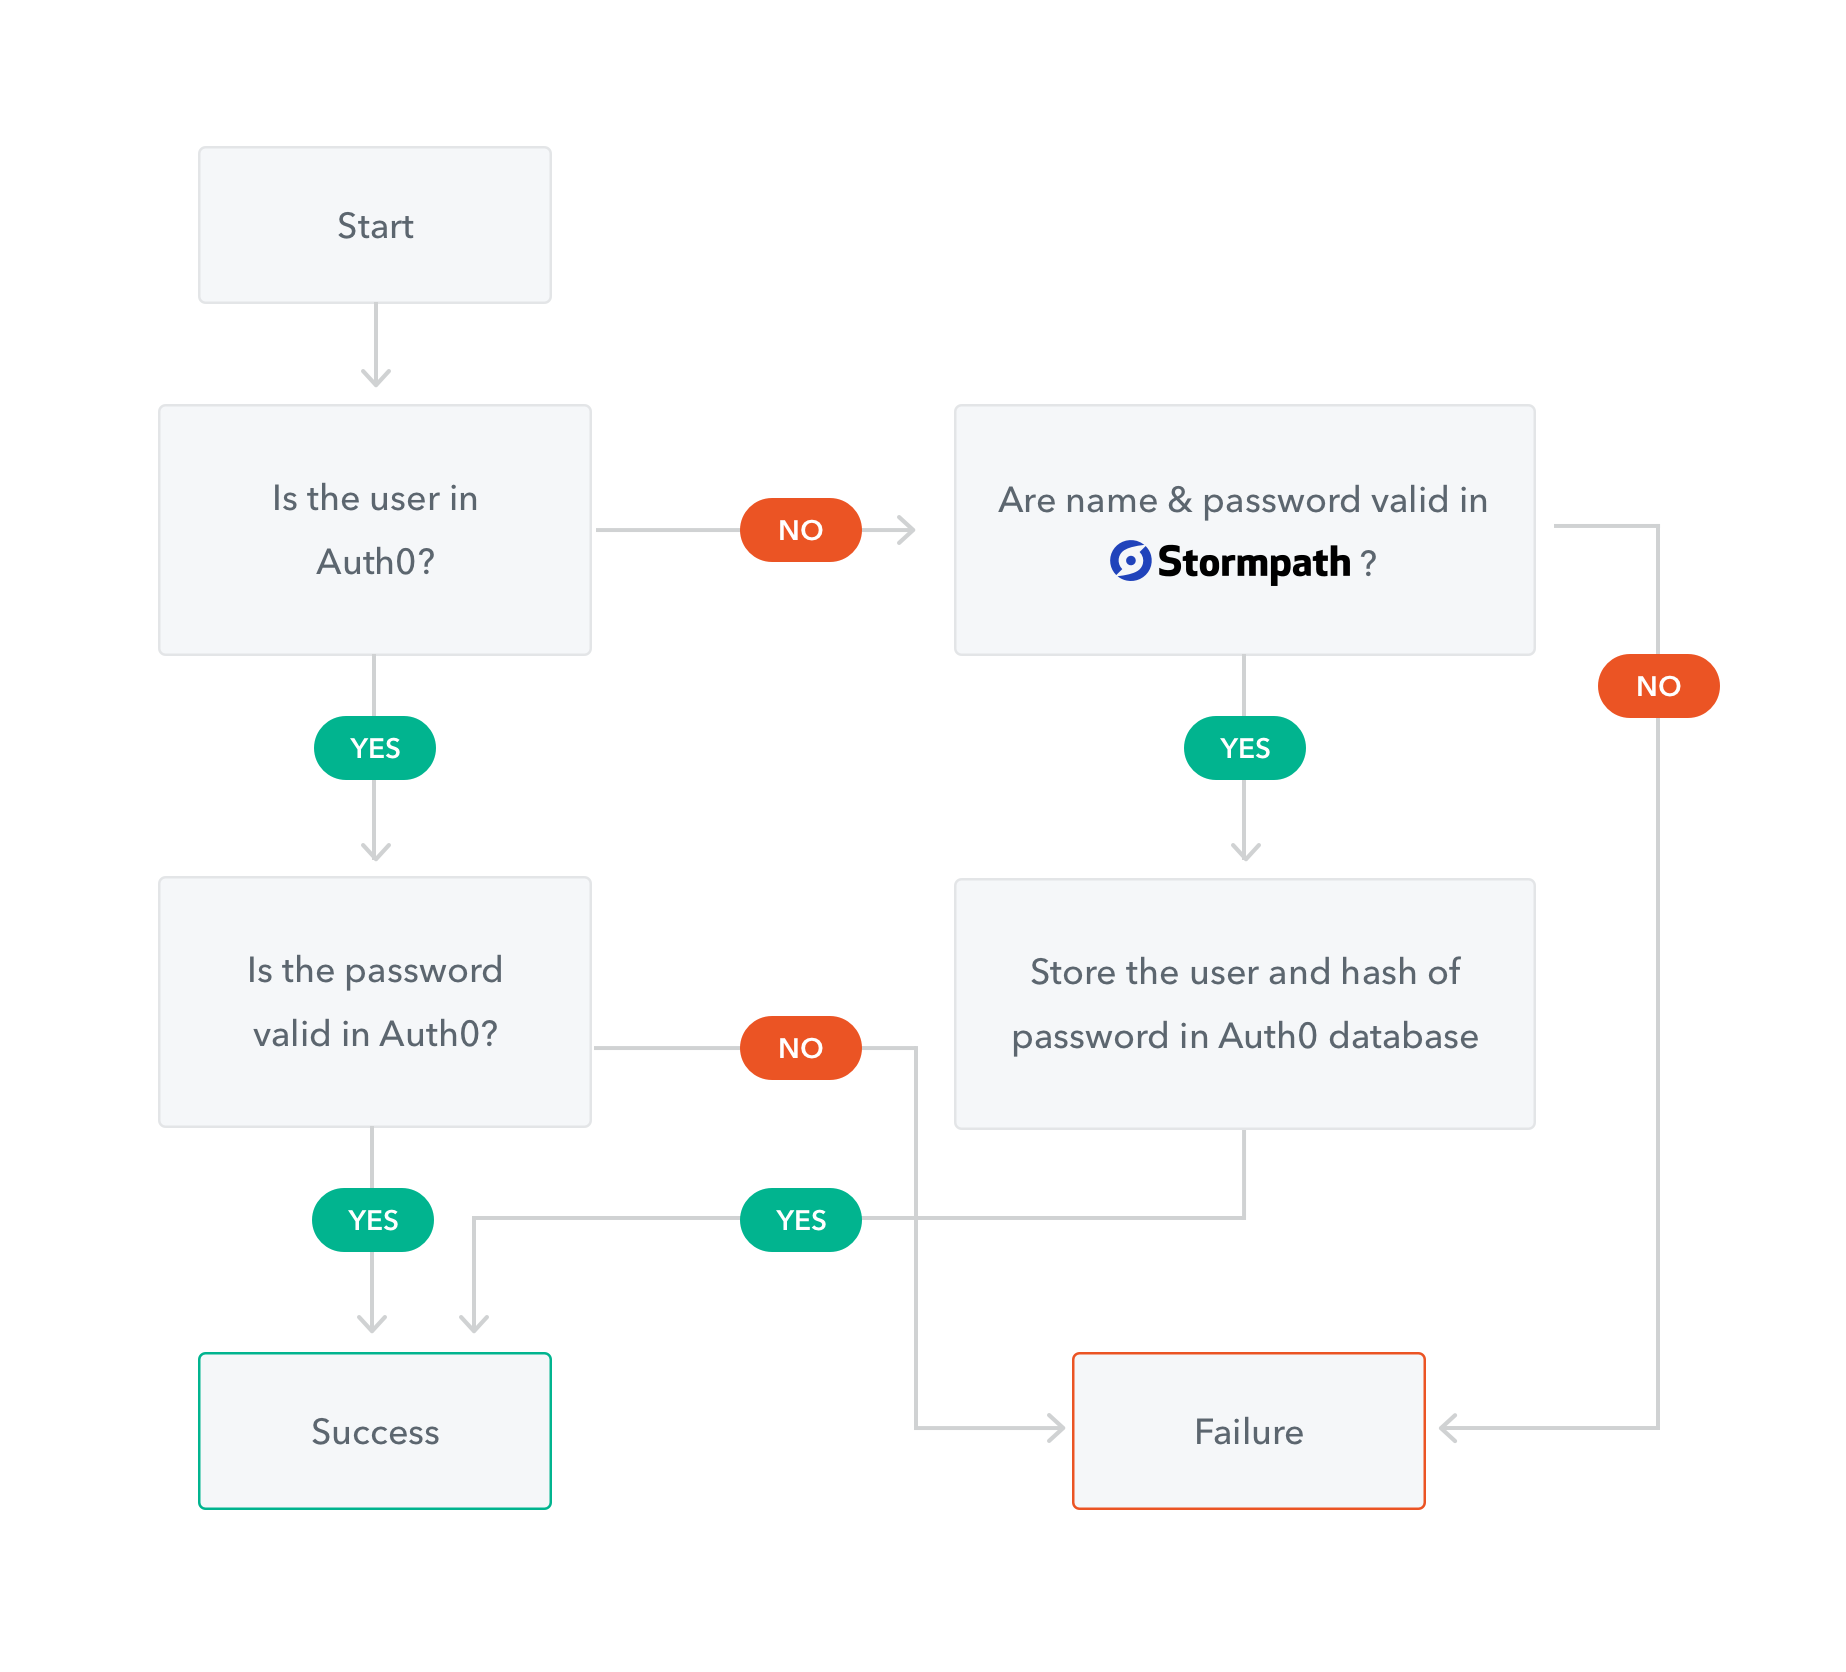
The way this feature works is by setting up a custom database connection and connecting it to your Stormpath account. When your users login the first time, they will enter their existing Stormpath credentials and, if authenticated successfully, we will automatically migrate that user account from Stormpath into Auth0. Your users will not have to change their password or jump through any additional hoops and you can decide what data to port over from Stormpath. Next time the user logs in, Auth0 will detect that they have been migrated and authenticate them with their Auth0 account.
Talk is cheap, so let me actually walk you through the steps.
Implementing the Database Migration Scripts
First of all you will need an Auth0 account. Signup for free here. With your account created, let's setup a custom database connection. In your Auth0 management dashboard, navigate to the database connections section.
Auth0 offers a generous free tier to get started with modern authentication.
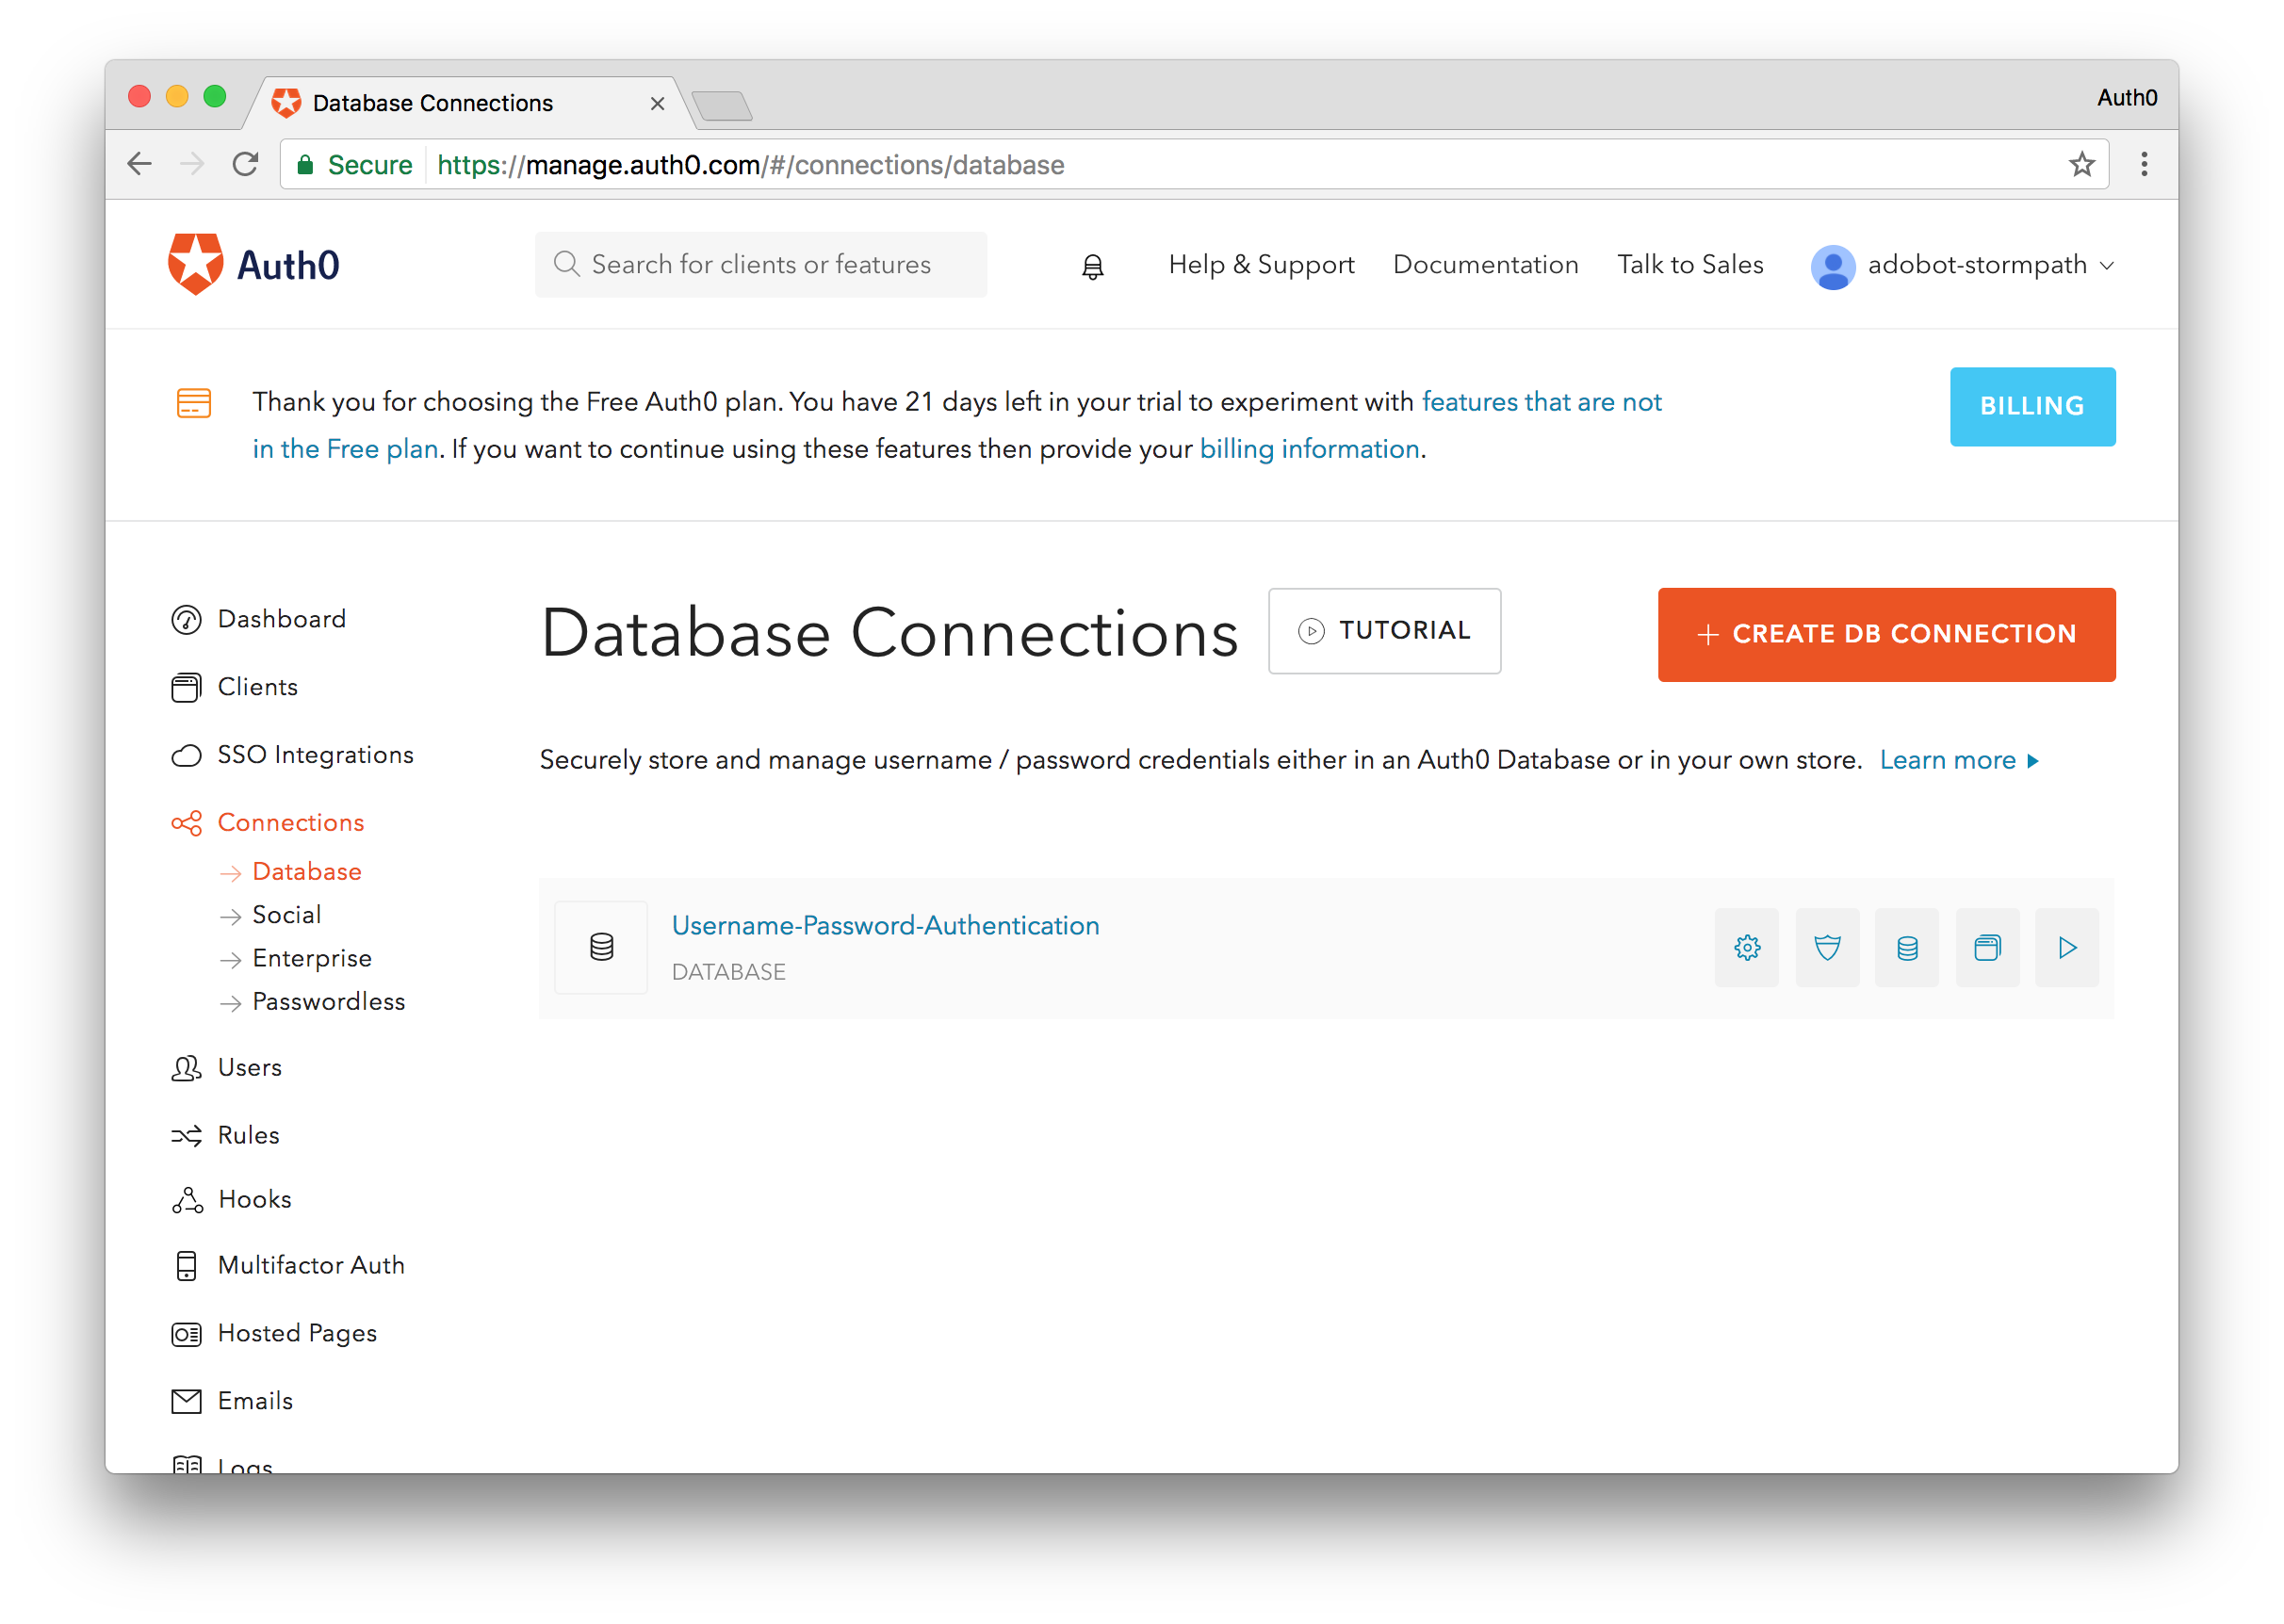
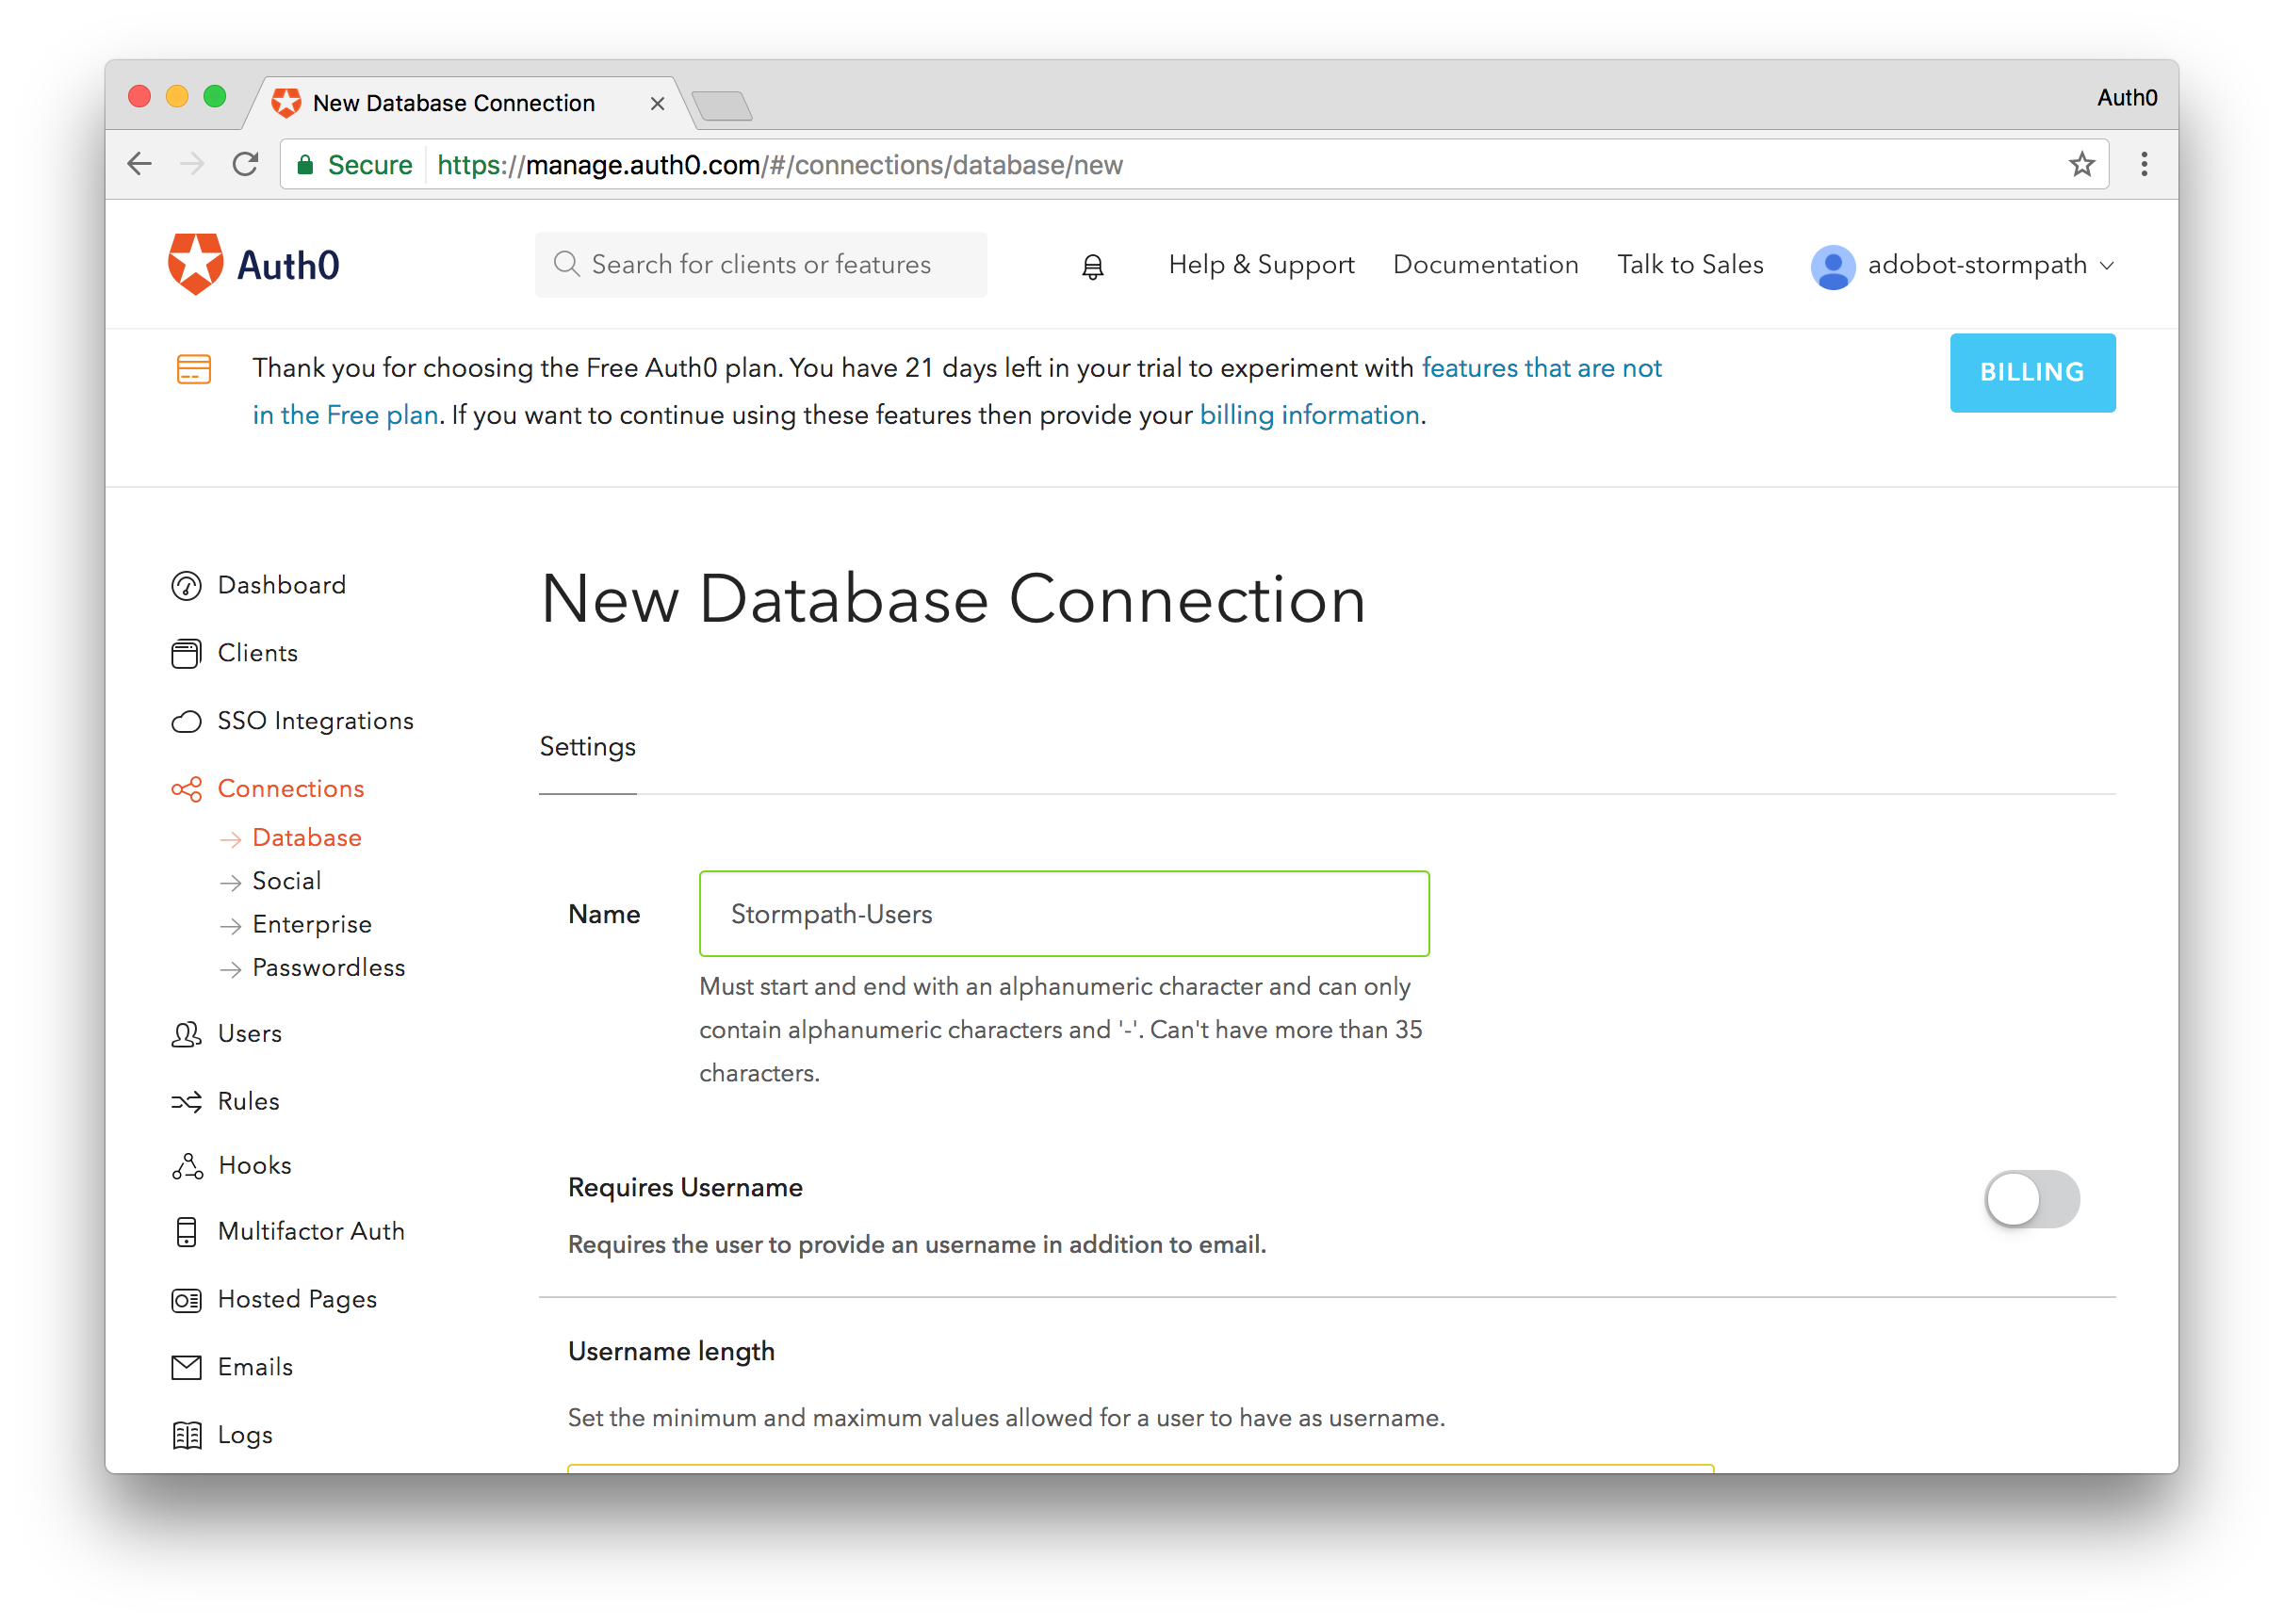
You can name your connection anything you like. Leave all the default settings as is for now and click the Create button to create the connection.
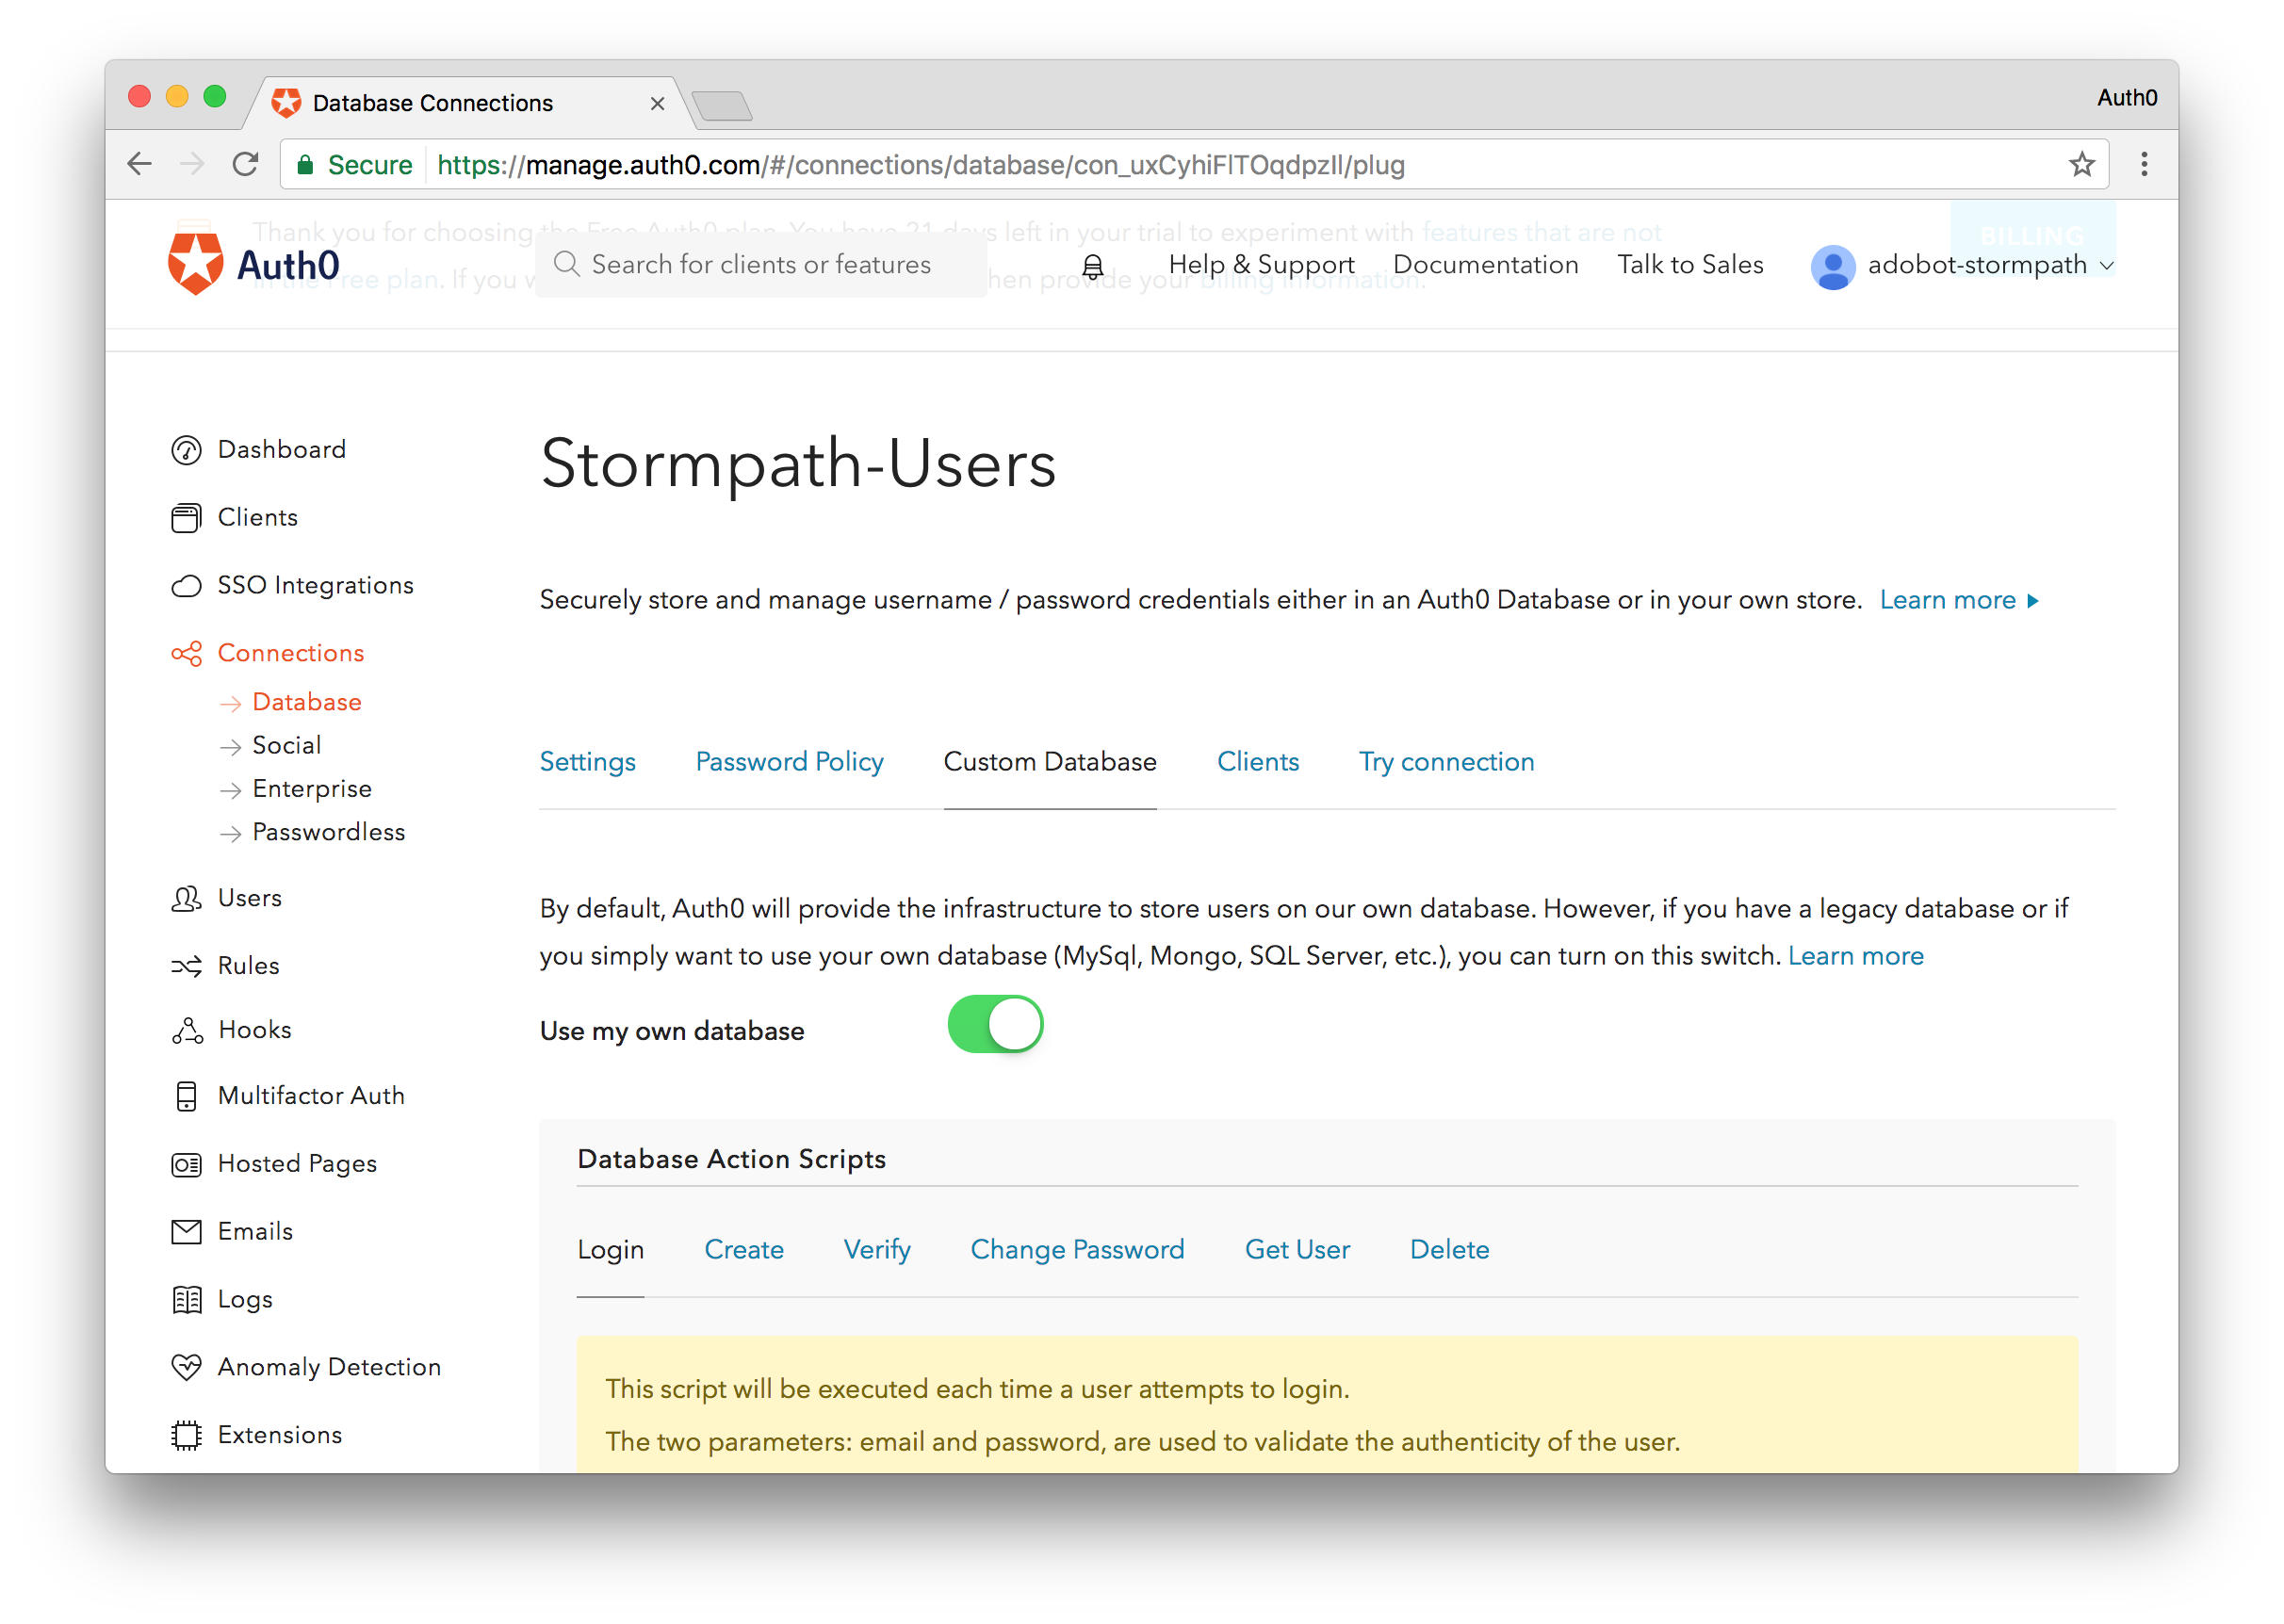
Next, let's go into this database connection and connect it to our Stormpath account. Click on your newly created connection and navigate to the Custom Database tab. Flip the switch titled "Use my own database" and the Database Action Scripts section will be enabled. This is where we will write our code to connect to your existing Stormpath user datastore. We will need to write two scripts: Login and Get User. Login will proxy the login process and Get User will manage looking up accounts when a user attempts to reset their password.
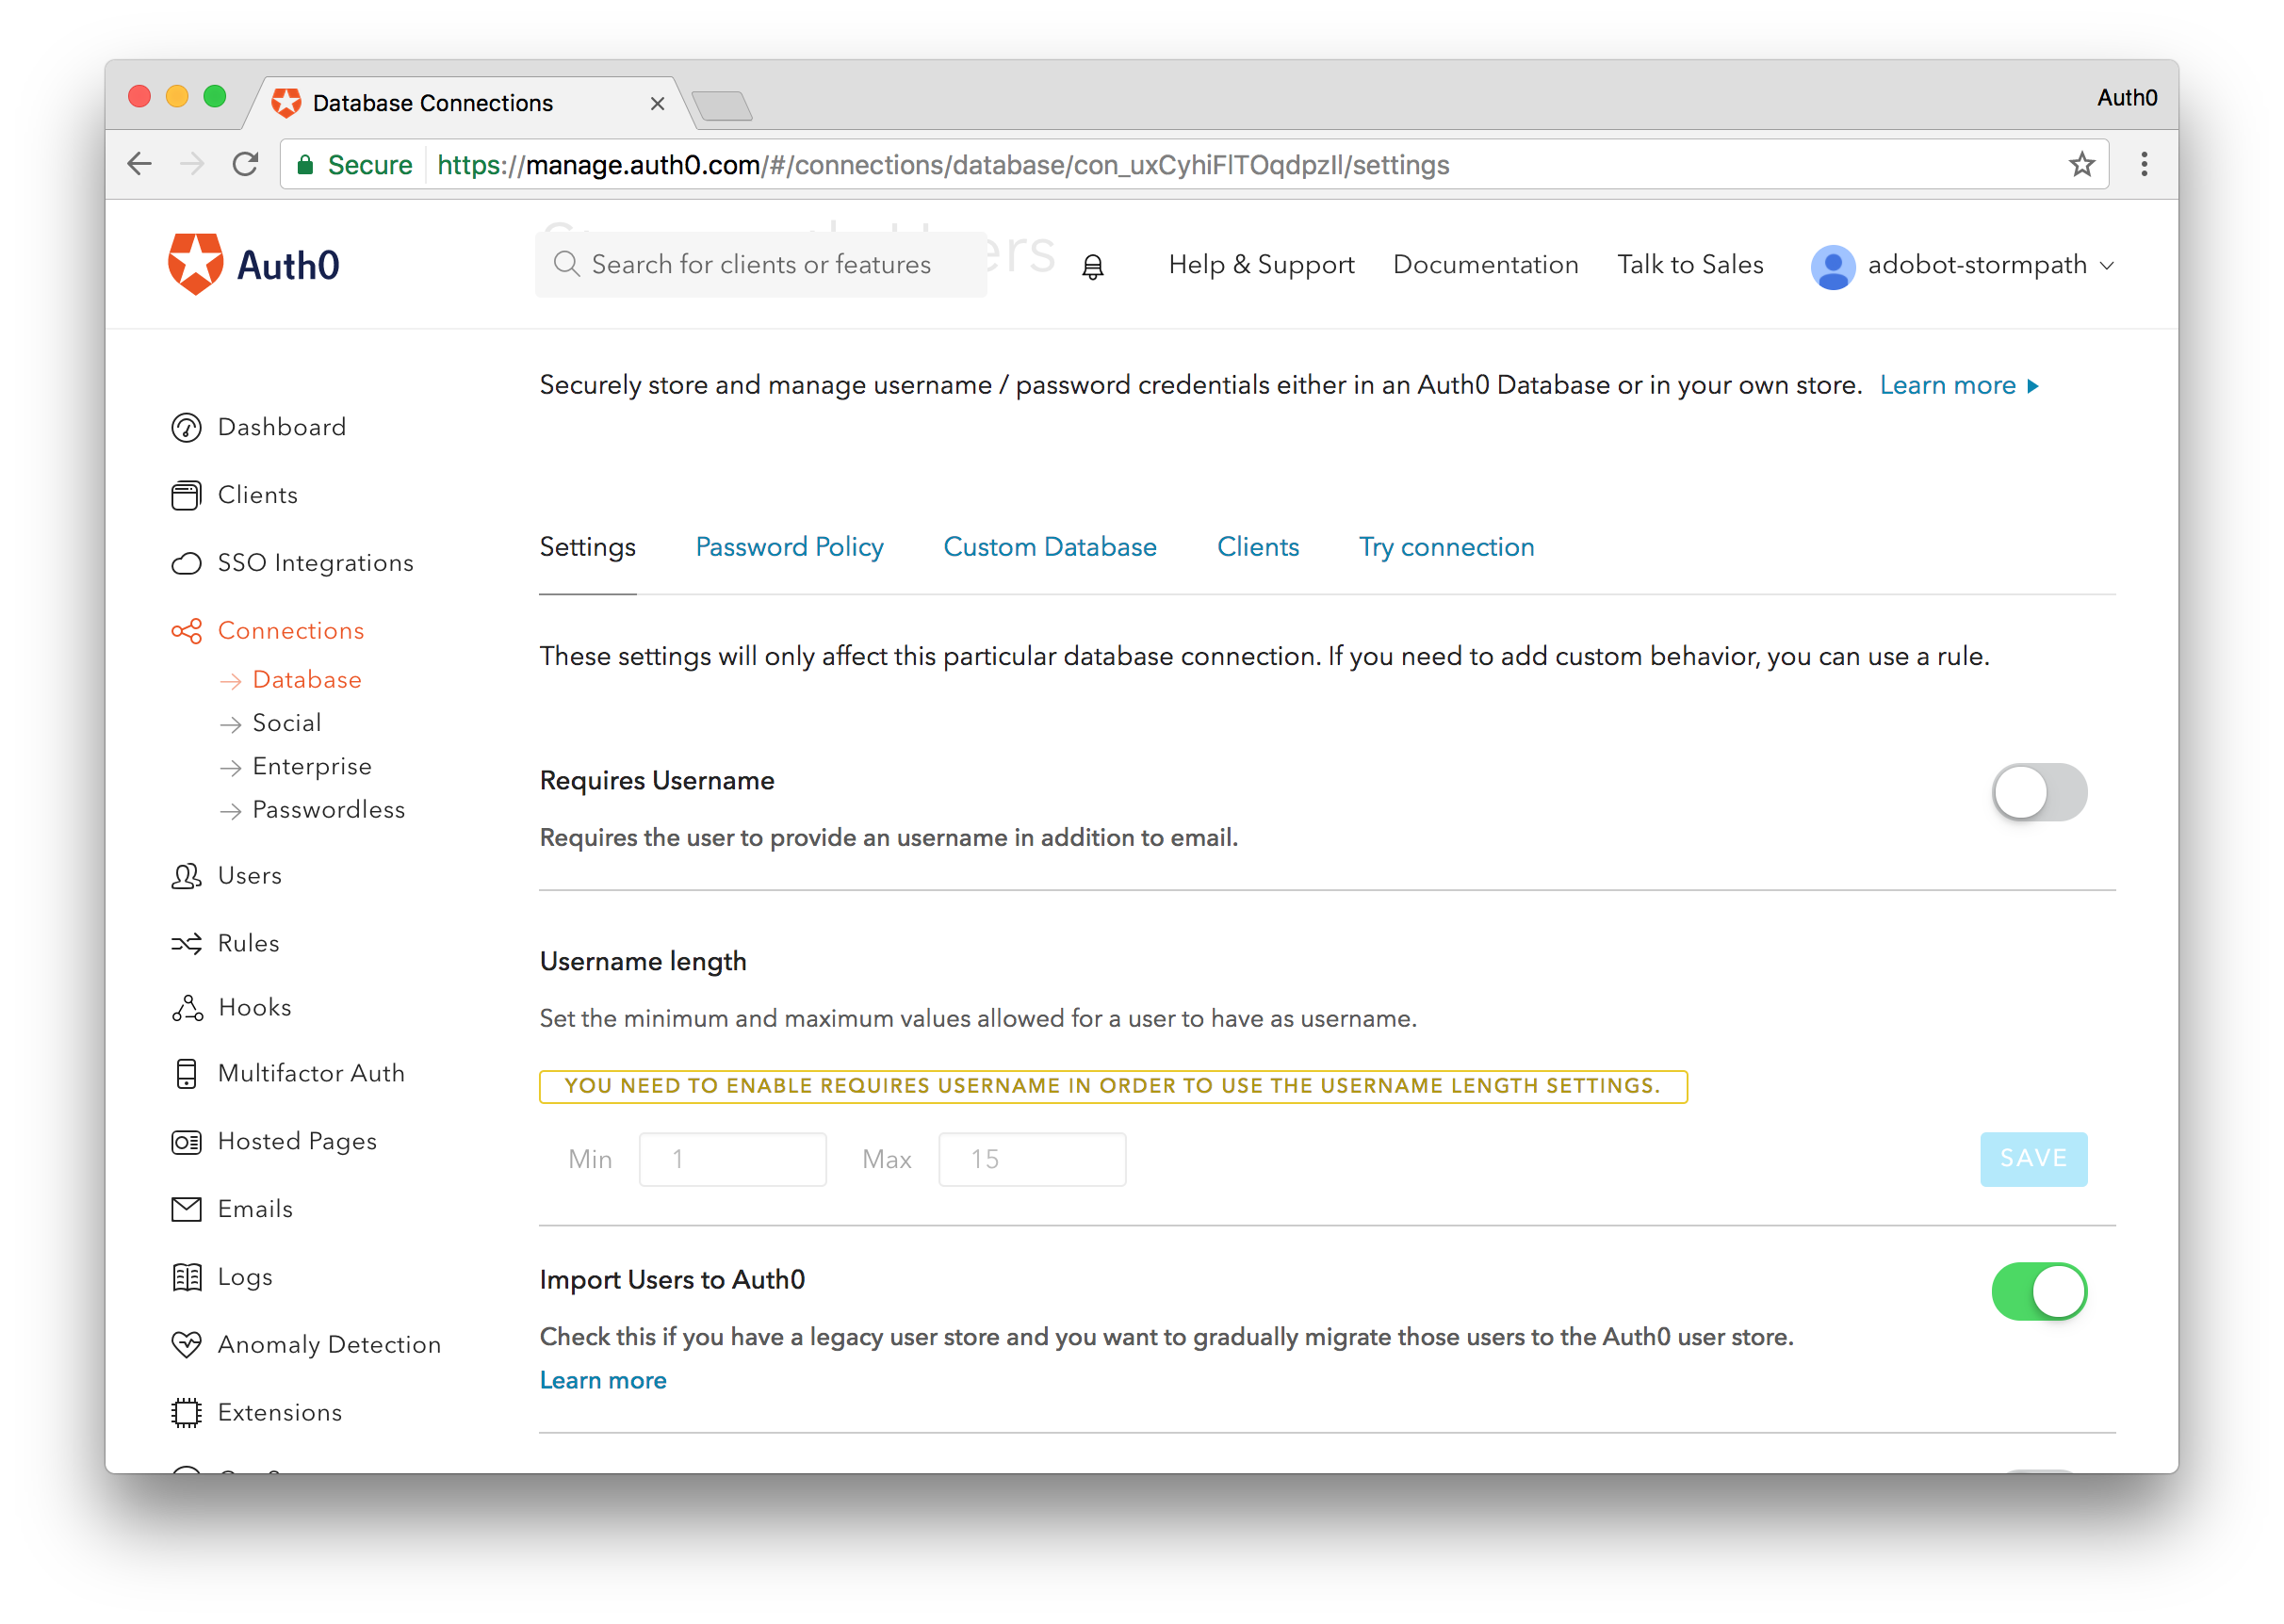
With our custom database feature turned on, let's enable the import functionality. By default the custom database connection will allow us to authenticate with an external database. If we want to migrate users from the external platform into Auth0 we'll need to simply toggle a switch. Go to the Settings tab of the connection and flip the switch titled "Import Users to Auth0" and you're done.
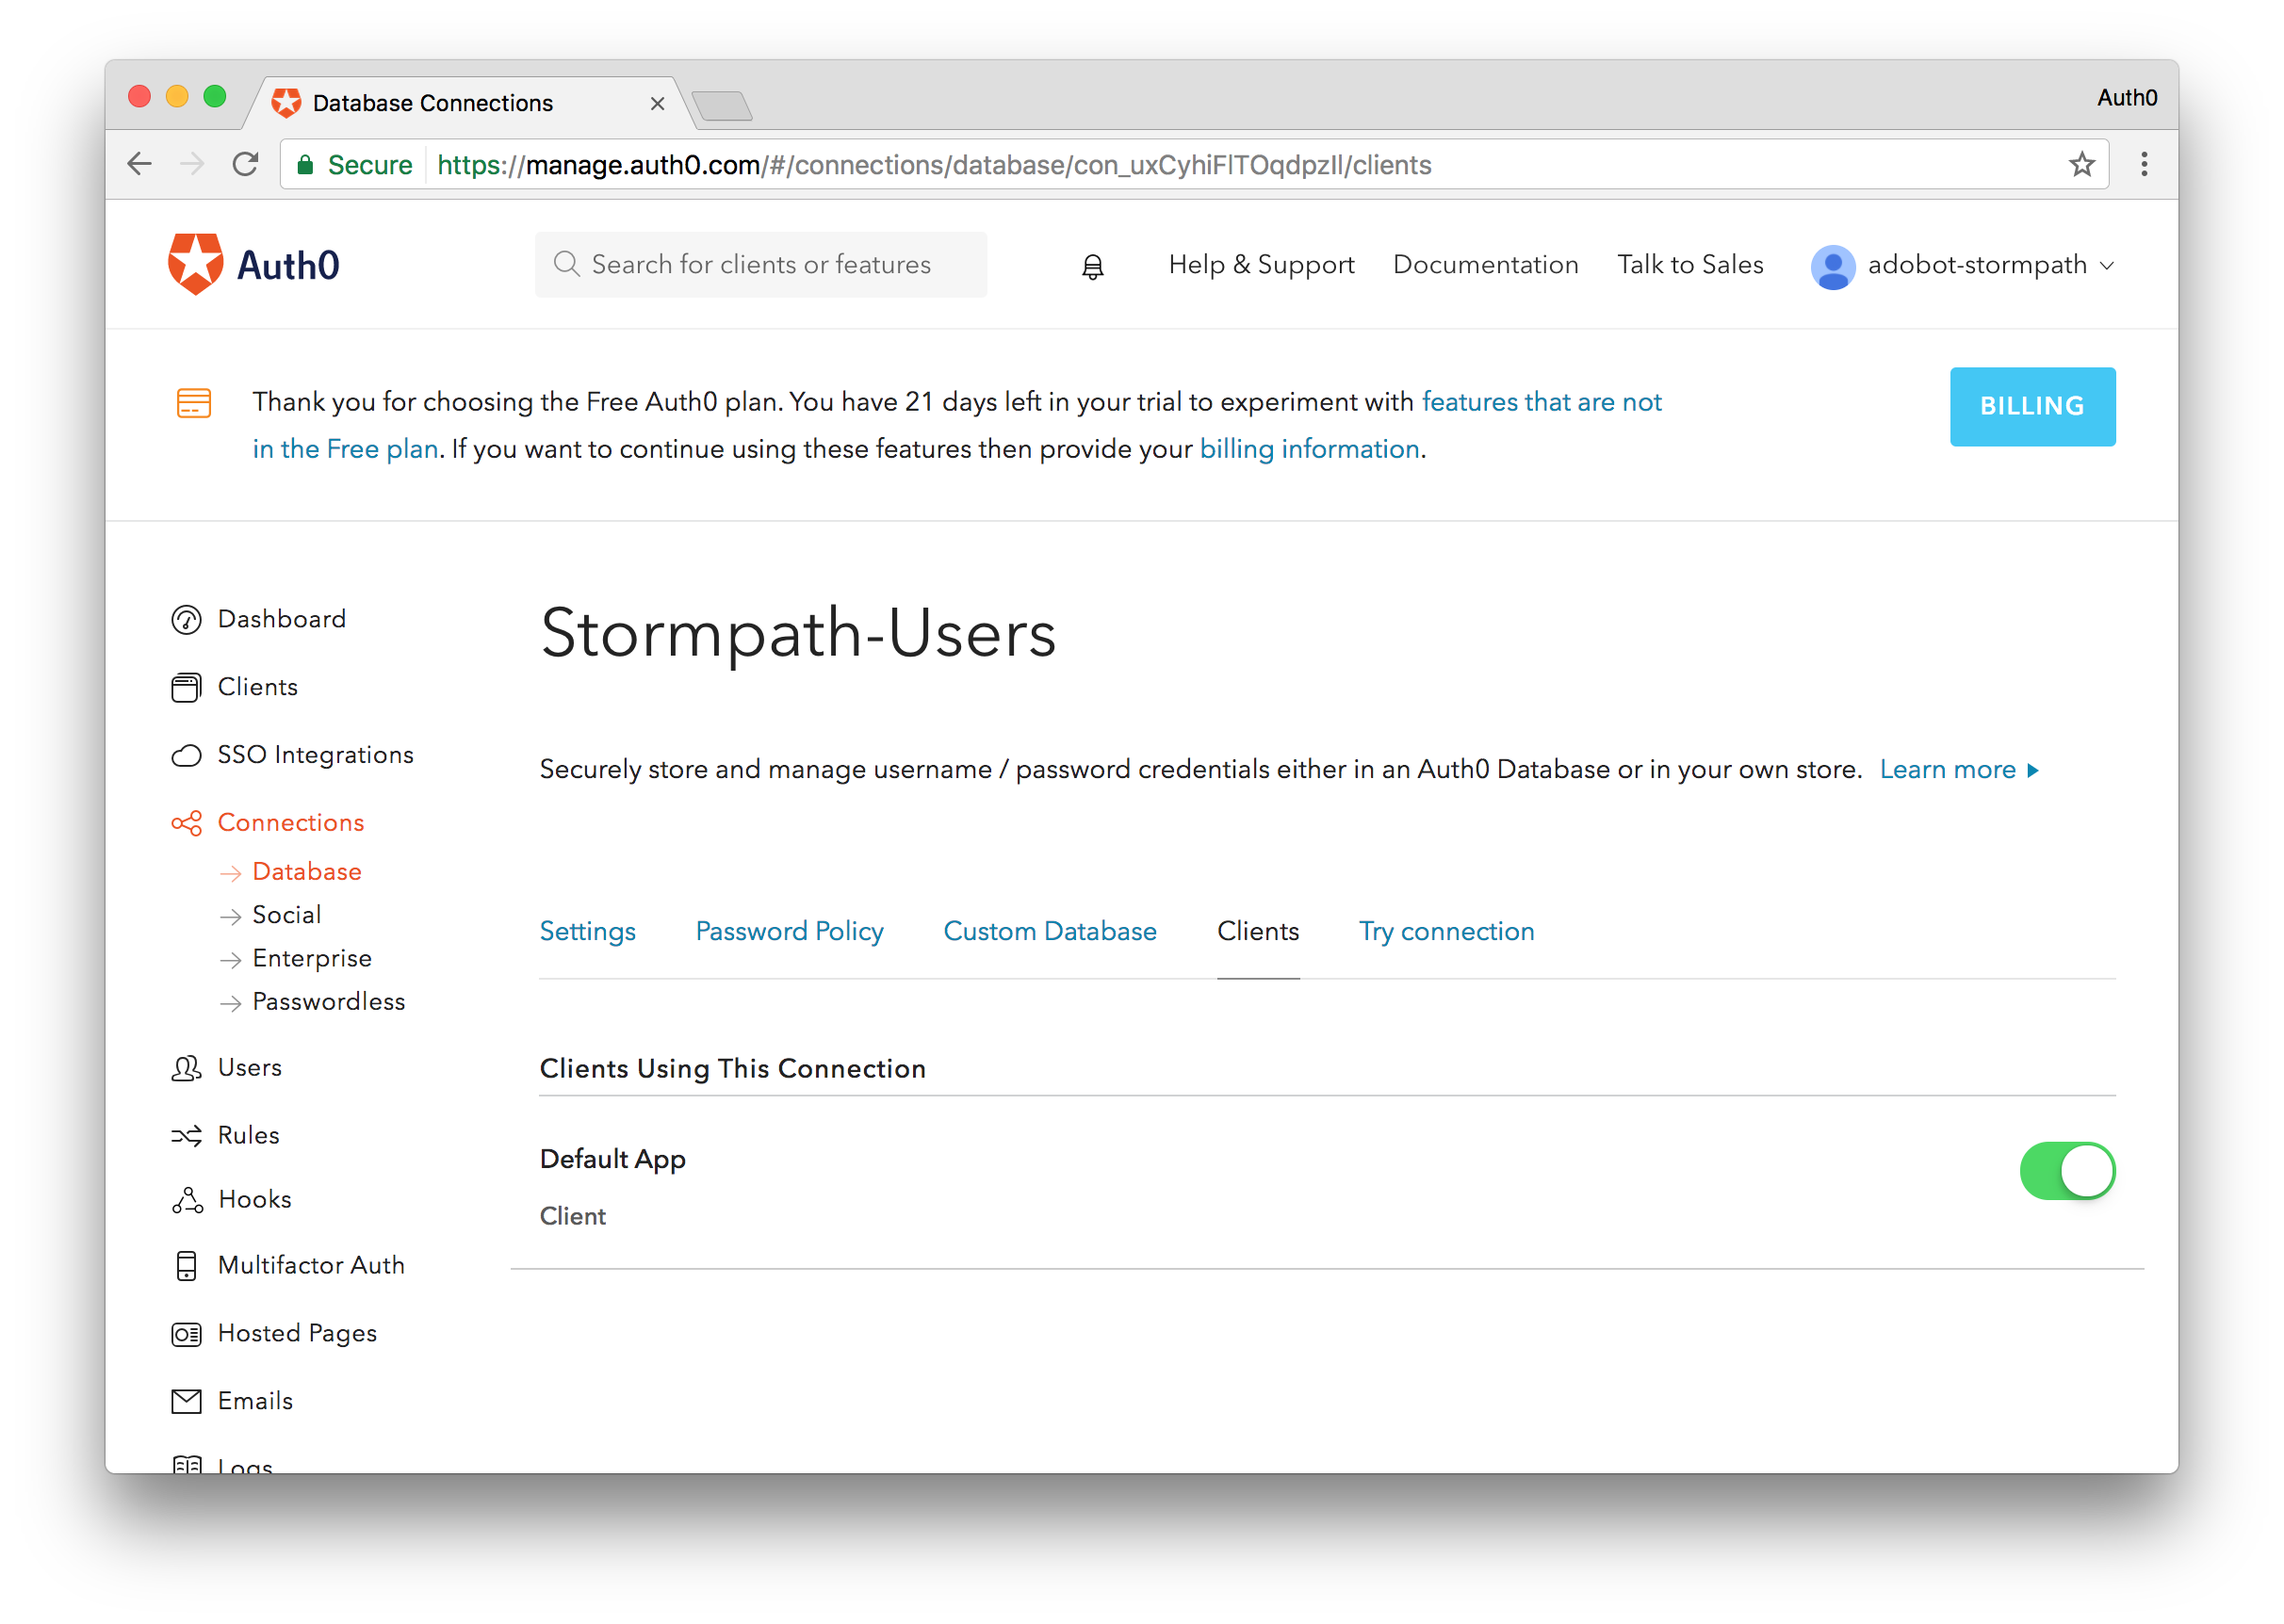
One final step we'll do before implementing our scripts is enabling this connection for our default client. Navigate to the Clients tab while you are in your database connection and flip the switch to enable this client for the Default Connection. If you already have an existing Auth0 account, the connection name may be different.
Login
The Login script is executed when a user attempts to sign in but their account is not found in the Auth0 database. Here we will implement the functionality to pass the user credentials provided to our Stormpath user datastore and see if that user is valid. Auth0 provides templates for many common databases such as MongoDB, MySQL and Sql Server, but for Stormpath we will have to write our own. We will utilize Stormpath's REST API to authenticate the user. Let's look at the implementation below:
function login(username, password, callback) {
  // Replace the YOUR-CLIENT-ID attribute with your Stormpath ID
  var url = 'https://api.stormpath.com/v1/applications/{YOUR-CLIENT-ID}/loginAttempts';

  // Stormpath requires the user credentials be passed in as a base64 encoded message
  var message = username + ':' + password;
  var pass = new Buffer(message).toString('base64');

  // Here we are making the POST request to authenticate a user
  request({
    url: url,
    method: 'POST',
    auth: {
      // Your API Client ID
      user: '{STORMPATH-CLIENT-ID}',
      // YOUR API Client Secret
      password: '{STORMPATH-CLIENT-SECRET}'
    },
    headers: {
      'Content-Type': 'application/json'
    },
    json: {
      type: 'basic',
      // Passing in the base64 encoded credentials
      value: pass
    }
  }, function (error, response, body) {
    // If response is successful we'll continue
    if (response.statusCode !== 200) return callback();
    // A successful response will return a URL to get the user information
    var accountUrl = body.account.href;

    // We'll make a second request to get the user info. This time it will be a GET request
    request({
      url: accountUrl,
      method: 'GET',
      auth: {
        // Your API Client ID
        user: '{STORMPATH-CLIENT-ID}',
        // YOUR API Client Secret
        password: '{STORMPATH-CLIENT-SECRET}'
      }
    }, function (errorUserInfo, responseUserInfo, bodyUserInfo) {
      // If we get a successful response, we'll process it
      if (responseUserInfo.statusCode !== 200) return callback();

      var parsedBody = JSON.parse(bodyUserInfo);
      // To get the user identifier, we'll strip out the Stormpath API
      var id = parsedBody.href.replace('https://api.stormpath.com/v1/accounts/', '');

      // Finally, we'll set the data we want to store in Auth0 and migrate the user
      return callback(null, {
        user_id : id,
        username: parsedBody.username,
        email: parsedBody.email,
        // We set the users email_verified to true as we assume if they were a valid
        // user in Stormpath, they have already verified their email
        // If this field is not set, the user will get an email asking them to verify
        // their account
        email_verified: true,
        // Add any additional fields you would like to carry over from Stormpath
      });
    });
  });
}
Get User
The Get User script is executed when the user attempts to do a password reset but their account is not found in the Auth0 database. The Get User script interfaces with your Stormpath datastore and checks to see if the user exists there. If the user does exist, their data is sent back to Auth0 where the user is automigrated and a password reset email is sent out from Auth0. Once the user confirms the reset, they are good to go and can access your app. Subsequent logins will be authenticated against the Auth0 database as the users profile is now stored with Auth0.
Let's look at our implementation of the Get User script for Stormpath:
function getByEmail(email, callback) {
  // Replace the YOUR-CLIENT-ID attribute with your Stormpath ID
  var url = 'https://api.stormpath.com/v1/applications/{YOUR-CLIENT-ID}/accounts';

  request({
    url: url,
    method: 'GET',
    auth: {
      // Your API Client ID
      user: '{STORMPATH-CLIENT-ID}',
      // YOUR API Client Secret
      password: '{STORMPATH-CLIENT-SECRET}'
    },
    qs: { q: email }
  }, function (error, response, body) {
    if (response.statusCode !== 200) return callback();

    var parsedBody = JSON.parse(body);
    var user = parsedBody.items[0];

    if (!user) return callback();

    var id = user.href.replace('https://api.stormpath.com/v1/accounts/', '');

    return callback(null, {
      user_id: id,
      username: user.username,
      email: user.email,
      email_verified: true,
      // Add any additional fields you would like to carry over from Stormpath
    });
  });
}
With these two scripts we have user migration setup and ready to go. To test it and make sure our code works, let's build a simple application that allows a user to login and request protected resources via an API. We'll build the frontend with Angular 2 and the backend we'll power with Spring.
Building the Frontend
We will build our frontend with Angular 2. We'll use the Auth0 Angular 2 Quickstart to get up and running quickly. Our source code can be found here. Auth0 provides a comprehensive set of quickstarts, SDKs, and guides for many popular languages and frameworks. See them all here. With the project downloaded, we'll need to setup our Auth0 credentials. We'll do that in the auth.config.js file. Open the file and change the values to look like this:
"use strict";
exports.myConfig = {
    // Your Auth0 ClientID.
    clientID: '{AUTH0-CLIENT-ID}',
    // Your Auth0 Domain
    domain: '{YOUR-AUTH0-DOMAIN}.auth0.com'
};
Both of these values can be found in your Auth0 management dashboard. In the dashboard, simply click on the Clients link from the main menu, and select the Default Client that was created when you signed up. If you already had an Auth0 account, select the client that has the database connection with the custom database enabled.
With these values configured save the file and run npm install. Once npm has installed all the required dependencies, run the project by executing npm start. Navigate to localhost:3000 to see the app in action.
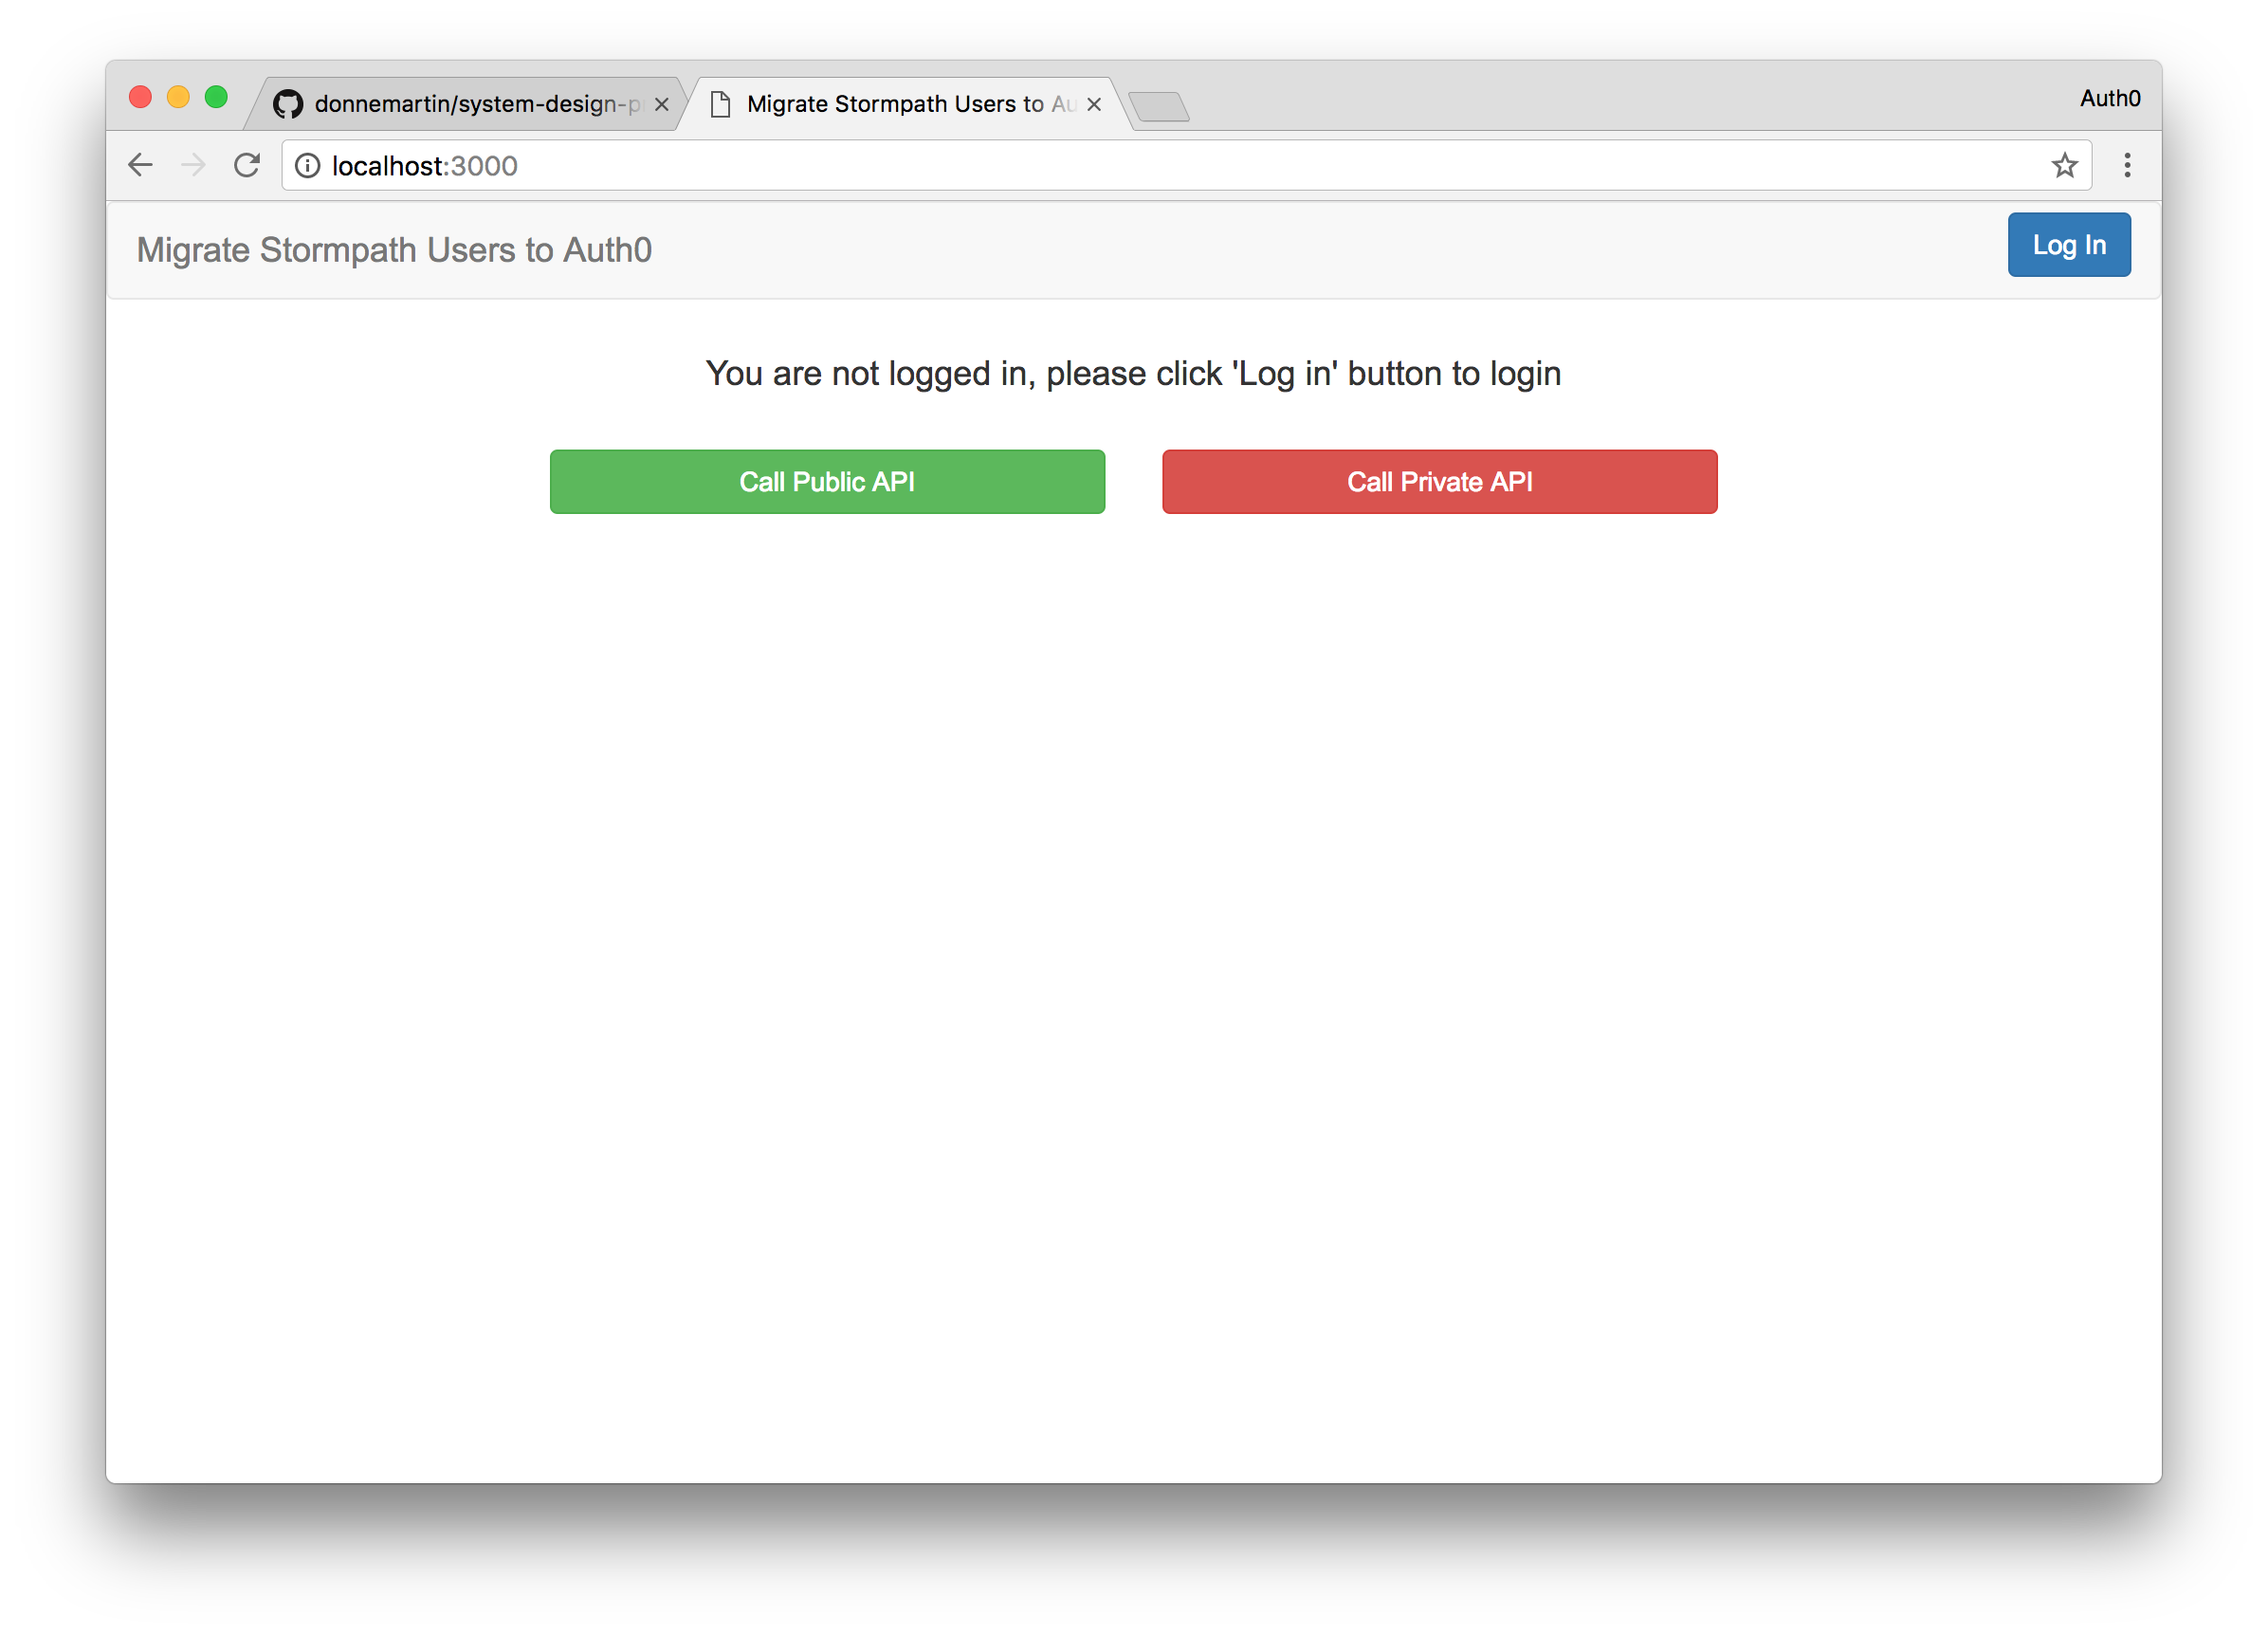
Click on the Login button to login to your application. Clicking the Login button will bring up the Auth0 Lock widget and ask the user to provide their email and password. Here, the user will provide their Stormpath email and password credentials and if they are correct they will be logged in. If you don't already have a Stormpath user account you can login with, go into your Stormpath dashboard and create an account. Now login with your Stormpath user credentials.
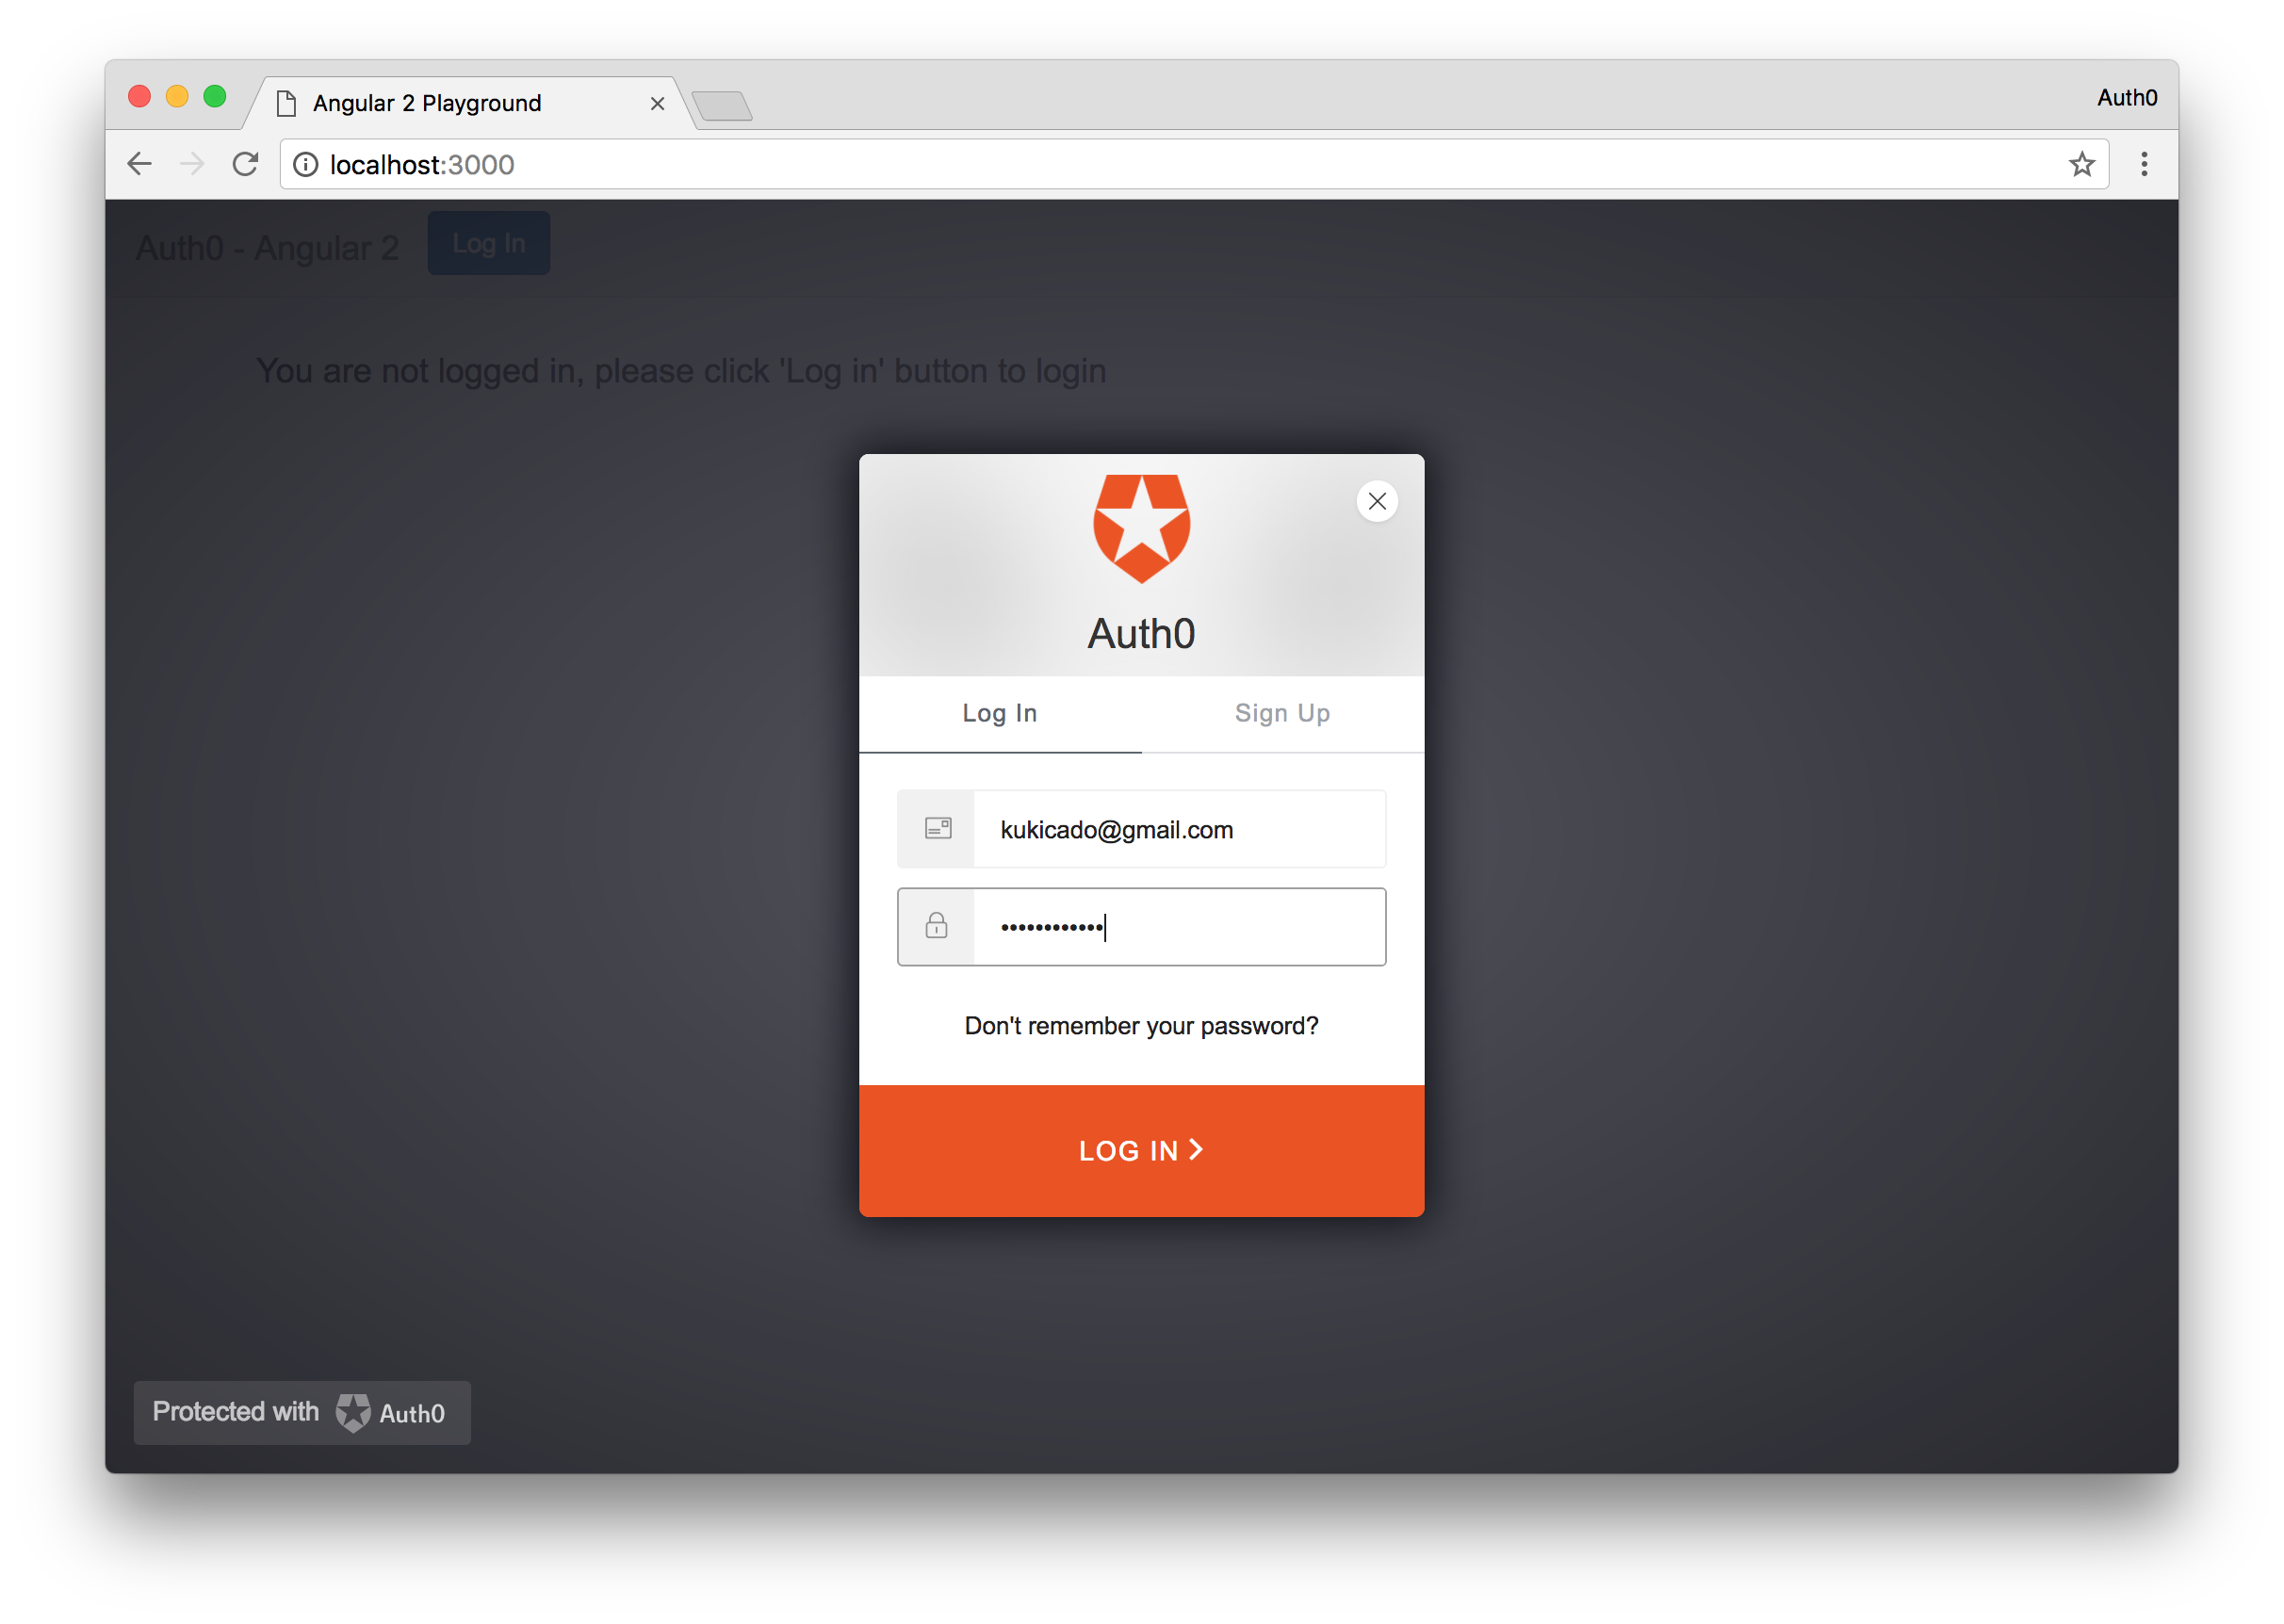
Lock is an embeddable login form for desktop, tablet and mobile devices. It provides the easiest way for securing your website and mobile apps.
Notice that you are instantly logged in. If we look at the response data from the transaction we'll see that the user is coming from the Stormpath-Users connection alongside other data that we imported. Let's make sure that this user was migrated to Auth0 as well. To check this we'll navigate to the Users section of the Auth0 dashboard and we'll now see the user we logged in with.
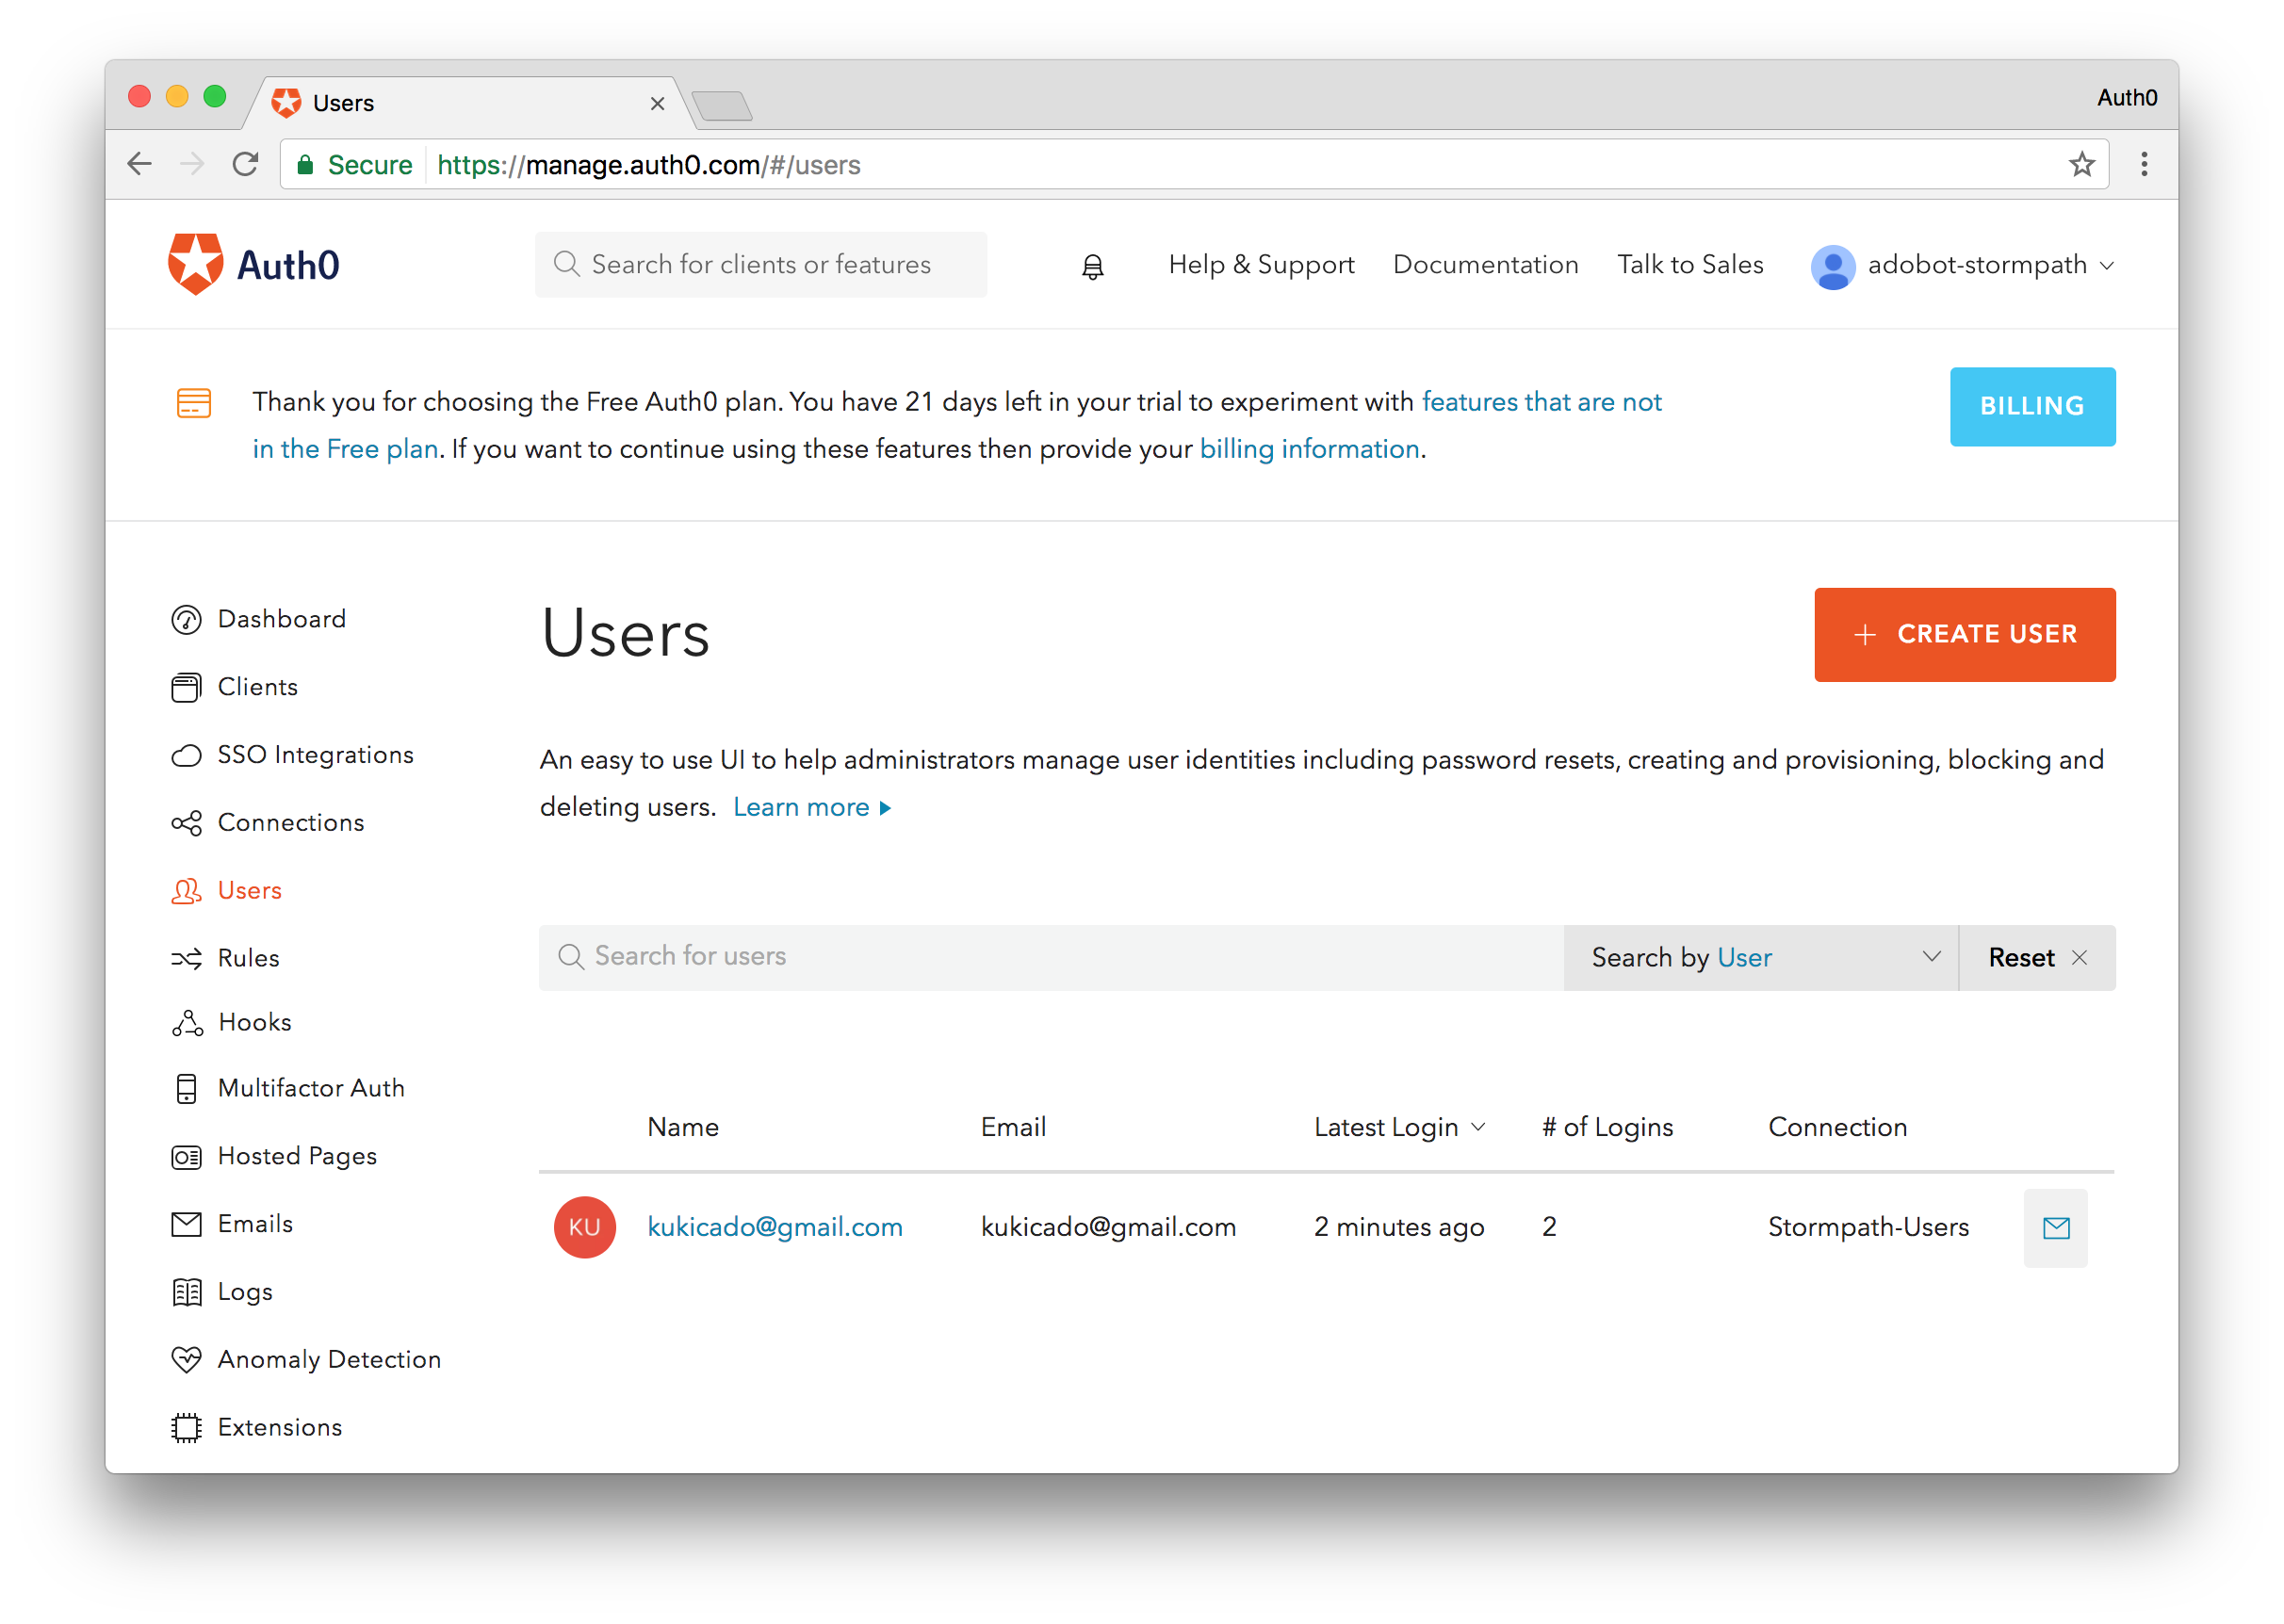
This means that our migration was successful. This user is now migrated to Auth0. The next time they login to the application, we'll check their credentials against Auth0's database instead of making the extra call to Stormpath. The workflow diagram below illustrates the process once again.
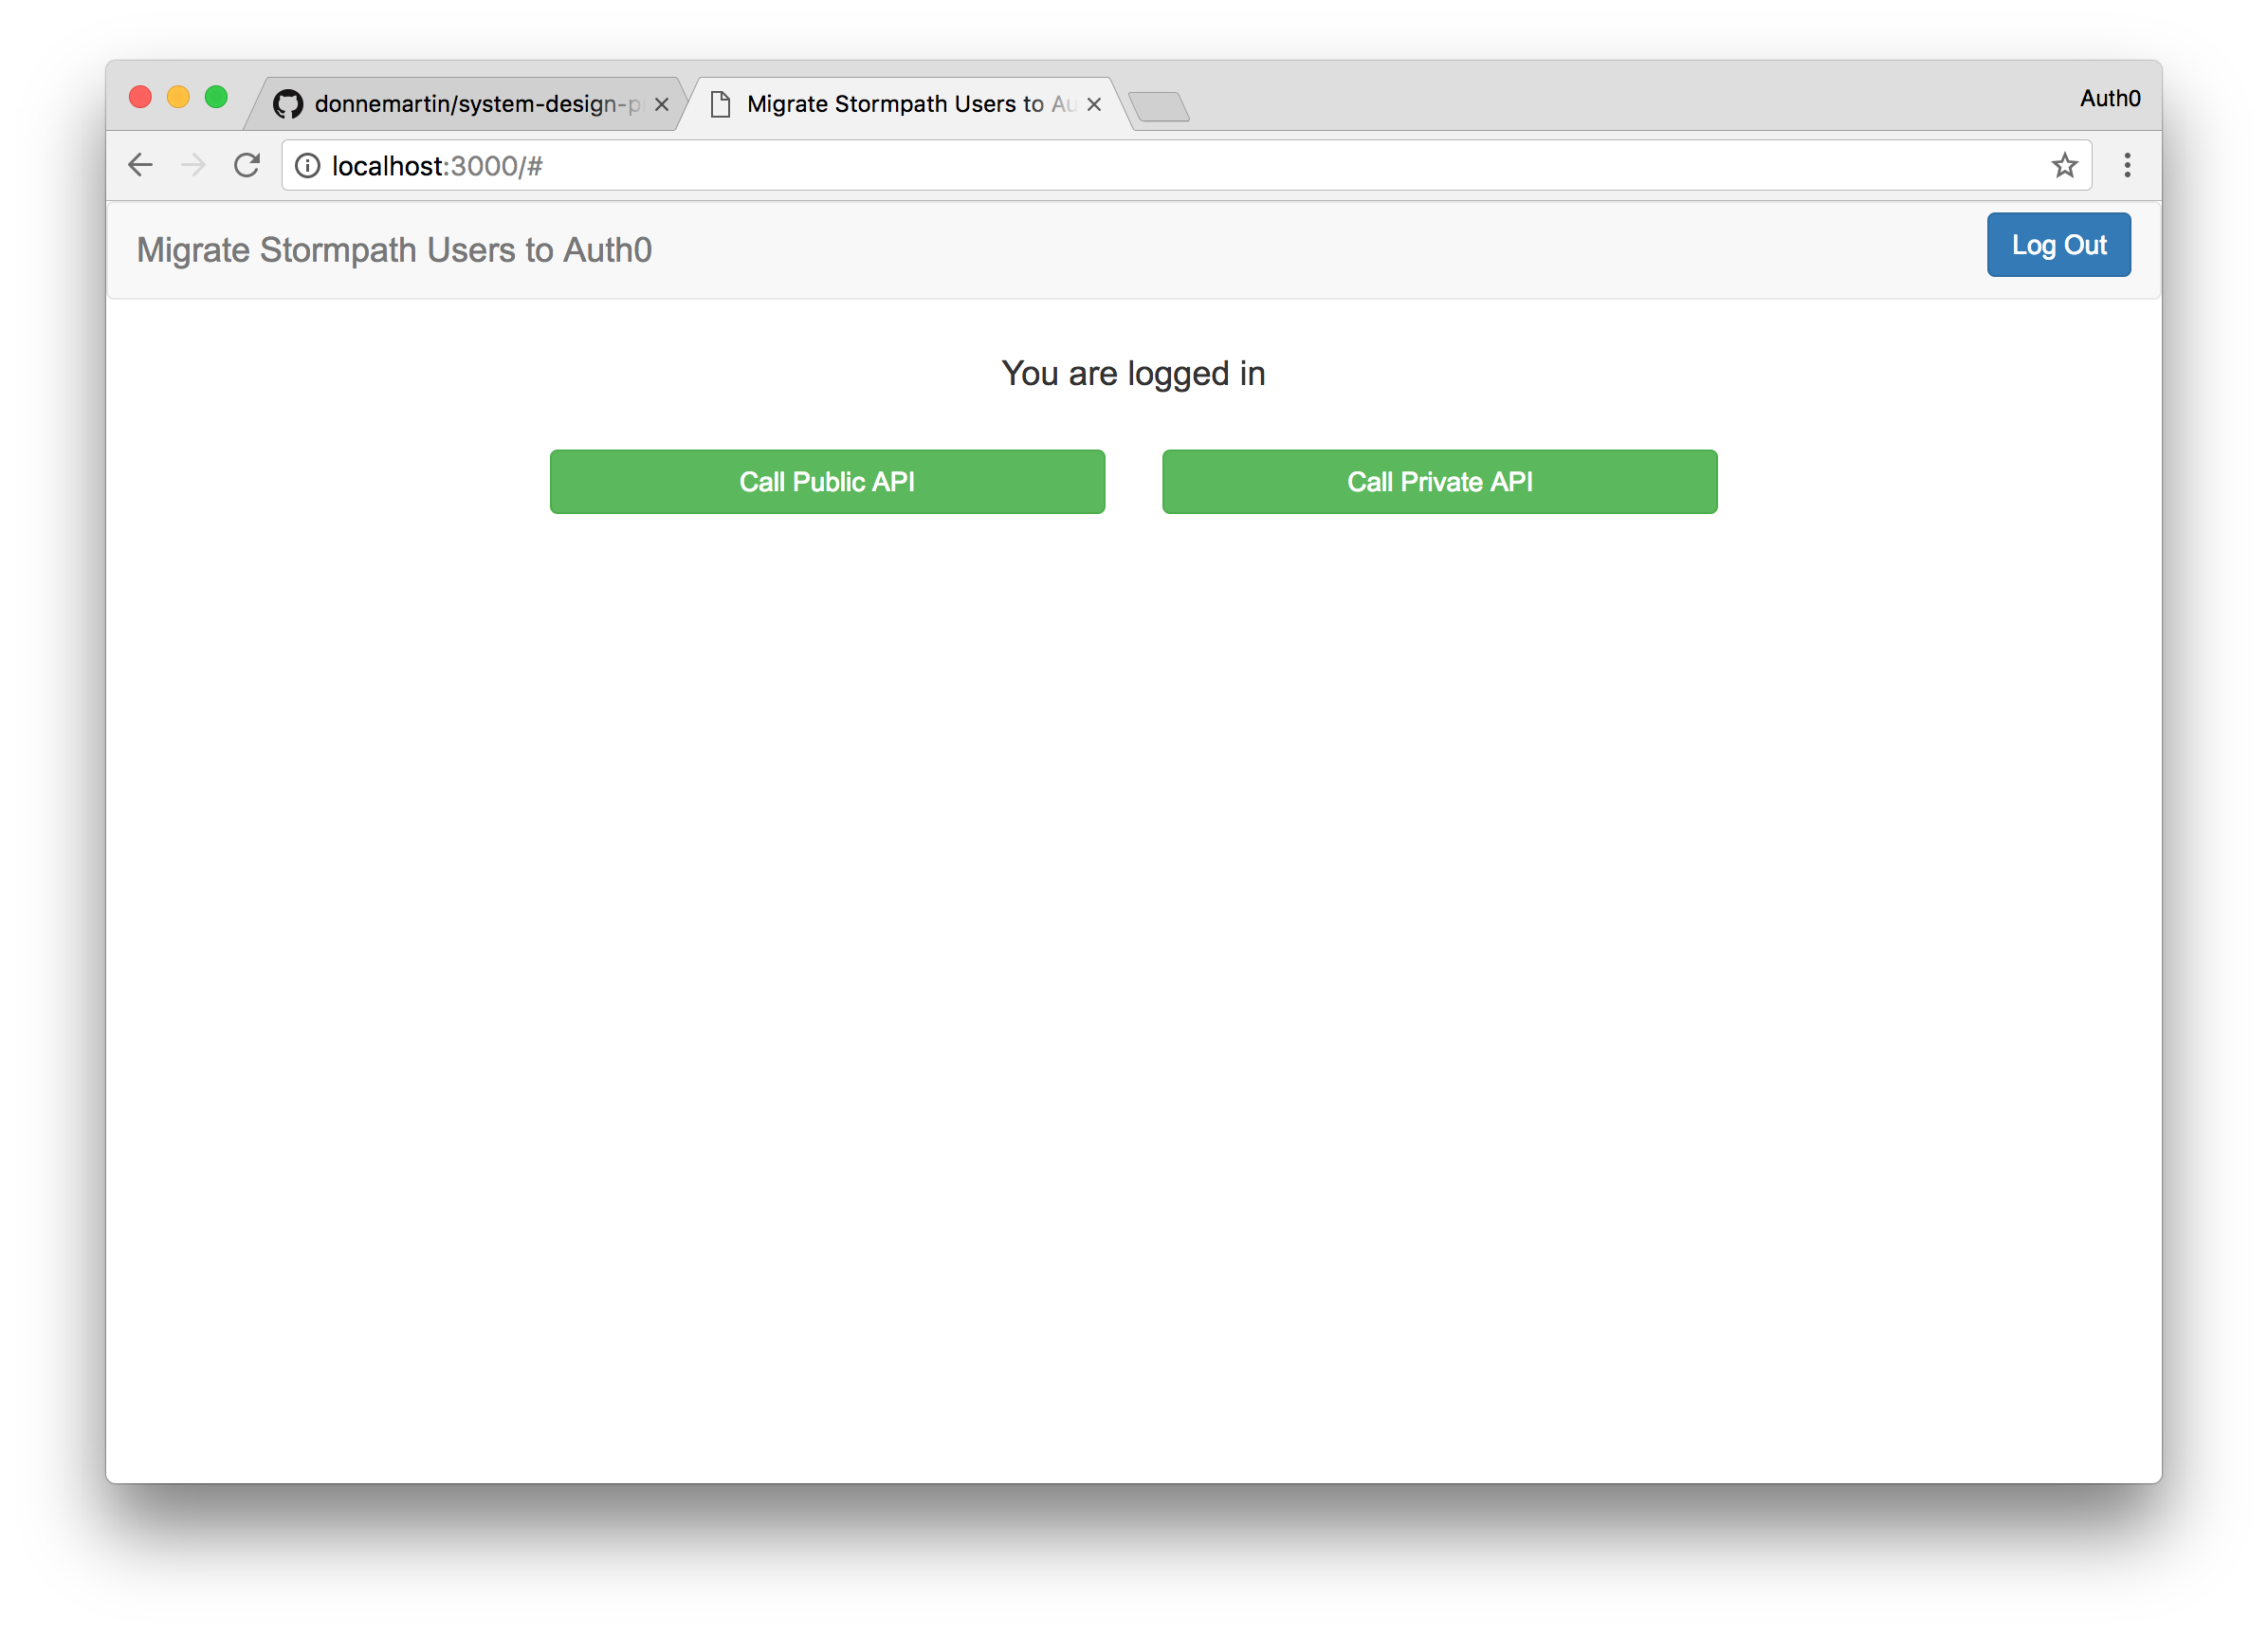
Now you may notice the two links Call Public API and Call Private API. Let's build a simple backend that will return data when these links are clicked. We'll do that next.
Building the Backend
For our backend, we'll build a simple Spring Boot application that exposes a RESTful API. You can get the code for the sample application here. To setup the application, you will just need to update the application with your credentials. The file where the credentials are stored is called auth0.properties and can be found in the src/main/resources/ directory. Edit the file to look like so:
auth0.domain: {YOUR-AUTH-DOMAIN}.auth0.com
auth0.issuer: https://{YOUR-AUTH0-DOMAIN}.auth0.com/
auth0.clientId: {YOUR-AUTH0-CLIENT-ID}
auth0.securedRoute: NOT_USED
auth0.base64EncodedSecret: false
auth0.authorityStrategy: ROLES
auth0.defaultAuth0ApiSecurityEnabled: false
auth0.signingAlgorithm: HS256
With this update in place, you should be able to build the application by running:
mvn spring-boot:run -Drun.arguments="--auth0.secret=YOUR_SECRET_KEY"
If the application was built successfully, you will be able to access the API at localhost:4000. The two routes that are exposed by this application that we care about are /public and /secure. The /public route will be accessible by everyone, while the /secure route will return a successful response only if the user is authenticated and passes the correct credentials.

Once your backend is up and running go back to your frontend application and try clicking on the the two links Call Public API and Call Private API. The public API you will be able to access even when not logged in. For the private API, you will need to be logged in to call the route and get the appropriate response.
We also used Angular 2 to add some dynamic classes. So if the user is logged in we'll make both of the buttons green to indicate they can be clicked.
Go Further with Auth0
I hope the user migration functionality I showed in this post helps with your use case. This gradual migration works great because it is transparent to your end-users. As the deadline approaches and Stormpath prepares to shut down their service, you may need to speed up the migration process. Auth0 can help here as well. You can bulk import your existing user datastore into Auth0 or since we already wrote the Get User script you can send out a mass email to your users letting them know they need to change their password and by clicking on the link in the email their accounts will be migrated to Auth0.
Now that your migrates woes have been taken care of, let's briefly talk about what Auth0 brings to the table besides authentication and authorization. Many features that Auth0 provides can be enabled with the flip of a switch. Multifactor authentication is one such feature. You can enable MFA using our in-house MFA solution, Guardian, with just the flip of a switch.
If you are already using a 3rd party MFA solution or have your own custom solution, you can continue to use it as well. The Auth0 Rules extensibility platform allows you to take control of the authorization workflow. Here you can configure any number of events such as triggering 3rd party MFA, performing progressive profiling, and much more.
We want to make your switch to Auth0 as painless as possible, so we are making the Database Migration feature free for all existing Stormpath customers. For customers switching from Stormpath to Auth0 and purchasing an Auth0 Enterprise Support plan, we are also offering 8 hours of professional services at no cost.
Conclusion
Stormpath will be shutting down their authentication and authorization API's this coming August. Customers have until August 18, 2017 to move off the platform. At Auth0, we hope to give existing Stormpath customers an easy and smooth transition plan. Our database migration feature can start migrating your users today!
If you are affected by the Stormpath news and want to easily migrate your users, give Auth0 a try, sign up for a free account and get started today.
Auth0 provides the simplest and easiest to use User interface tools to help administrators manage user identities including password resets, creating and provisioning, blocking and deleting users.
About the author

Ado Kukic
Former Auth0 Employee (Auth0 Alumni)